Therap for Canada 2025.7.1 Released!
Release Date: 8/4/2025 To learn more about the new features and enhancements included in this release, please view Release User Guides for Canada 2025.7.1
- Billing
- Care Plan
- Case Note
- Daily MAR
- Default Enrollment Program
- Drug Count
- Document Storage
- Employment History
- Event Summary
- General
- General Event Reports (GER)
- GER Resolution
- Health Passport
- Health Tracking
- Help & Support Site
- Individual Demographic Form (IDF)
- Individual Home Page
- Individual Plan
- ISP Program
- Letter
- Bulk Letter Request New!
- Medication Administration Record (MAR)
- Medication History
- Notification
- Personal Finance
- Provider Administration
- Order
- Report Library
- Scheduling
- Self Password Reset
- Two Factor Authentication (2FA)
Billing
[Back to Top]- The order of fields appearing on the ‘Search Service for New Attendance’ and the ‘Attendance Data Search’ pages has been changed.
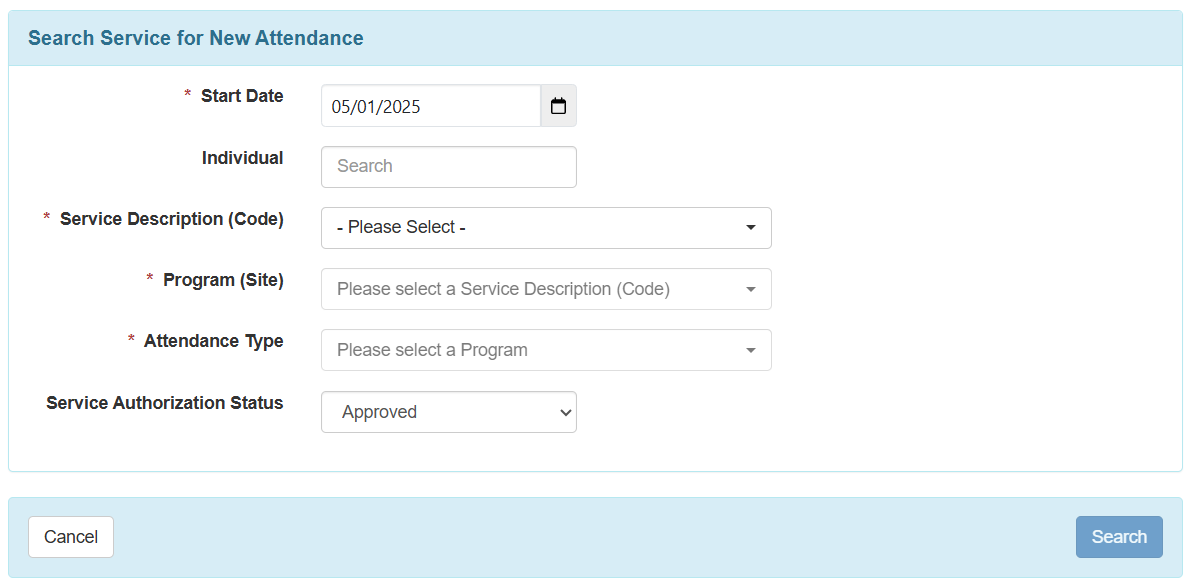
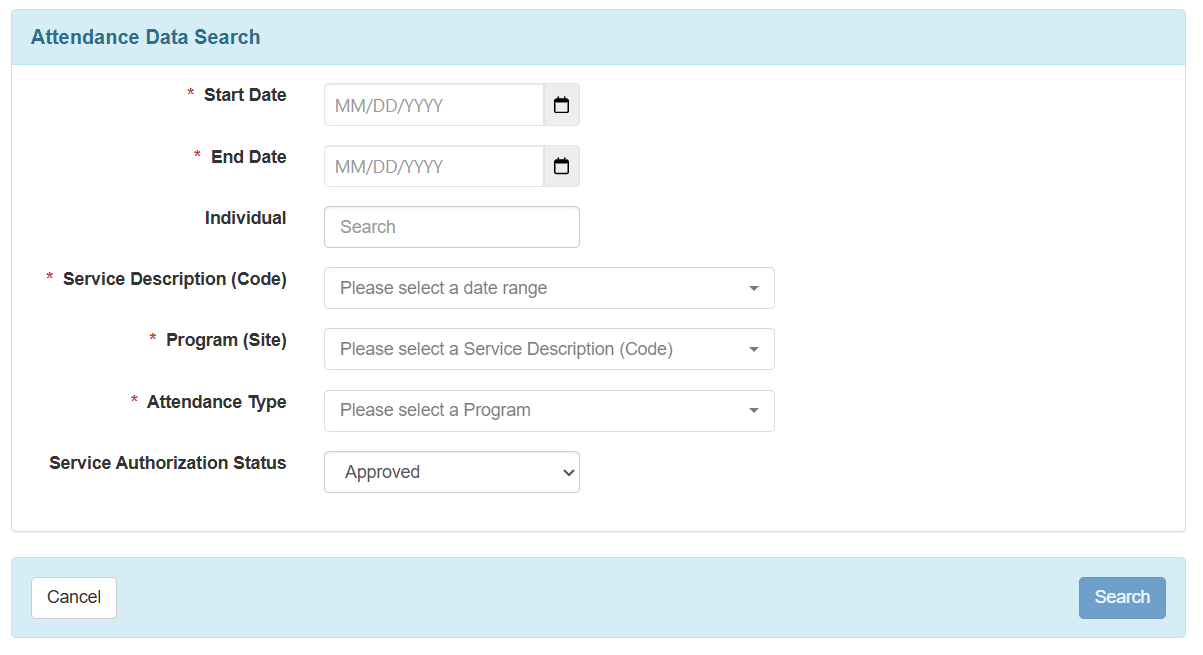
ptions in the Service Description (Code), Program (Site), and Attendance Type fields will be dynamically filtered according to the selected Start Date/End Date, Individual, and Service Authorization Status.- On the ‘Search Service for New Attendance’ page, selecting the Start Date is required prior to selecting the Service Description (Code), Program (Site), and Attendance Type fields. On the ‘Attendance Data Search’ page, selecting the Start Date and End Date is required prior to selecting the Service Description (Code), Program (Site), and Attendance Type fields.
- If only one option is available for any of the fields that are filtered (Service Description (Code), Program (Site), and Attendance Type), they will be auto-populated. If there are multiple options available, users will have to select the appropriate option from the fields.
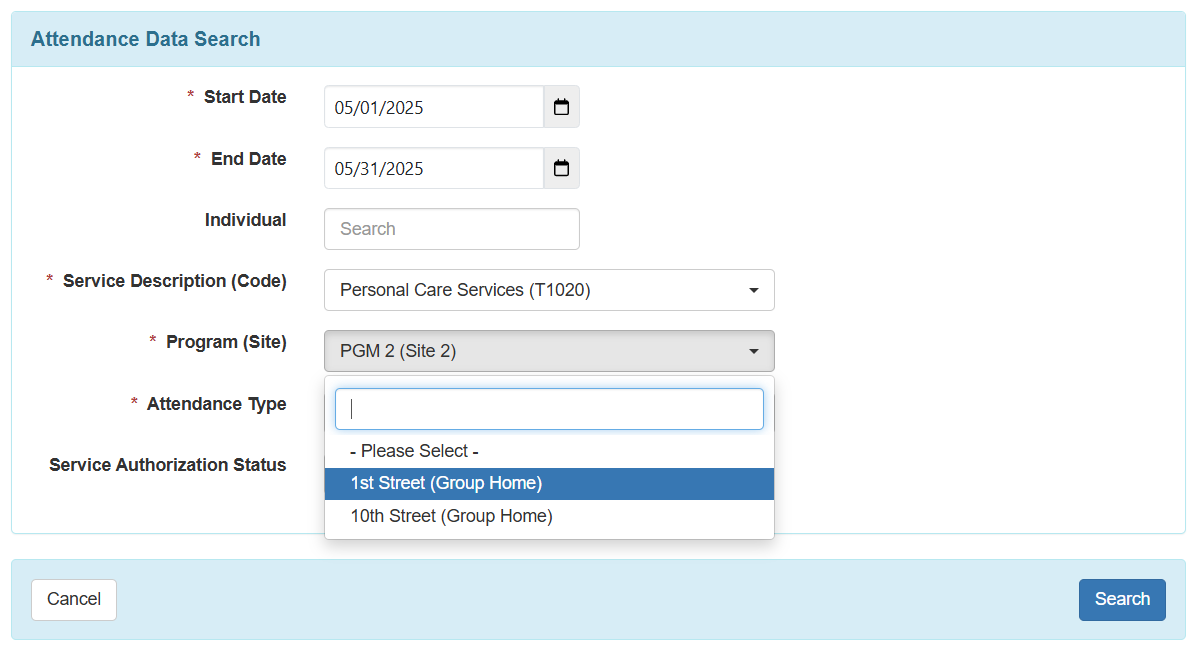
Users will be able to click on the Search button only if all the required fields are populated. Otherwise, the Search button will be disabled and greyed out.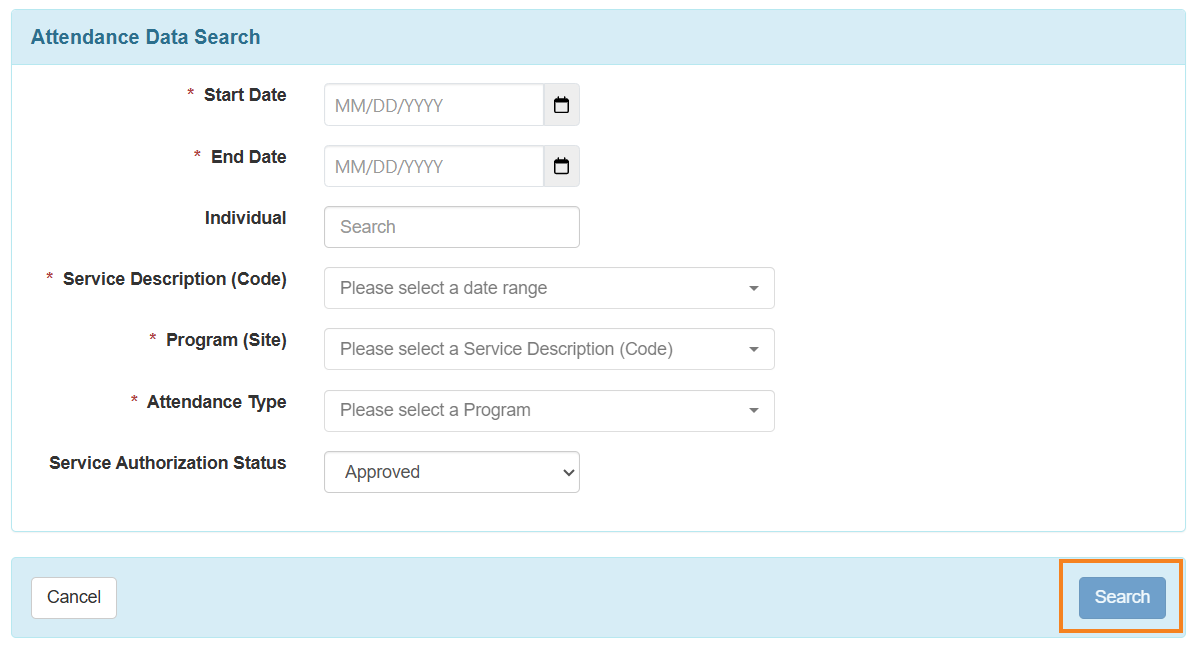
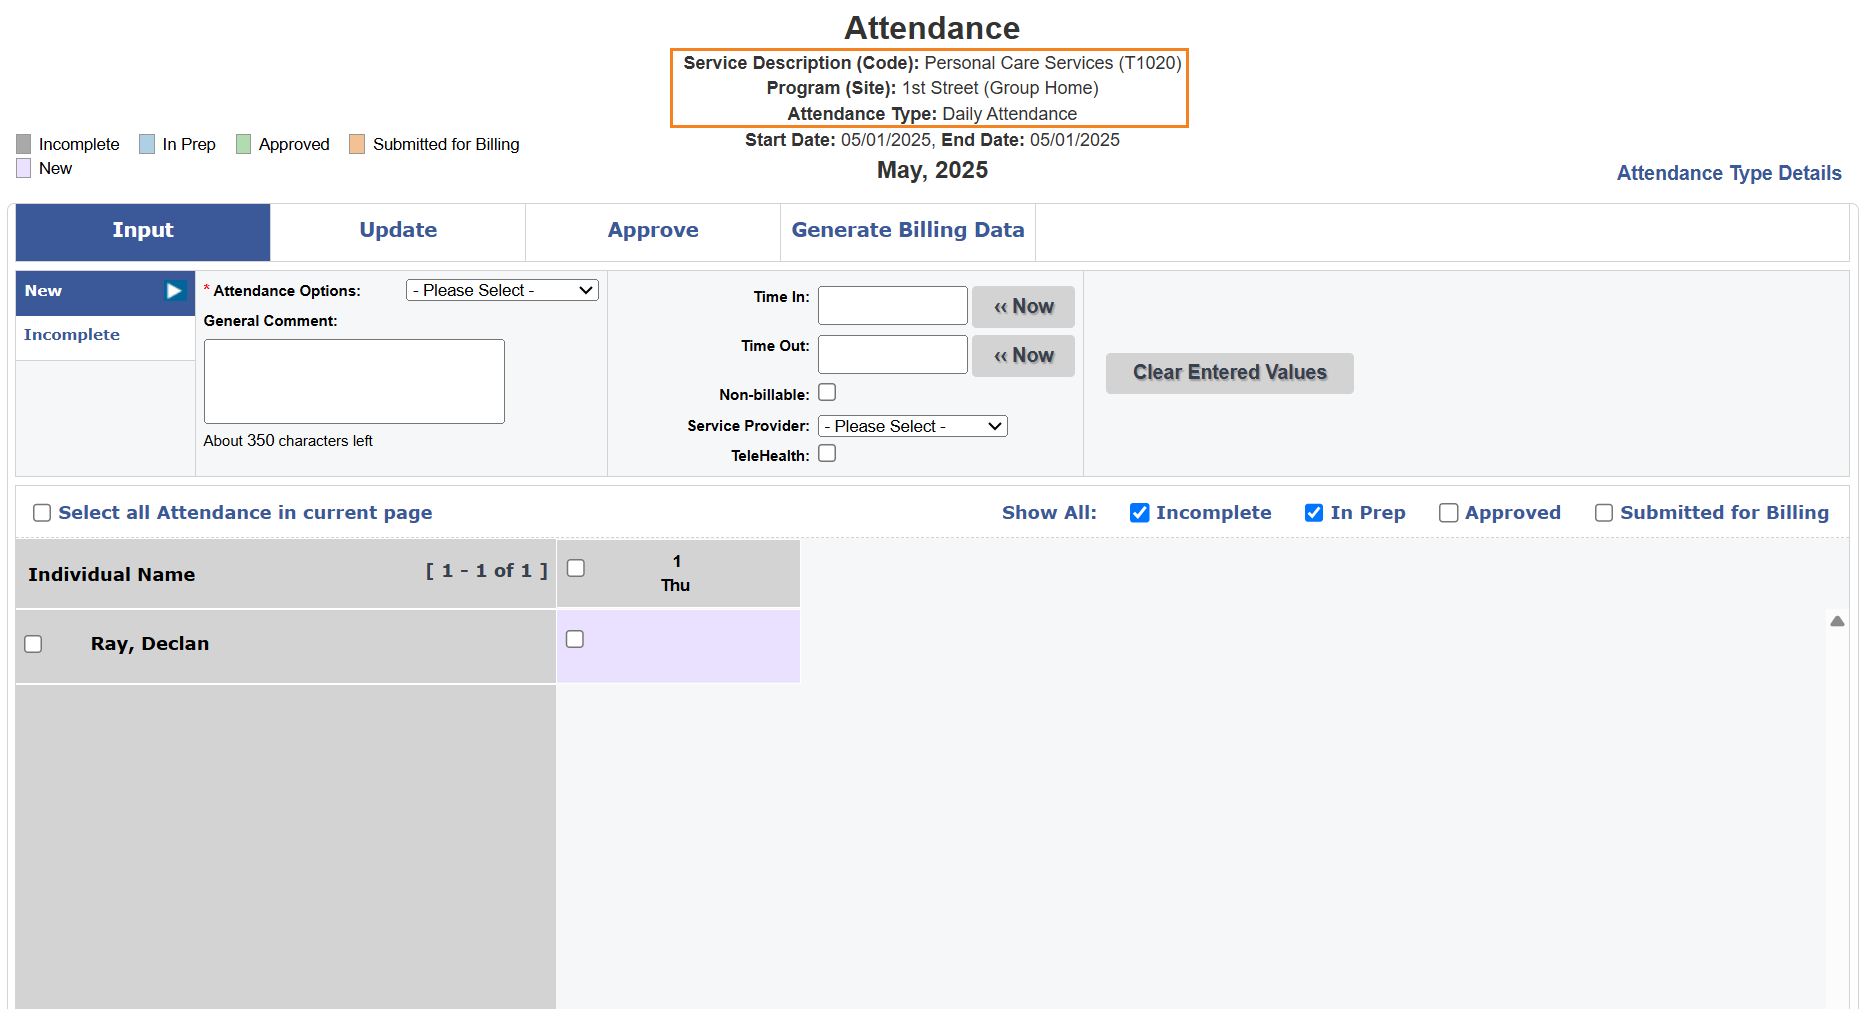
- The order of information appearing at the top of the Attendance grid has been changed.
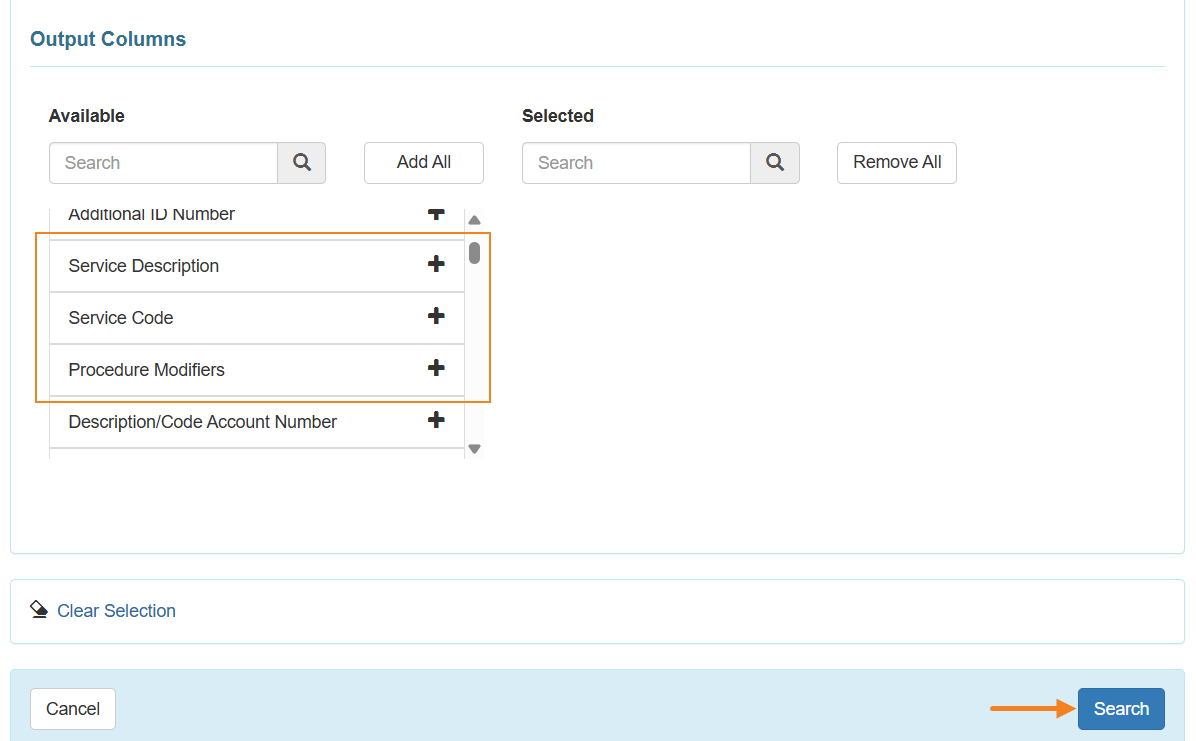
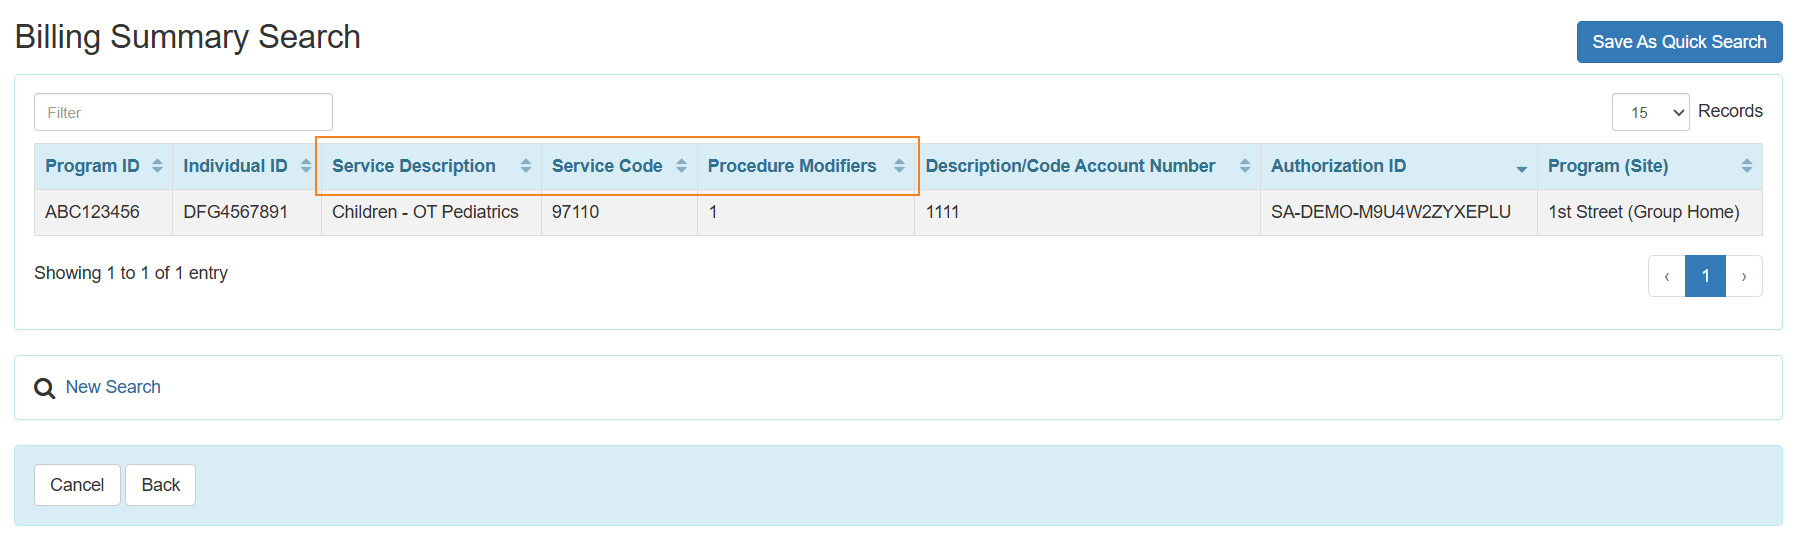
- The orders of the Service Description, Service Code, and Procedure Modifiers output columns have been changed in the Billing Data Summary Search page. This will be reflected on the columns in the Billing Data Summary Search results page as well.
- The following changes have been made to the user interface of the Attendance grid:
- The amount of ‘Direct Billing Units’ will now be shown directly on the grid.

- Time In/Out, Comment, Deduct Lunch Time, and TeleHealth icons have been updated.
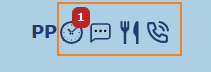
- New icons have been introduced to show Face-To-Face/ISP Data Count. The Daily Bundling Code for users in New York has been repositioned.

- Attendance Details Excel Export icon has been updated.

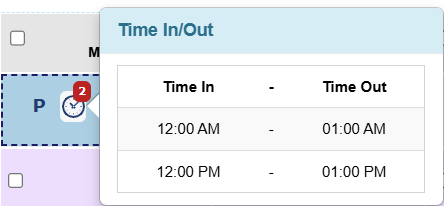
- The user interface of the popups after clicking on the ‘Direct Billing Units’ and ‘Time In/Out’ icons has been changed.

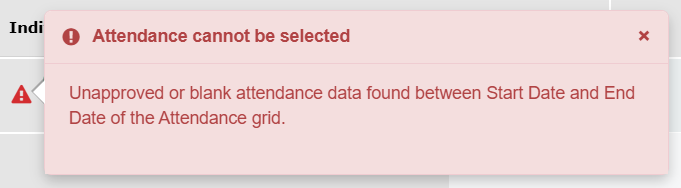
- The user interface of the error message and the icon beside the individual’s name on the ‘Generate Billing Data’ tab that appears if there is unapproved data or blank data in the date range has been changed.
- The user interface of the fields and buttons on top of the Attendance grid have been updated.

- The amount of ‘Direct Billing Units’ will now be shown directly on the grid.
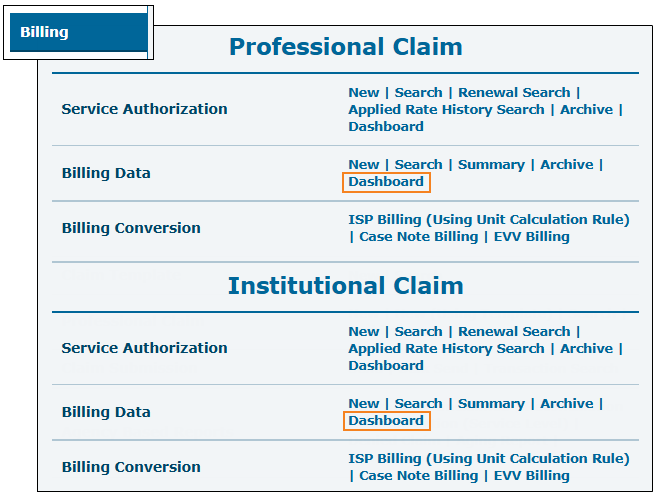
- A new 'Billing Data Dashboard' feature has been introduced. Users assigned with any of the Billing Data Submit, Billing Data Update, or Billing Data View caseload-based roles will see a new Dashboard link next to the Billing Data option in the 'Professional Claim' and the 'Institutional Claim’ sections of the Billing tab.
- Clicking on the Dashboard link will open the 'Professional/Institutional Billing Data Dashboard' search page where users can enter a Start Date and an End Date to generate the dashboard using the Generate Dashboard button. A maximum date range of one month can be selected to generate the Dashboard. The date range must be within the same month.

- Based on the date range entered, the Billing Data Dashboard will display data counts for the following criteria:
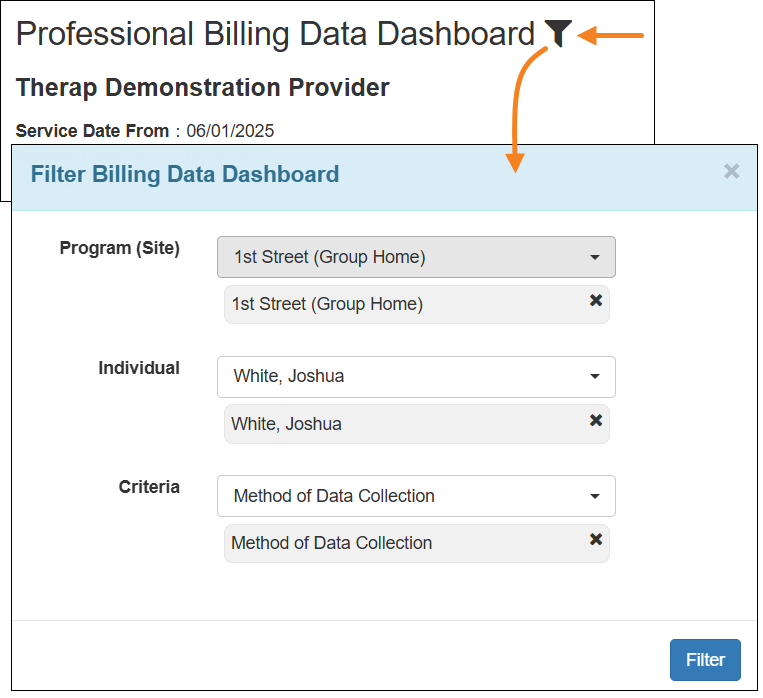
- Method of Data Collection
- Applied Service Rate
- Updated Rate Using Rate History
- Applied Total Unit Validation
- Claim Conversion
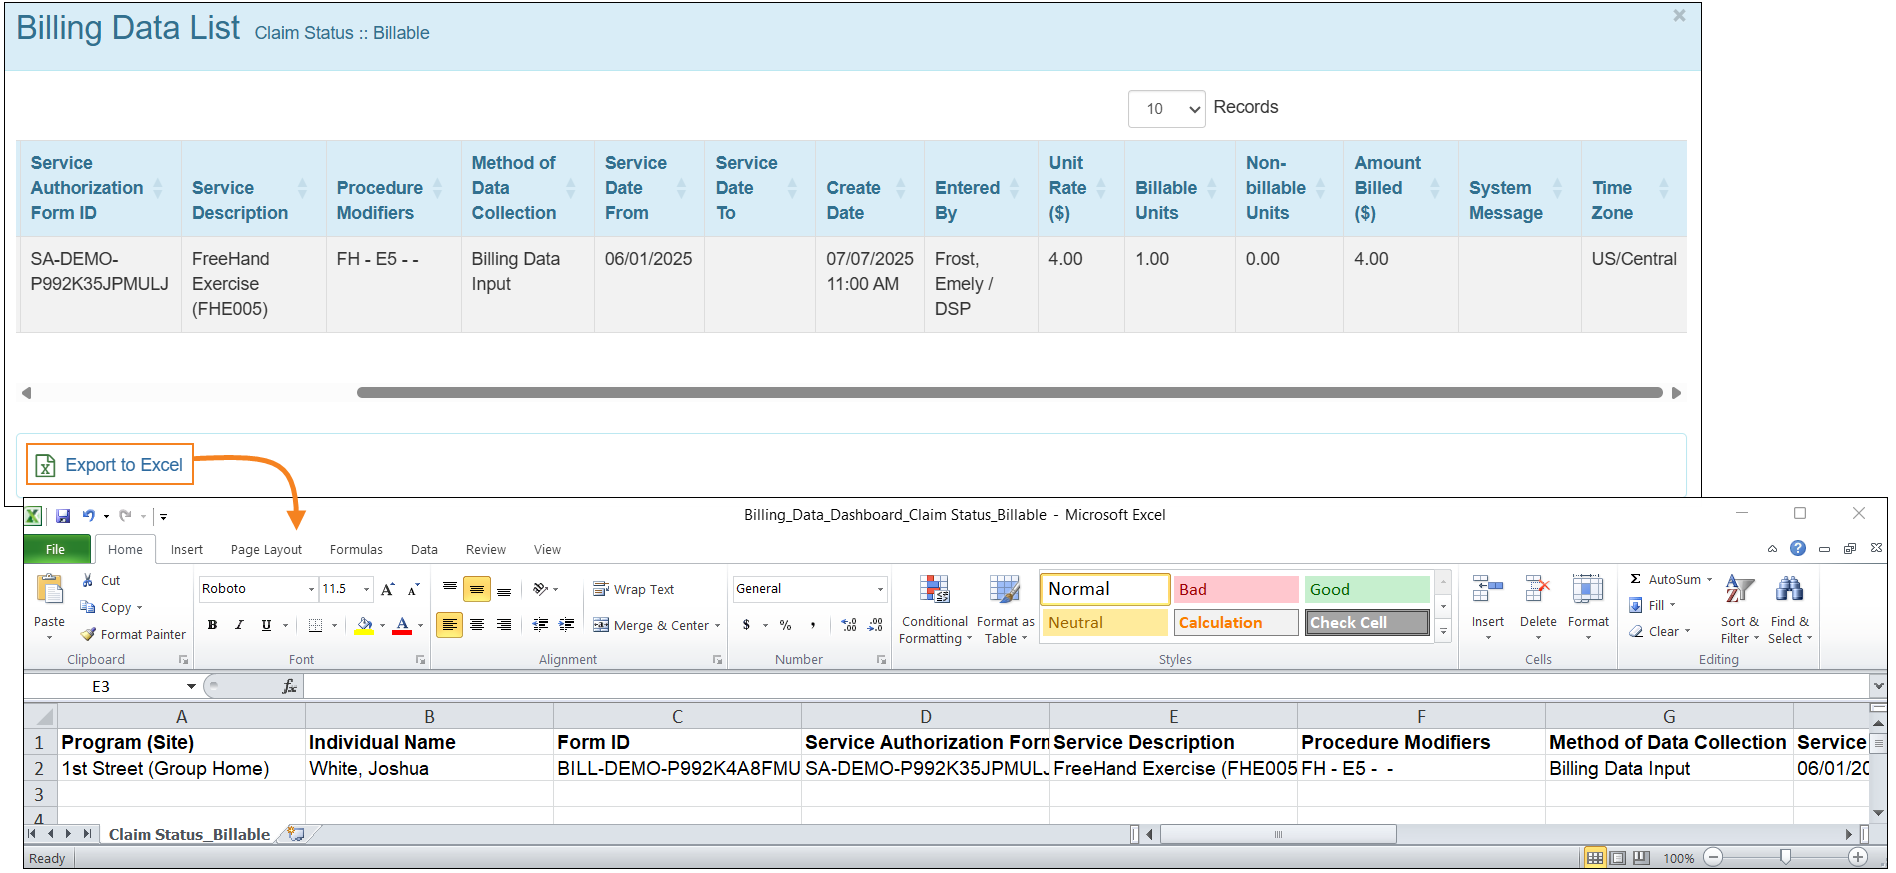
- Claim Status
- Unclaimed Billing Data: Days Since Creation
- Unclaimed Billing Data: Per Service
- Daily or Date Range Billing
- Has Non-Billable Unit
- Data Collected from External Source
- Updated After Claim creation
- Individual
- Description Code
- Program
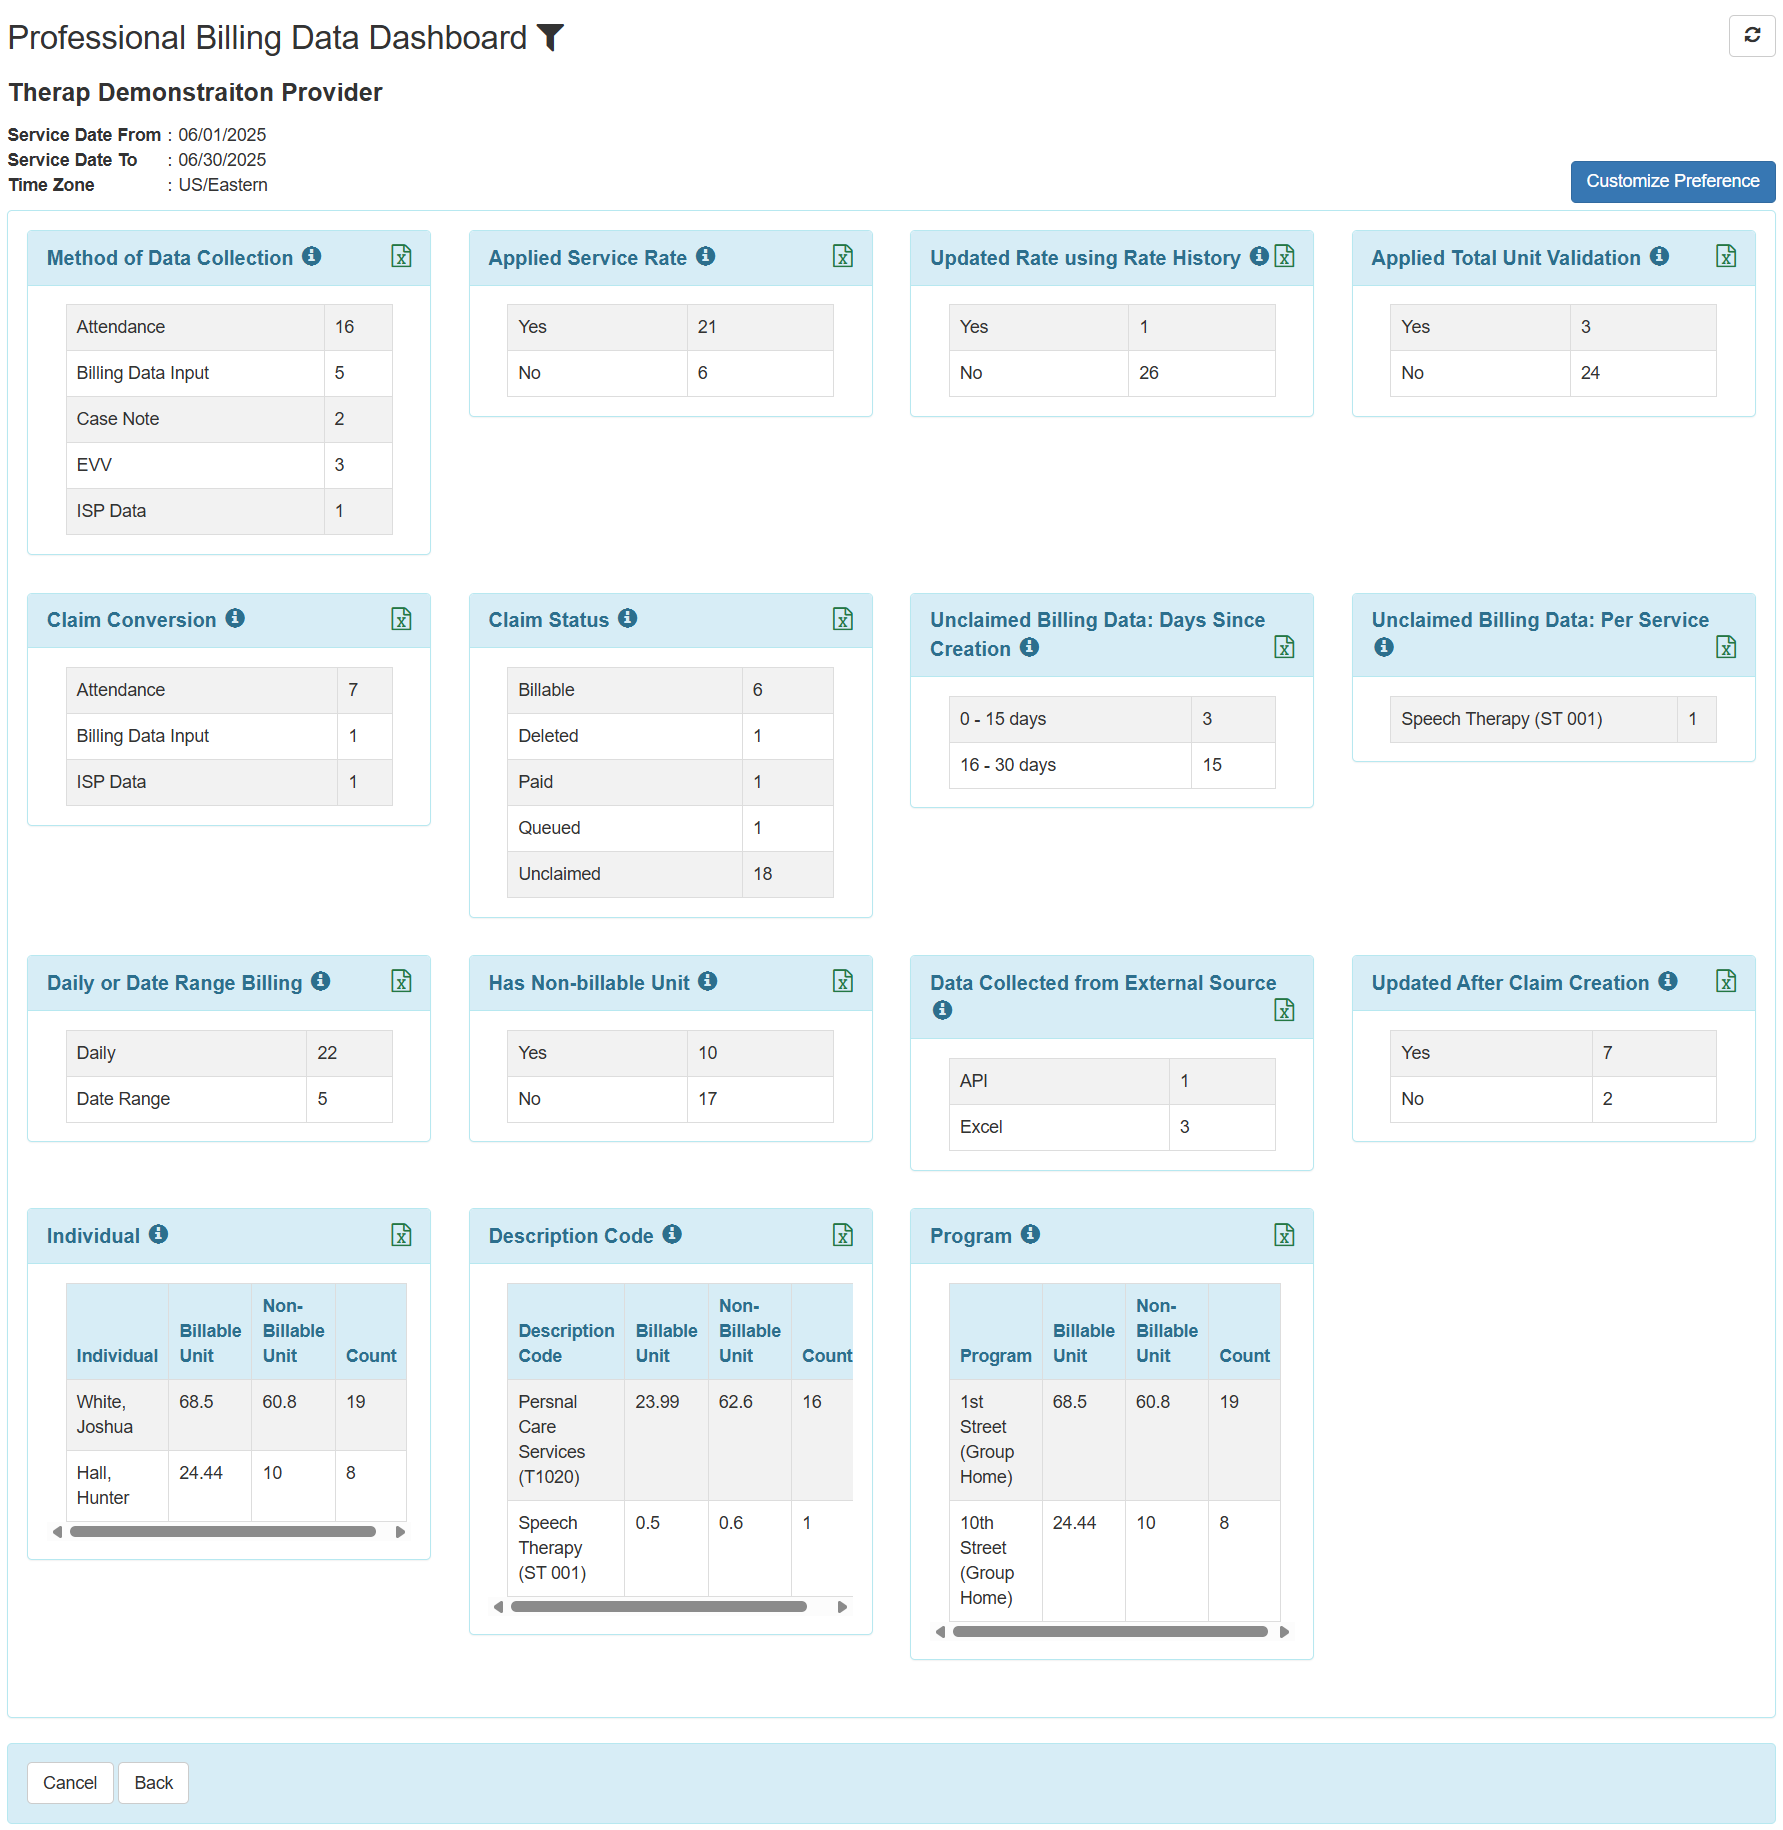
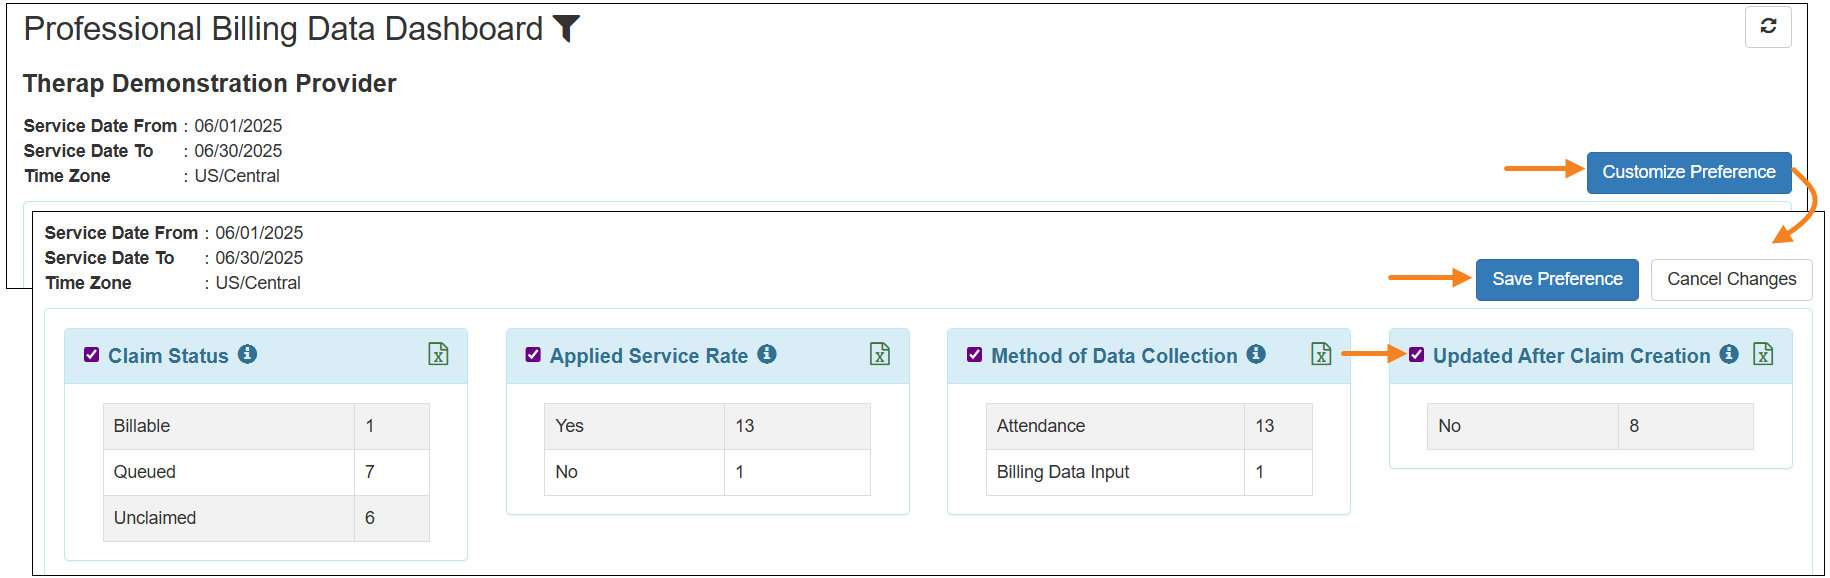
- Users may click on the Customize Preference button and uncheck the sections that they do not want to be displayed on the Billing Data Dashboard. Re-checking the sections will bring back the sections. Clicking on the Save Preference button will apply the changes to the Dashboard.
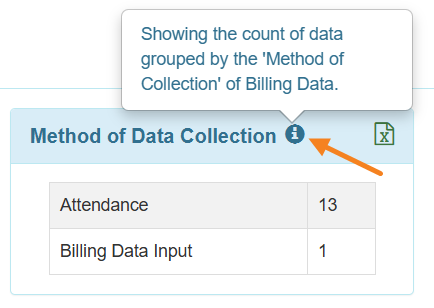
- Clicking on the 'i' icon on top of each section will show a description of that section.
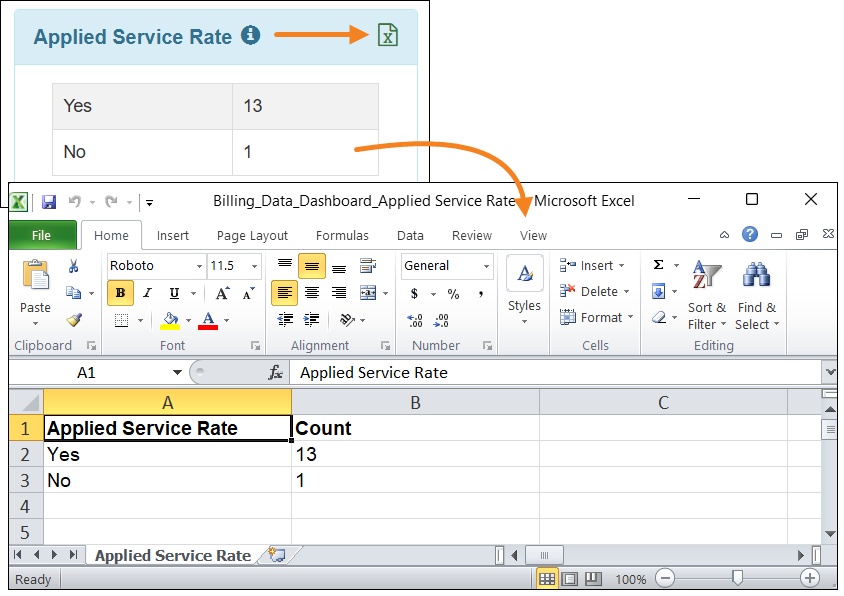
- Clicking on the Excel file icon of each section will download an Excel file with the data from that section.
- Clicking on an item in a section will open a Billing Data List. Clicking on a Billing Data from that list will open the Billing Data form.
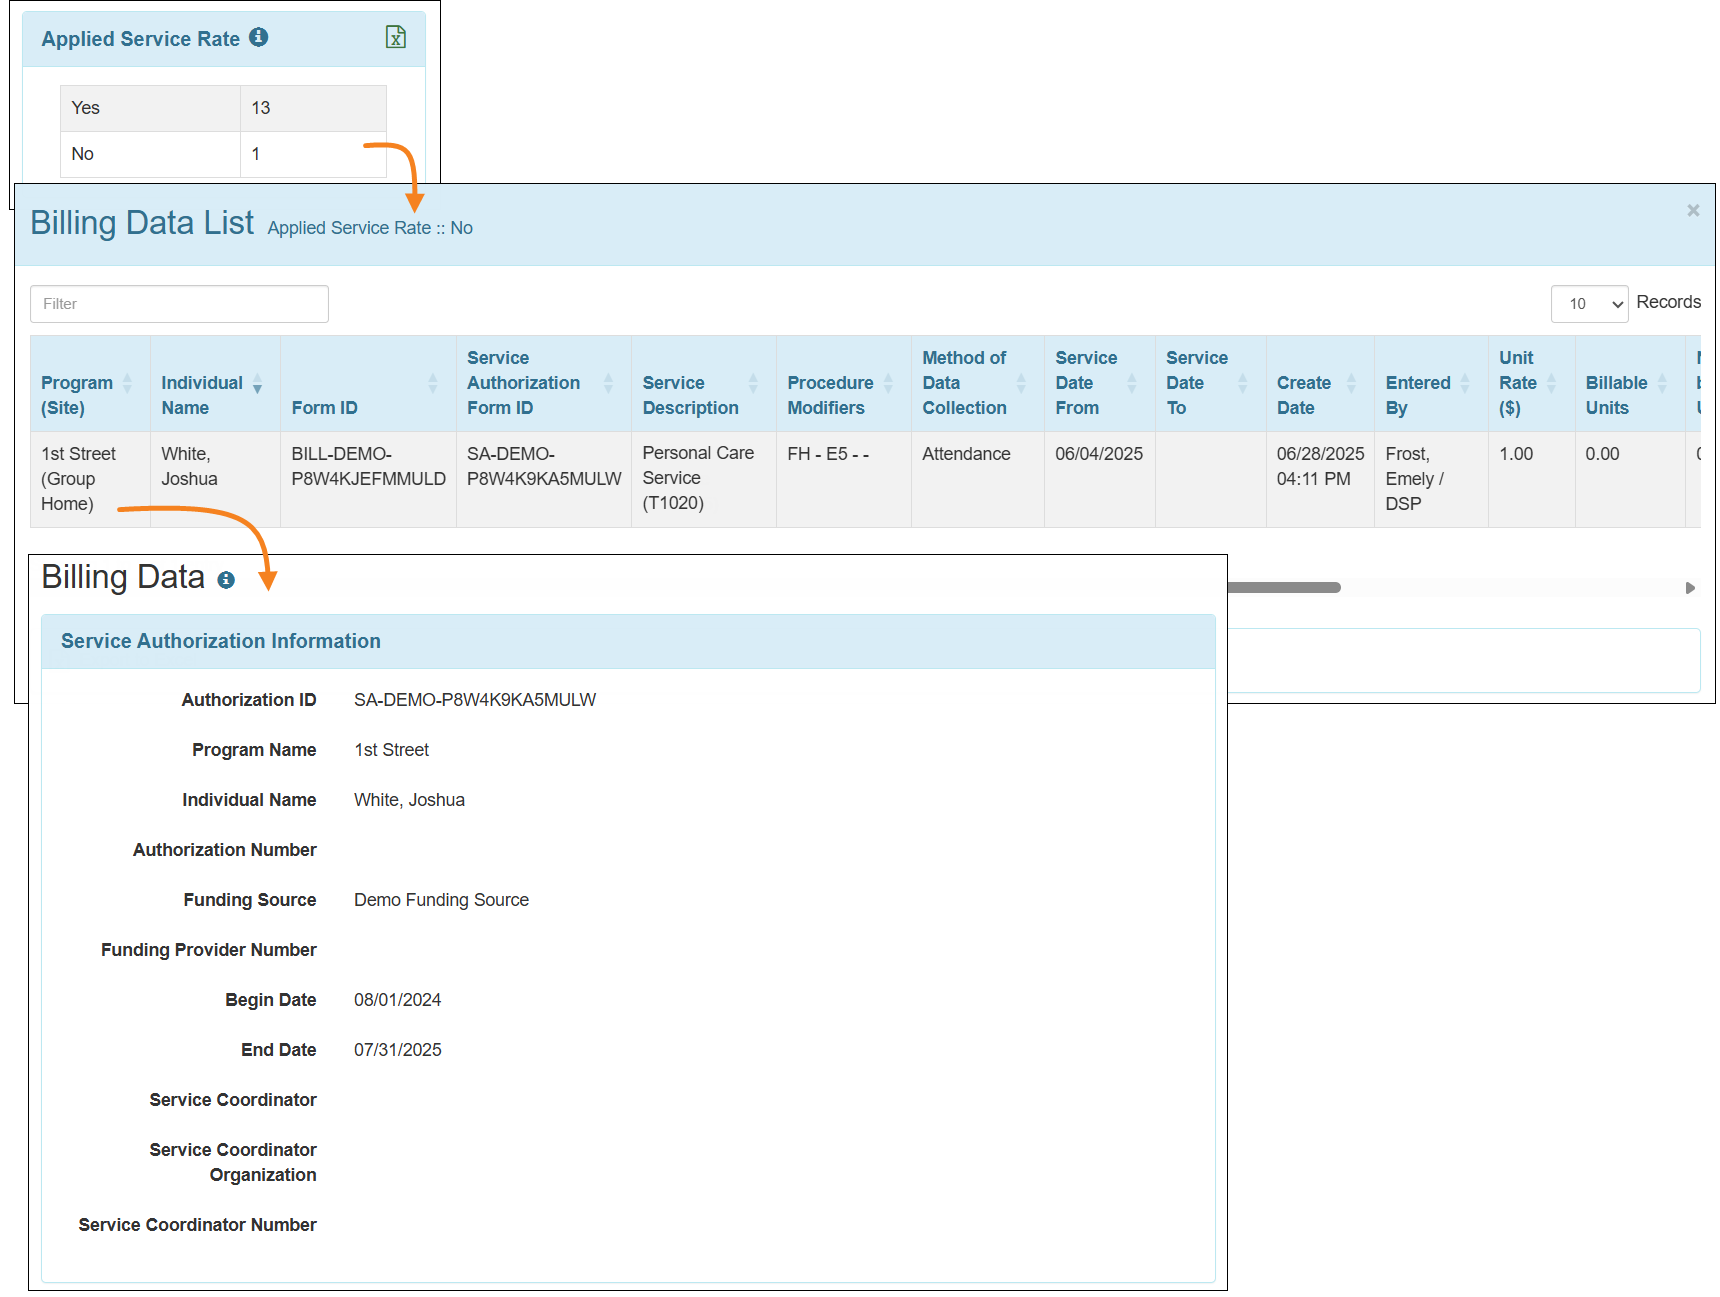
- Clicking on the Export to Excel link at the bottom of any Billing Data List will download an Excel file of the information on the list.
- The filter icon at the top of the Billing Data Dashboard can be used to apply a filter to the Dashboard.
Care Plan
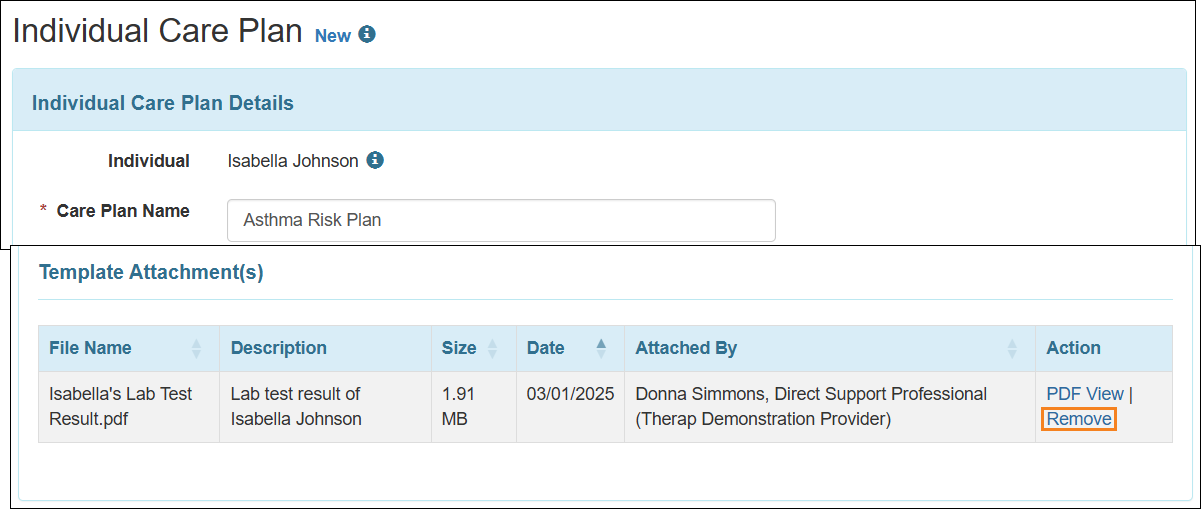
[Back to Top]- A new Remove link has been added in the Action column of the ‘Template Attachment(s)’ section of Individual Care Plans created using a Care Plan Template. Users will now be able to remove any attachments added to a Care Plan Template once it has been applied to an individual.
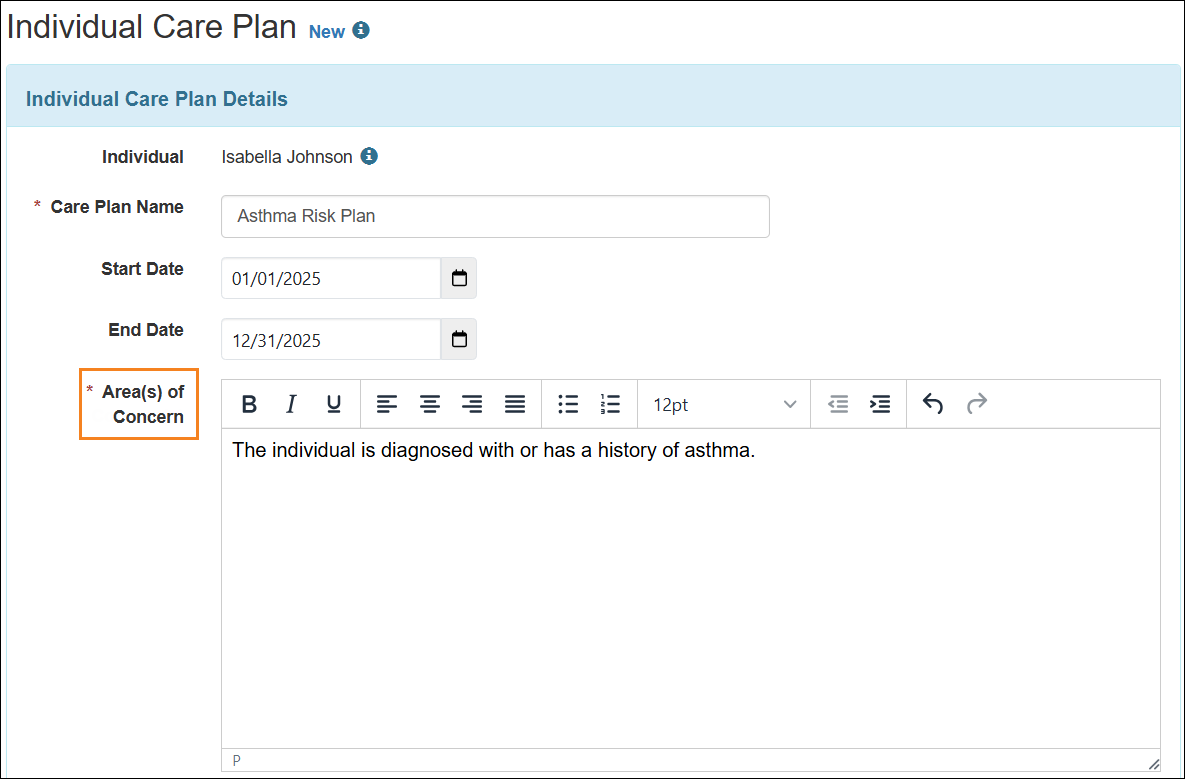
- The Problem(s) field has been renamed as Area(s) of Concern in Care Plan Template, Global Care Plan Template, and Individual Care Plan forms, archived Care Plan Template and Individual Care Plan forms, and the PDFs of the Individual Care Plan forms.
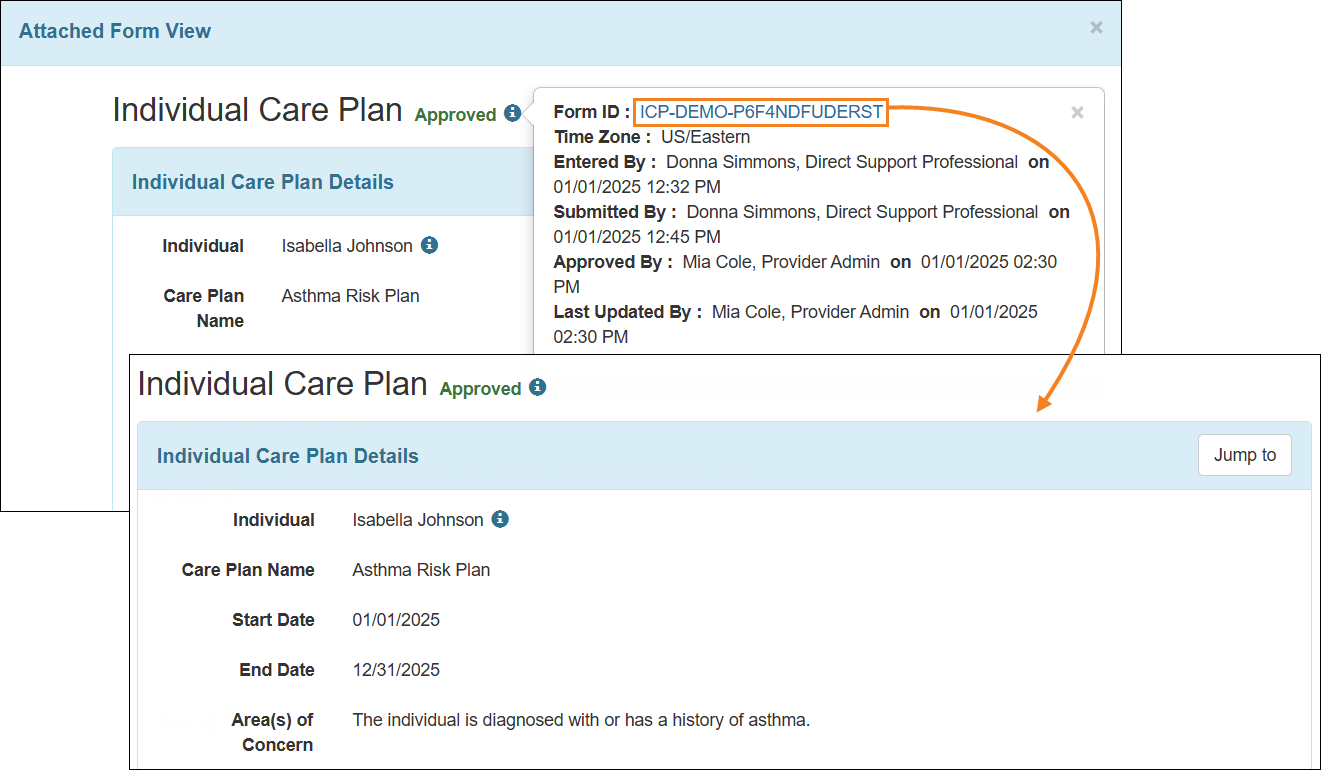
- If an Individual Care Plan form is opened in a pop-up window, the Form ID available in the ‘i’ icon of that form will appear as a link and clicking on the link will open the corresponding Individual Care Plan form in a new tab.
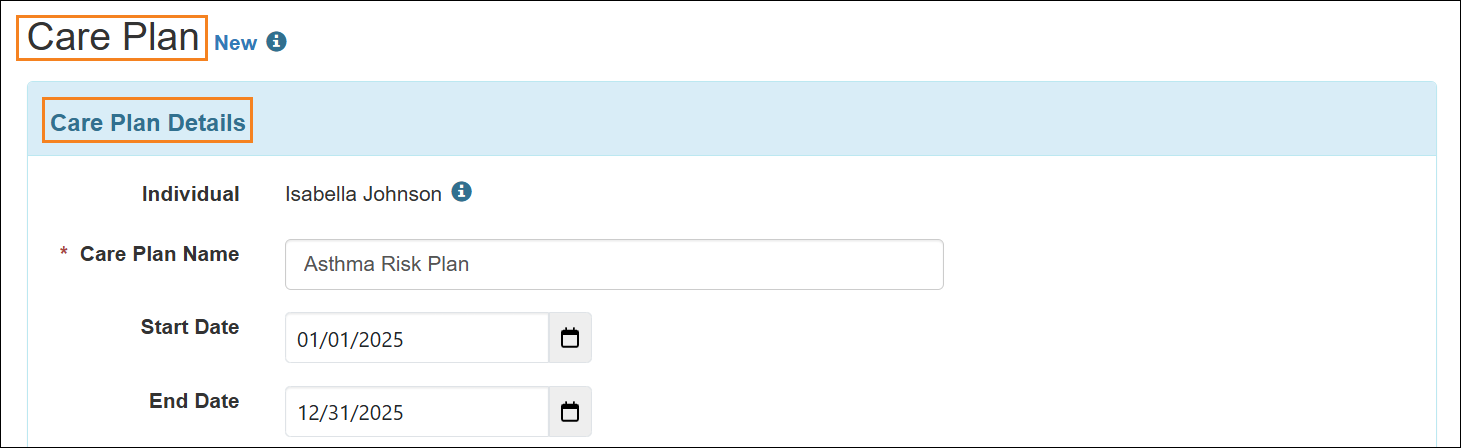
- The ‘Individual Care Plan’ form and its PDF and archived versions have been renamed to ‘Care Plan’. The ‘Individual Care Plan Details’ section has also been renamed to ‘Care Plan Details’ in the form, PDF, and archived versions.
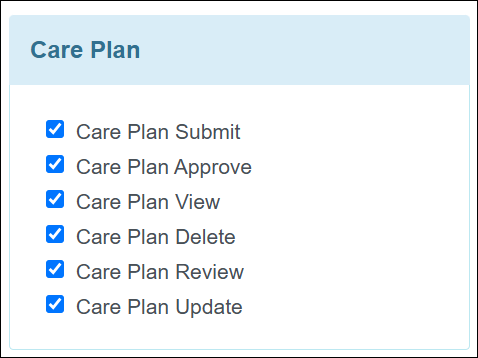
- The ‘Individual Care Plan’ section and the names of the caseload-based roles in this section of the Super Role page have been renamed.
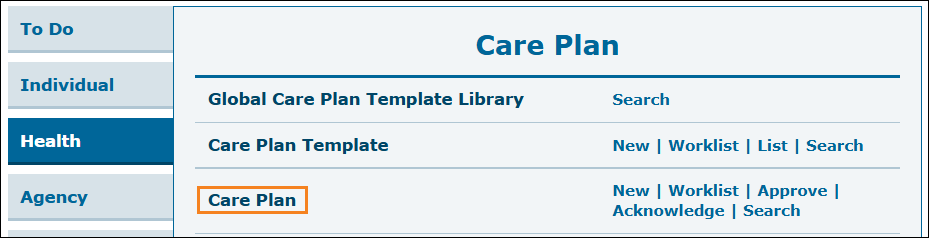
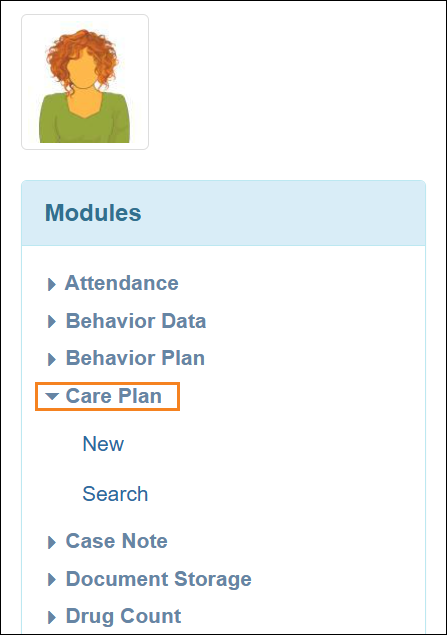
- The Individual Care Plan option in the ‘Modules’ section of the To Do tab and in the ‘Care Plan’ section of the Health tab have been renamed to Care Plan.

- The following changes have been made to the pages within this module:
- 'Individual Care Plan Worklist' page has been renamed to 'Care Plan Worklist'.
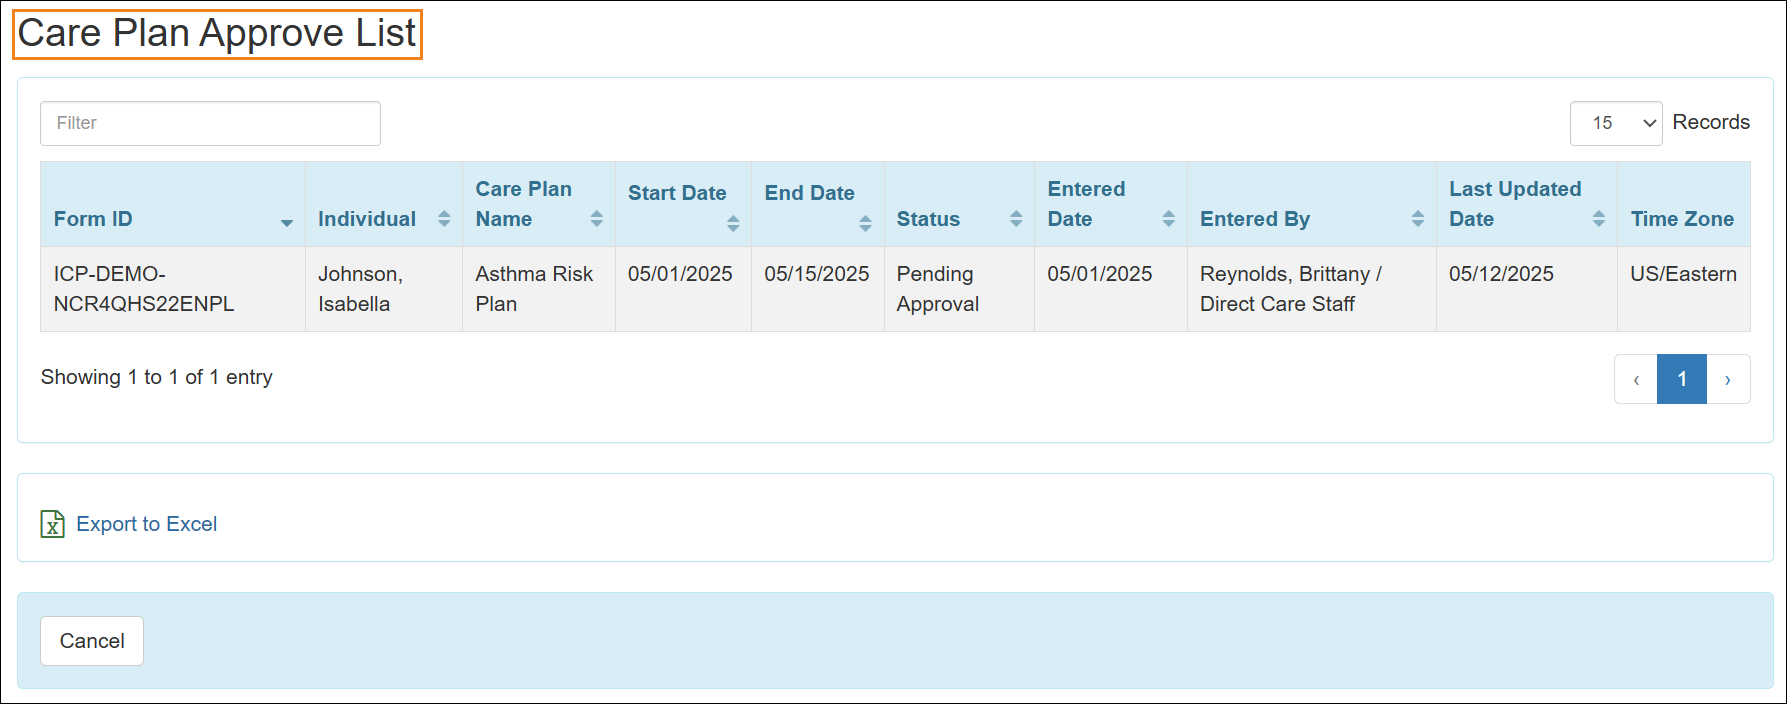
- 'Individual Care Plan Approve List' page has been renamed to 'Care Plan Approve List'.
- 'Individual Care Plan Acknowledge List' page has been renamed to 'Care Plan Acknowledge List'.
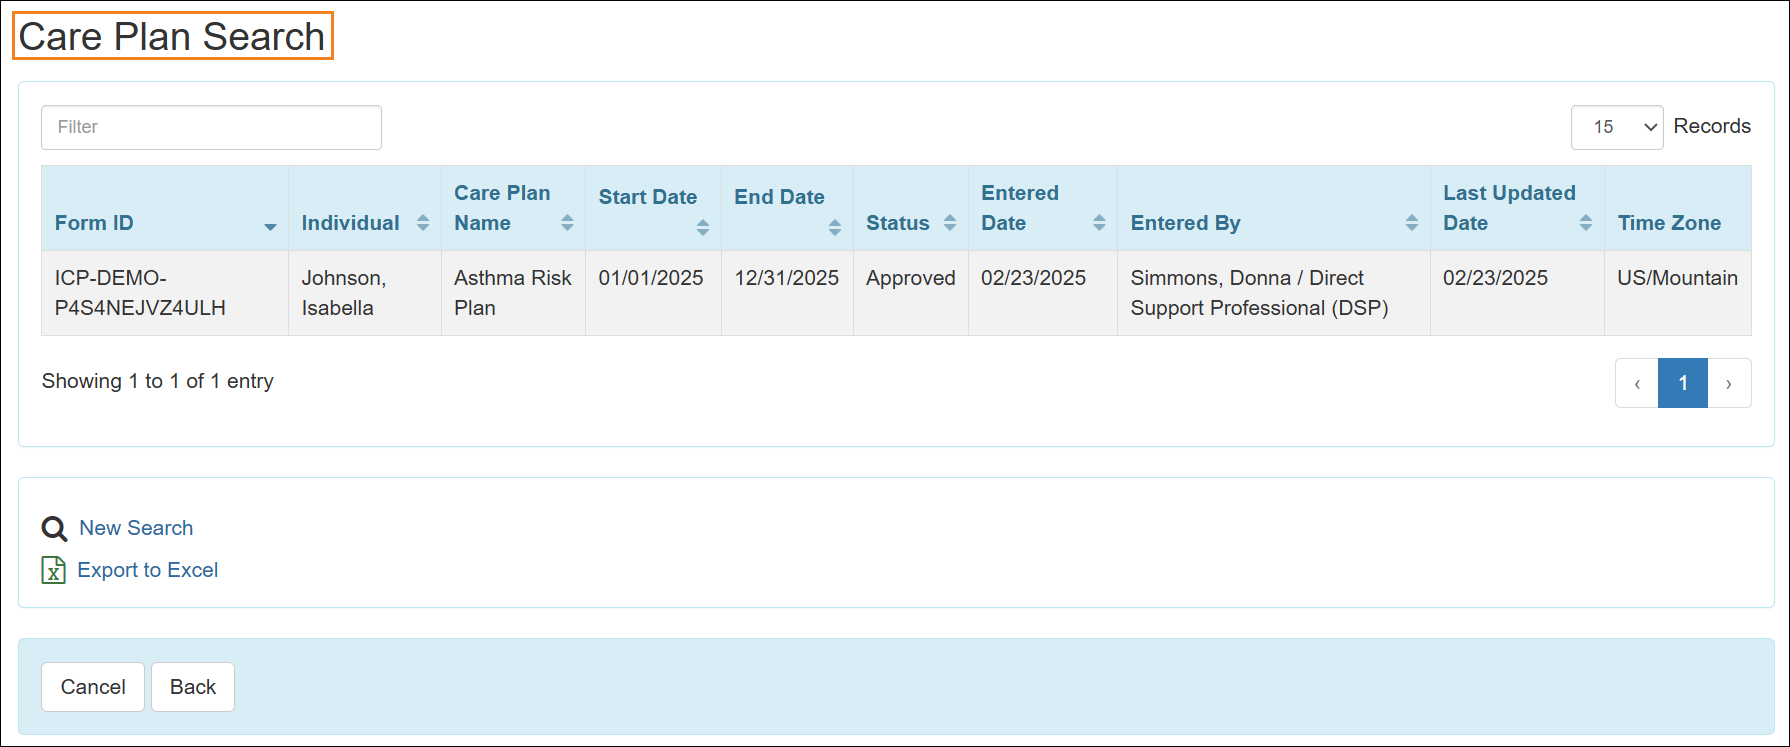
- The 'Individual Care Plan Search' pages have been renamed to 'Care Plan Search'.
- The files downloaded from the Export to Excel link and the downloaded PDF will have 'Care Plan' in the file name instead of 'Individual Care Plan'.

- The links in the success messages after saving a new Care Plan and after discontinuing and copying an acknowledged Care Plan have been renamed to:
- Create New Care Plan
- Newly Created Care Plan

- The following changes have been made to the module reports:
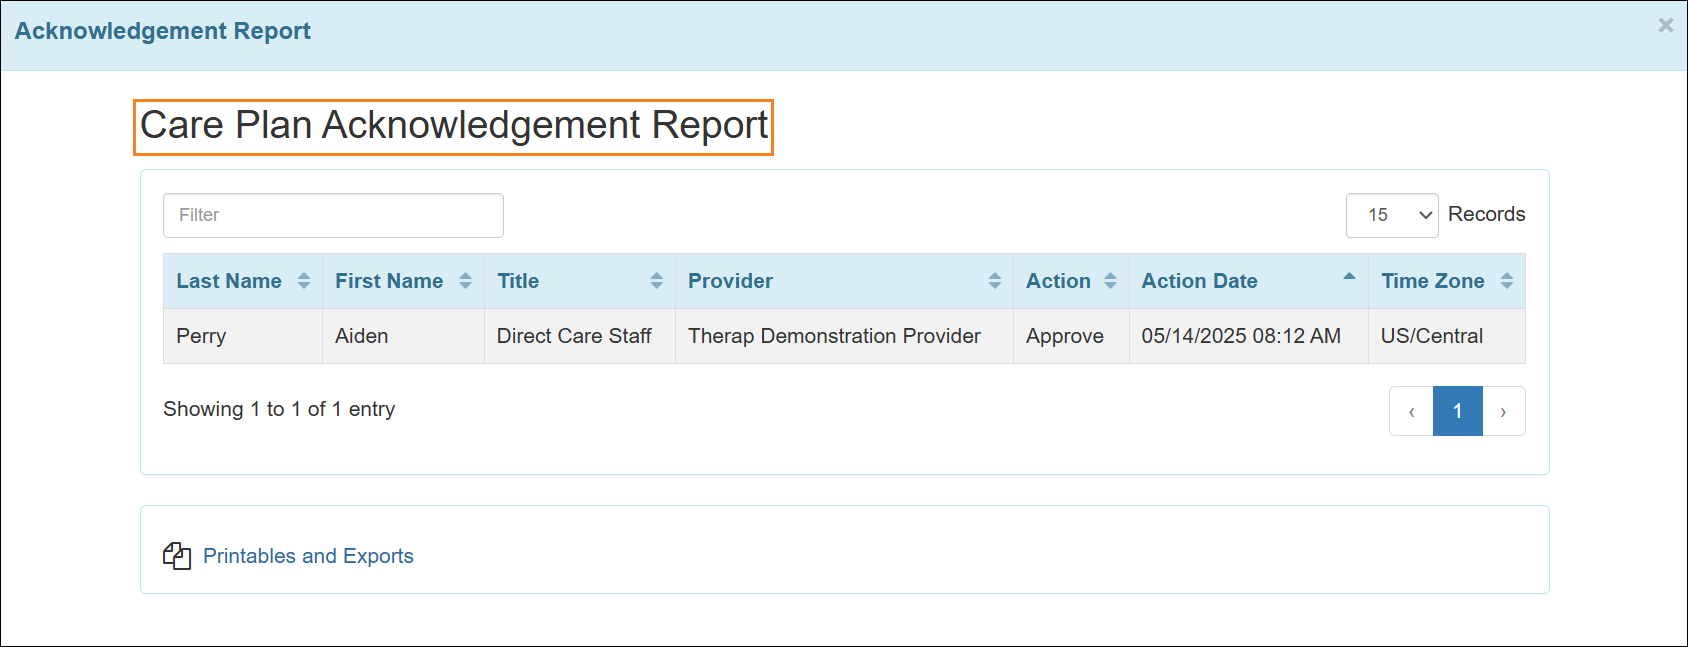
- 'Individual Care Plan Acknowledgement Report' has been renamed to 'Care Plan Acknowledgement Report'.
- 'Individual Care Plan Pending Acknowledgement Report' has been renamed to 'Care Plan Pending Acknowledgement Report'.
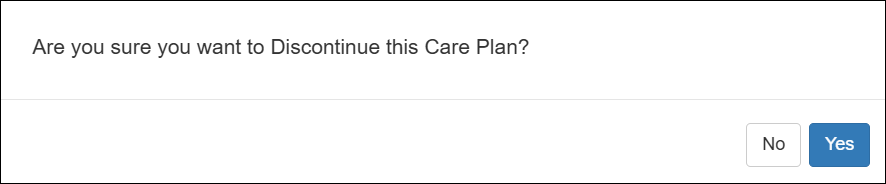
- The form name in the warning messages that appear after clicking on the Delete, Discontinue, and Discontinue and Copy buttons have been renamed from Individual Care Plan to Care Plan.
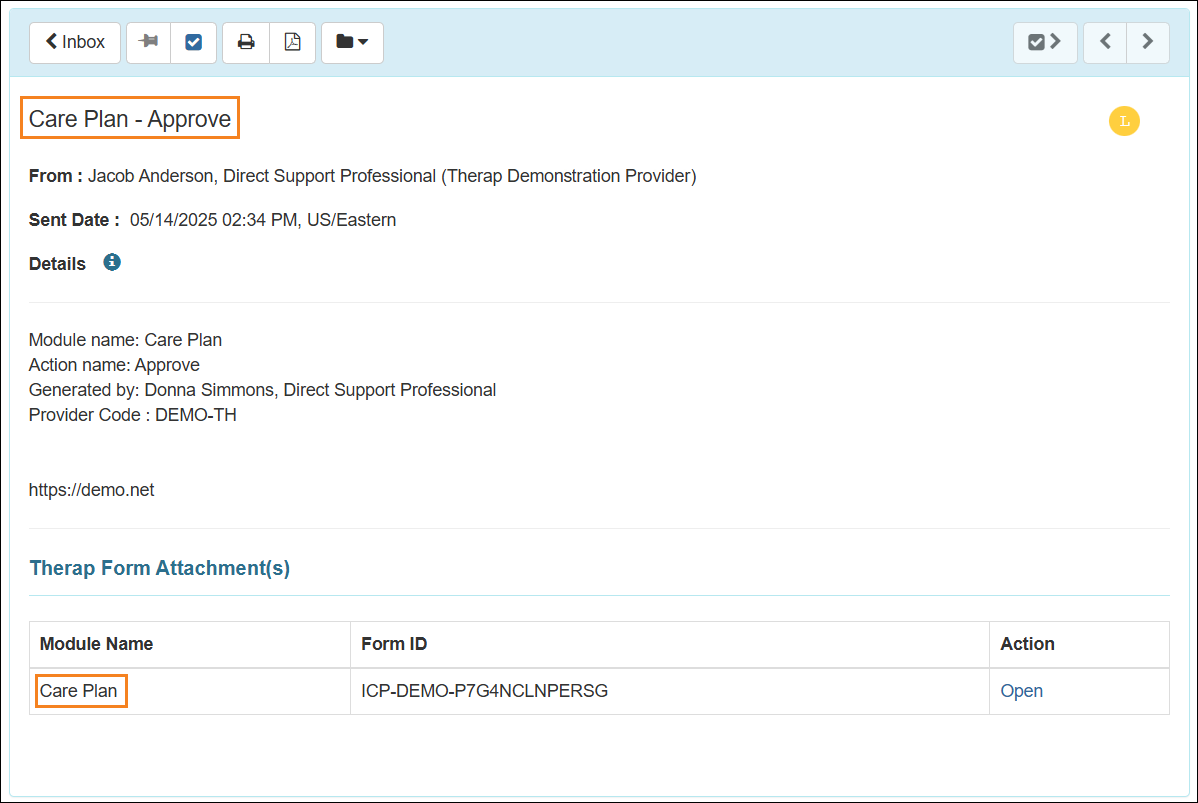
- The following changes have been made in the SComm messages received for Care Plan notification:
- The form name in the SComm message title has been renamed to Care Plan.
- Individual Care Plan has been renamed to Care Plan in the Module Name column of the ‘Therap Form Attachment(s)’ section.
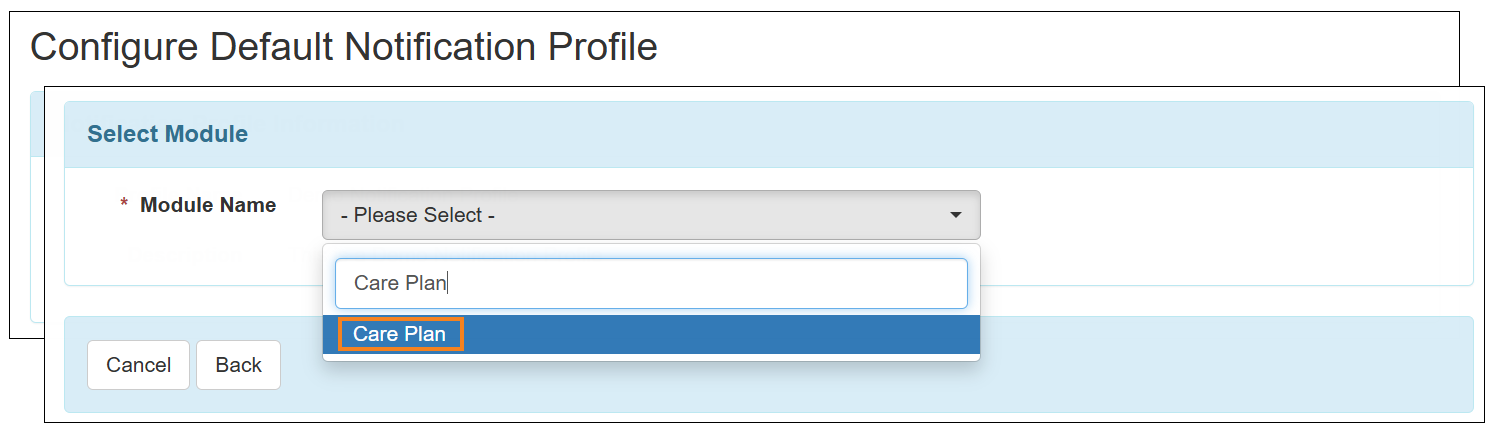
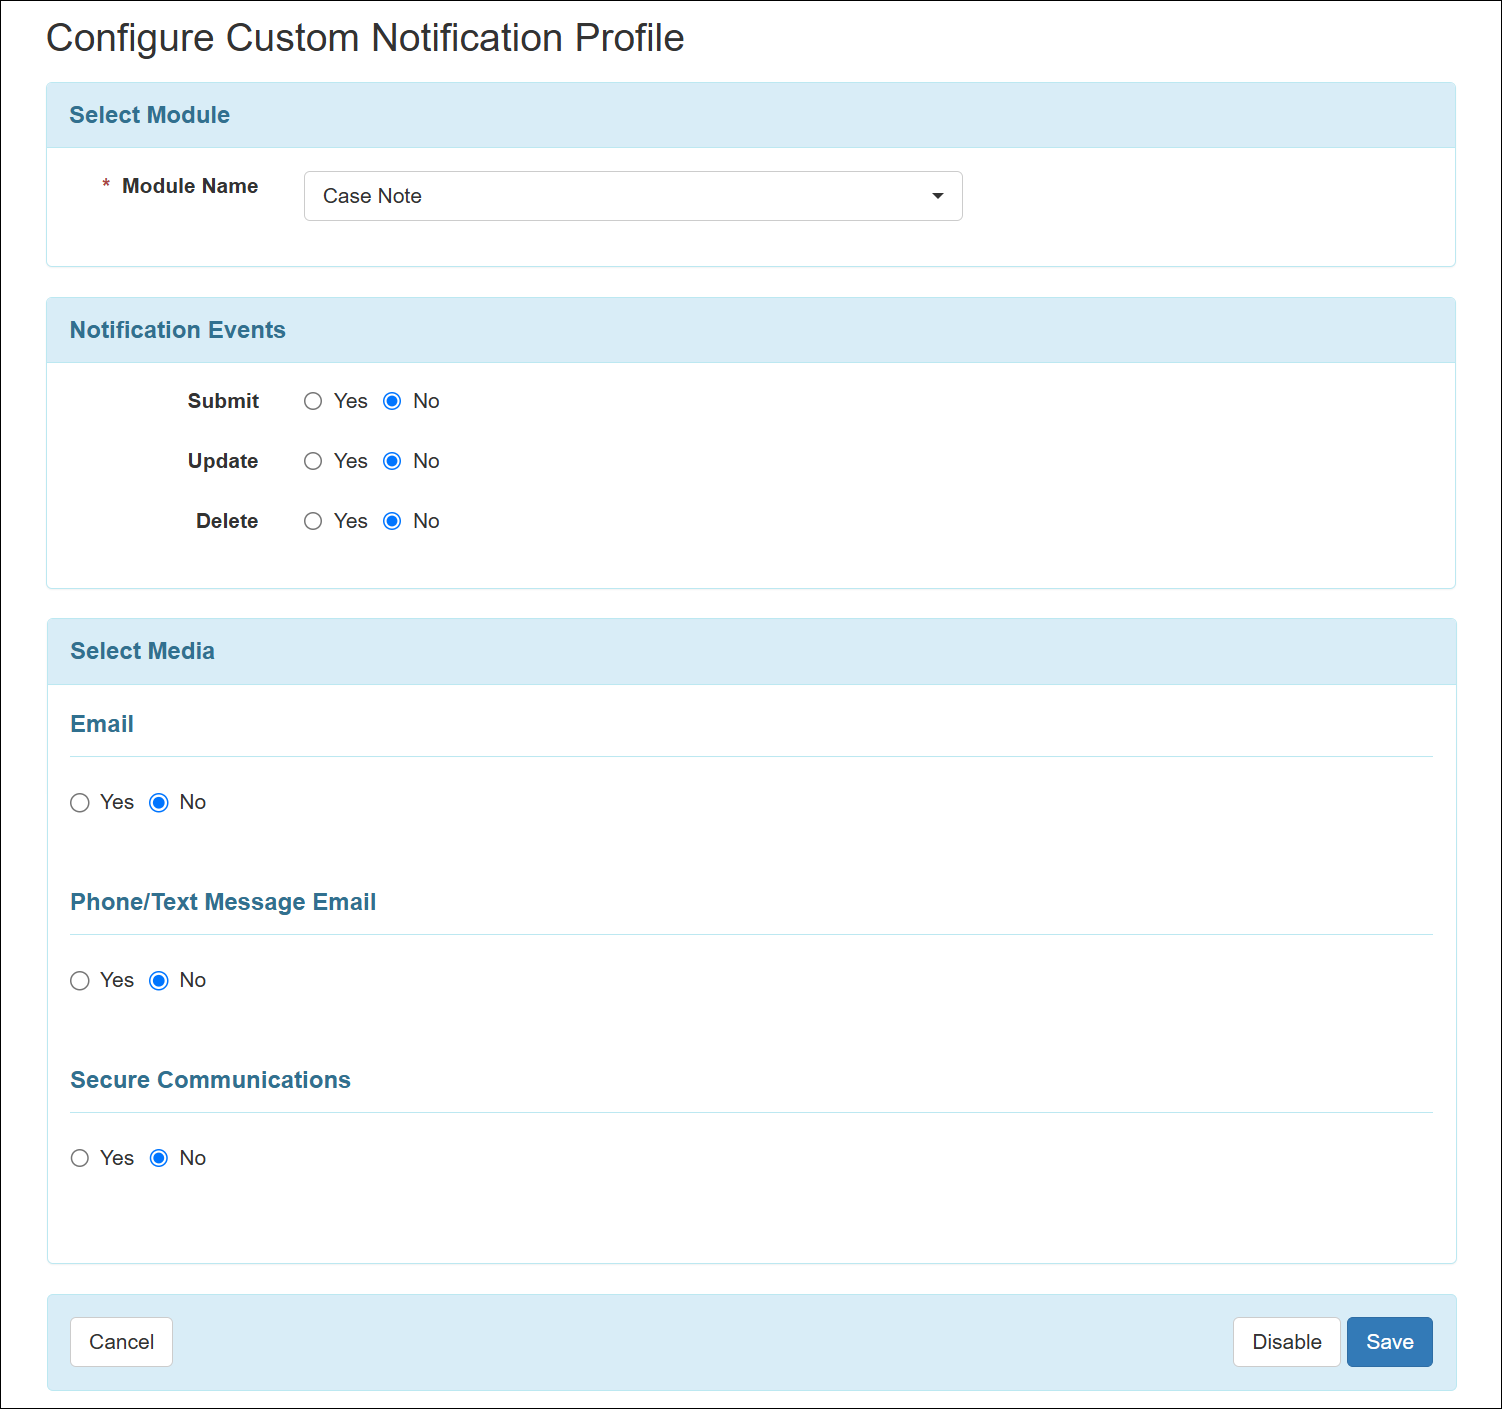
- The ‘Individual Care Plan’ option in the Module Name field of the ‘Configure Default Notification Profile’ page and ‘Configure Custom Notification Profile’ page has been renamed to ‘Care Plan’.
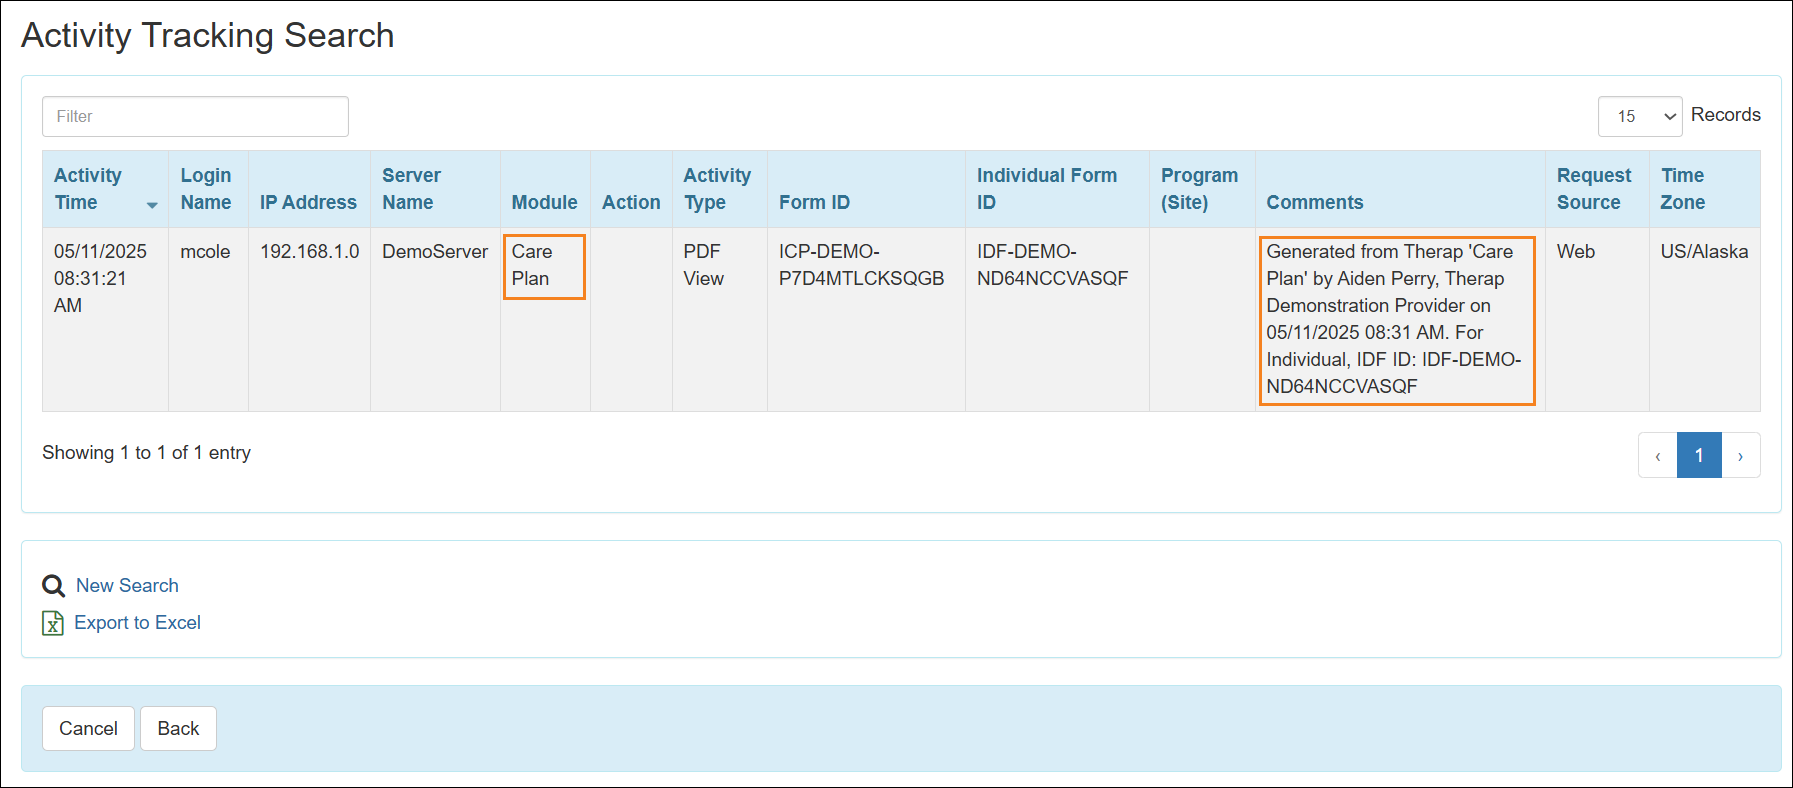
- The ‘Individual Care Plan’ option in the Module field of the 'Activity Tracking Search' page has been renamed to ‘Care Plan’.
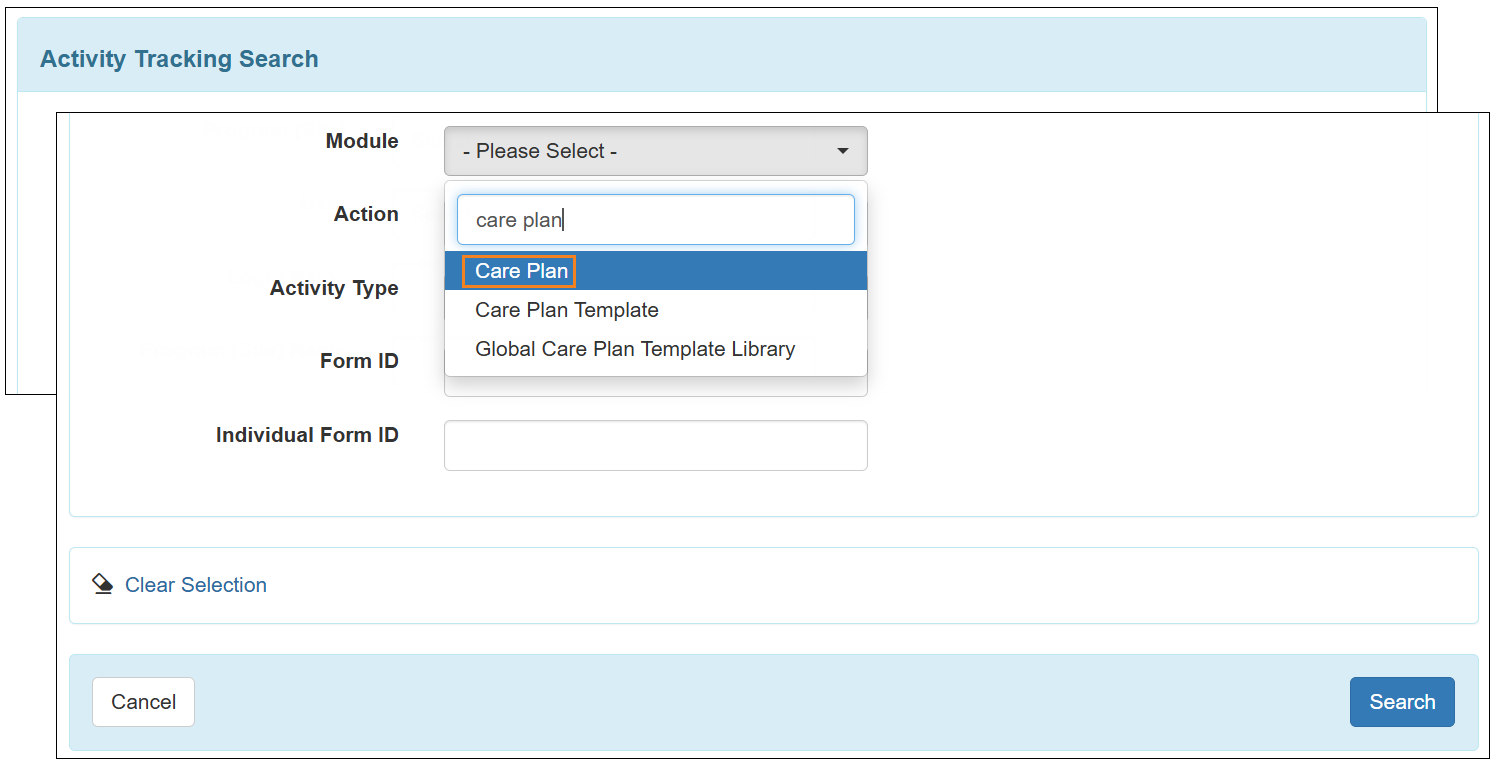
The 'Activity Tracking Search' results page will display ‘Care Plan’ instead of 'Individual Care Plan' in the ‘Module’ and ‘Comments’ column.
- The ‘Individual Care Plan’ module has been renamed to ‘Care Plan’ in the Home tab and Plans tab of the Individual Home Page.
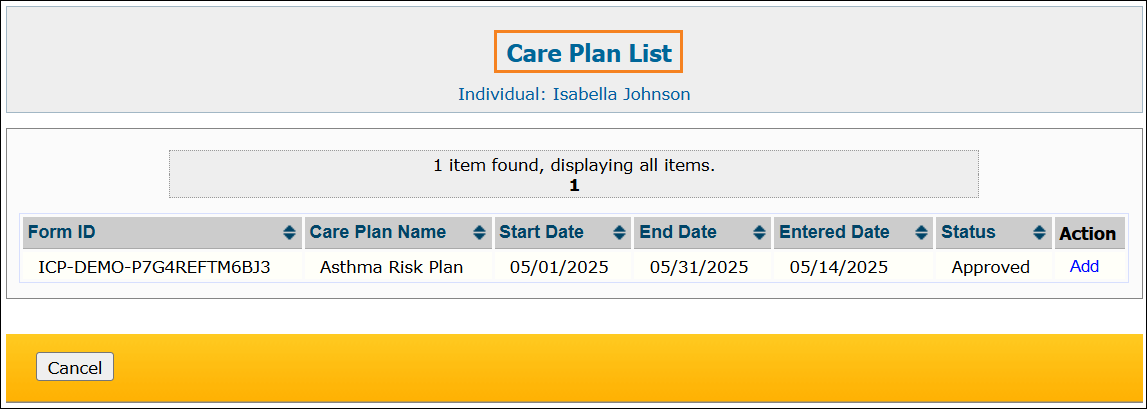
- The ‘Individual Care Plan List’ popup window has been renamed to ‘Care Plan List’ while linking a Care Plan to a Summary Report of Comprehensive Health Assessment Tool (eCHAT).
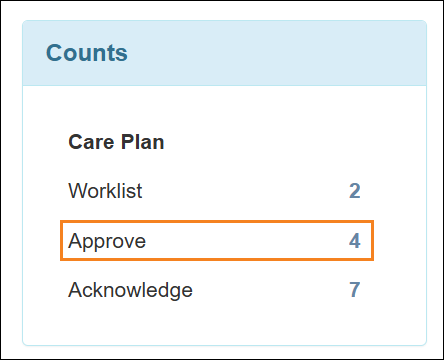
- Users assigned with the Care Plan Approve caseload-based role can now access a new Approve count for the Care Plan module on the To Do tab, where the Care Plans in ‘Pending Approval’ status will be listed for 30 days after being submitted or updated.
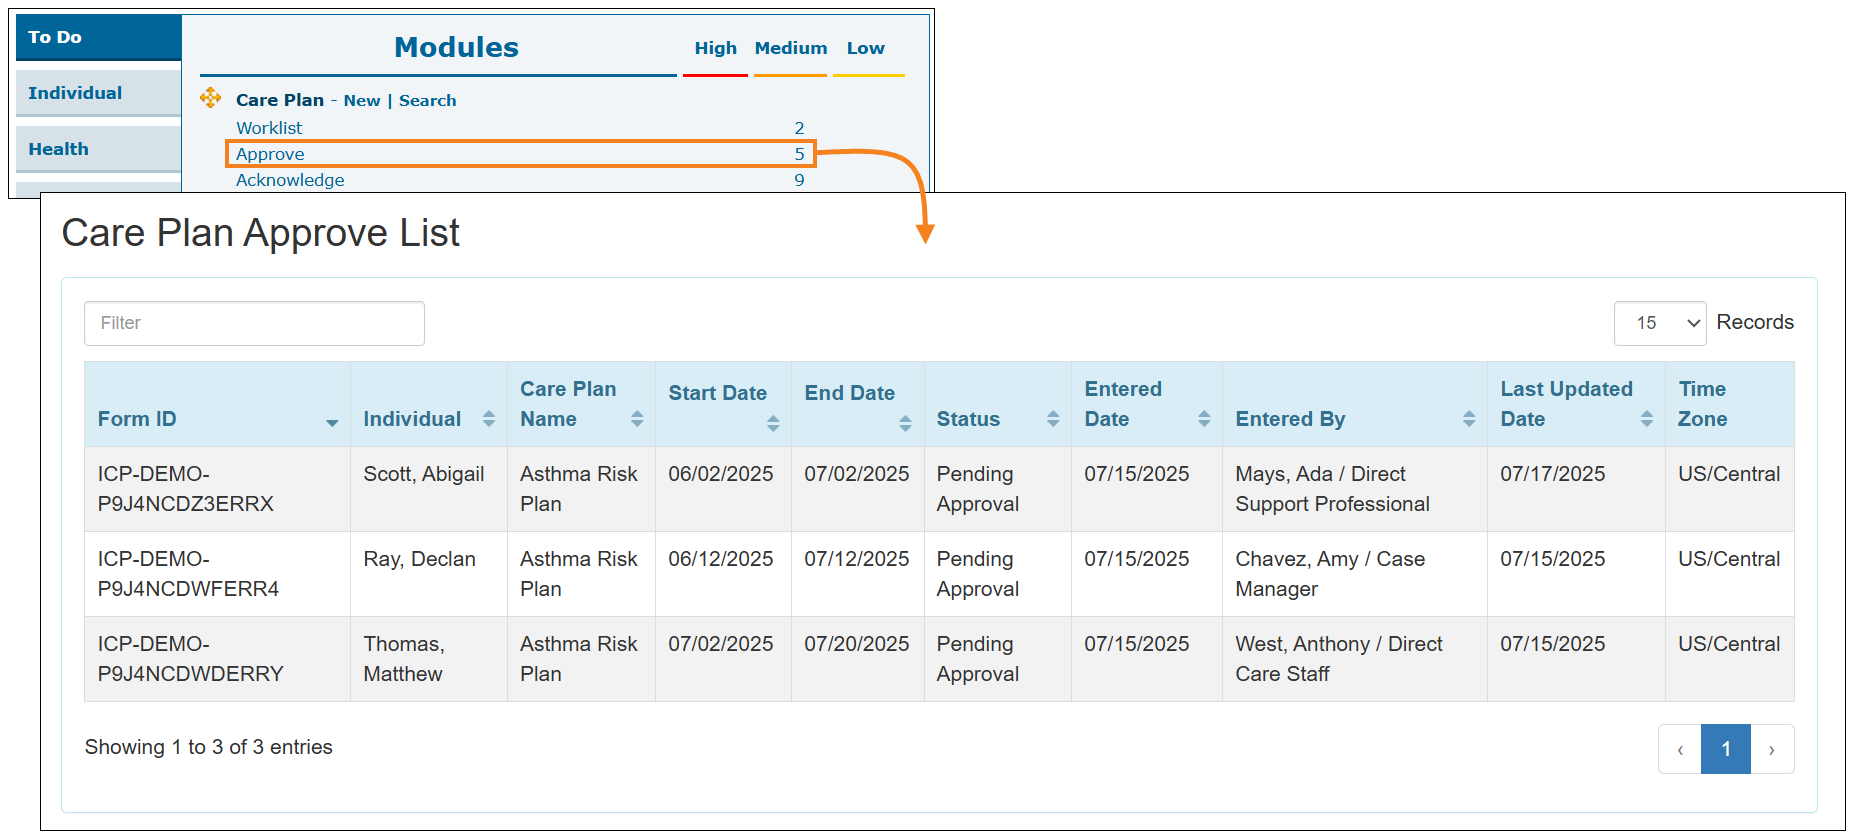
- Similarly, the count for Care Plans in ‘Pending Approval’ status will also be displayed in the ‘Counts’ section of the Plans tab on the Individual Home Page.
Case Note
[Back to Top]- If the Billing Unit(s) field is marked as Visible or Required in Case Note Template, then the following warning message will appear at the top Case Note Templates of all statuses: Billing Unit(s) will be used for billing if Calculation of Units is set as "Use direct billing units".

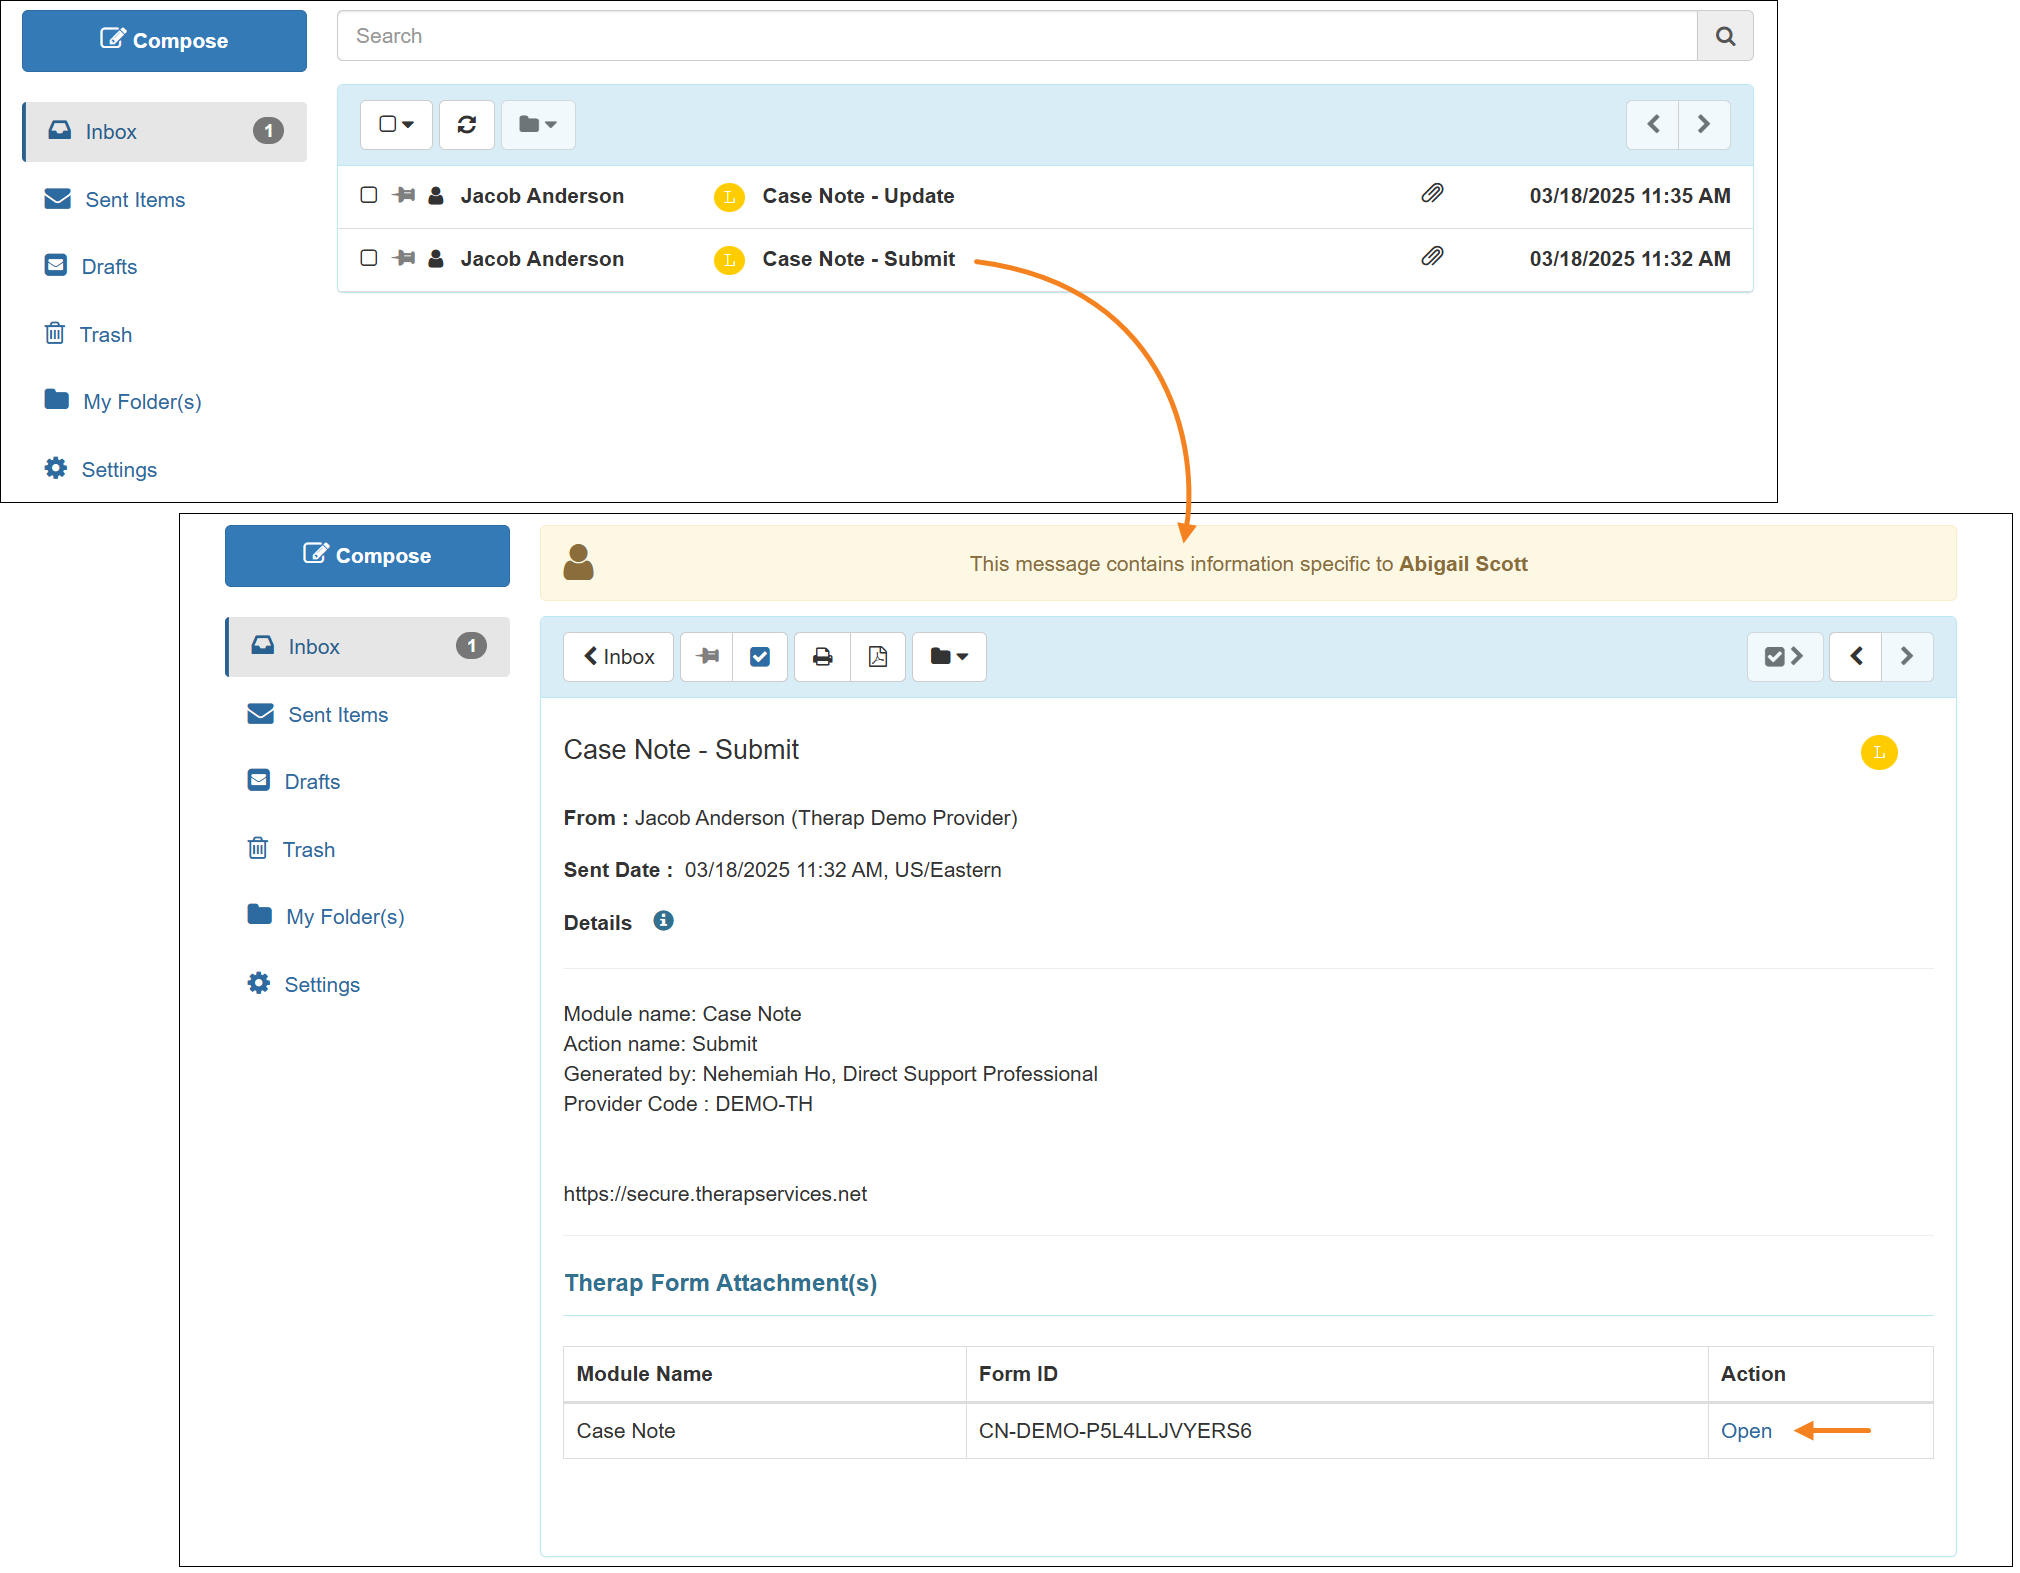
- Notifications have been added in the Notification Profile for the Case Note module. Users with any of the Case Note View, Case Note Edit, and Case Note Delete caseload-based roles will be able to receive notifications for Case Note Submit, Update, and Delete events.
- In the SComm Notification, the Form ID and few other specific details of the Case Note will be shown and the Case Note form will be linked in the ‘Therap Form Attachment(s)’ section at the bottom of the SComm.
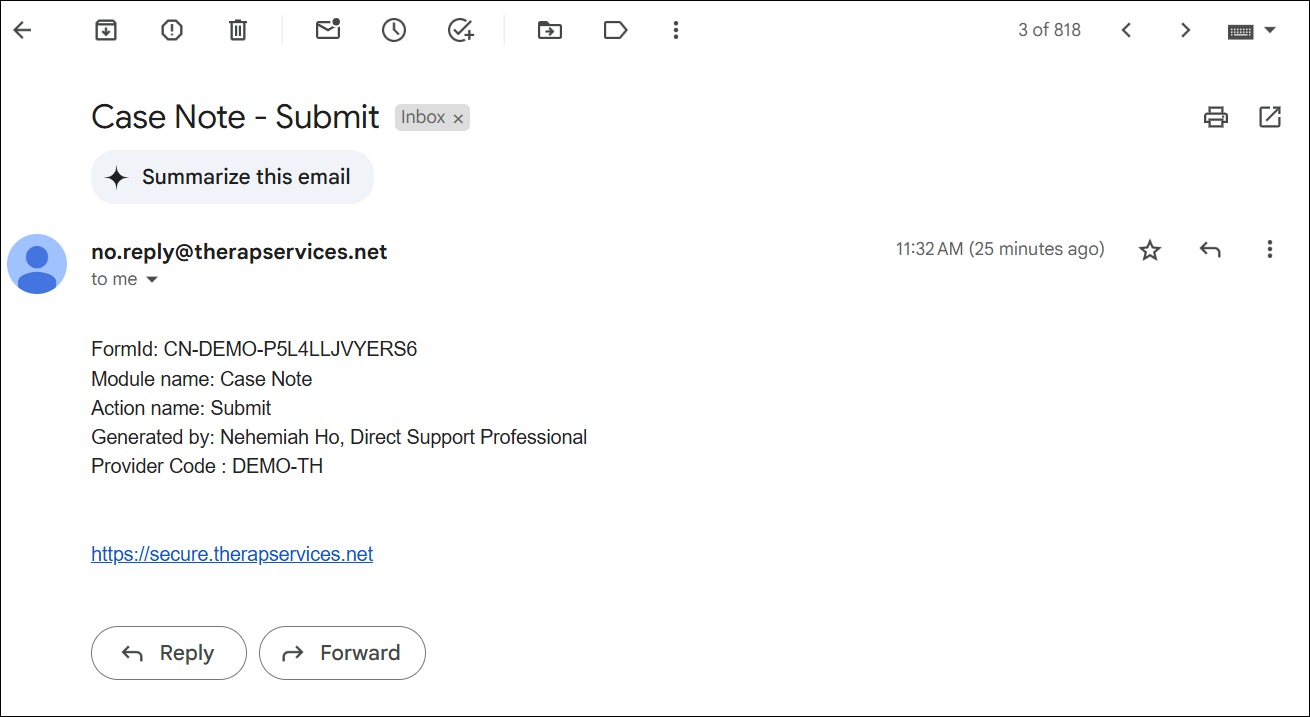
- The Form ID and few other specific details of the Case Note form will be shown in the Email Notification.
Daily MAR
[Back to Top]- The PDF containing QR/Barcode(s) has been updated. The following fields will be available in the PDF along with the QR/Barcode(s):
- Individual
- DOB
- Medication Name
- Dose Form
- Route
- Strength
- Frequency
QR Code: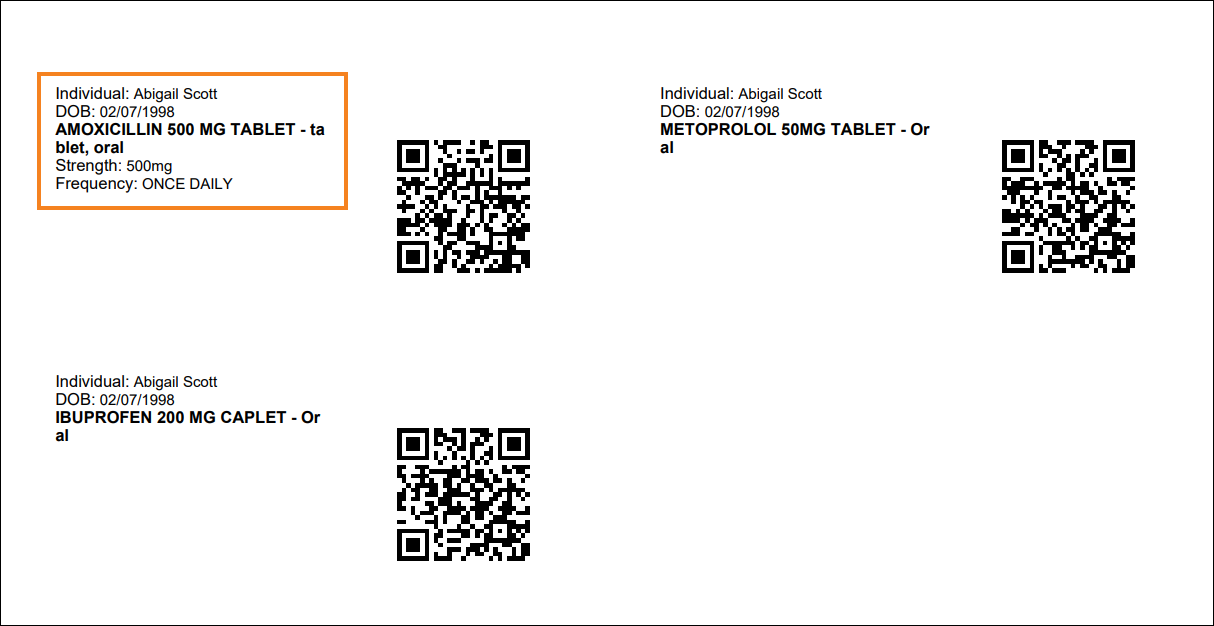
Barcode: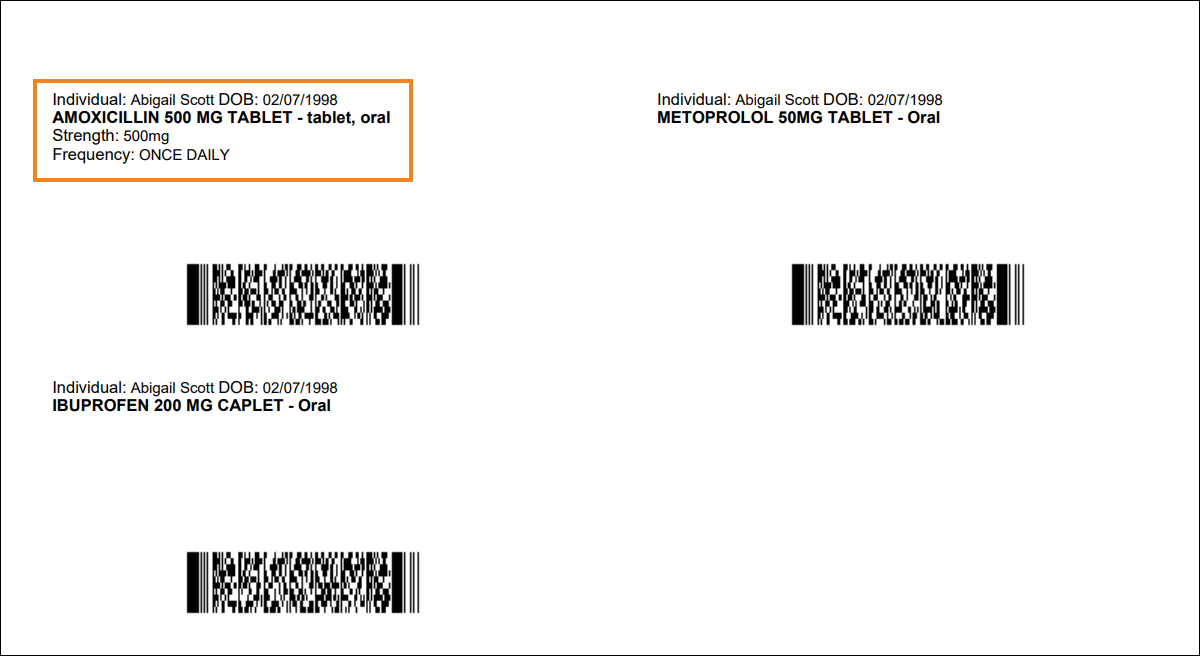
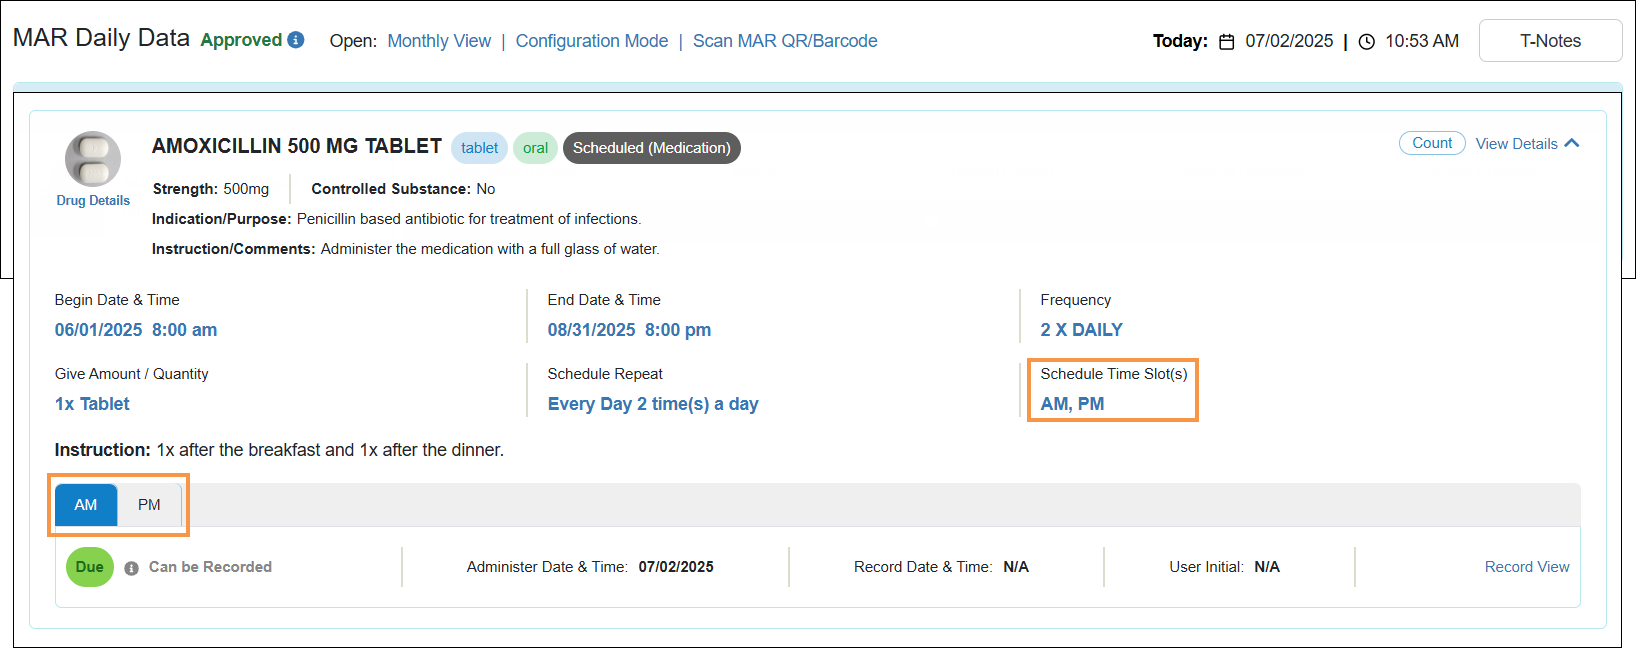
- The Schedule Text slot(s) selected in the Medication History form will now appear in the Daily MAR details view. Since the Schedule Text slot(s) do not contain a time frame, Documentation Window will not be applicable for those slot(s).
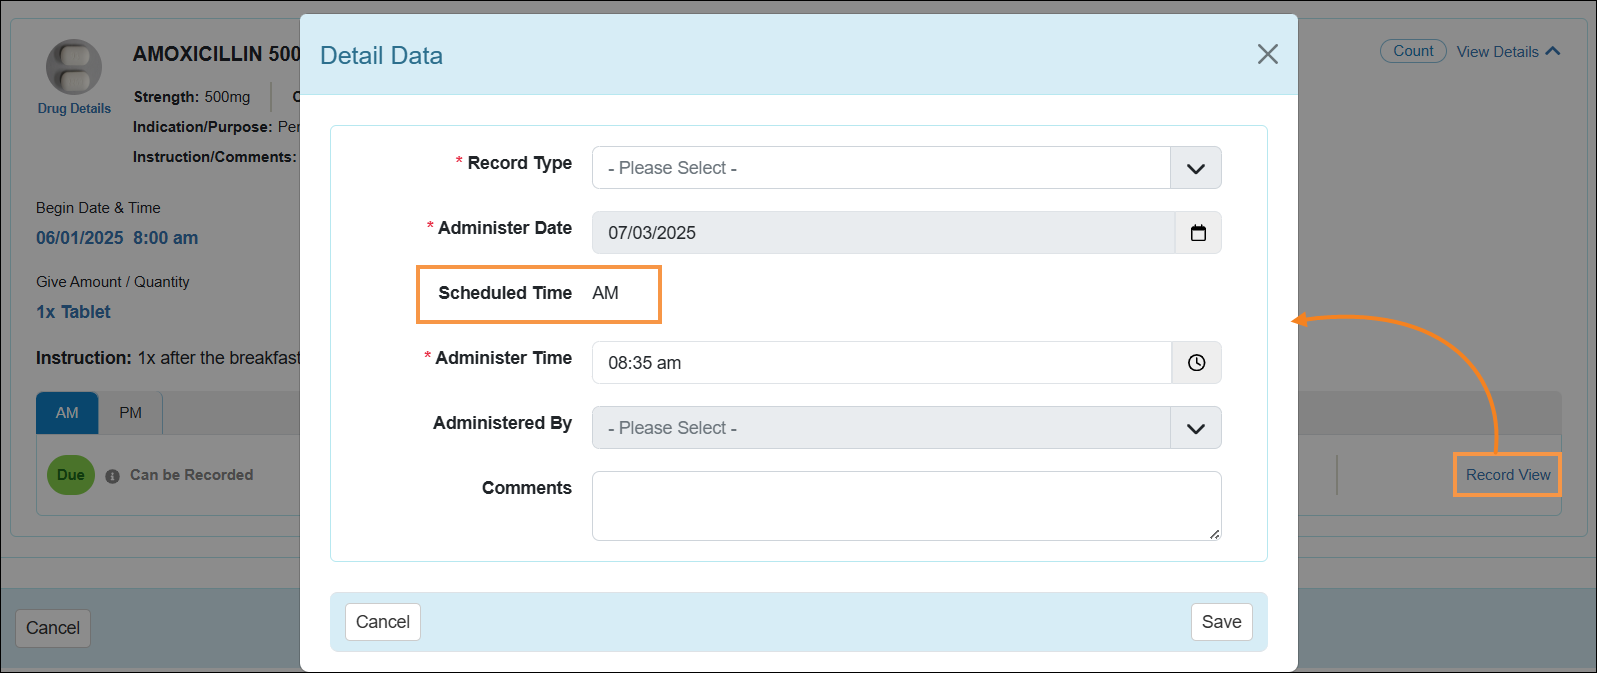
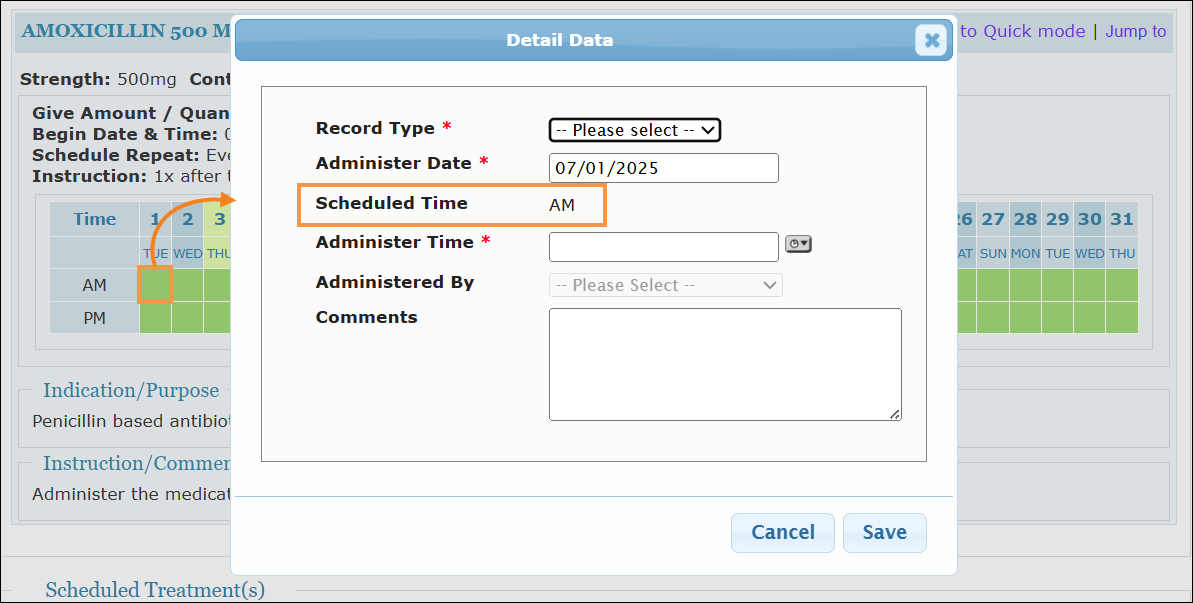
- A new read-only field titled Scheduled Time has been added to the Daily MAR ‘Detail Data’ popup window, which will display the scheduled time or scheduled text, or remain blank based on the selected Schedule Time slot(s) of the respective medication.
- The following changes have been made to the ‘Provider MAR Configuration’ page:
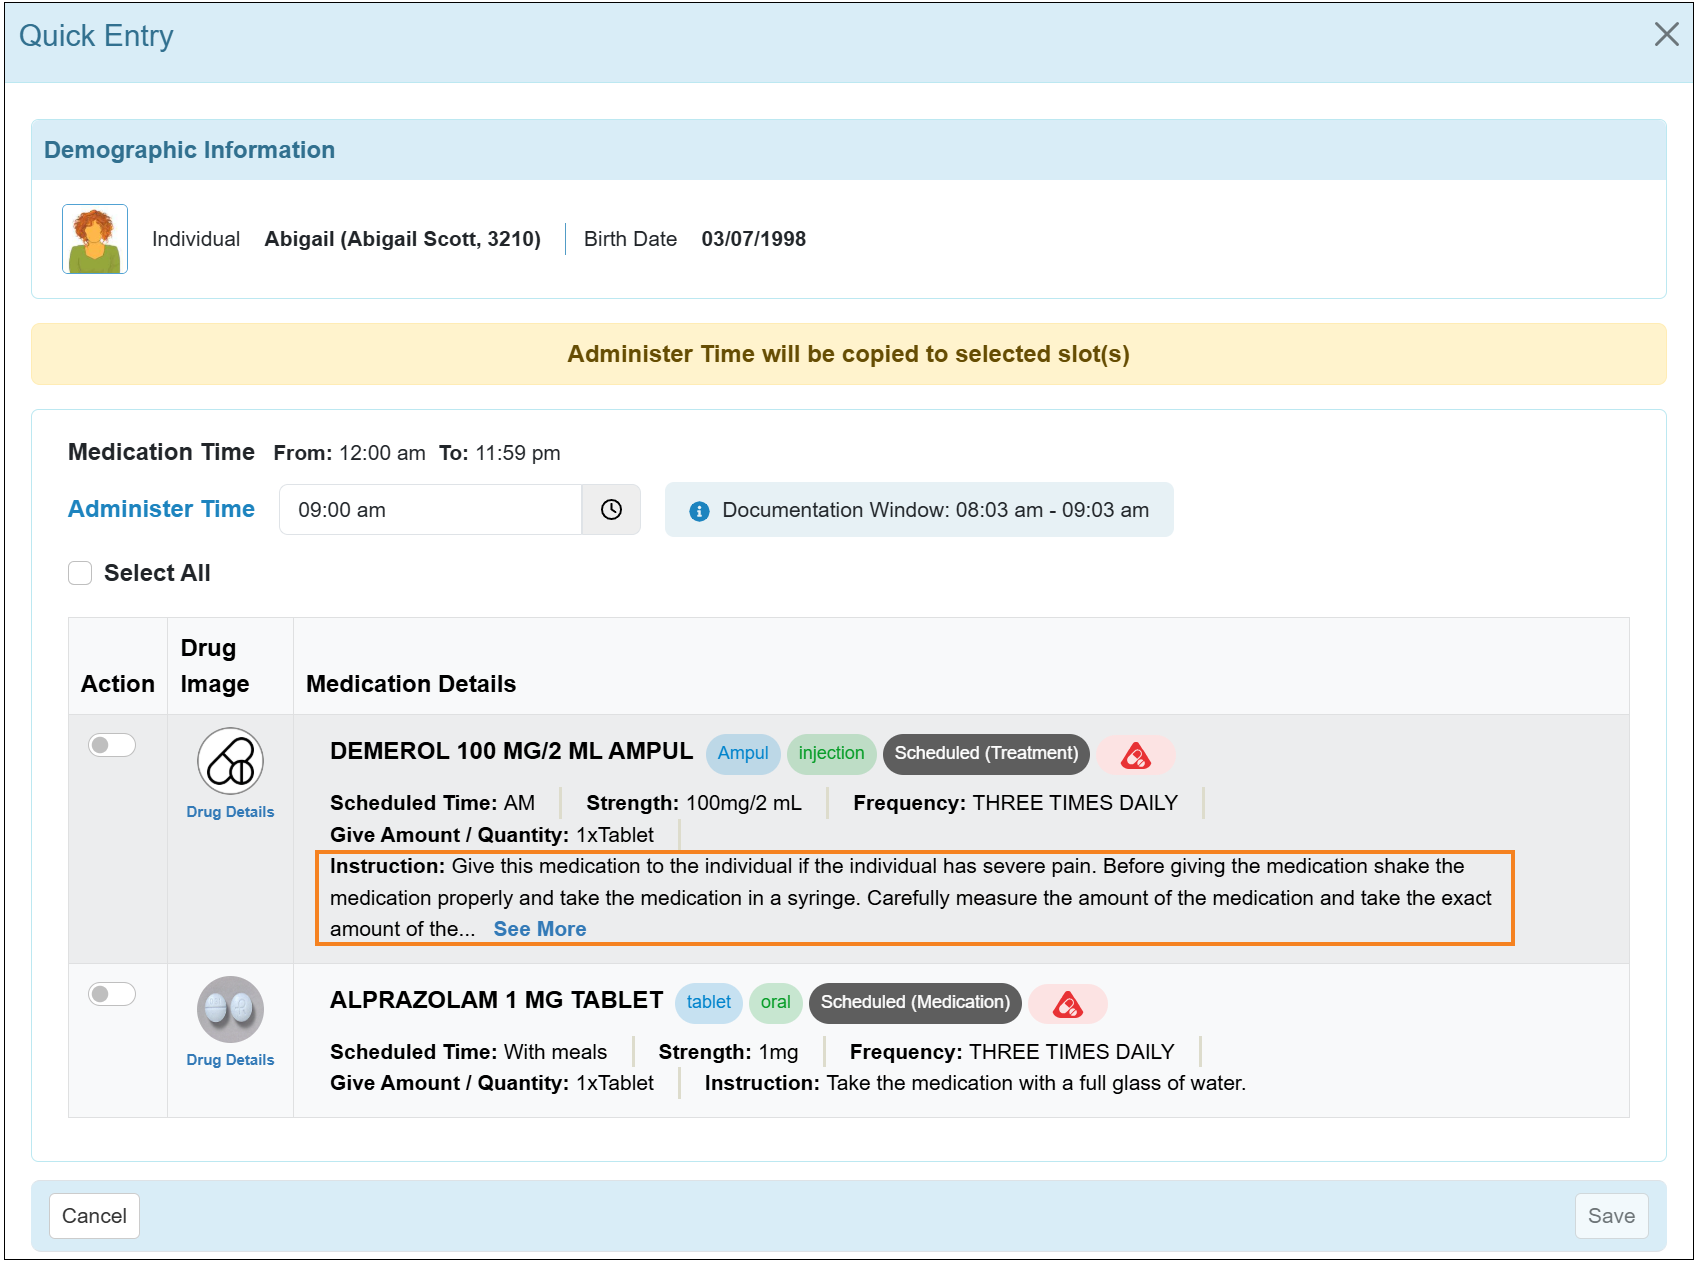
- A new Enable Select All for Quick Entry checkbox will now be available for the Daily MAR enabled providers. After this release, the Select All button in the Daily MAR 'Quick Entry' popup will be disabled by default, and users will be able to enable it again by checking off the Enable Select All for Quick Entry option from the 'Provider MAR Configuration' page.
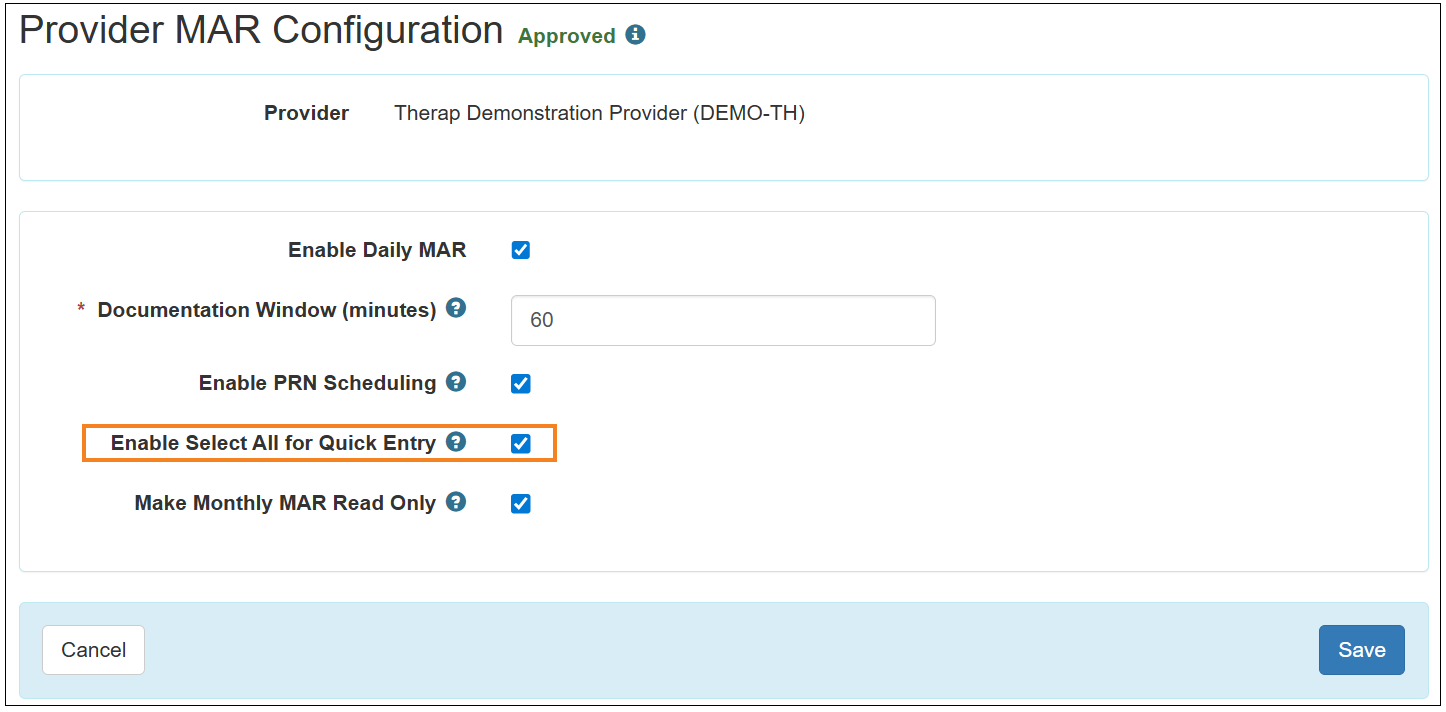
- A Help button denoted by a question mark (?) has been added next to the Make Monthly MAR Read Only
option.
- A new Enable Select All for Quick Entry checkbox will now be available for the Daily MAR enabled providers. After this release, the Select All button in the Daily MAR 'Quick Entry' popup will be disabled by default, and users will be able to enable it again by checking off the Enable Select All for Quick Entry option from the 'Provider MAR Configuration' page.
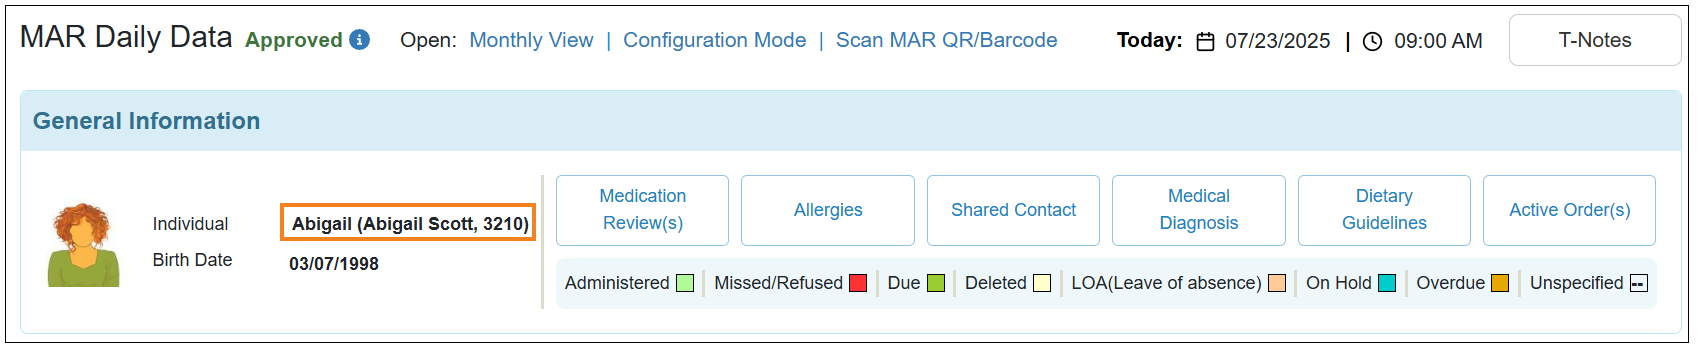
- Information added to the Goes By field of the individual’s Individual Demographic Form (IDF) will now show next to the Individual fields of the Daily MAR.
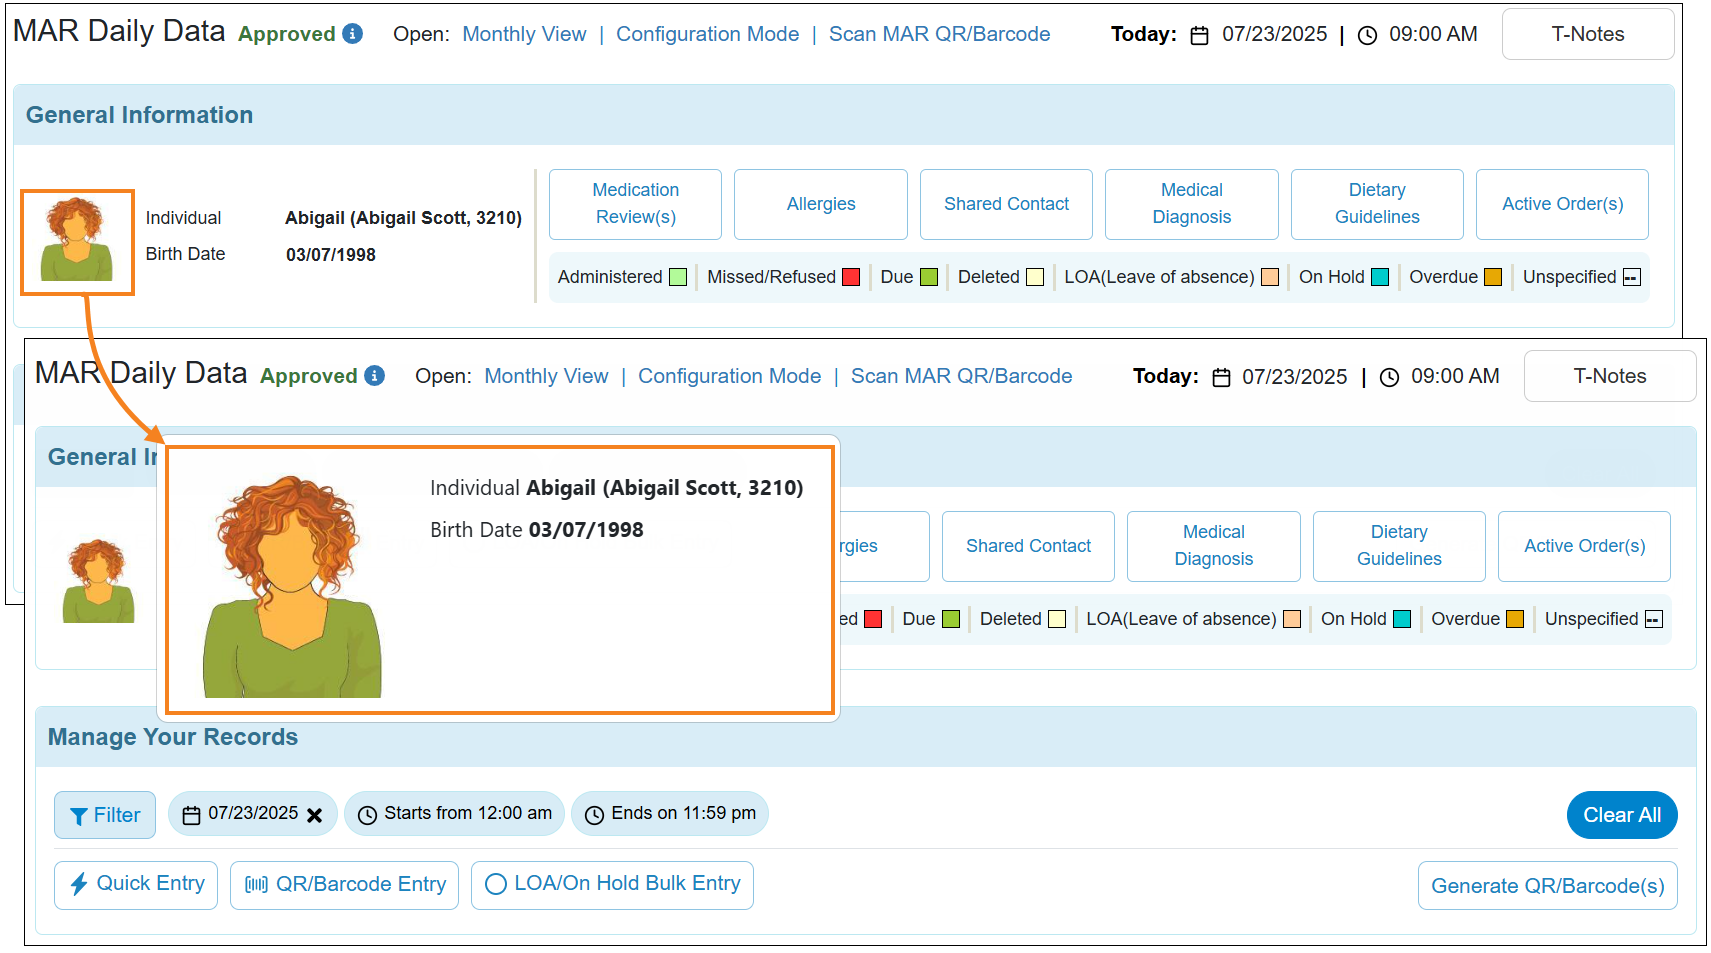
- Hovering over the individual photo will now show an enlarged version of the Individual’s Photo, Birth Date, and Individual information in a popup.
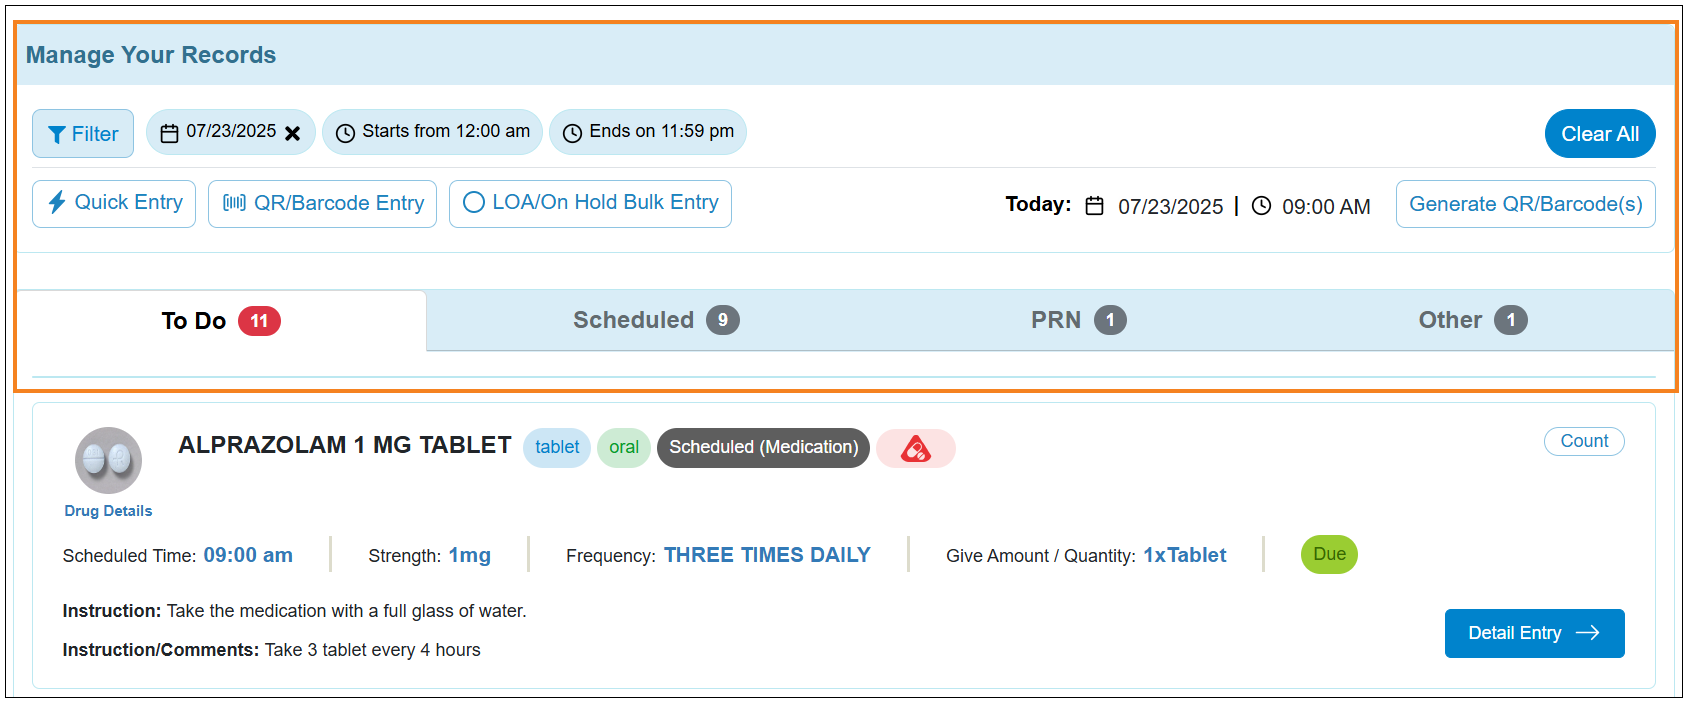
- The ‘Manage Your Records’ section along with its data entry options and corresponding tabs will now remain fixed, when users scroll down to the Daily MAR. The Today information located at the top of Daily MAR will also display within the 'Manage Your Records' section when users scroll down to the bottom.
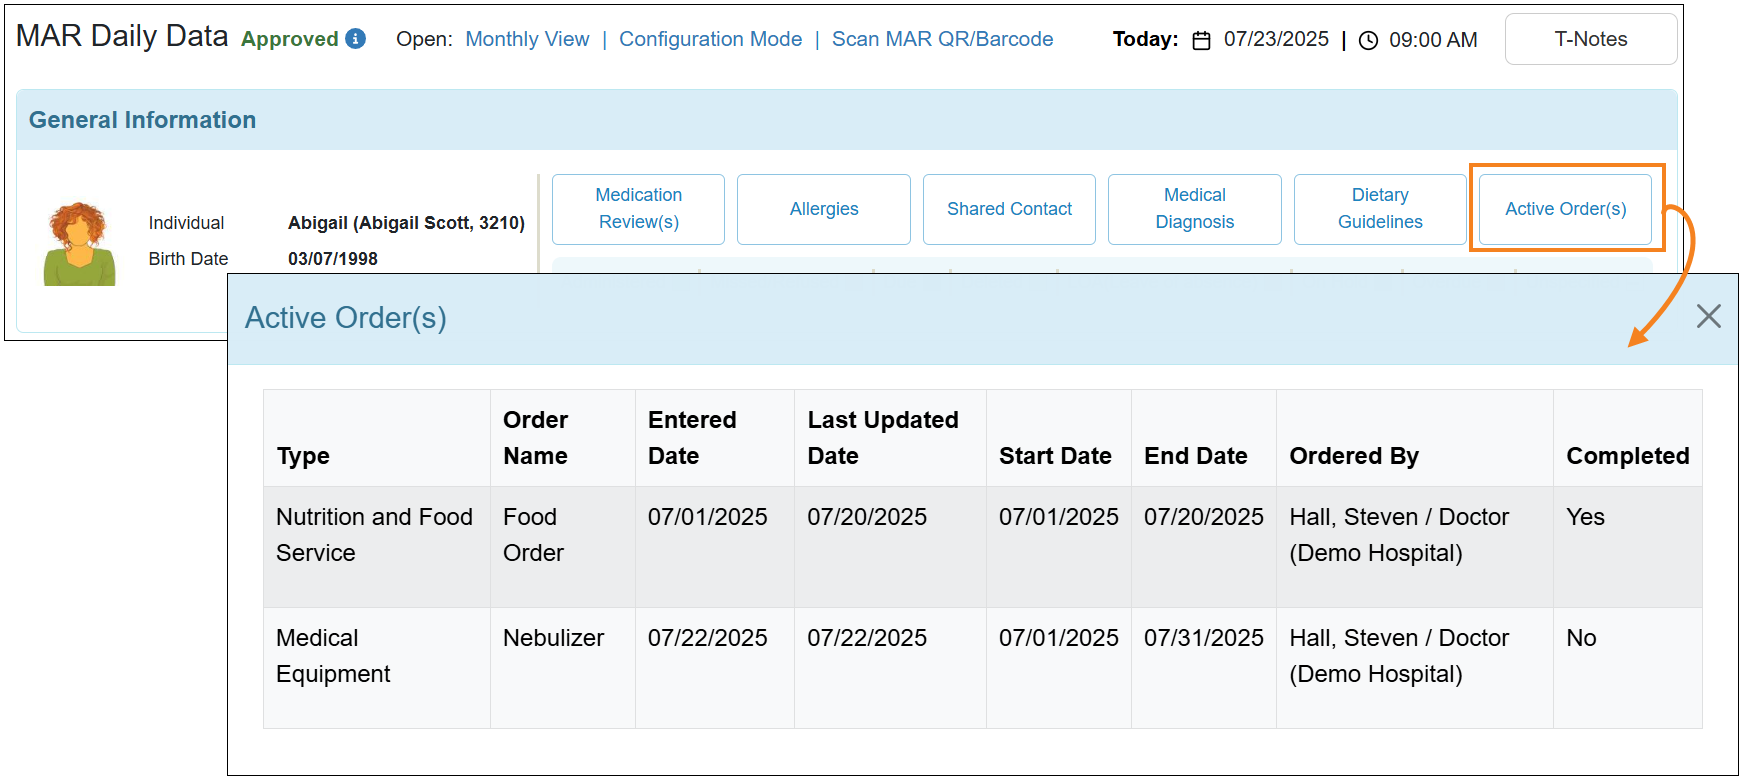
- A new button titled Active Order(s) has been added within the 'General Information' section of the ‘MAR Daily Data’ page. Clicking this button will display the individual's approved Orders whose Start Date to End Date range falls within the MAR timeframe.
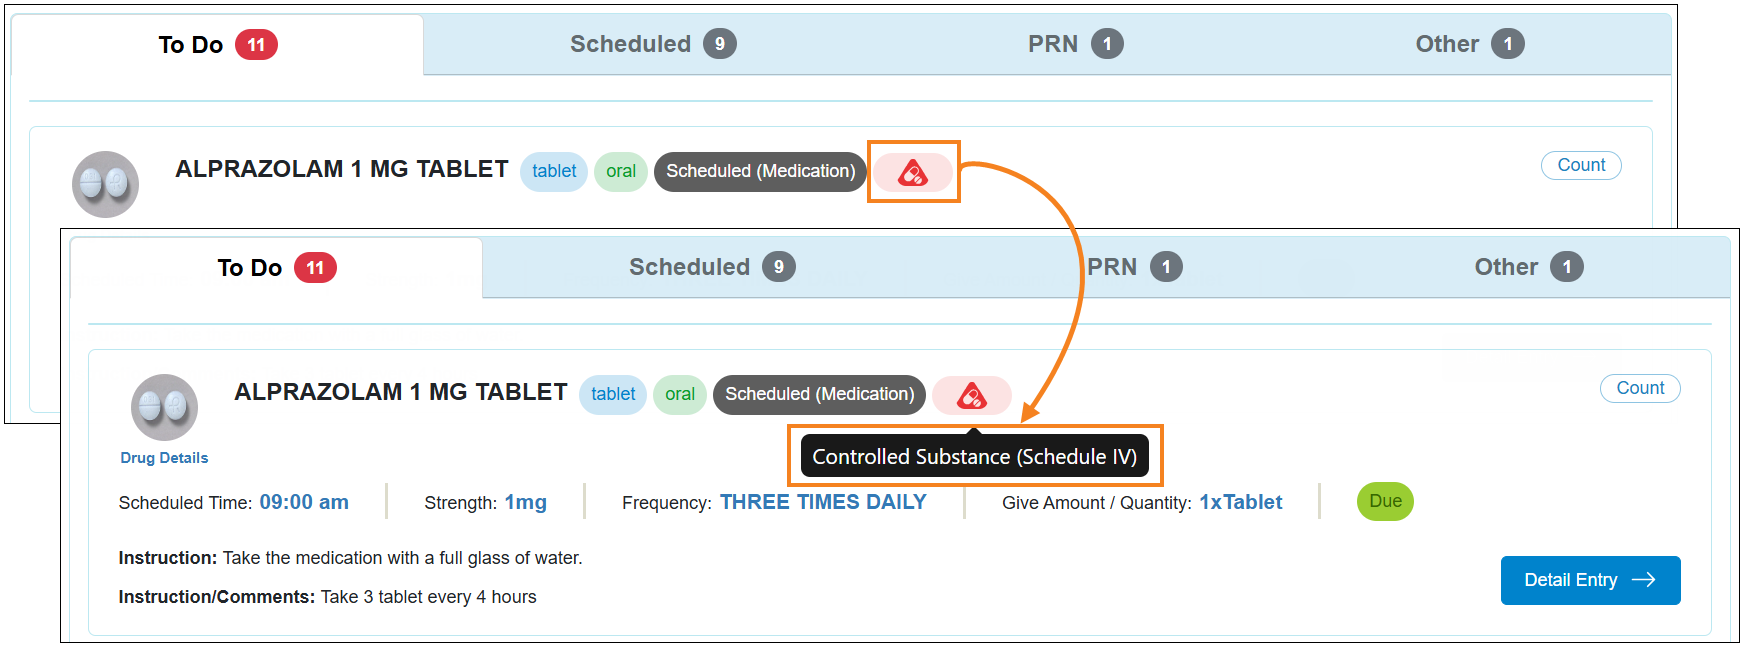
- The Controlled Substance field and its corresponding Control Type information have been replaced with a new Controlled Substance icon in the Daily MAR. This icon will appear only for medications that are marked as controlled substances, and will also be visible in the 'Quick Entry', 'LOA/On Hold Bulk Entry', and 'QR/Barcode Entry' popups. Hovering over the icon will display 'Controlled Substance' along with the selected Control Type. Medications that are not marked as control substances will not show this icon in Daily MAR.
- A new Instruction field has been added to the ‘Quick Entry’ popup window that will display the Instruction information added to the ‘Administration Details’ section of the respective Medication History form.
Default Enrollment Program
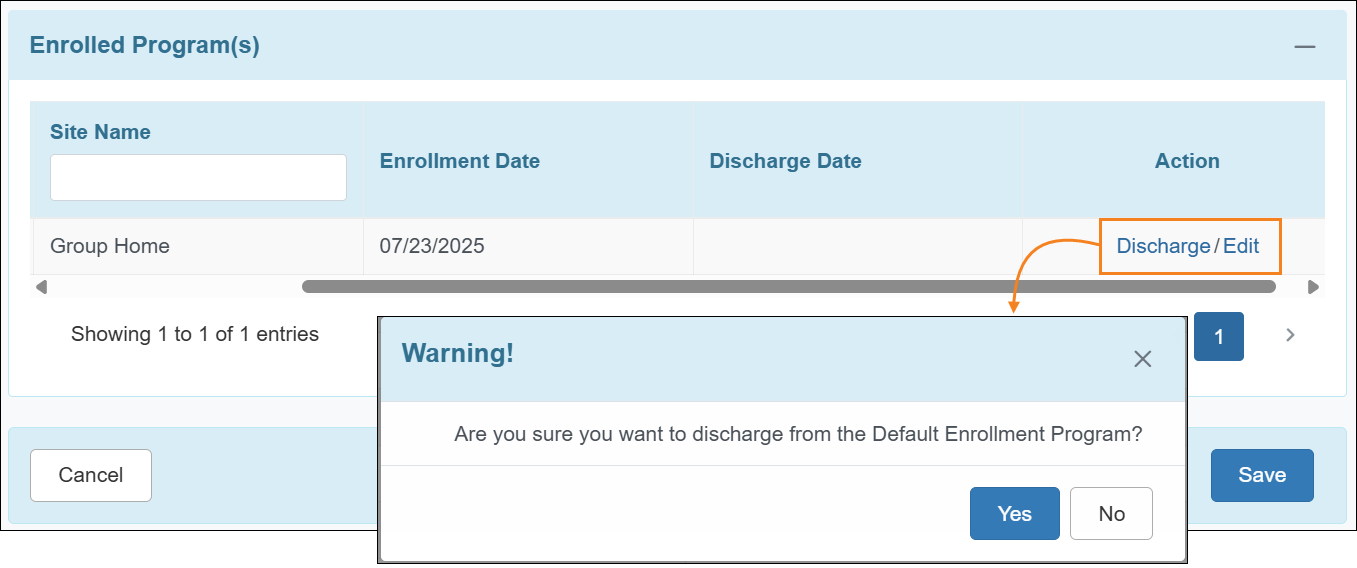
[Back to Top]- A new warning message will be displayed when an individual is being discharged from the Default Enrollment Program, stating: Are you sure you want to discharge from the Default Enrollment Program?
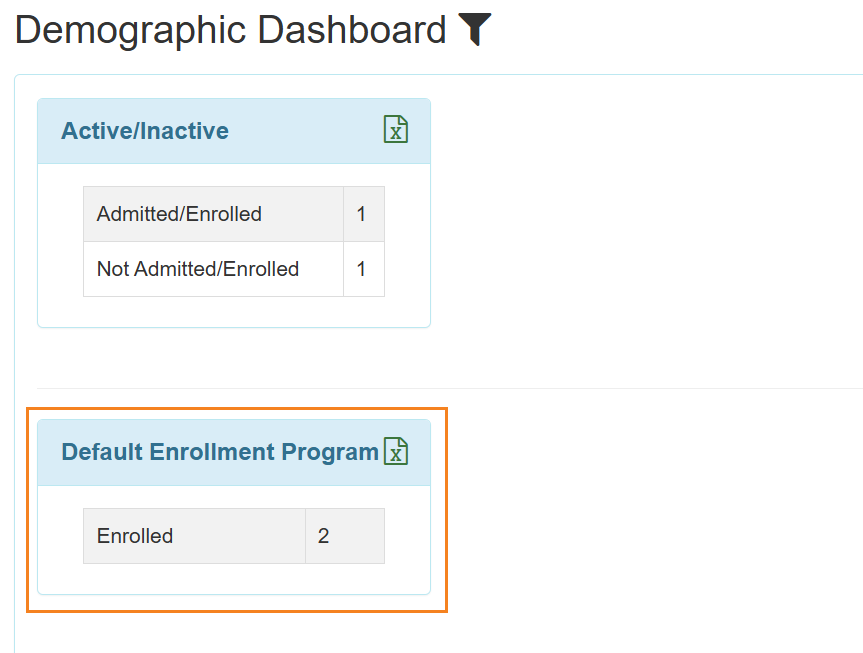
- A new ‘Default Enrollment Program’ section has been added to the Demographic Dashboard.
Document Storage
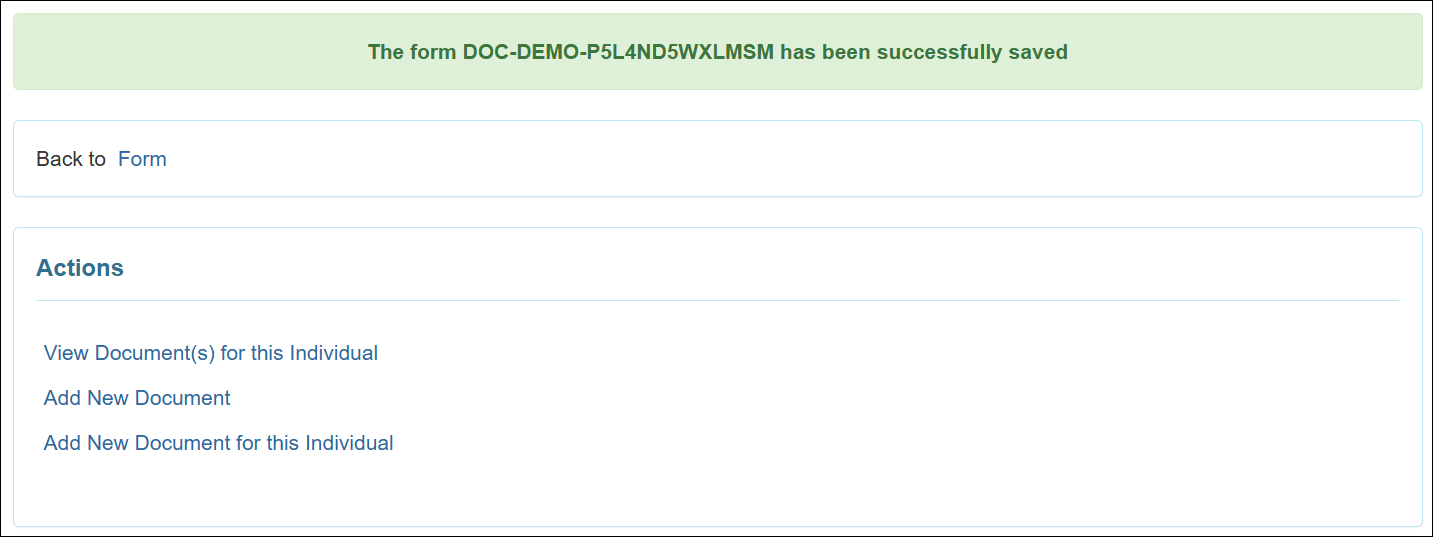
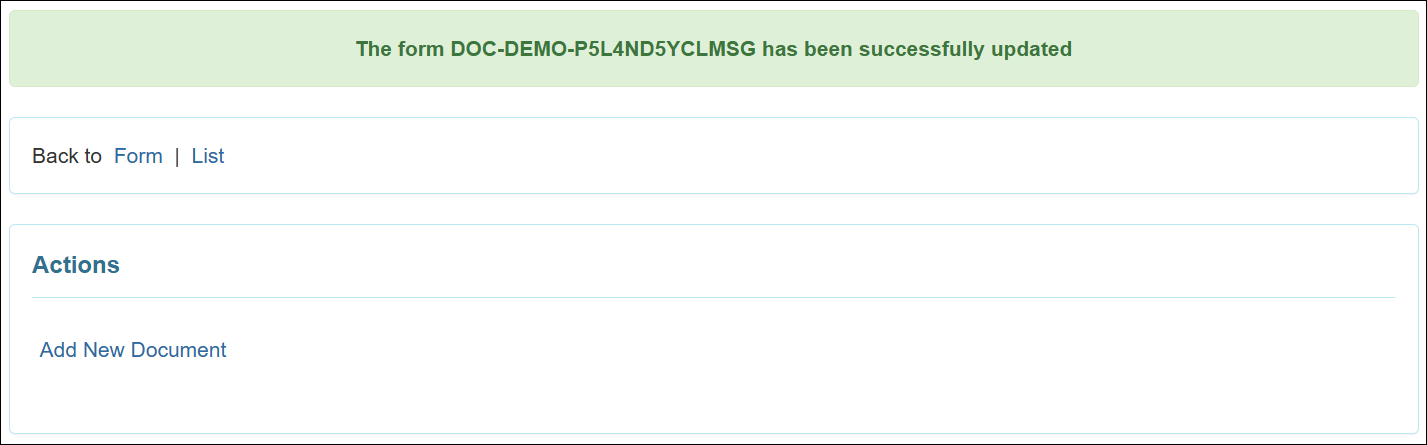
[Back to Top]- The following changes have been made to the success message pages displayed after saving, updating, or deleting Individual Document Storage and Agency Wide Document Storage forms:
- A Form link has been added which will open the corresponding Document Storage form.
- If the form is updated or deleted by using the Search then a List link will be available which will open the ‘Document Search’ results page.
- The Back to Dashboard, View Document, and Back to Search Results links have been removed from the ‘Actions’ section.
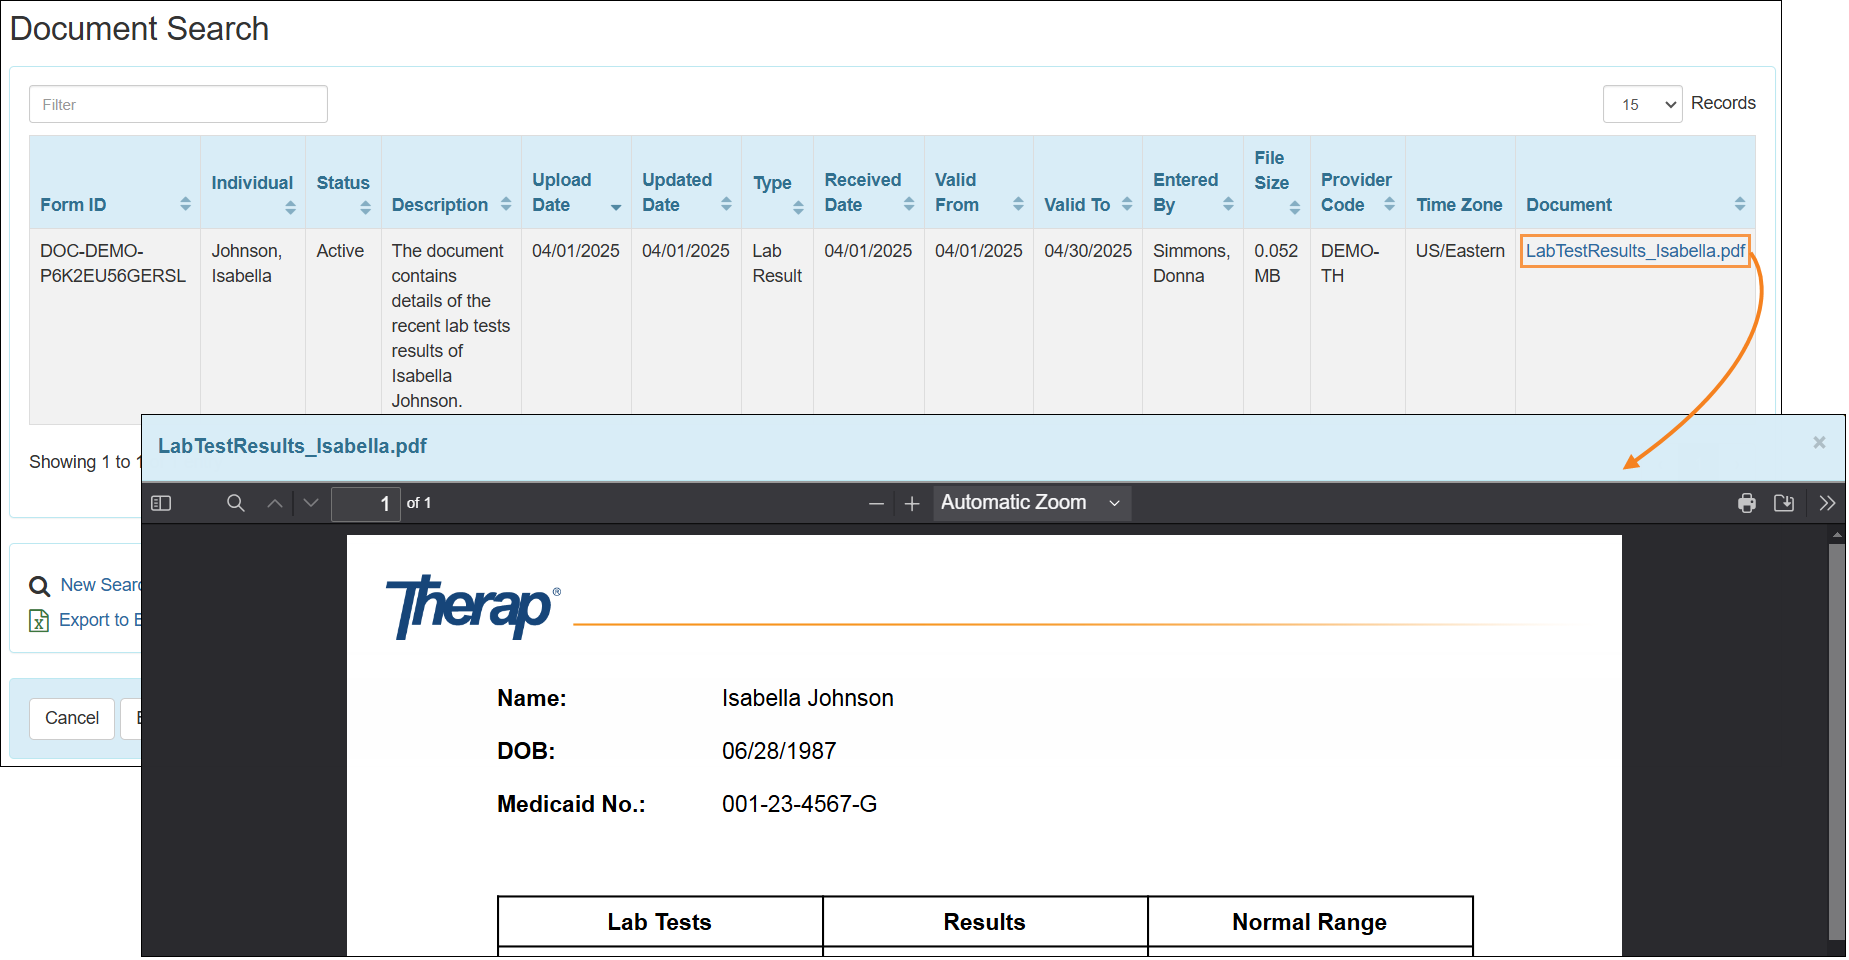
- Users will now be able to view the PDF attachment of a Document Storage form in a PDF Viewer by clicking on the link in the Document column of the ‘Document Search’ result page for both Individual and Agency Wide Document Storage.
Drug Count
[Back to Top]- An Export To PDF option has been added under the Printables and Exports link on the ‘Drug Count Search’ results page. Clicking this link will download the PDF version of the Drug Count Report.
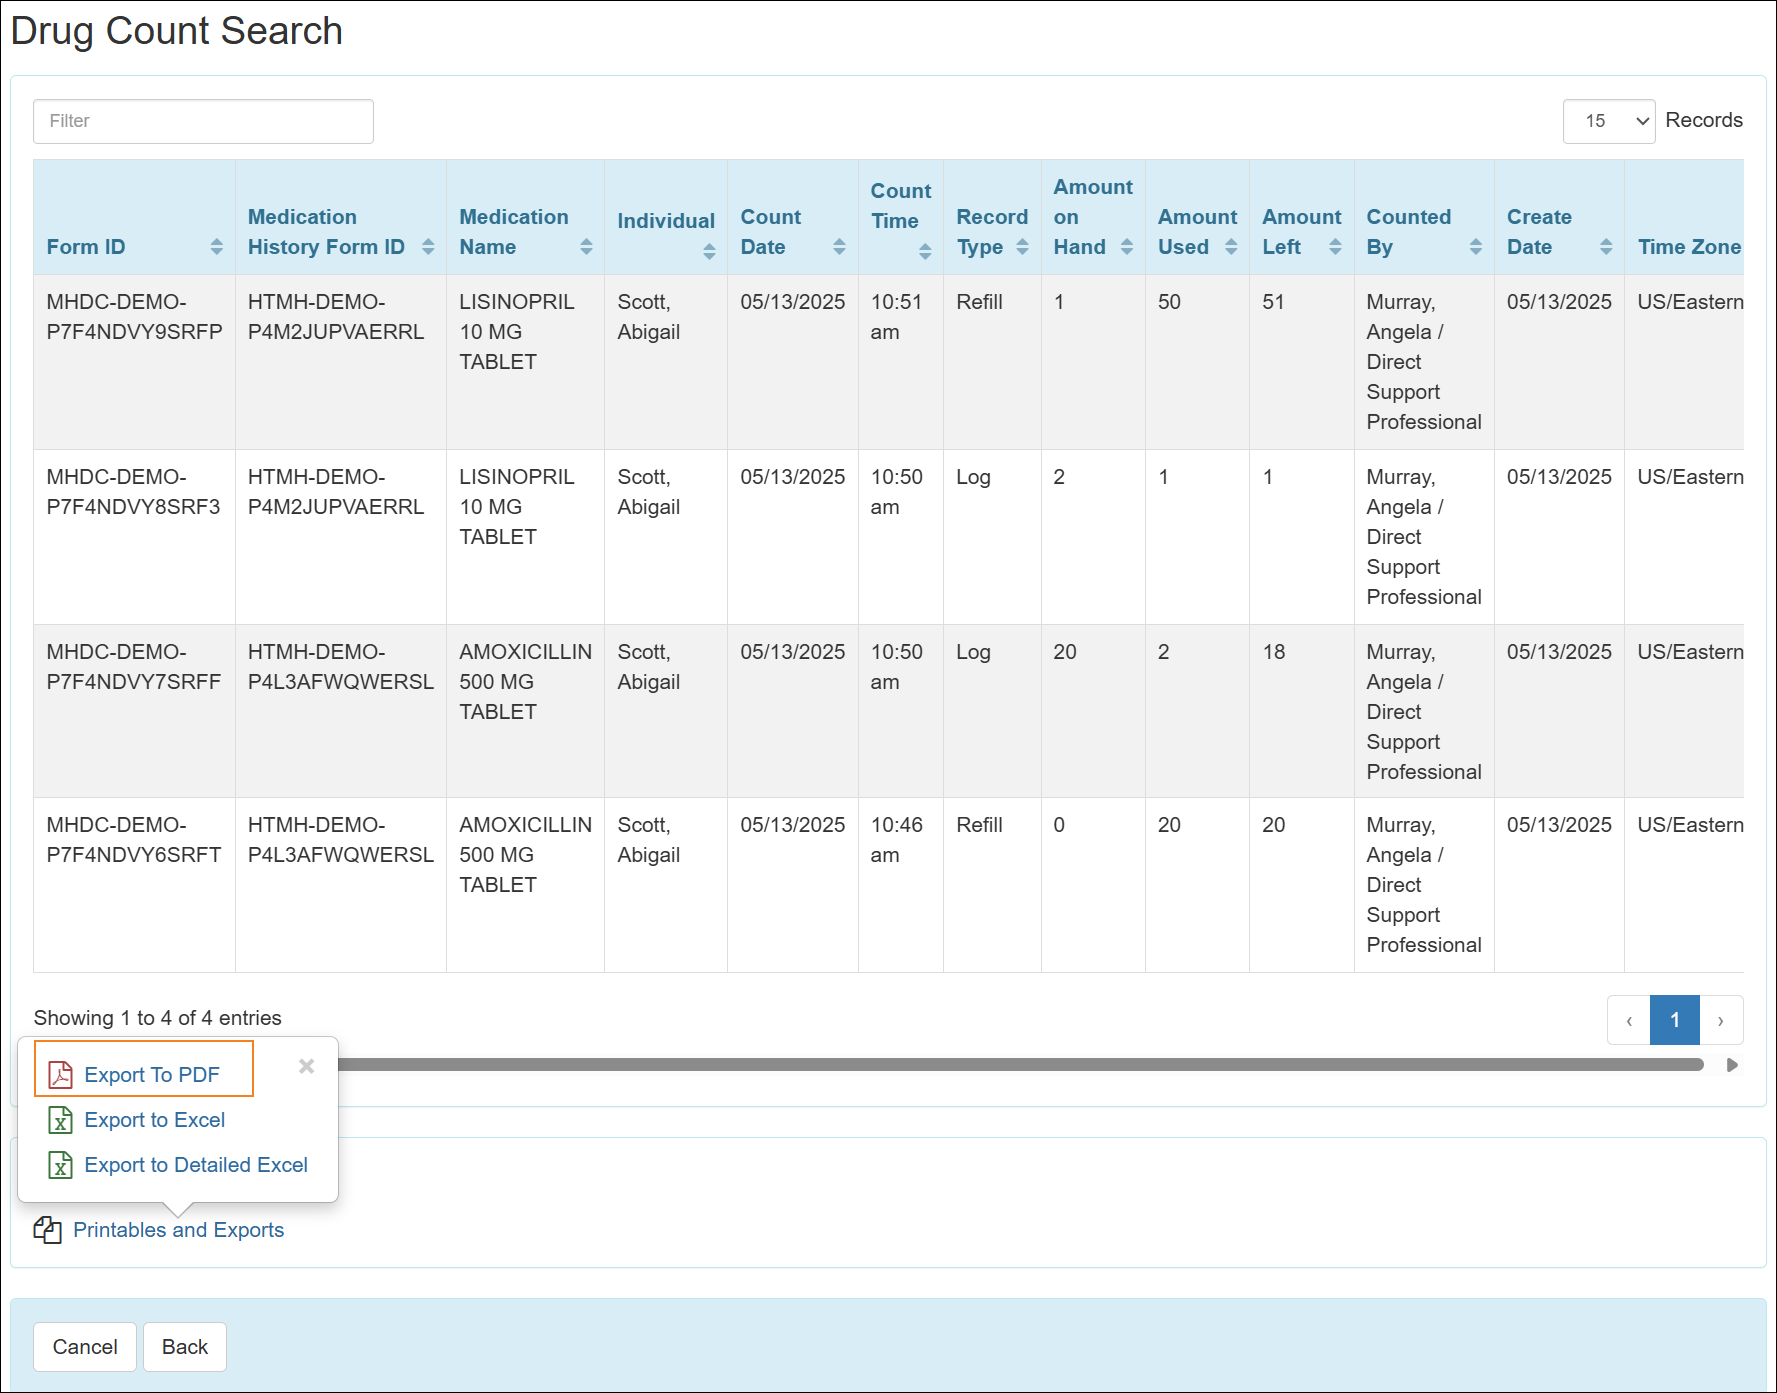
The search criteria selected on the ‘Drug Count Search’ page will be displayed in the generated PDF. If an individual has multiple Drug Count records for the same medication in the search results, they will be grouped together in the same table under the corresponding Medication History Form ID. Any comments added for a Drug Count will be shown in the Comments field.
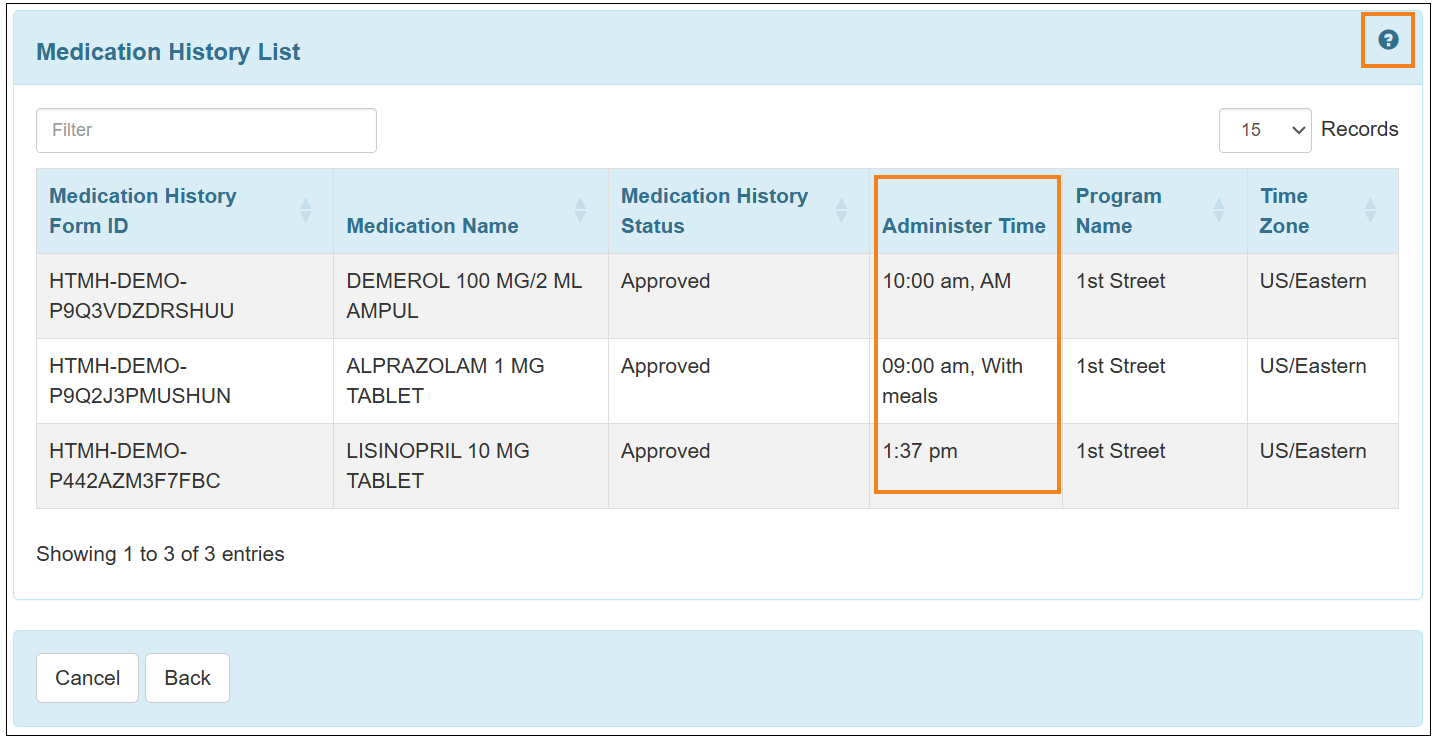
- In the ‘Medication History List’ that appears while recording new Drug Counts, a new column titled Administer Time has been added. It will show the scheduled time(s) of the medication from the Medication History form will be displayed. If a medication contains more than one scheduled slot, then the scheduled slot(s) will be separated by a comma. A Help button denoted by a question mark (?) has also been added on the top right corner.
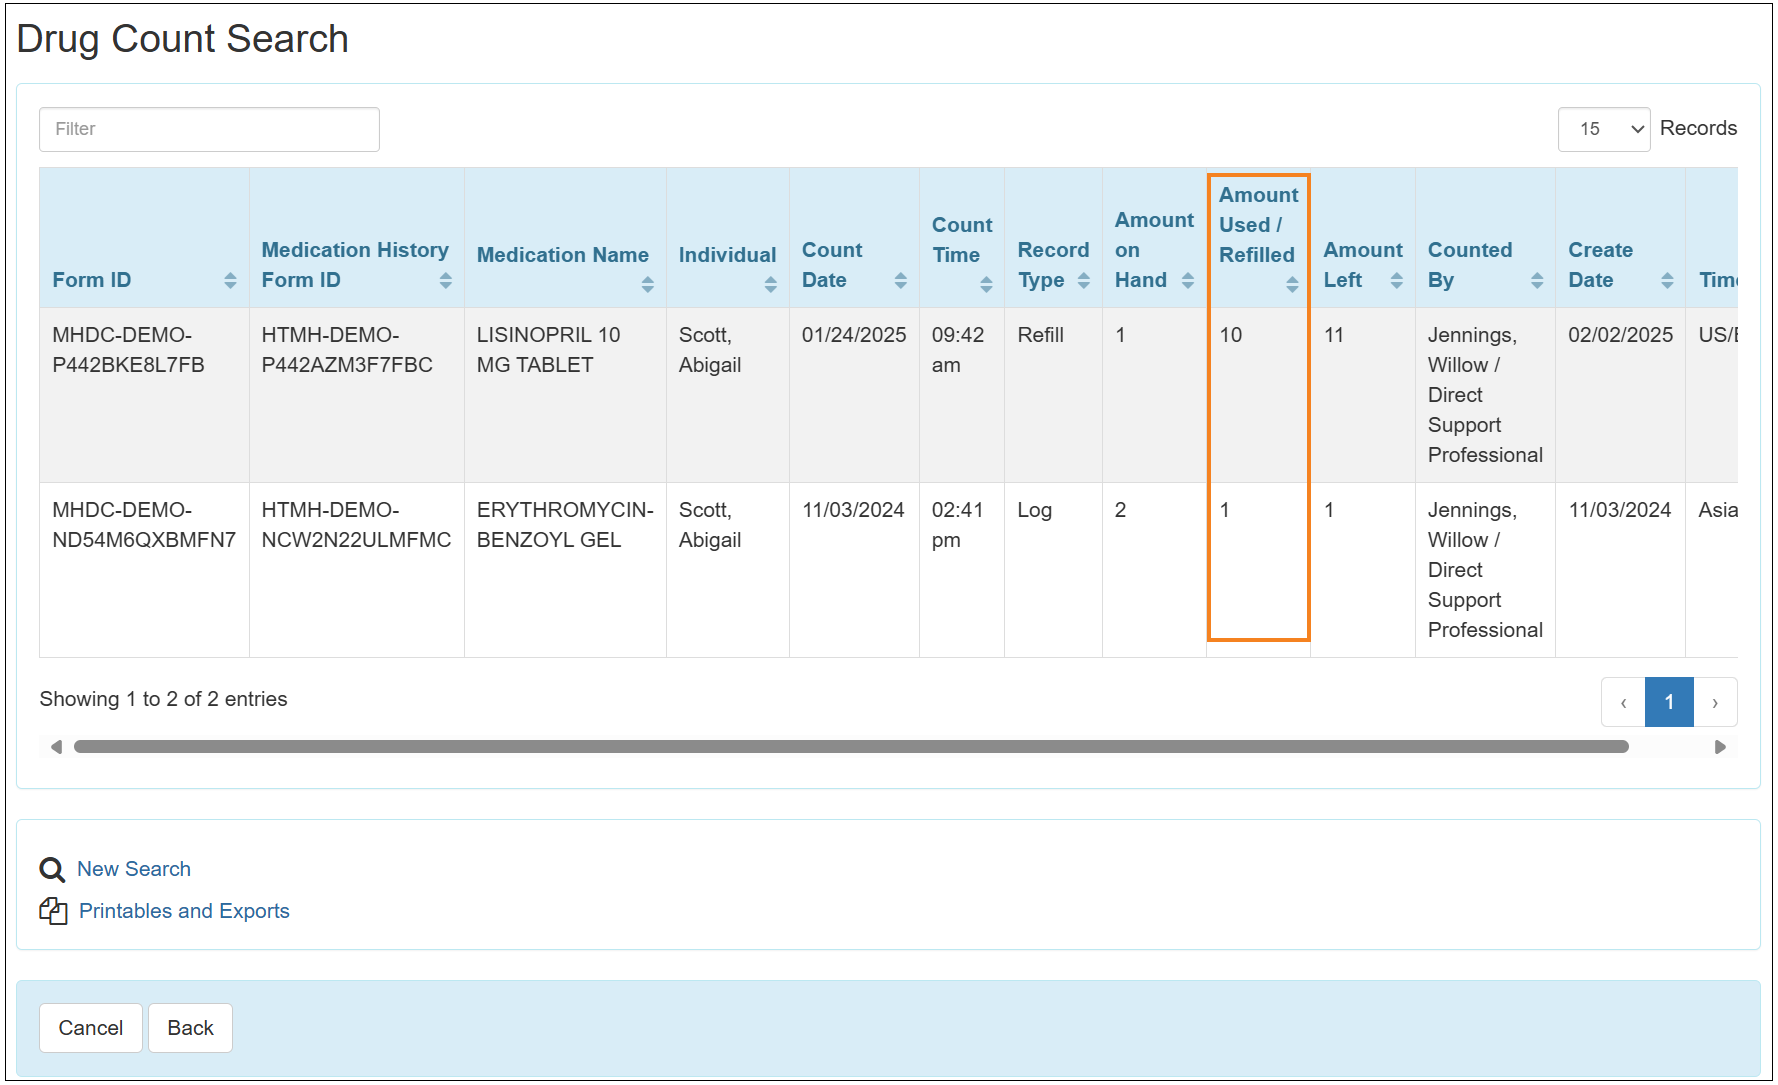
- The Amount Used column within the 'Drug Count Search' page and 'Drug Count List' popups has been renamed to Amount Used / Refilled. This will also be applicable for exported Excels, Detailed Excels and PDFs of the Drug Count lists.
Employment History
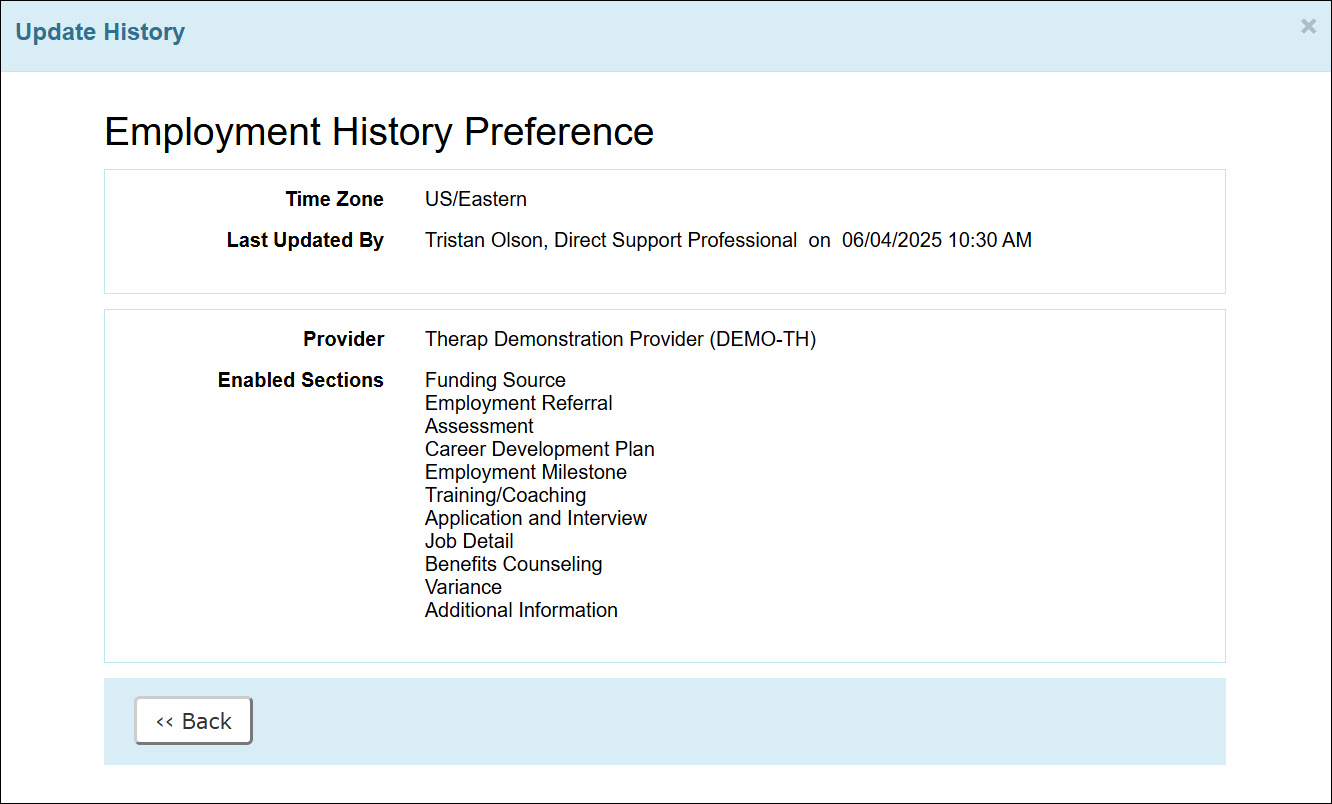
[Back to Top]- The user interface of the archived forms displayed in the ‘Update History’ popup window of the Employment History Preference form has been updated.
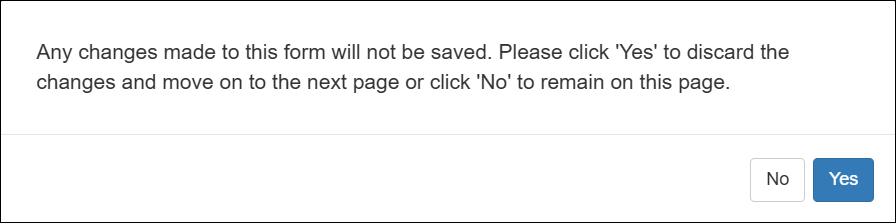
- The warning message that appears while attempting to navigate away from any type of unsaved Employment History forms has been updated to: Any changes made to this form will not be saved. Please click ‘Yes’ to discard the changes and move on to the next page or click ‘No’ to remain on this page.
Event Summary
[Back to Top]- The option titled “Annually” has been removed from the Period field on the Event Search page of the Event Summary module.
General
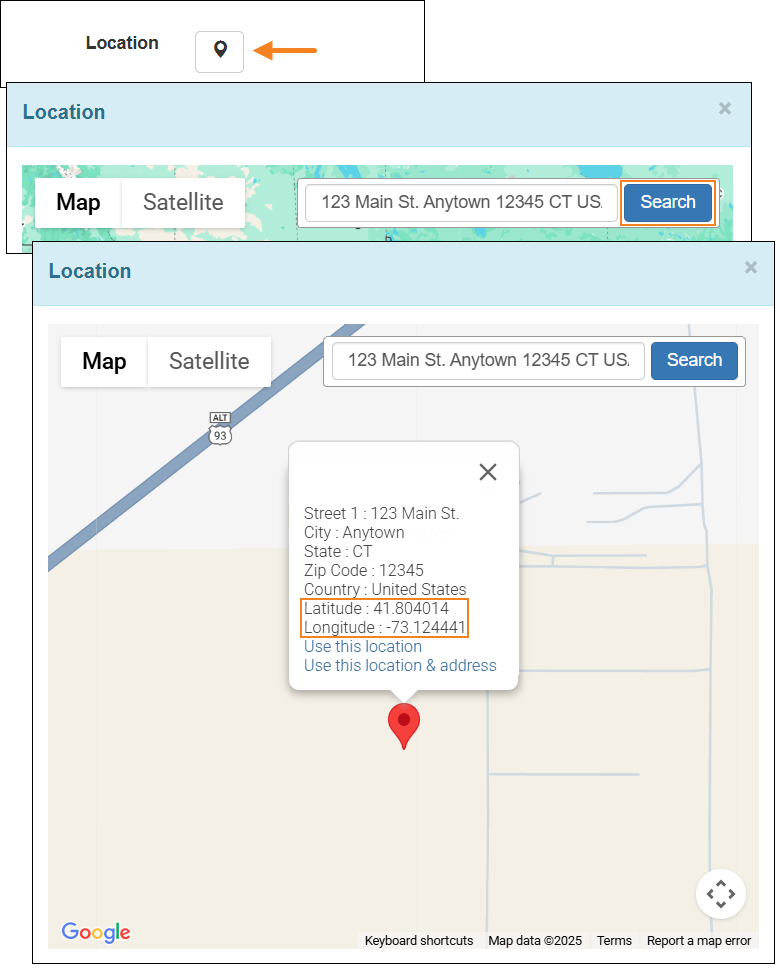
[Back to Top]- On the ‘Location’ pop-up, the map marker dialogue box will now include the Latitude and Longitude information of the coordinate.
General Event Reports (GER)
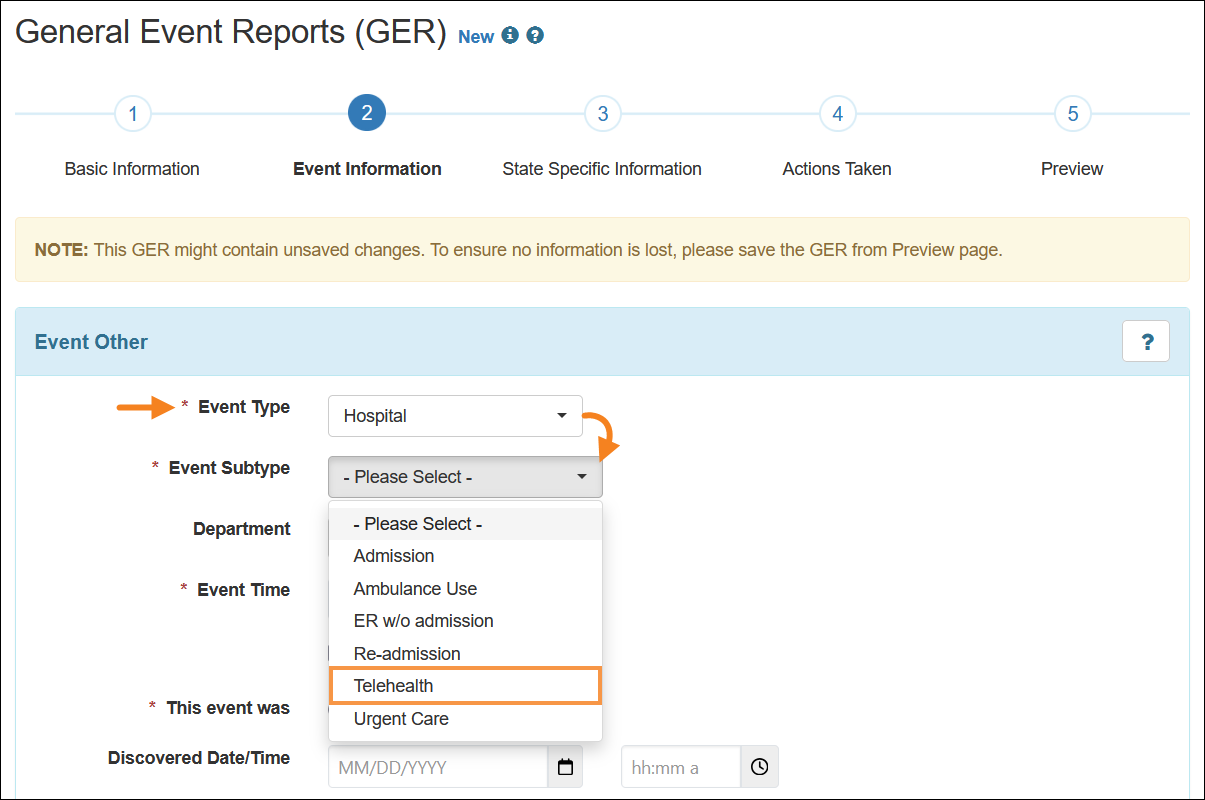
[Back to Top]- A new option titled Telehealth will now be available in the Event Subtype dropdown field, if the Event Type of Other Event GER is selected as 'Hospital'.
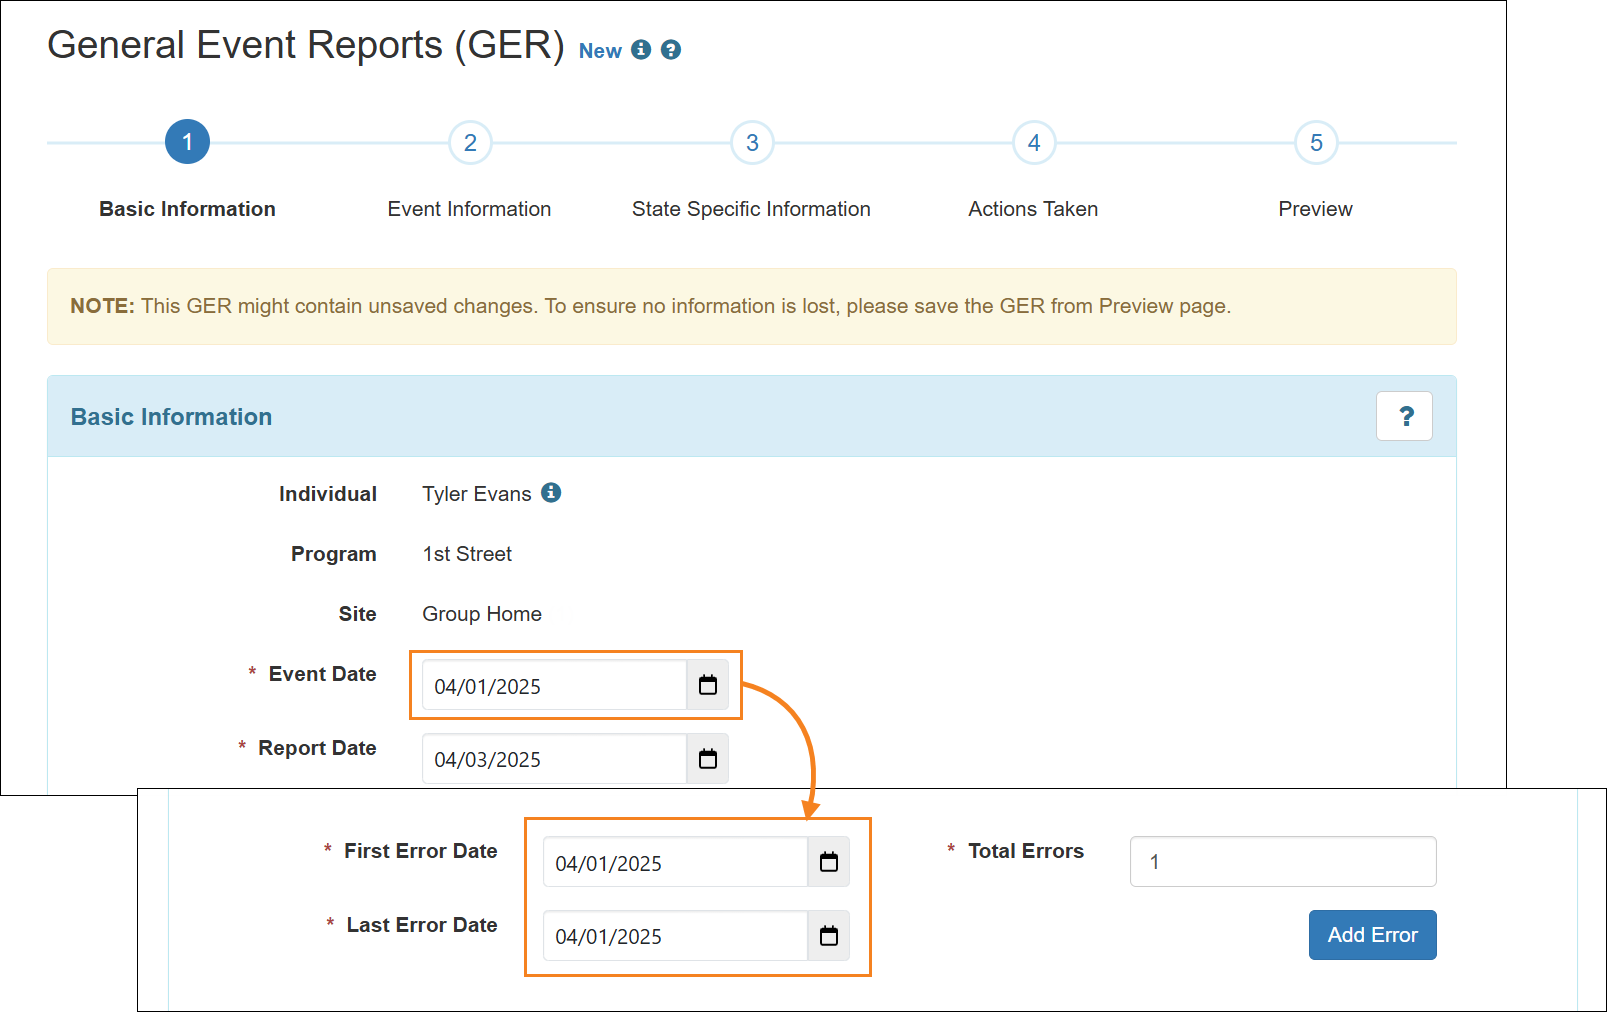
- The First Error Date and Last Error Date fields on the 'Event Information' page for GERs with the Medication Error event type will now pre-populate from the Event Date field in the 'Basic Information' page.
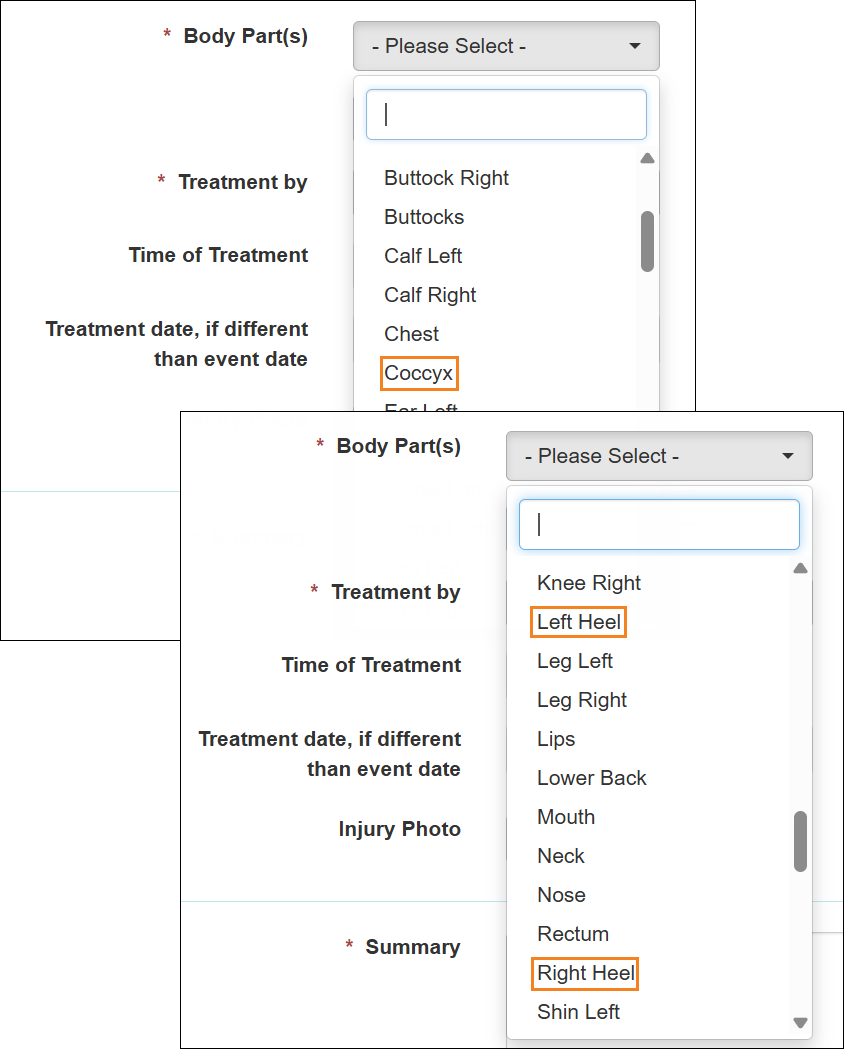
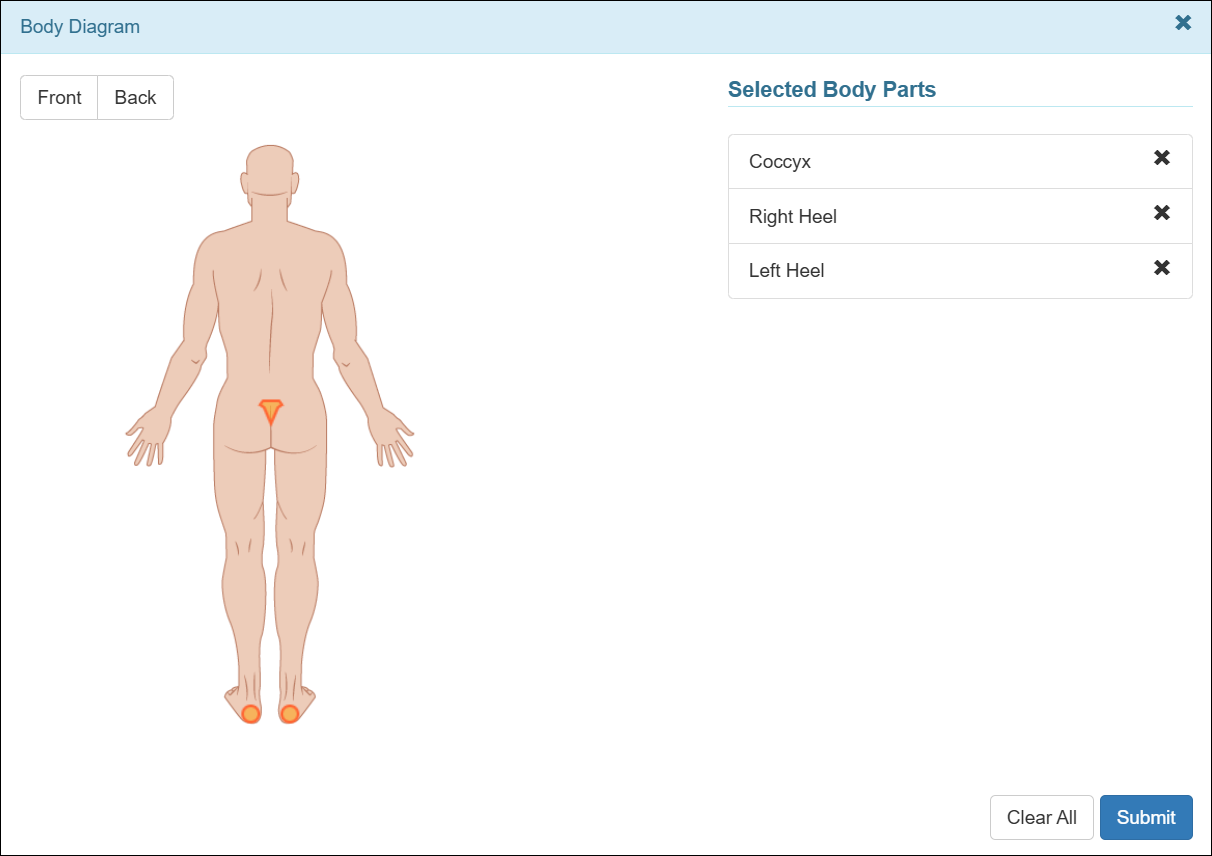
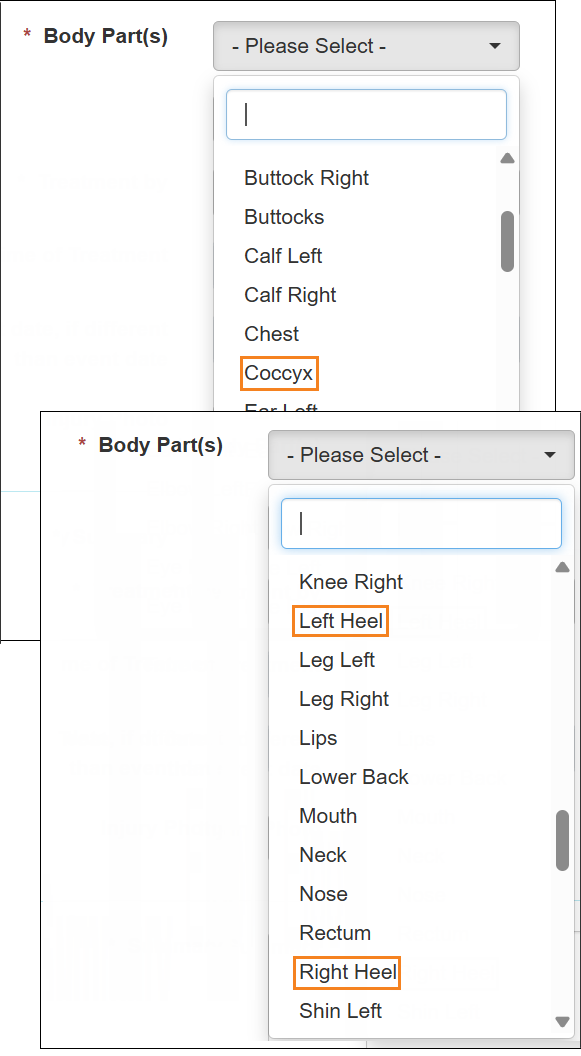
- The following new options have been added to the Body Part(s) dropdown field and the Body Diagram in the Event Information page for GER Injury Events:
- Coccyx
- Left Heel
- Right Heel
- If the user selected in the Witness(es) dropdown field has been deactivated or deleted, the error message regarding prior approval of the associated Witness form will no longer be displayed when approving the GER.
GER Resolution
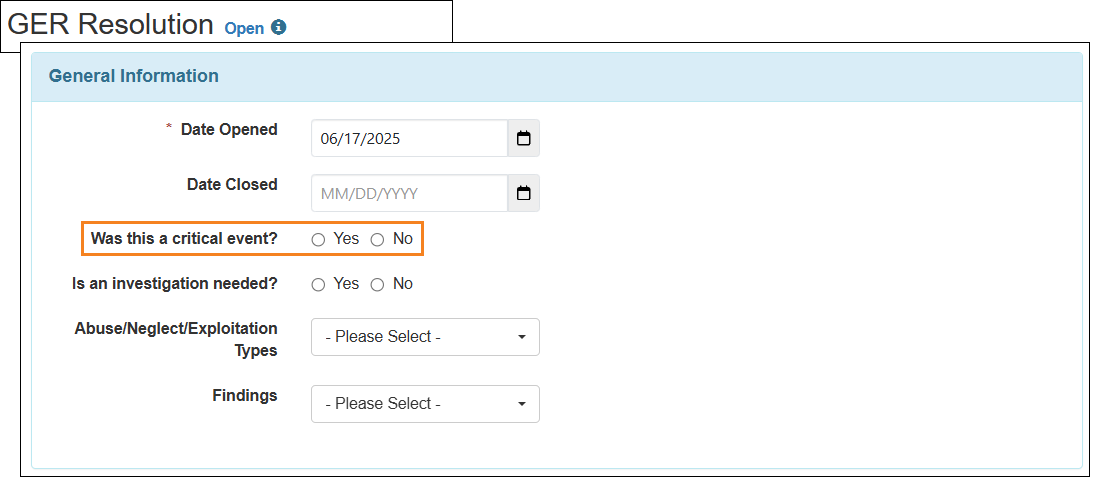
[Back to Top]- The radio buttons for the Was this a critical event? field within the GER Resolution form can now be deselected.
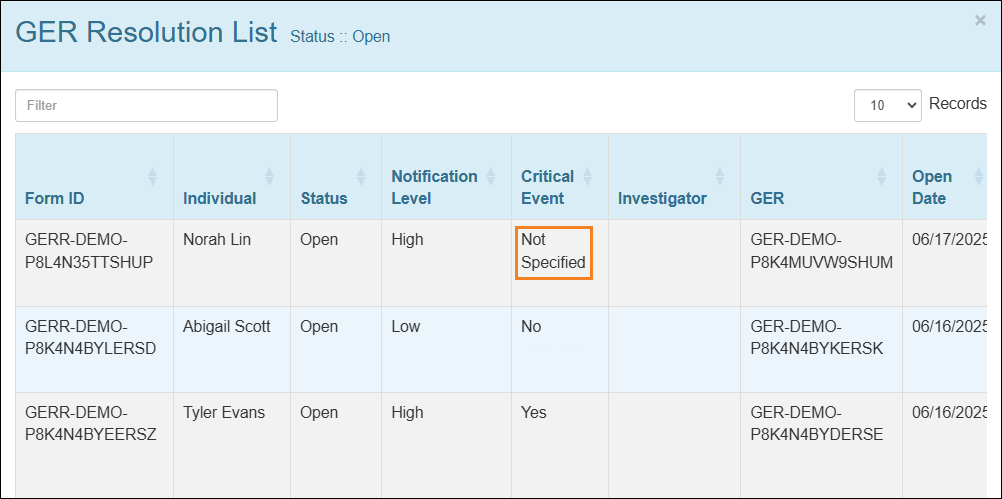
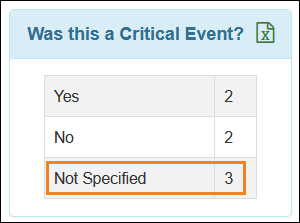
- In the GER Resolution Dashboard, the Critical Event column on the ‘GER Resolution List’ page will now display ‘Not Specified’ if no option in the Was this a critical event? field was selected in the corresponding GER Resolution. Prior to this release, the Critical Event column remained blank if no option was selected in the Was this a critical event? field of the GER Resolution.
- A new ‘Not Specified’ option has been added in the ‘Was this a Critical Event?’ section of the GER Resolution Dashboard.
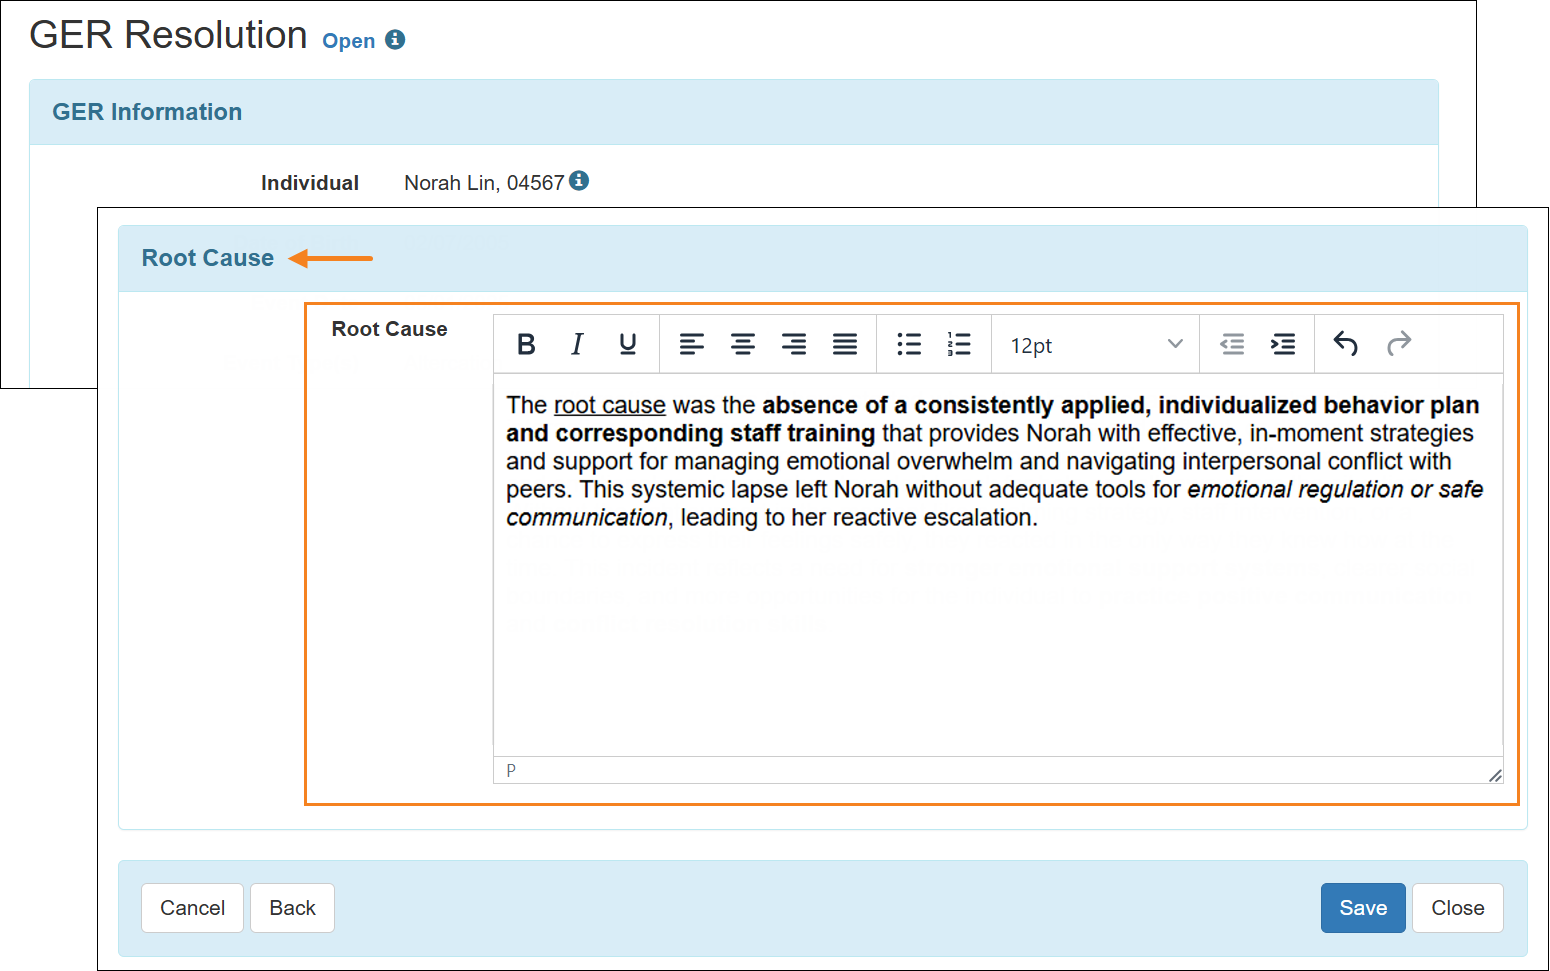
- A new section titled ‘Root Cause’ including the Root Cause rich text field has been added at the bottom of the GER Resolution form.
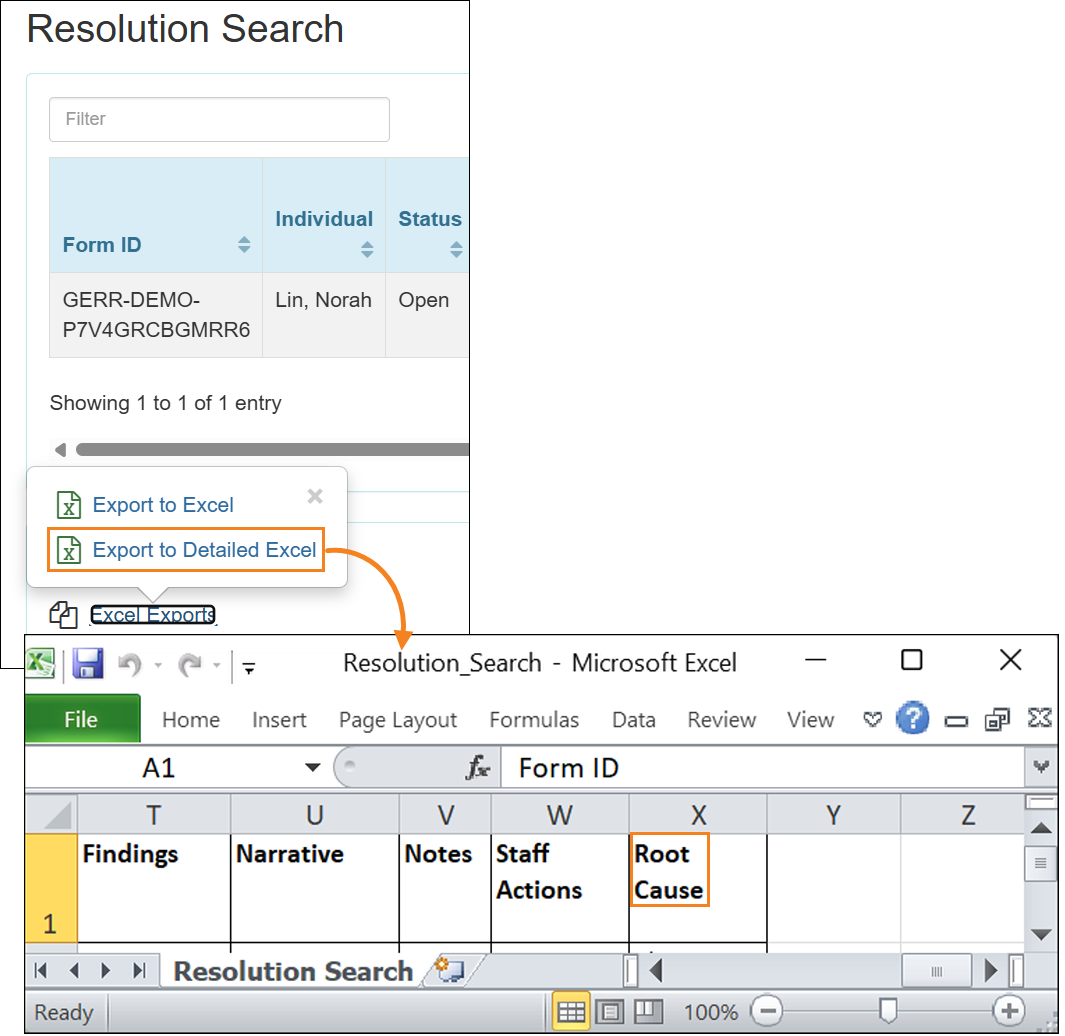
- A new column titled Root Cause has been added to the Detailed Excel exported from the ‘GER Resolution Search’ results page.
Help & Support Site
[Back to Top]- As of this release, users will be required to log into their Therap account to access the majority of the Therap Help & Support site materials. The only exceptions are the following Help & Support site pages:
- Help and Support Site Home Page
- State-Specific Pages
- Module and Training Overview Pages
- Events Page
- User Guides and Videos for essential functions like Login, Password Reset, 2-Factor Authentication (2FA), and Single Sign-On (SSO)
- Therap reserves the right to modify login requirements for any Help & Support materials in the future.

Health Passport
[Back to Top]- The ‘Major Safety Issues & Risk Factors’ mentioned in the table below will now appear as checked on an individual’s Health Passport if any of the listed ICD-10 Diagnosis Codes are added as active diagnoses on that individual’s ‘Diagnosis List’:
Major Safety Issues & Risk Factors ICD-10 Diagnosis Code/Description Asthma/COPD J44.0 - Chronic obstructive pulmonary disease with (acute) lower respiratory infection (Billable) J44.1 - Chronic obstructive pulmonary disease with (acute) exacerbation (Billable) J44.8 - Other specified chronic obstructive pulmonary disease J44.9 - Chronic obstructive pulmonary disease, unspecified (Billable) J45 - Asthma J45.20 - Mild intermittent asthma, uncomplicated (Billable) J45.21 - Mild intermittent asthma with (acute) exacerbation (Billable) J45.22 - Mild intermittent asthma with status asthmaticus (Billable) J45.30 - Mild persistent asthma, uncomplicated (Billable) J45.31 - Mild persistent asthma with (acute) exacerbation (Billable) J45.32 - Mild persistent asthma with status asthmaticus (Billable) J45.40 - Moderate persistent asthma, uncomplicated (Billable) J45.41 - Moderate persistent asthma with (acute) exacerbation (Billable) J45.42 - Moderate persistent asthma with status asthmaticus (Billable) J45.50 - Severe persistent asthma, uncomplicated (Billable) J45.51 - Severe persistent asthma with (acute) exacerbation (Billable) J45.52 - Severe persistent asthma with status asthmaticus (Billable) J45.901 - Unspecified asthma with (acute) exacerbation (Billable) J45.902 - Unspecified asthma with status asthmaticus (Billable) J45.909 - Unspecified asthma, uncomplicated (Billable) CPAP/Sleep Apnea G47.30 - Sleep apnea, unspecified (Billable) G47.31 - Primary central sleep apnea (DSM-5) (Billable) G47.33 - Obstructive sleep apnea (adult) (pediatric) (DSM-5) (Billable) G47.37 - Central sleep apnea in conditions classified elsewhere (DSM-5) (Billable) G47.39 - Other sleep apnea (Billable) Z99.89 - Dependence on other enabling machines and devices (Billable) Substance Abuse F19.10 - Other psychoactive substance abuse, uncomplicated (DSM-5) (Billable) F19.11 - Other psychoactive substance abuse, in remission (DSM-5) (Billable) F19.120 - Other psychoactive substance abuse with intoxication, uncomplicated (Billable) F19.121 - Other psychoactive substance abuse with intoxication delirium (DSM-5) (Billable) F19.122 - Other psychoactive substance abuse with intoxication with perceptual disturbances (Billable) F19.129 - Other psychoactive substance abuse with intoxication, unspecified (DSM-5) (Billable) F19.130 - Other psychoactive substance abuse with withdrawal, uncomplicated (DSM-5) (Billable) F19.131 - Other psychoactive substance abuse with withdrawal delirium (DSM-5) (Billable) F19.132 - Other psychoactive substance abuse with withdrawal with perceptual disturbance (DSM-5) (Billable) F19.139 - Other psychoactive substance abuse with withdrawal, unspecified (DSM-5) (Billable) F19.14 - Other psychoactive substance abuse with psychoactive substance-induced mood disorder (DSM-5) (Billable) F19.150 - Other psychoactive substance abuse with psychoactive substance-induced psychotic disorder with delusions (Billable) F19.151 - Other psychoactive substance abuse with psychoactive substance-induced psychotic disorder with hallucinations (Billable) F19.159 - Other psychoactive substance abuse with psychoactive substance-induced psychotic disorder, unspecified (DSM-5) (Billable) F19.16 - Other psychoactive substance abuse with psychoactive substance-induced persisting amnestic disorder (Billable) F19.17 - Other psychoactive substance abuse with psychoactive substance-induced persisting dementia (DSM-5) (Billable) F19.180 - Other psychoactive substance abuse with psychoactive substance-induced anxiety disorder (DSM-5) (Billable) F19.181 - Other psychoactive substance abuse with psychoactive substance-induced sexual dysfunction (DSM-5) (Billable) F19.182 - Other psychoactive substance abuse with psychoactive substance-induced sleep disorder (DSM-5) (Billable) F19.188 - Other psychoactive substance abuse with other psychoactive substance-induced disorder (DSM-5) (Billable) F19.19 - Other psychoactive substance abuse with unspecified psychoactive substance-induced disorder (Billable) Tobacco Use F17.200 - Nicotine dependence, unspecified, uncomplicated (DSM-5) (Billable) F17.201 - Nicotine dependence, unspecified, in remission (DSM-5) (Billable) F17.203 - Nicotine dependence unspecified, with withdrawal (DSM-5) (Billable) F17.208 - Nicotine dependence, unspecified, with other nicotine-induced disorders (DSM-5) (Billable) F17.209 - Nicotine dependence, unspecified, with unspecified nicotine-induced disorders (DSM-5) (Billable) F17.210 - Nicotine dependence, cigarettes, uncomplicated (Billable) F17.211 - Nicotine dependence, cigarettes, in remission (Billable) F17.213 - Nicotine dependence, cigarettes, with withdrawal (Billable) F17.218 - Nicotine dependence, cigarettes, with other nicotine-induced disorders (Billable) F17.219 - Nicotine dependence, cigarettes, with unspecified nicotine-induced disorders (Billable) F17.220 - Nicotine dependence, chewing tobacco, uncomplicated (Billable) F17.221 - Nicotine dependence, chewing tobacco, in remission (Billable) F17.223 - Nicotine dependence, chewing tobacco, with withdrawal (Billable) F17.228 - Nicotine dependence, chewing tobacco, with other nicotine-induced disorders (Billable) F17.229 - Nicotine dependence, chewing tobacco, with unspecified nicotine-induced disorders (Billable) F17.290 - Nicotine dependence, other tobacco product, uncomplicated (Billable) F17.291 - Nicotine dependence, other tobacco product, in remission (Billable) F17.293 - Nicotine dependence, other tobacco product, with withdrawal (Billable) F17.298 - Nicotine dependence, other tobacco product, with other nicotine-induced disorders (Billable) F17.299 - Nicotine dependence, other tobacco product, with unspecified nicotine-induced disorders (Billable) 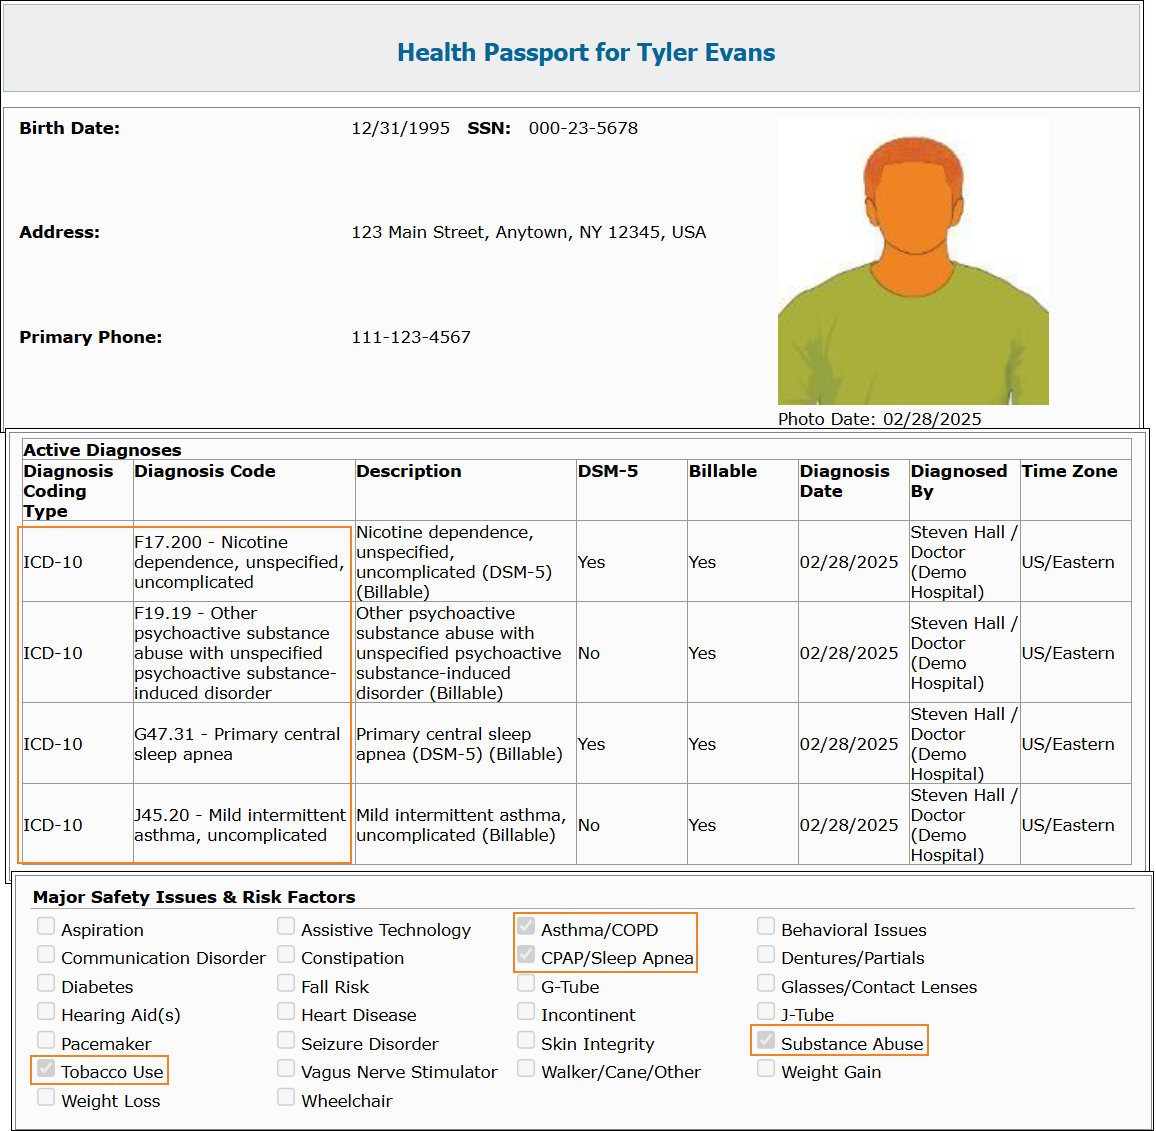
Health Tracking
Blood Glucose
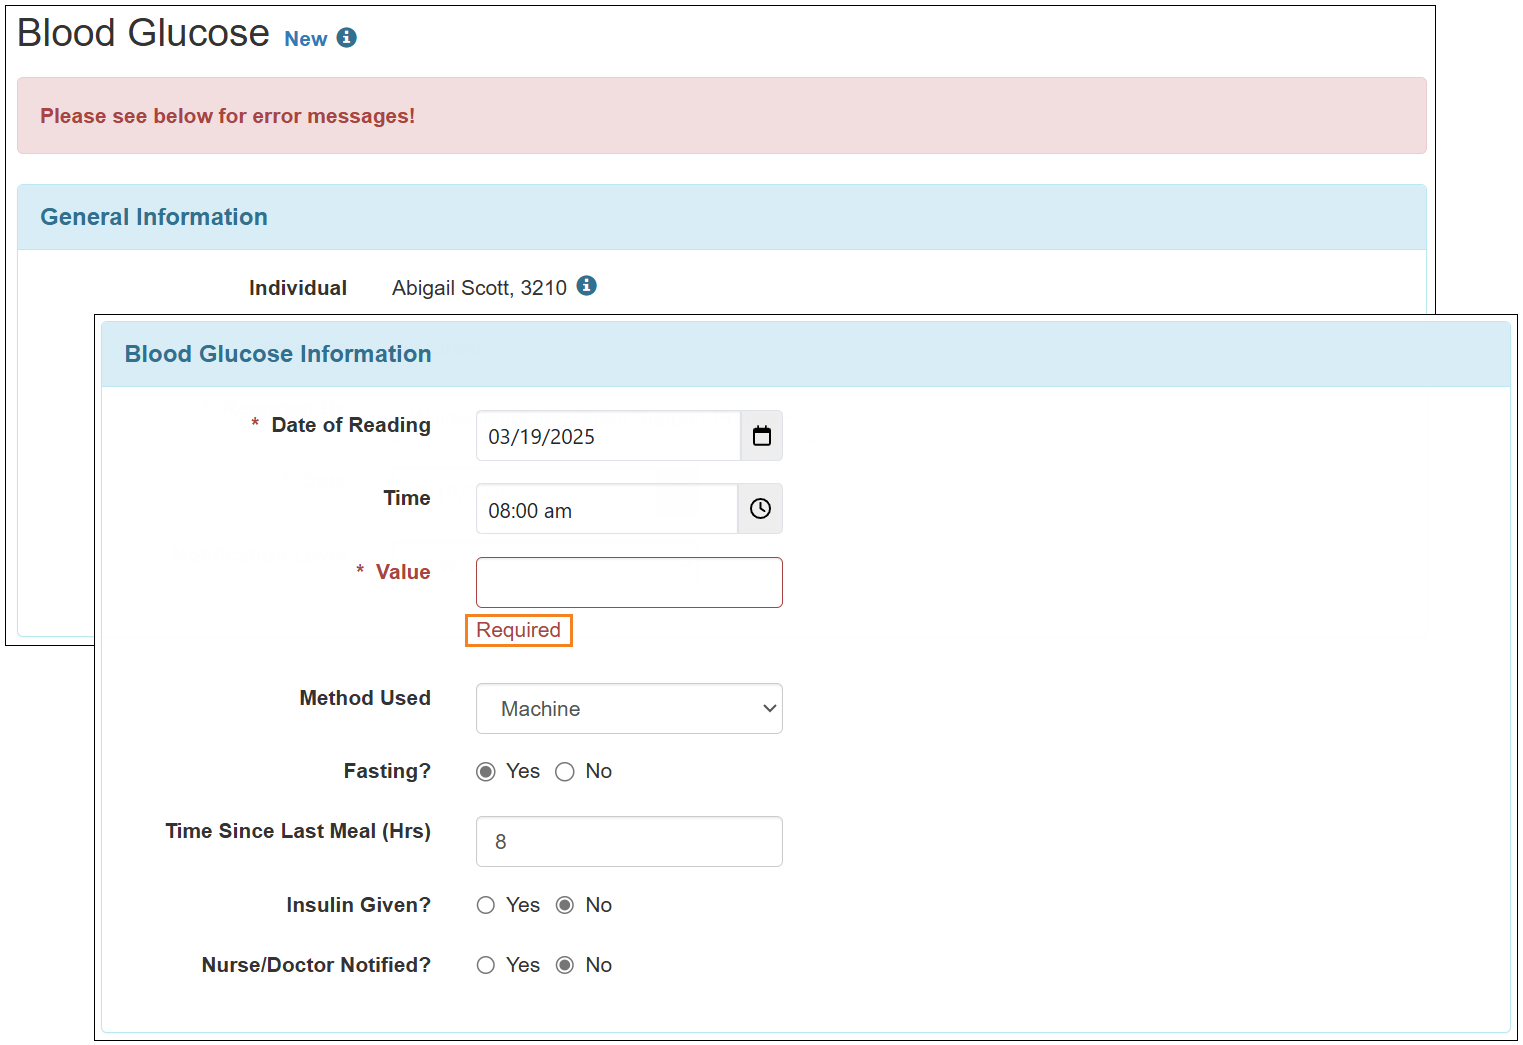
[Back to Top]- A 'Required' validation message will now be displayed if users attempt to save, submit, or update Blood Glucose forms without entering a Blood Glucose Value. For ‘In Prep’ or ‘Approved’ Blood Glucose forms without a Blood Glucose Value created before this release, the validation message will not appear when deleting the form.
- Users cannot enter a Value greater than 600 in the Blood Glucose form. If they do, the system will display the validation message: Cannot be greater than 600
For forms created before this release that contain a value above 600, any attempt to update or delete the form will trigger the same validation. The Value must be adjusted to 600 or below before the form can be updated or deleted.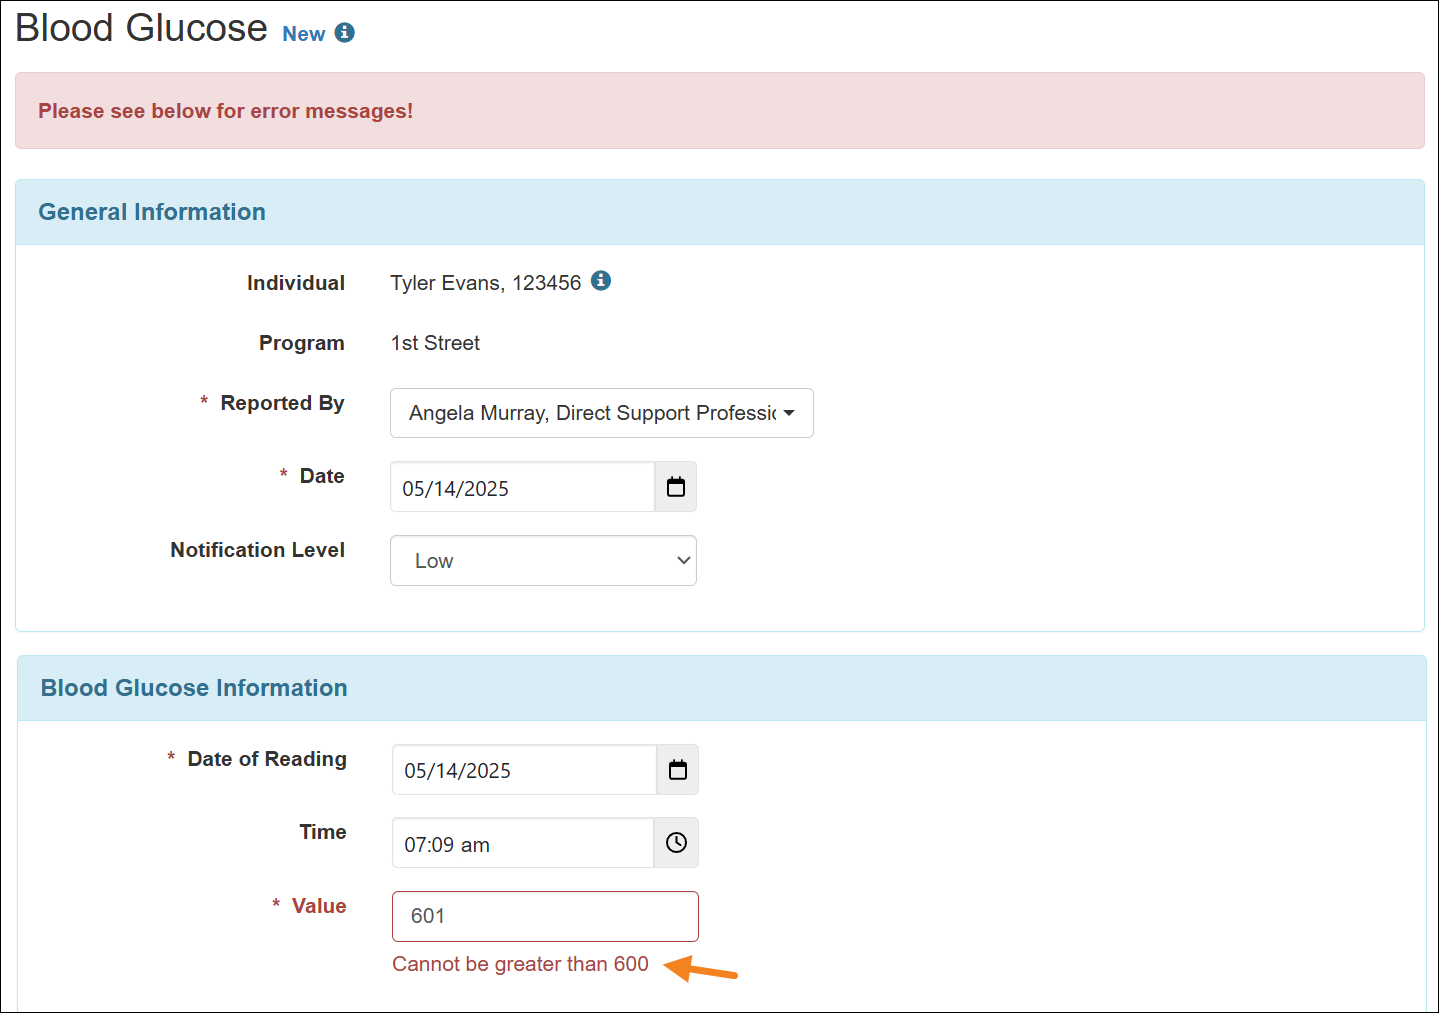
Immunization
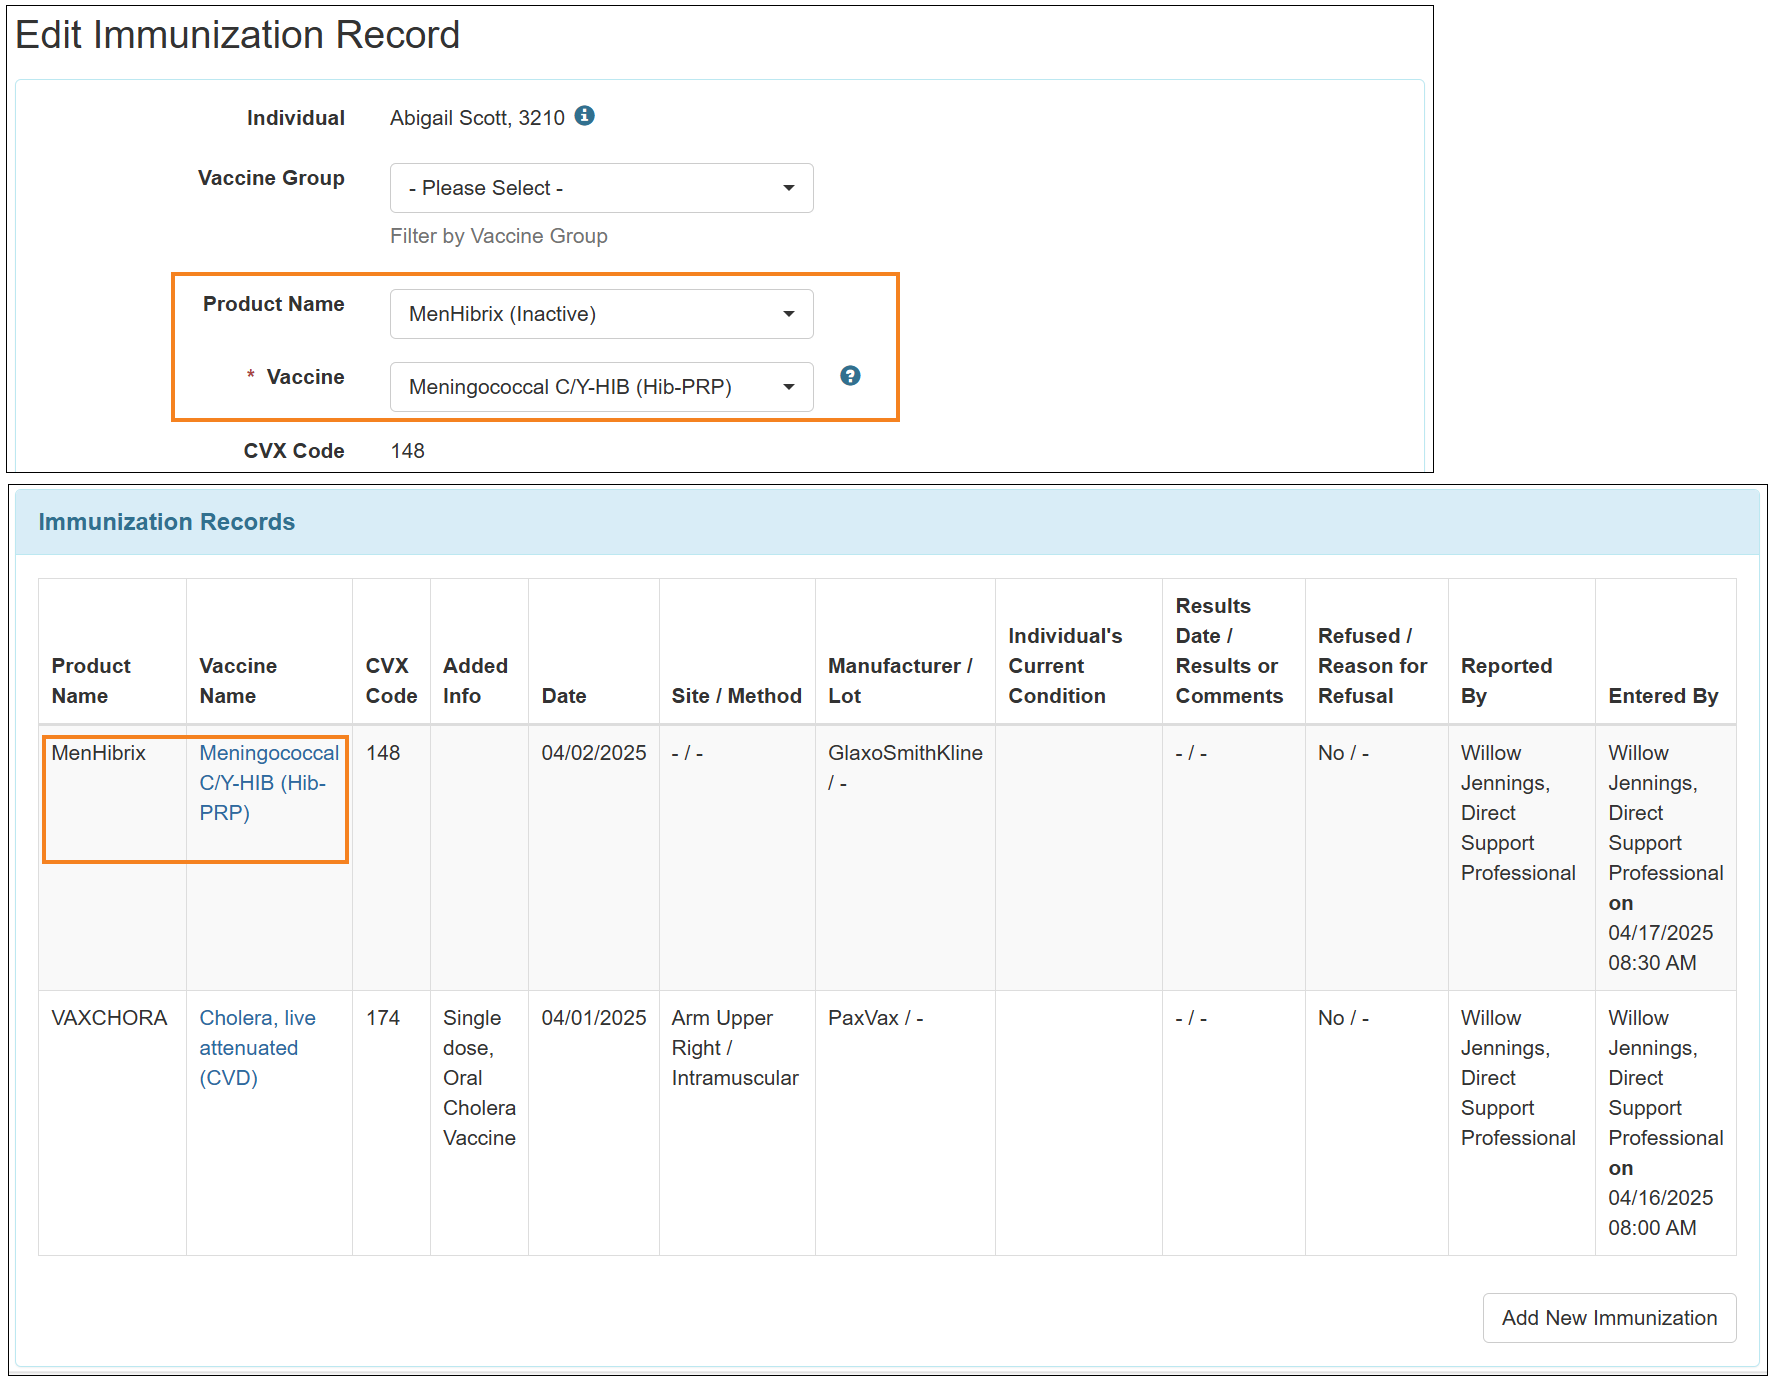
[Back to Top]- A new ‘Help’ icon has been added next to the Vaccine field.
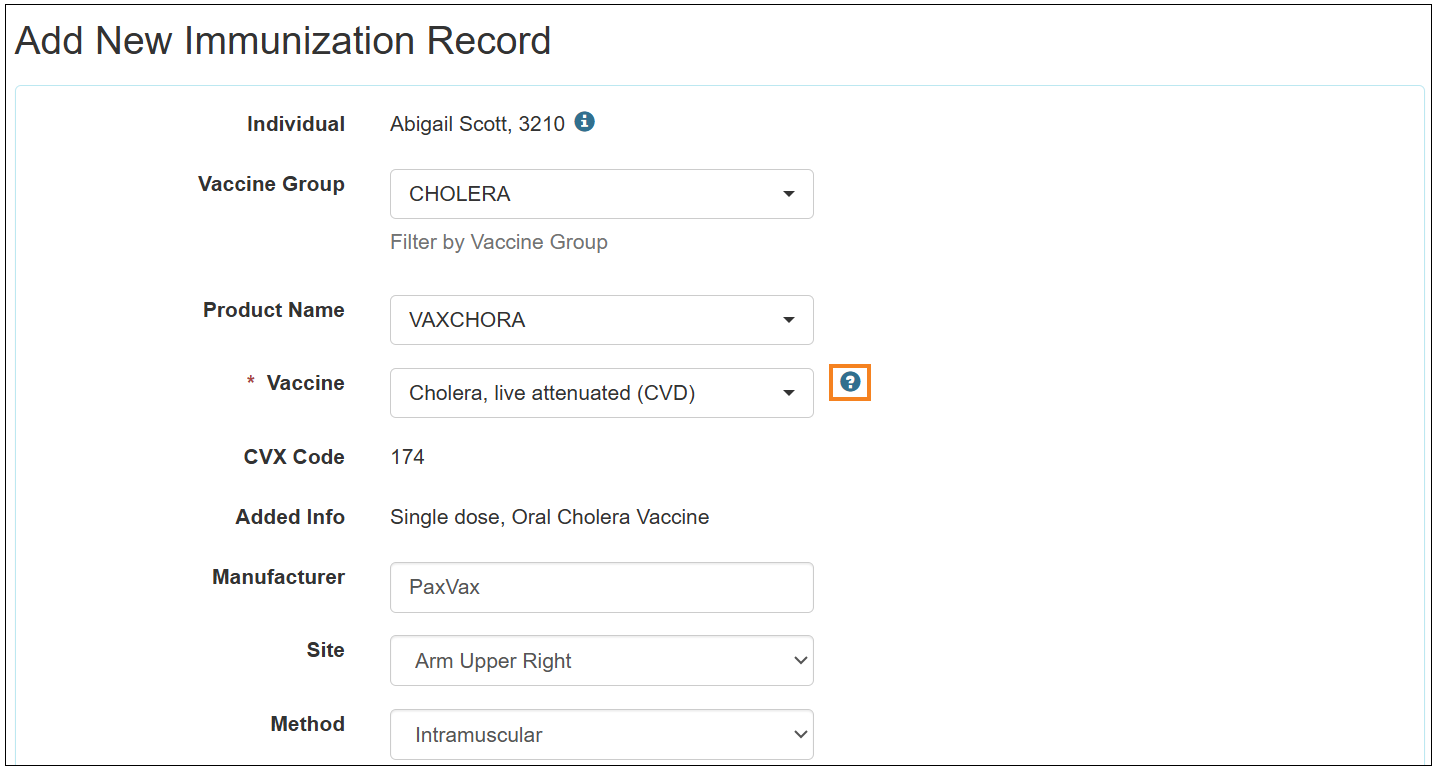
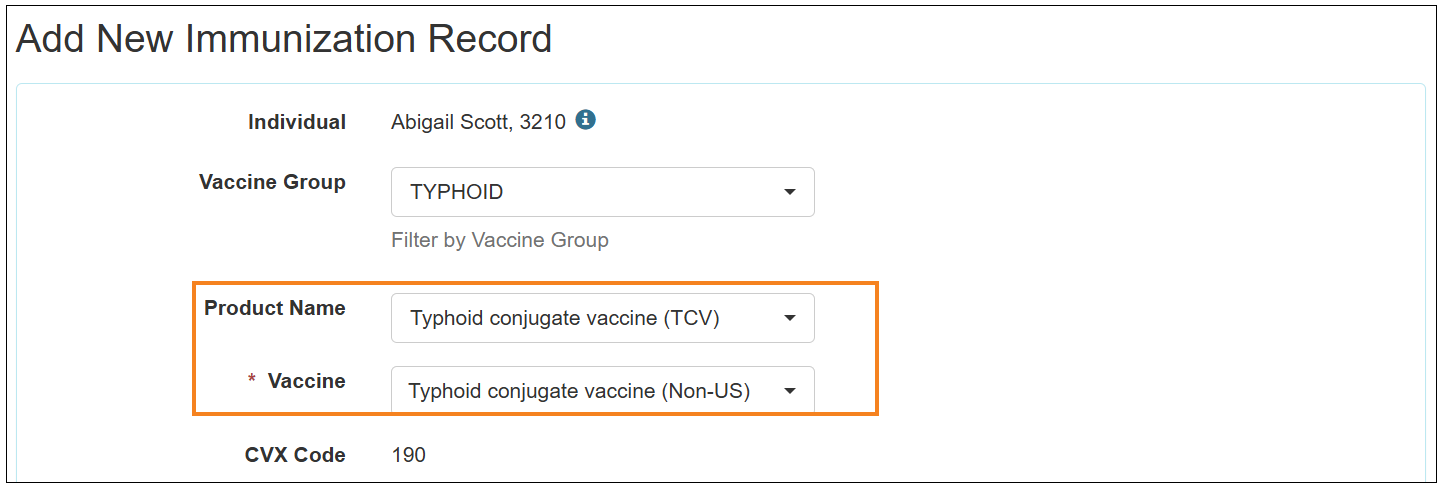
- The ‘Vaccine’ list in the ‘Add New Immunization Record’, ‘Edit Immunization Record’, and ‘Immunization Search’ pages will be sorted based on the ‘Active’, ‘Inactive’, and ‘Non-US’ Vaccine status. Additionally, the product names in the ‘Product Name’ dropdown list in the ‘Add New Immunization Record’ and ‘Edit Immunization Record’ pages will be sorted based on the ‘Active’, ‘Inactive’, and ‘Non-US’ Product status. Both the ‘Add New Immunization Record’ and ‘Edit Immunization Record’ pages will display the vaccine and product statuses.
- The Product Name column in the ‘Immunization’ form, ‘Immunization Search’ results page, ‘Health Tracking Detailed Report’, and ‘Health Care Report’ will now display only the Product Name without the Product Status. The Immunizations appearing in the ‘Upcoming’ and 'Overdue' sections of the Individual Home Page will show only the Product Name, not the Product Status.
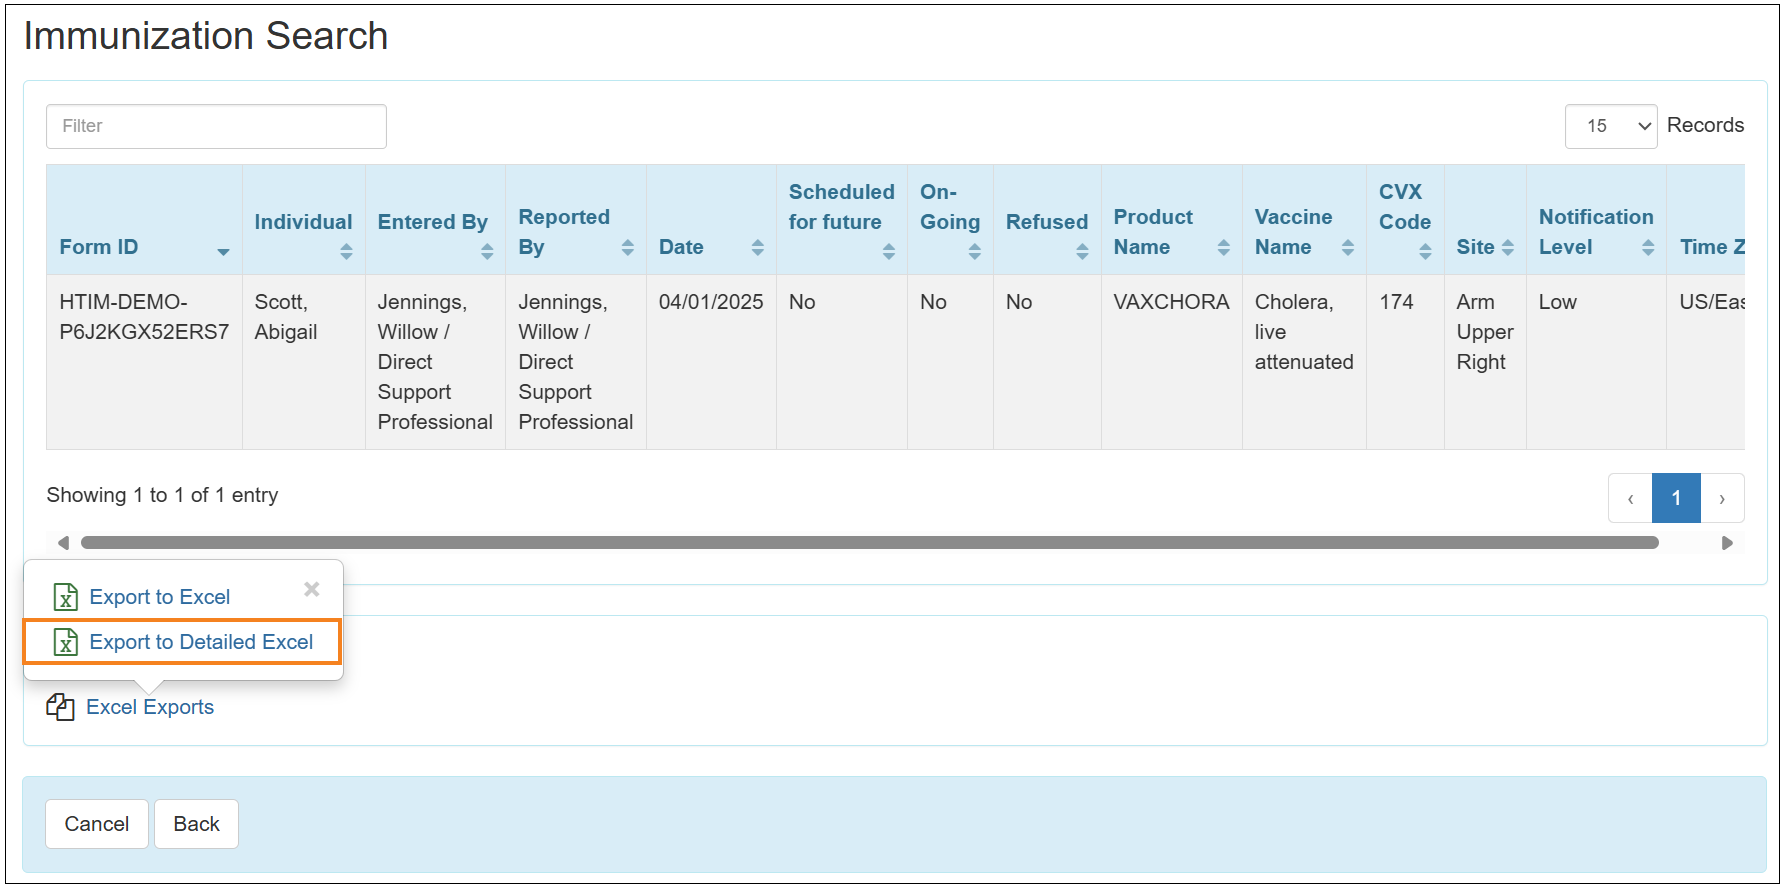
- The Method field has been removed from the ‘Immunization Search’ page.

- The Added Info and Method columns have been removed from the ‘Immunization Search’ results page. Users will now be able to Export the Immunization Search Results to a Detailed Excel report using the Export to Detailed Excel link.
Infection Tracking
[Back to Top]- The following new options have been added to the Body Part(s) dropdown field in the Infection Tracking forms:
- Coccyx
- Left Heel
- Right Heel
Skin/Wound
[Back to Top]- The following new options have been added to the Body Diagram in the Skin/Wound forms:
- Coccyx
- Left Heel
- Right Heel

Individual Demographic Form (IDF)
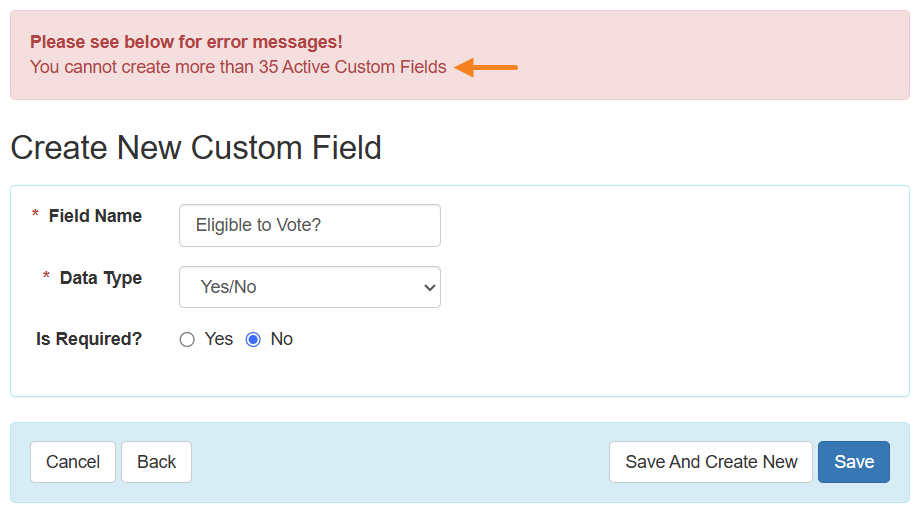
[Back to Top]- The number of active Custom Fields an agency can have at a time has been increased from 25 to 35.
Individual Home Page
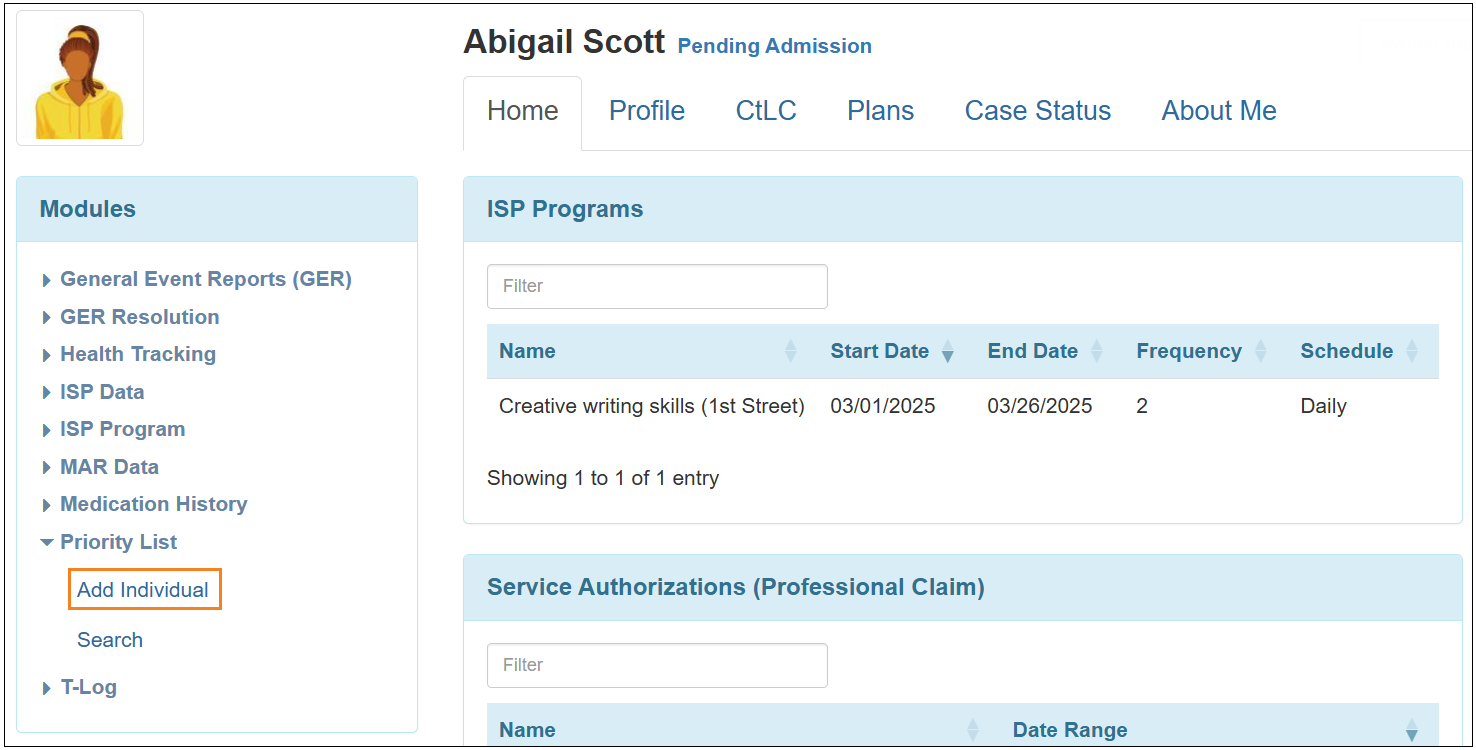
[Back to Top]- In the ‘Modules’ section on the Home tab, an Add Individual link has been added to the ‘Priority List’ dropdown list for individuals in ‘Pending Admission’ status.
Individual Plan
[Back to Top]- Users will now be able to edit the order of the items for the Enabled Sections field on the Plan Templates. The items can be re-ordered by dragging and dropping, or by clicking on the corresponding up and down arrows. This feature will be available in all editable Plan Templates.
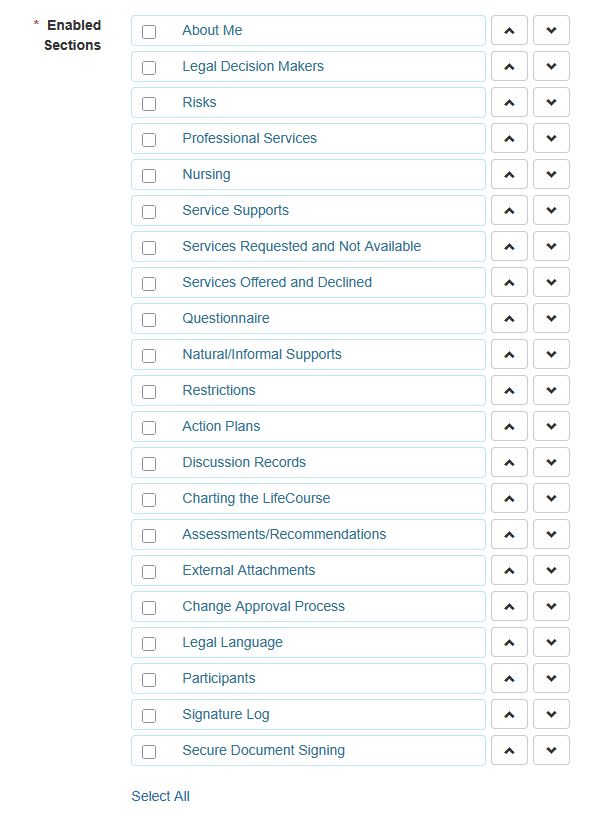
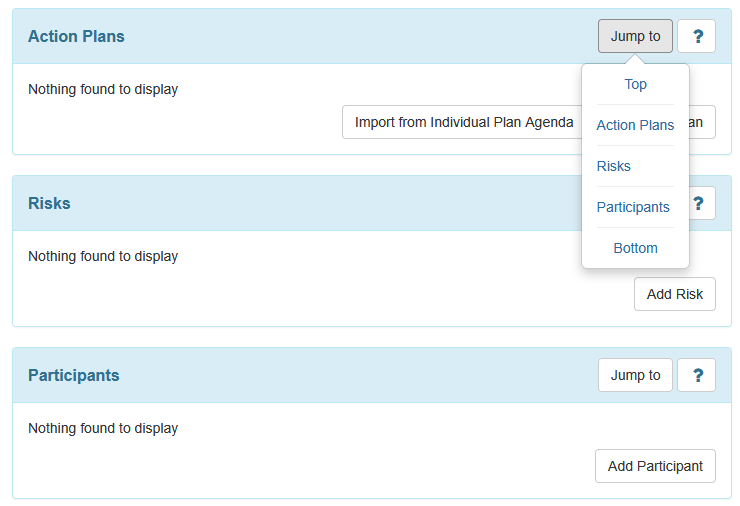
- The sections in Individual Plans and in the Jump To list of Individual Plans will appear following the order selected in the corresponding Plan Template.
ISP Program
[Back to Top]- From this release, Approved ISP Programs with End Dates older than 13 months from the current date will no longer be listed in the ‘ISP Program List’ page for submitting ISP Data.
- Users will now be able to view PDFs attached to the ‘Files & Images’ section in ISP Programs in PDF Viewer from the ISP Program acknowledgement pages.
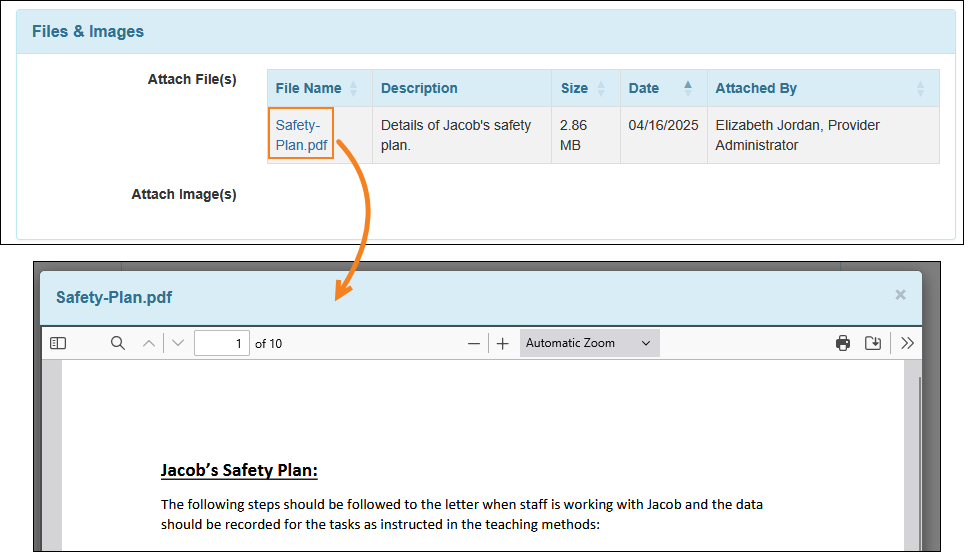
- In the read-only mode of ISP Programs and ISP Program Templates, users will now be able to view PDFs attached to the ‘Files & Images’ section in PDF Viewer.

Letter
[Back to Top]- A new field titled Font Size has been added to the Letter Templates. Users will be able select font sizes from the dropdown list.

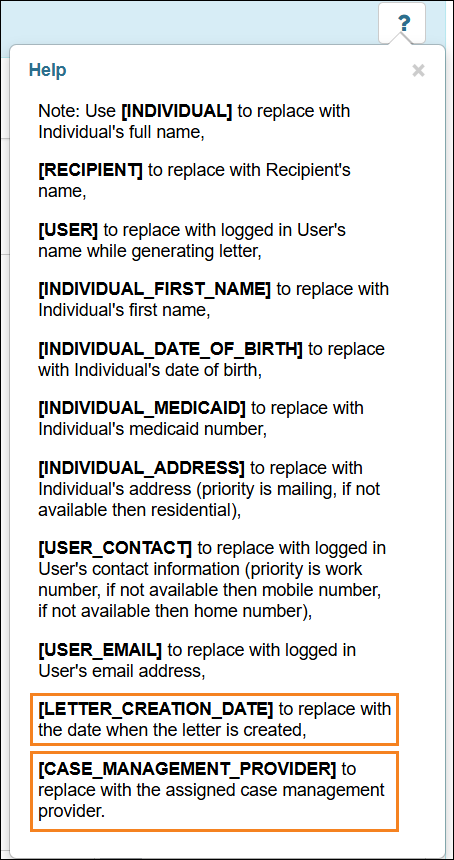
- Two new indicators with descriptions have been added in the 'Help' section of the dropdown box available by clicking on the ? button:
- [LETTER_CREATION_DATE] to replace with the date when the letter is created,
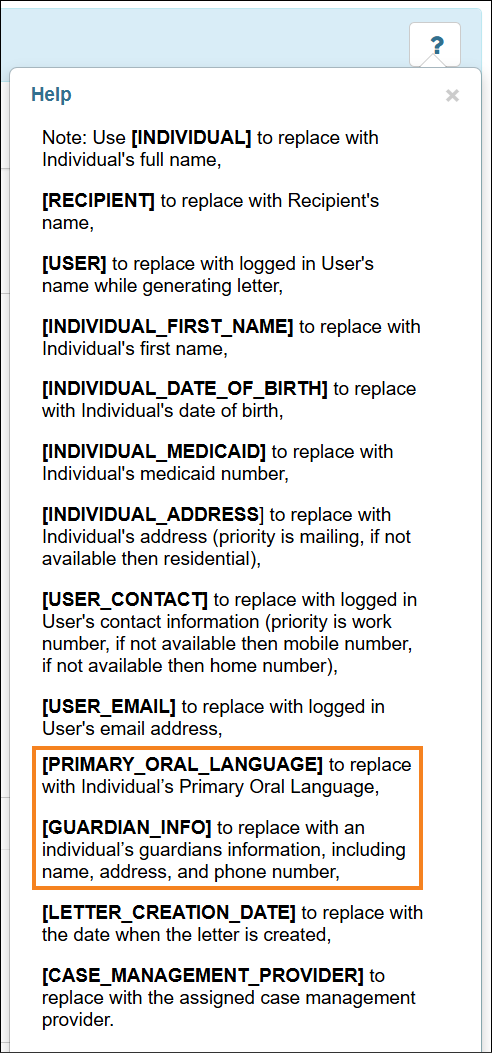
- Two new indicators with description have been added in the ‘Help’ popup message accessed by clicking on the ? button:
- [PRIMARY_ORAL_LANGUAGE] to replace with Individual’s Primary Oral Language,
- [GUARDIAN_INFO] to replace with an individual’s guardians information, including name, address, and phone number.
Bulk Letter Request New!
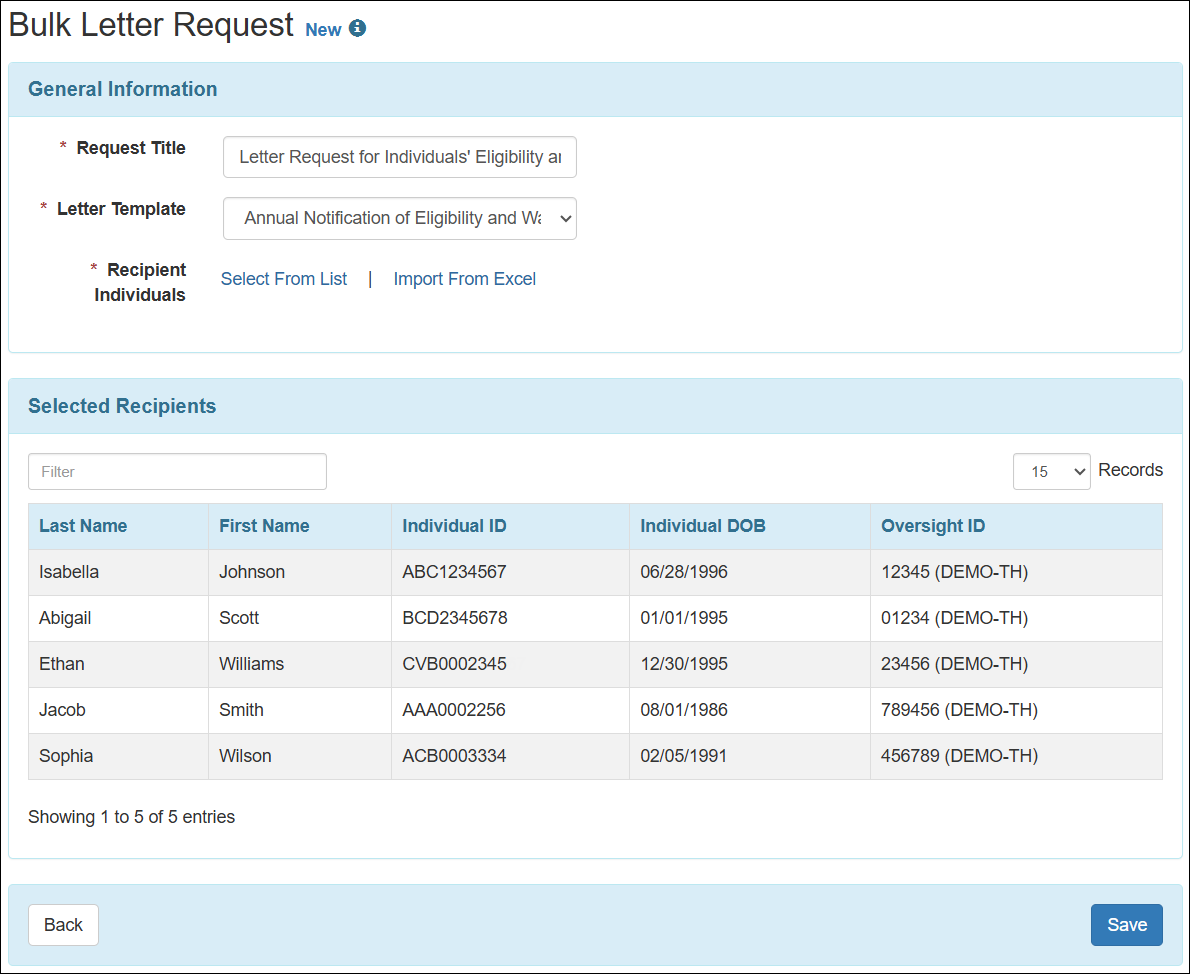
[Back to Top]- The Bulk Letter Request module has been introduced. Using this module, oversight users will be able to generate and send letters in bulk for the selected individuals.
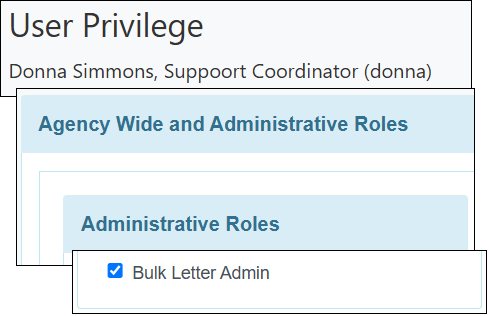
- A new Bulk Letter Admin administrative role has been added in the ‘Administrative Roles’ section in the ‘User Privilege’ page.
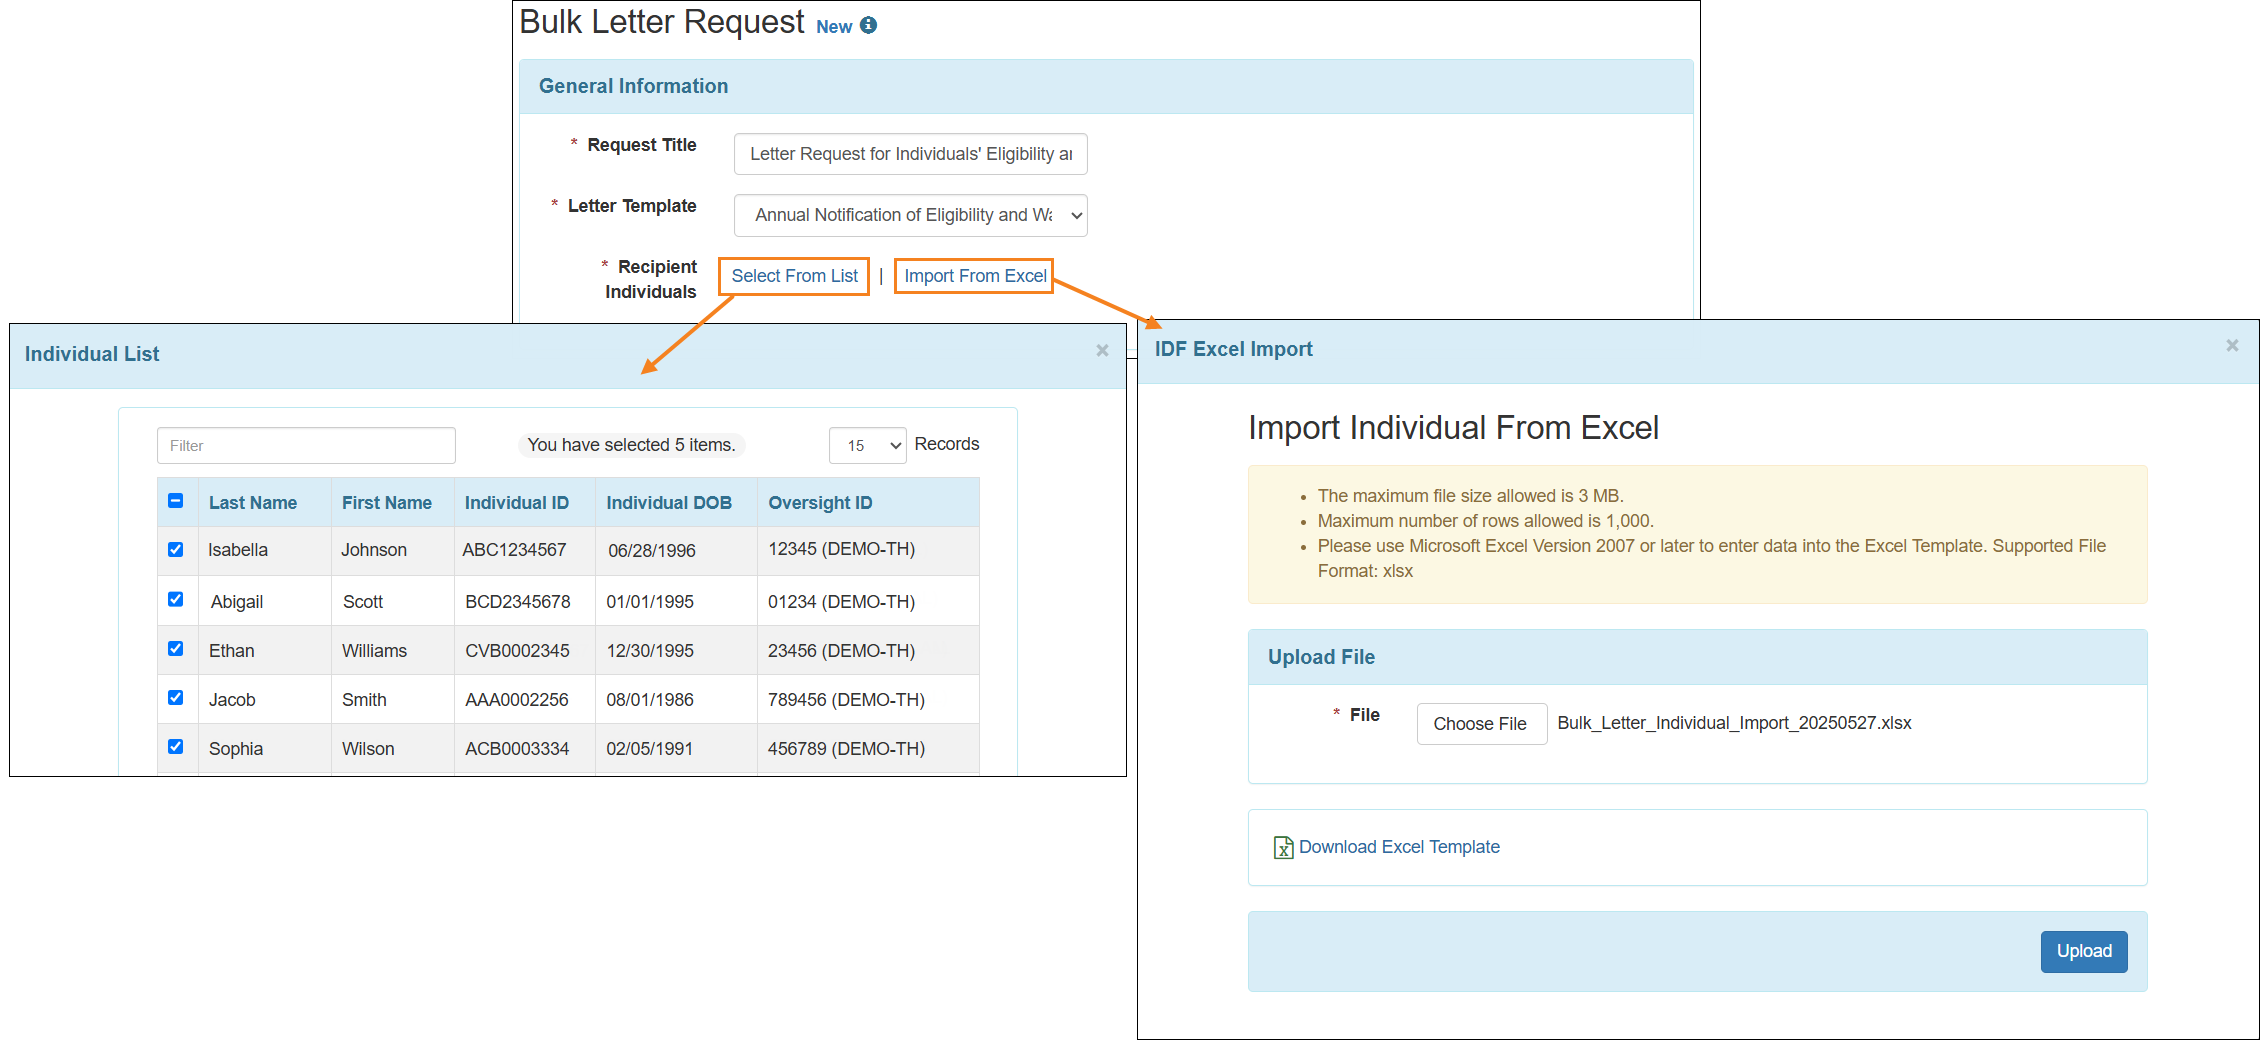
- On the Bulk Letter Request form, users will be able to request for generating letters for individuals by selecting a Letter Template and Recipient Individuals from the ‘Individual List’ pop up window accessed by clicking on the Select From List link or import individual using an Excel from the ‘IDF Excel Import’ pop-up window accessed by clicking on the Import from Excel link. A maximum of 1,000 individuals can be selected at a time for a request.
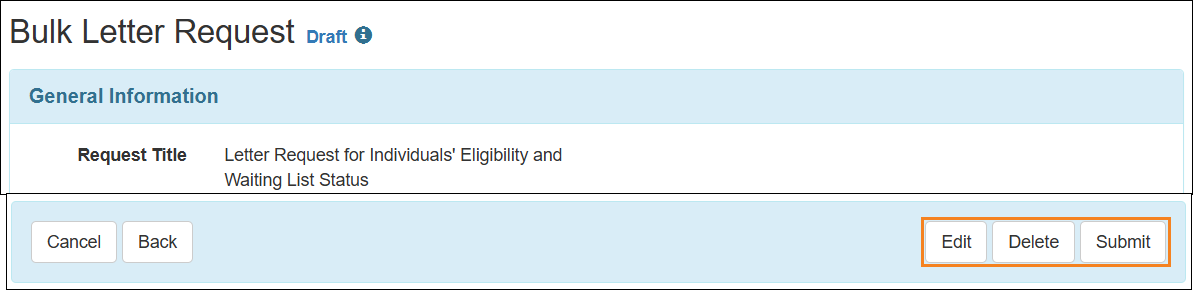
- Users will be able to Edit, Delete, or Submit a Bulk Letter Request form in ‘Draft’ status.
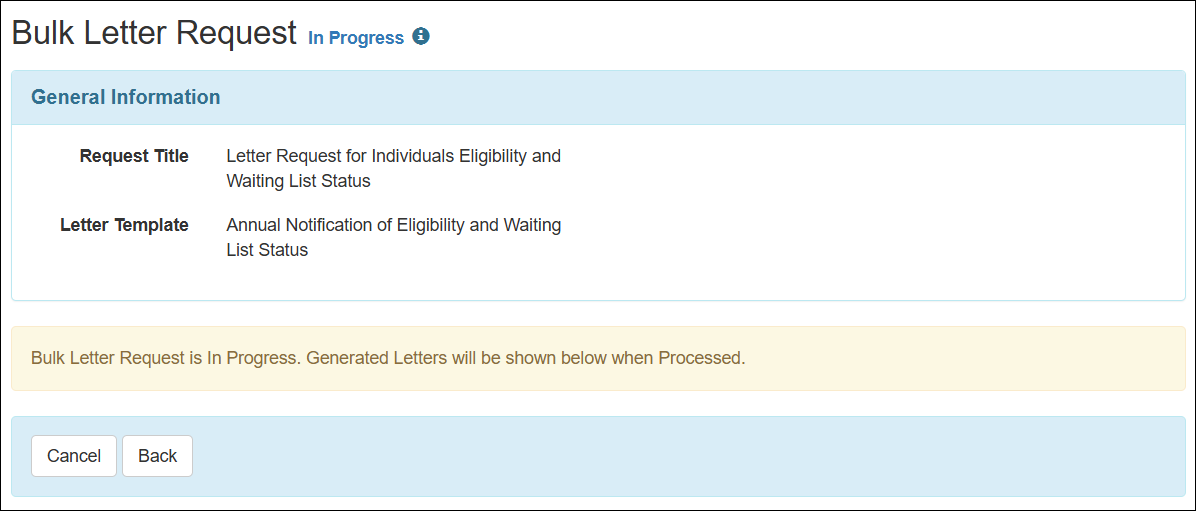
- The submitted form will be in ‘In Progress’ status. Users will not be able to take any further action until the letters are generated. The system will generate letters every hour. Once the letters are generated, the form will be in ‘Completed’ status.
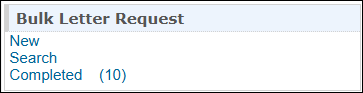
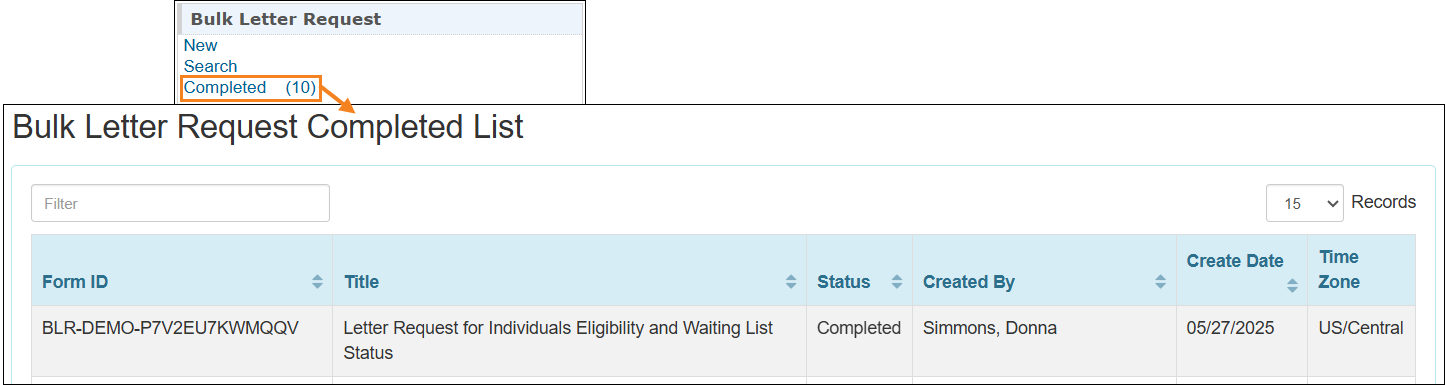
- The forms in ‘Completed’ status can be accessed from the ‘Bulk Letter Request Completed List’ page by clicking on the Completed link in the ‘Bulk Letter Request’ section.
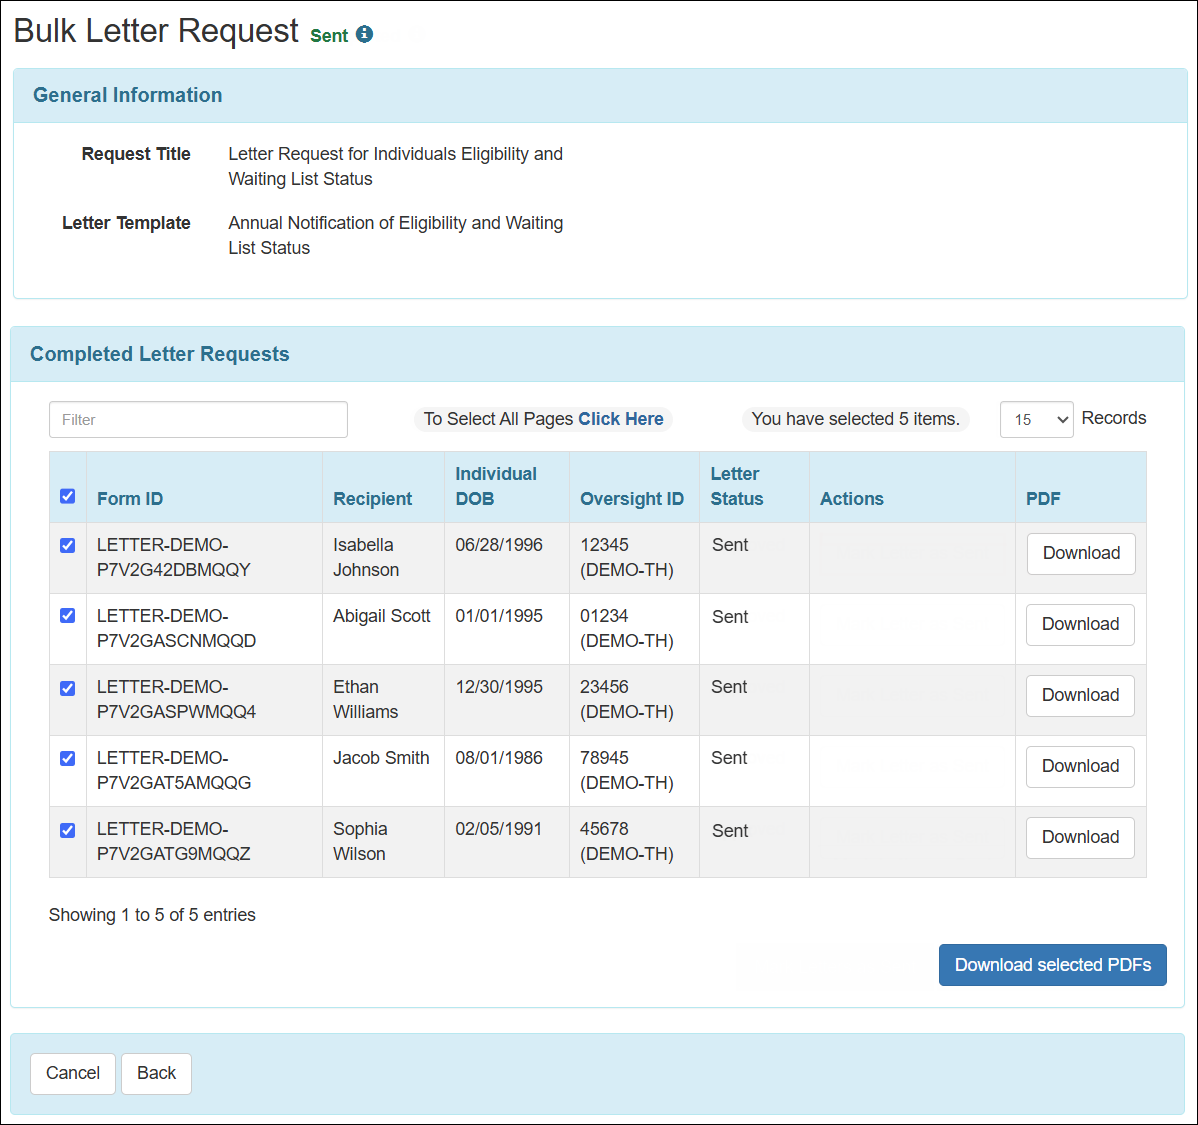
- Users will be able to take the following actions in the ‘Completed’ form:
- Send and download each letter clicking on the Mark Letter as Sent button in the Action column and the Download button in the PDF column, respectively.
- Send and download multiple letters at once by selecting them and clicking on the Mark Letters as Sent and Download Selected PDFs buttons, respectively.

- After a letter is marked as sent, the Letter Status will be changed to 'Sent'. Once all the letters have been sent, the Bulk Letter Request form will be in ‘Sent’ status. Users will then only be able to download PDFs.
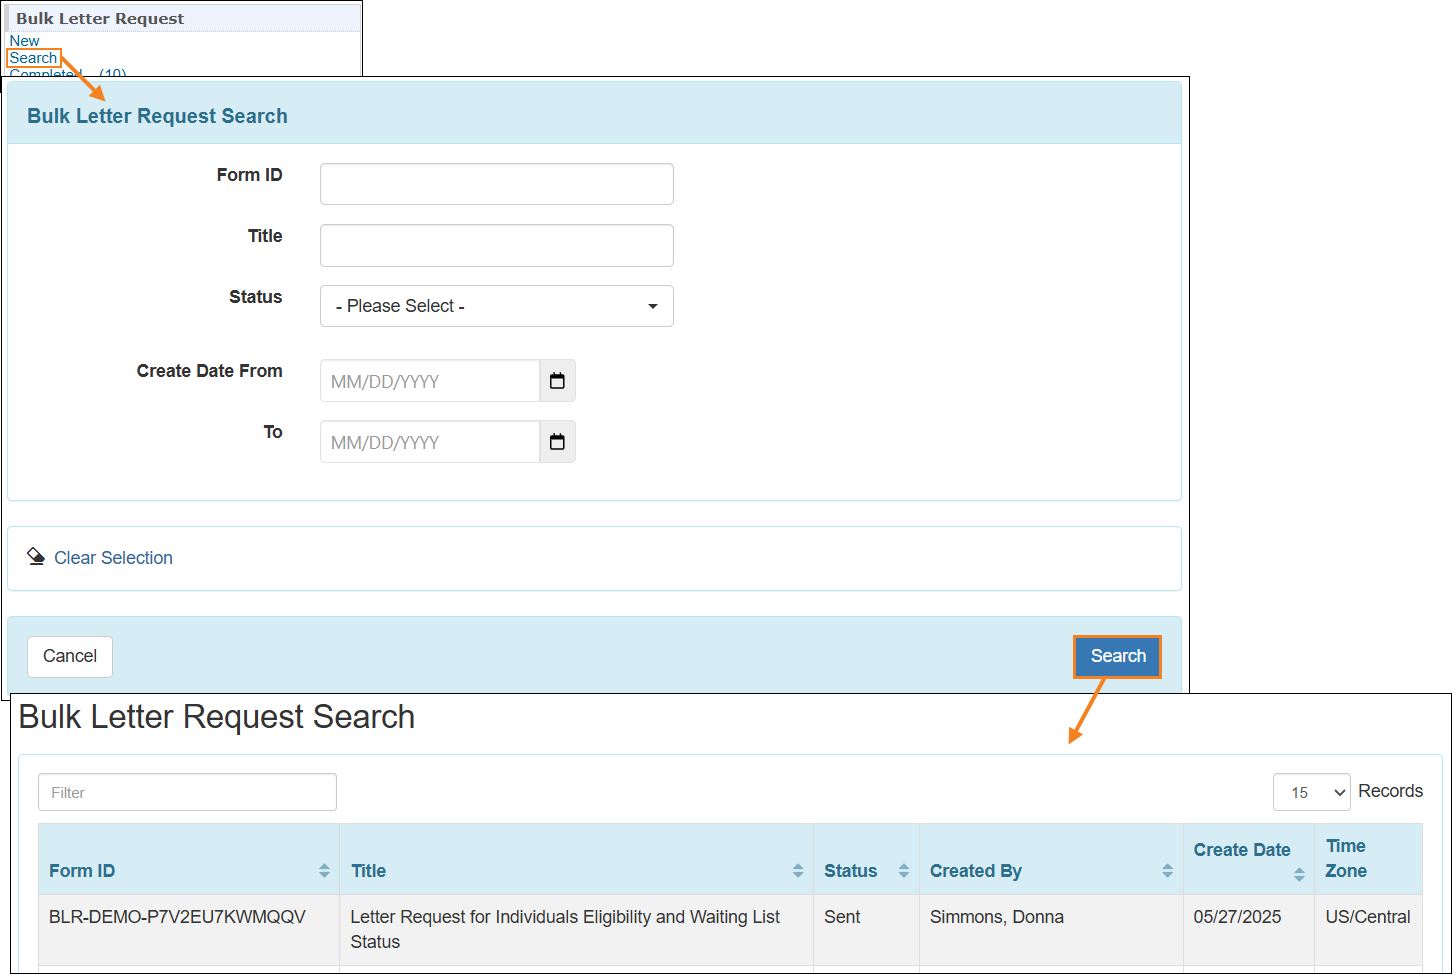
- Users can search for the Bulk Letter Request forms of all statuses by using the Search function.
Medication Administration Record (MAR)
- The following message will now be displayed at the top of the Monthly MAR in Data Entry mode:
‘This legacy (Monthly) MAR module will become read-only in December 2025. Data collection will require use of the new Daily MAR in 2026. (Link to Daily MAR overview)’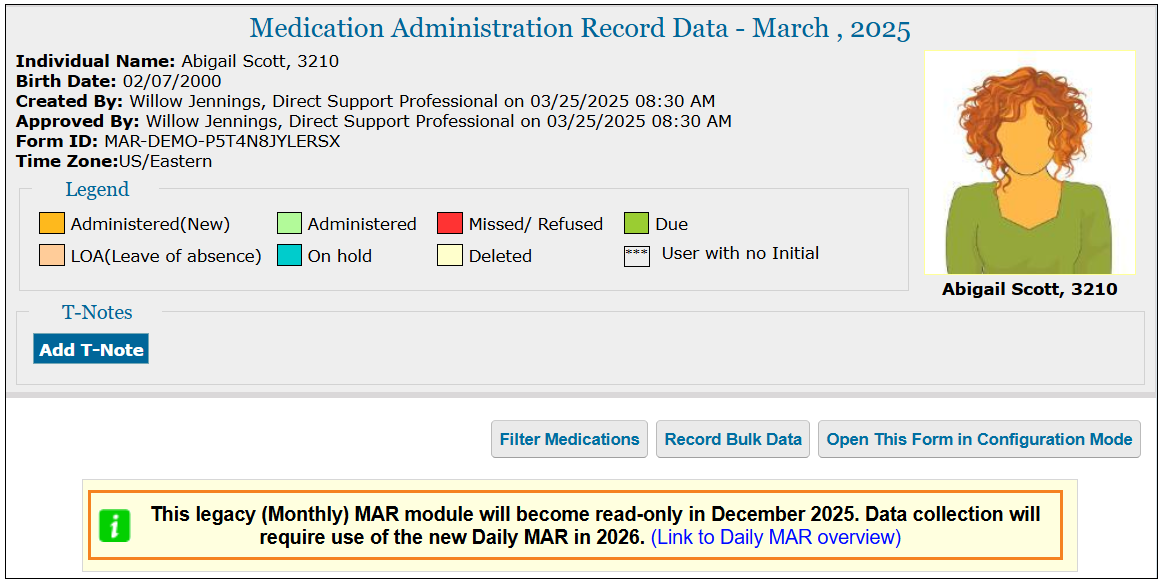
- The Schedule Text slot(s) selected in the Medication History form will now appear in the Time column of the MAR Data grid.
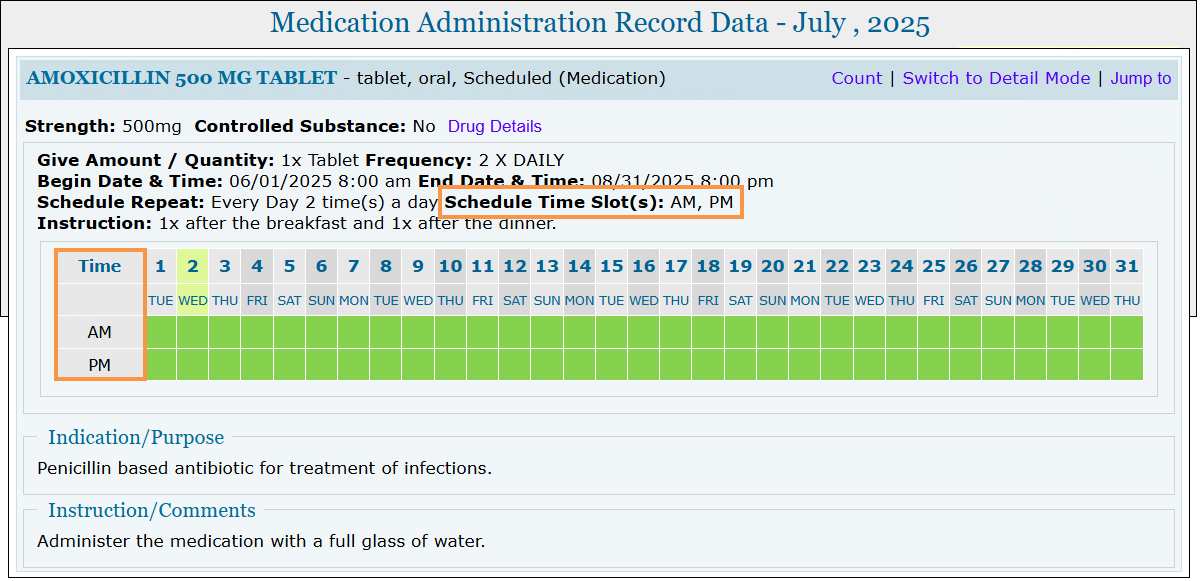
- A new read-only field titled Scheduled Time has been added to the MAR ‘Detail Data’ popup window, which will display the scheduled time or scheduled text, or remain blank based on the selected Schedule Time slot(s) of the respective medication.
- A new section titled ‘Active Order(s)’ has been added on the MAR Form PDF.

Medication History
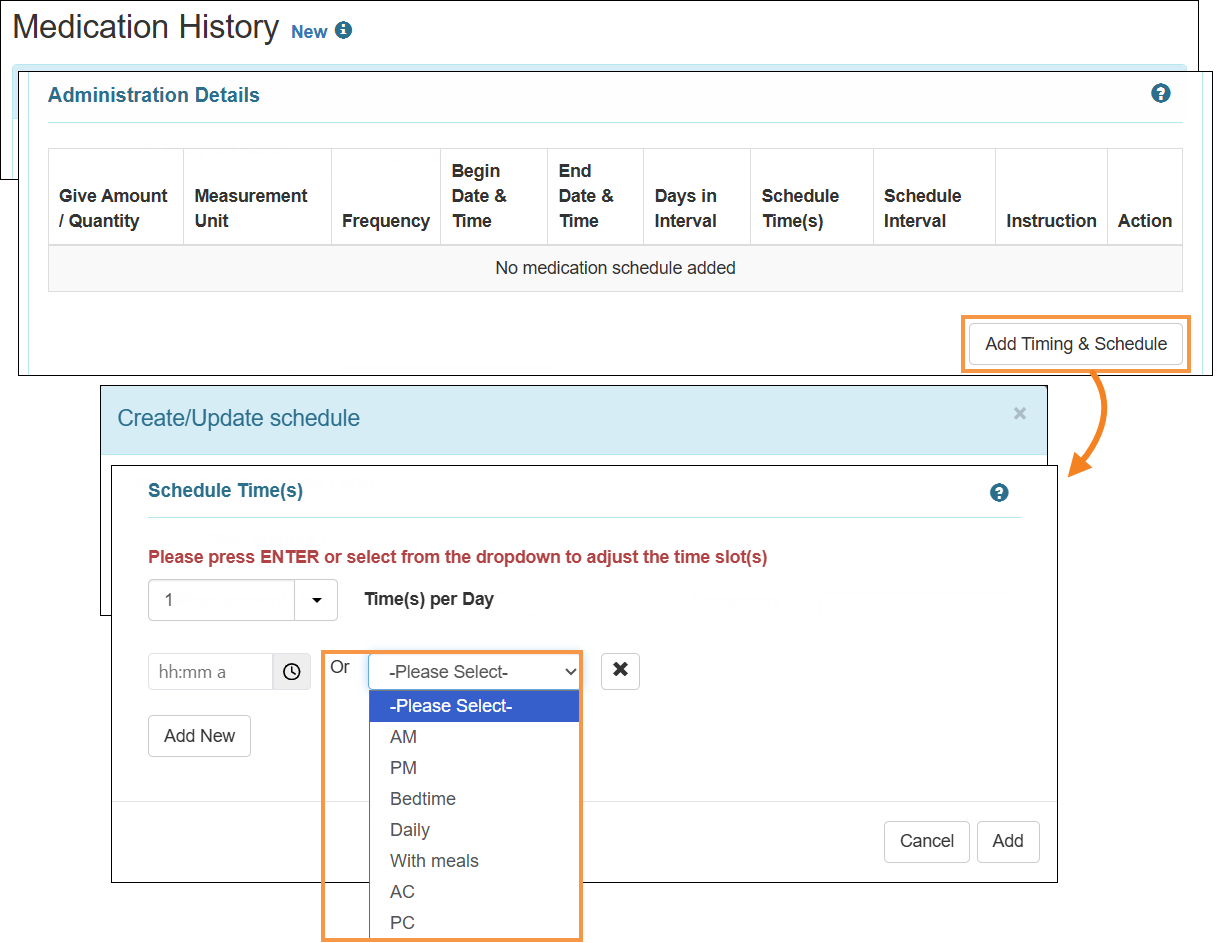
[Back to Top]- A new Schedule Text slot dropdown field has been added in the 'Schedule Time(s)' section of the ‘Create/Update Schedule’ popup window, located next to the existing Schedule Time slot field. Users can now select either a Schedule Text value from the dropdown or a Schedule Time, but not both.
The following options are available in the dropdown list:- AM
- PM
- Bedtime
- Daily
- With meals
- AC
- PC
If users select both schedule time and text slots, they will receive an error message, stating: Please provide time or select value from dropdown in the Schedule Time field.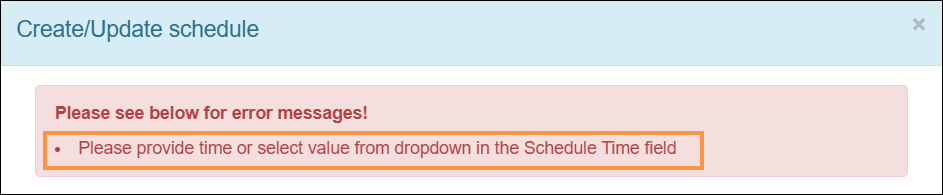
- In the sample file of the Medication History Excel Import, the following changes have been made:
- A new column titled Schedule Text, including the new AM, PM, Bedtime, Daily, With meals, AC, and PC dropdown options have been added.

- In the Help sheet, details to the Schedule Text column, along with the mapped values have been added.
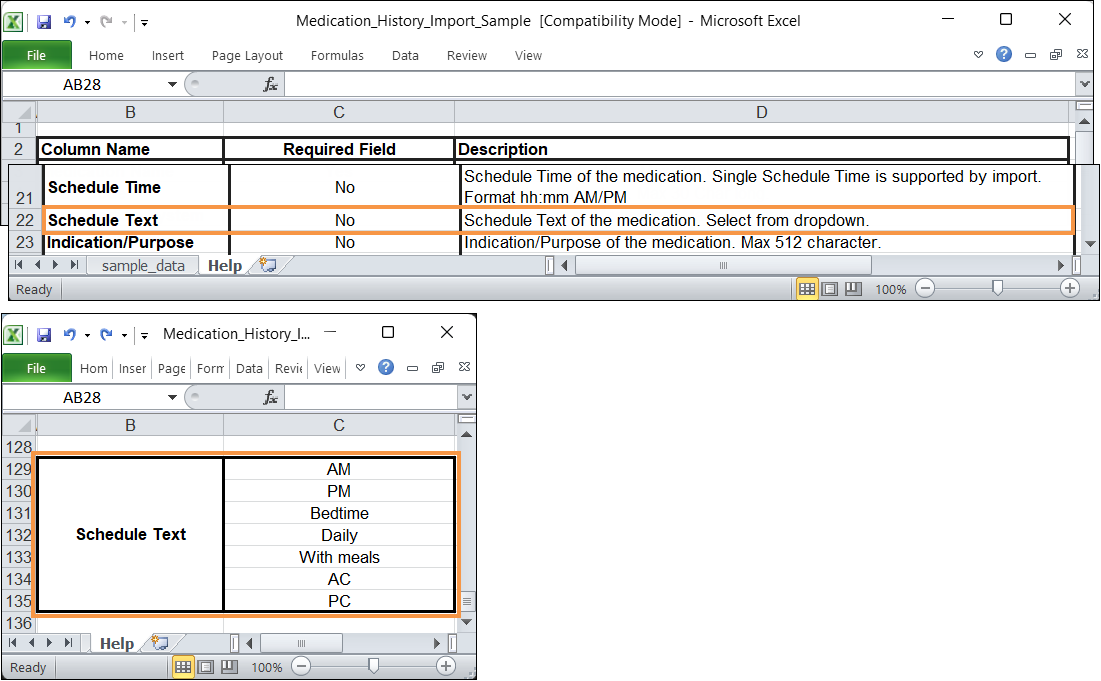
- A new column titled Schedule Text, including the new AM, PM, Bedtime, Daily, With meals, AC, and PC dropdown options have been added.
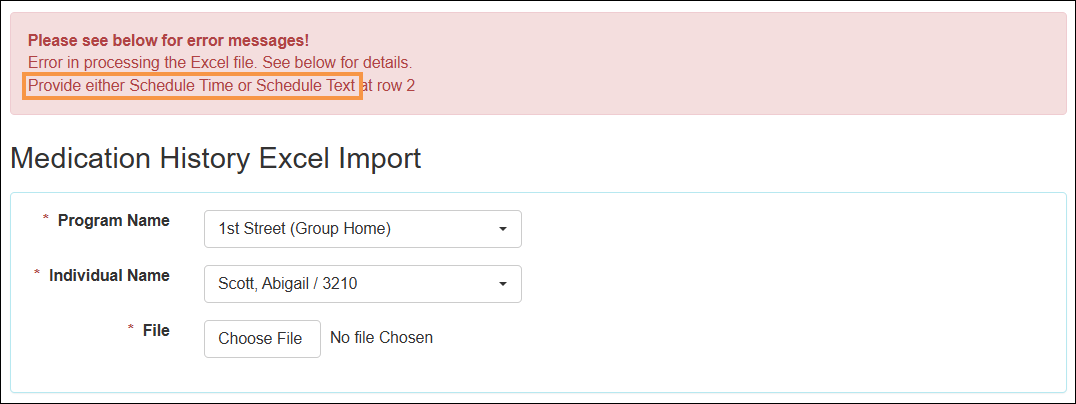
- If the file imported in the ‘Medication History Excel Import’ page contains both Schedule Time and Schedule Text information for a row, an error message will be displayed.
Notification
[Back to Top]- Push Notification for the Therap Mobile Applications has been introduced in this release. Users with the Super Admin administrative role will need to send a request to Therap via the 'Issue Tracking' section to have this functionality activated.
- For Push Notification enabled providers, a new ‘Push Notification’ section along with the notification criteria will be available on the Notification Profile configuration page of the supported modules. Currently, Push Notification is configurable for only the MAR module, and users with appropriate MAR caseload-based roles can receive push notifications when a MAR form is ‘Locked’, or when an entry is recorded as 'Missed' or 'Refused'.
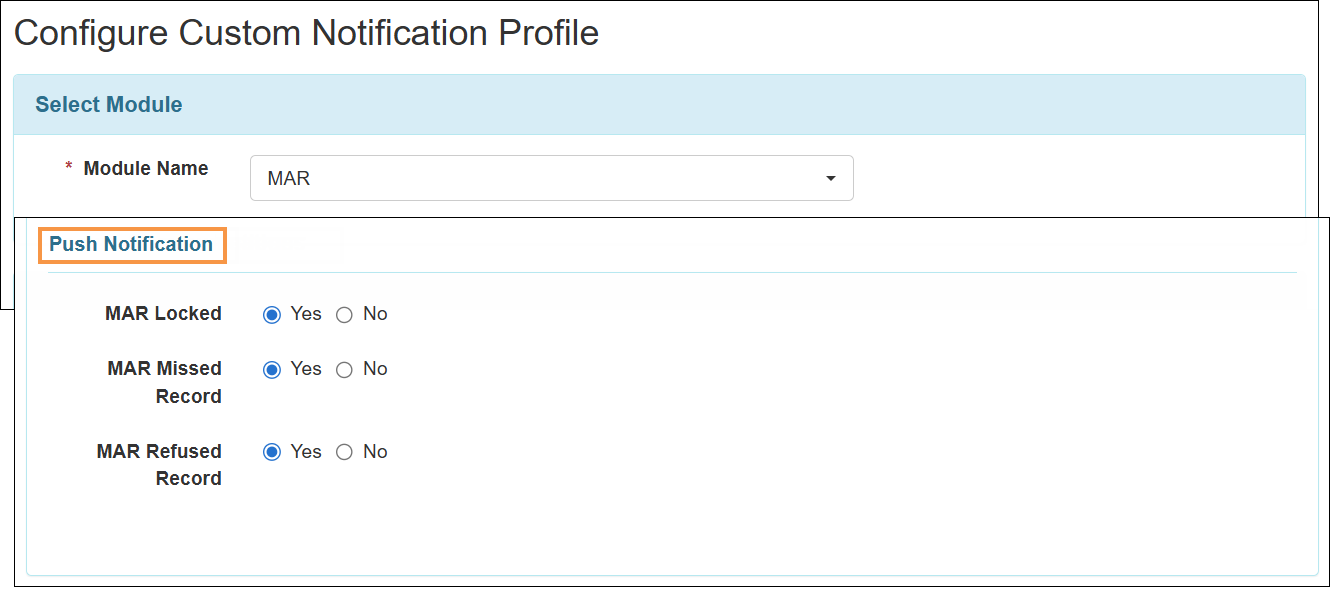
For more information on Push Notifications in Mobile MAR, please refer to the Mobile App Release Notes for 25.9.0.
Personal Finance
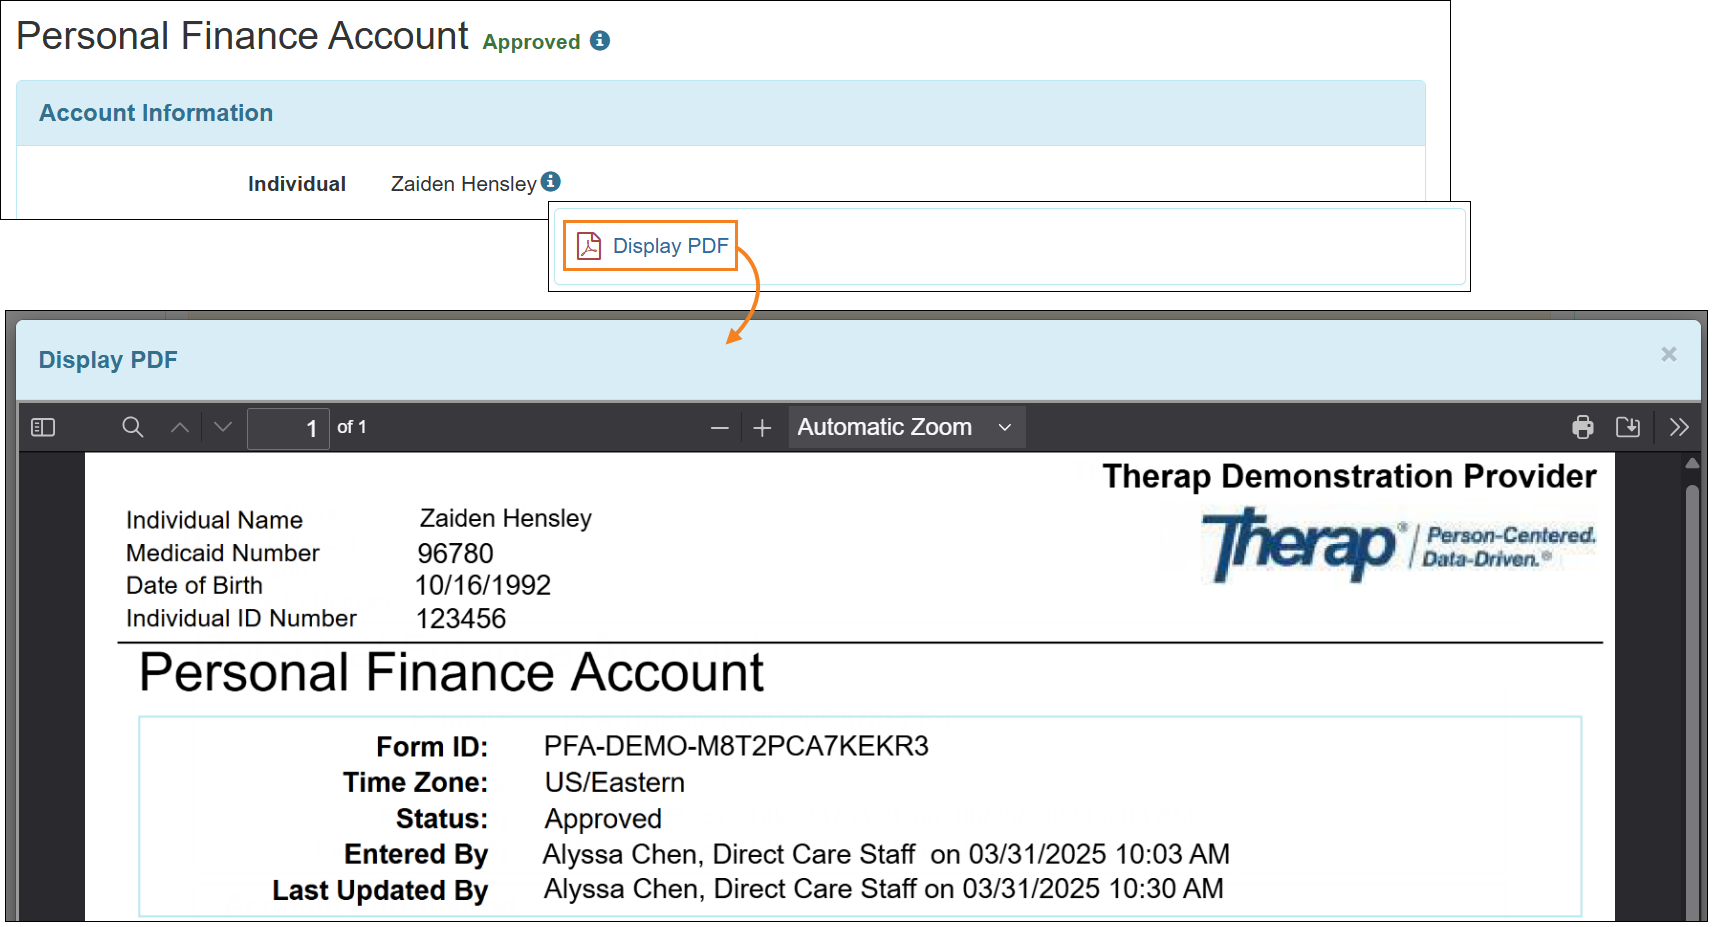
[Back to Top]- Users will now be able to view the PDF in PDF Viewer after clicking on the Display PDF link at the bottom of the ‘Personal Finance Account’ form.
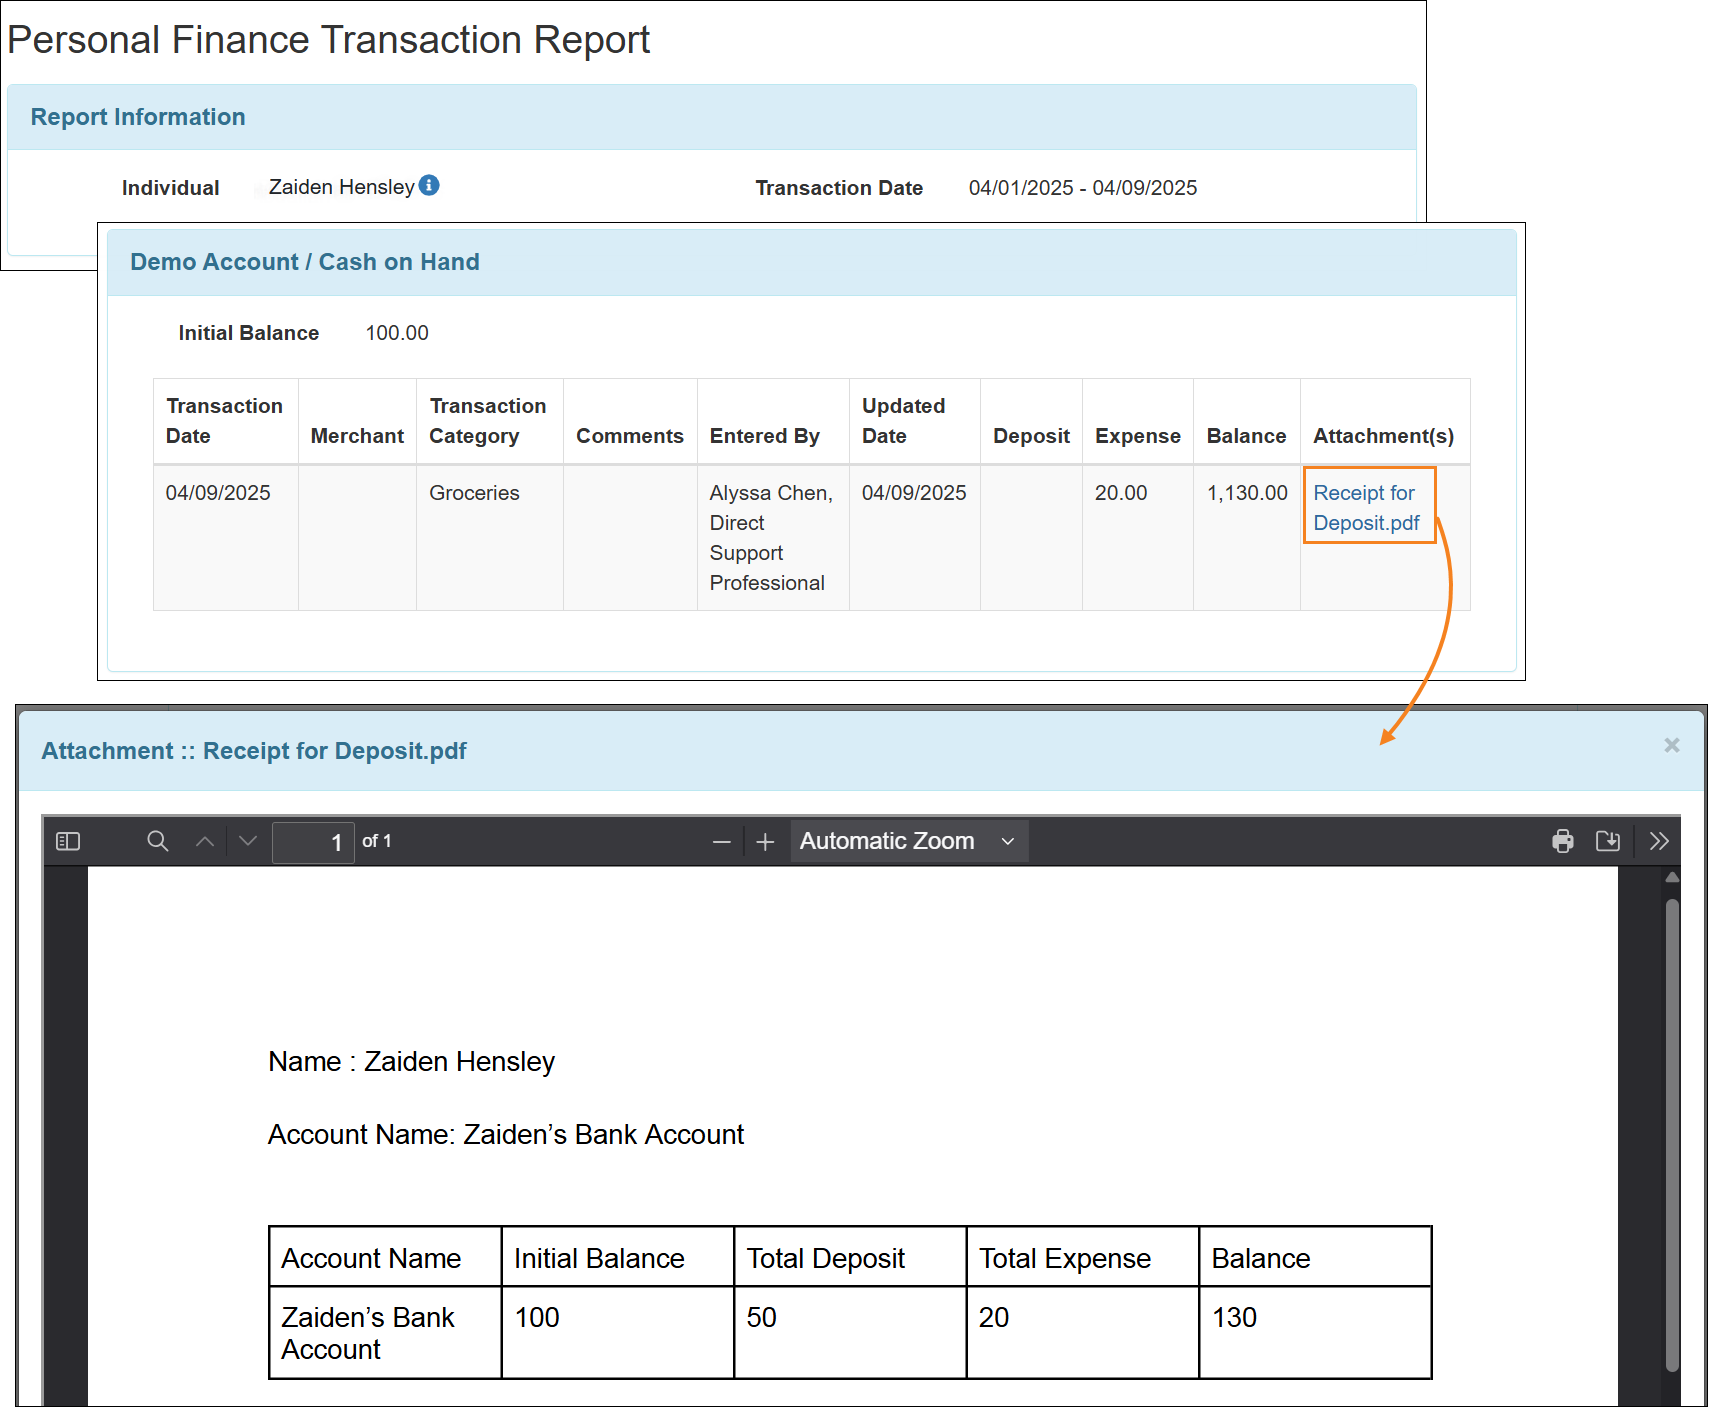
- Clicking on the PDF link in the Attachment(s) column of the 'Personal Finance Transaction Report' will now open the PDF in PDF Viewer.
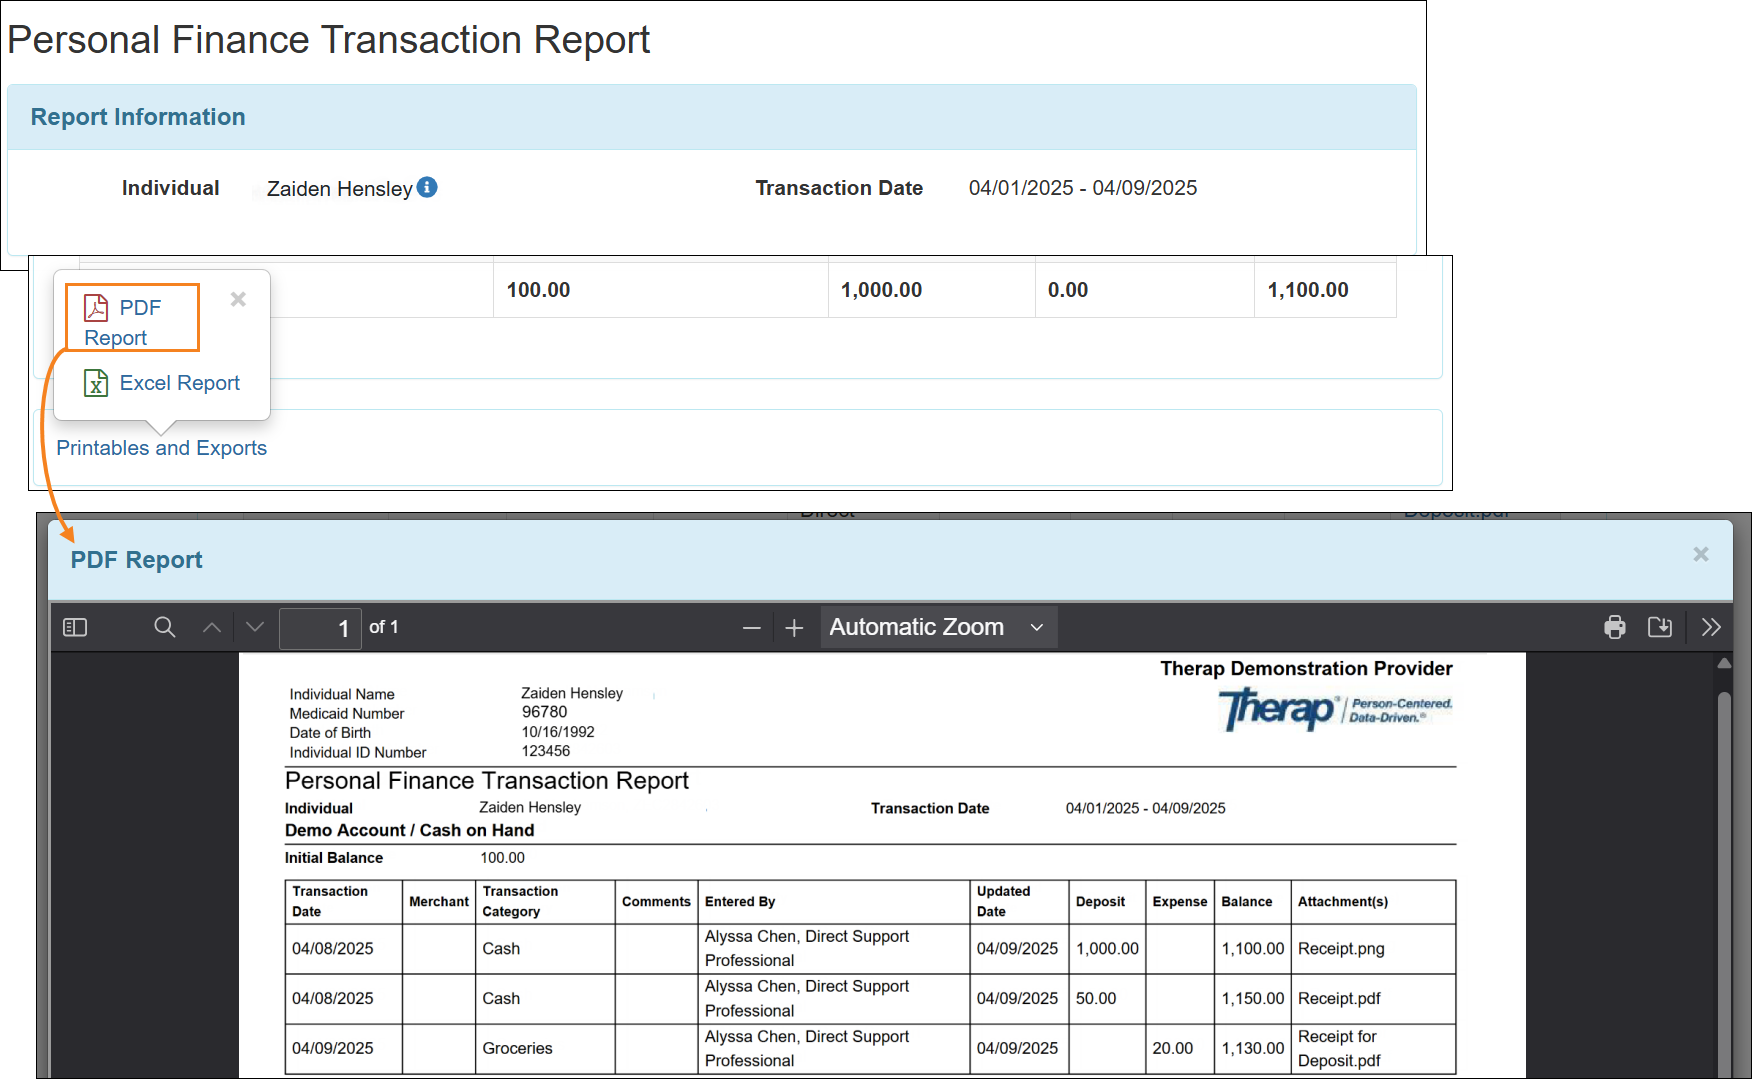
- Clicking on the PDF Report link at the bottom of the 'Personal Finance Transaction Report' page will now open the PDF in PDF Viewer.
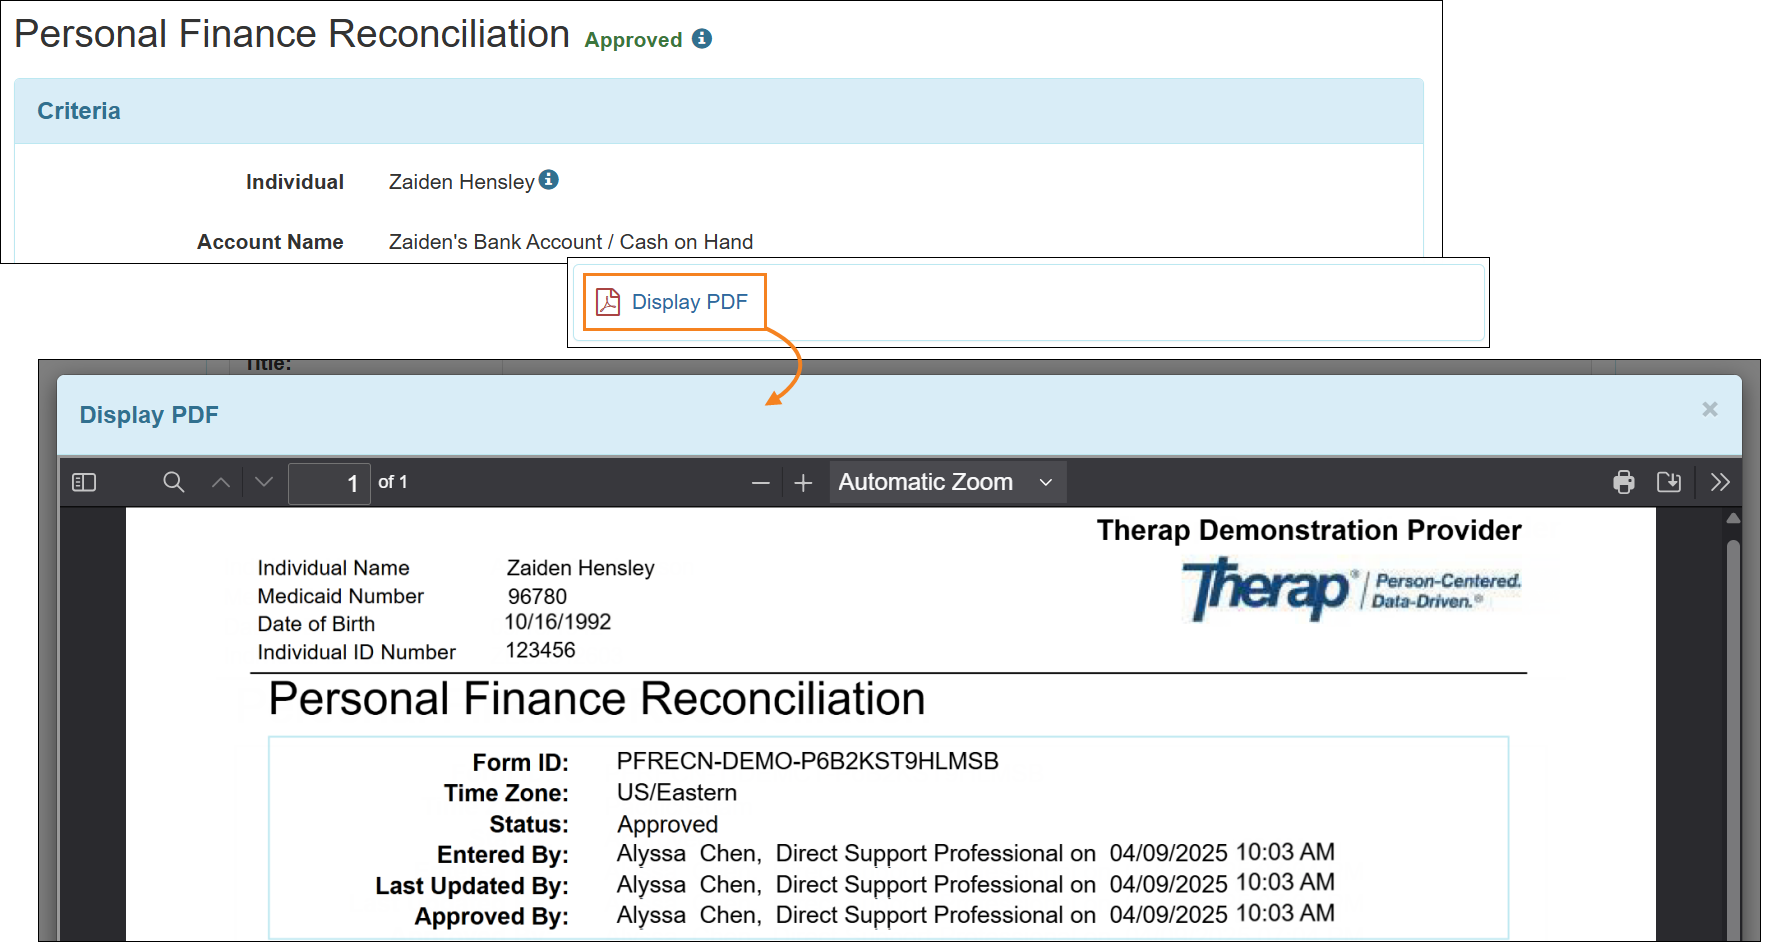
- Clicking on the Display PDF link at the bottom of the ‘Personal Finance Reconciliation’ form will open the PDF in PDF Viewer.
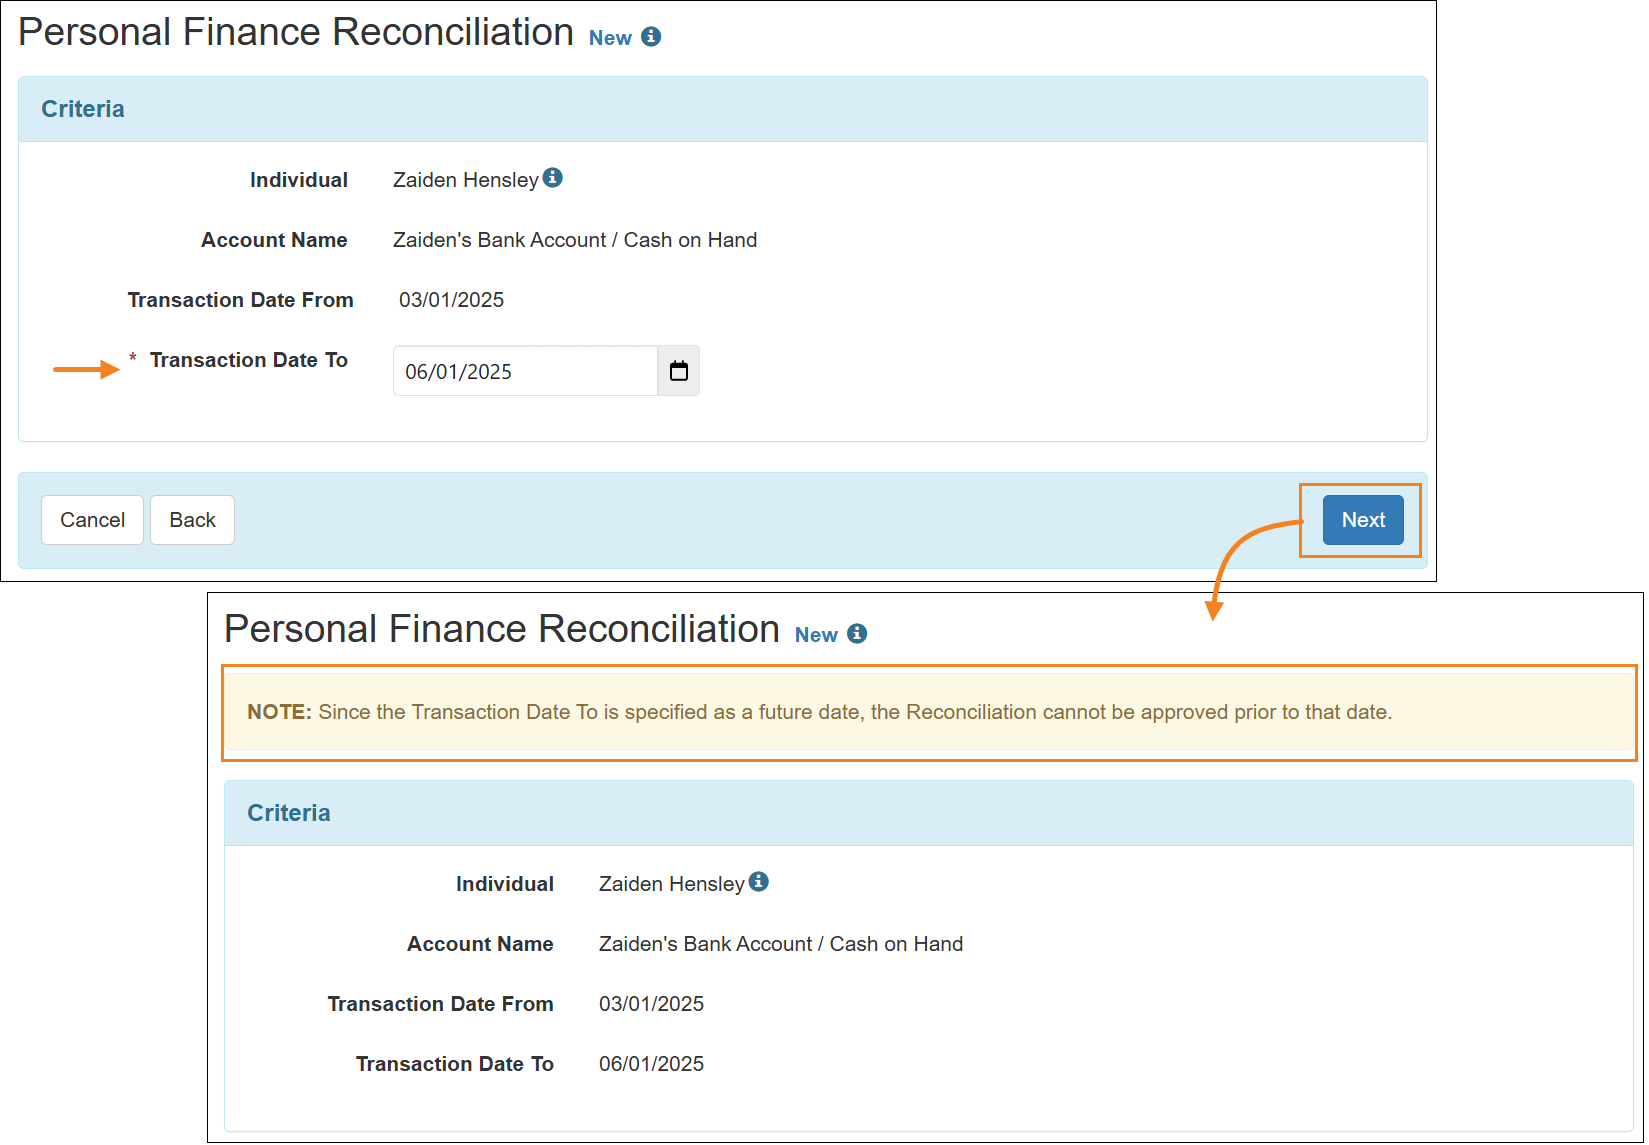
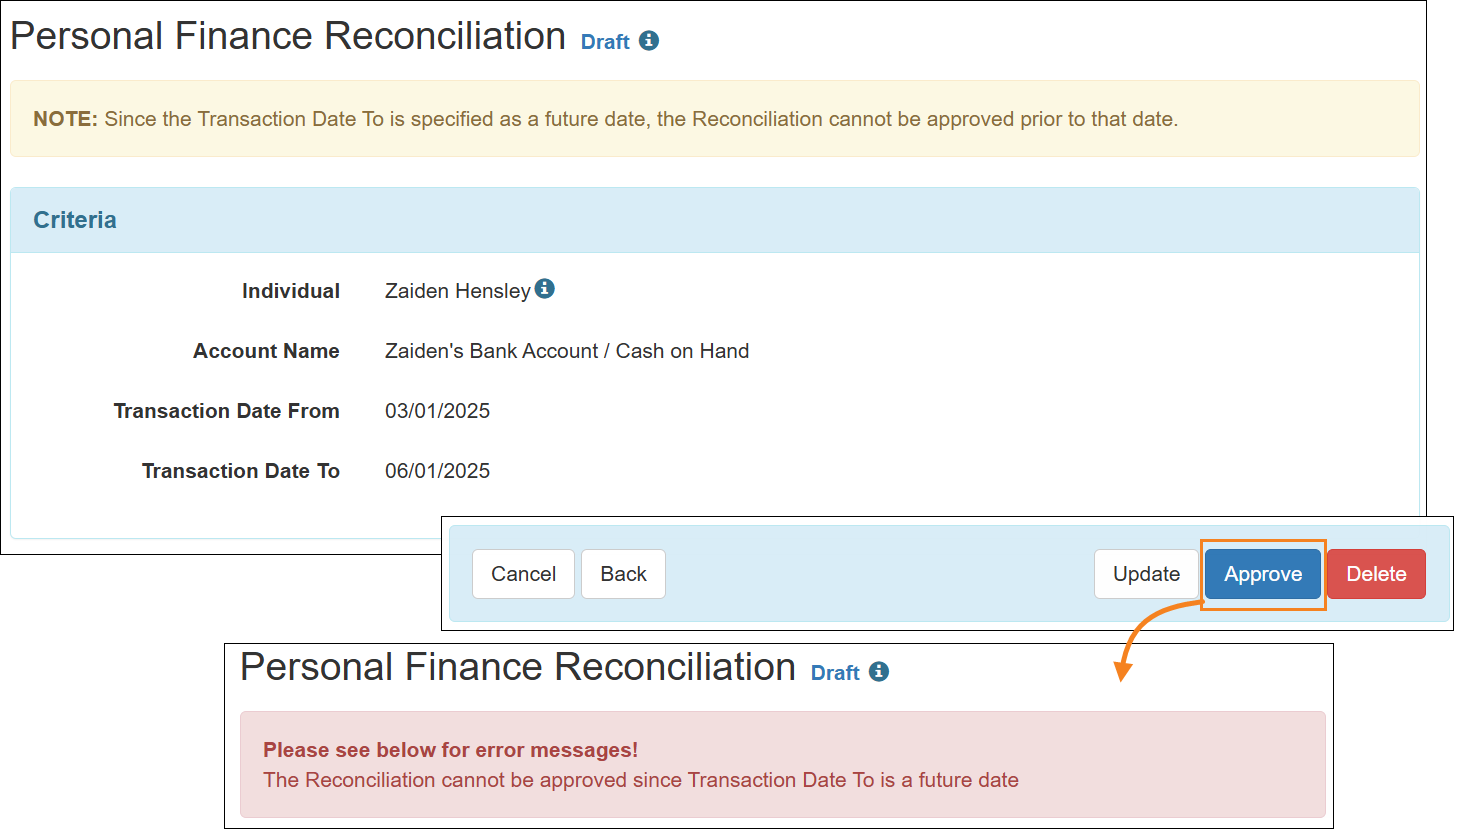
- The following message will now be displayed if users enter a future date in the Transaction Date To field of New Personal Finance Reconciliation forms or open Draft Personal Reconciliation forms in editable mode:
Note: Since the Transaction Date To is specified as a future date, the Reconciliation cannot be approved prior to that date.
- The following error message will now be displayed if users attempt to approve a Personal Finance Reconciliation form with a future date in the Transaction Date to field:
The Reconciliation cannot be approved since Transaction Date To is a future date.
Provider Administration
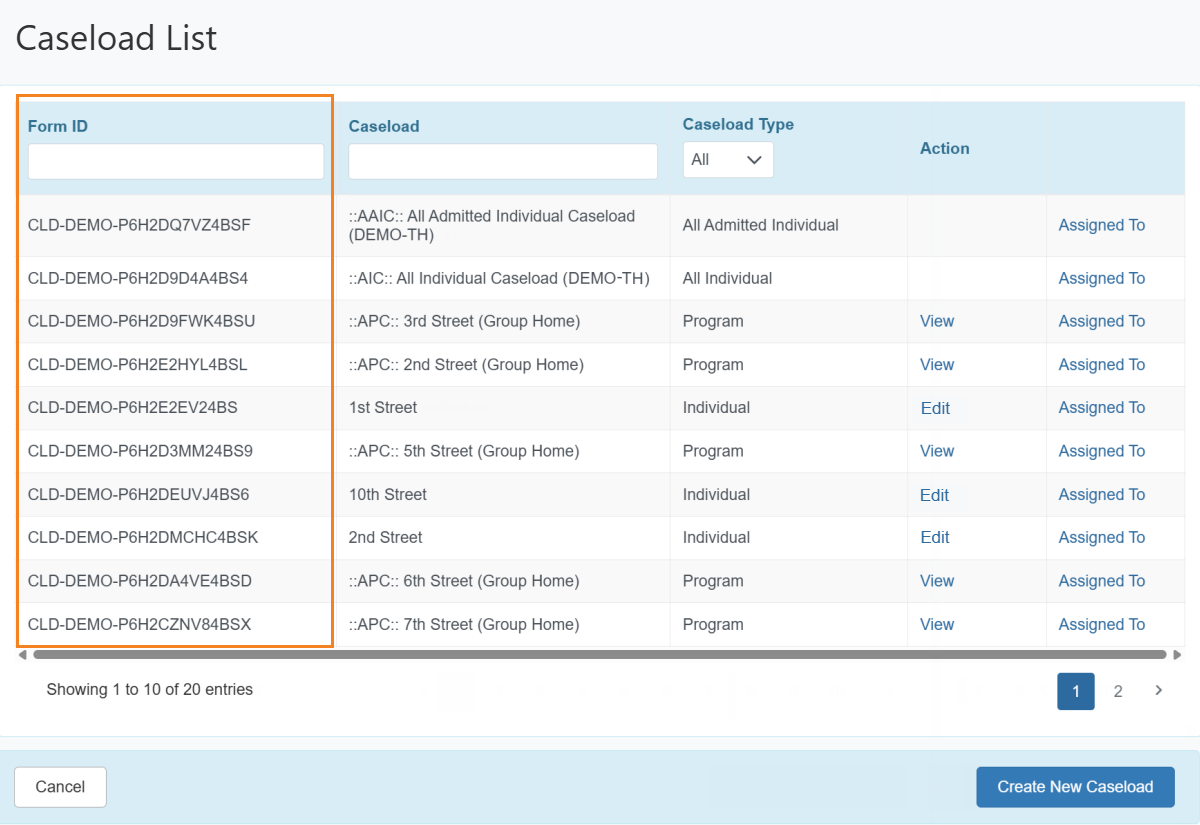
Form IDs have been added to Super Roles, Caseloads, and User Profiles. These Form IDs will be displayed on the following pages:
- Caseload Form IDs will be listed in a new Form ID column on the ‘Caseload List’ page.
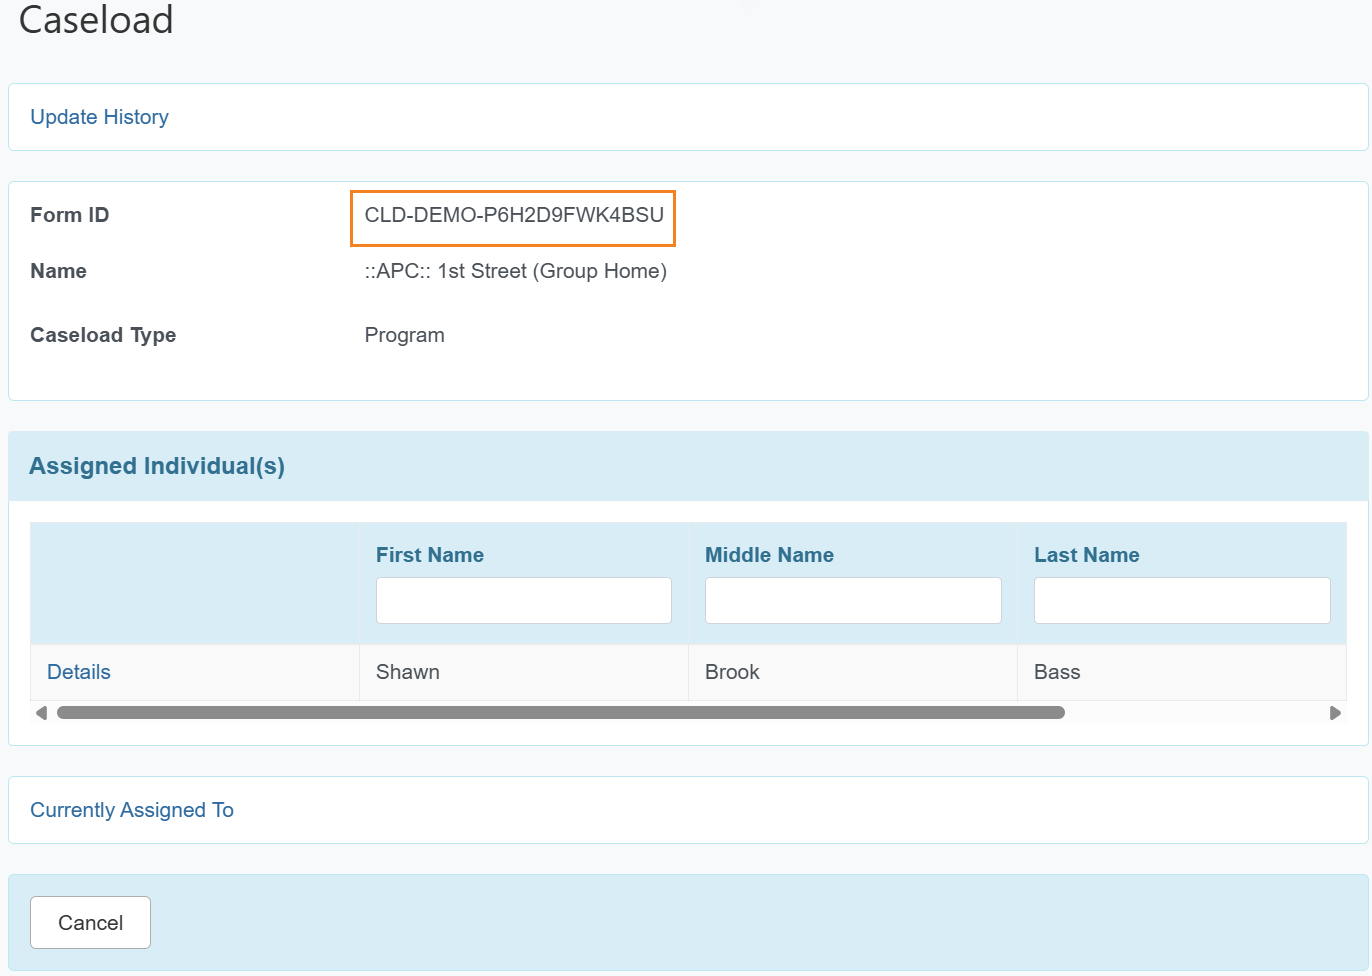
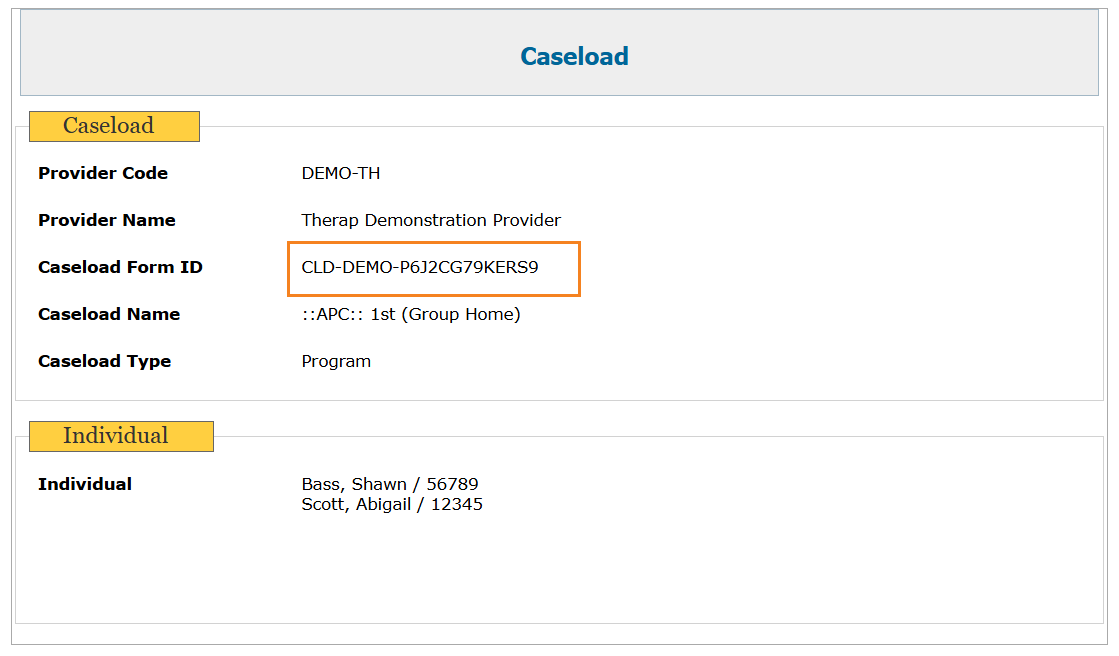
- Caseload Form IDs will be displayed on the ‘Caseload’ form beside a new Form ID label.
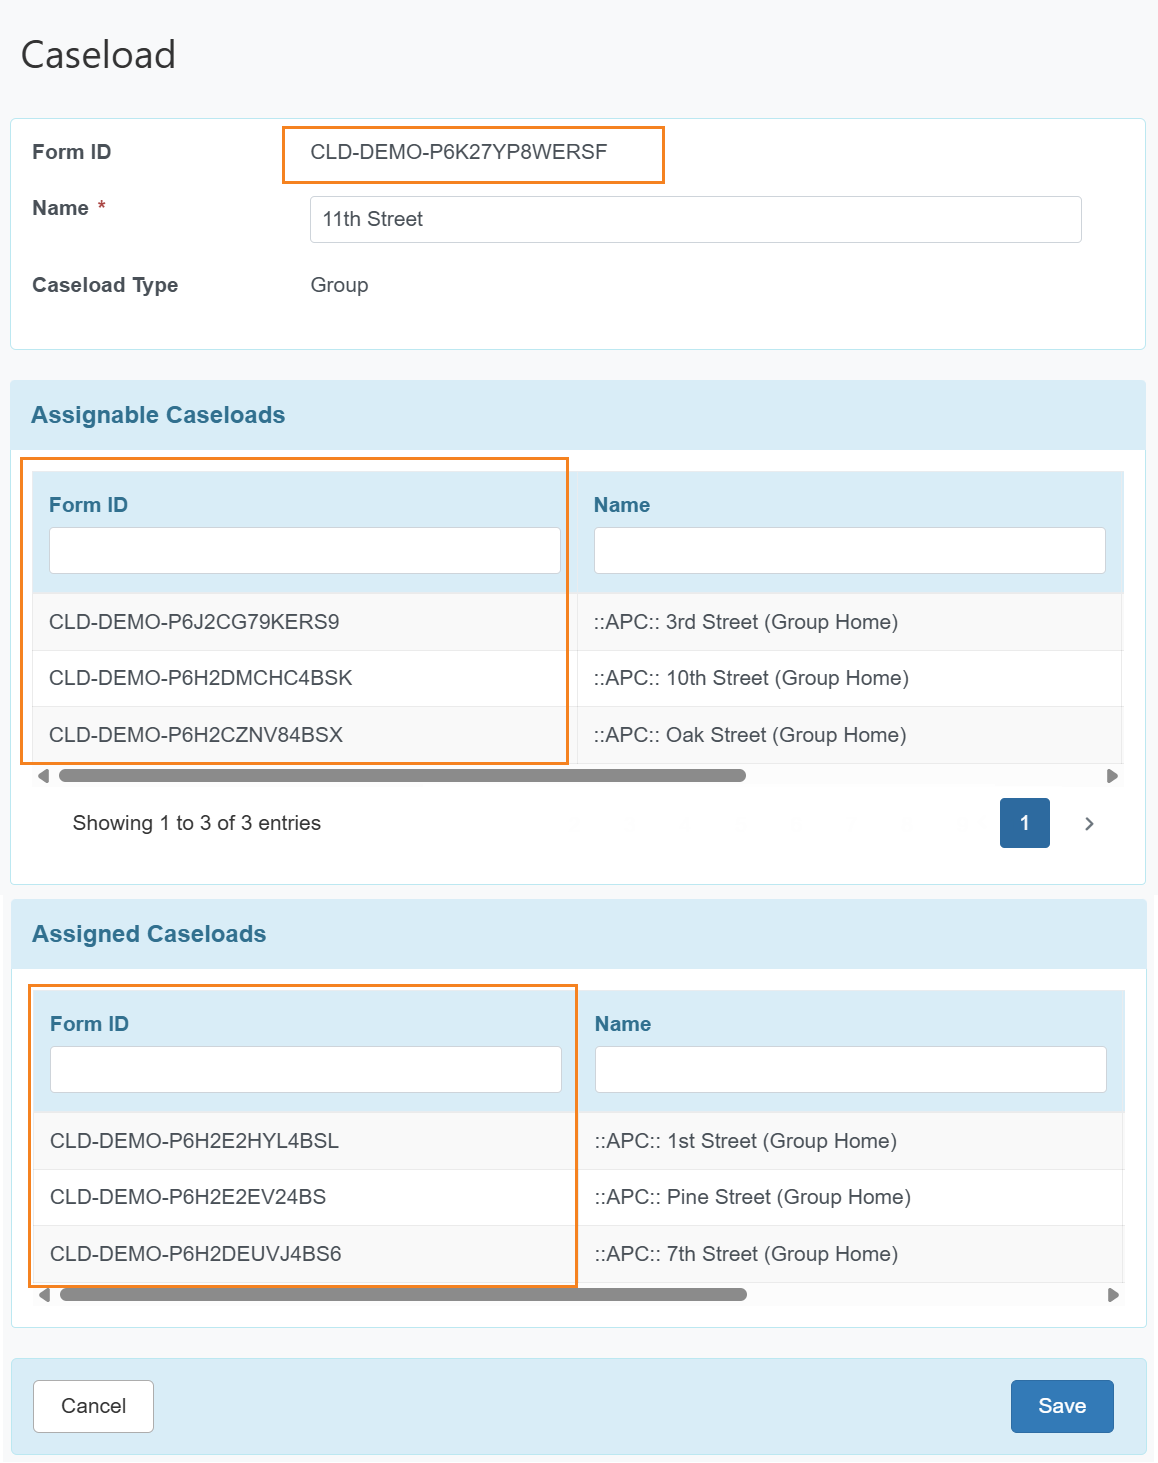
- Caseload Form IDs will be displayed in the new Form ID columns in the ‘Assignable Caseloads’ and ‘Assigned Caseloads’ sections of Group-based ‘Caseload’ forms.
- Caseload Form IDs have been added to archived Caseloads.
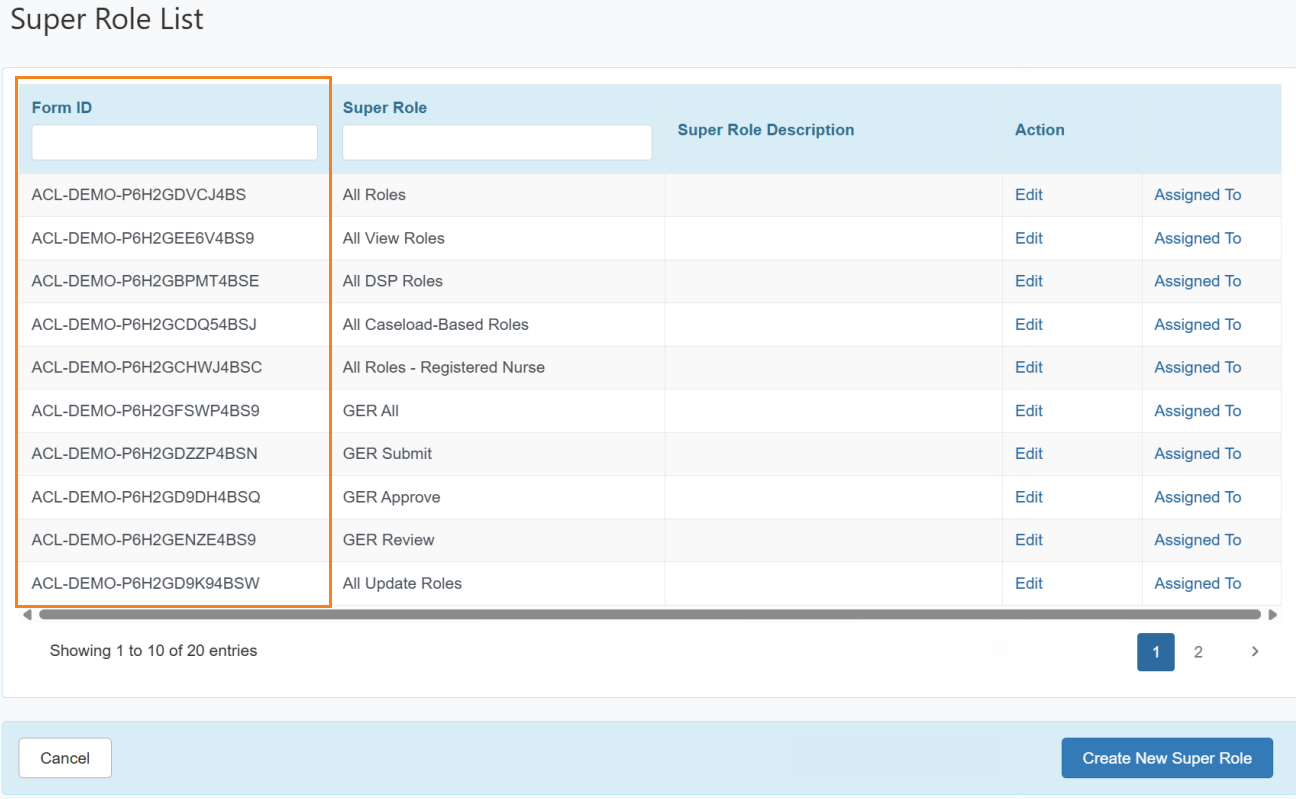
- Super Role Form IDs will be listed in a new Form ID column on the ‘Super Role List’ page.
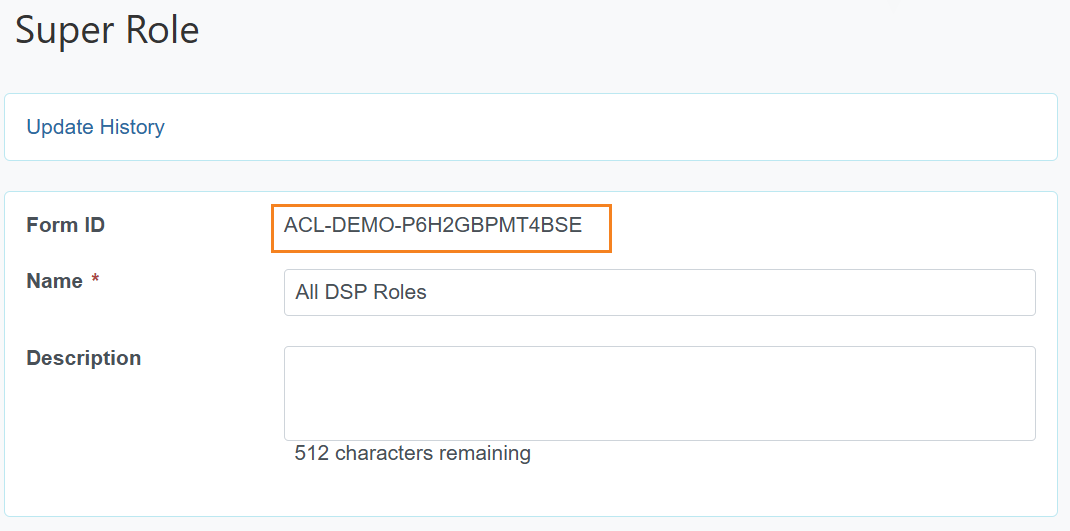
- Super Role Form IDs will be displayed on the ‘Super Role’ form beside a new Form ID label.
- Super Role Form IDs have been added to Super Role ‘Update History’ and ‘Archive’ records.

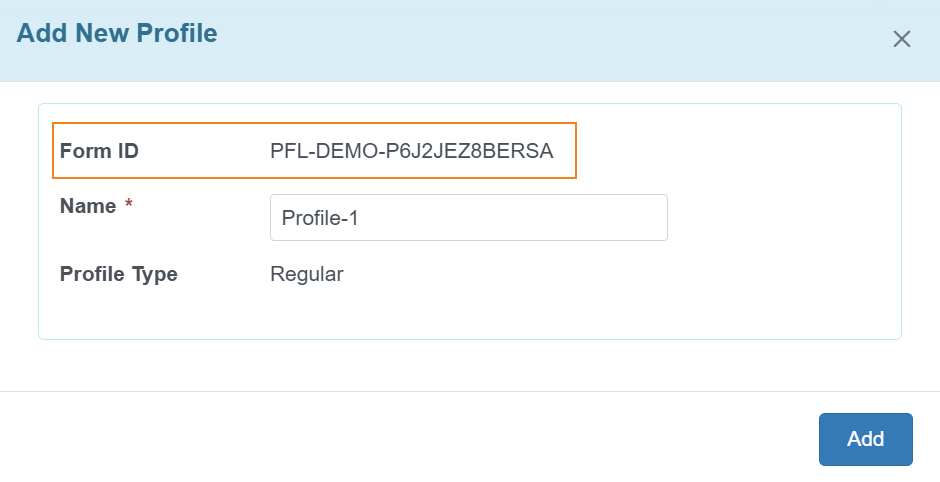
- Profile Form IDs are displayed when creating new Profiles.
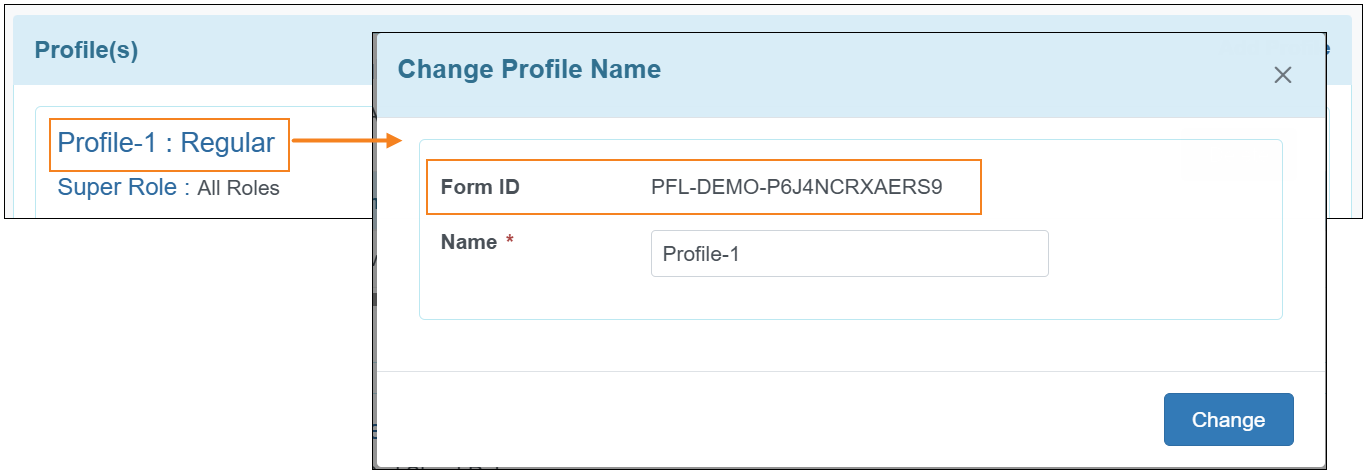
- Profile Form IDs are displayed on the ‘Change Profile Name’ pop-up.
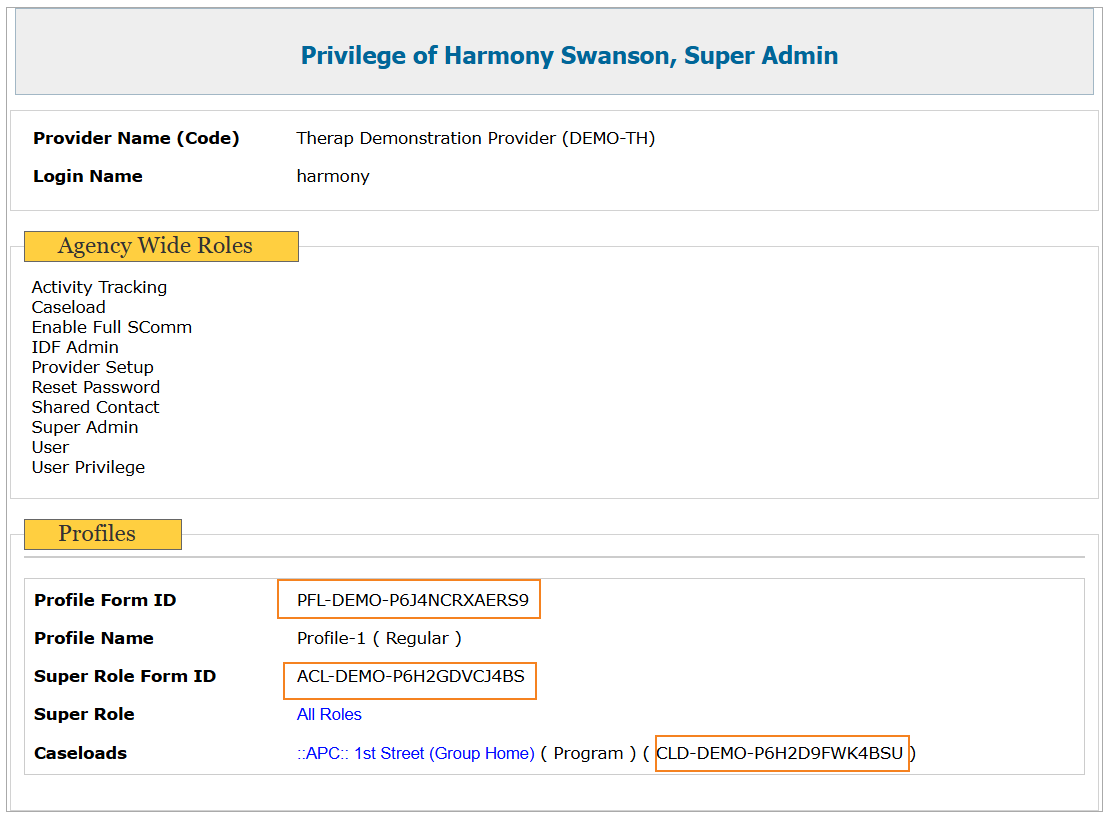
- The Form IDs of Caseloads, Super Roles, and Profiles are now visible on the archived ‘User Privilege’ pages.
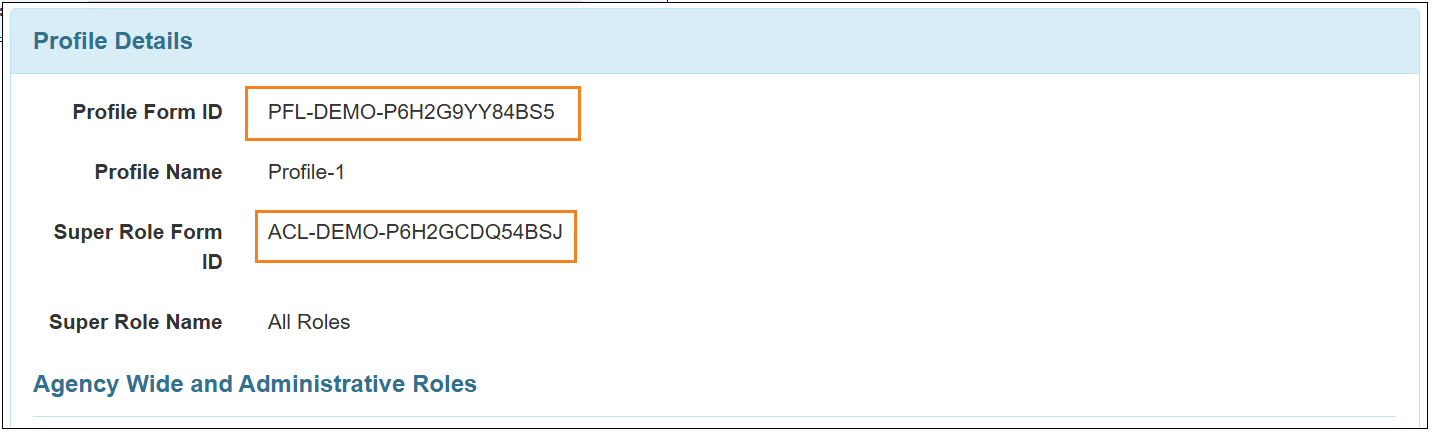
- The Form IDs of Profiles and Super Roles are displayed on the ‘Profile Details’ page.
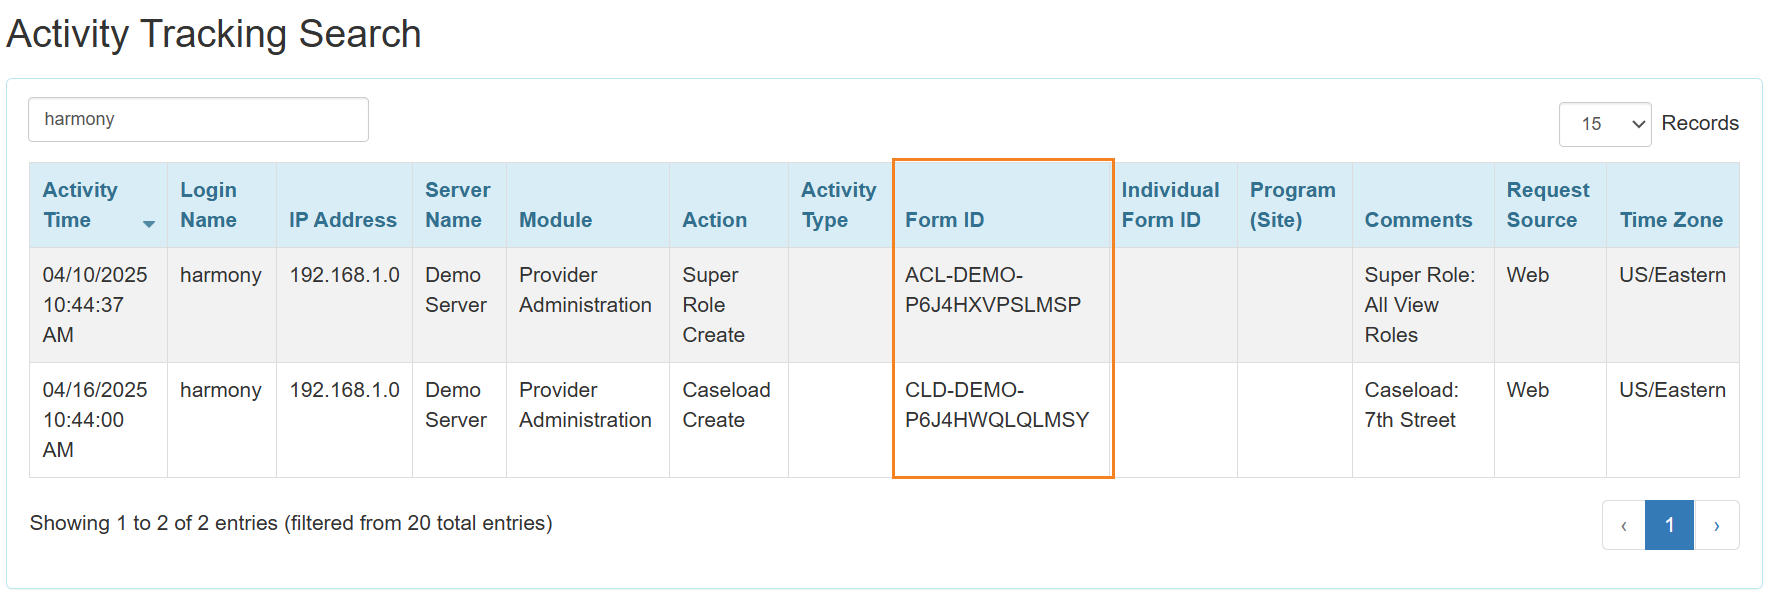
- For activities on changes to Caseloads and Super Roles, their Form IDs are now displayed in the Form ID column of Activity Tracking Search results.
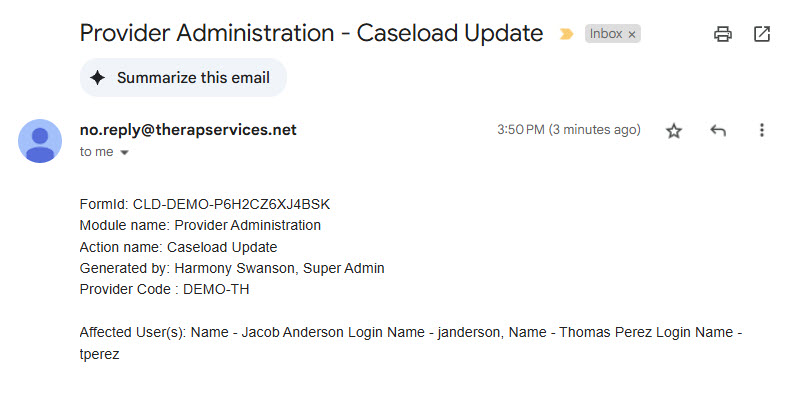
- Notifications related to Super Roles and Caseloads will now include their Form IDs.
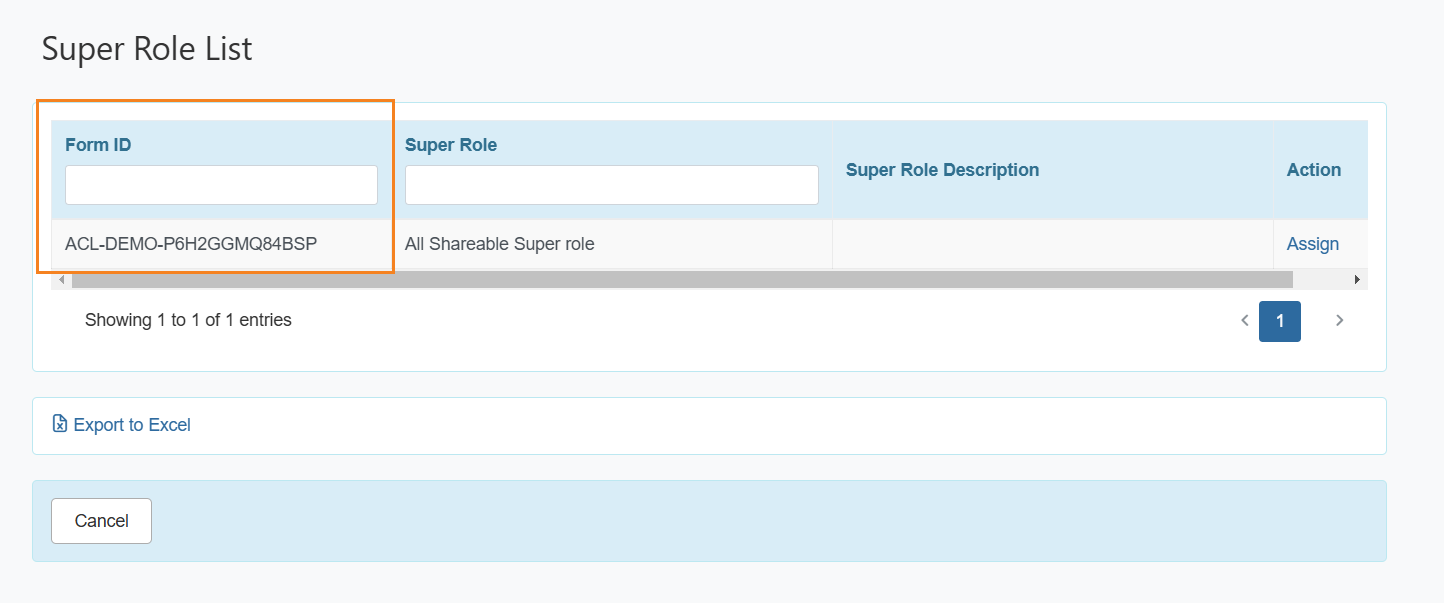
- For Oversight Providers, the Shareable Super Role Form IDs will be displayed on the ‘Super Role List’ page accessible from Assign Shareable Super Role link on the Oversight Dashboard.
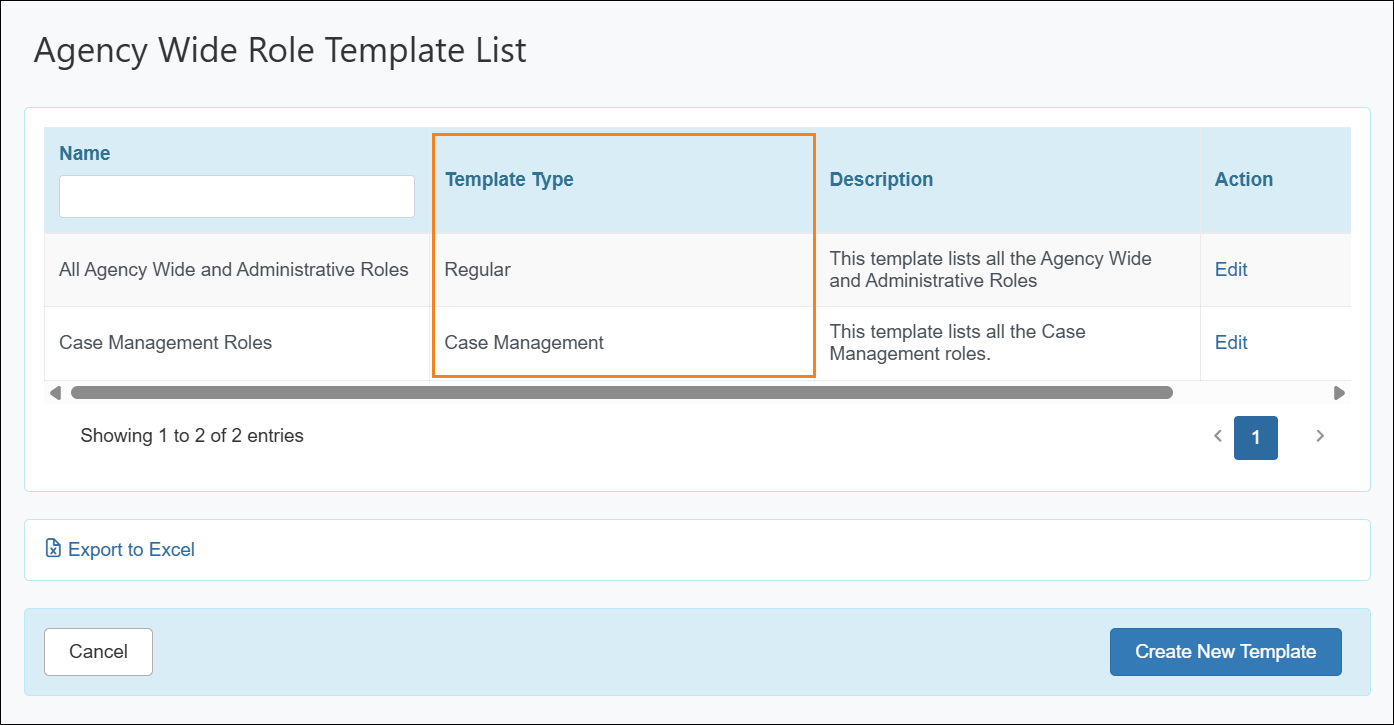
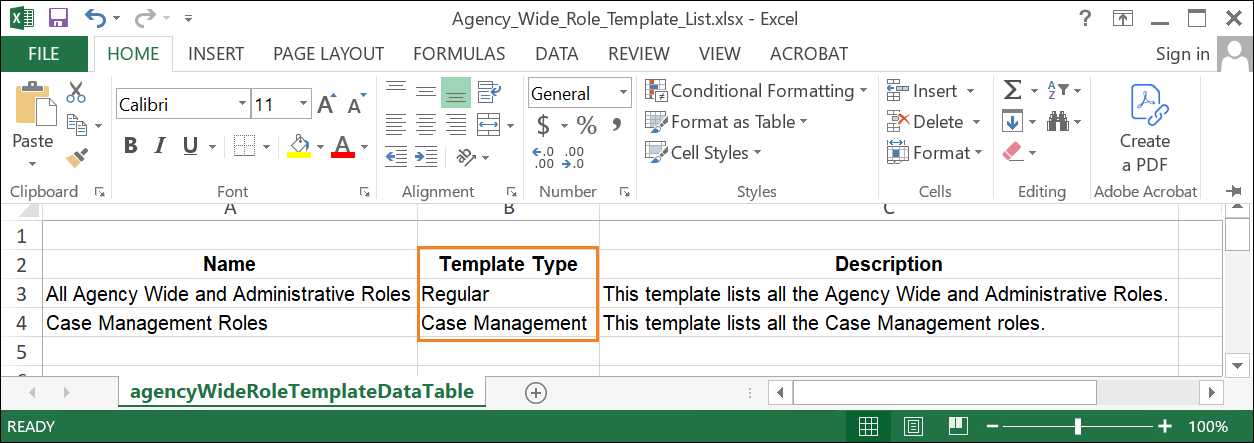
- A new column titled Template Type has been added to the ‘Agency Wide Role Template List’ page and its Excel export.
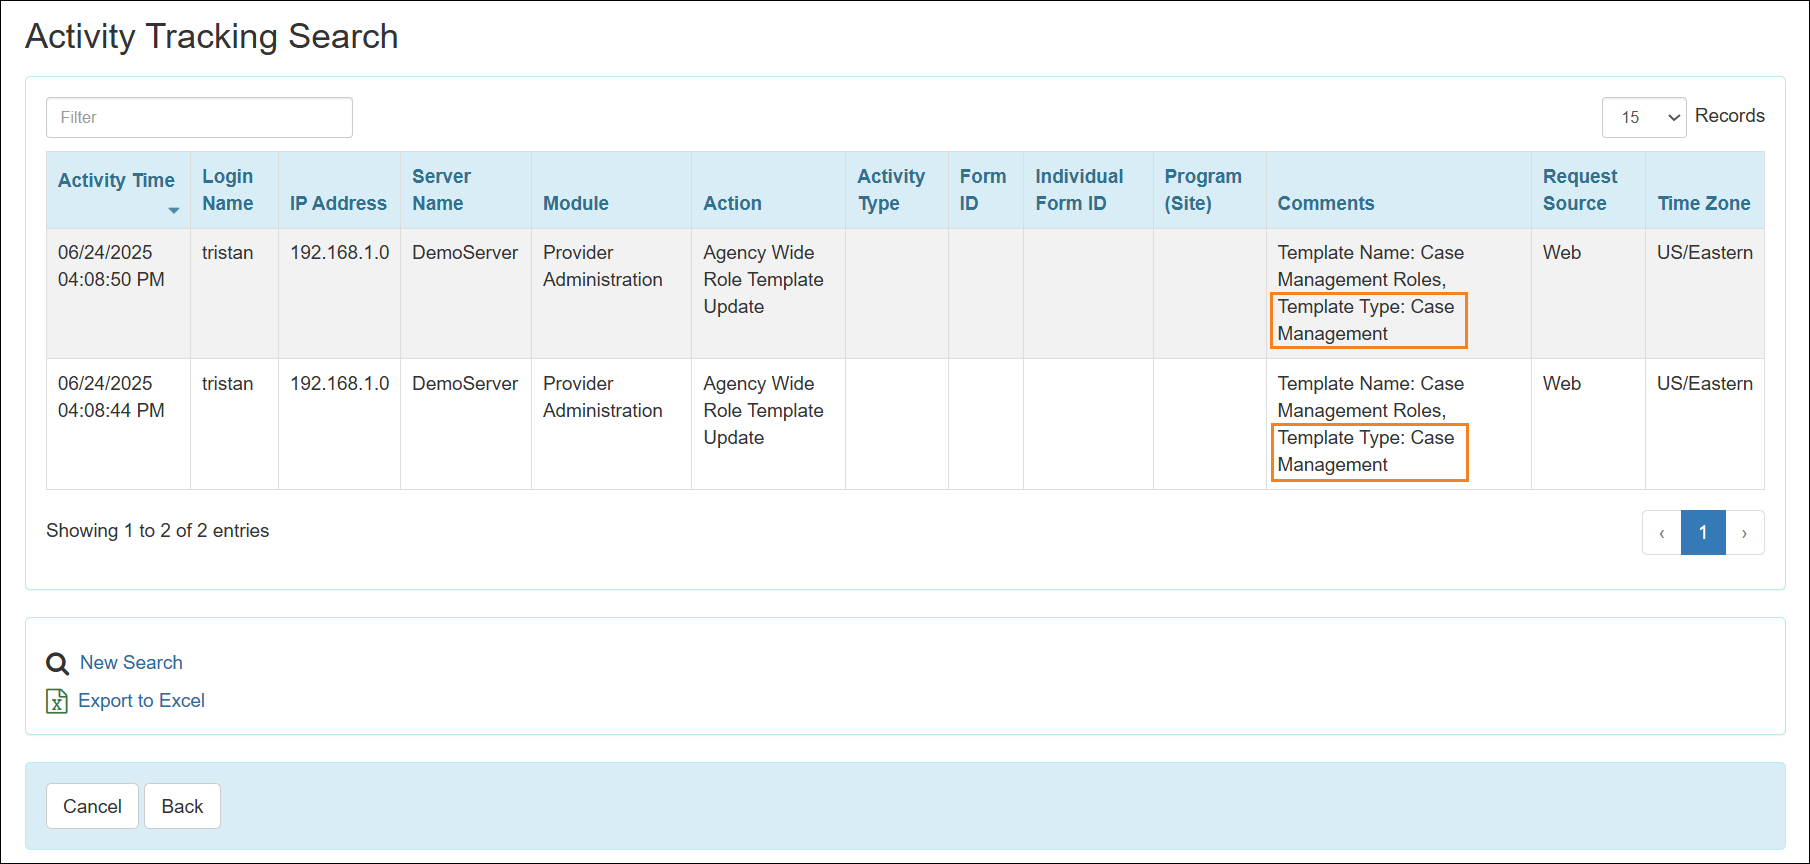
- The Comments column of the ‘Activity Tracking Search’ results page will also include the ‘Template Type’ information for Actions related to Agency Wide Role Template Create, Agency Wide Role Template Update, and Agency Wide Role Template Delete.
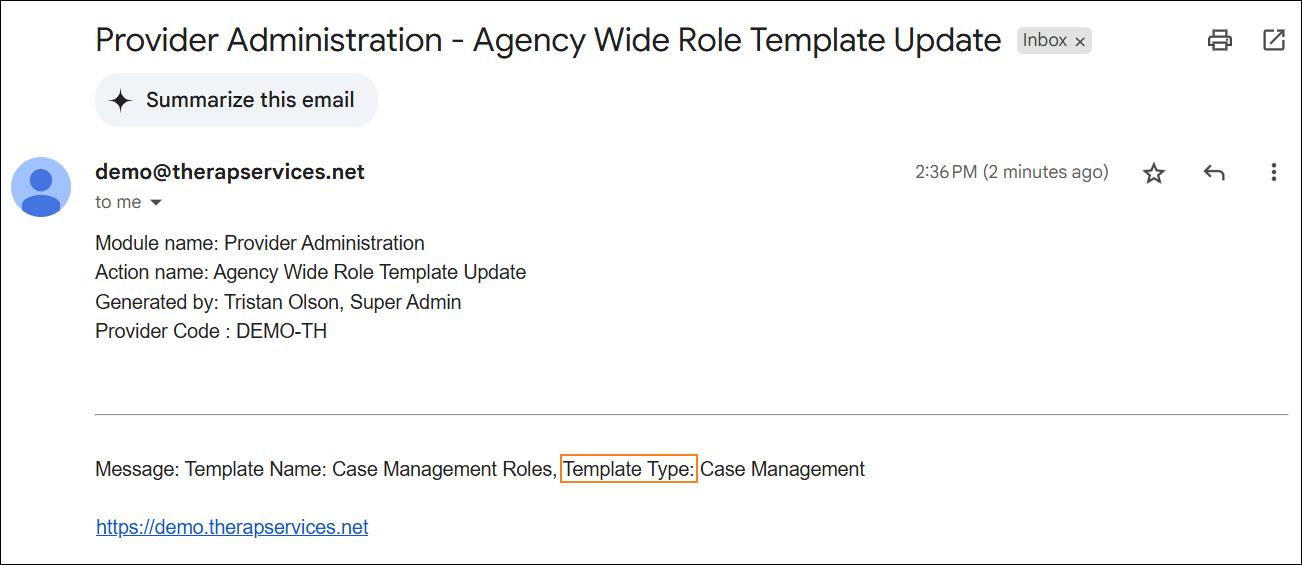
- The email notification received for any action on the ‘Agency Wide Role Template’ will also have the ‘Template Type’ information.
Order
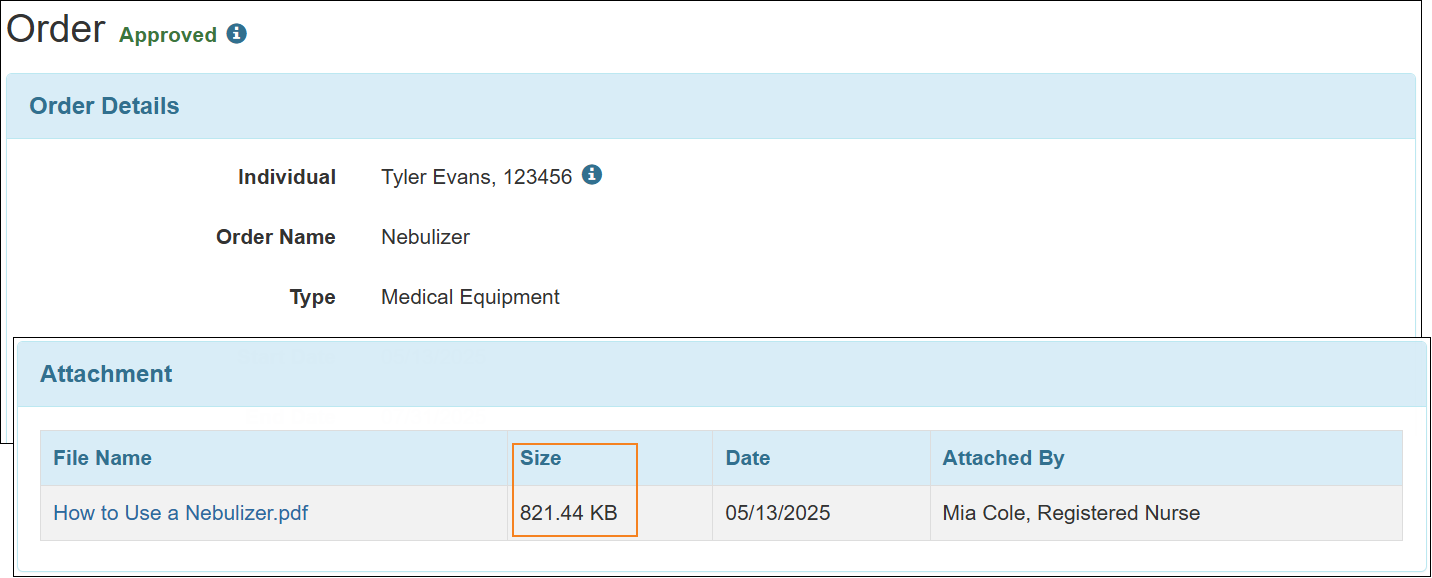
[Back to Top]- Upon attaching a file to the ‘Order’ form, a new column titled Size will appear in the ‘Attachment’ section of the form. This new column will display the size of the attached document. This new column will also appear in the exported PDF files and in the archived versions of the ‘Order’ forms accessed using the Update History link.
Report Library
[Back to Top]- All the reports enabled for an agency's Report Library will now be available for them in the dropdown list while assigning reports to users. Moving forward, all new reports will also be added to this list by default.
Scheduling
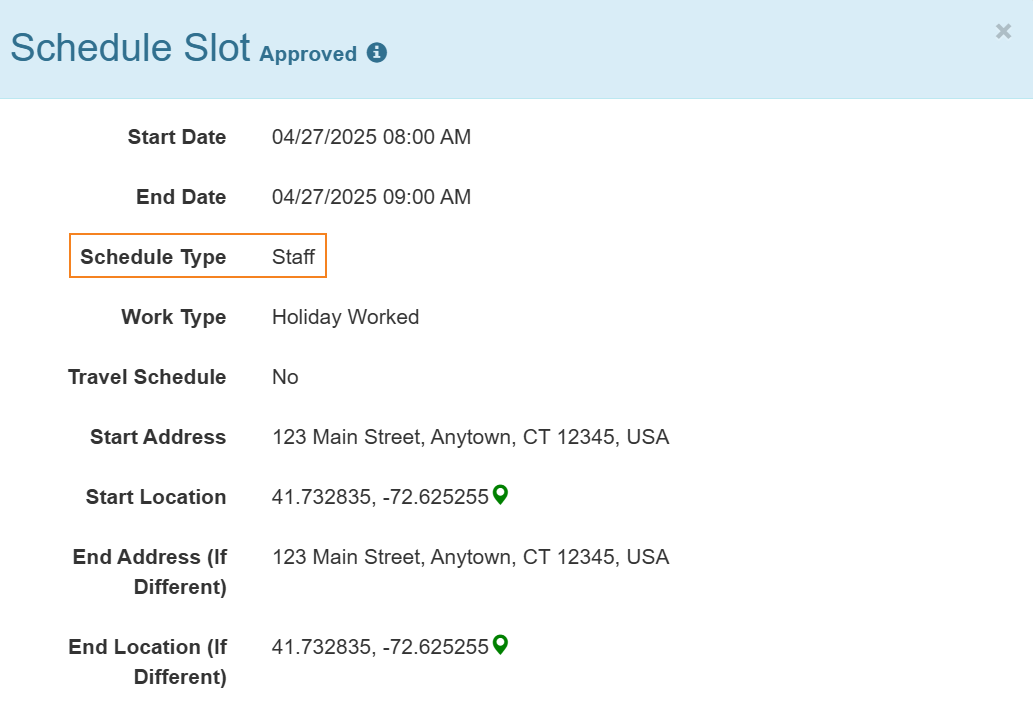
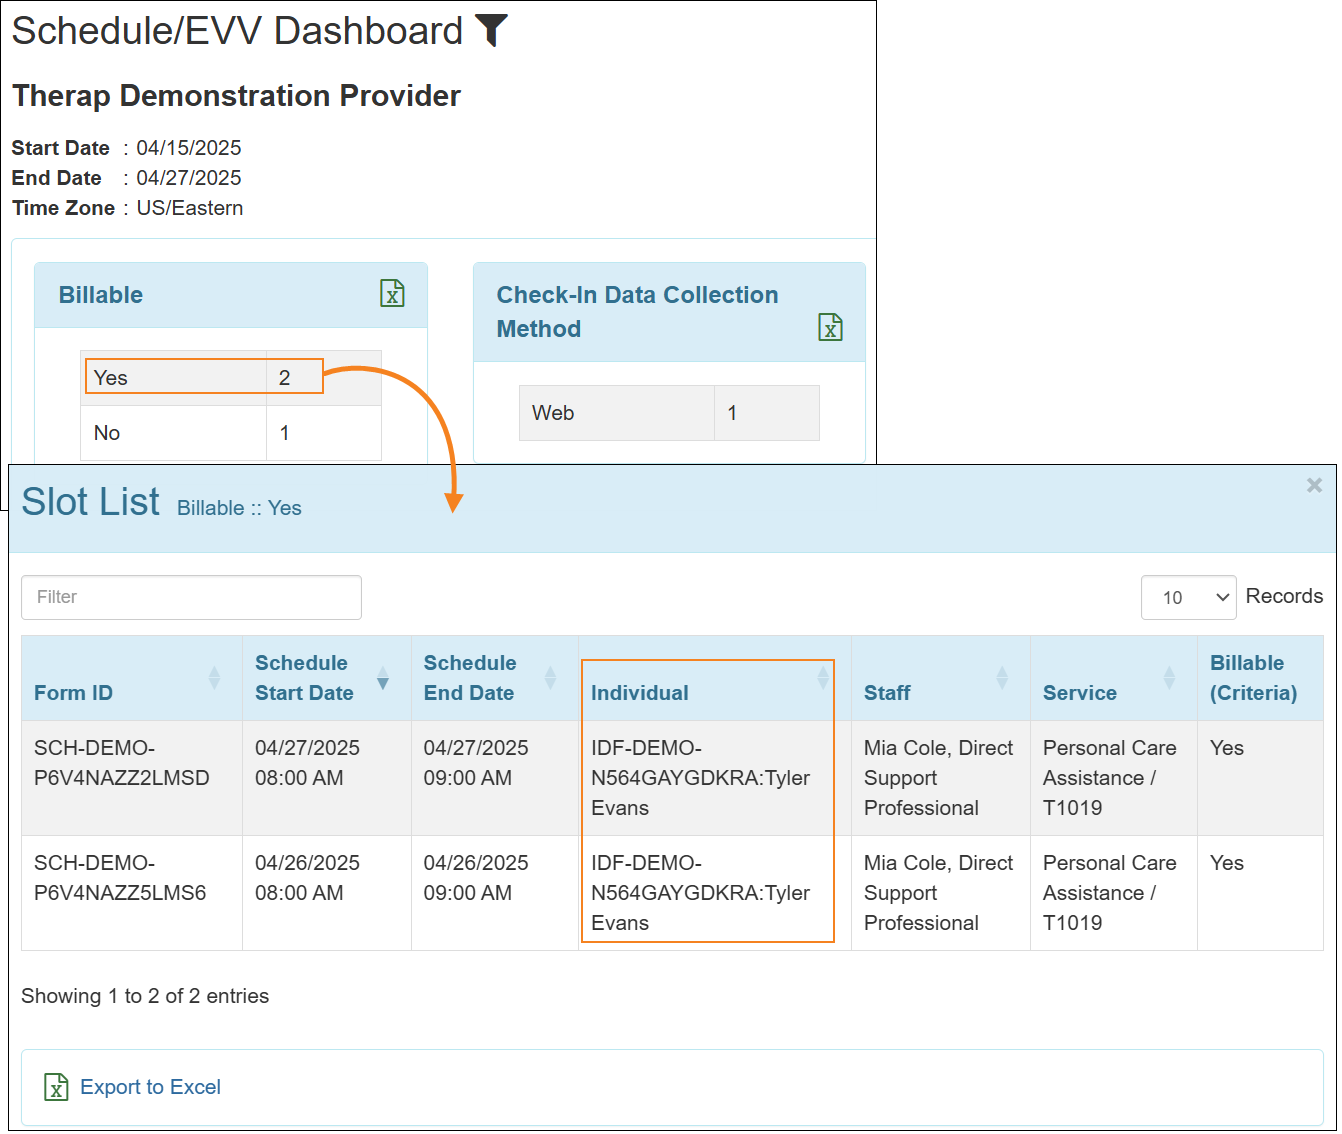
[Back to Top]- From now on, the Billable field will no longer appear on the ‘Staff’ type Schedule Slots.
- Only the number of ‘Individual’ type Schedule Slots will now be taken into account while displaying the counts of billable and non-billable Schedule Slots in the ‘Billable’ section of the ‘Schedule/EVV Dashboard’. The system will no longer consider the number of ‘Staff’ type Schedule Slots while calculating and displaying the counts of billable and non-billable schedules in the ‘Billable’ section of the ‘Schedule/EVV Dashboard’.
Self Password Reset
| Super Admins will need to send us requests through the 'Issue Tracking' section to enable this feature for their agency. |
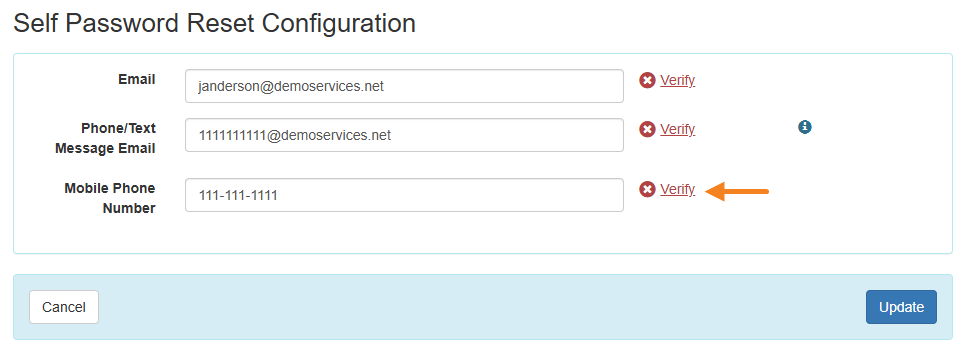
- A new Mobile Phone Number field has been added to the 'Self Password Reset Configuration' page. Users who wish to receive login One Time Passcodes (OTP) via SMS will have to enter a valid mobile phone number in this field and click on the adjacent Verify option.
- This will open a ‘Verify Mobile Phone Number’ window, where the verification code sent to the phone number via SMS must be entered in the Verification Code field.
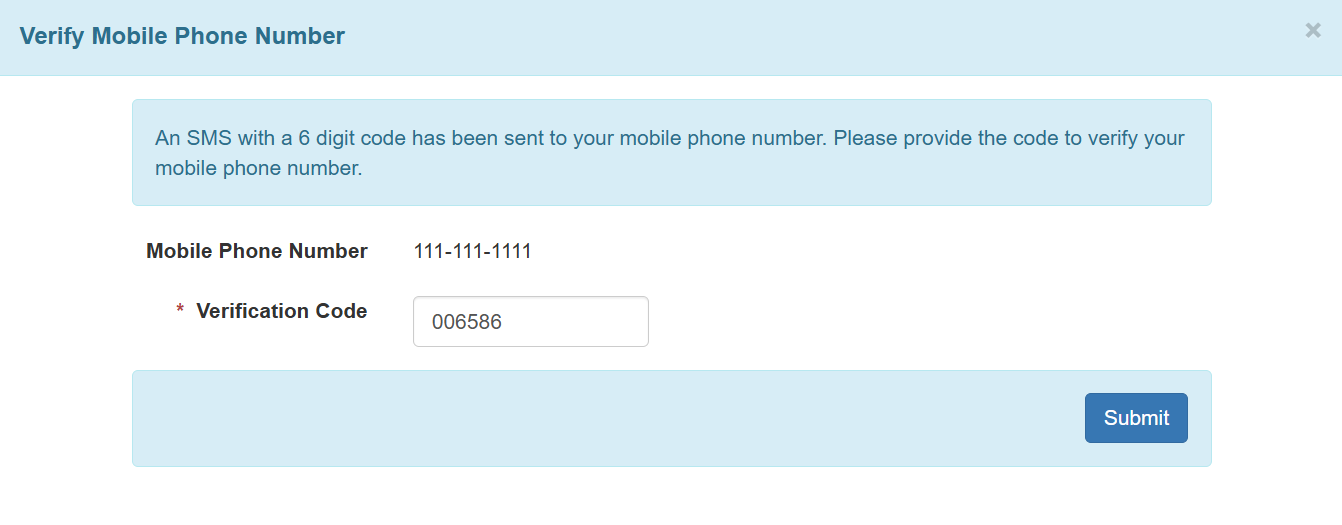
- Entering the correct 6-digit verification code will verify the phone number and a ‘Verified’ label will be added beside the Mobile Phone Number field.

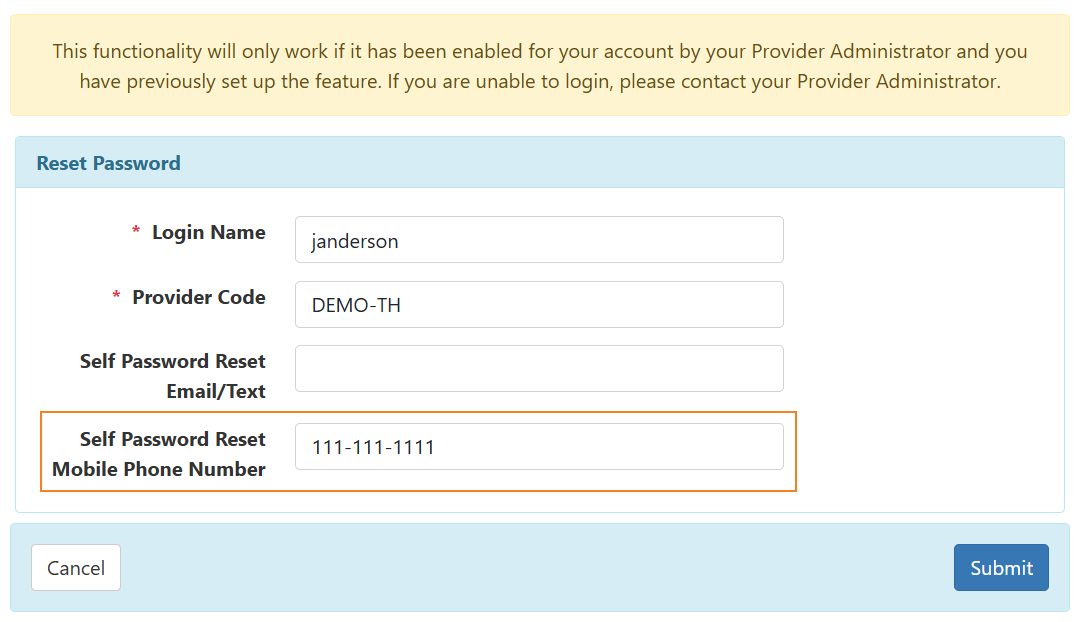
- The 'Reset Password' page accessible from the Forgot Password? link on the login page now includes a Self Password Reset Mobile Phone Number field, which can now be utilized to receive the Password Reset Token via SMS. Attempting to submit both Password Reset Email/Text and Self Password Reset Mobile Phone Number will show a validation error.
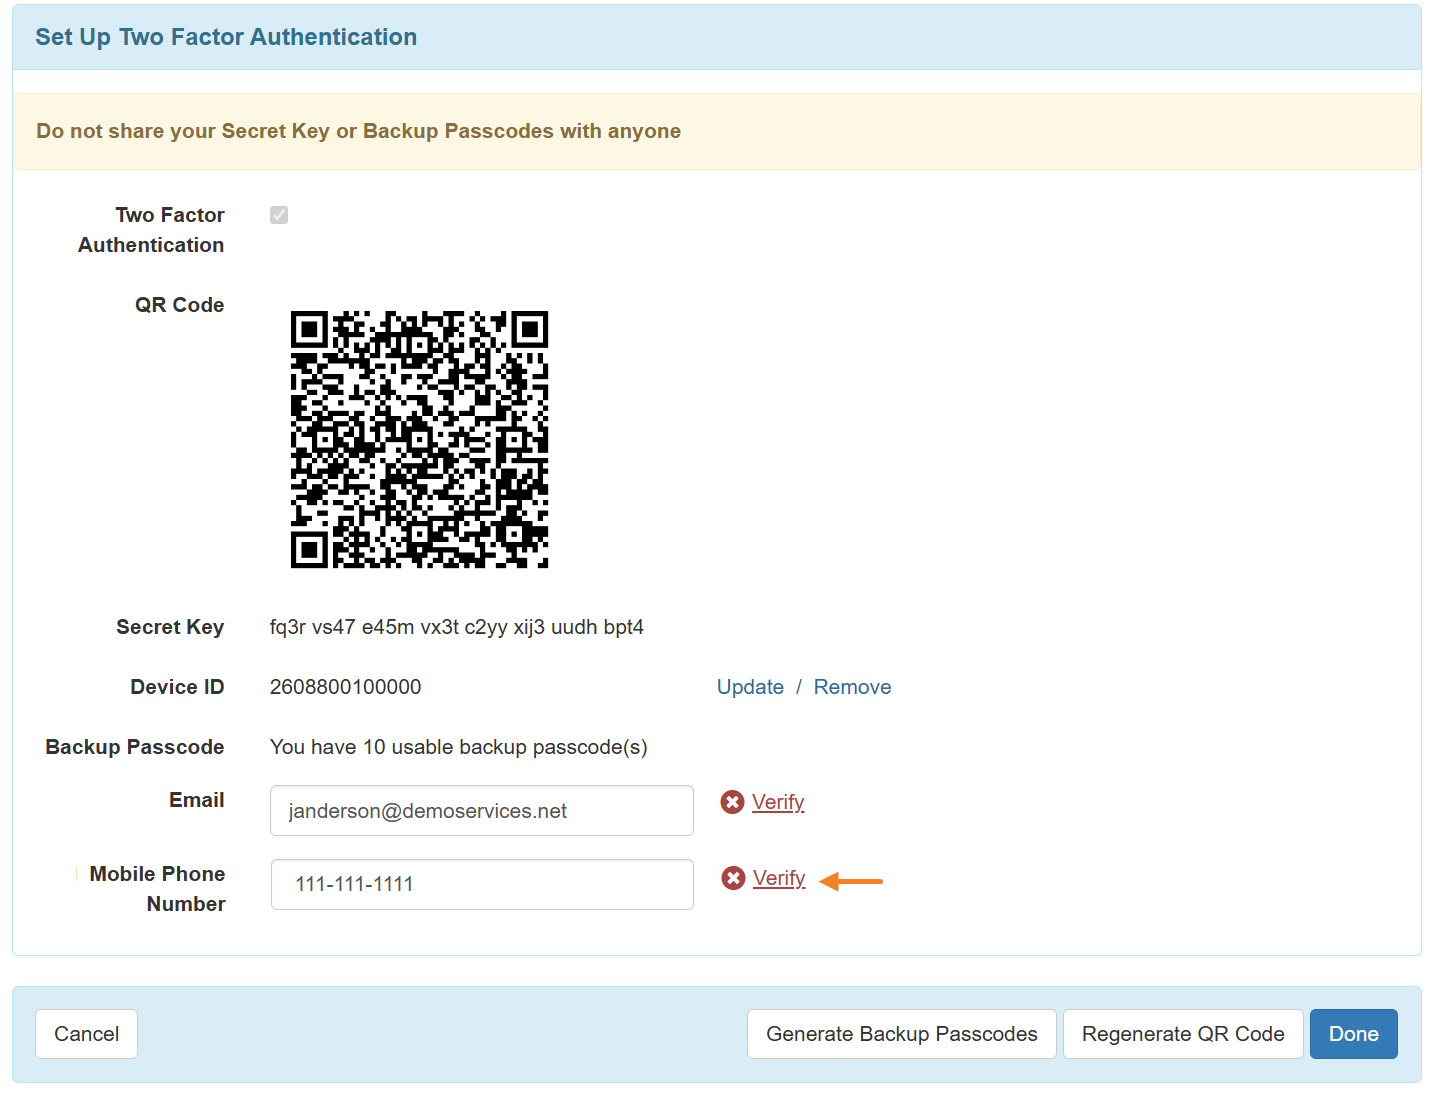
Two Factor Authentication (2FA)
- A new Mobile Phone Number field has been added to the 'Set Up Two-Factor Authentication' page. Users who wish to receive login One Time Passcodes (OTP) via SMS will have to enter a valid mobile phone number in this field and click on the adjacent Verify option.
- This will open a ‘Verify Mobile Phone Number’ window, where the verification code sent to the phone number via SMS must be entered in the Verification Code field.
- Entering the correct 6-digit verification code will verify the phone number and a ‘Verified’ label will be added beside the Mobile Phone Number field.
- This will open a ‘Verify Mobile Phone Number’ window, where the verification code sent to the phone number via SMS must be entered in the Verification Code field.
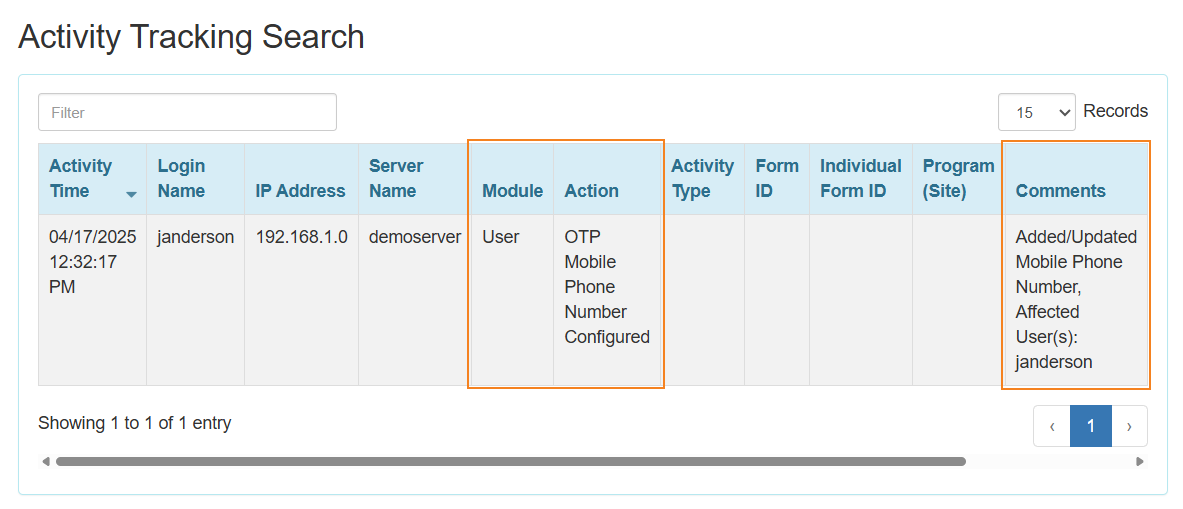
- A new second factor Passcode via SMS is now available during 2FA login. Selecting this option will send an OTP to the phone number configured on the ‘Set Up Two-Factor Authentication’ page. The received OTP will have to be entered in the One Time Passcode field in the next 5 minutes, and a new code can be requested by clicking the Resend link.

- A new option titled OTP Mobile Phone Number Configured has been added to the Action dropdown field for the Module titled User on the 'Activity Tracking Search' page, to view when users configure their 2FA Mobile Phone Number.