Therap for Canada 2025.1.0 Released!
Release Date: 1/26/2025 To learn more about the new features and enhancements included in this release, please view Release User Guides for Canada 2025.1.0
- Appointments
- Case Note
- Case Note Billing
- Daily MAR New!
- Employment History
- Individual Home Page
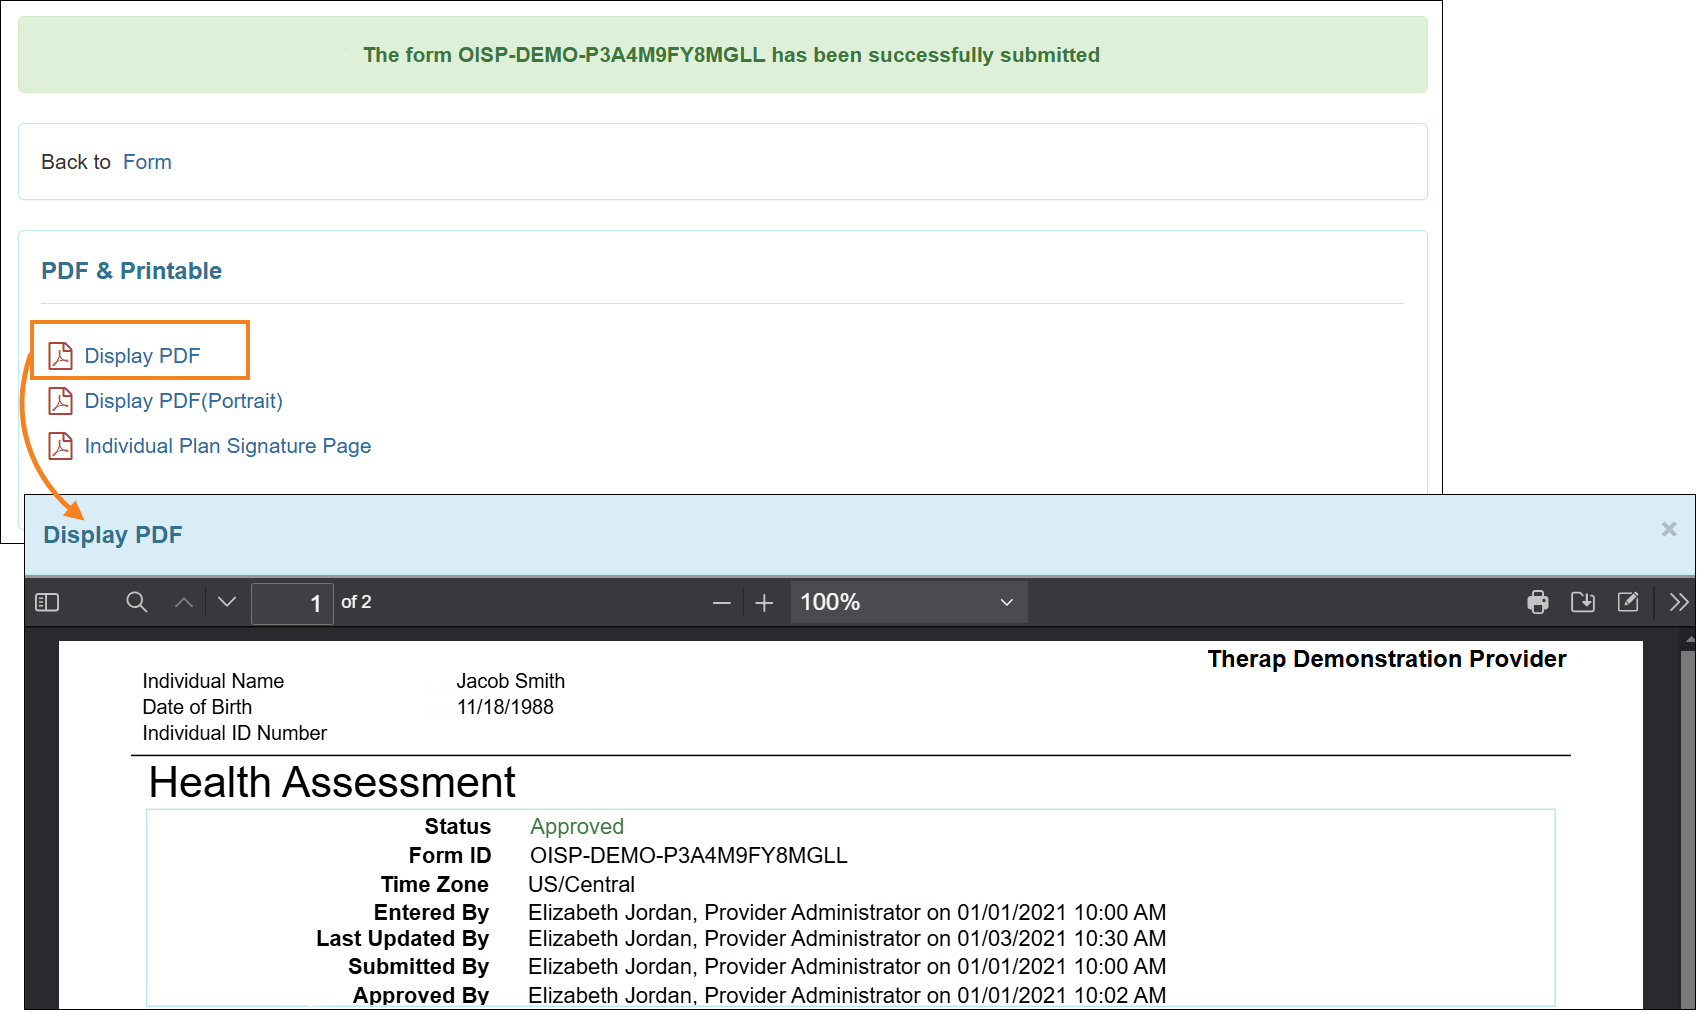
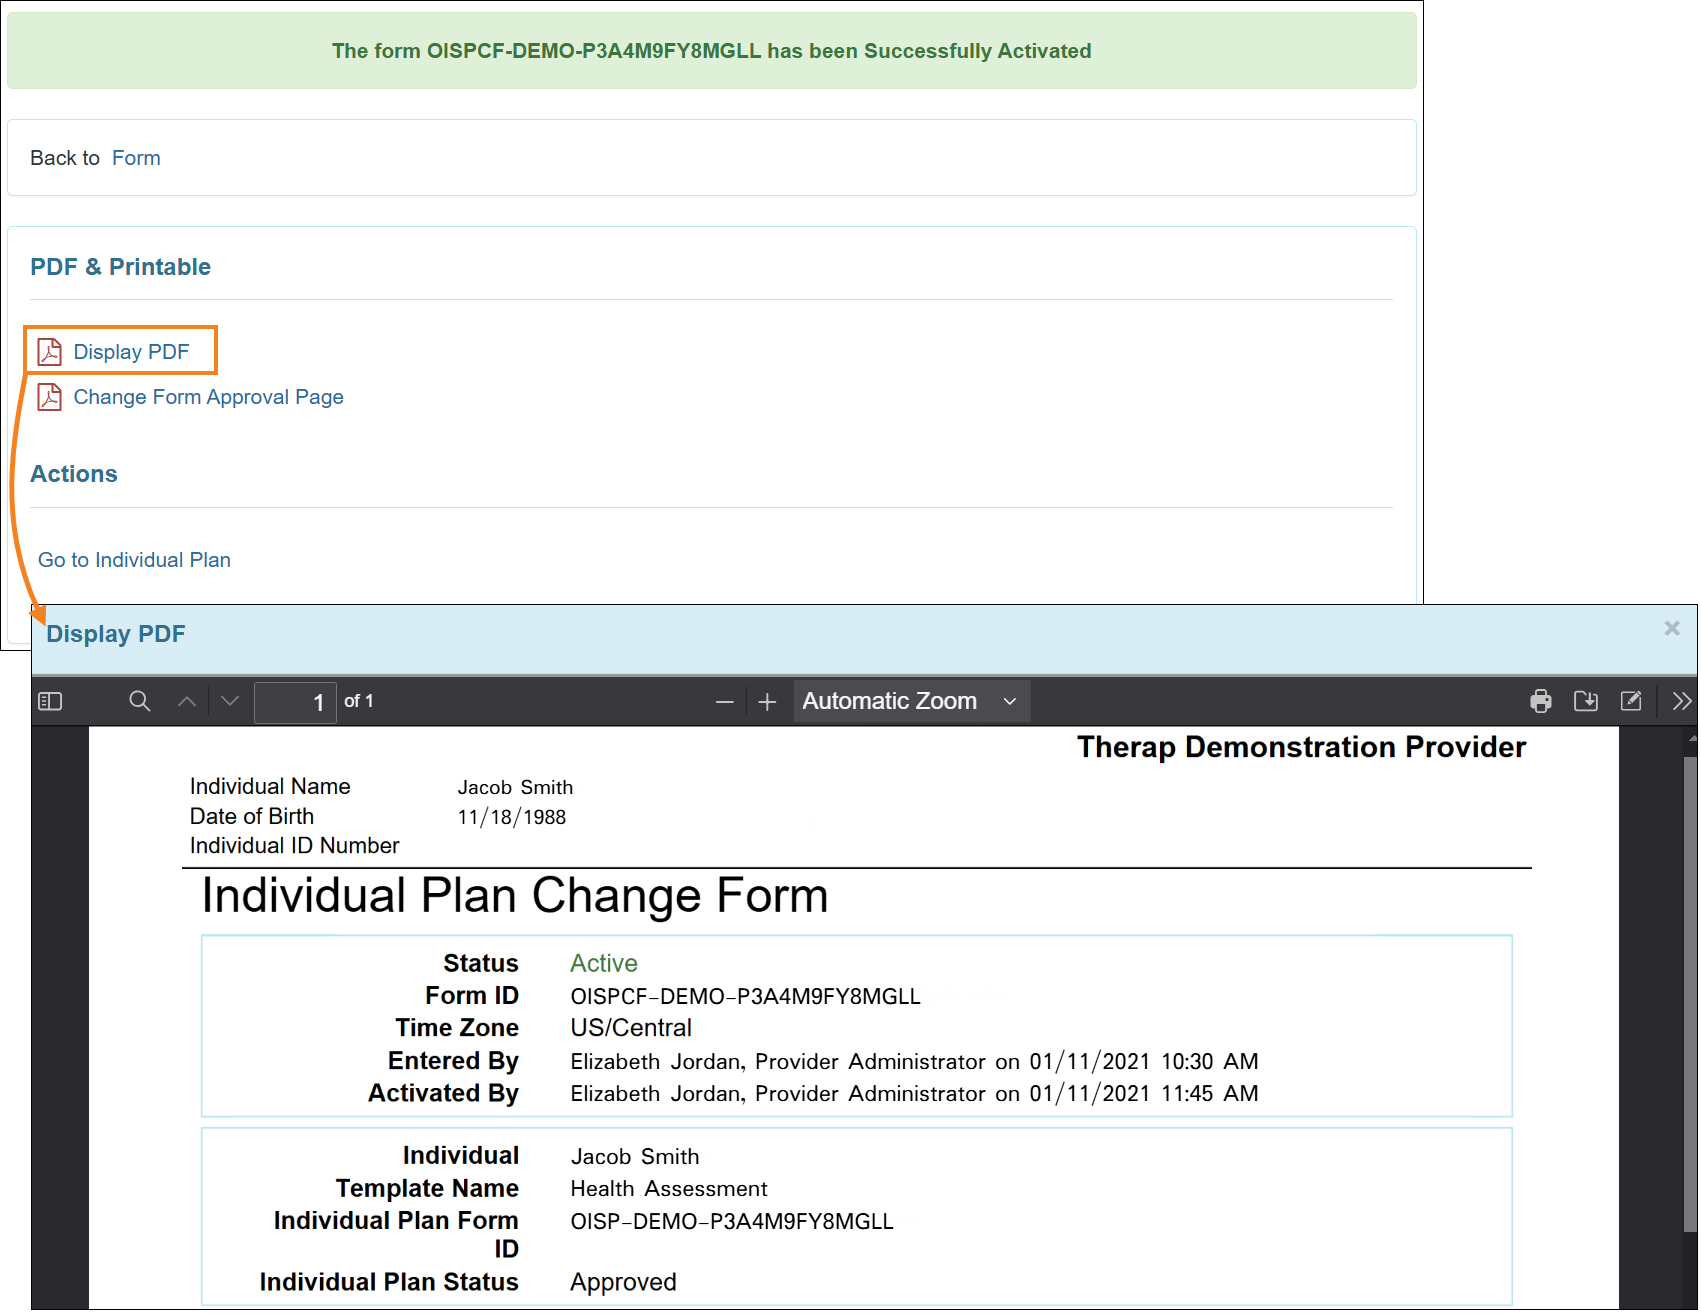
- Individual Plan
- Individual Plan Agenda
- Order
- Personal Finance
- Personal Focus Worksheet
- Provider Preference
- Service Authorization
- Service Directory
Appointments
[Back to Top]- Users will now receive a warning message if they attempt to submit an Appointment for the same individual that overlaps with the Begin Time to End Time span of an existing ‘Approved’ Appointment within the same Date. To submit overlapping Appointments, users will need to click on the Yes button in the warning message popup.

Case Note
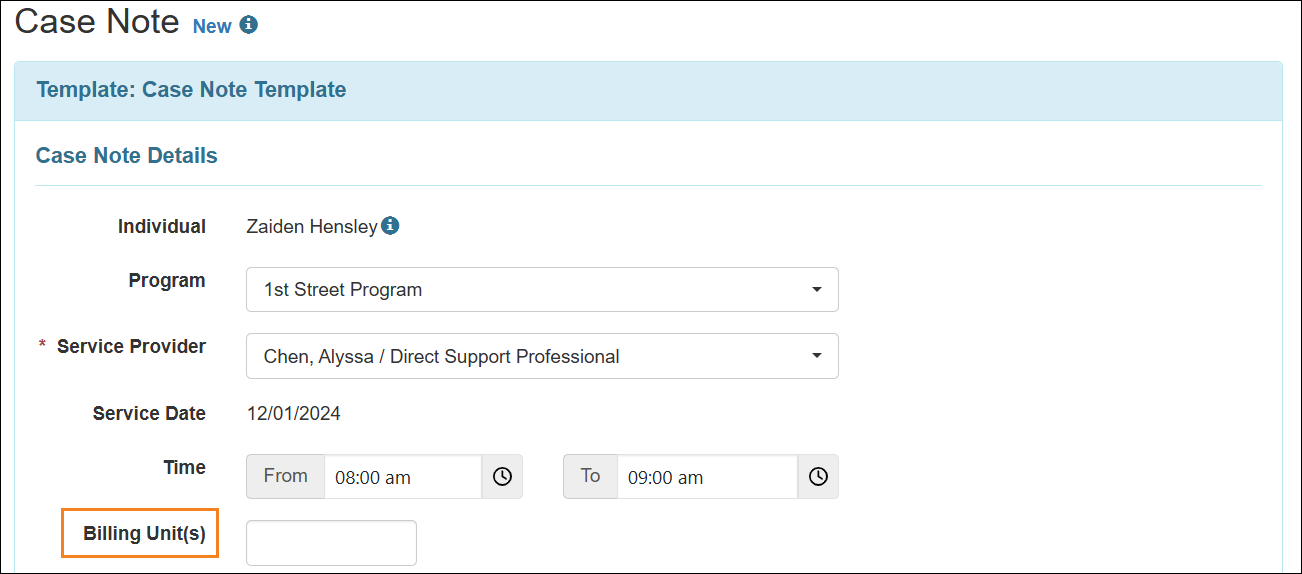
[Back to Top]- A new field titled Billing Unit(s) has been added to the ‘Field Properties’ section of Case Note Template. The field will not be selected by default.
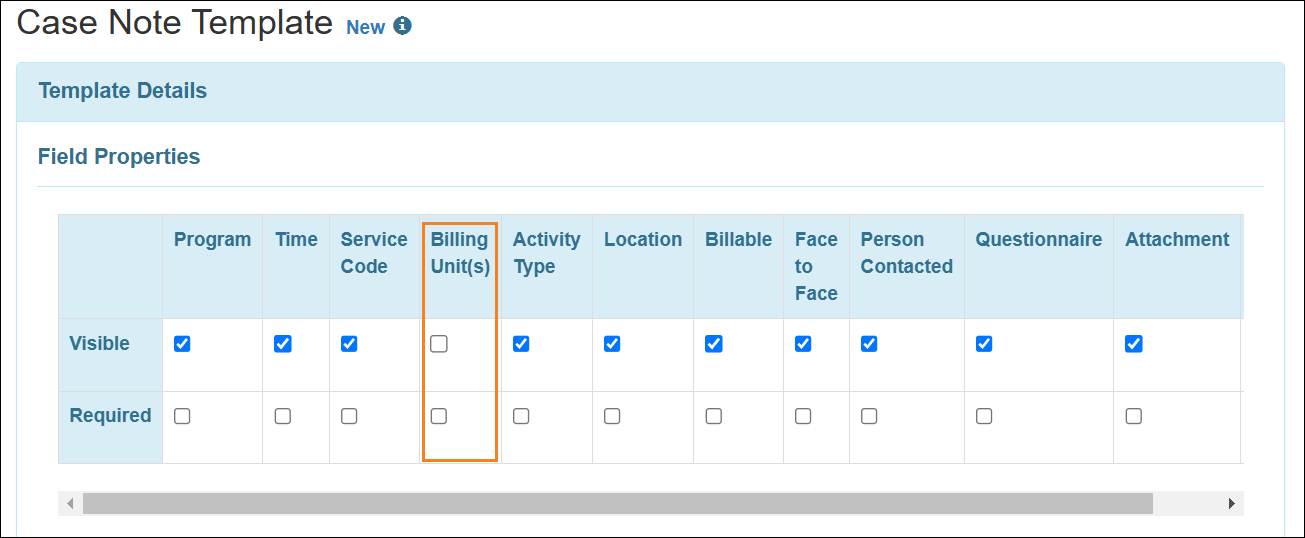
- If users select this field in the template then a Billing Unit(s) text field will be shown in the corresponding Case Notes.
- A new Billing Unit(s) column has been added on the ‘Case Note Search’ results page.
-250102.png)
Case Note Billing
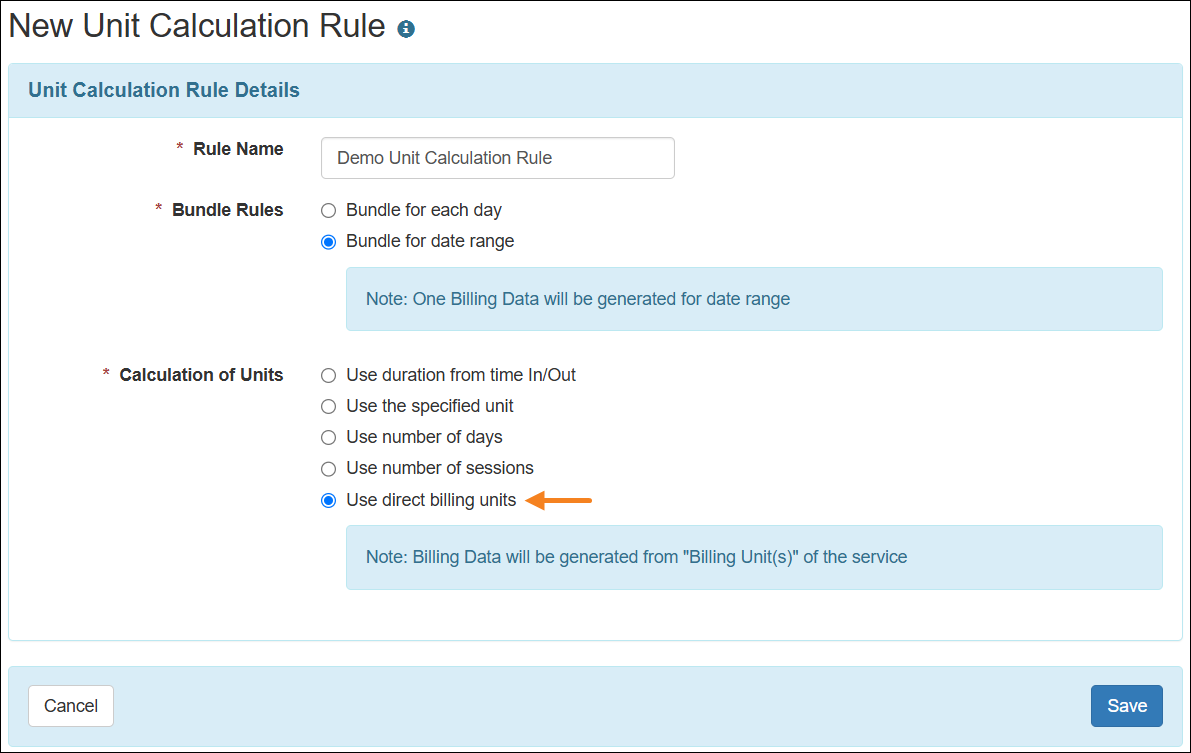
[Back to Top]- A new Use direct billing units option has been added for the Calculation of Units field on the ‘Unit Calculation Rule’ form.
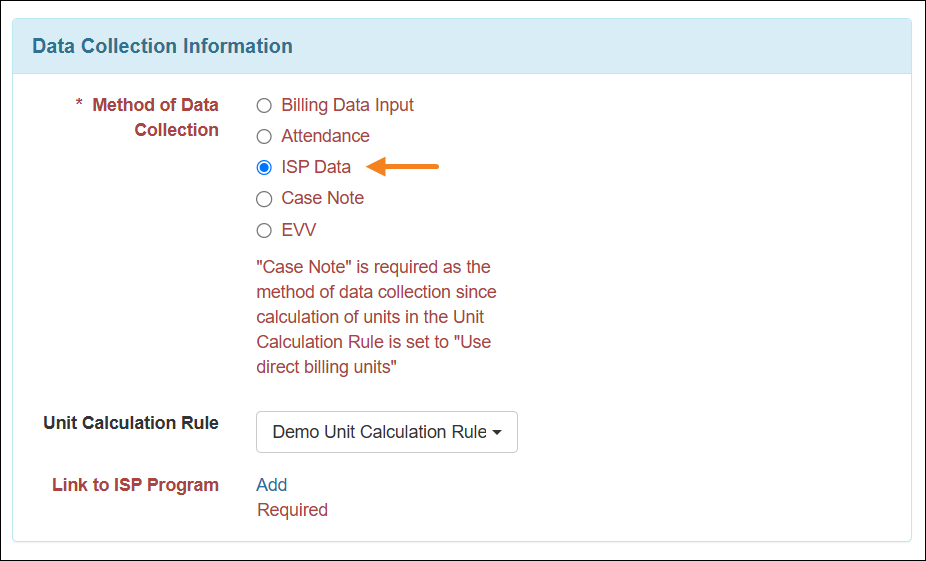
- If ‘Use direct billing units’ has been selected as the Calculation of Units in the Unit Calculation Rule, then Method of Data Collection needs to be selected as ‘Case Note’. When users select ‘EVV’ or ‘ISP Data’ as the Method of Data Collection, the following validation message will appear in the Service form when creating a Service Authorization: “Case Note” is required as the method of data collection since calculation of units in the Unit Calculation Rule is set to “Use direct billing units”.
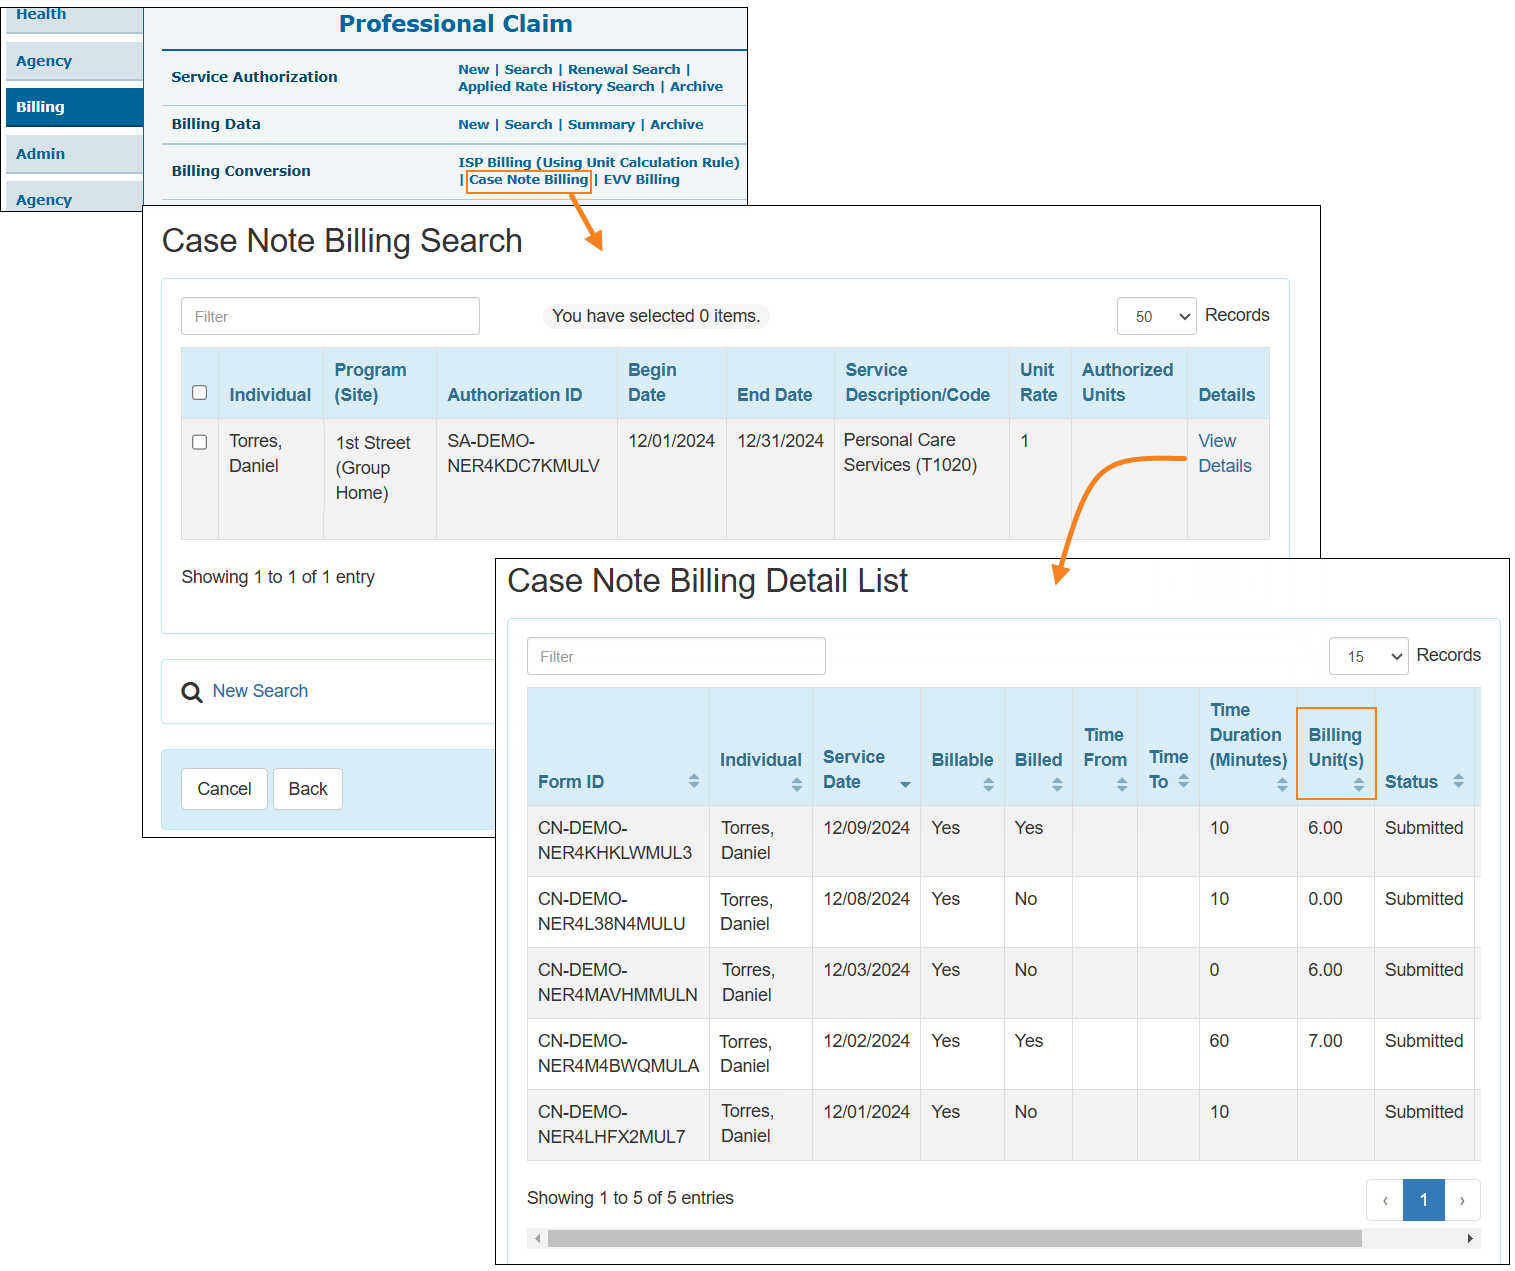
- A new Billing Unit(s) column has been added in the 'Case Note Billing Detail List' and the 'Case Note Reference Search' list pages.
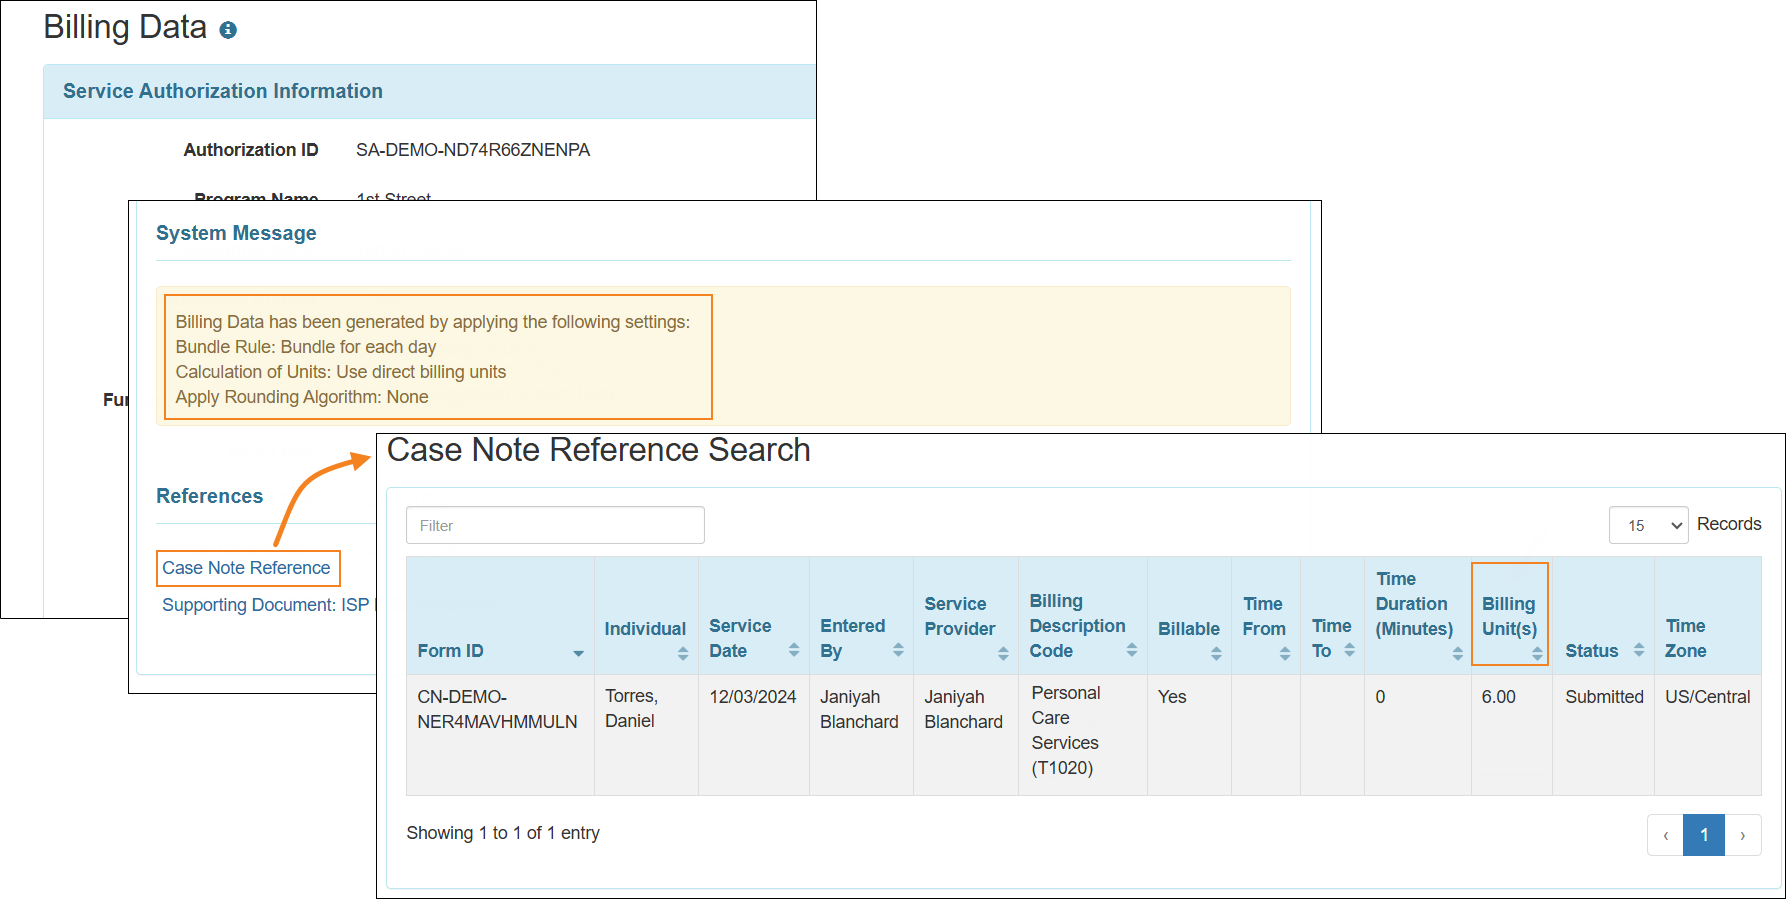
- After generating the billing, the following message is also shown in the ‘System Message’ section of the Billing Data form: "Calculation of Units: Use direct billing units". The Billing Unit(s) column will be available on the ‘Case Note Reference Search’ page that is shown after clicking on the Case Note Reference link on the Billing Data form.
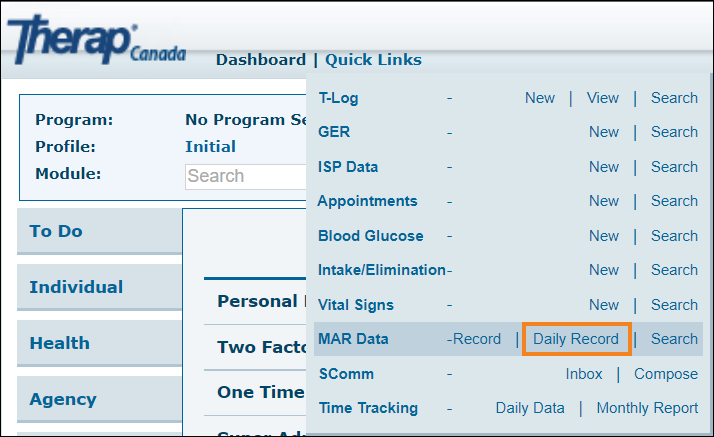
Daily MAR New!
[Back to Top]- To get started, have a Super Admin at your agency complete this form.
Once Daily MAR is enabled for the agency, users assigned with the Provider Setup administrative role will be able to see a new option titled Provider MAR Configuration in the 'General' section of the Admin tab.
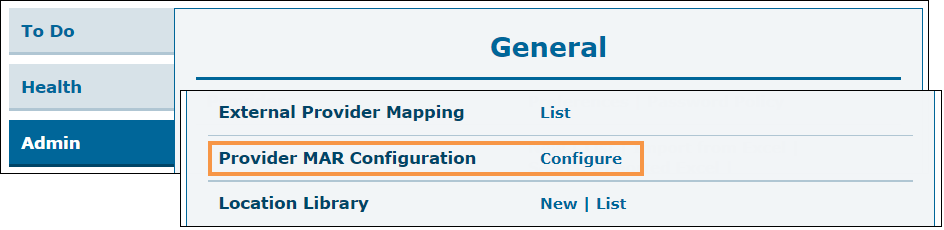
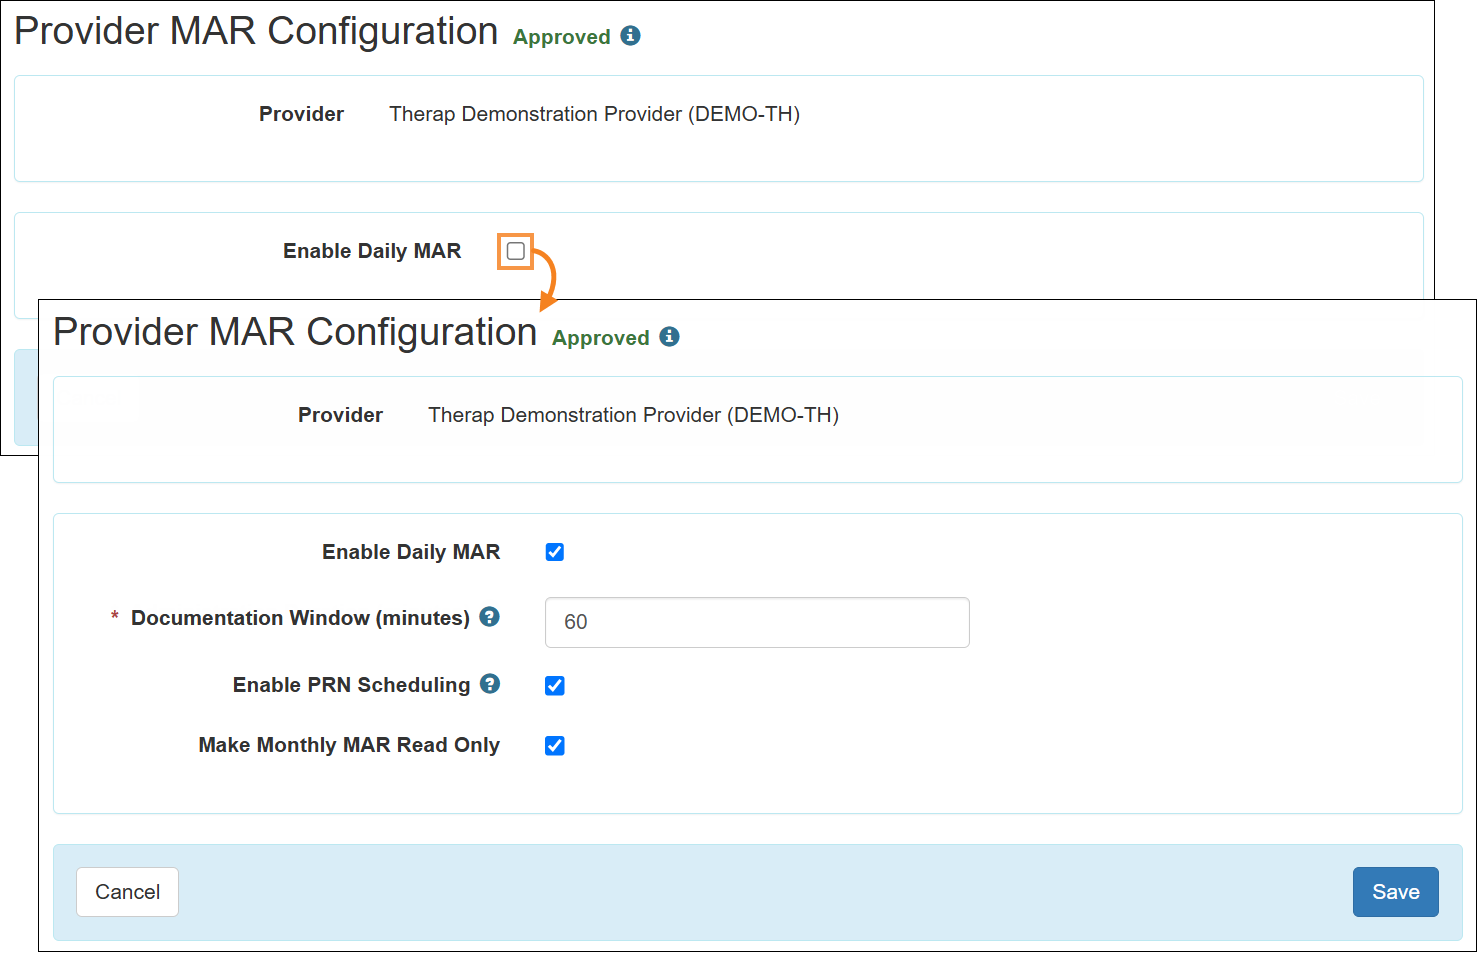
Using the Configure link next to this option, users can enable or disable Daily MAR for their provider. The following options will be available upon checking the Enable Daily MAR checkbox:- Documentation Window (minutes): To specify how long before and after the scheduled administration time, the slot can be recorded within the system.
- Enable PRN Scheduling: To enable scheduling of PRN followup and PRN record for a recorded PRN entry.
- Make Monthly MAR Read Only: To make the monthly MAR data entry mode read-only.
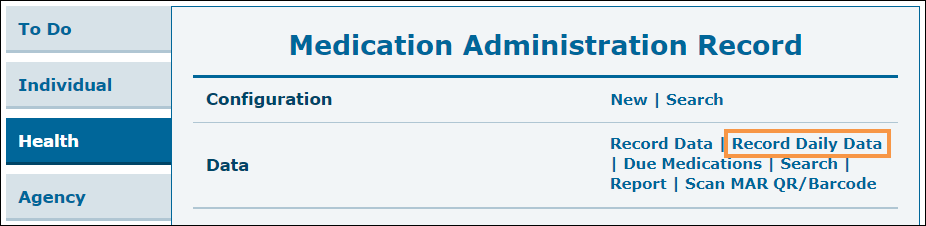
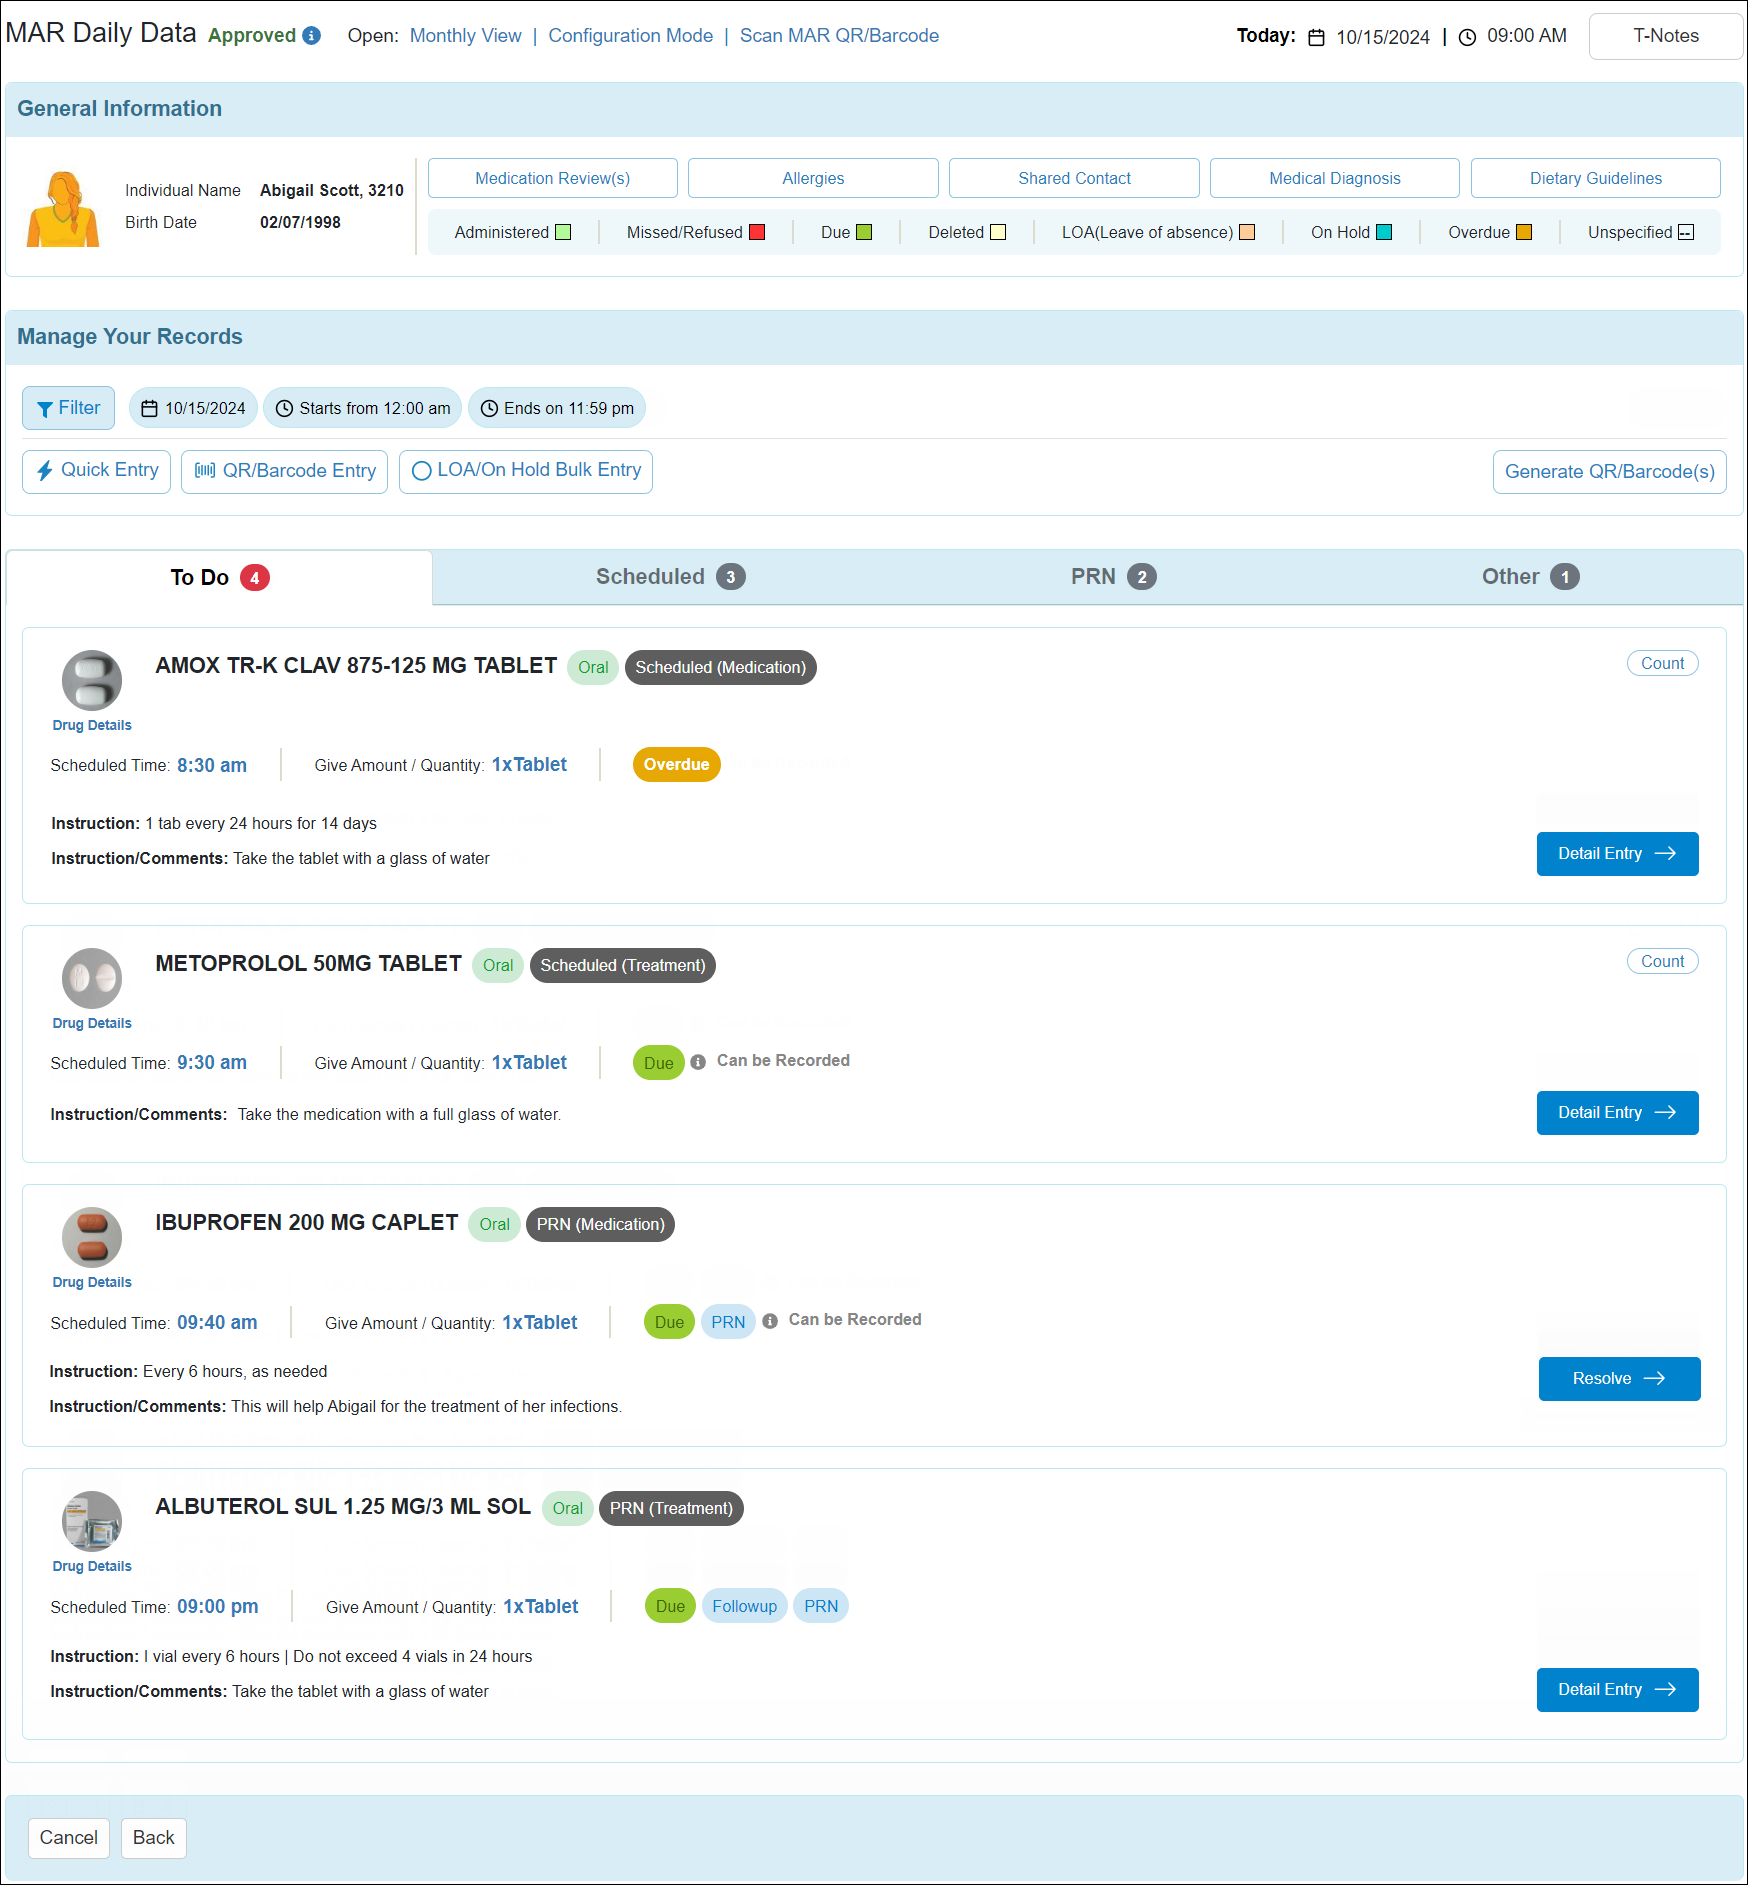
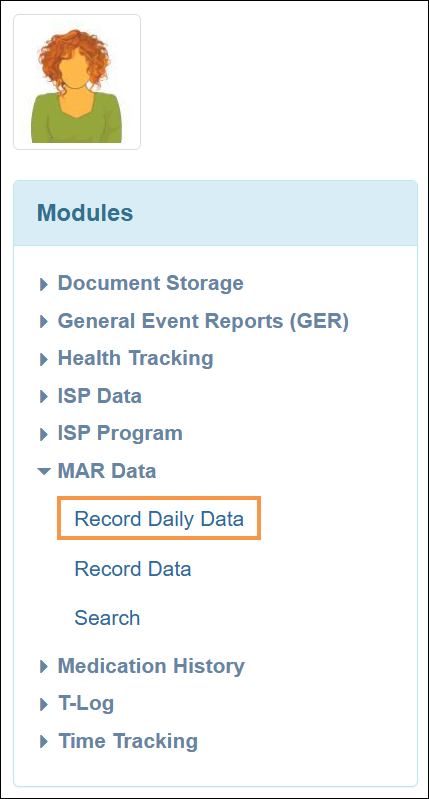
- For the Daily MAR enabled providers, if Daily MAR is also enabled in the 'Provider MAR Configuration' page, then a new Record Daily Data button beside the Data option on the Health tab will be available for the users who are assigned with MAR Data caseload-based roles.
Clicking on the Record Daily Data link will take users to the Daily Data selection page where they will need to Filter the date and select the individual whose MAR they want to access. The current date will auto-populate on the Date field by default, and only the individuals who have approved MAR available on the filtered date will be displayed in the individual(s) list.
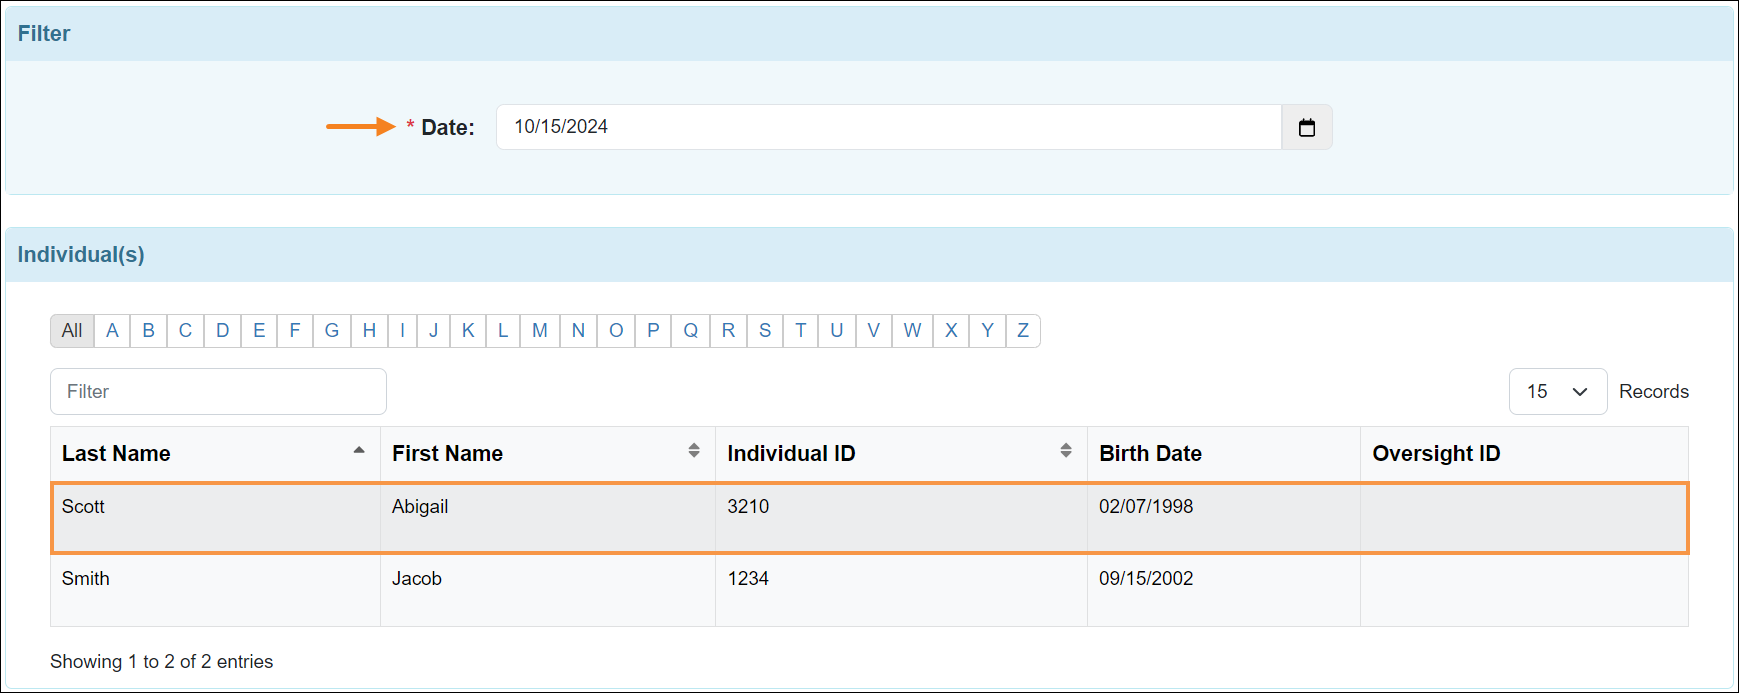
Selecting the individual will open-up their Daily MAR for the filtered date.
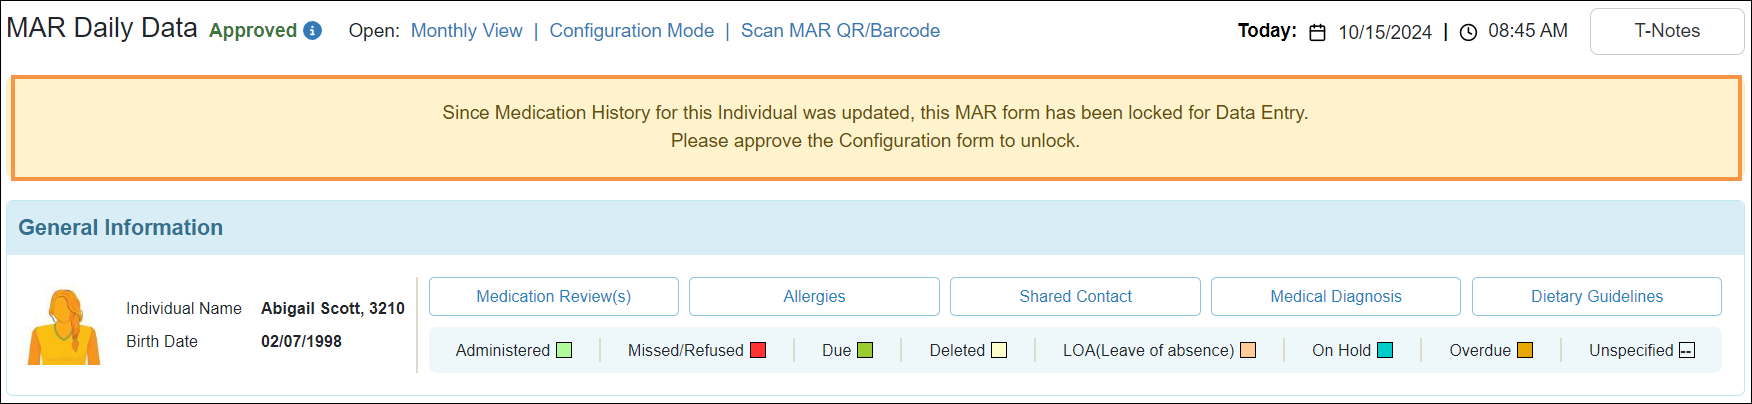
However, if MAR for the selected month is in locked state, then users will be unable to record on the Daily MAR, and the following note will be displayed on top of the MAR:
'Since Medication History for this Individual was updated, this MAR form has been locked for Data Entry.
Please approve the Configuration form to unlock.'
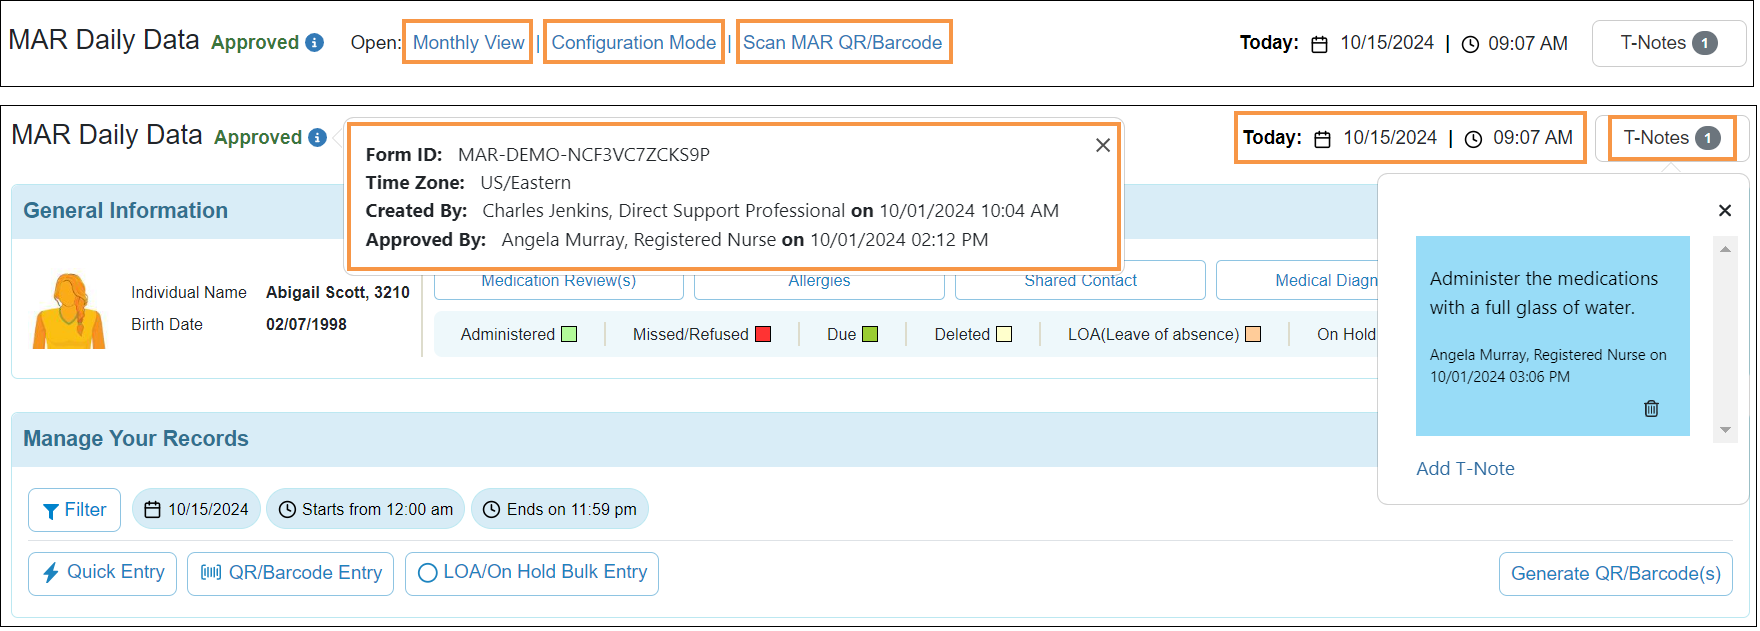
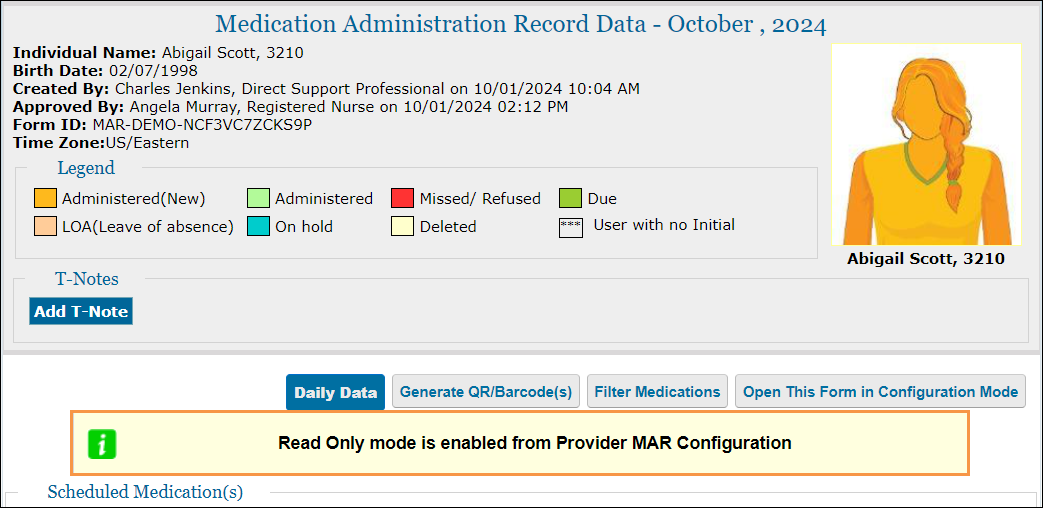
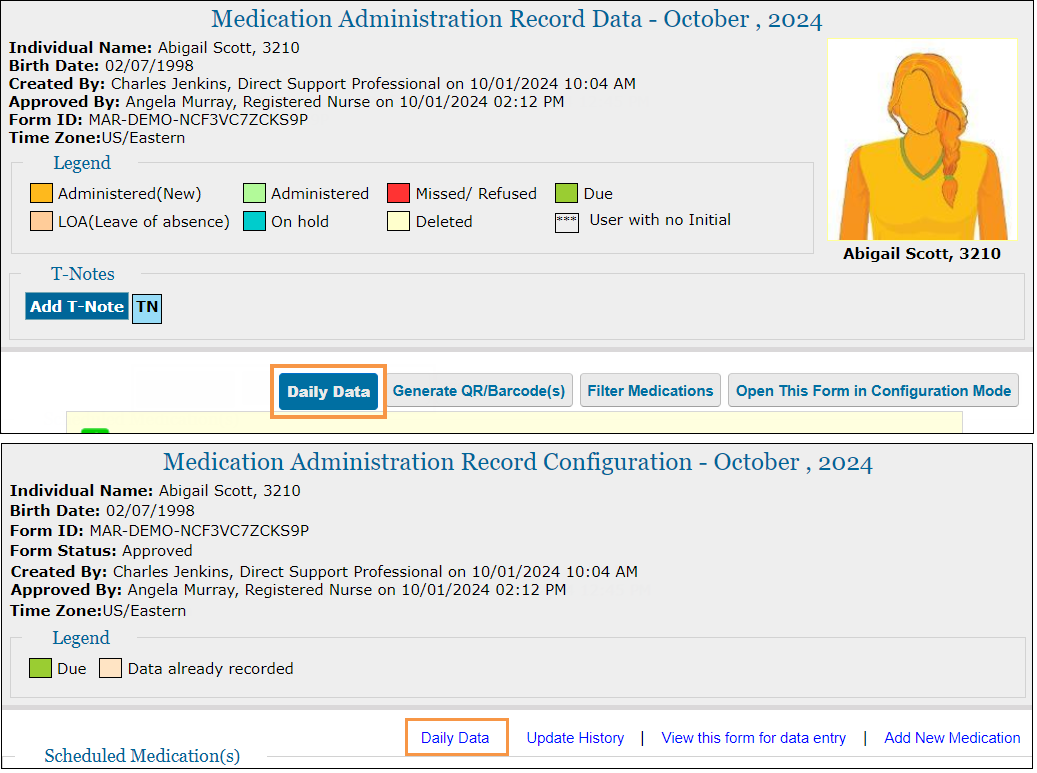
- The following information will be displayed on top of the Daily MAR:
- Clicking on the 'i'' button will display the MAR Form ID, Time Zone, Created By, and Approved By information.
- Clicking on the Monthly View link will take users to the monthly MAR in Data Entry Mode.
- Clicking on the Configuration Mode link will take users to the monthly MAR in Configuration Mode.
- The Scan MAR QR/Barcode link allows users to scan or manually search for a MAR or a medication within the MAR.
- The Today field will display the current Date and Time based on the Time Zone of the MAR form.
- The T-Notes button can be utilized to add, view, or minimize T-Notes. If T-Notes have been added for a month, then it will auto-popup when the Daily MAR is accessed.
- The 'General Information' section of the Daily MAR Data will display the following:
- Individual-specific information such as individual's photos from the Individual Demographic Form (IDF), Individual Name, and Birth Date will be displayed. If 'Individual ID' is available for the individual, it will display beside the individual's name.
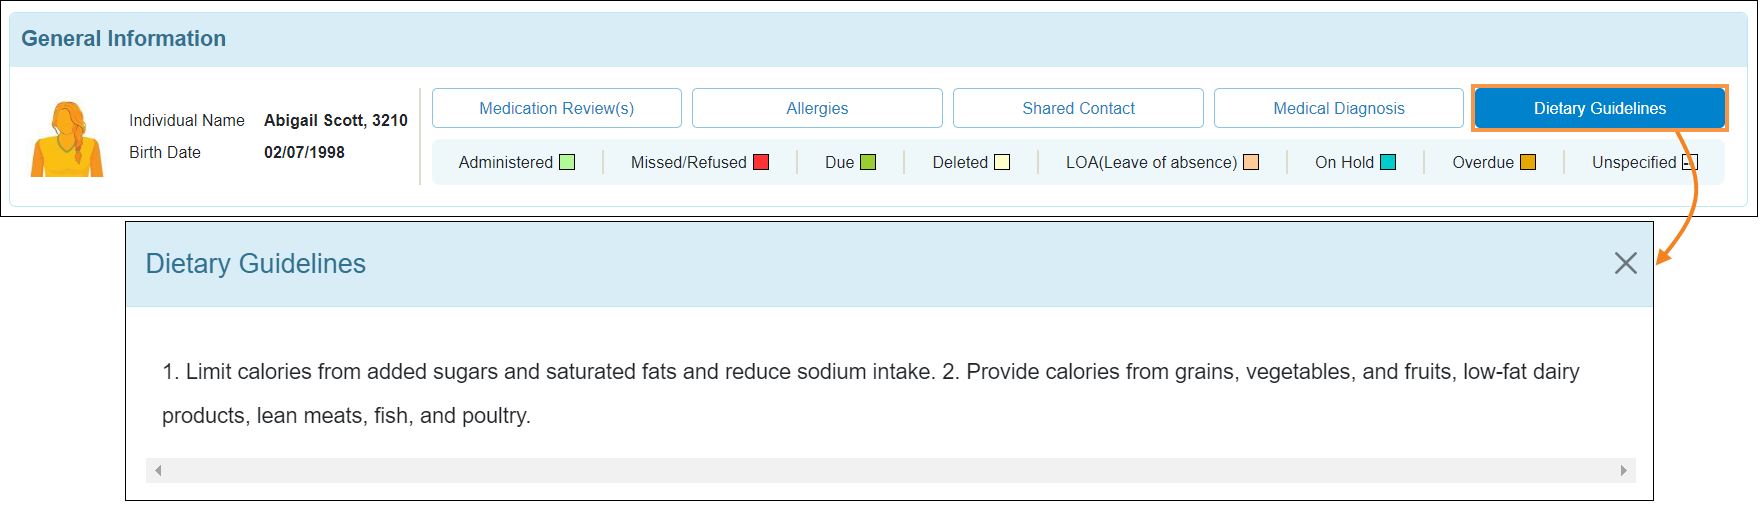
- Clicking on the Medication Review(s), Allergies, Shared Contact, Medical Diagnosis, and Dietary Guidelines buttons will allow users to access the respective information available for the individual in a popup window.
- The color legends for the Administered, Missed/Refused, Due, Deleted, LOA, On Hold, Overdue, and Unspecified type Administrations Records. The 'Due' and 'Overdue' label for medications will be displayed when the scheduled slot(s) are later and earlier than the current time, respectively.
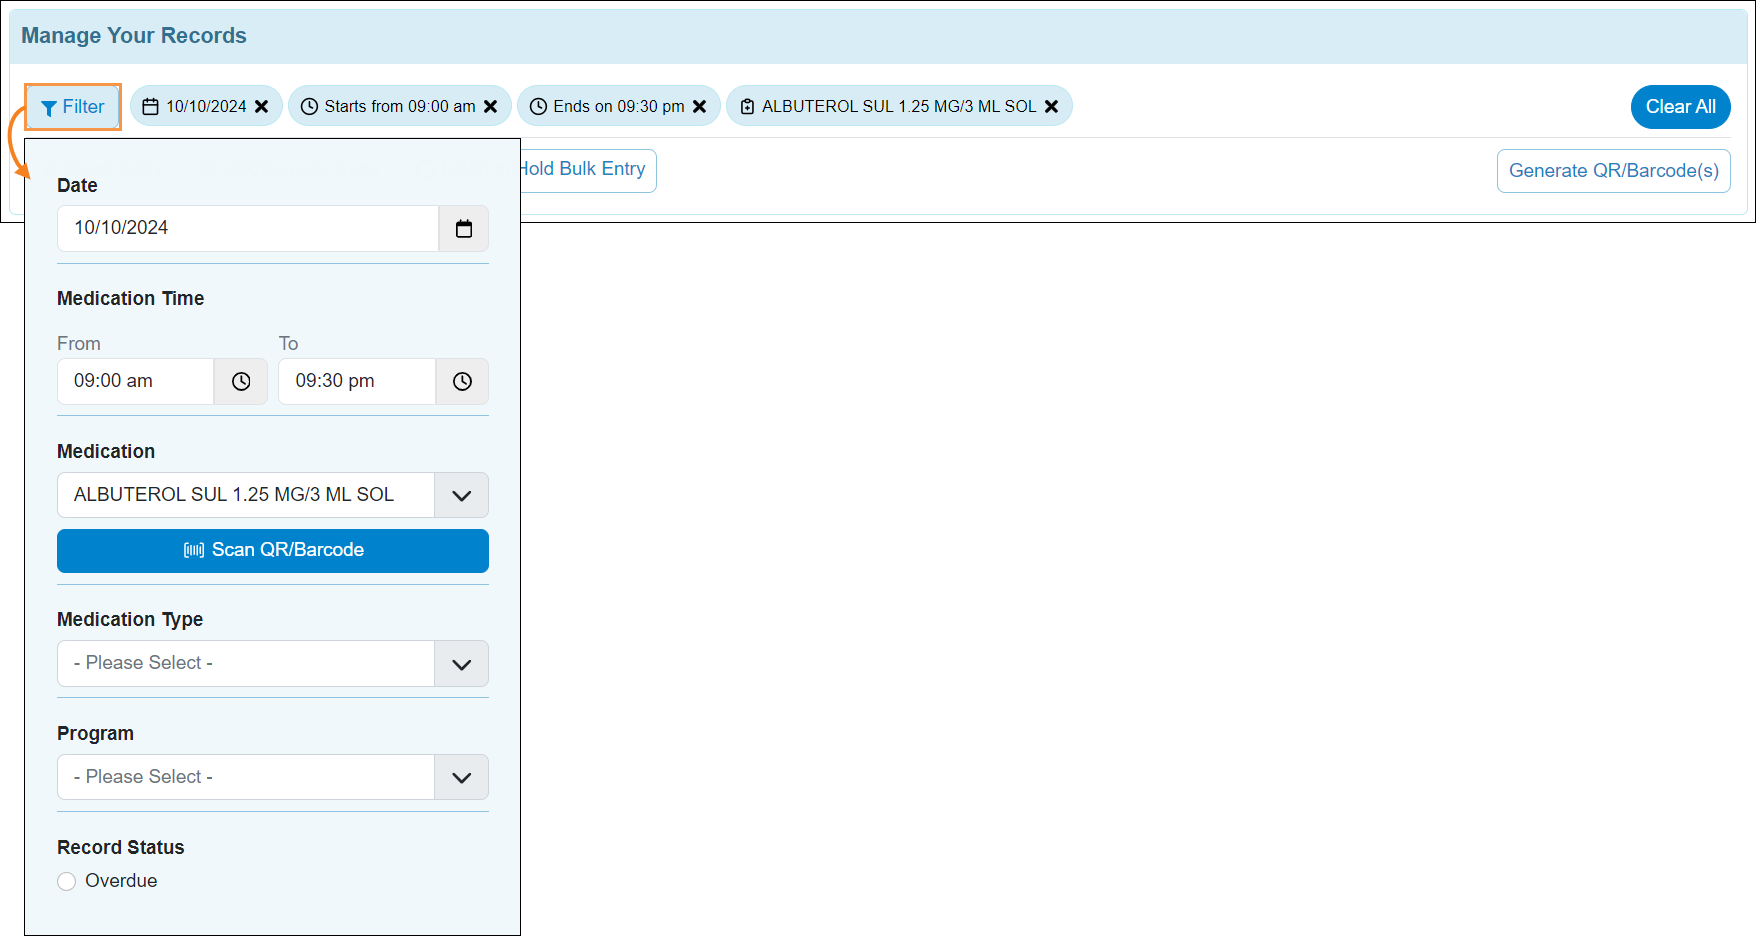
- Users can filter medications by Date, Medication Time (From to To), Medication (Name), Medication Type, Program, and Record Status information. If Scan is enabled for the provider, then users can also scan medications using the Scan QR/Barcode button from the Filter popup. Once a medication has been filtered, users can manually deselect the filtered criteria by using the cross (x) icon next to the filtered criteria. Users can also clear all the applied filters at a time and apply the default filter again by clicking on the Clear All button.
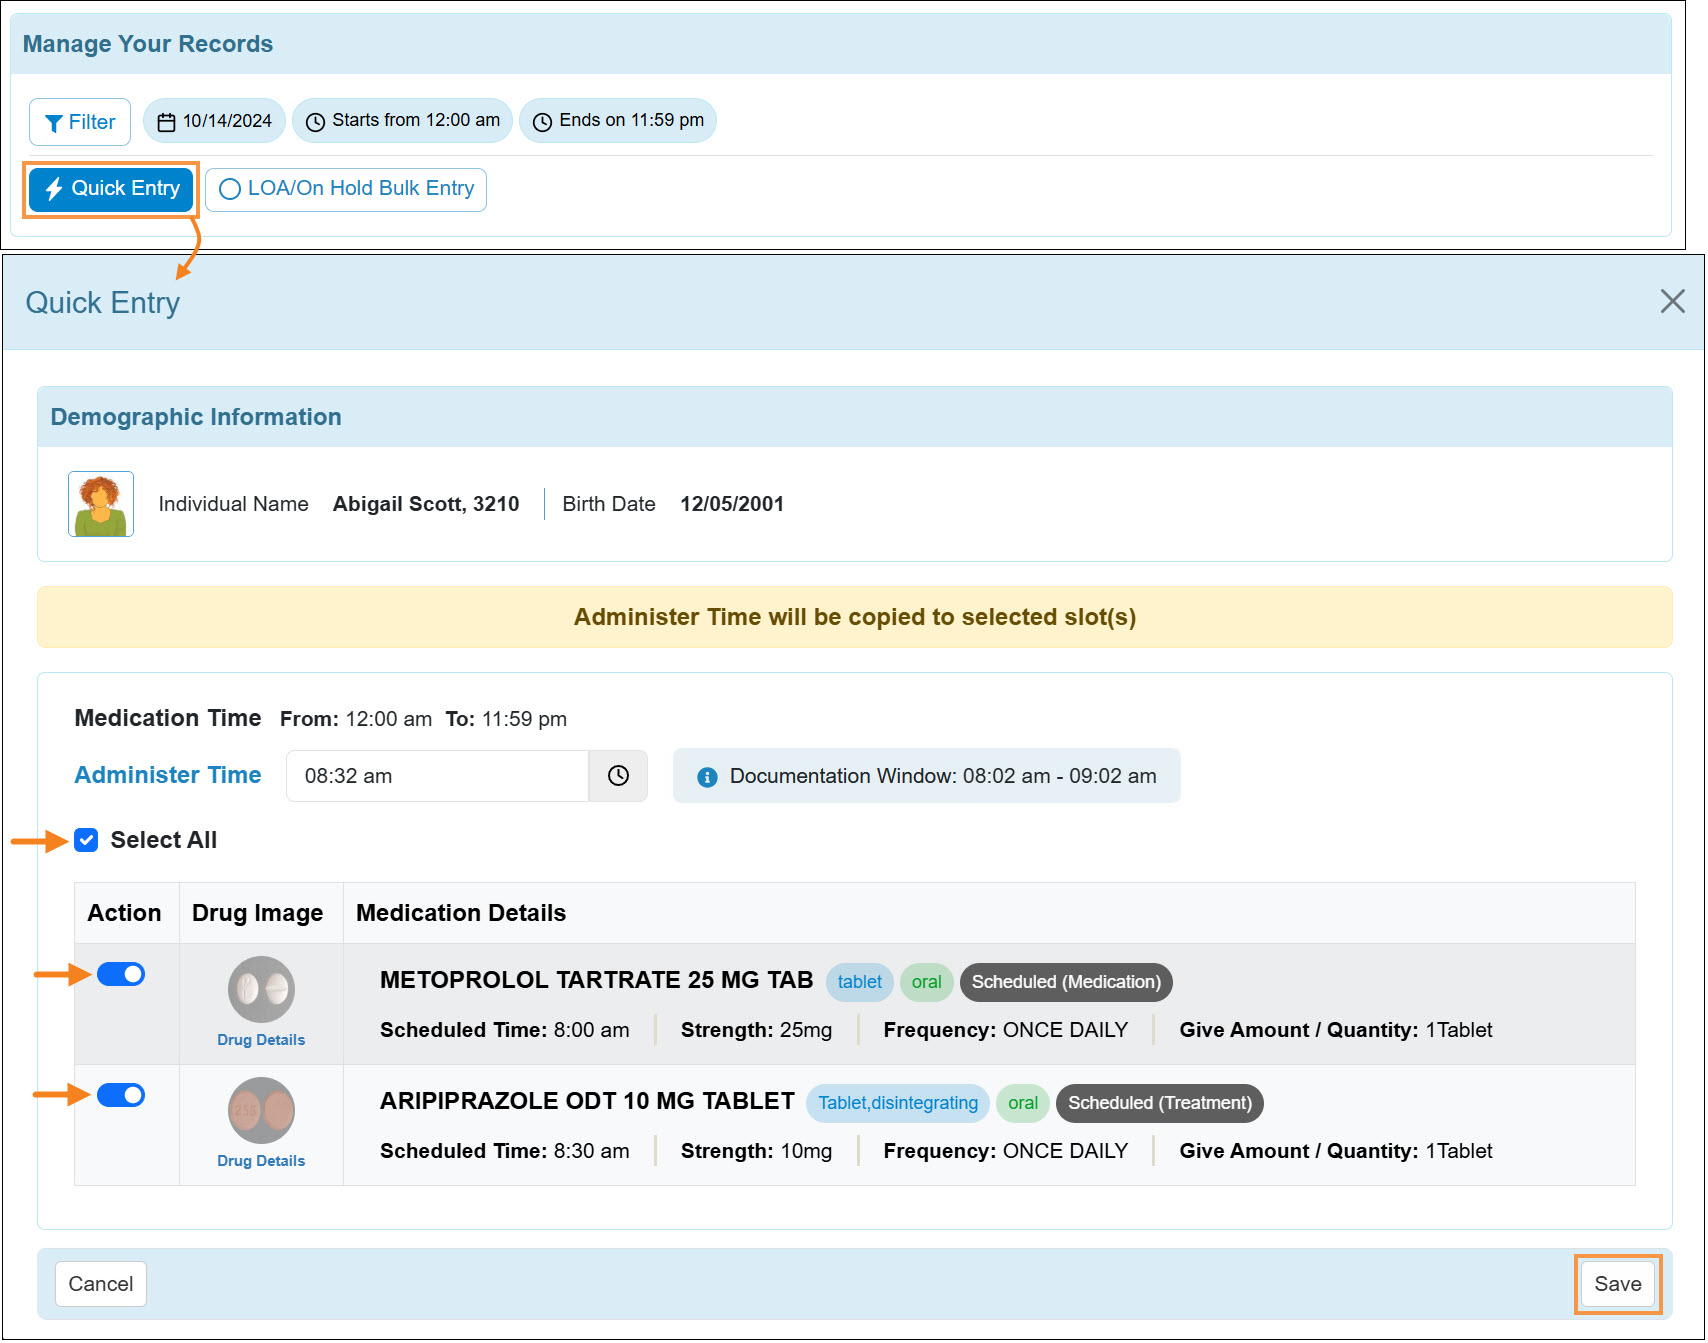
- Users can click on the Quick Entry button to quickly record the slot(s) as ‘Administered’ that are scheduled for the current date. Medications from future and past dates cannot be recorded using Quick entry. The following will be applicable for the Quick Entry feature:
- The Individual Photo, Name, Individual ID, and Birth Date of the individual will be displayed in the ‘Demographic Information’ section.
- The Medication Time From to To range will display the filtered time of the Daily MAR.
- The Administer Time field will auto-populate the current time, however users can select a time in this field that is not later than the current time.
- The Documentation Window field will display the duration of the documentation window with respect to the current time.
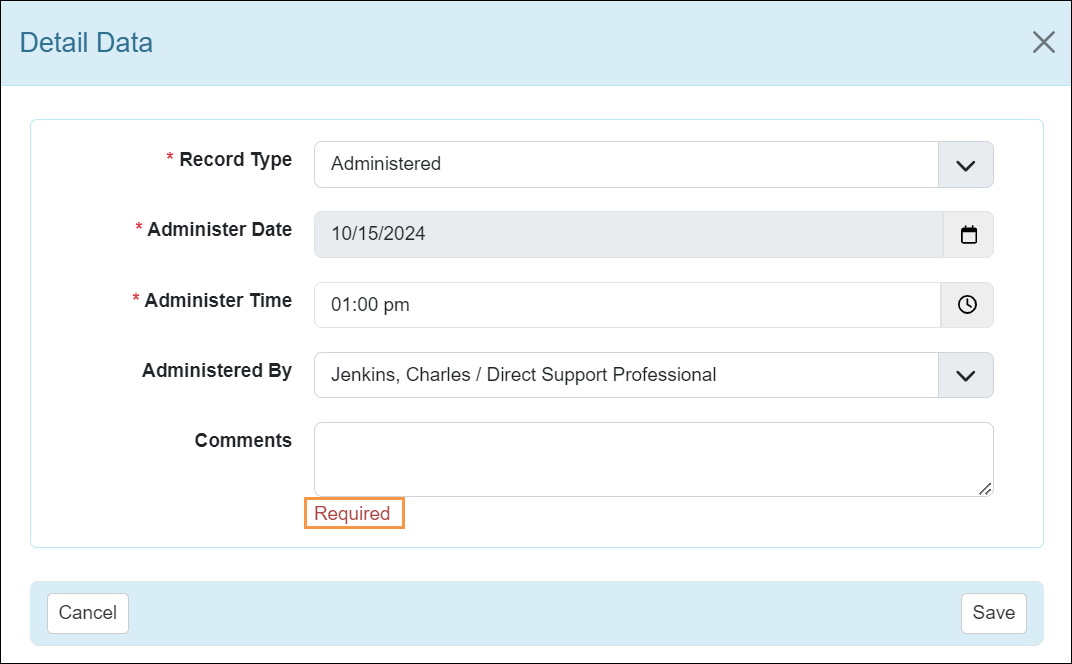
- If the selected Administer Time is outside of any particular scheduled slot's documentation window, then users will receive a validation stating: 'Comments required for the highlighted slot(s)'. Users will have to administer those slot(s) from the ‘Detail Data’ popup window of the corresponding slot.
- While selecting slots, medications can be marked one by one using the toggle button in the Action column, or all the displayed slots can be marked at a time by using the Select All checkbox.
- Scheduled PRN Followups will not be applicable for Quick Entry.
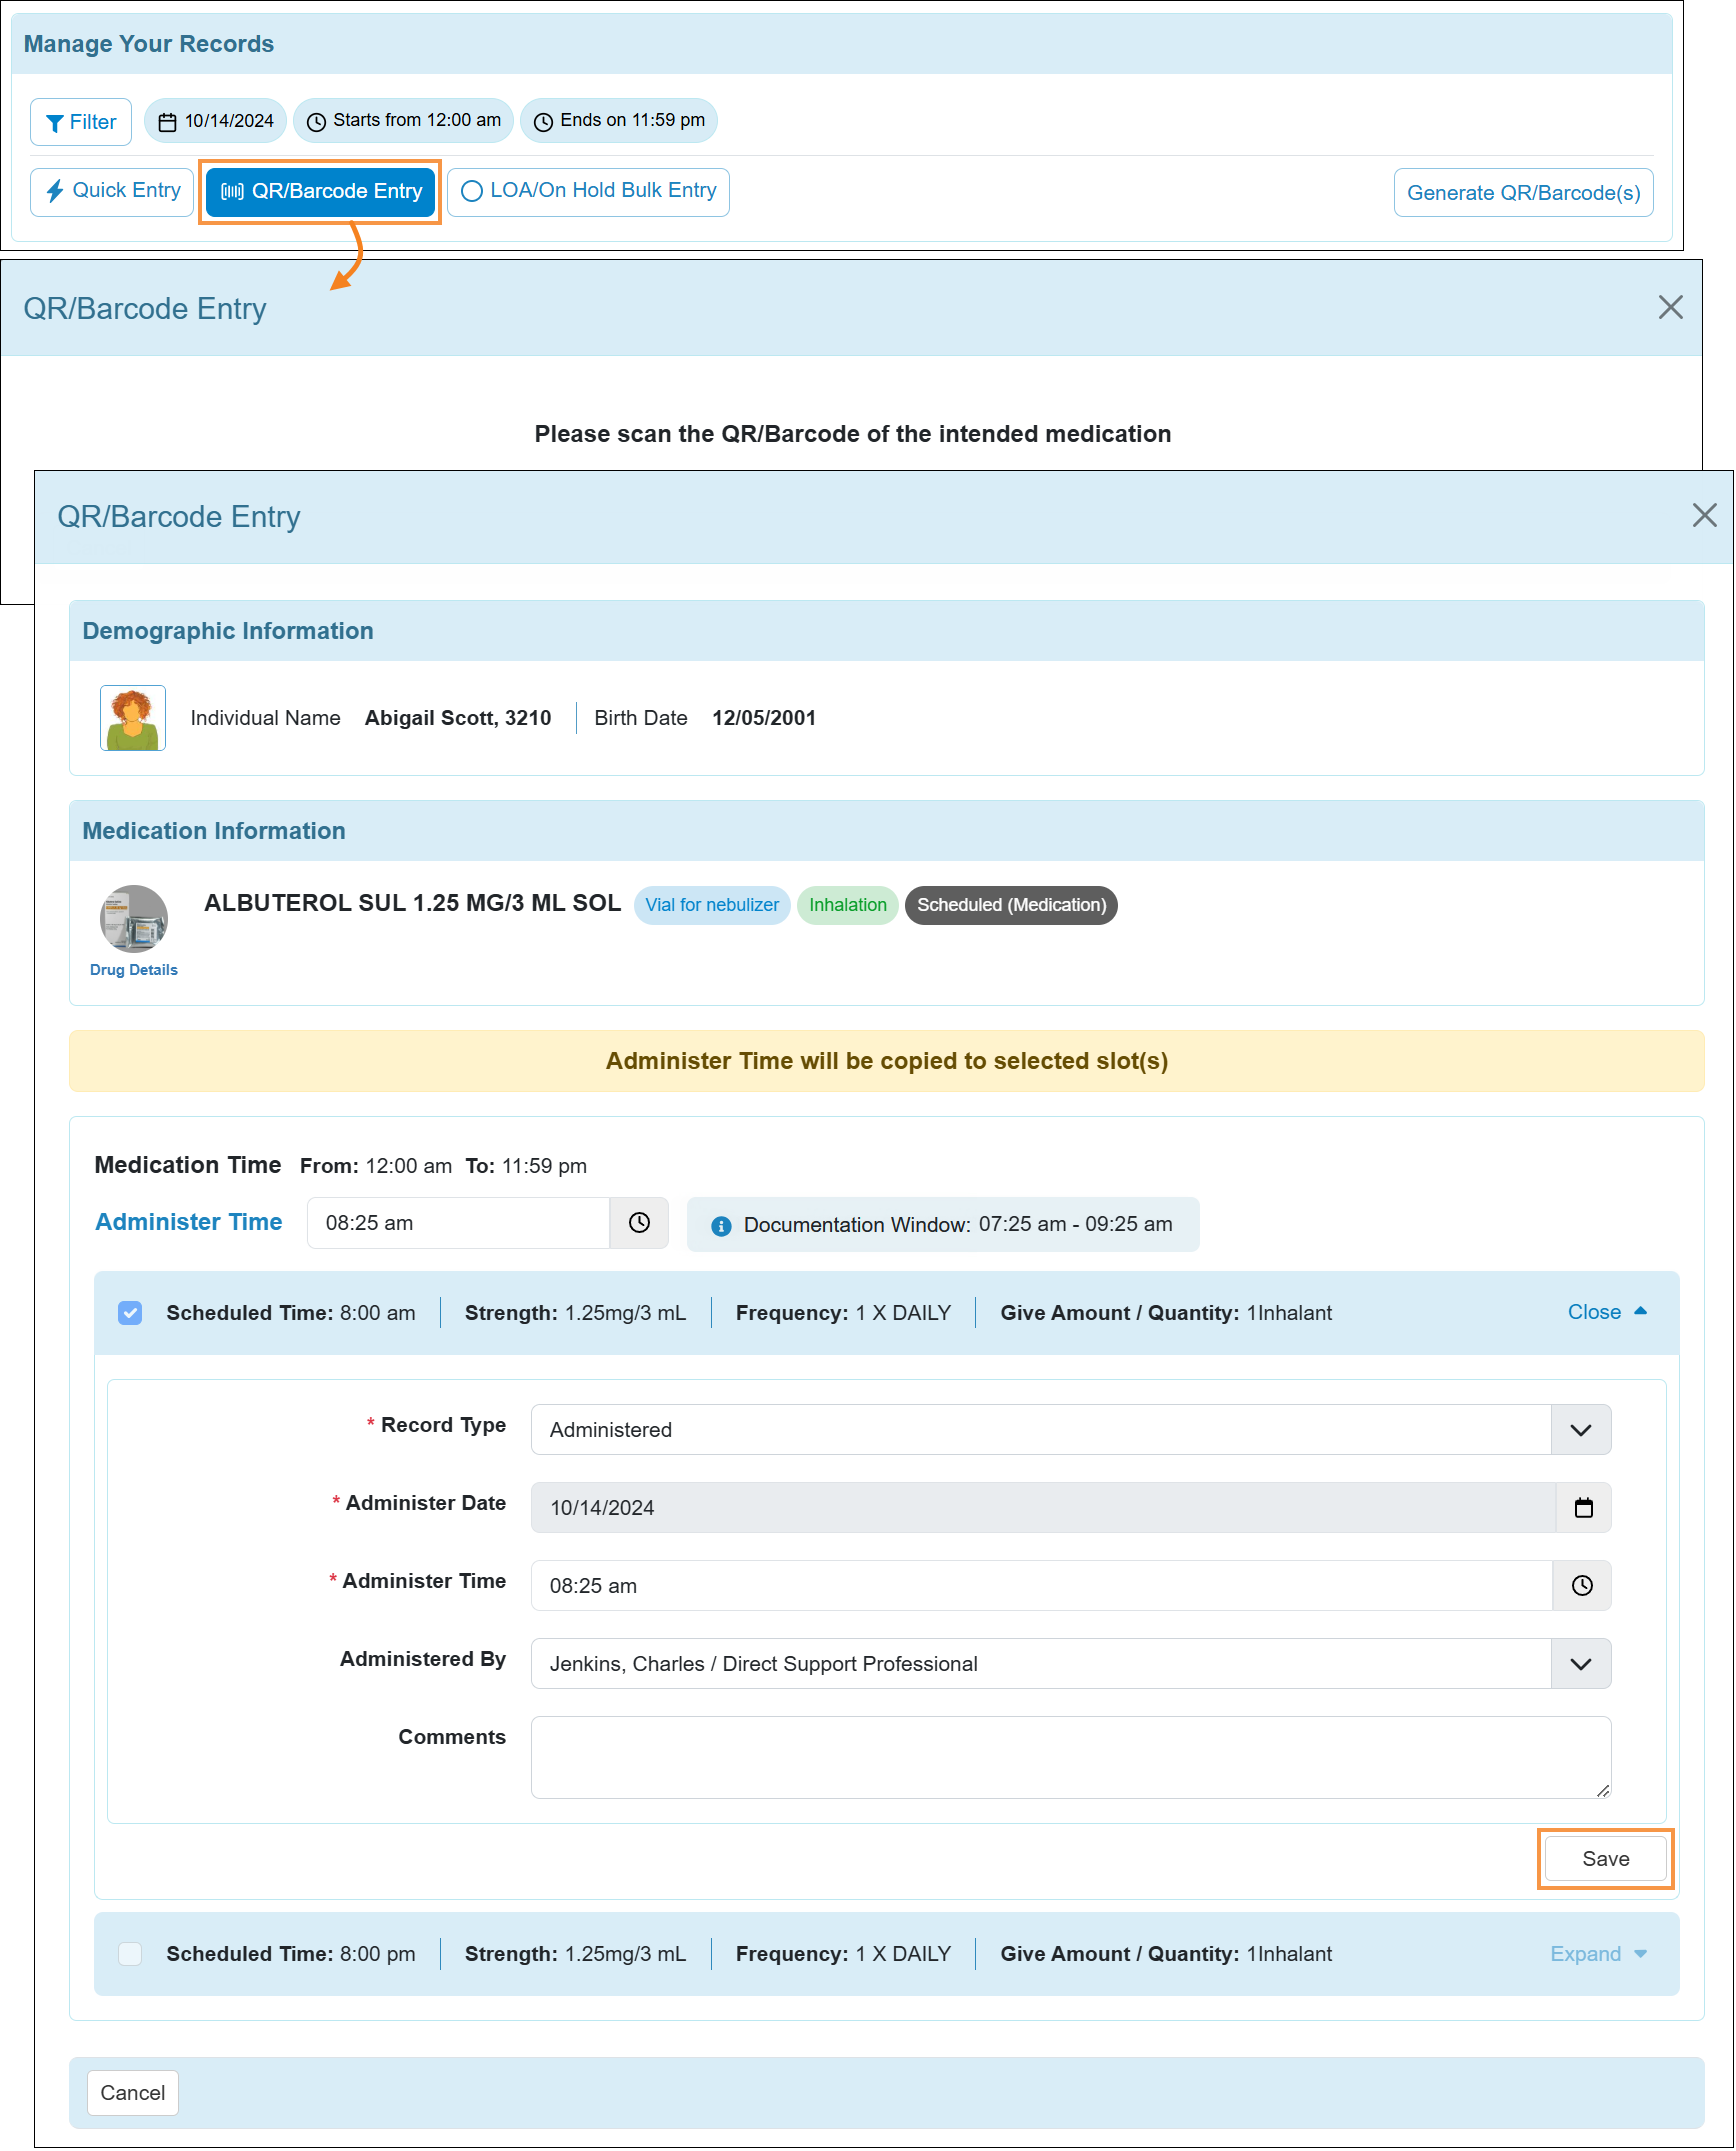
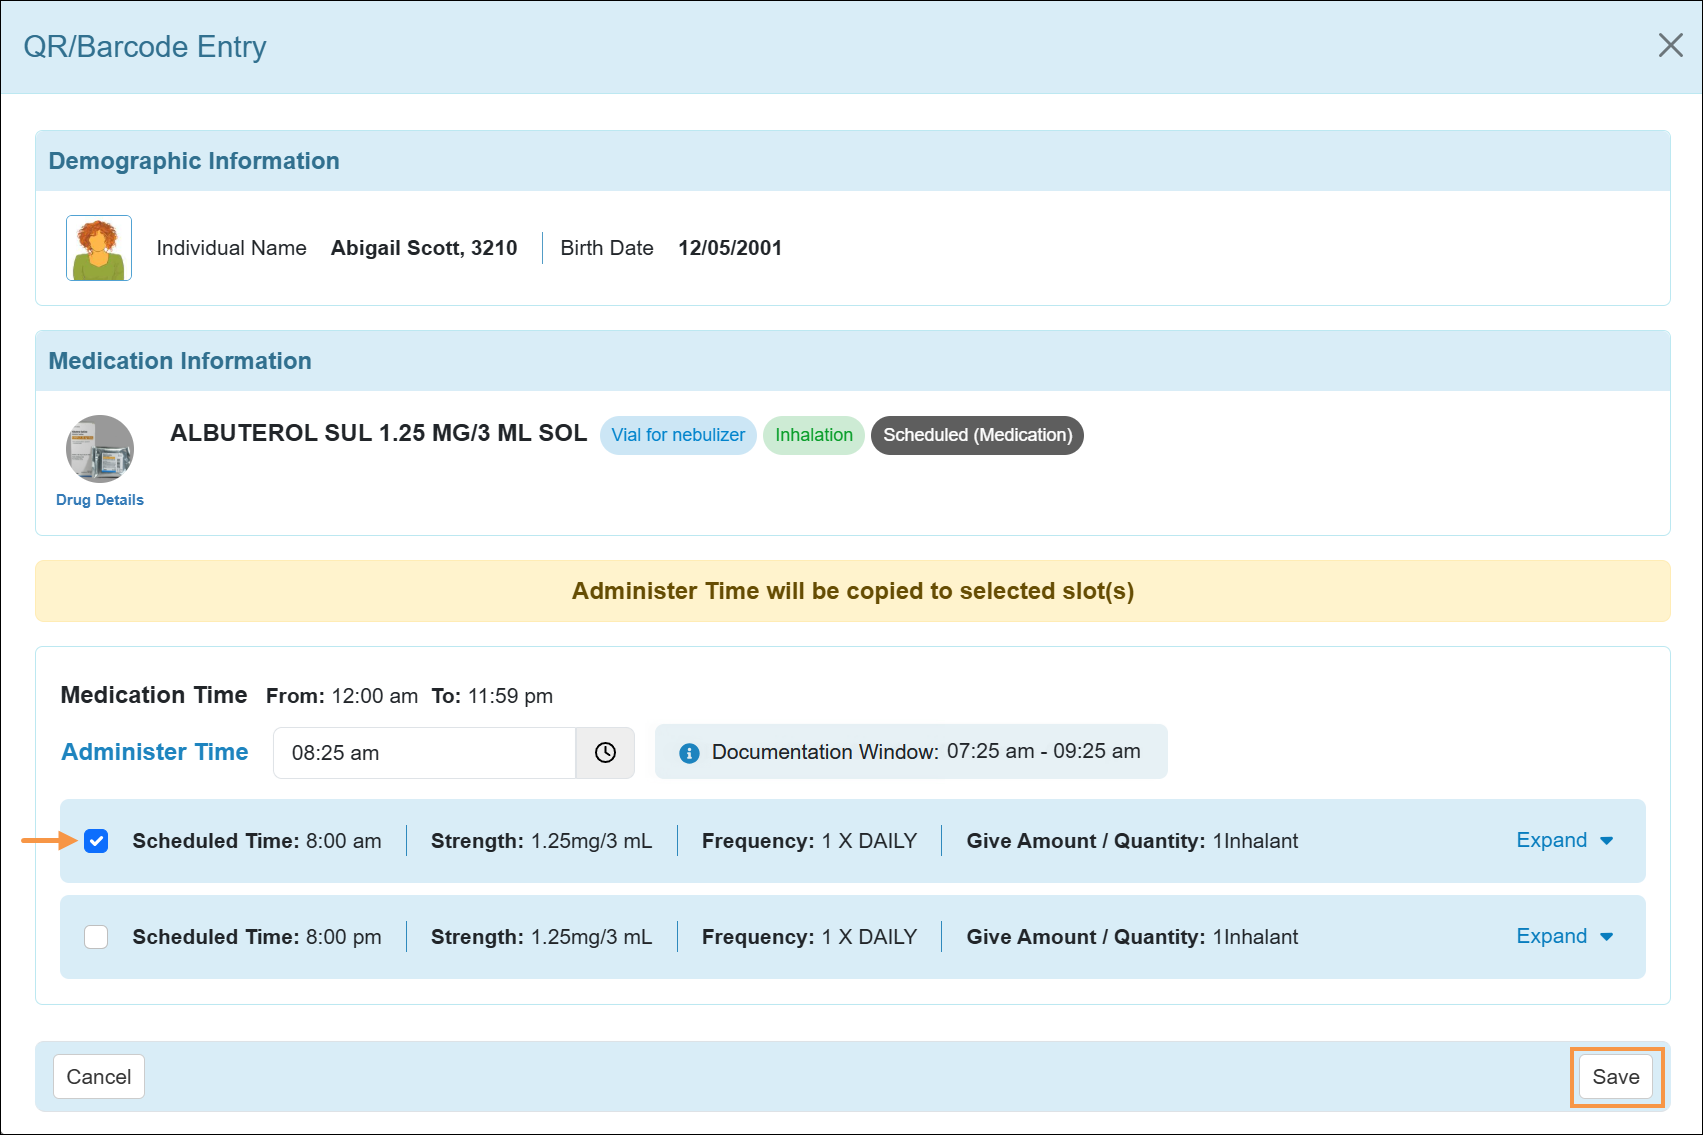
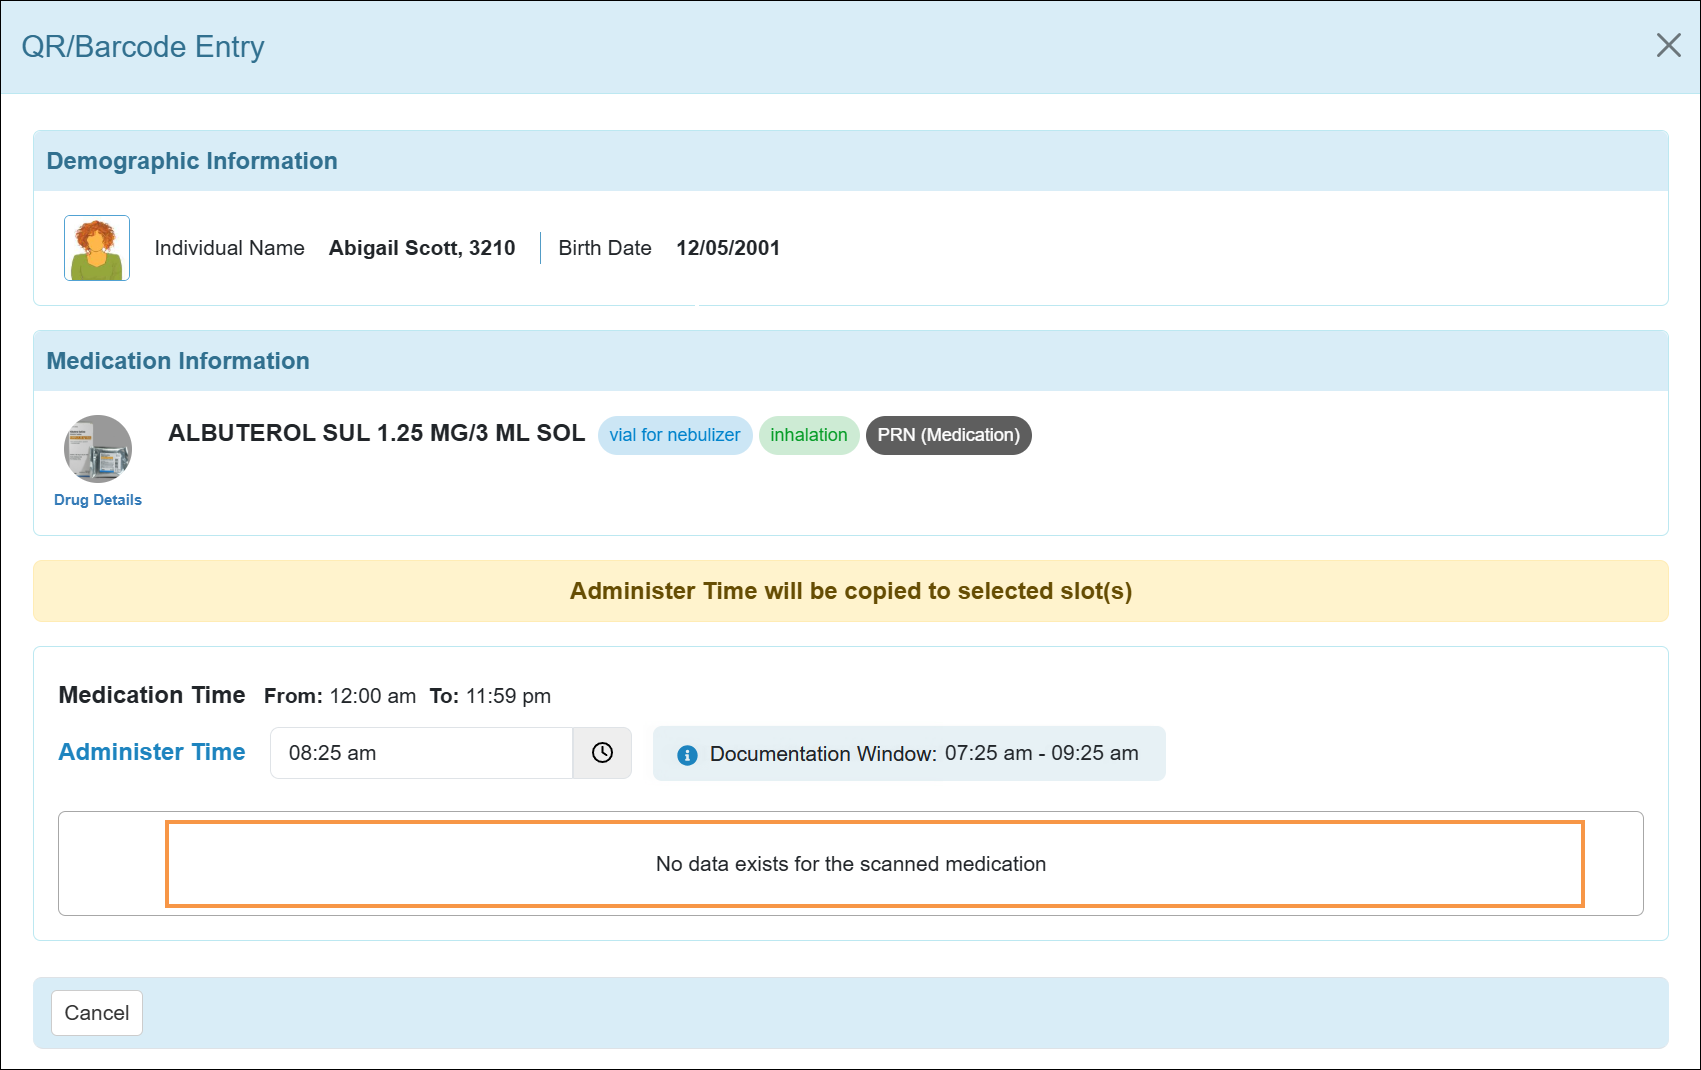
- Users can click on the QR/Barcode Entry button to scan a particular medication and record the scheduled slot(s). The following will be applicable for QR/Barcode Entry:
- The Individual Photo, Name, Individual ID, and Birth Date of the individual will be displayed in the ‘Demographic Information’ section.
- The Medication Time From to To range will display the filtered time of the Daily MAR.
- The Administer Time field will auto-populate the current time, however users can select a time in this field that is not later than the current time.
- The Documentation Window field will display the duration of the documentation window with respect to the current time. Slot(s) scheduled within the documentation window will be displayed in the ‘QR/Barcode Entry’ popup window.
- Administer Time of the selected slot(s) will be set based on the Administer Time of the ‘QR/Barcode Entry’ popup window.
- If the selected Administer Time is outside of any particular scheduled slot's documentation window, then users will receive a validation stating: 'Comments required for the highlighted slot(s)'. Users will have to administer those slot(s) from the ‘Detail Data’ popup window of the corresponding slot.
- Users can also use the Expand button to record each slot in Detail Mode after modifying information. However, if users attempt to close a filled-up slot without saving it, they will receive a warning message.
- Multiple slot(s) can be marked and administered at a time. However, expanded slot(s) cannot be marked until it is closed again.
- If no slot exists for the scanned medication, a message will be displayed stating: 'No data exists for the scanned medication'.
- Along with the Overdue slot(s), bulk entries can now be recorded for the future time slot(s) using the LOA/On Hold Bulk Entry button on the Daily MAR. Clicking on this button, users can access the 'Bulk Data Preview' mode and then record the slot(s) as 'LOA' or 'On Hold' from the 'LOA/On Hold Bulk Entry' popup window. Users can also apply filters to narrow down the medications they want to record in bulk.
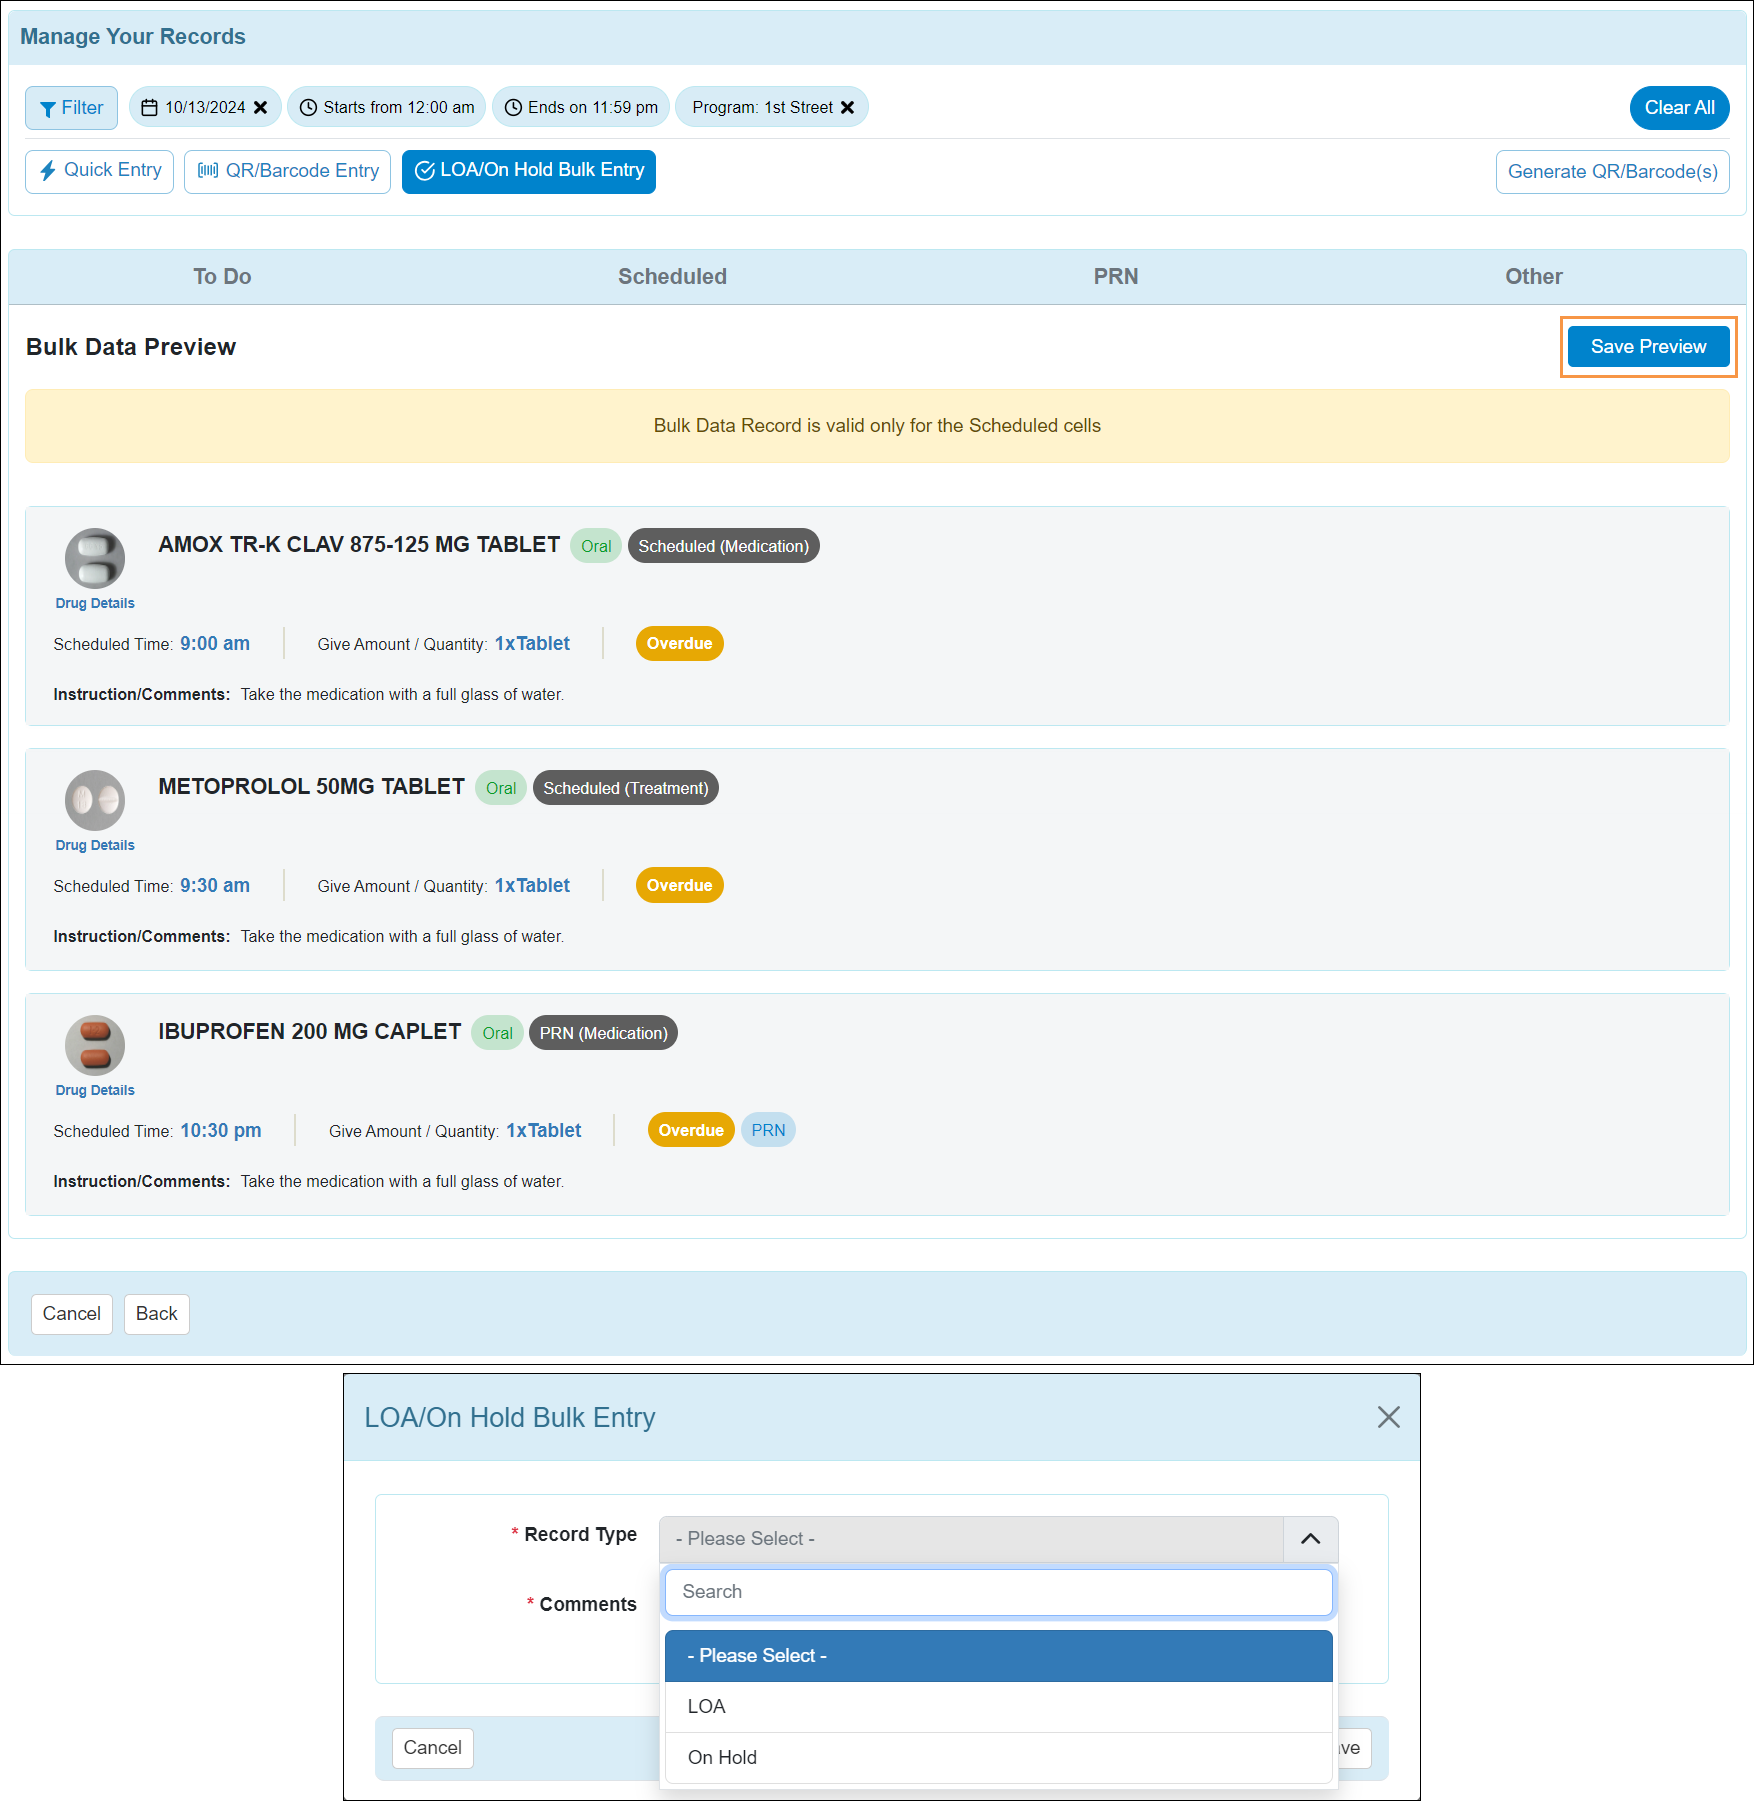
If a medication outside of the documentation window is recorded for a future date using the Bulk Entry, then users will only be able to view the recorded entry in read-only mode. However, they will not be able to update the entry until the medication coincides with the documentation window.
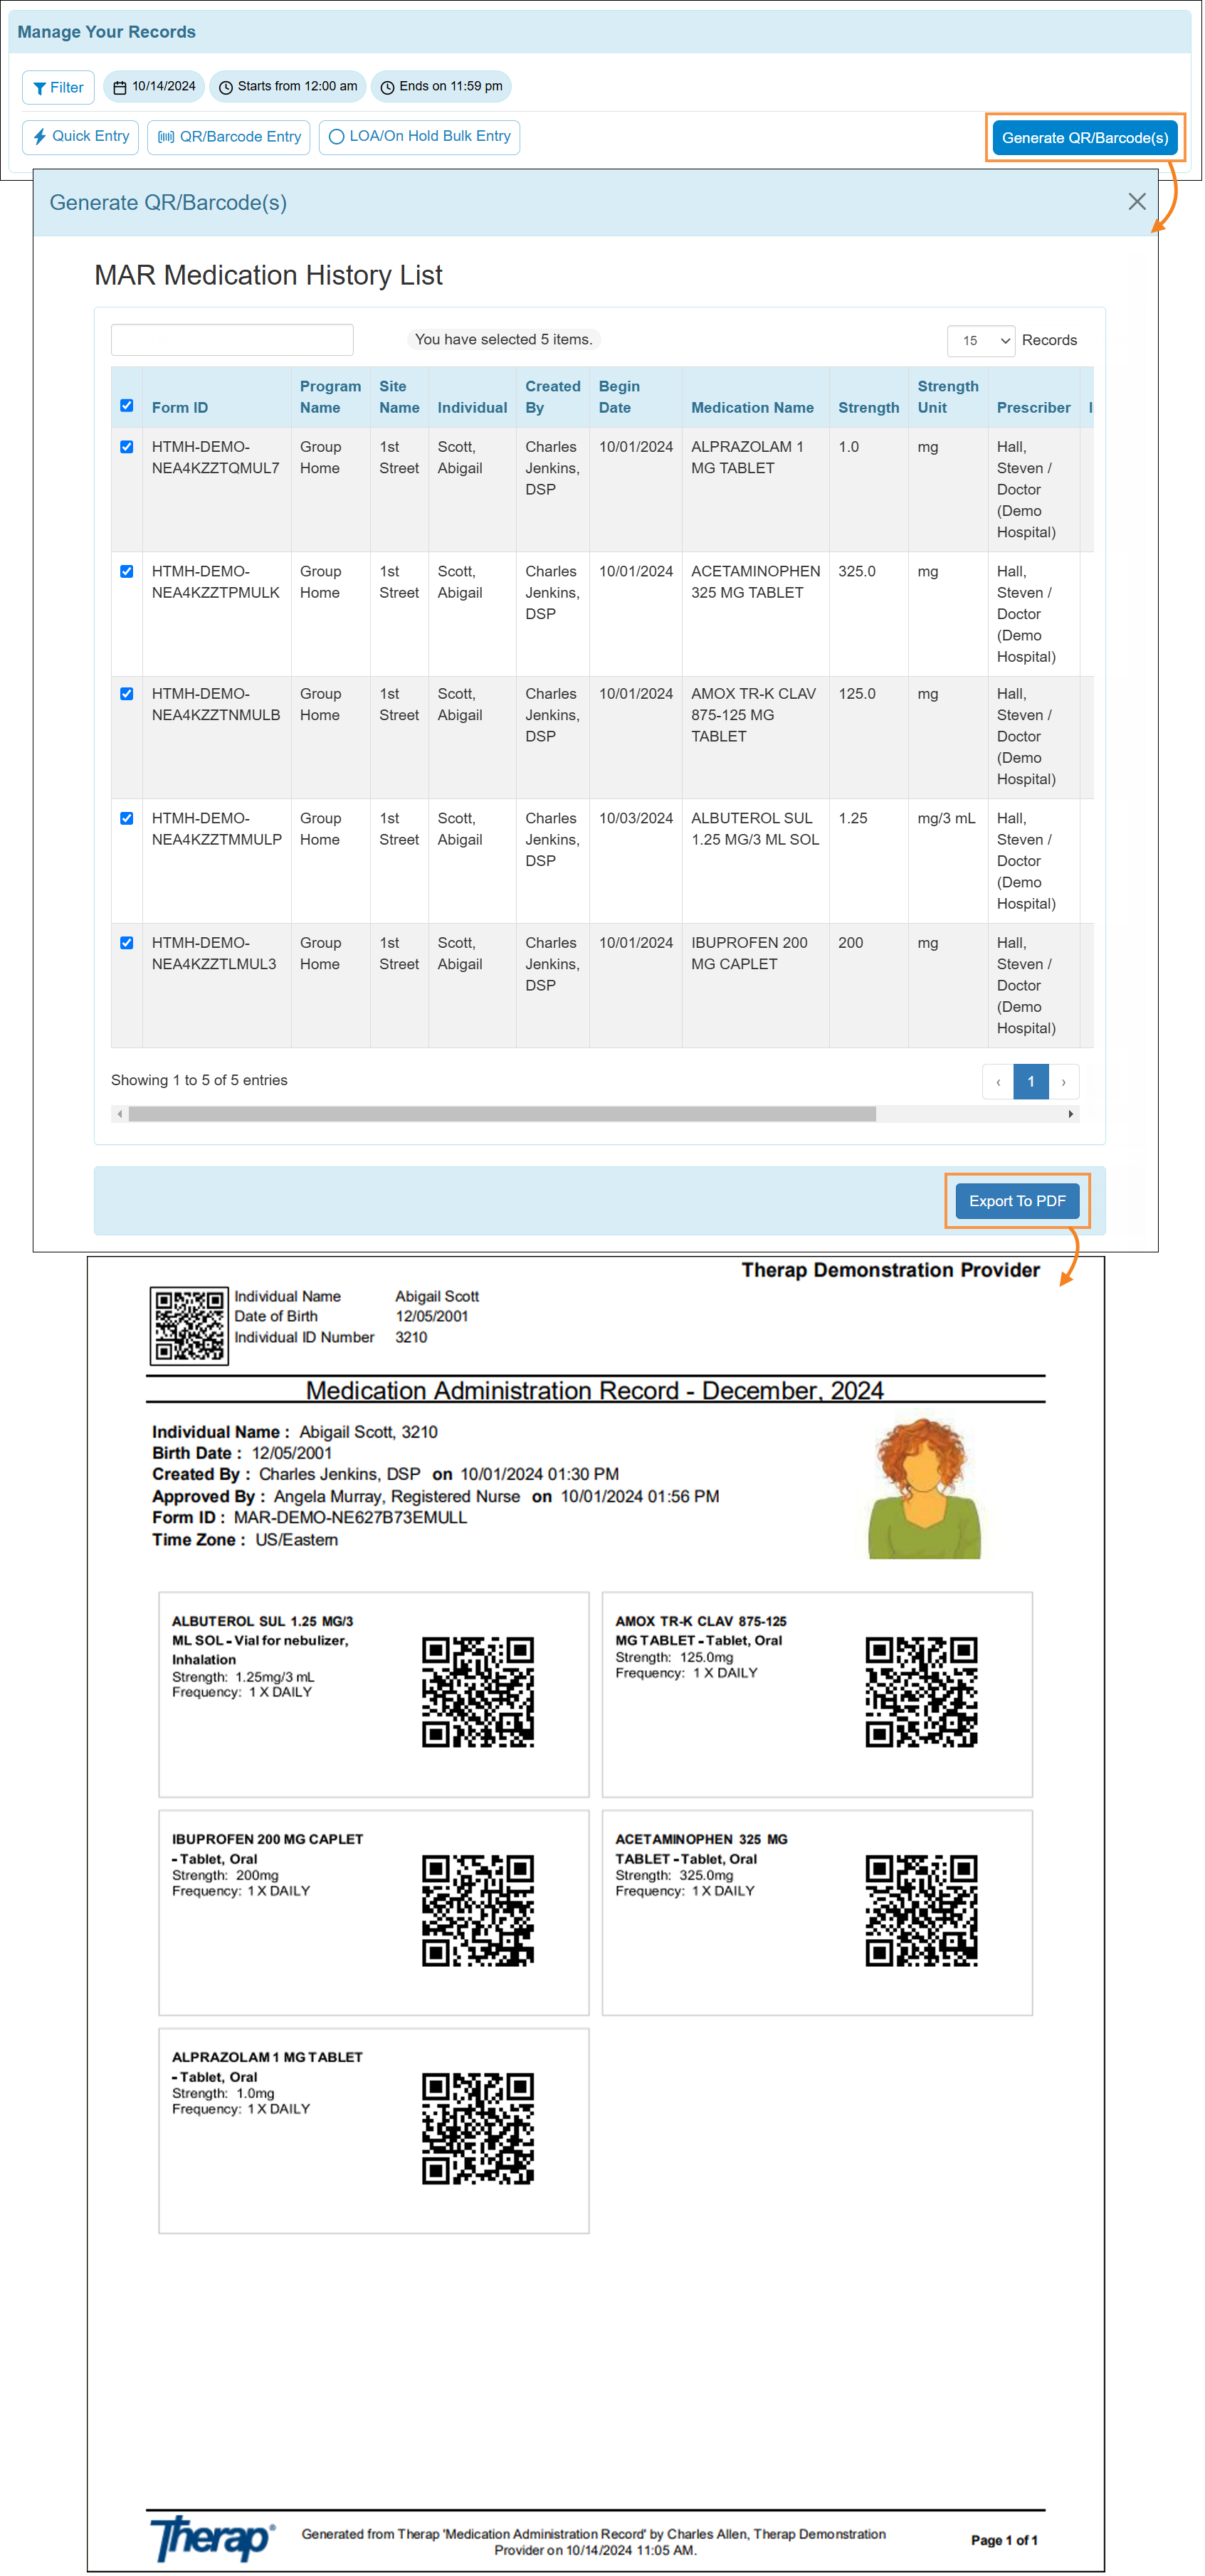
- If Barcode/QR Code is enabled from the 'Provider Preference' page, then the Generate QR/Barcode(s) button will be available in the 'Manage Your Records' section of the Daily MAR. Clicking on this button, users can export a PDF containing the QR/Barcode of the respective MAR as well as the selected medications within the MAR. The barcodes are designed to fit the Avery 5163 label format (dimensions: 2" x 4", a maximum of 10 labels per sheet).
- The To Do tab will display a brief information of the unrecorded slot(s) that have been scheduled for the selected date, and a total number of all the scheduled entries will be displayed next to the To Do tab label. Users can record the scheduled slots or PRN followups using the Detail Entry or Resolve buttons, respectively. Once a slot has been successfully recorded, counts from the To Do tab will fall off.
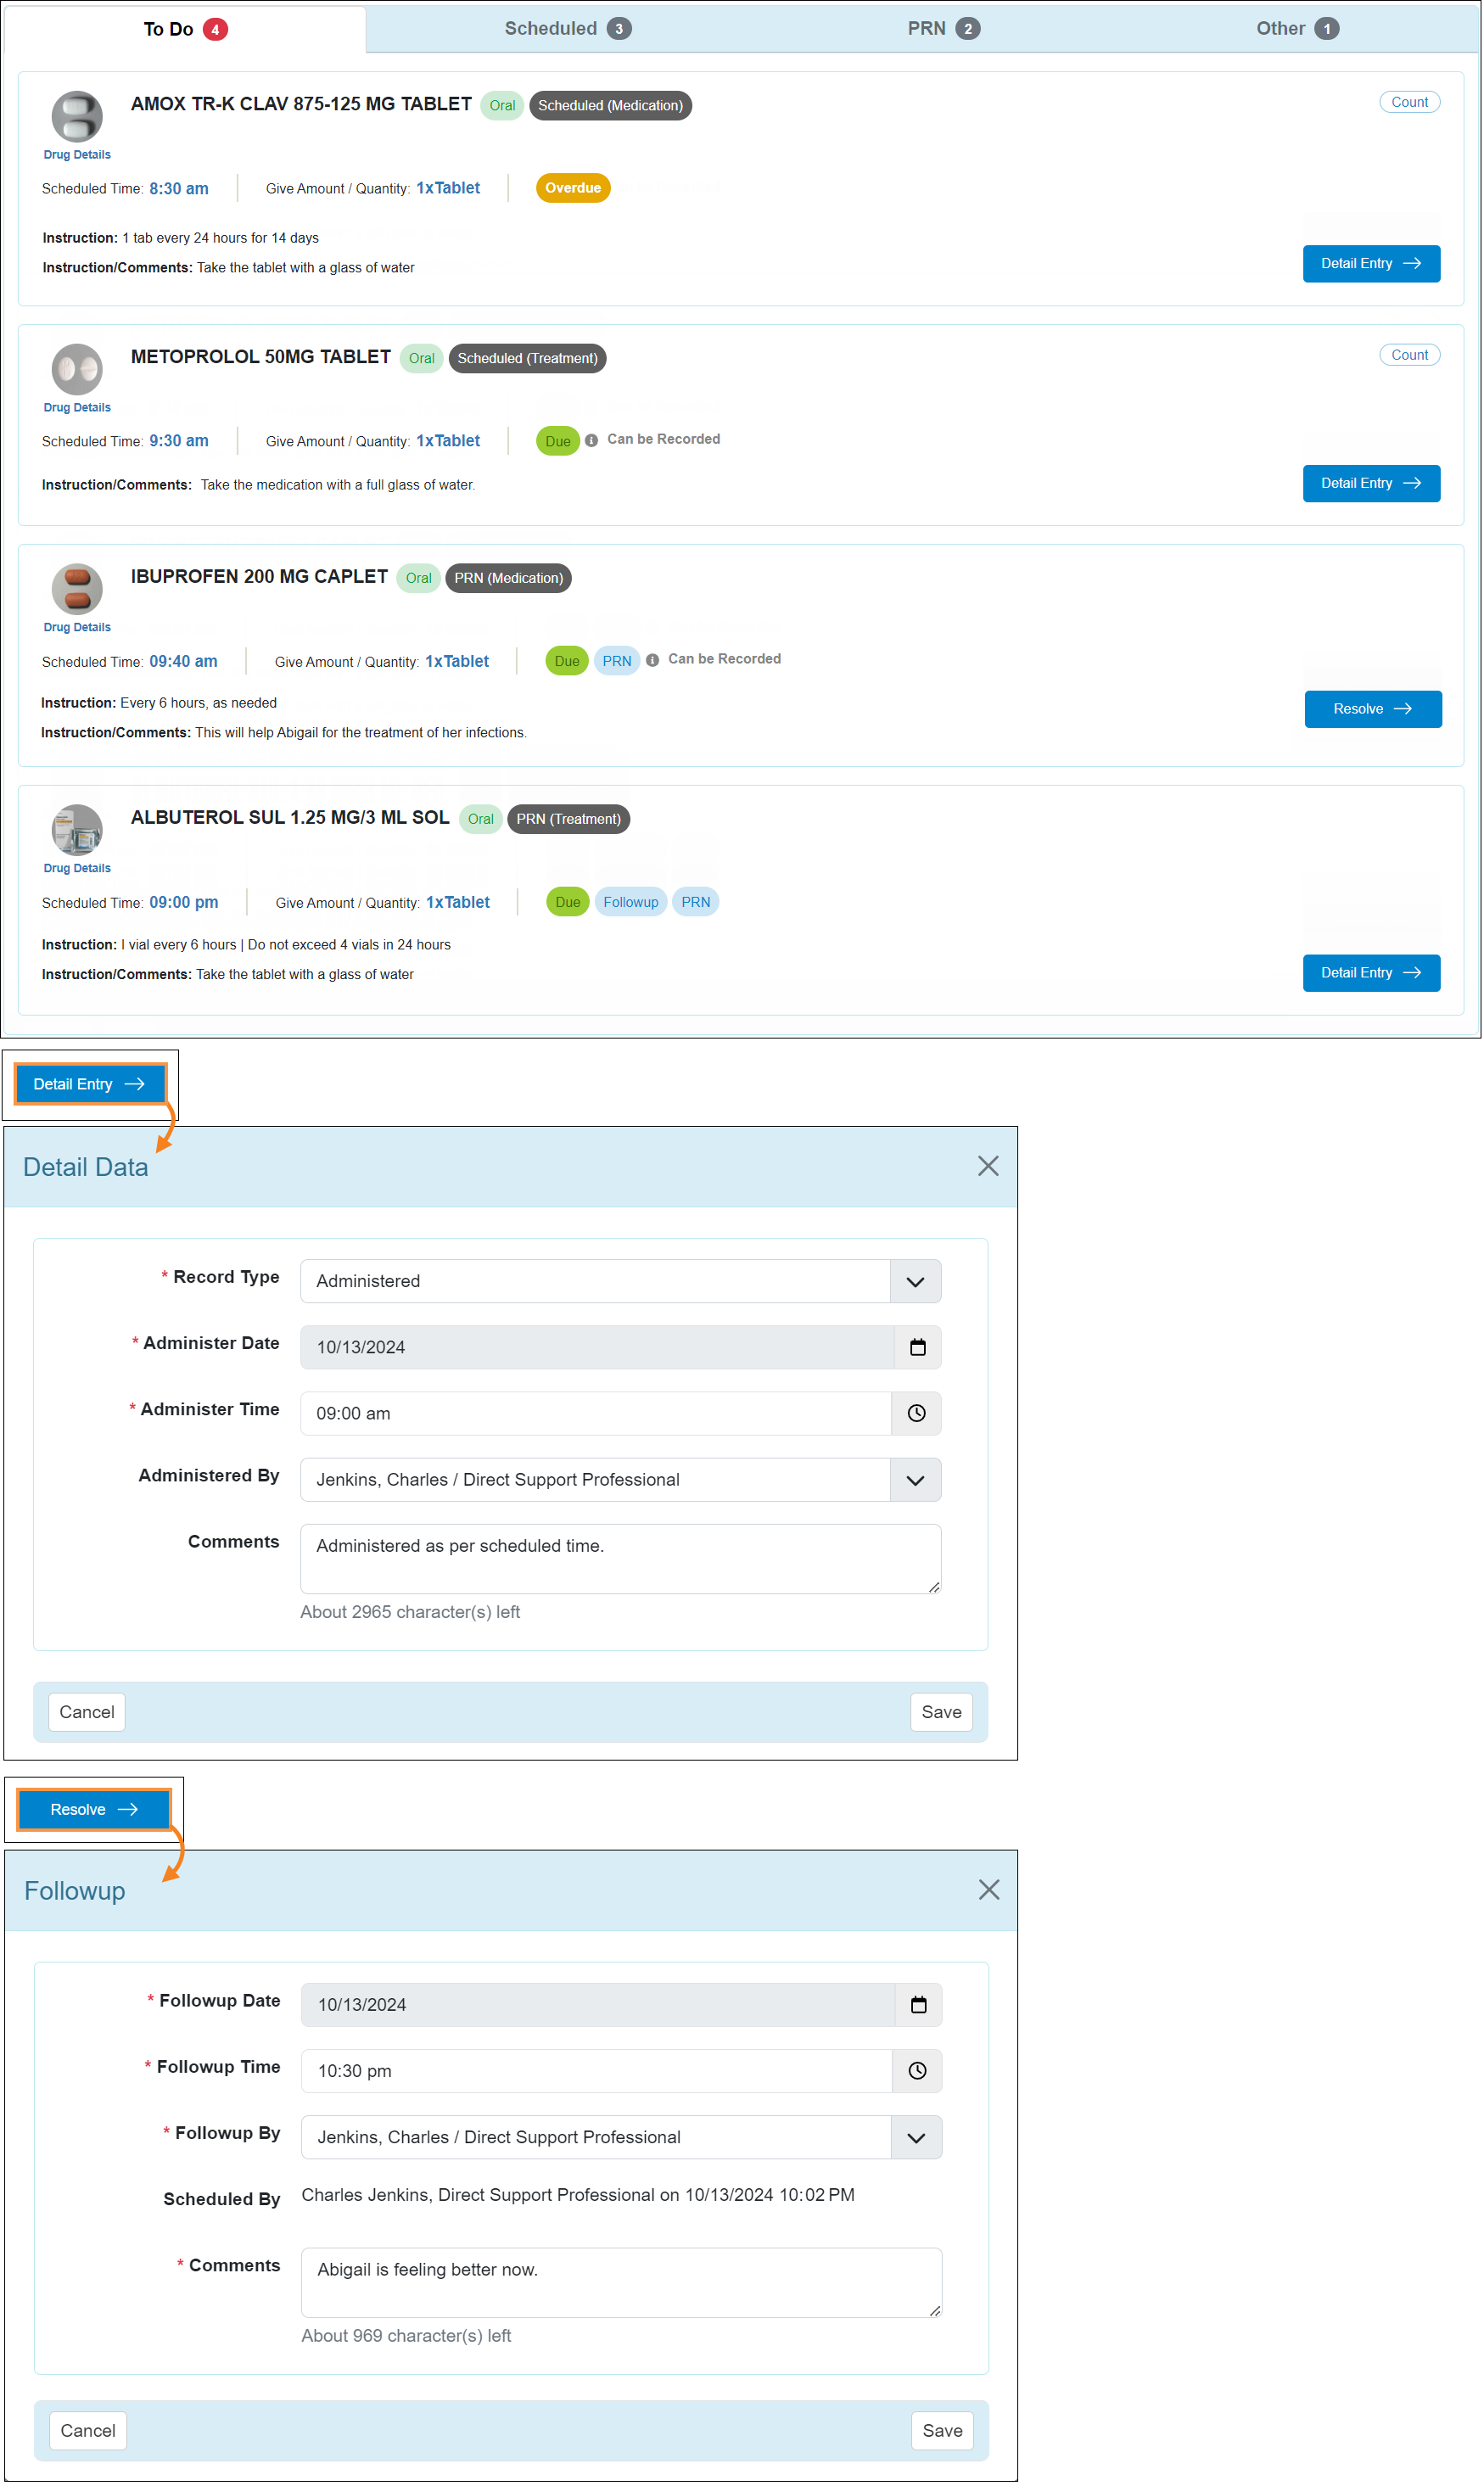
- Medication slot(s) or followup(s) that are scheduled for a future time but remain within the configured documentation window, will have a 'Can be Recorded' label next to the 'Due' label on the Daily MAR.
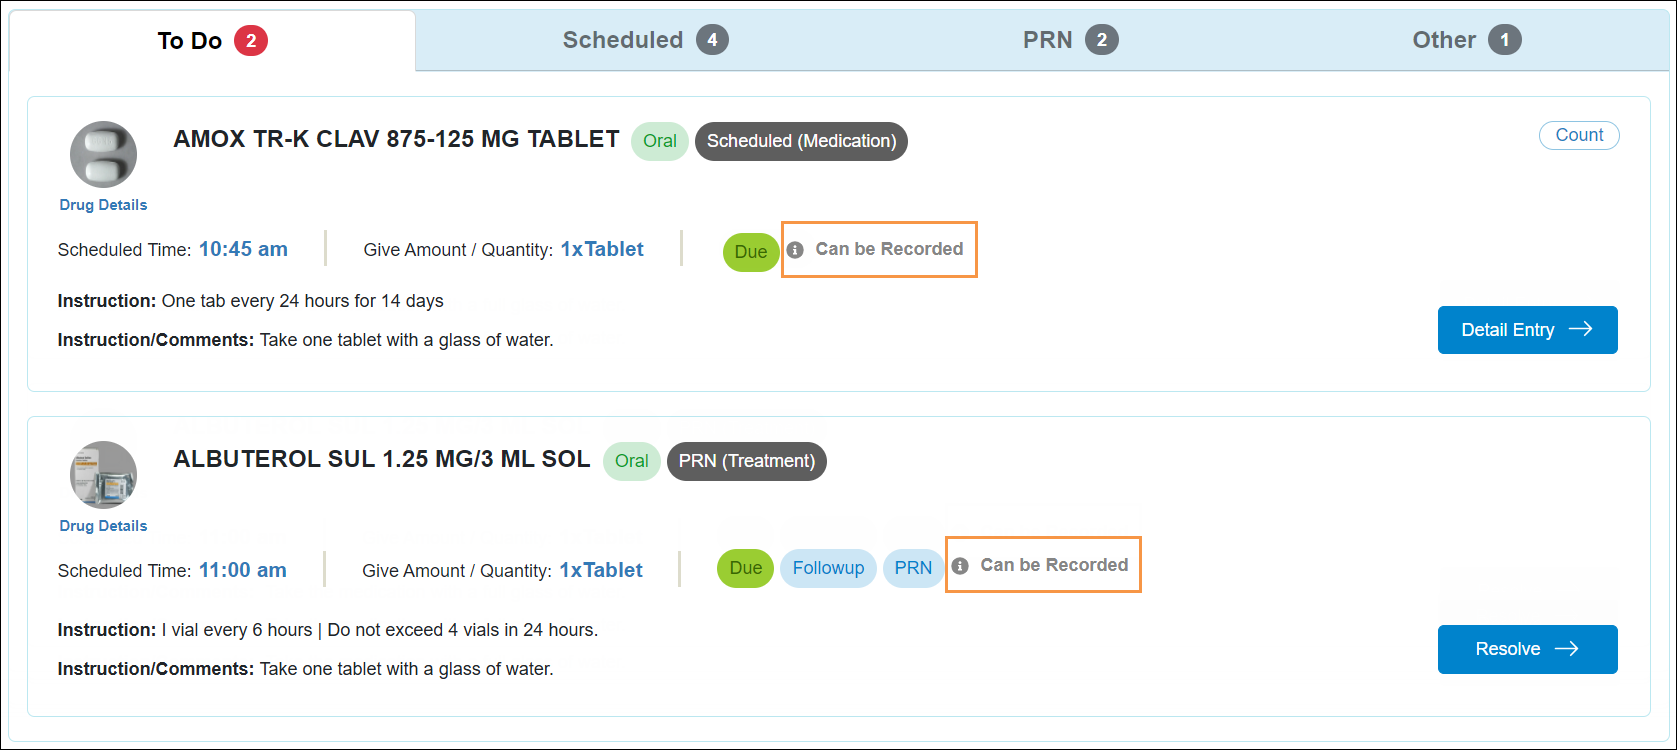
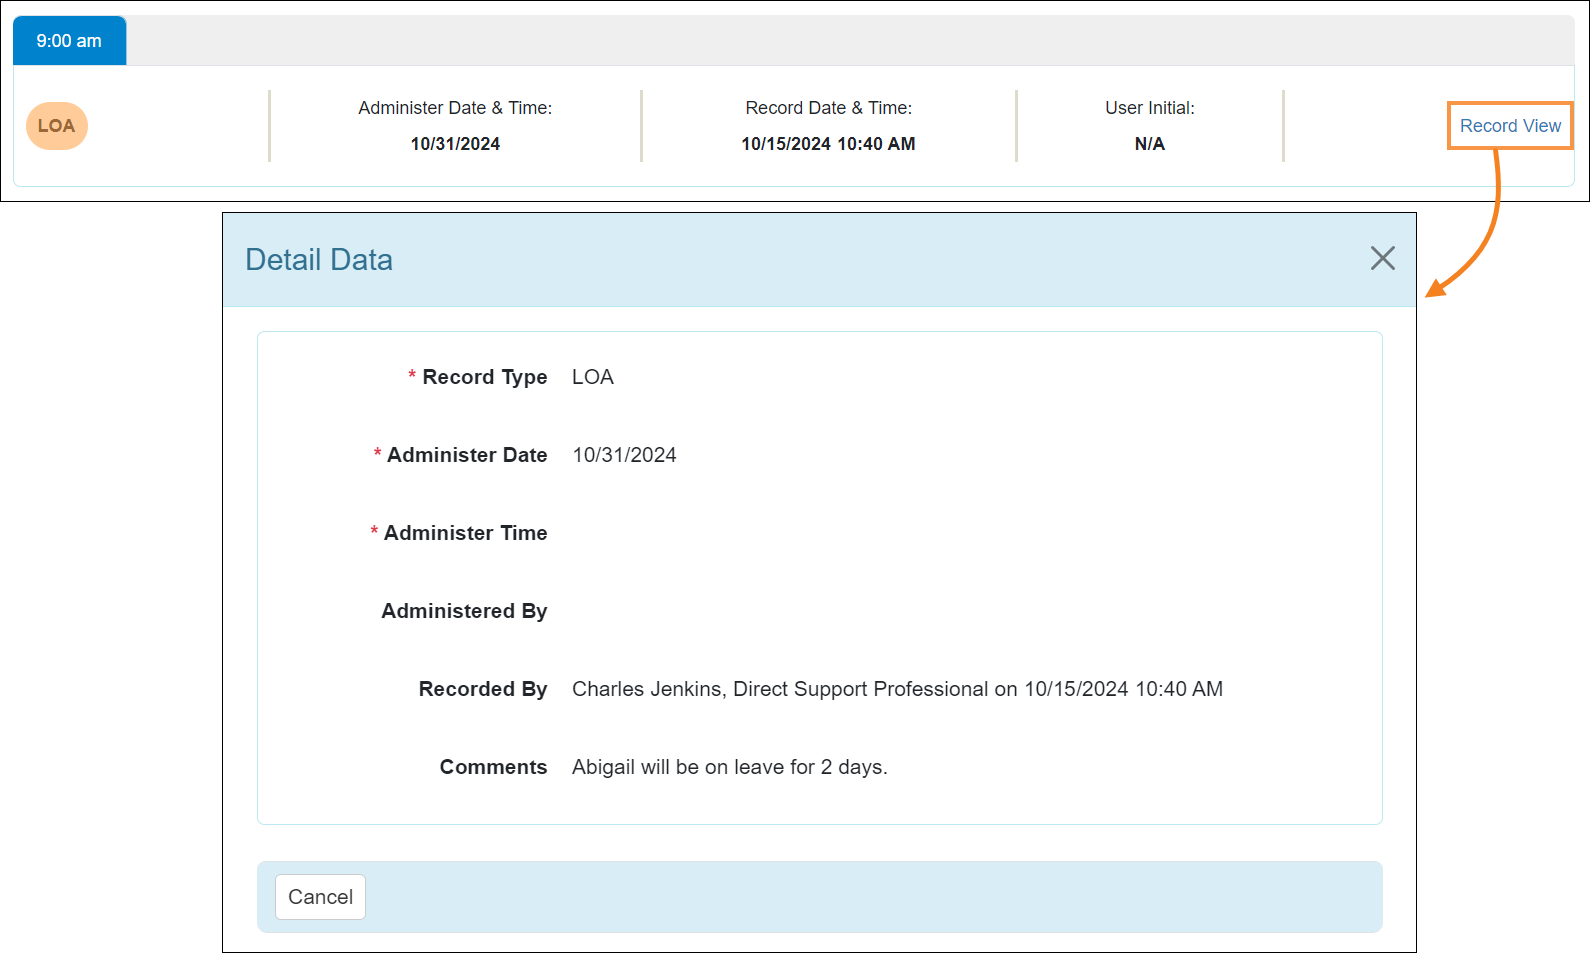
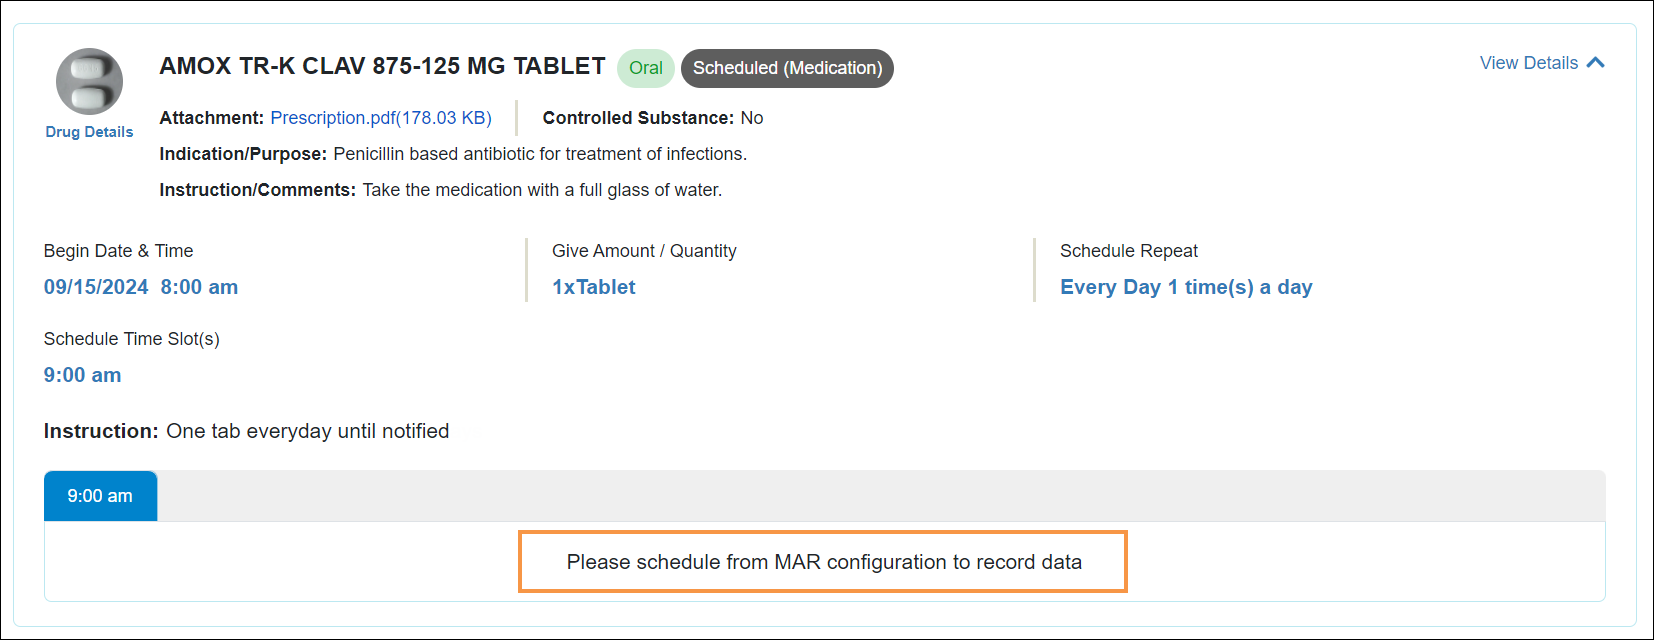
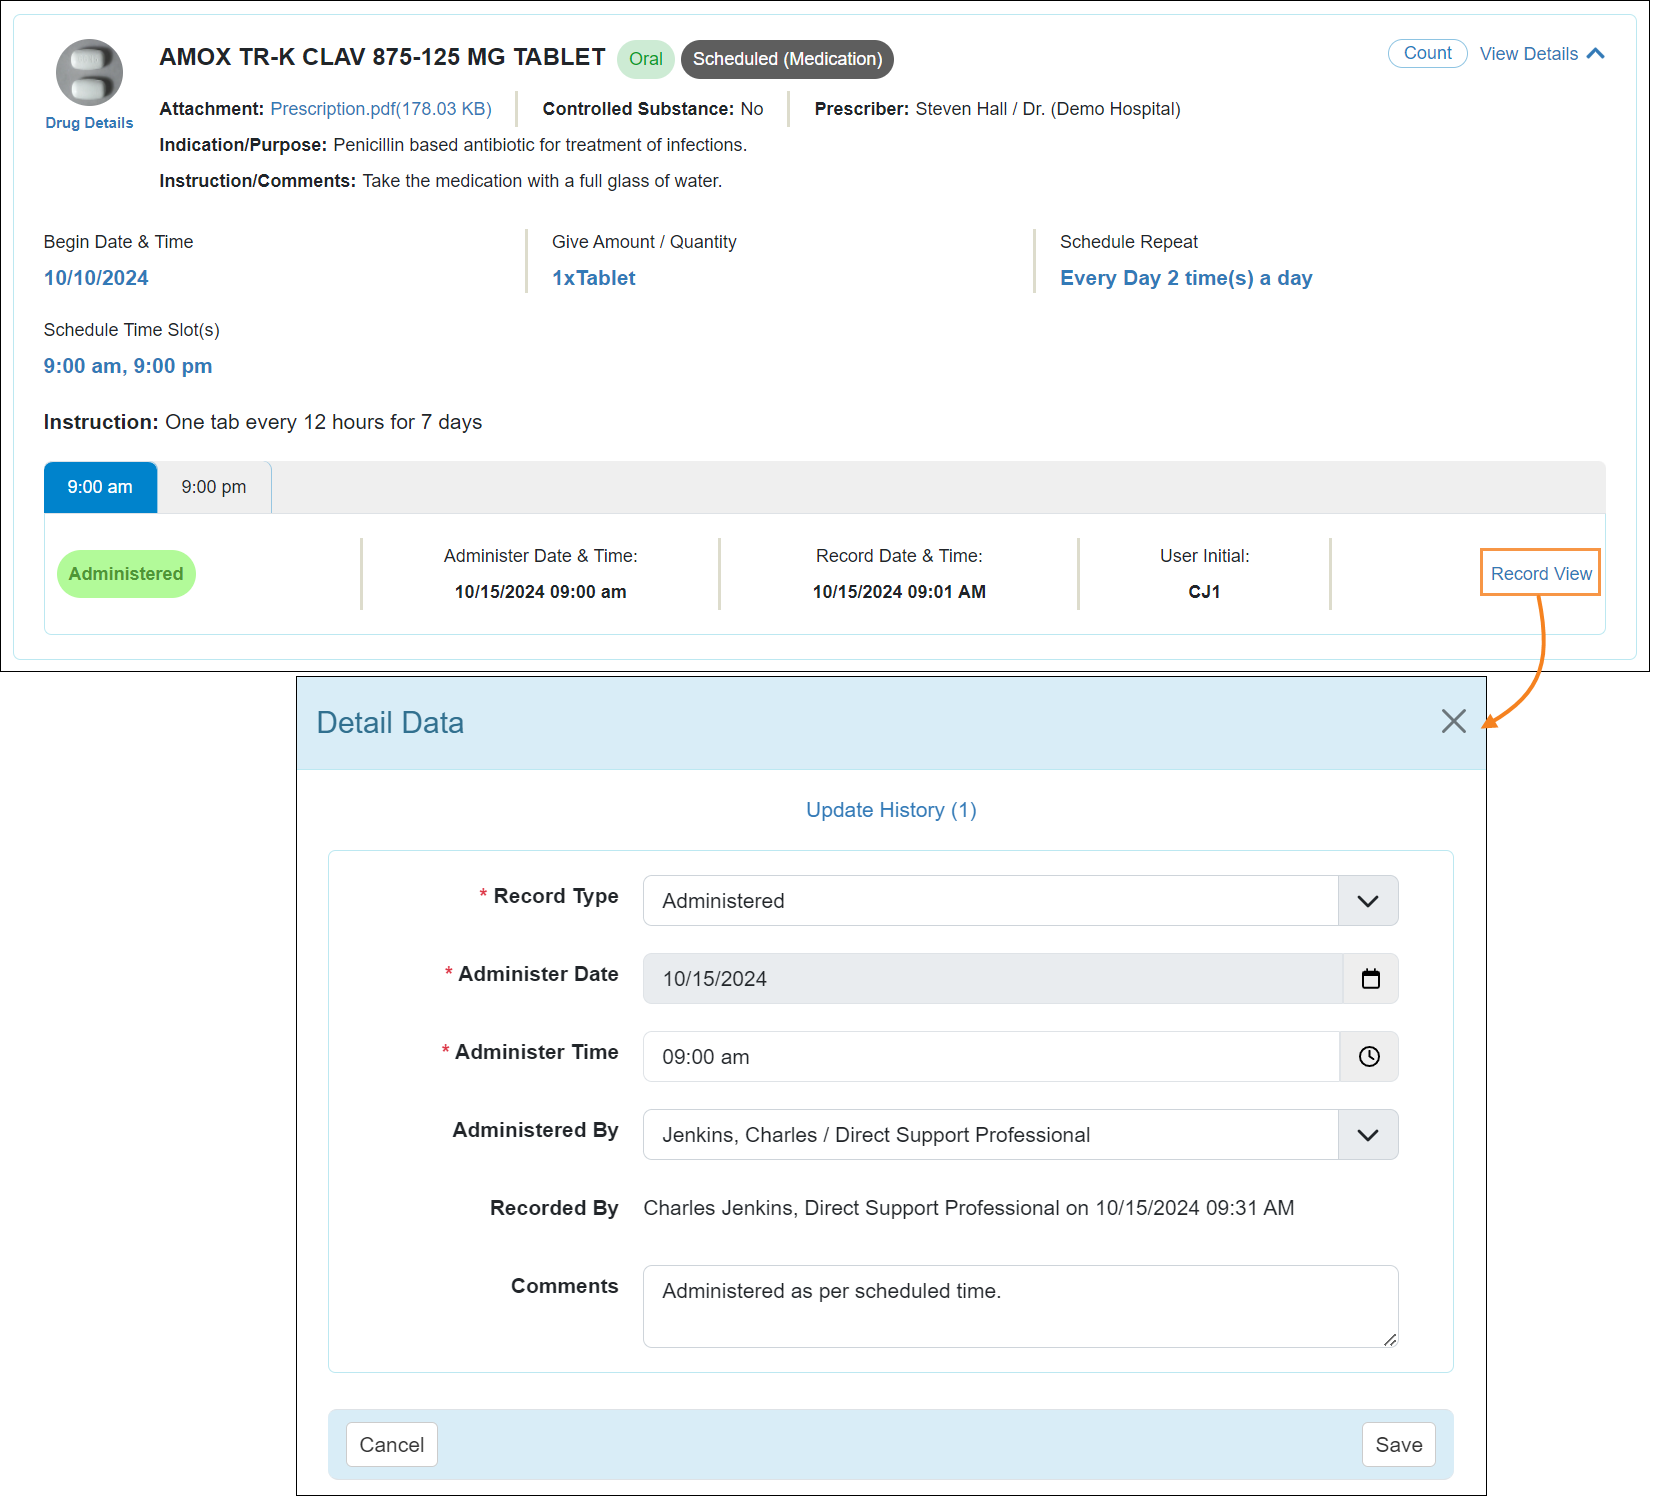
- The Scheduled tab will display the total number of scheduled medications and treatments that have been scheduled for the selected date. Users can click on the View Details link to expand the medication specific information. If a medication contains multiple scheduled slots for the selected date, then users can select the respective slot and then record it by using the Record View button.
Scheduled medications that are active on the selected date but not marked as scheduled, will show a message stating: 'Please schedule from MAR configuration to record data'.
Users can access MAR in Configuration mode to schedule the medication for the day and then record it from the Daily MAR.
If a medication is inactive on the filtered date, then 'No records found' will be displayed for the respective slot.
Once recorded the data can be viewed from the scheduled grid. Users can access the recorded slot in 'Detail Data' mode using the Record View button.
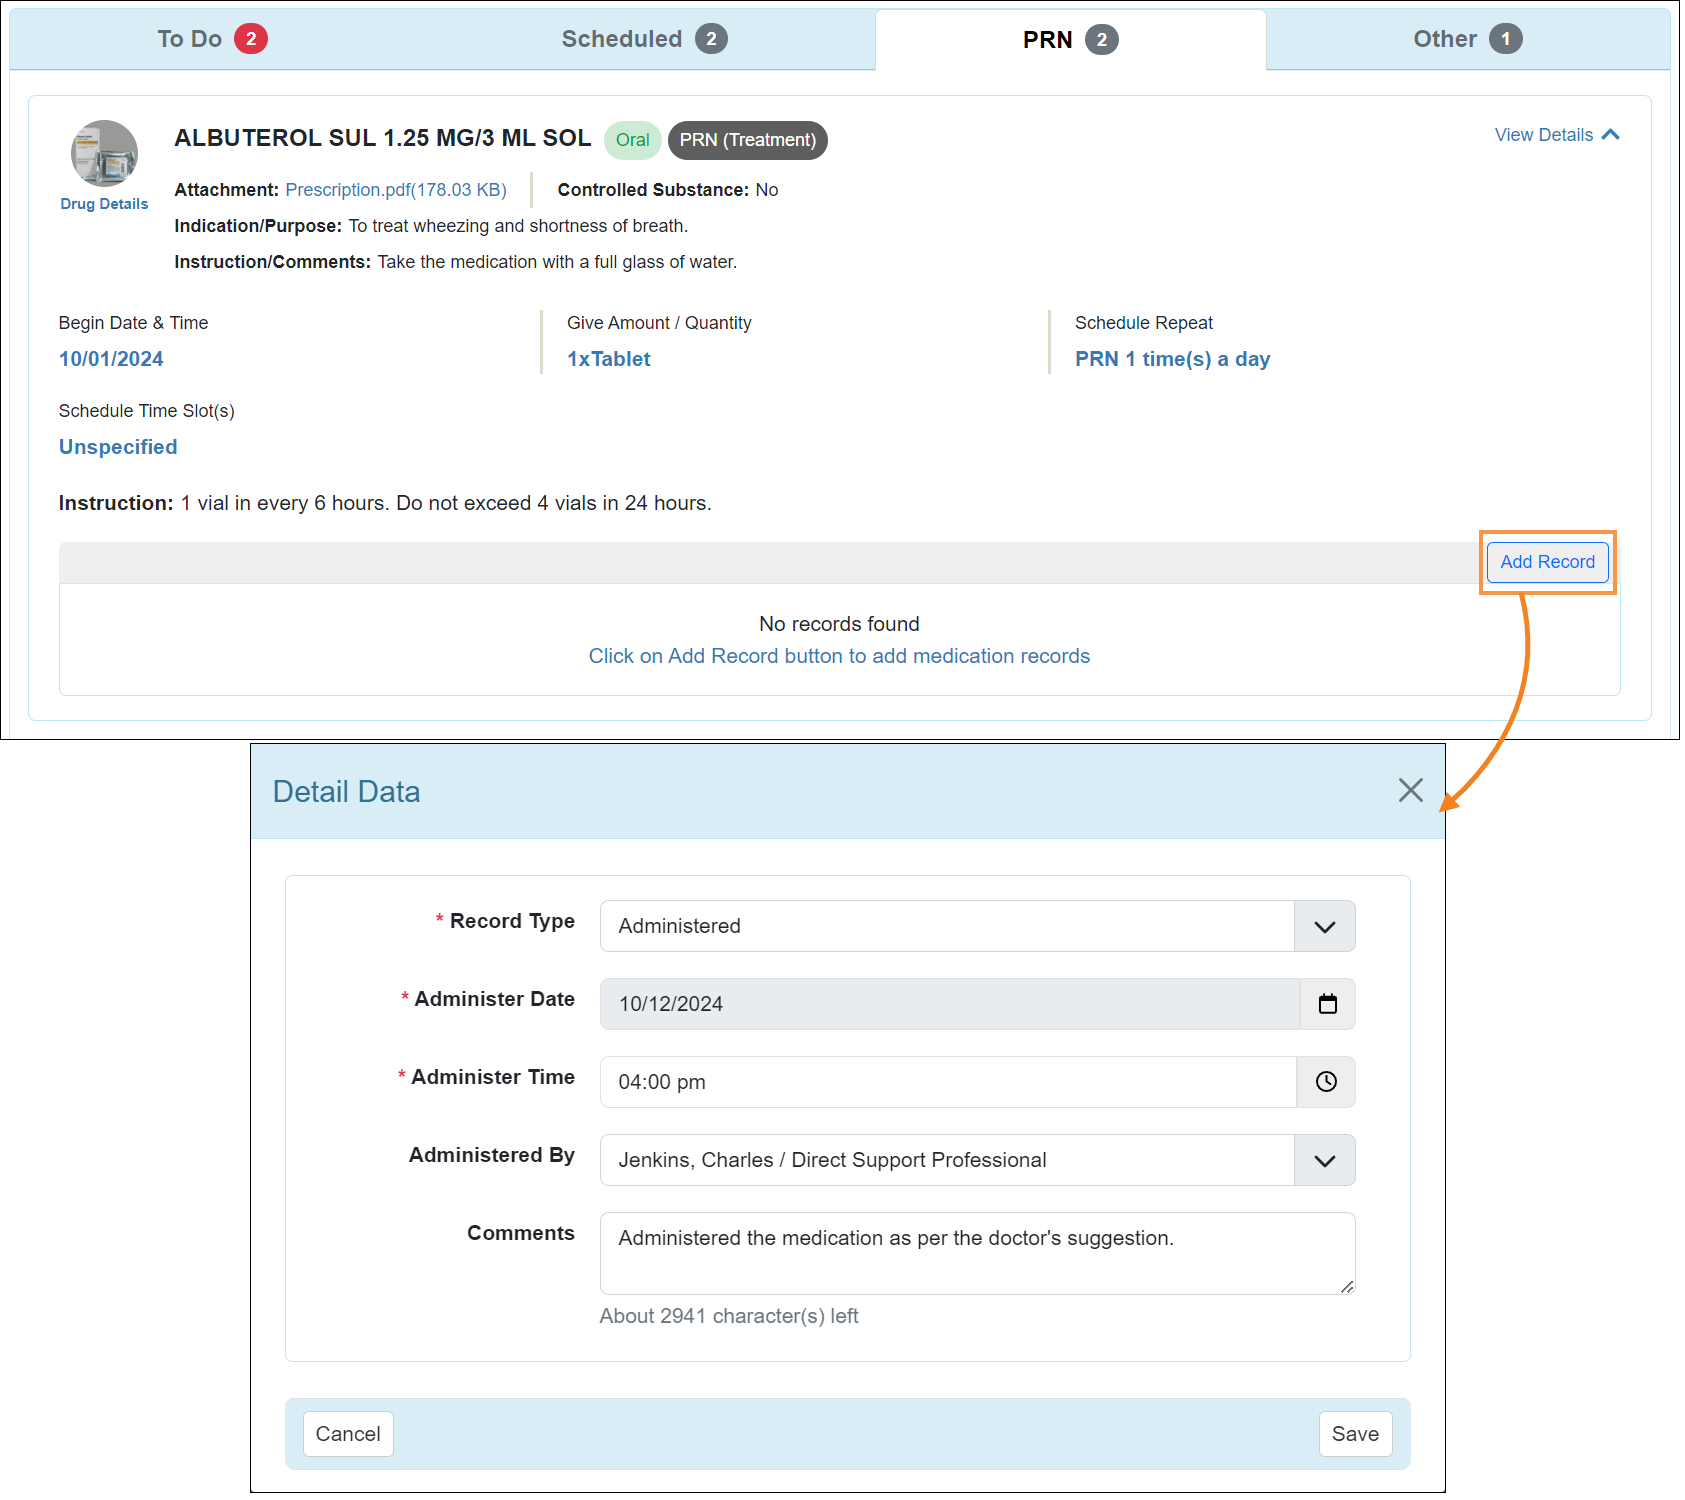
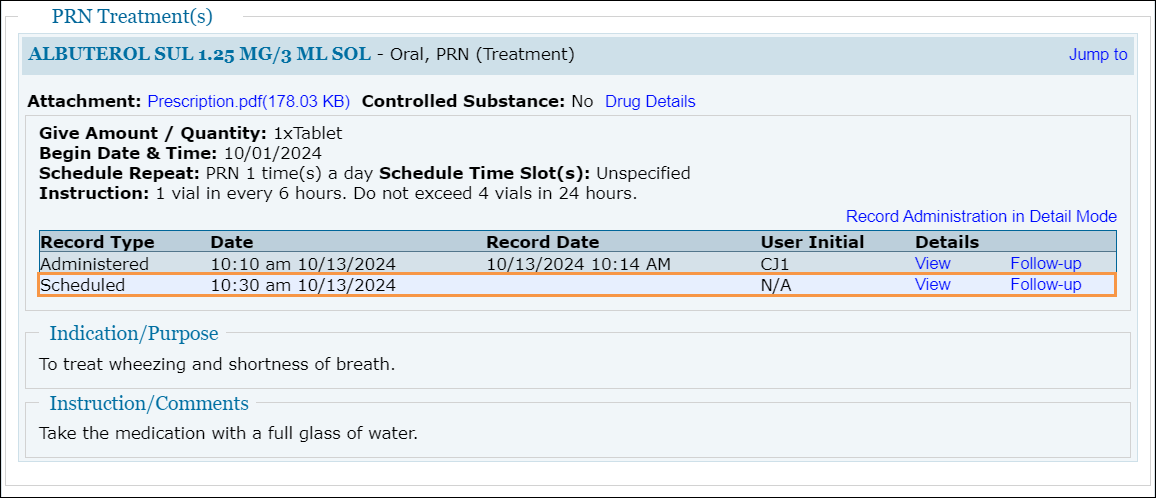
- The PRN tab will display the total number of PRN medications and treatments that have been scheduled for the selected date. Users can click on the View Details link to expand the medication-specific information and record the medication using the Add Record button.
After recording a PRN, followups can be added to the slot using the Followup button.
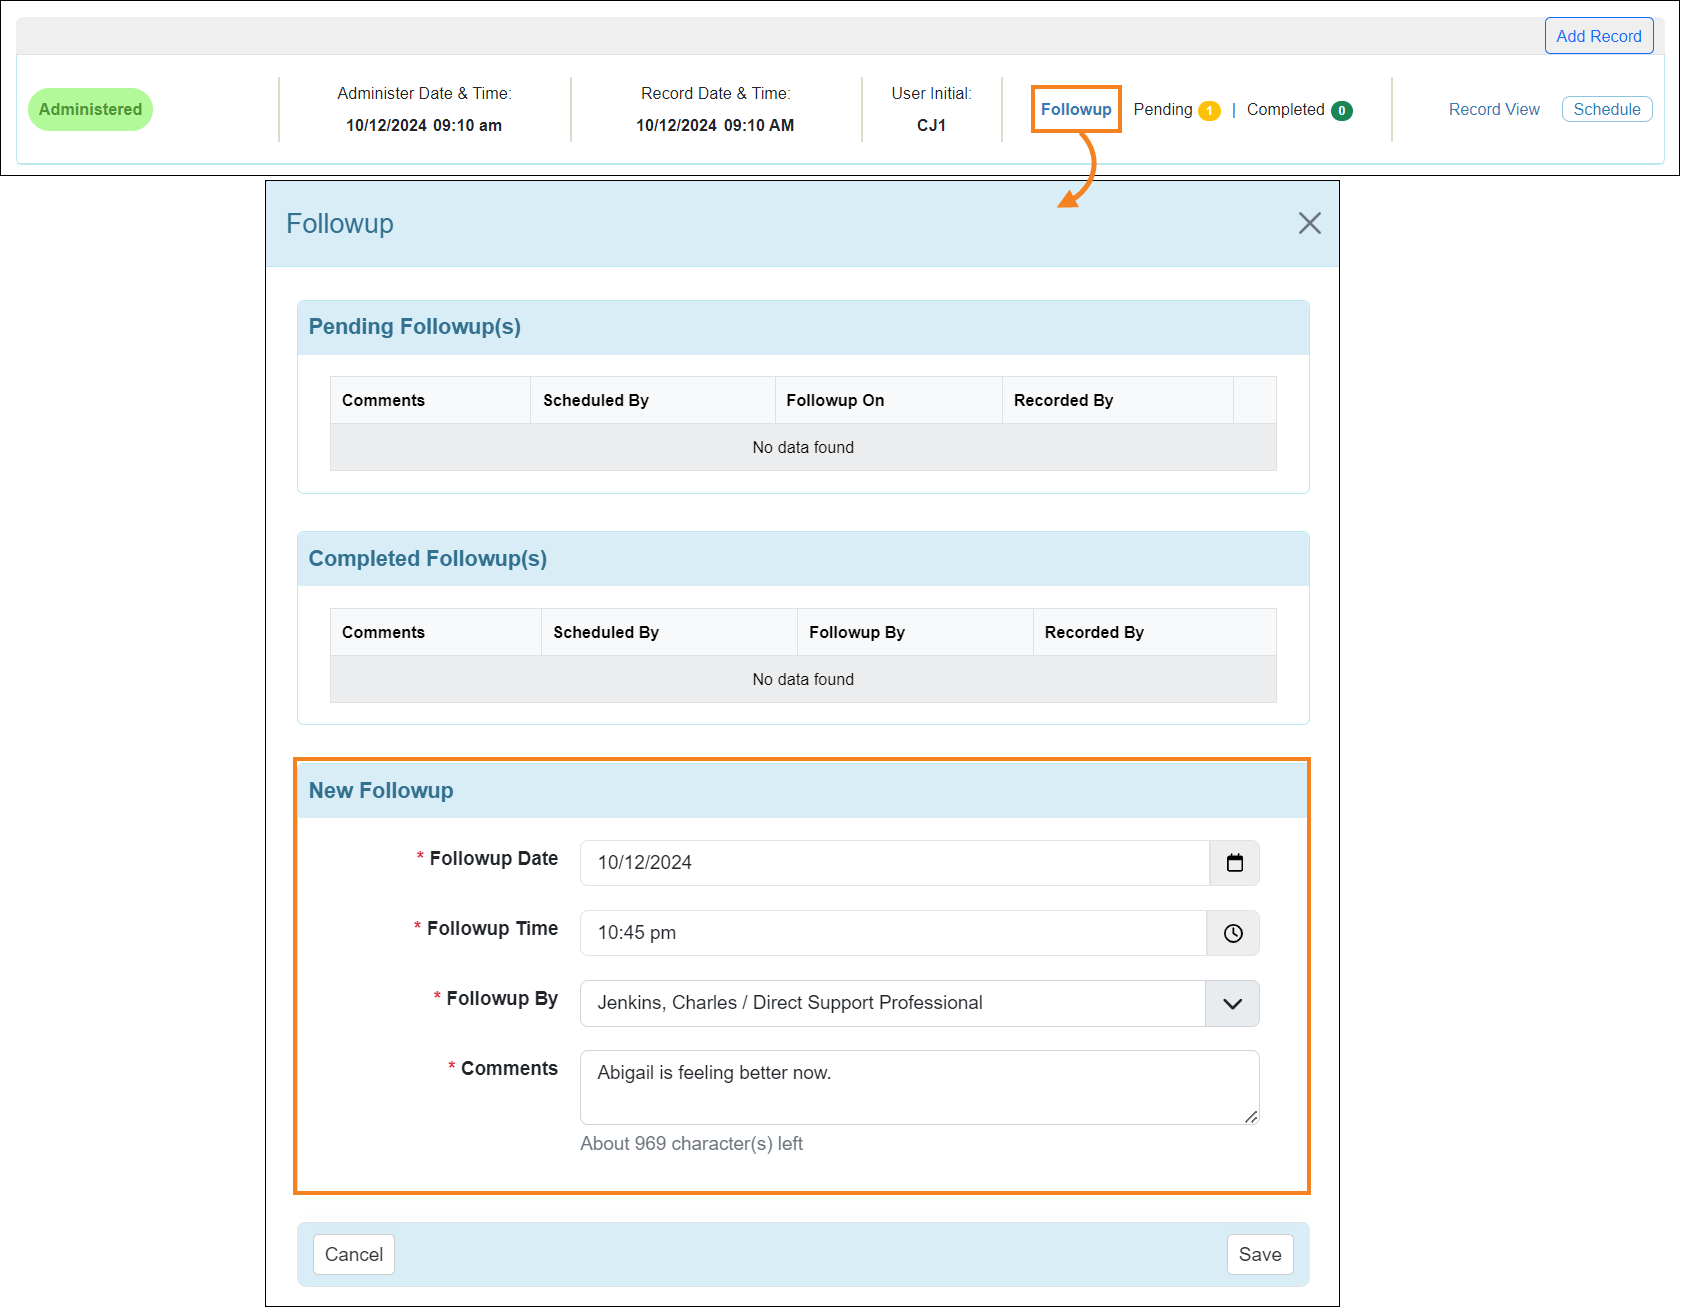
- If PRN Scheduling is enabled for the provider, then users can also schedule PRN Followup and PRN Records from 'Detail Data' popup of the respective slot.
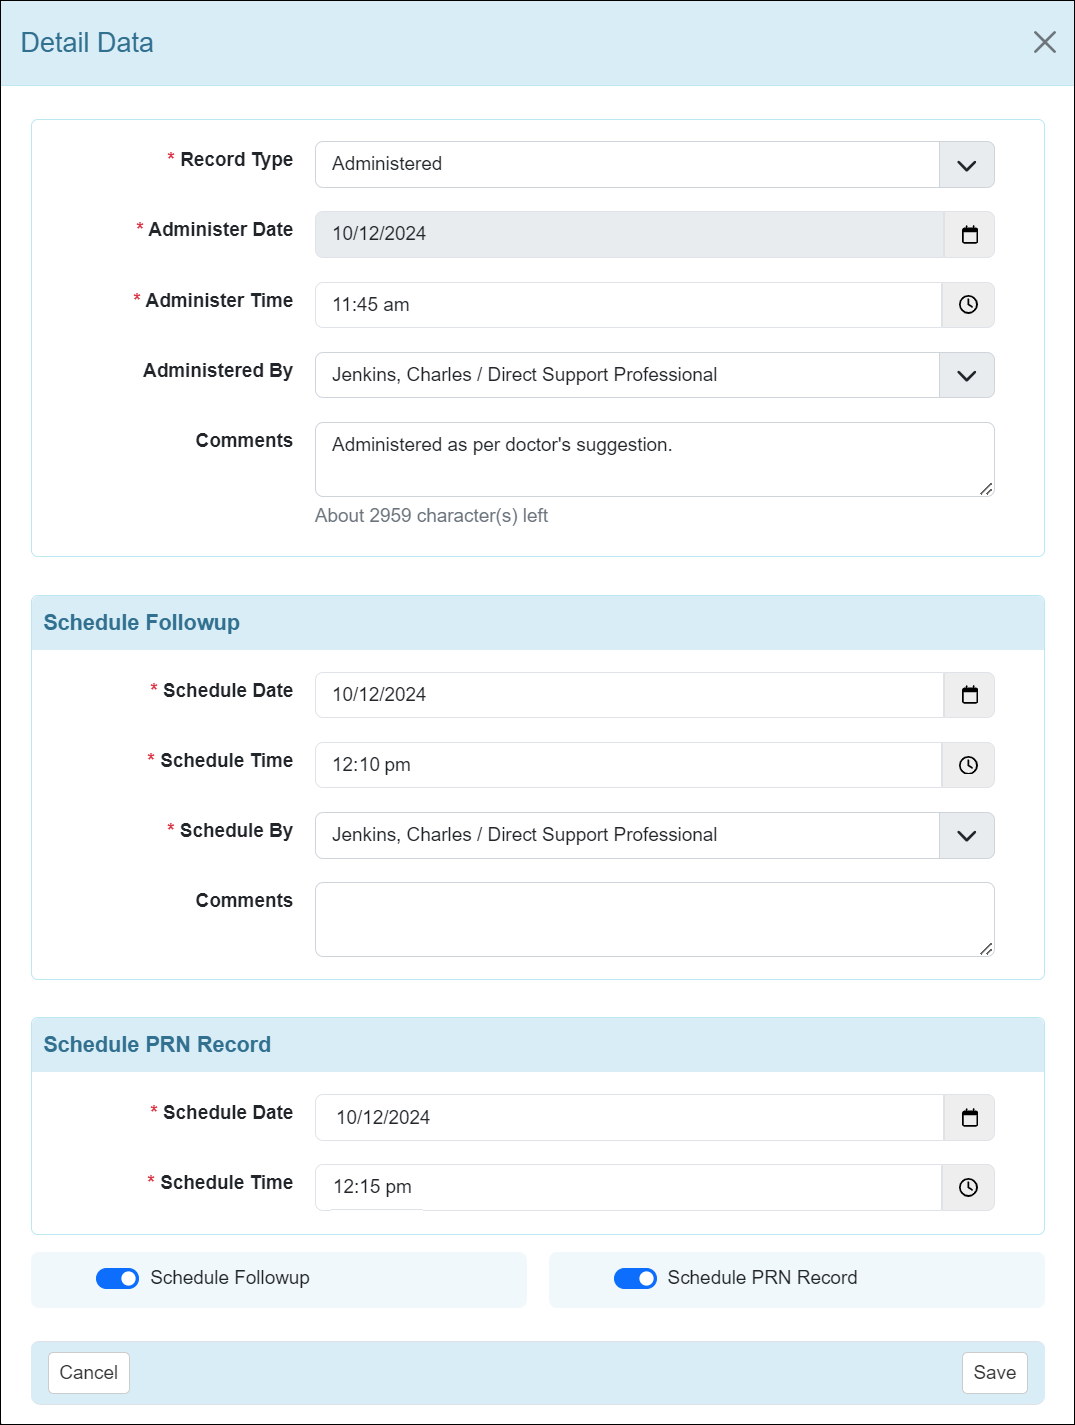
PRN Records and Followups can also be scheduled from the Schedule button next to the recorded PRN.
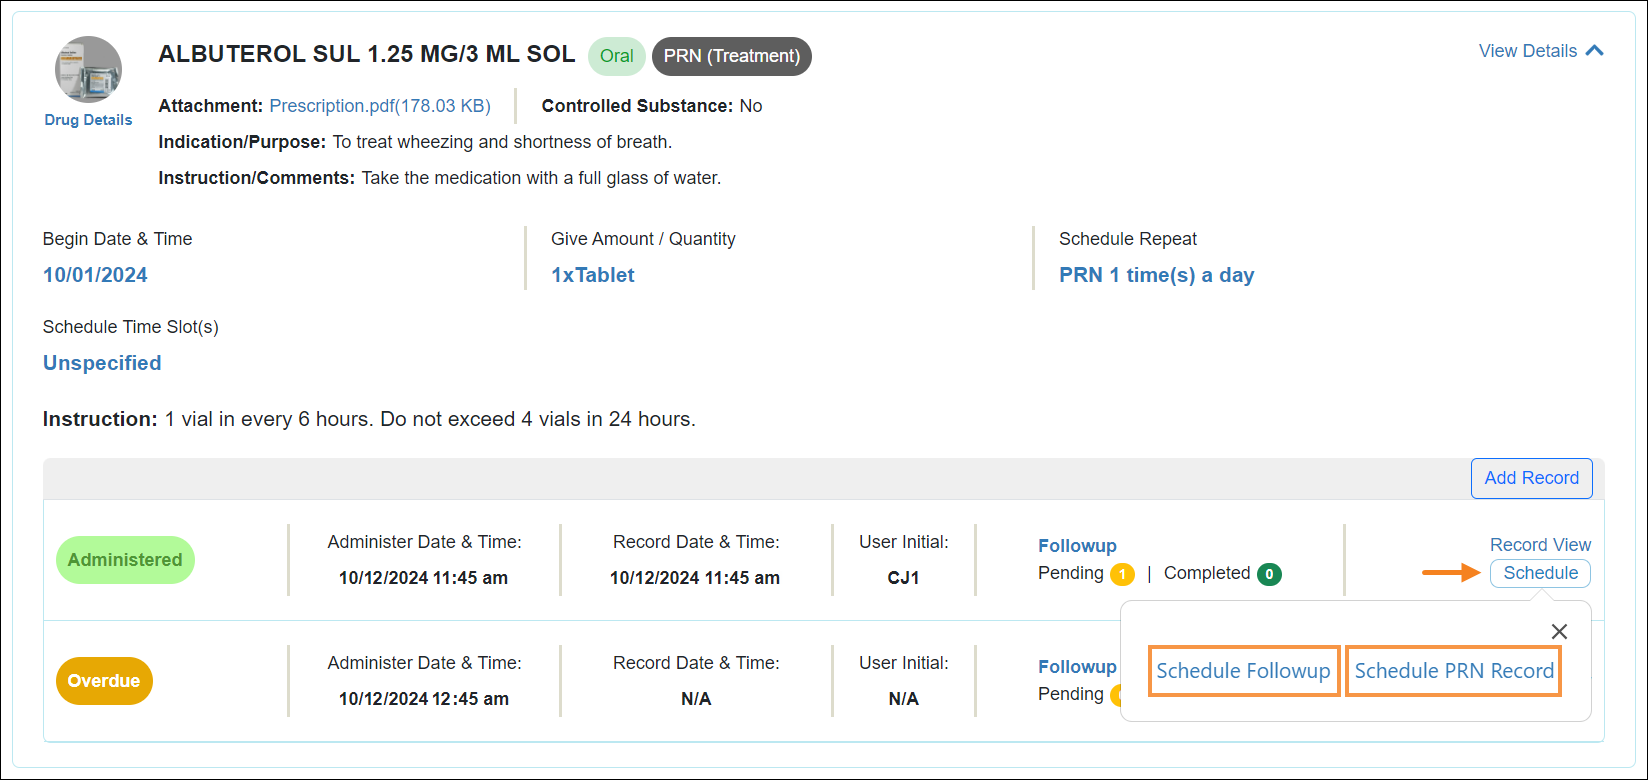
- Scheduled ‘PRN Record’ slot(s) will appear on the To Do and PRN tabs for the date it was scheduled. The Administer Date cannot be changed while saving a scheduled PRN record.
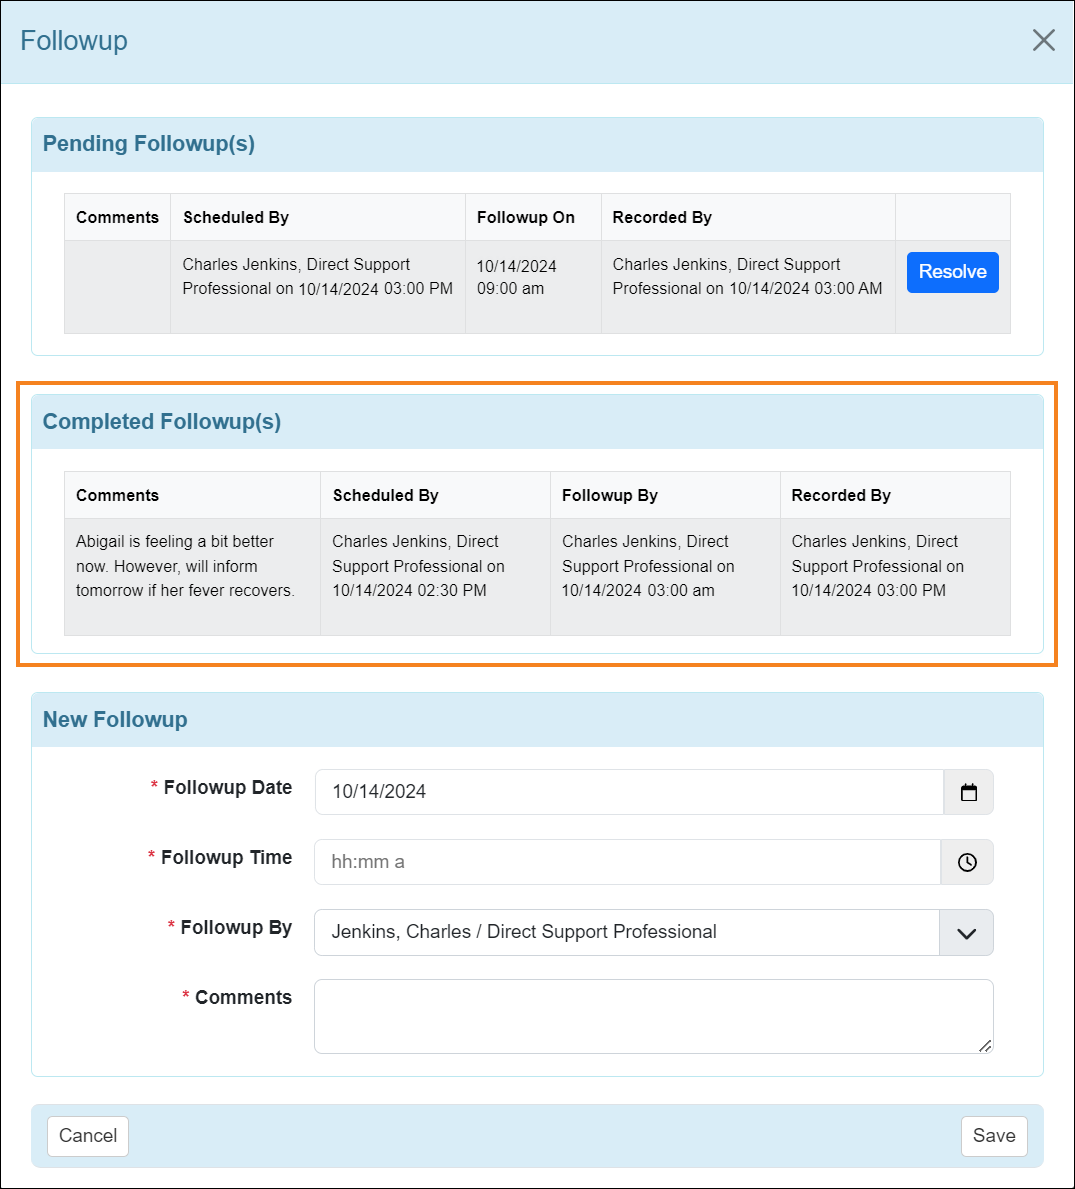
- Scheduled ‘PRN Followup’ slot(s) will appear on the To Do tab for the date it was scheduled and on the ‘Followup’ popup window of the respective PRN entry. Users will also be able to Resolve the scheduled followup from the respective PRN slot’s ‘Followup’ popup as well as from the To Do tab of the selected followup date. The Followup Date cannot be changed while saving a scheduled PRN Followup.
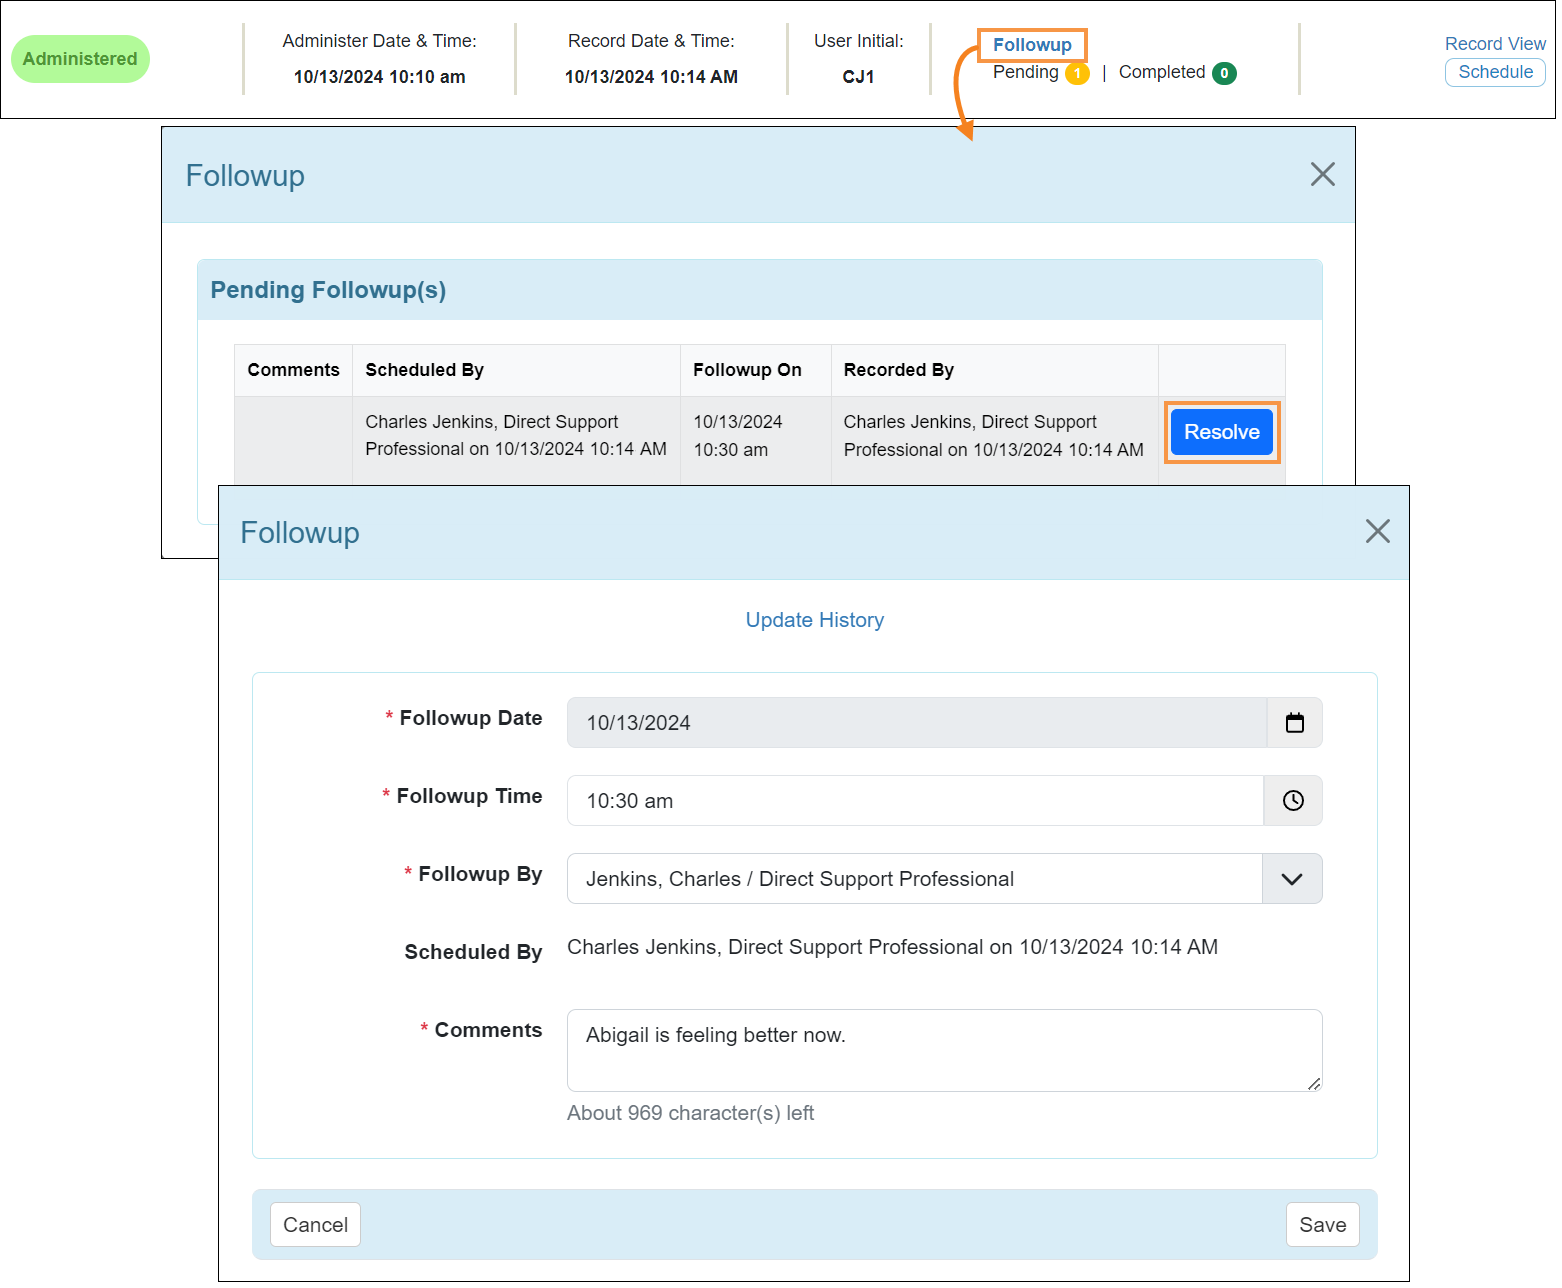
Resolved and directly added followups will appear in the 'Completed Followup(s)' section of the 'Followup' popup window.
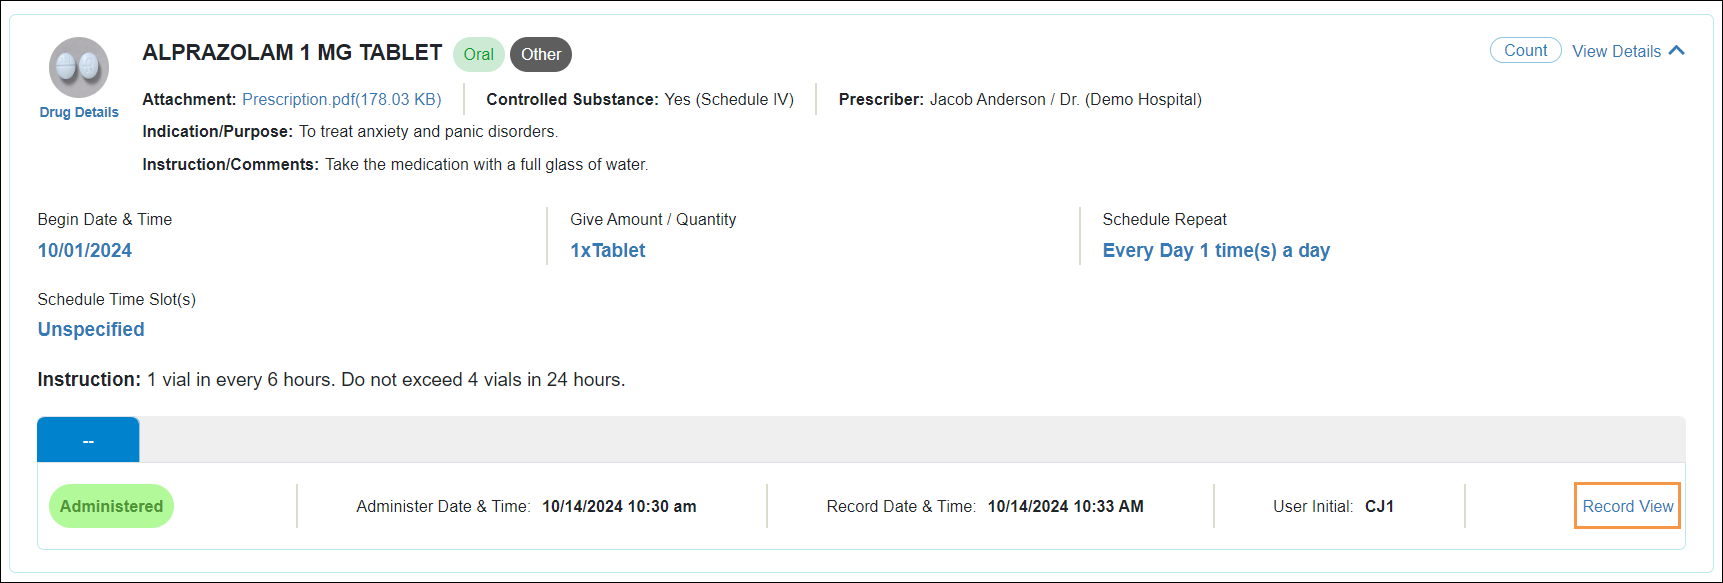
- The Other tab will display the total number of ‘Other’ type medications that have been scheduled for the selected date. Users can click on the View Details link to expand the medication-specific information and record the medication using the Add Record button.
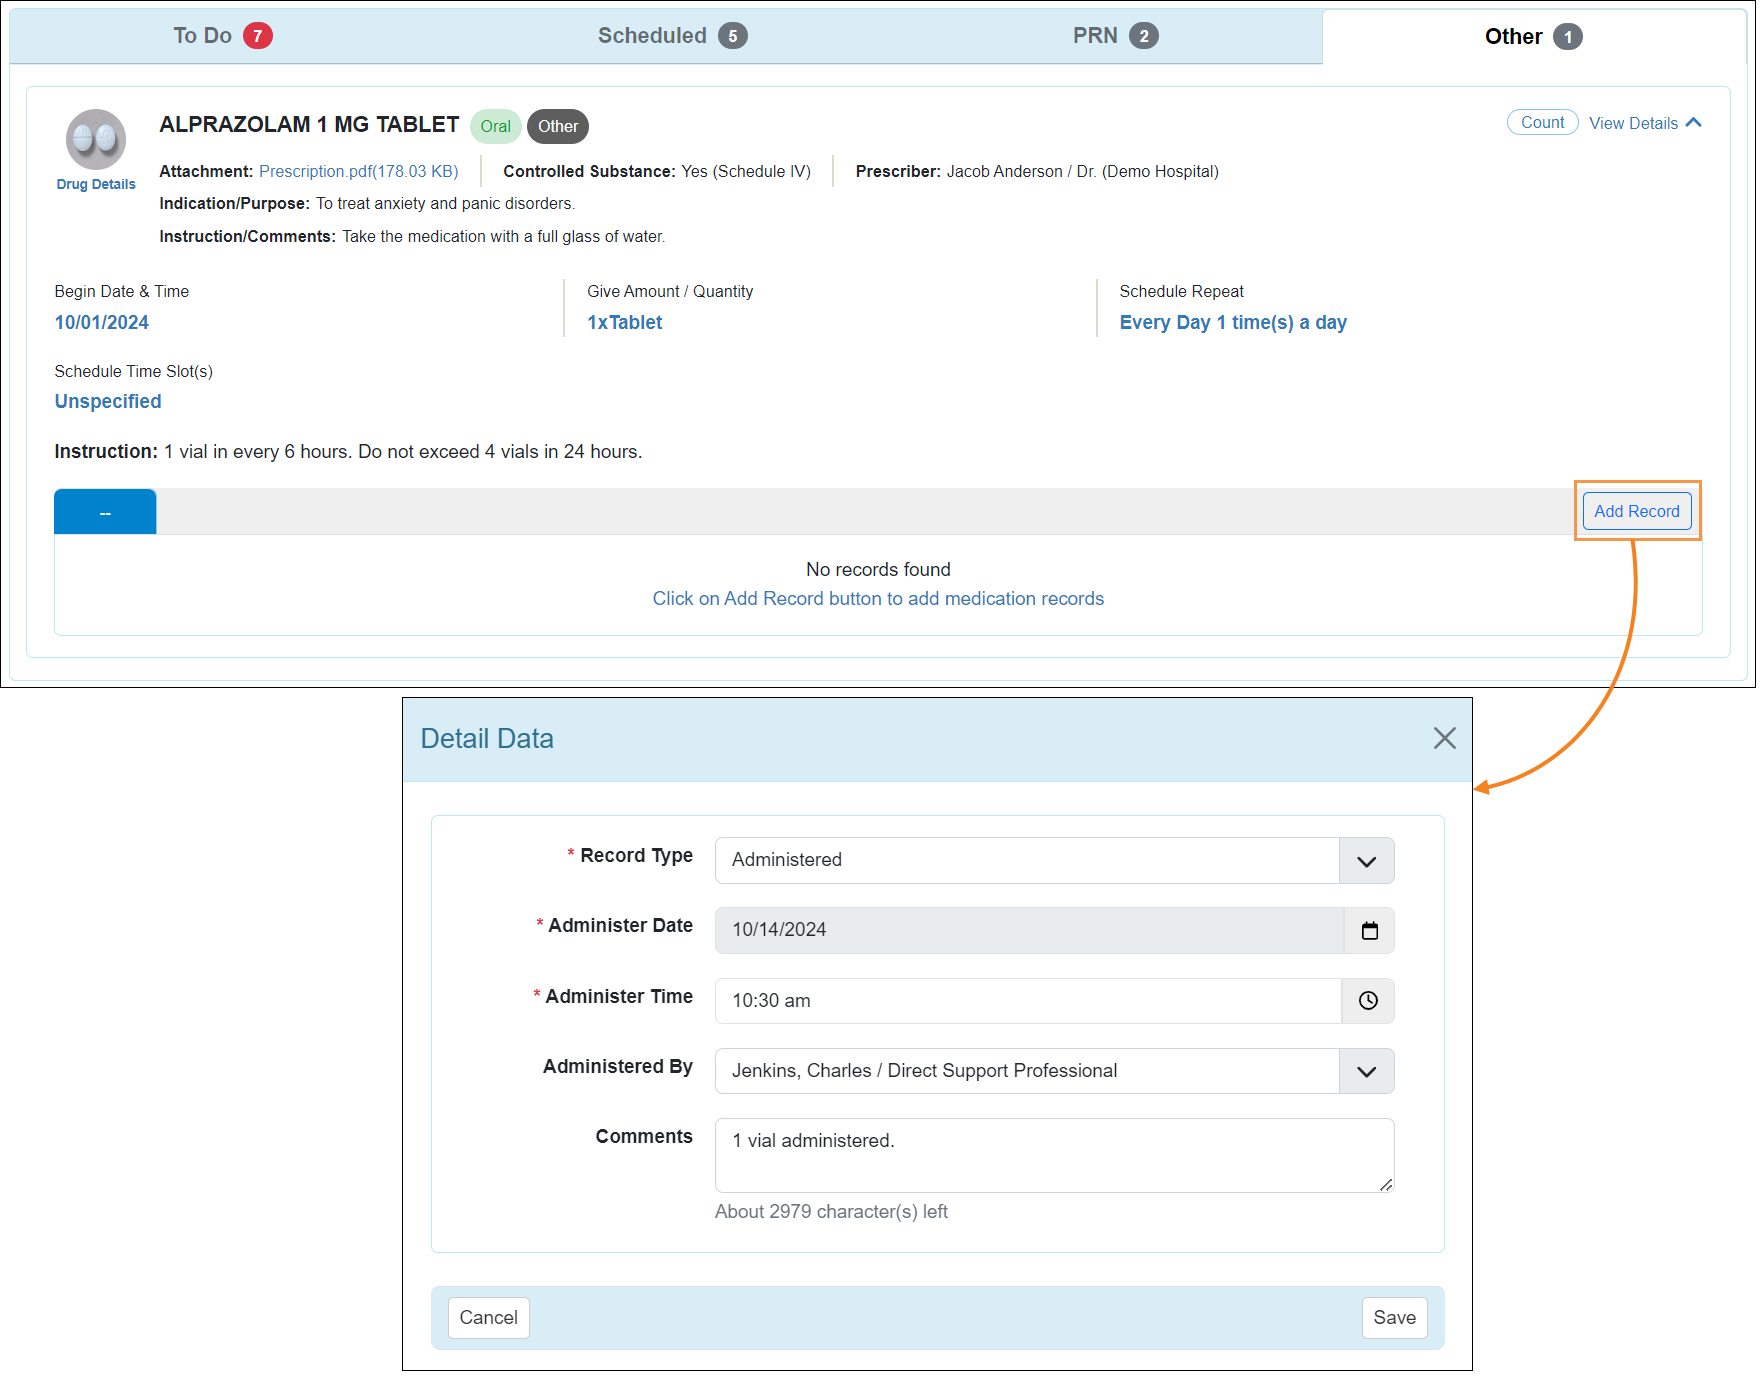
Once saved, the record can be viewed using the Record View button next to the corresponding slot.
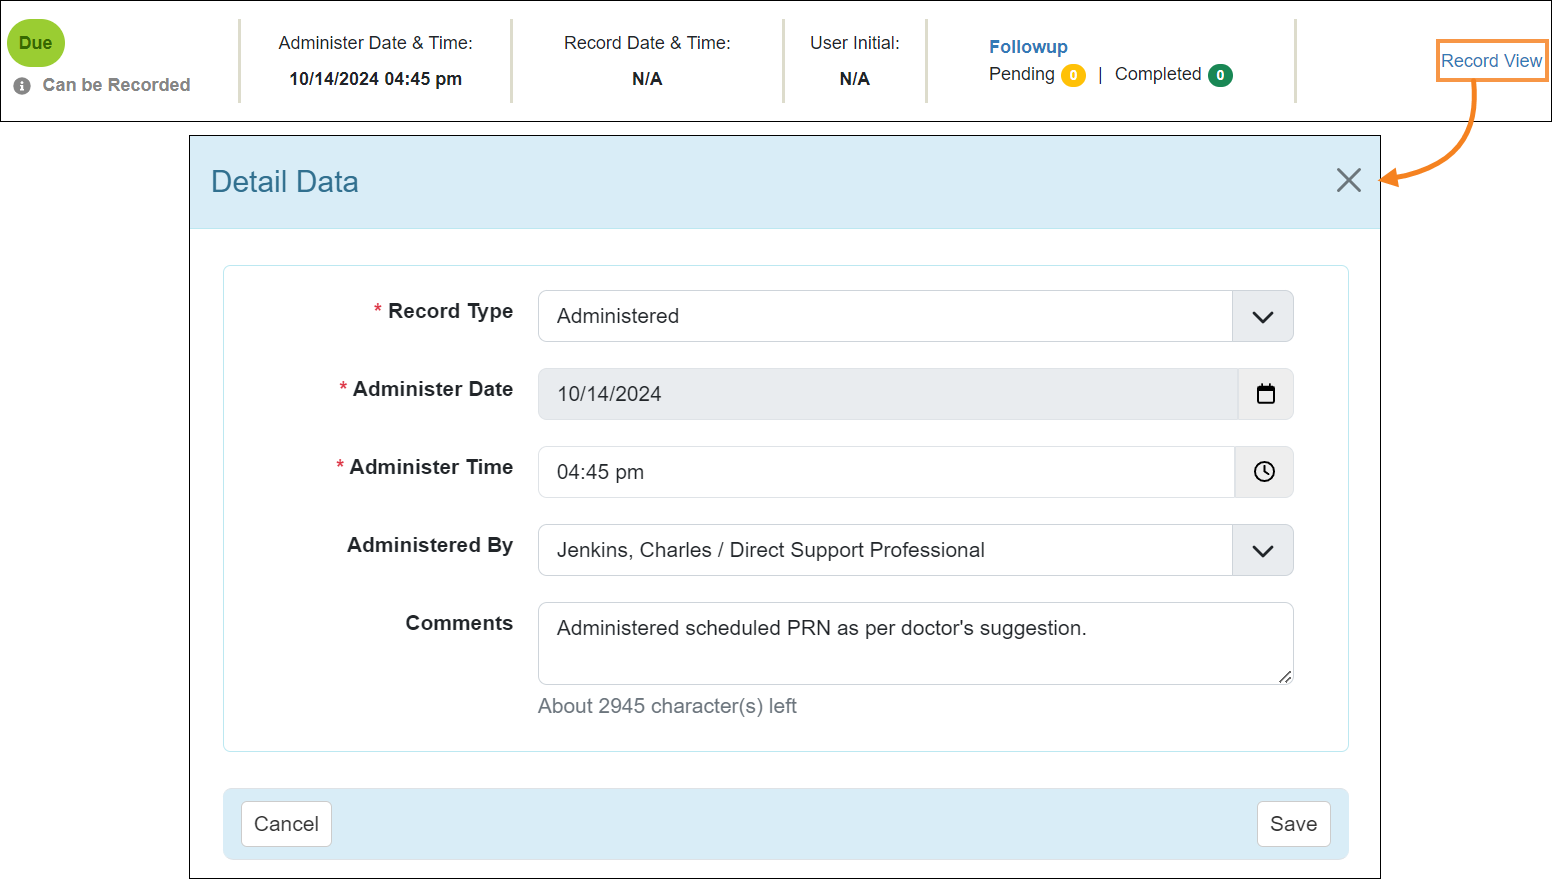
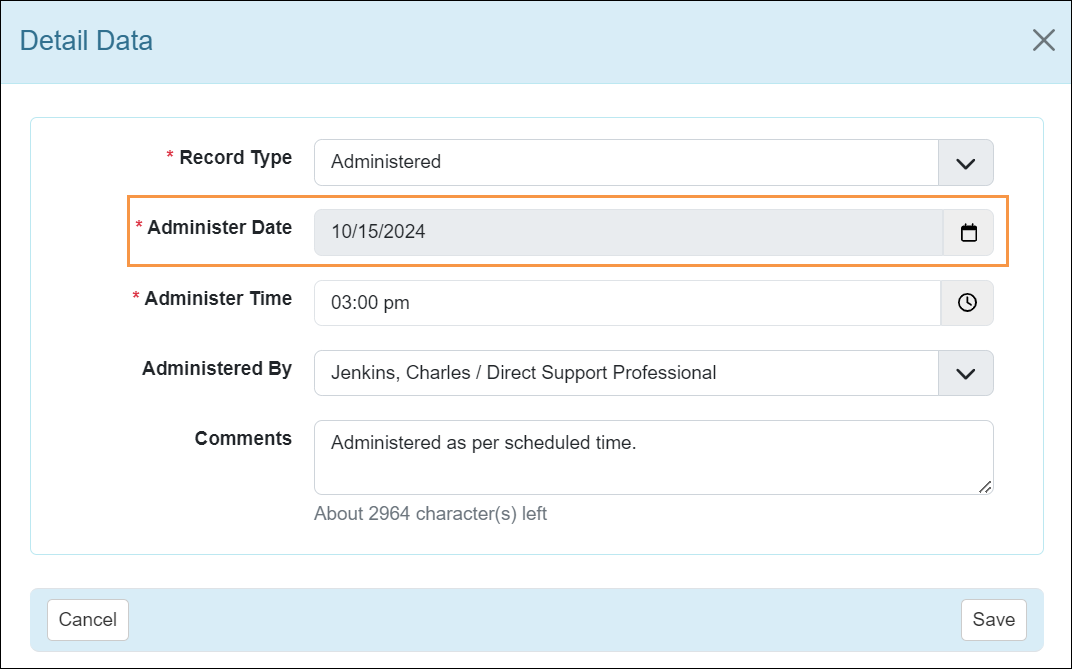
- Regardless of whether a medication is recorded from the To Do, Scheduled, PRN, or Other tab of the Daily MAR, users will not be able to change the Administer Date of an entry. This field will appear as read-only, and will be auto-selected based on the filtered date on the Daily MAR.
- For slot(s) scheduled for the current date, the Administer Time will auto-populate the current time based on the MAR Time Zone. For slot(s) scheduled for the past dates, it will auto-populate the Scheduled Time of the respective slot. This will also be applicable for the Followup Time of the scheduled PRN followups.
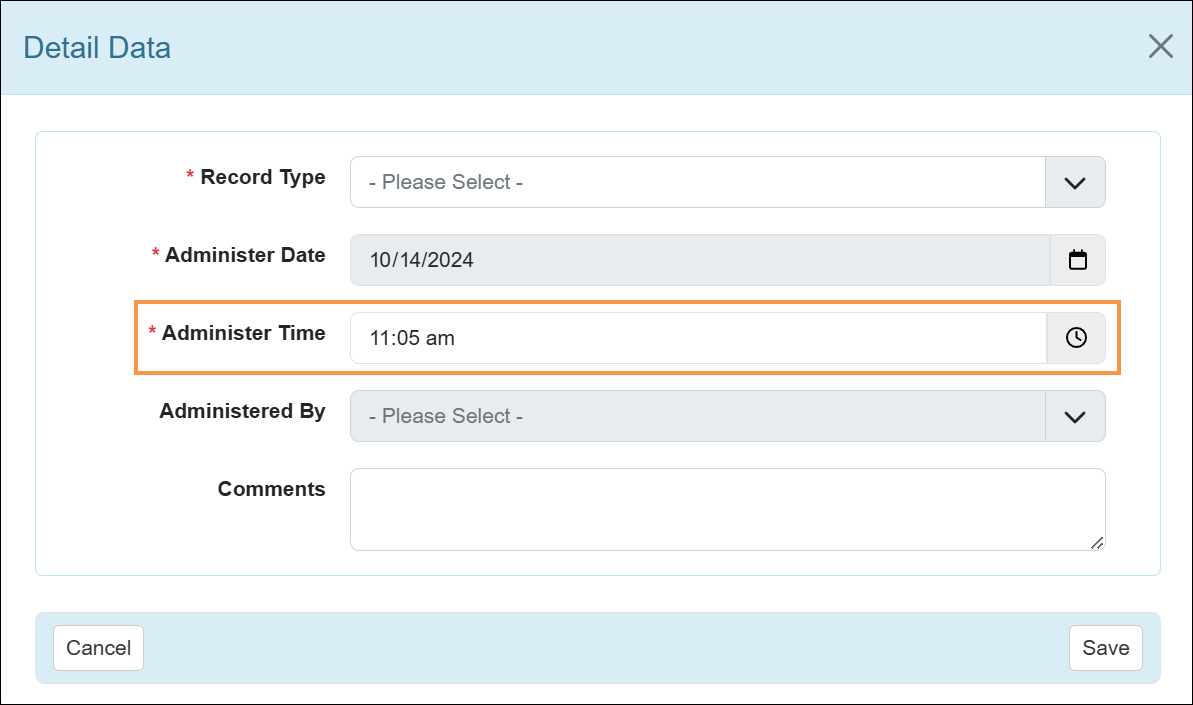
- For the unspecified and PRN slot(s), Administer Time will be empty by default. However, users will need to manually enter or select the administer time to save the record.

- For the scheduled slot(s), if selected Administer Time is outside of the documentation window or the scheduled slot is in the past date, then Comments will be required for the respective entry.
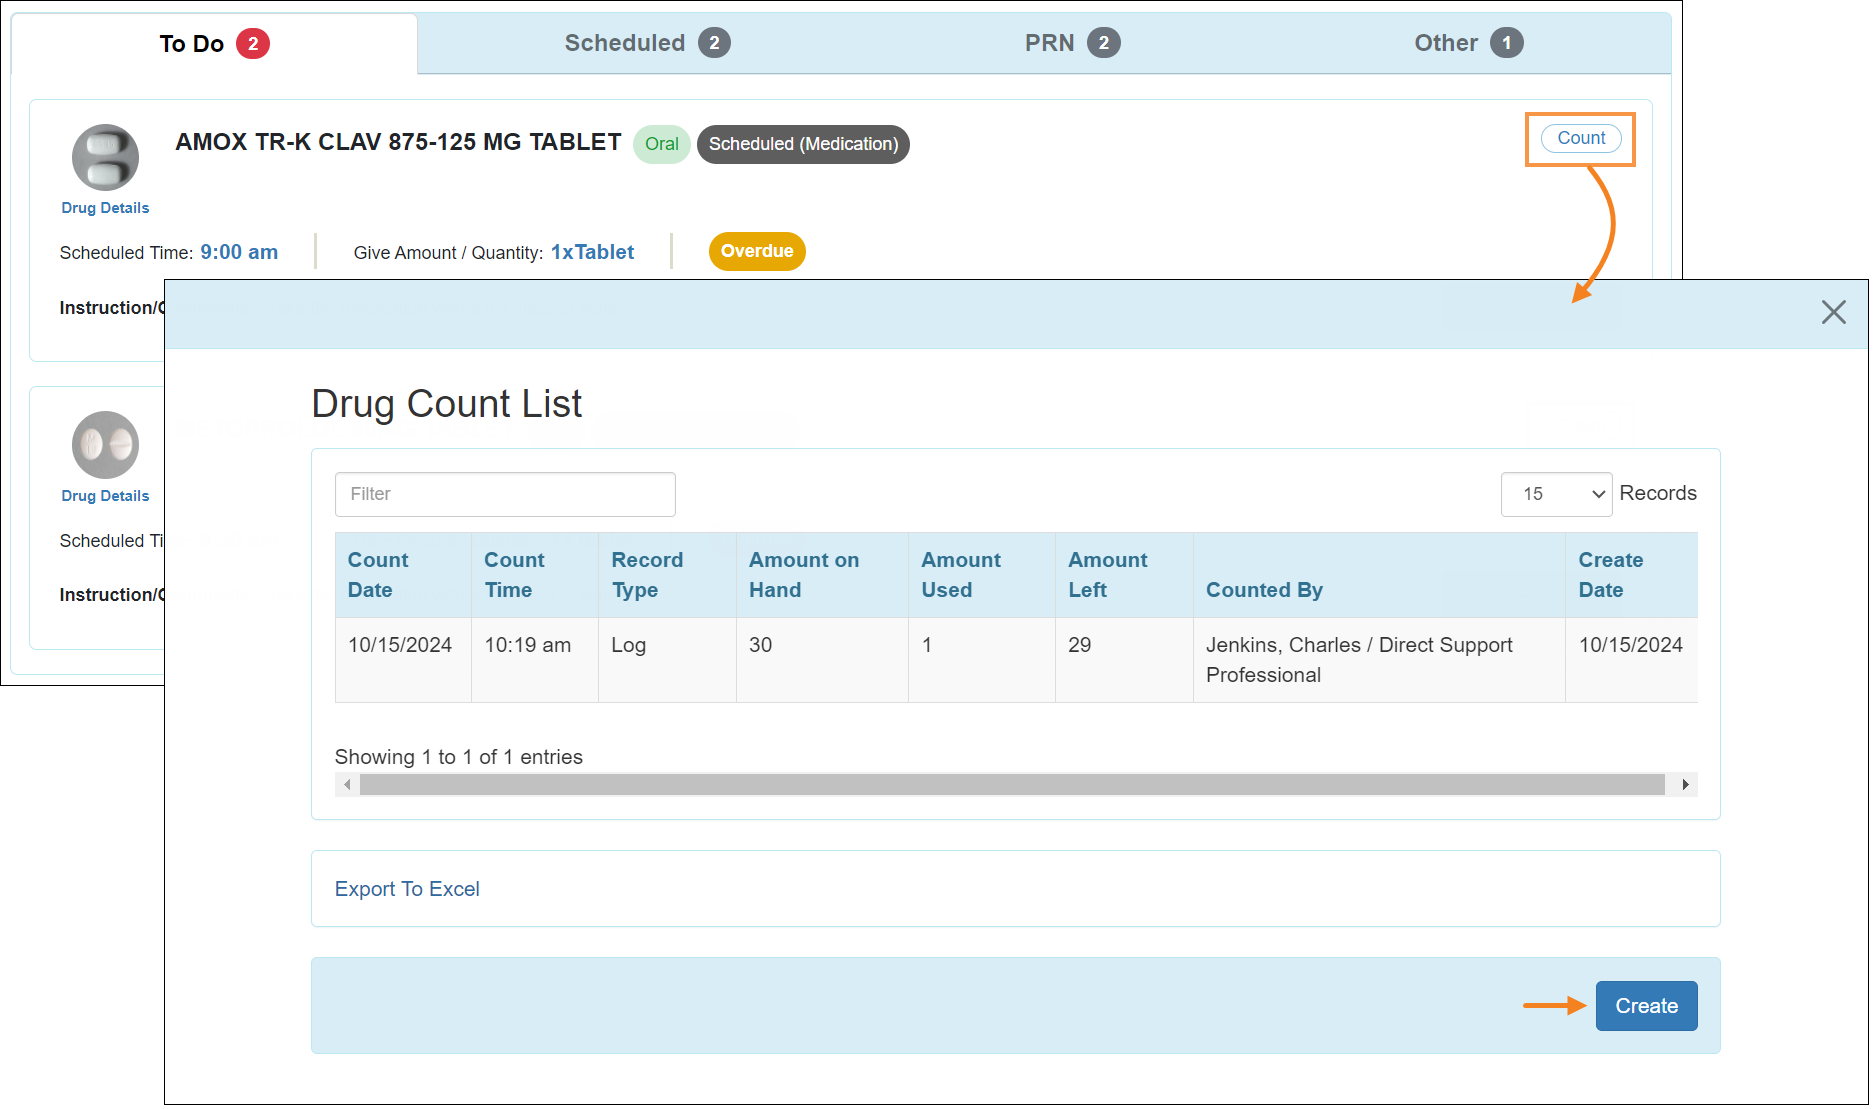
- If Drug Count is enabled for a medication then a Count button will be available next to the medication. Users will be able to click on this button to view record Drug Count and view the recorded counts for the respective medication.
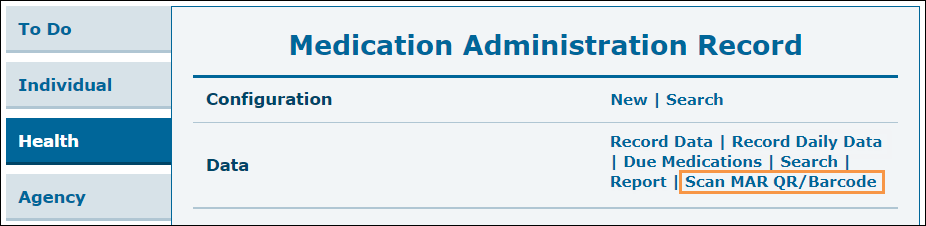
- If QR/Barcode is enabled for the provider, then a new Scan MAR QR/Barcode link will also be available next to the Data option to scan or manually search for MAR or the medication within MAR.
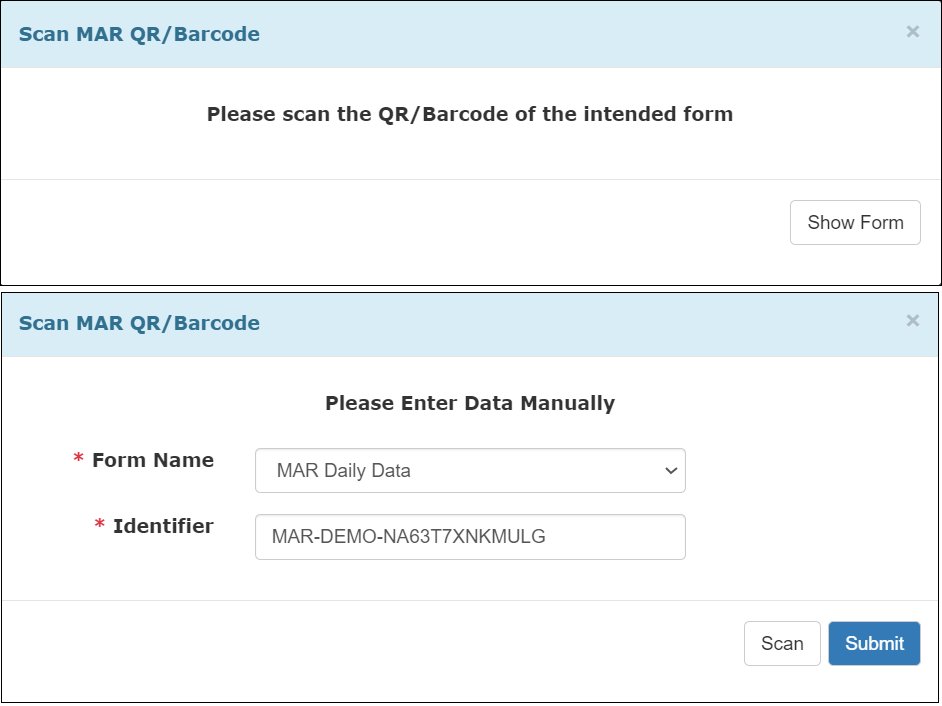
Selecting the Scan MAR QR/Barcode link will display a 'Scan MAR QR/Barcode' popup window where users can scan for the MAR or Medication History forms, and also manually search for it.
Scanning or manually searching for a MAR QR/Barcode will take users to the respective month's Daily MAR. However, MAR Medication Data can only be scanned or searched if the respective medication exists in the current month's MAR. If users attempt to search for a medication that is not available in the current month's MAR, then they will receive a popup message on the Daily MAR, stating: 'Selected medication is not available in the current MAR.'
- A Daily Record link has been added in the Quick Links beside the MAR Data option. This link will also be accessible from the Menu bar.

- The following changes will apply to the monthly MAR for providers with Daily MAR enabled:
- If Monthly MAR is made read-only from the 'Provider MAR Configuration' page, then the following message will be displayed on top of the Monthly MAR in Data Entry Mode, and users will not be able to record data from the monthly MAR: 'Read Only mode is enabled from Provider MAR Configuration'. However, monthly MAR will not be read-only in Configuration Mode.
- Two new buttons to access Daily Data and Generate QR/Barcode(s) will be available in the Data Entry mode of the monthly MAR form. The link to access Daily Data will also be available in the Configuration mode of the monthly MAR.
- If PRN Record has been scheduled for a medication, then it will appear as 'Scheduled' on the Data Entry mode of the monthly MAR.
- If PRN followup has been scheduled for a medication, then it will appear as 'Pending' on the 'Followup' popup window of the respective slot.

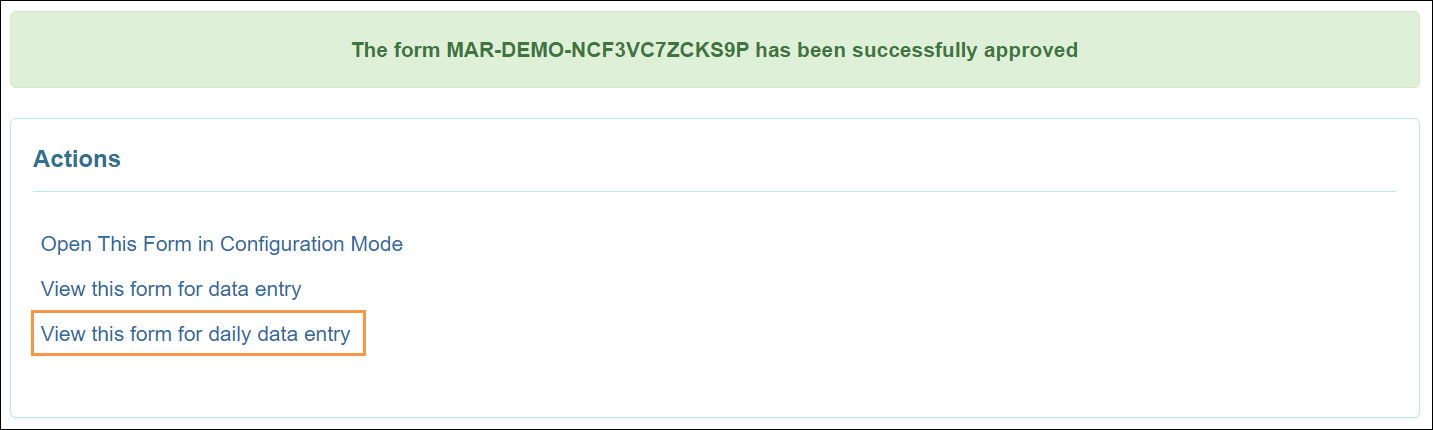
- A new View this form for daily data entry link will be displayed on the MAR success message page, allowing access to the MAR in Daily Data mode.
- If Monthly MAR is made read-only from the 'Provider MAR Configuration' page, then the following message will be displayed on top of the Monthly MAR in Data Entry Mode, and users will not be able to record data from the monthly MAR: 'Read Only mode is enabled from Provider MAR Configuration'. However, monthly MAR will not be read-only in Configuration Mode.
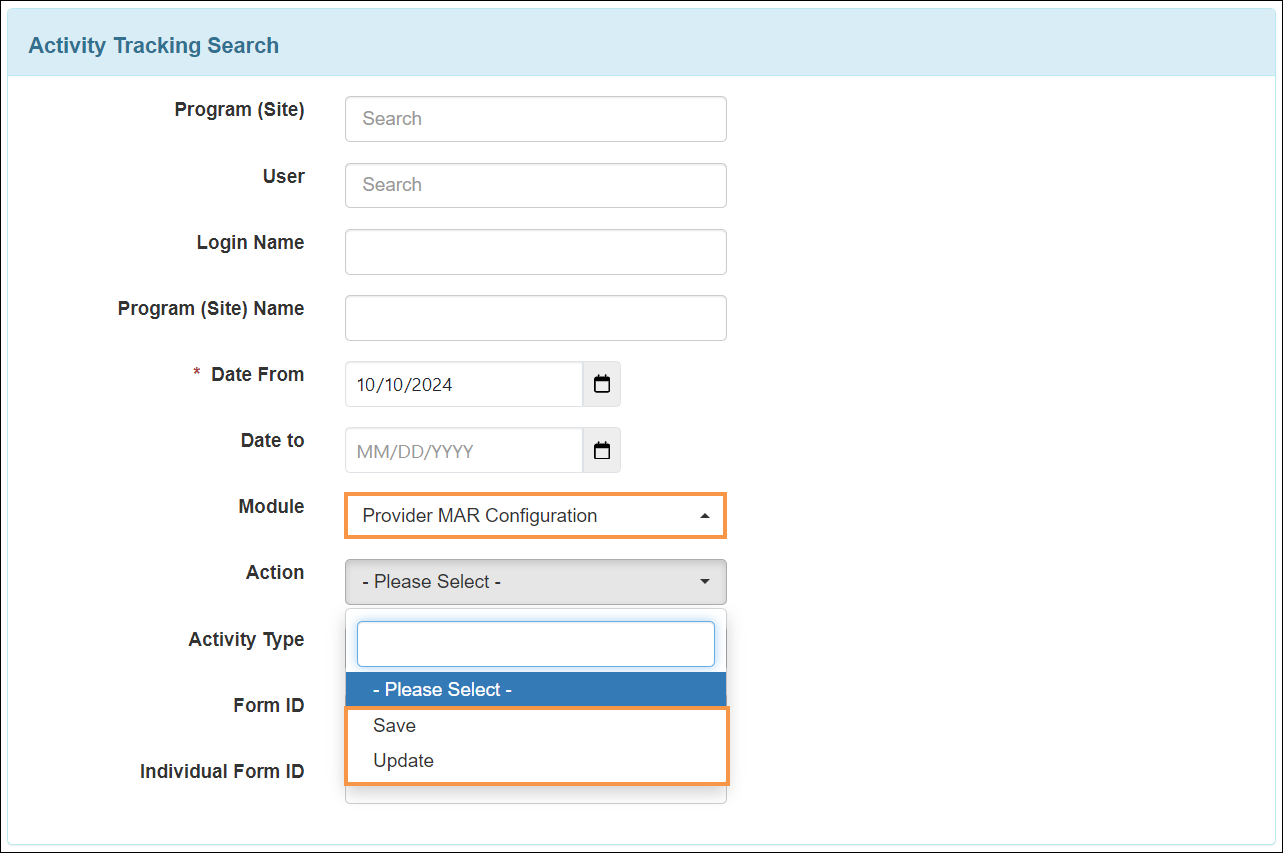
- The following changes will apply to the Activity Tracking module for providers with Daily MAR enabled:
- Provider MAR Configuration has been added as a new Module in the ‘Activity Tracking Search’ page. Users can view Save and Update type activities performed within this module.
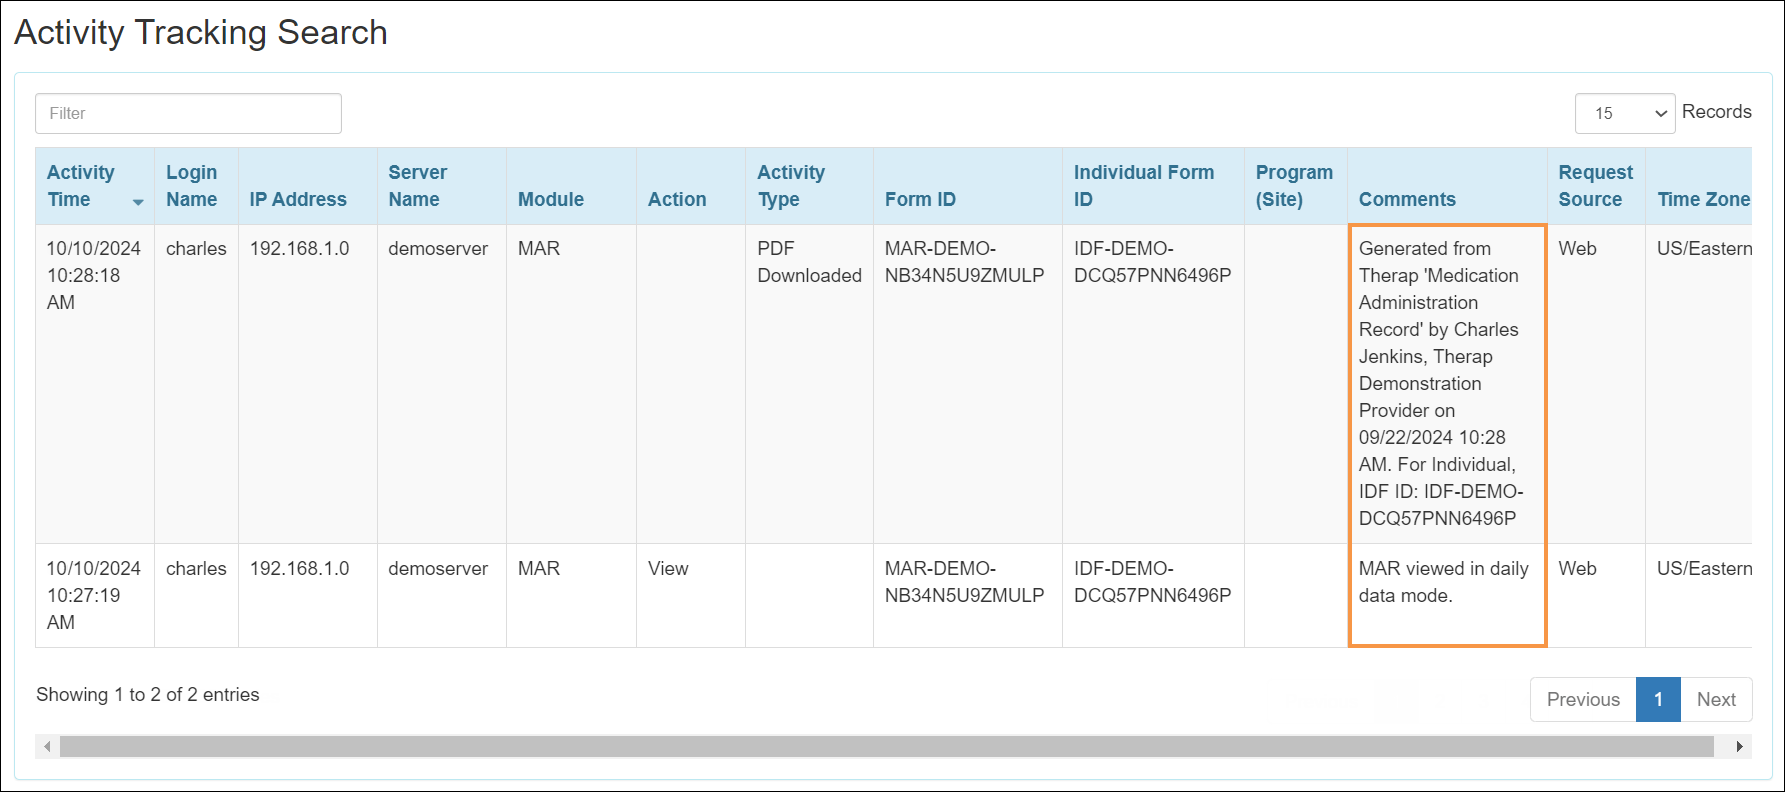
- For generating QR/Barcode PDF from the MAR or viewing MAR in Daily Data mode, Comments will be displayed in the ‘Activity Tracking Search’ results page.
- Provider MAR Configuration has been added as a new Module in the ‘Activity Tracking Search’ page. Users can view Save and Update type activities performed within this module.
Employment History
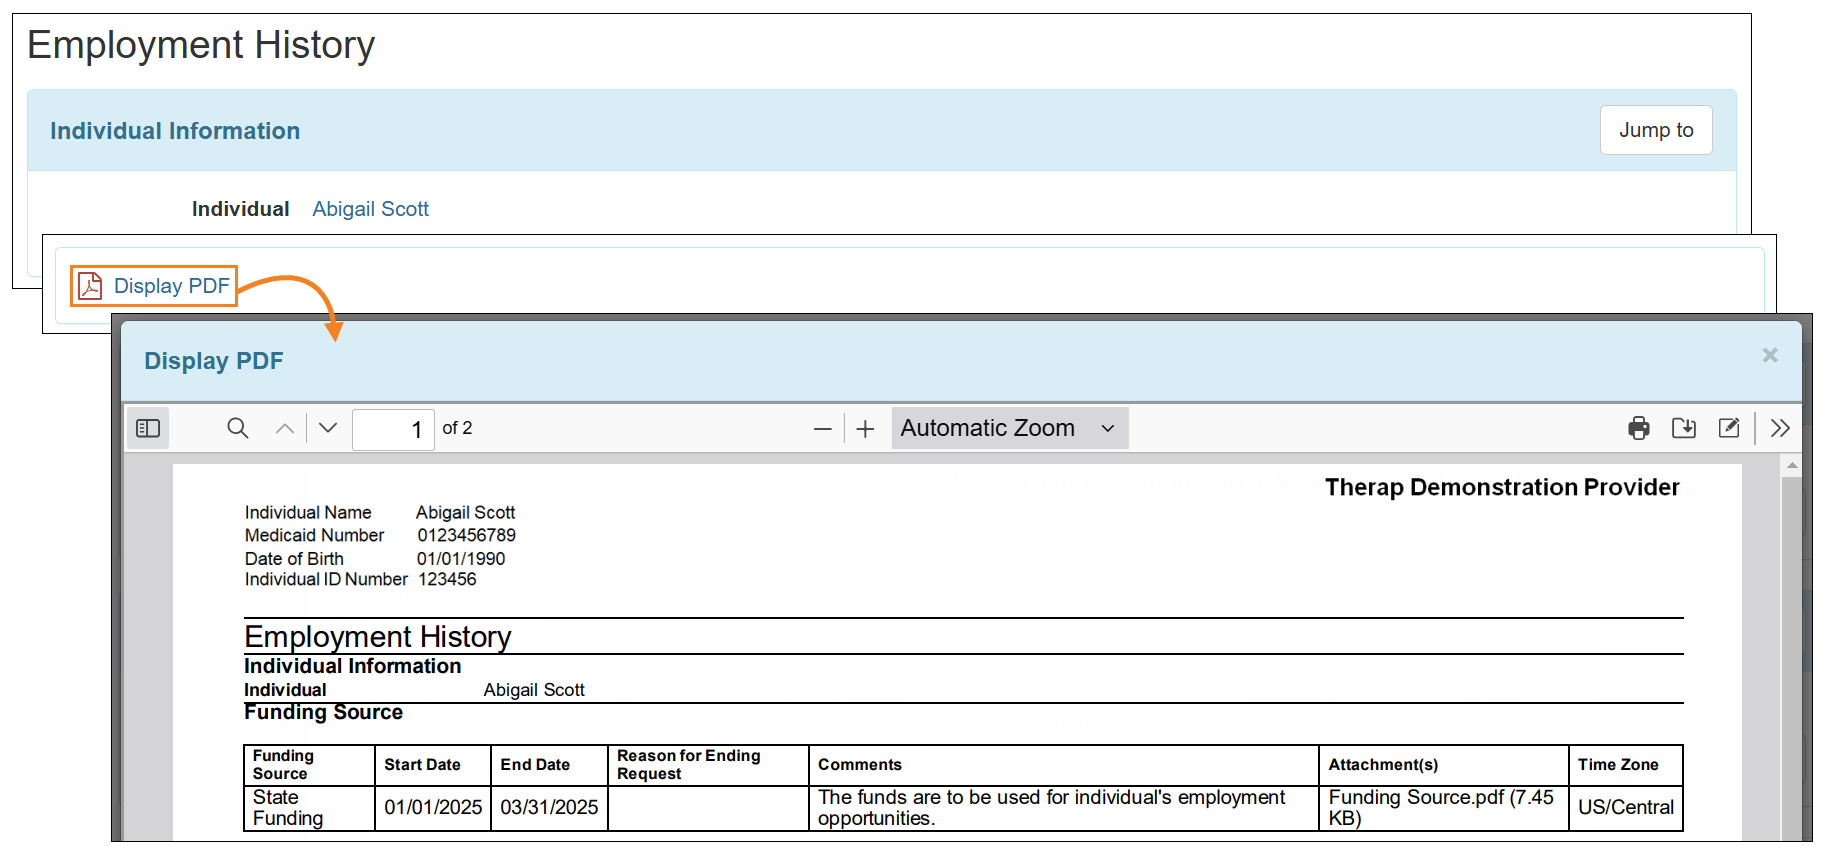
[Back to Top]- Users will now be able to view the PDF of the ‘Employment History’ report and ‘Job Outcome Data List’ page in the PDF Viewer by clicking on the Display PDF link at the bottom of the forms.
- The color of the Delete button at the bottom of all the Employment History forms has been changed to red.

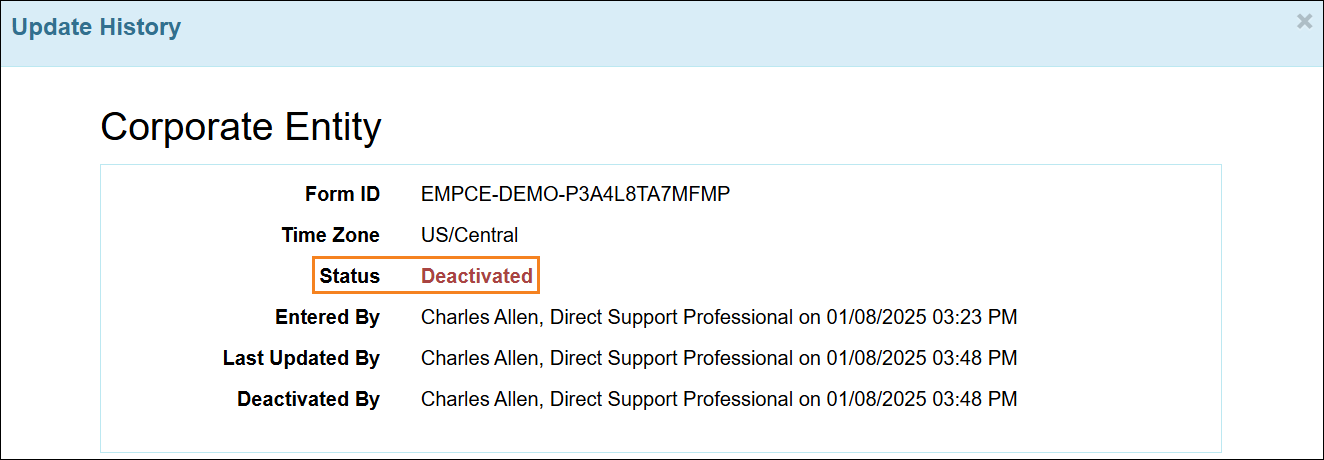
- The user interface of the archived forms displayed in the ‘Update History’ popup window within the Employment History forms accessed from the Agency tab has been updated.
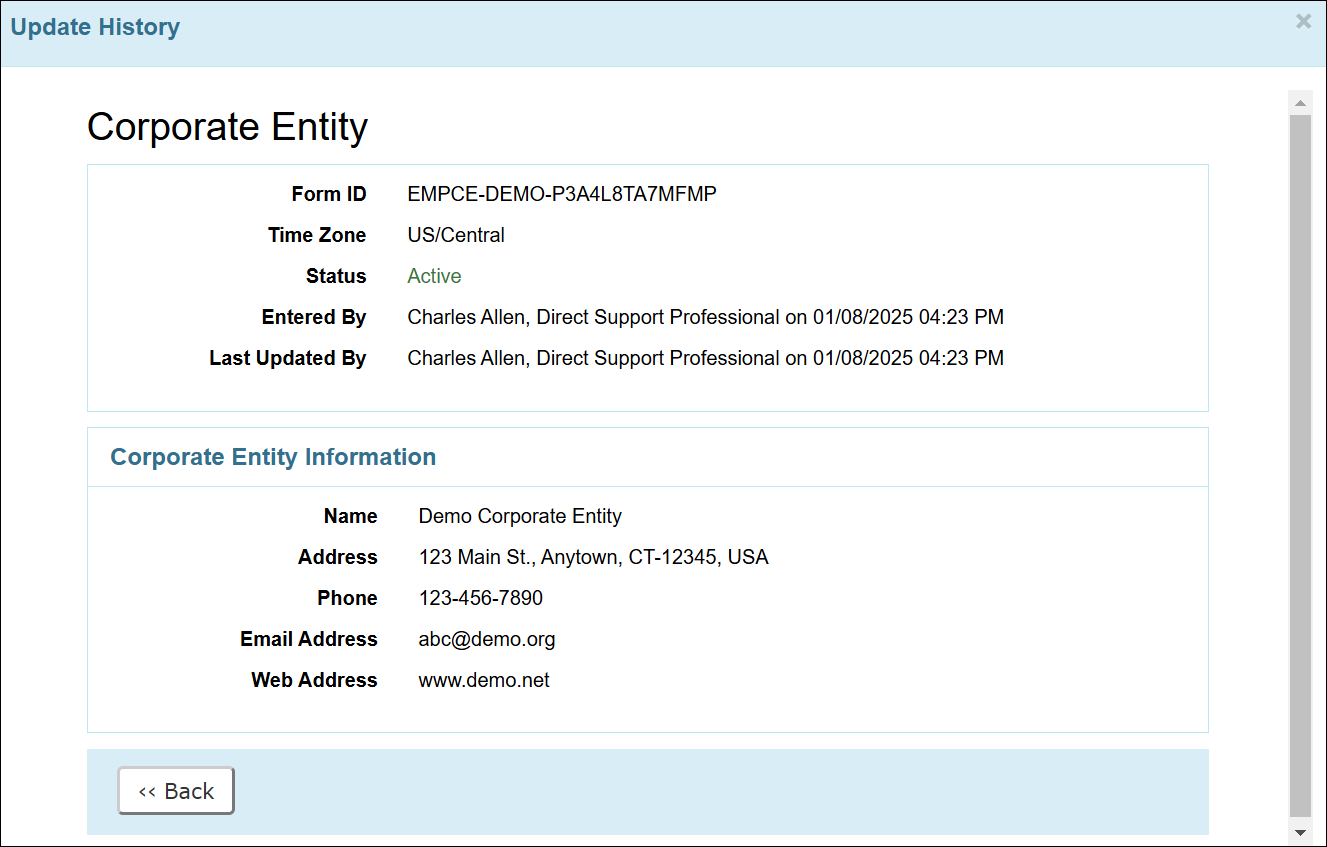
- The word ‘Archived’ has been removed from the header of all the Employment History forms in the ‘Update History’ popup window.
- In the Status field of the ‘Update History’ popup window, the ‘Active/Approved’ status of all the Employment History forms will now be displayed in green, while the ‘Deactivated/Deleted’ status will be displayed in red. Employment History forms created prior to this release will not display the Status in colored text.

- Users can now deselect their selected option by clicking again on the radio button for that option in the ‘Job Template’ and ‘Application and Interview’ forms.
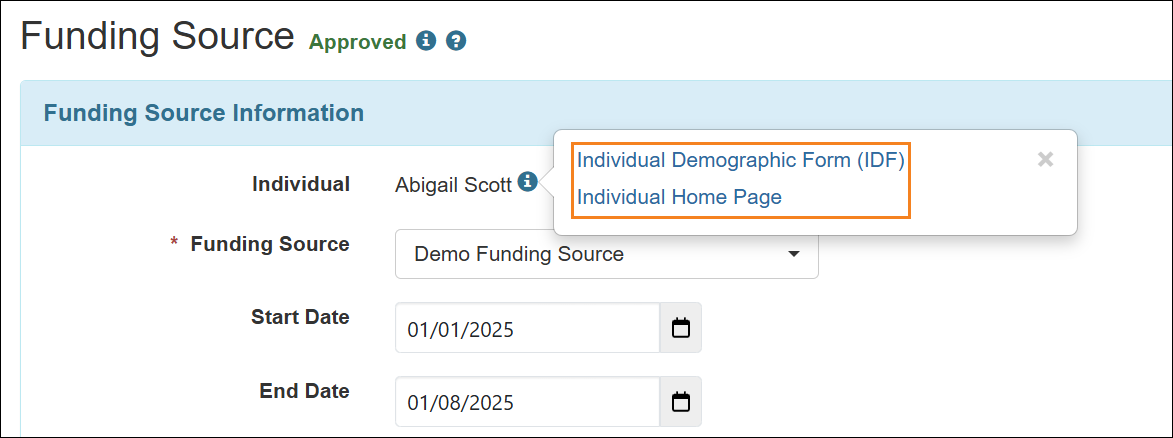
- An ‘i’ icon next to the Individual field has been added which will show the links to Individual Demographic Form (IDF) if they are assigned with the IDF Admin administrative role or any of the IDF View, IDF Edit, or Individual Admit/Discharge caseload-based roles and Individual Home Page link if they are assigned with the Individual Home Page caseload-based role.
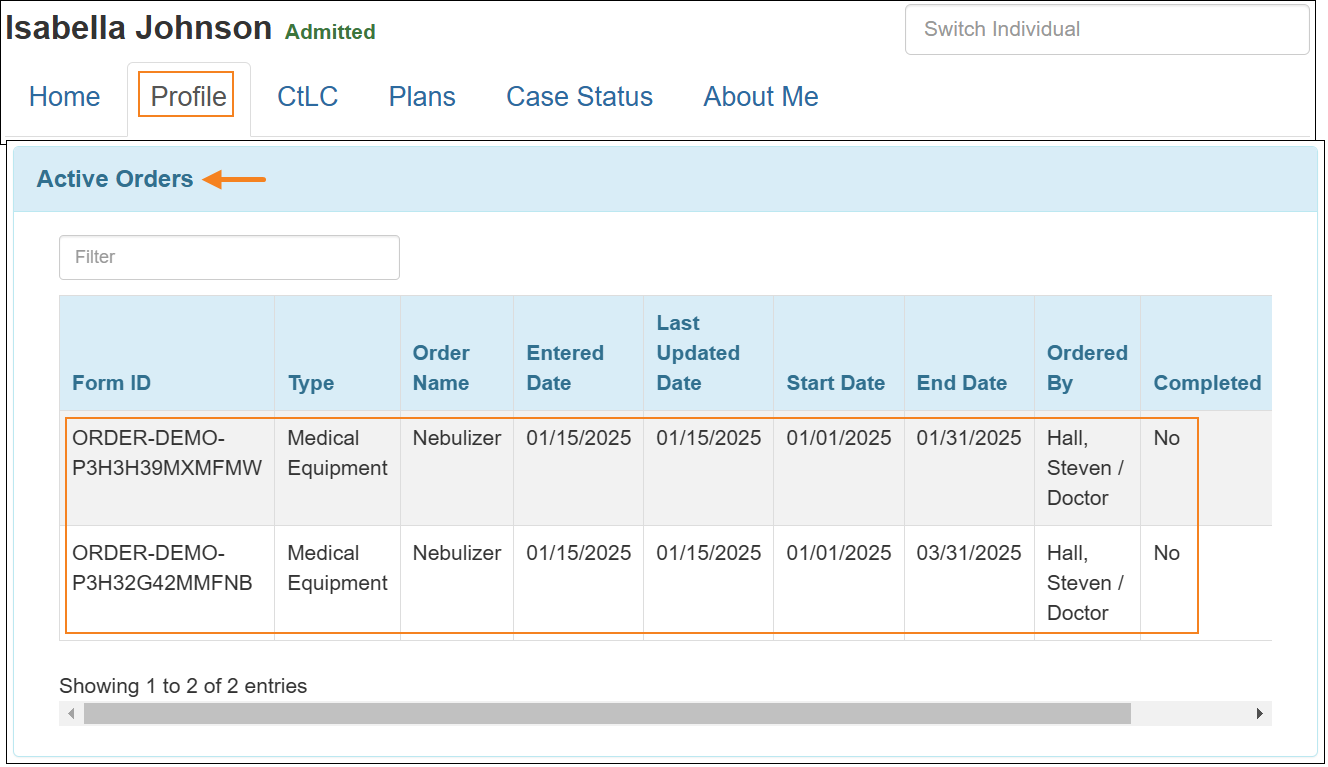
Individual Home Page
[Back to Top]- A new Record Daily Data link for the MAR Data dropdown option has been added in the 'Modules' section of the Individual Home Page. If MAR for the current month is configured for the individual, then users will be able to access the Daily MAR using this link.
- A new section titled ‘Active Orders’ has been added on the ‘Profile’ tab of the Individual Home Page. The individual’s active Orders (Approved Orders spanning over a date range that covers the current date and Approved orders for which no End Date is entered) will be listed in this section.
Individual Plan
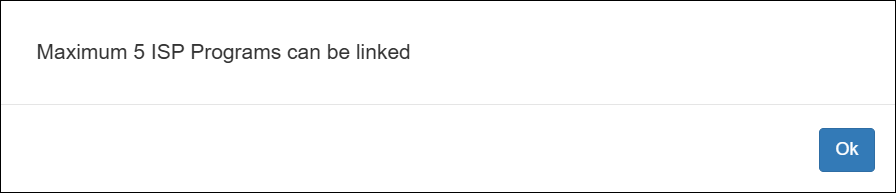
[Back to Top]- Users will now be able to link a maximum of 5 ISP Programs to each Action Plan of an Individual Plan. The linked ISP Programs will be sorted by the ISP Program Name column.
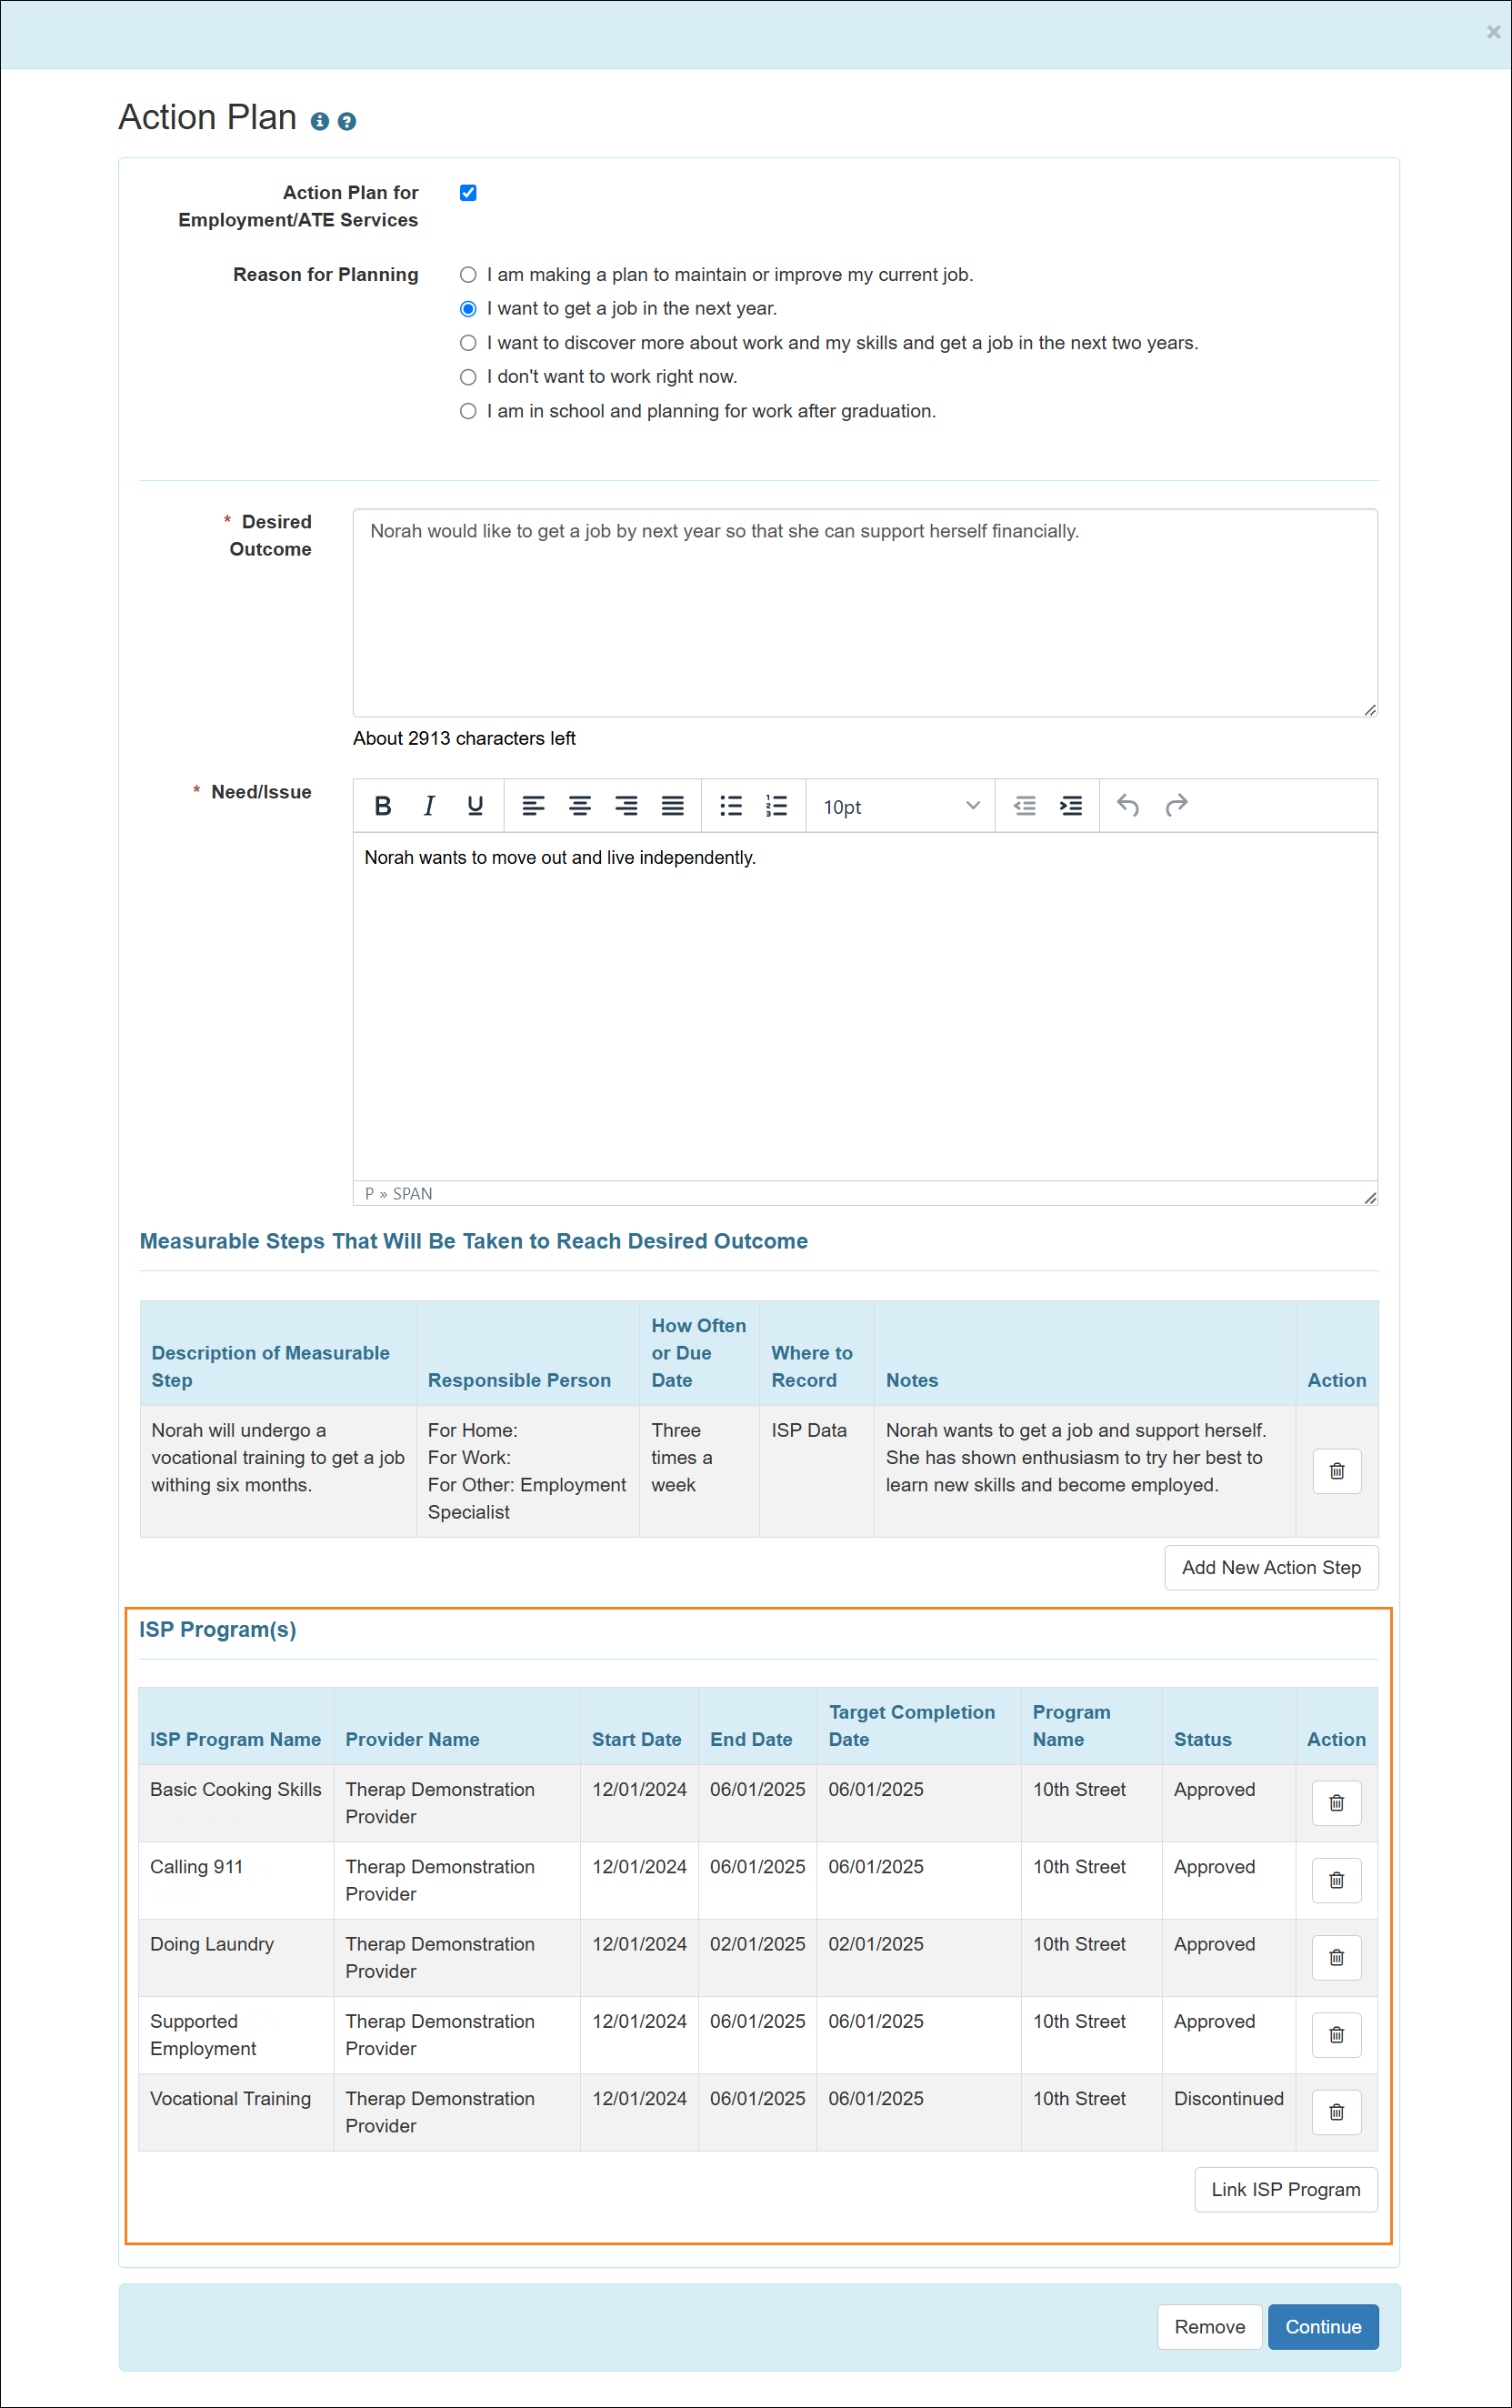
A validation message will be shown if more than 5 ISP Programs are selected in the ISP Program List.
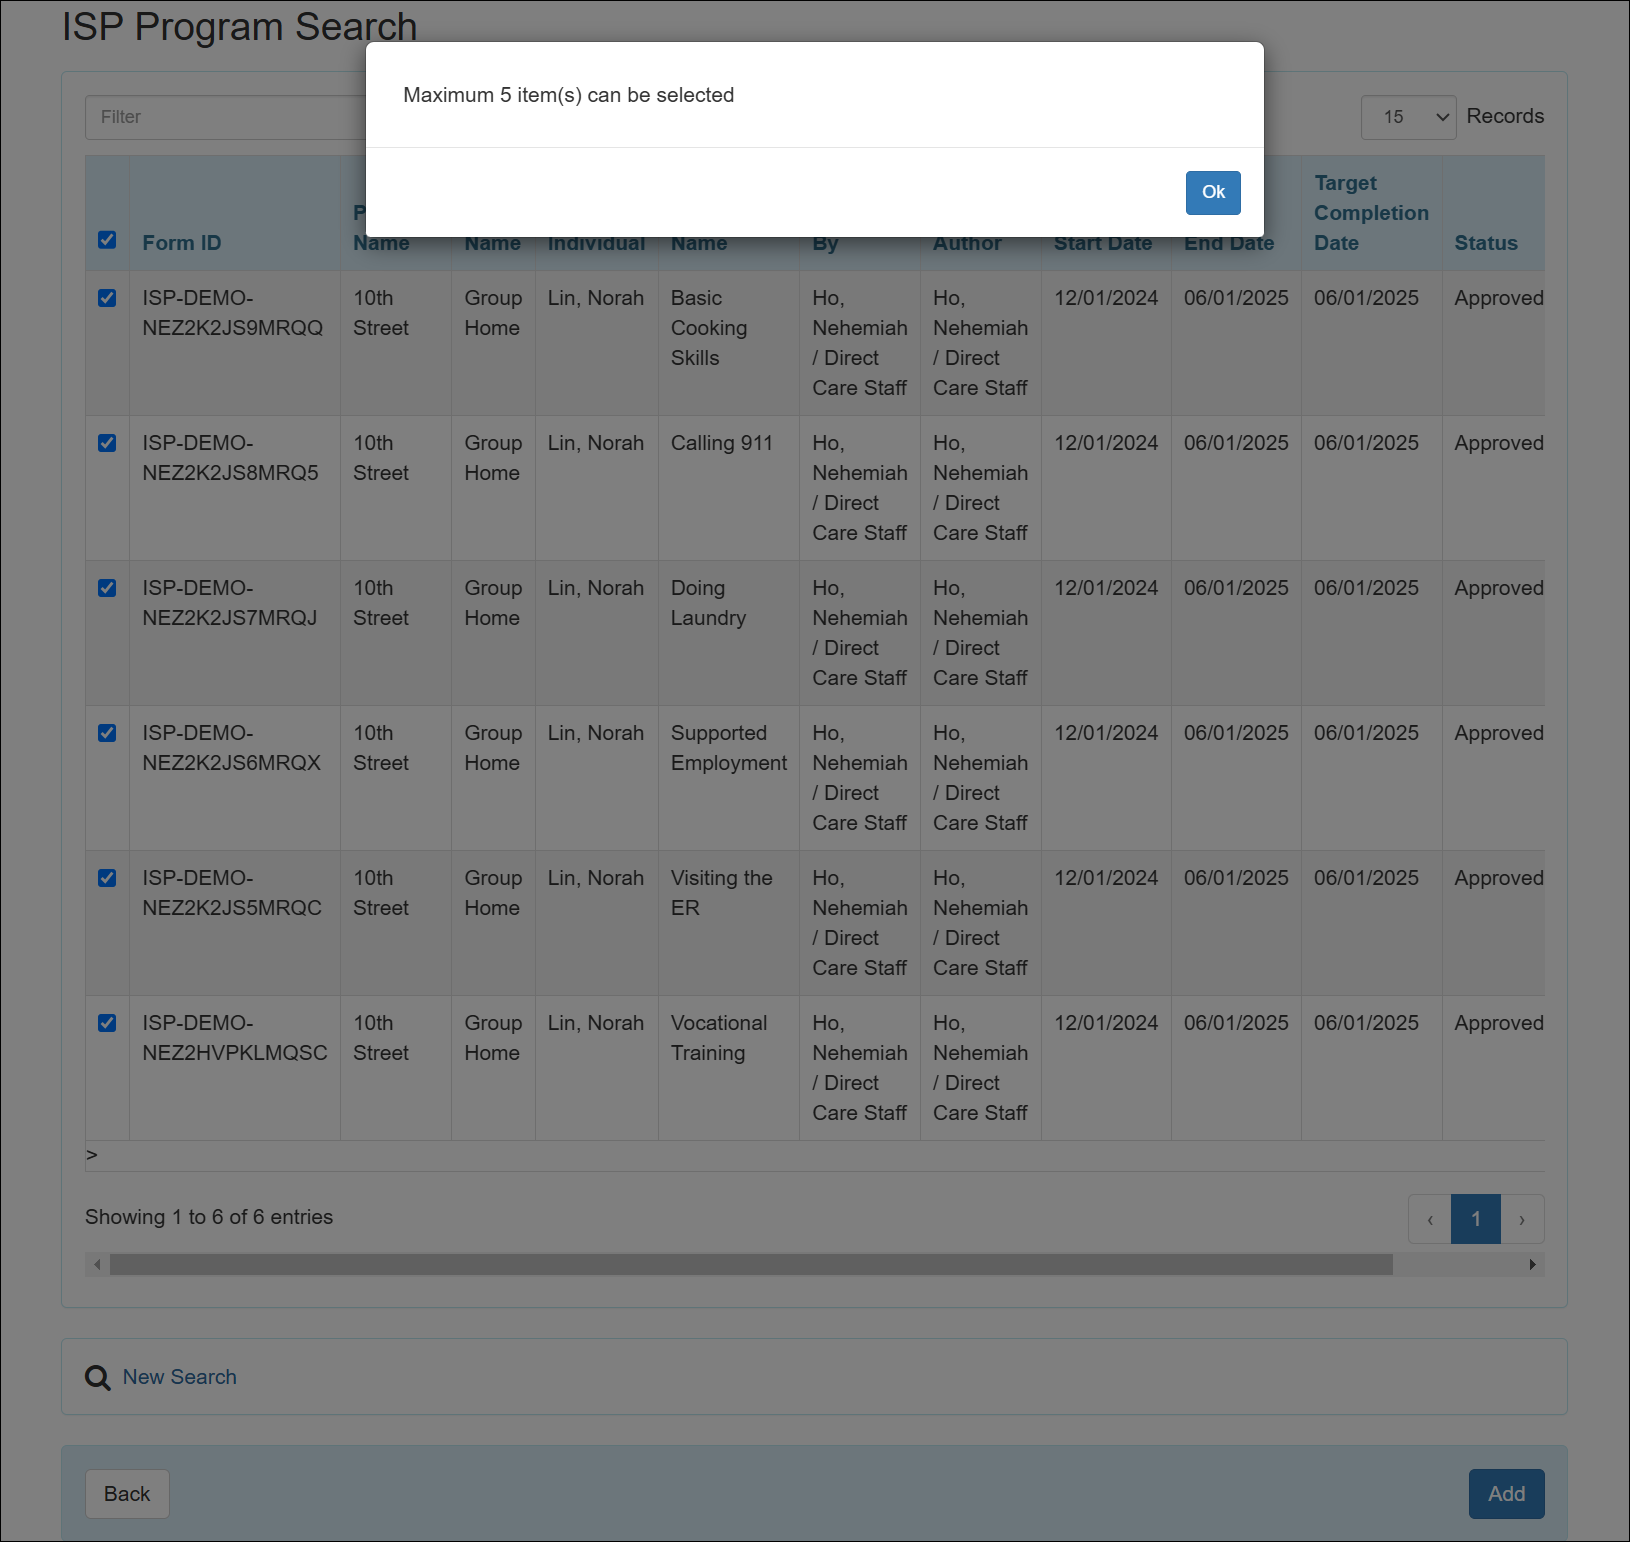
A validation message will be shown if the Link ISP Program button is clicked when 5 ISP Programs are already linked.
- Users will now be able to view the PDF in the PDF viewer after clicking on the links shown on the success message pages of Individual Plan.
- Users will now be able to view the PDF in the PDF viewer after clicking on the links shown on the success message pages of Individual Plan Change Form.
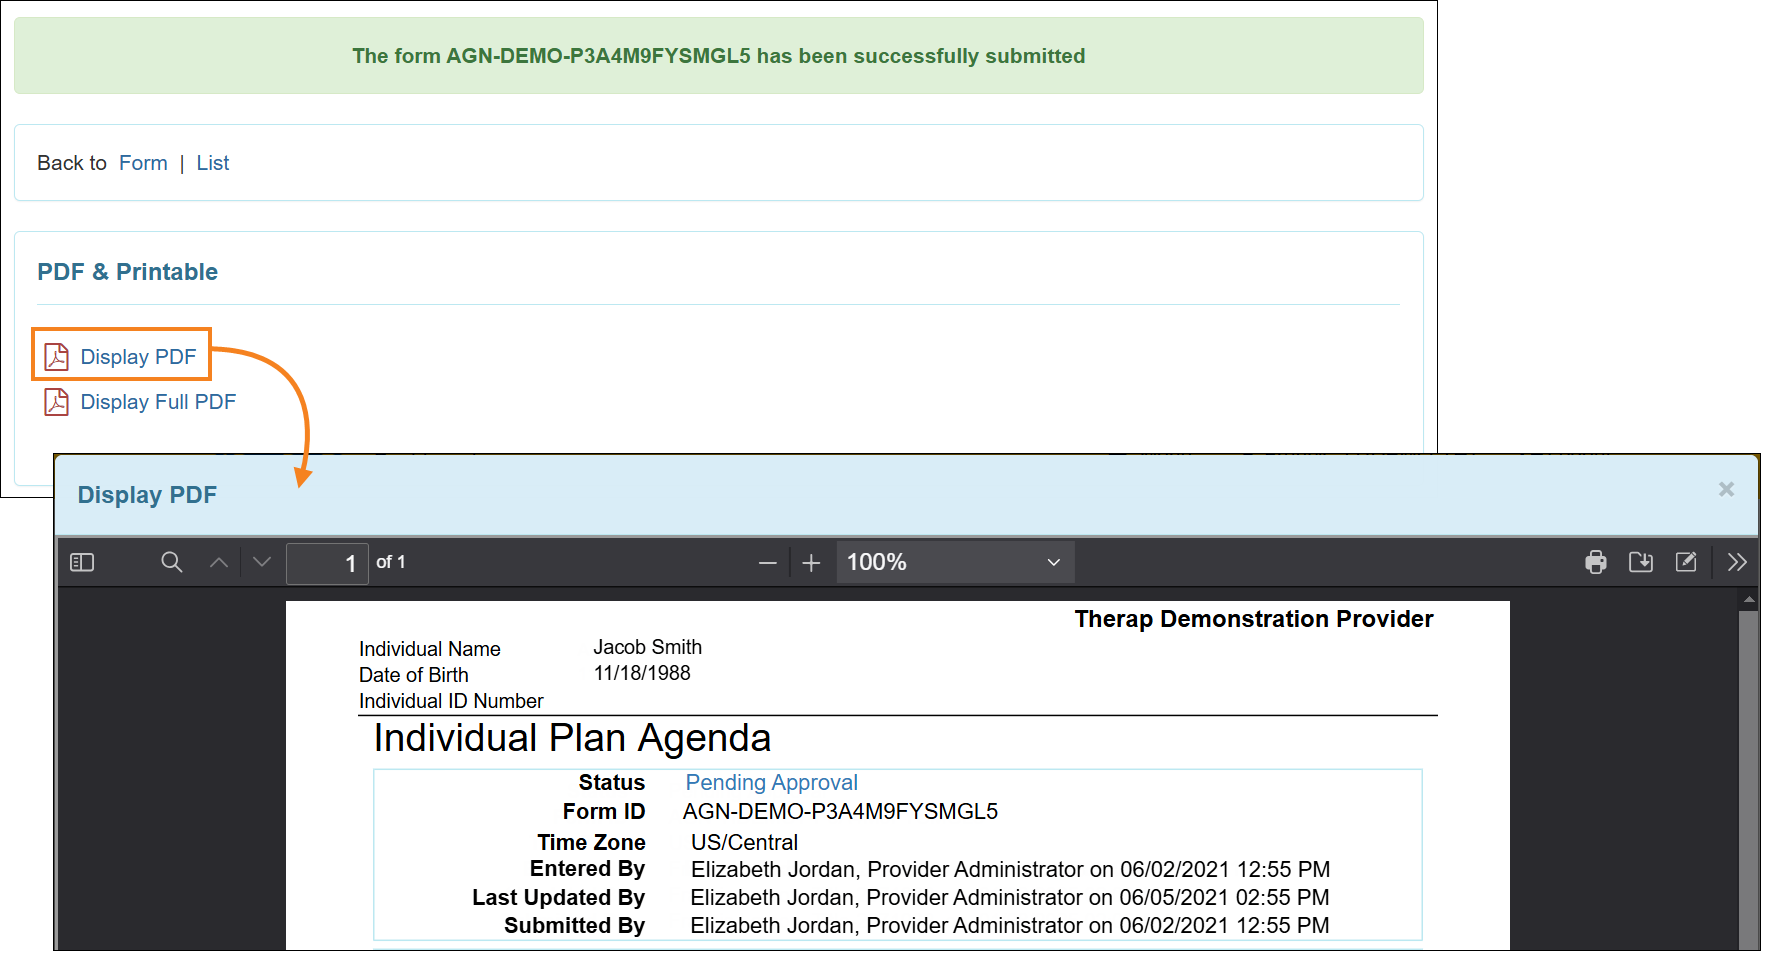
Individual Plan Agenda
[Back to Top]- Users will now be able to view the PDF in the PDF viewer after clicking on the links shown on the success message pages of Individual Plan Agenda.
Order
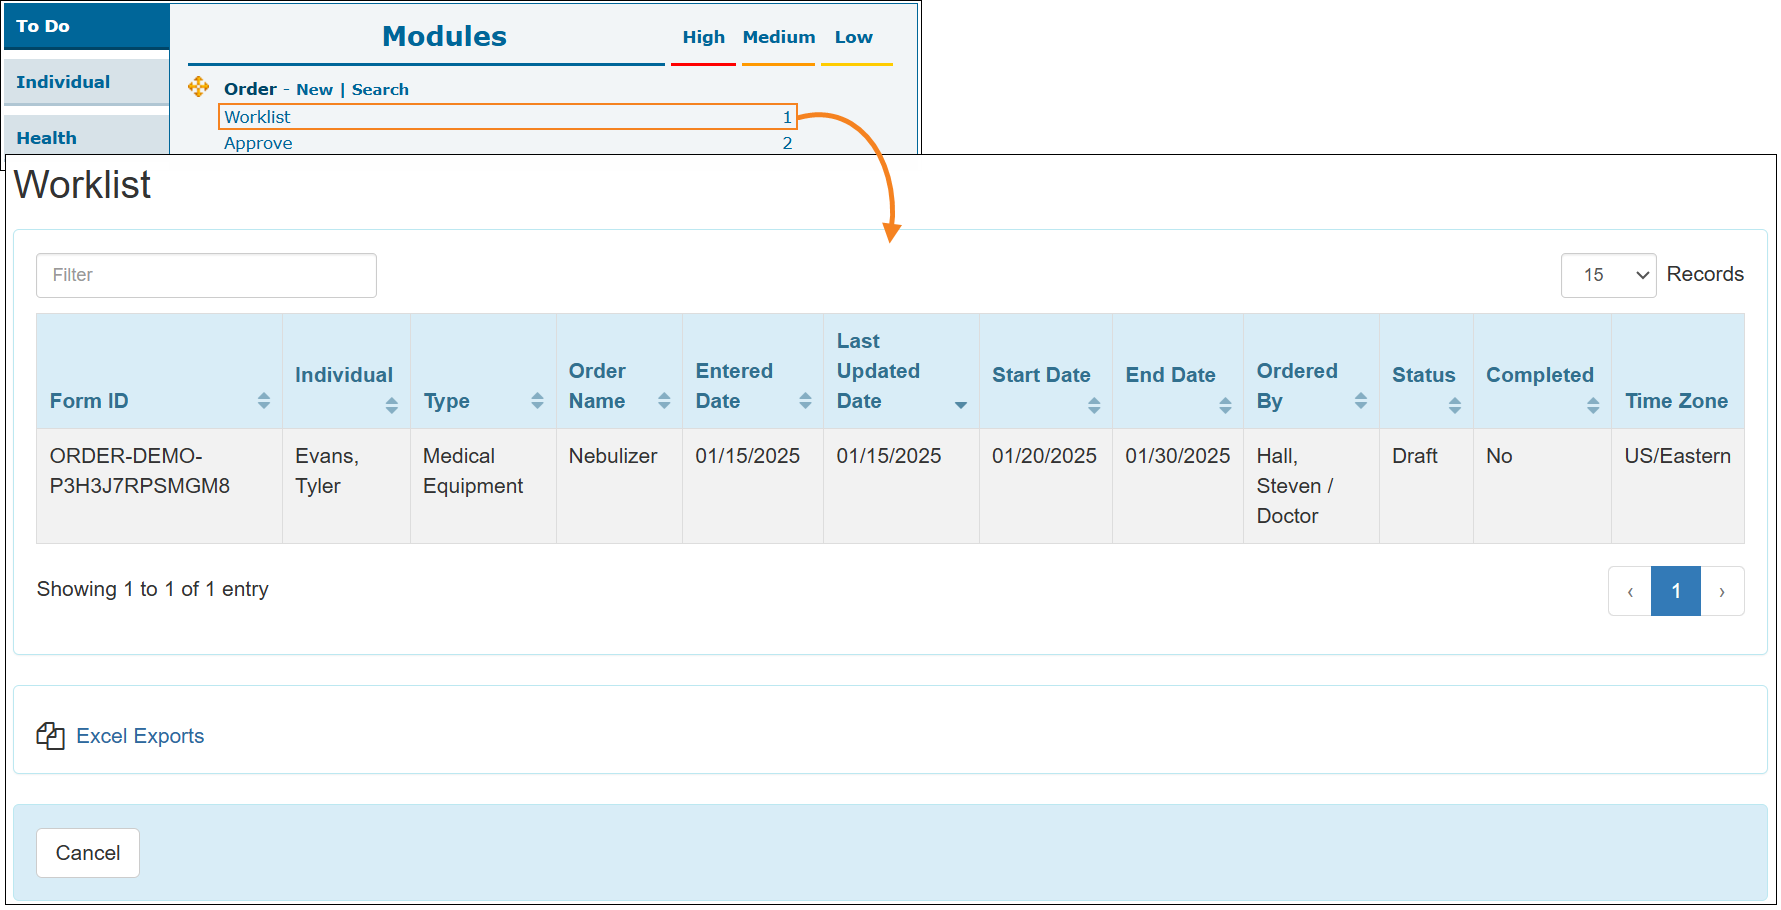
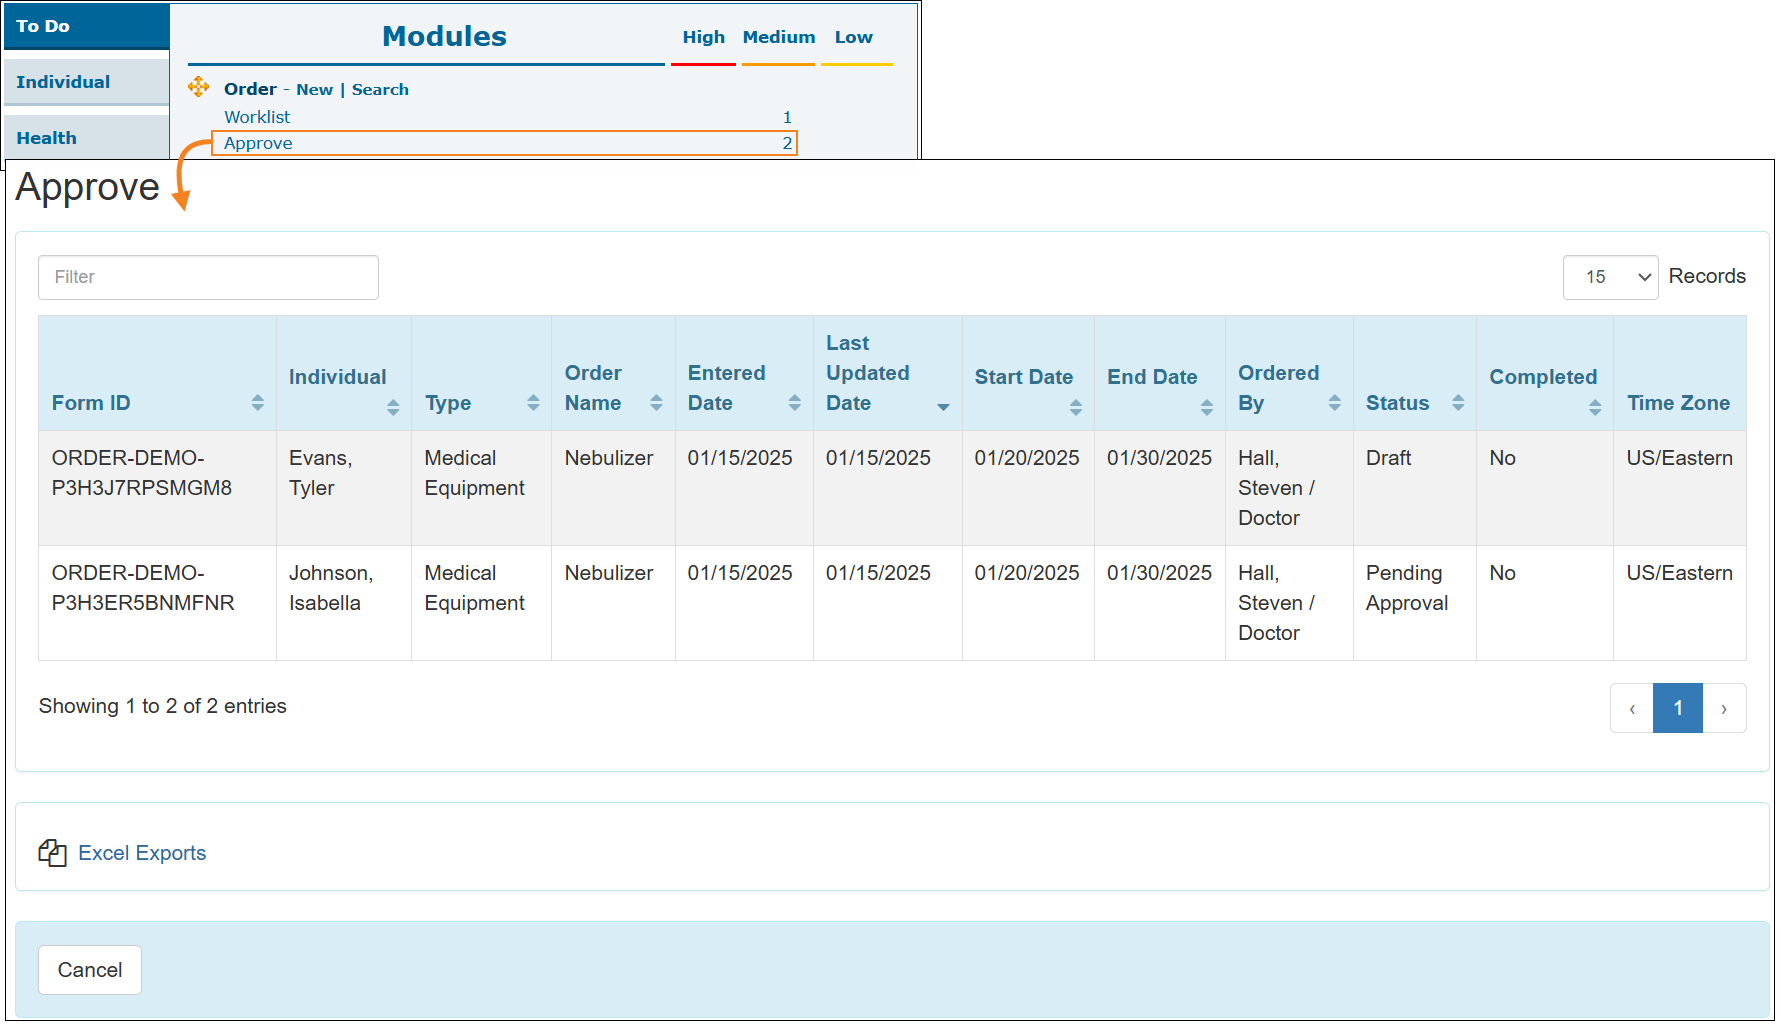
[Back to Top]- A new ‘Order’ section has been added to the To Do tab which will display the New and Search links which can be used to create and search orders. This section will also include the Worklist and Approve links for which appropriate counts will be displayed.
- Users with the Order Submit caseload-based role will be able to create new orders for the individuals on their caseloads using the New link beside the Order option on their To Do tab.
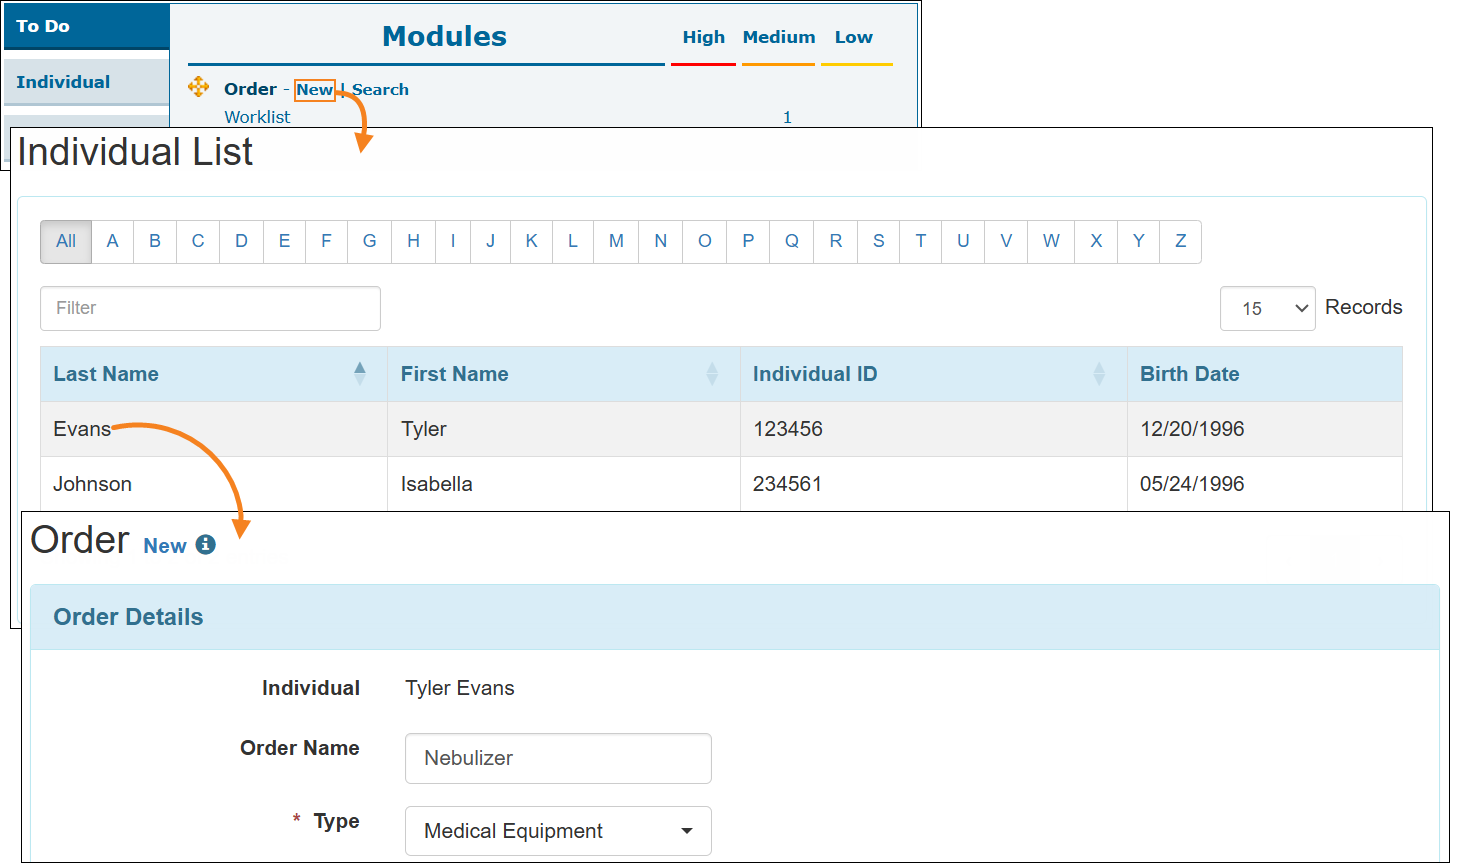
- Users with the Order Submit or Order Approve caseload based roles will be able to search Orders pertaining to individuals on their caseloads using the Search link beside the Order option on their To Do tab.
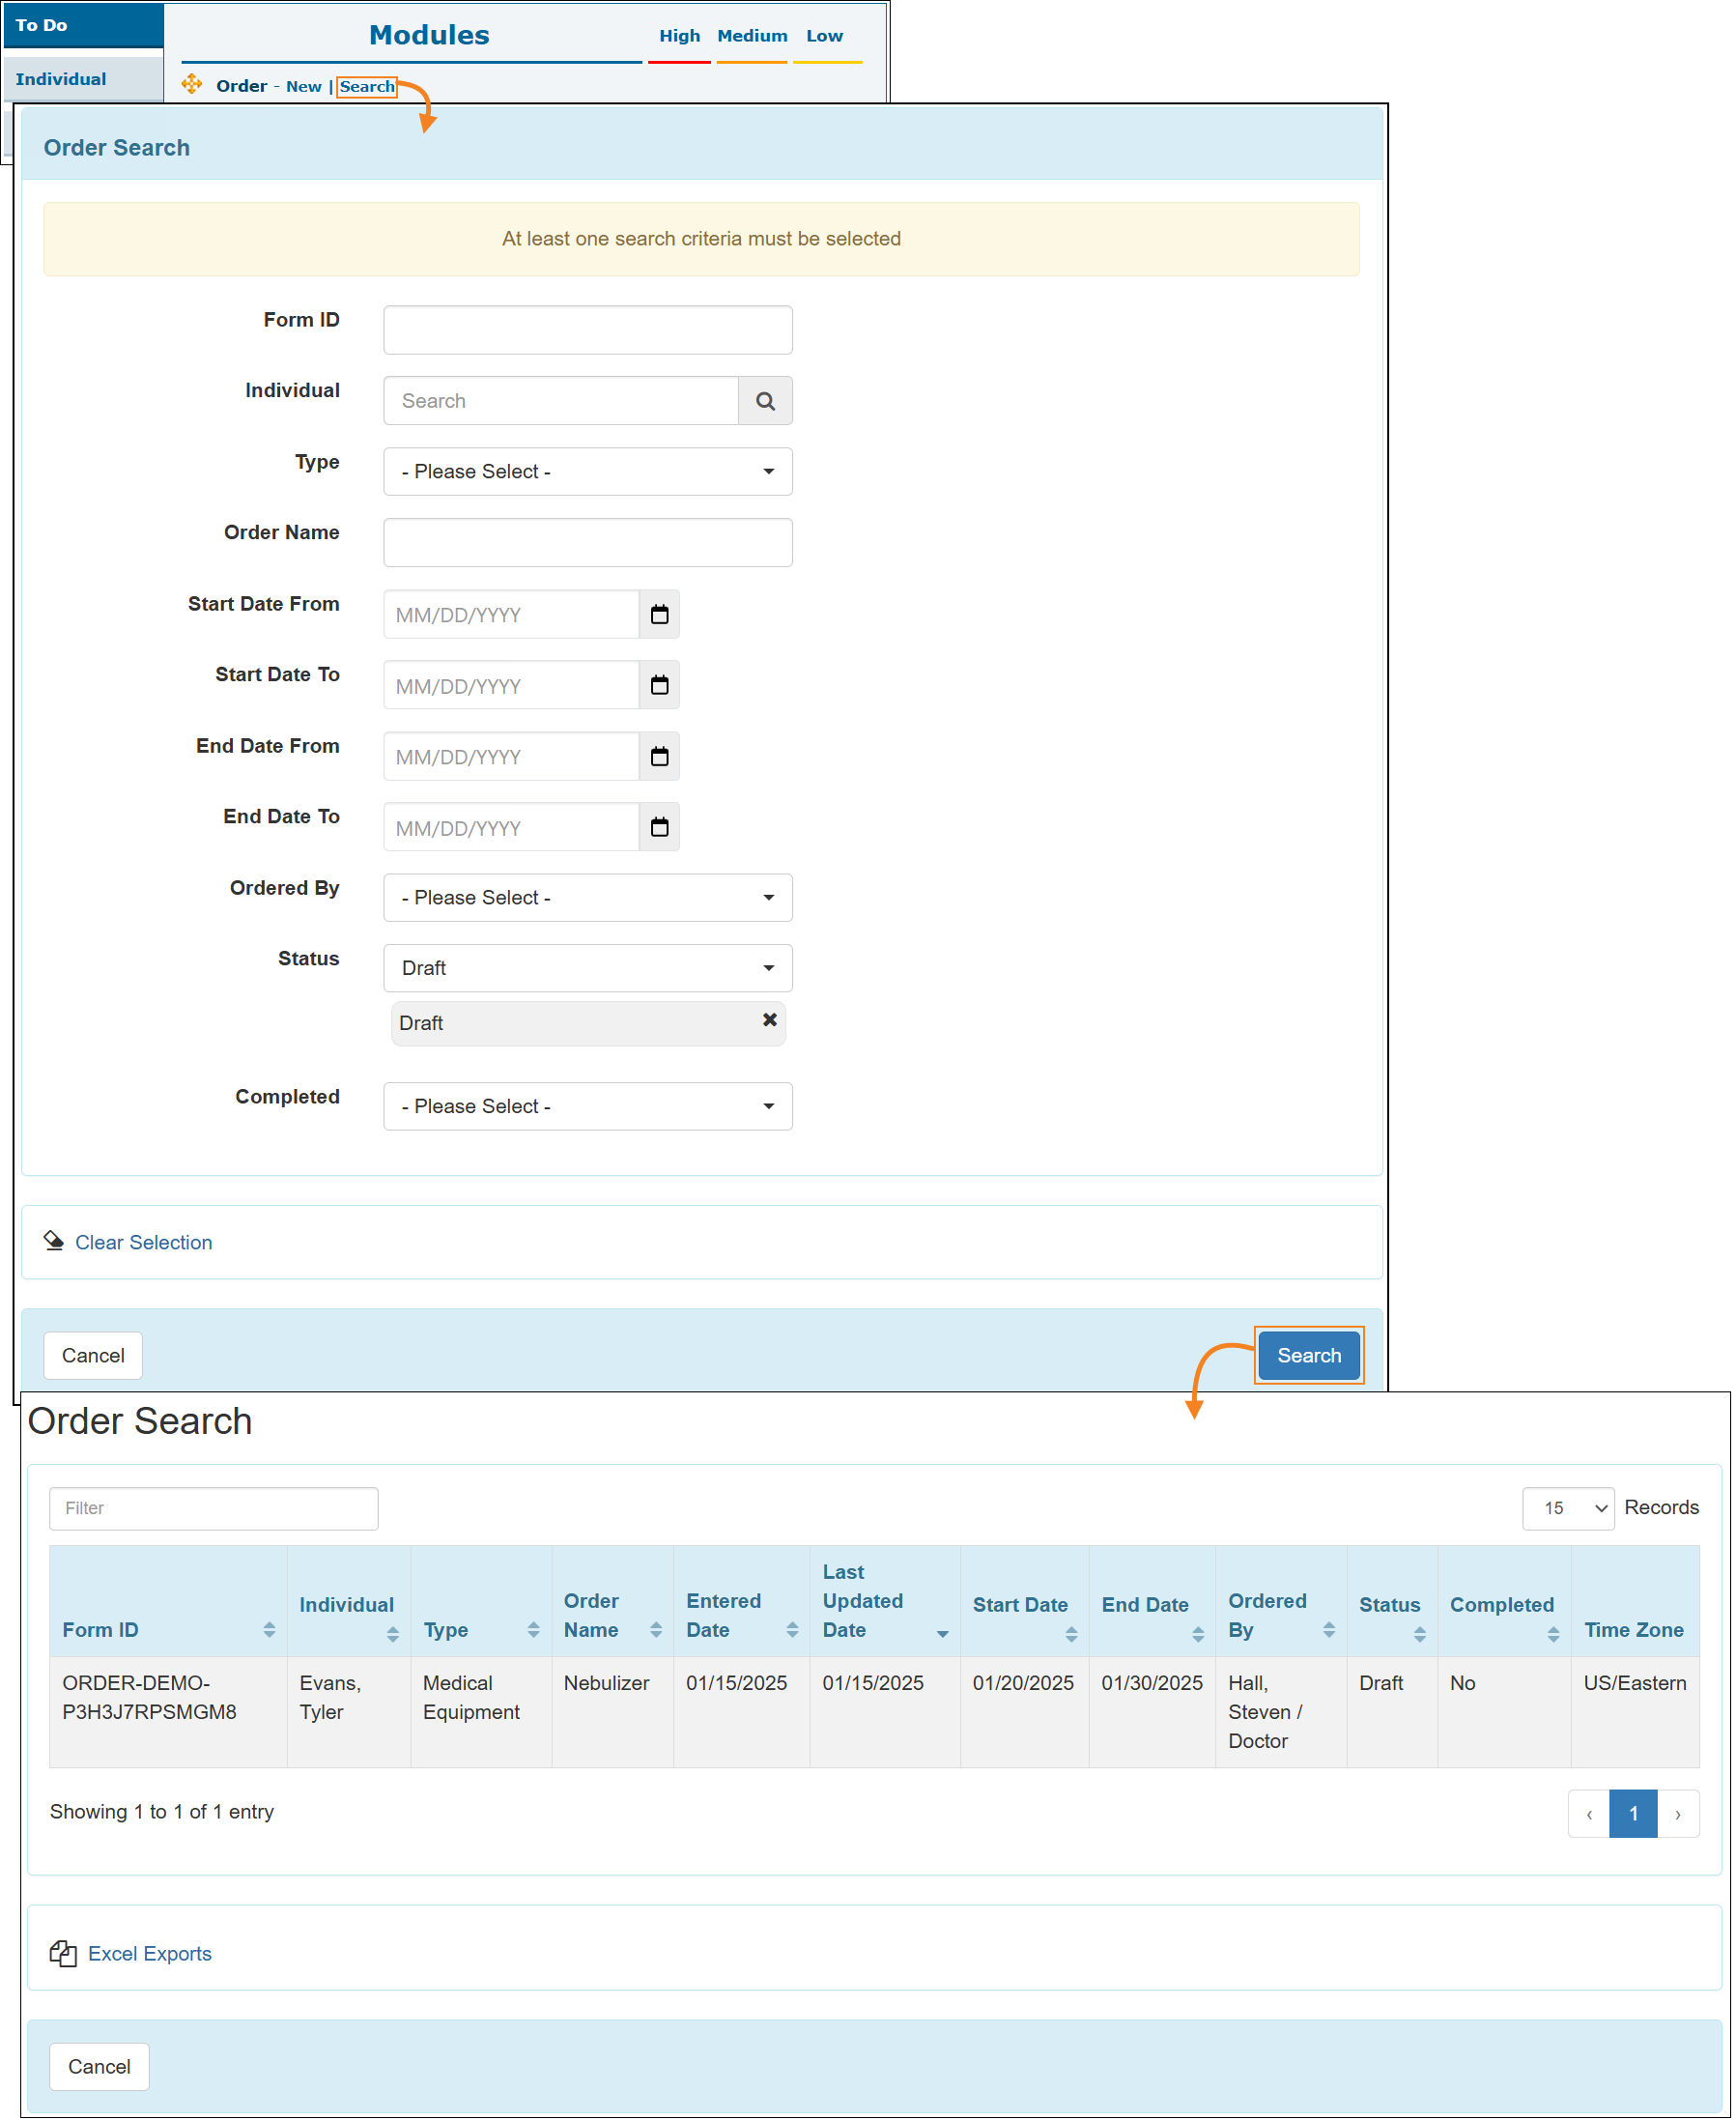
- Users with the Order Submit caseload-based role will receive Worklist counts in the ‘Order’ section of the To Do tab for Orders which they have created and kept in ‘Draft’ status within the last 30 days. Clicking on the counts will take users to the ‘Worklist’ page where a list of orders saved within the last 30 days will appear.
- For users who have the Order Submit caseload-based role, the Approve link in the newly added ‘Order’ section of the To Do tab will show counts for orders which have been saved/submitted for individuals on their caseloads within the last 30 days. Clicking on this Approve link will display a list of orders which have turned to ‘Draft’ and ‘Pending Approval’ status within the last 30 days.
- Users with the Order Submit caseload-based role will be able to create new orders for the individuals on their caseloads using the New link beside the Order option on their To Do tab.
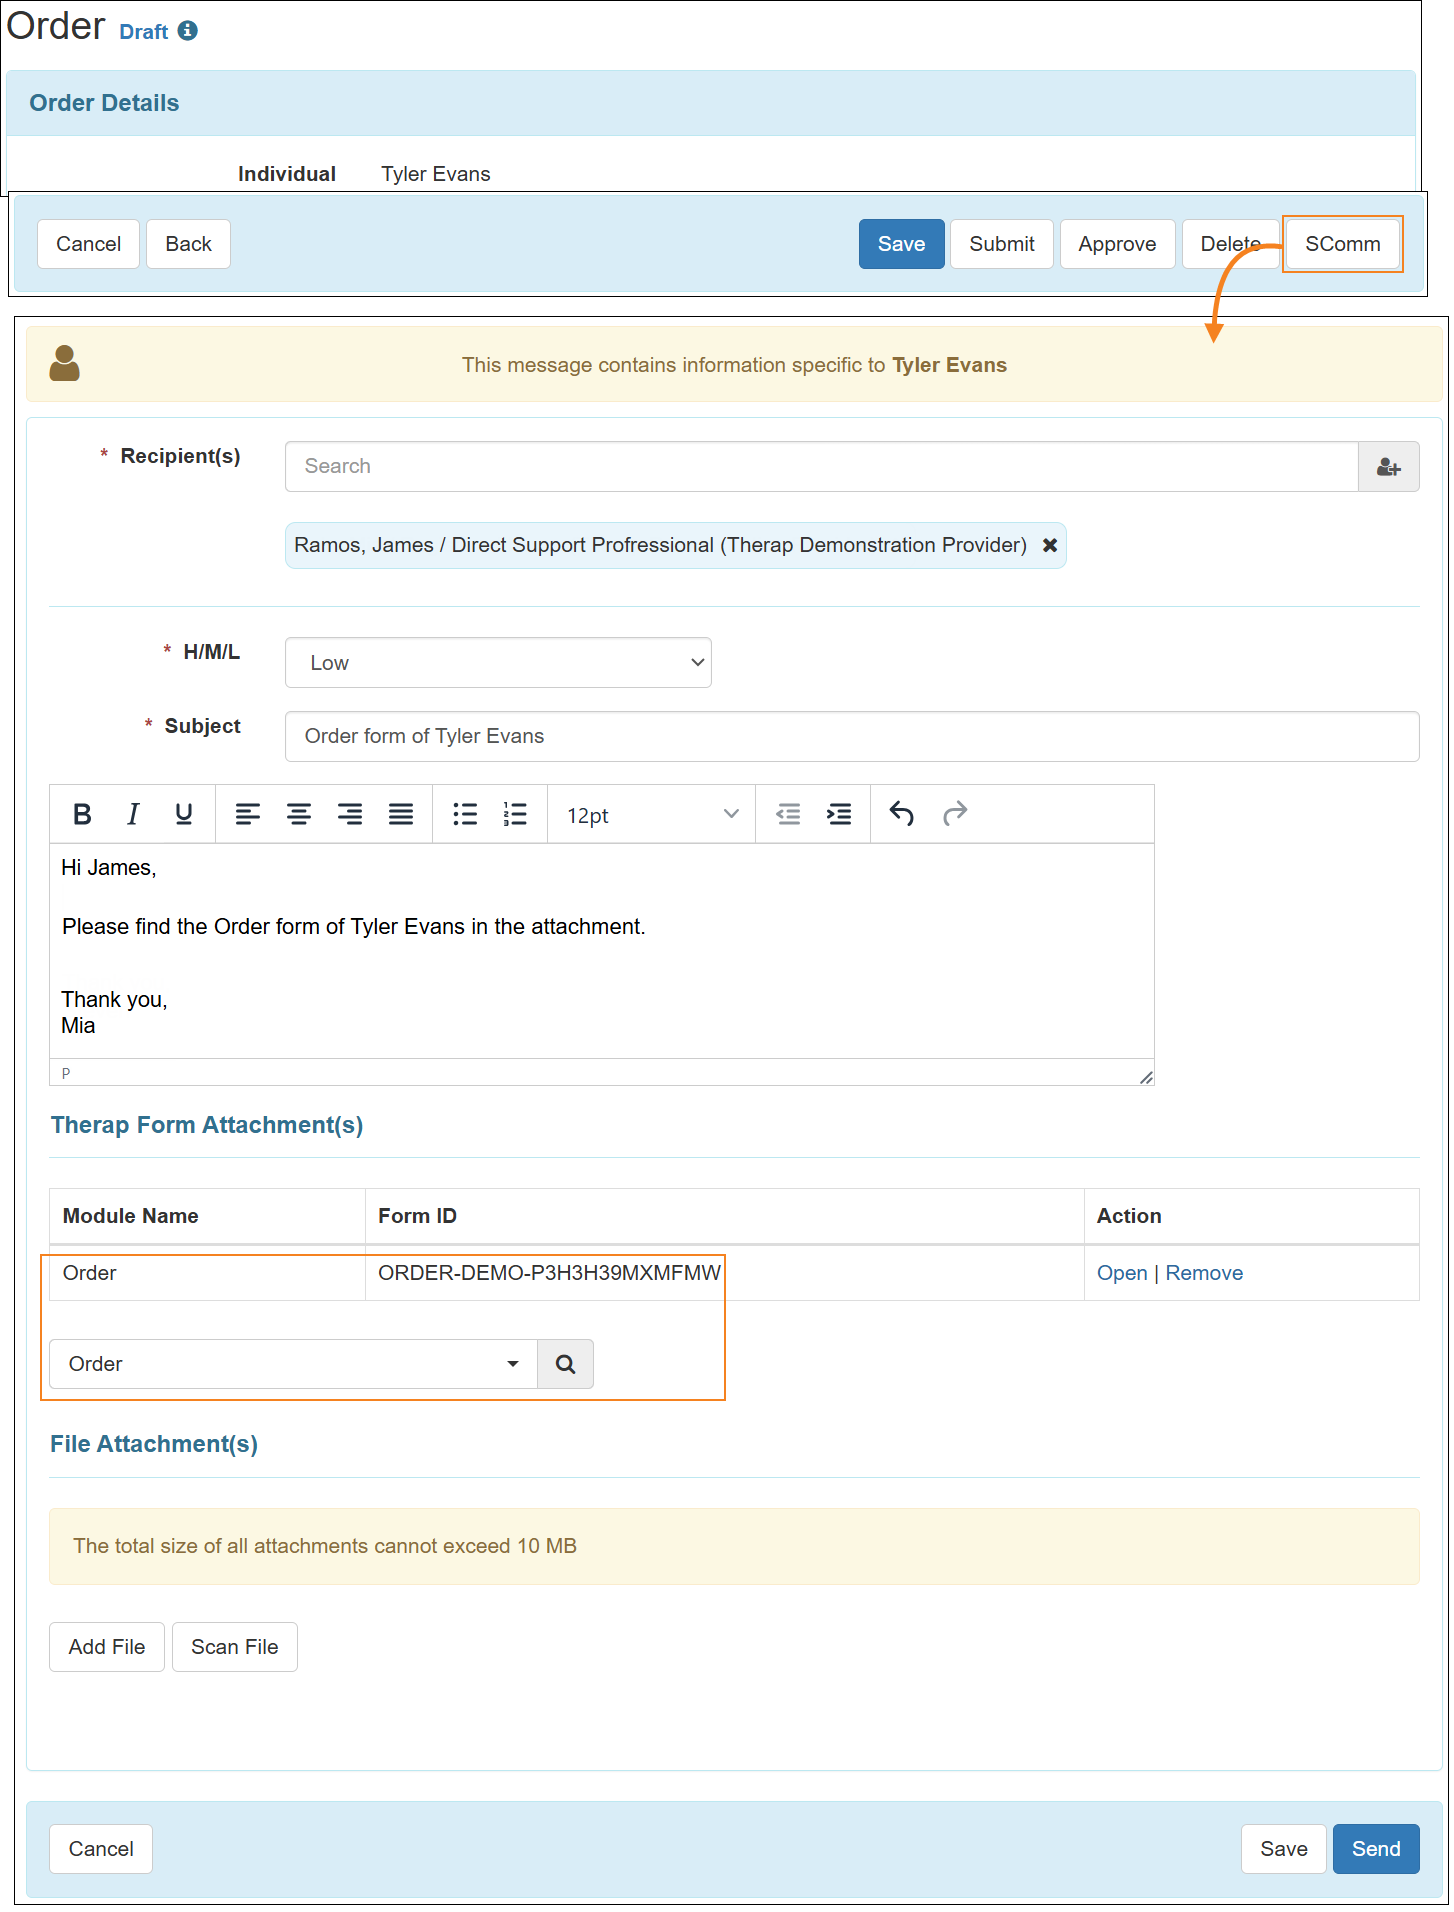
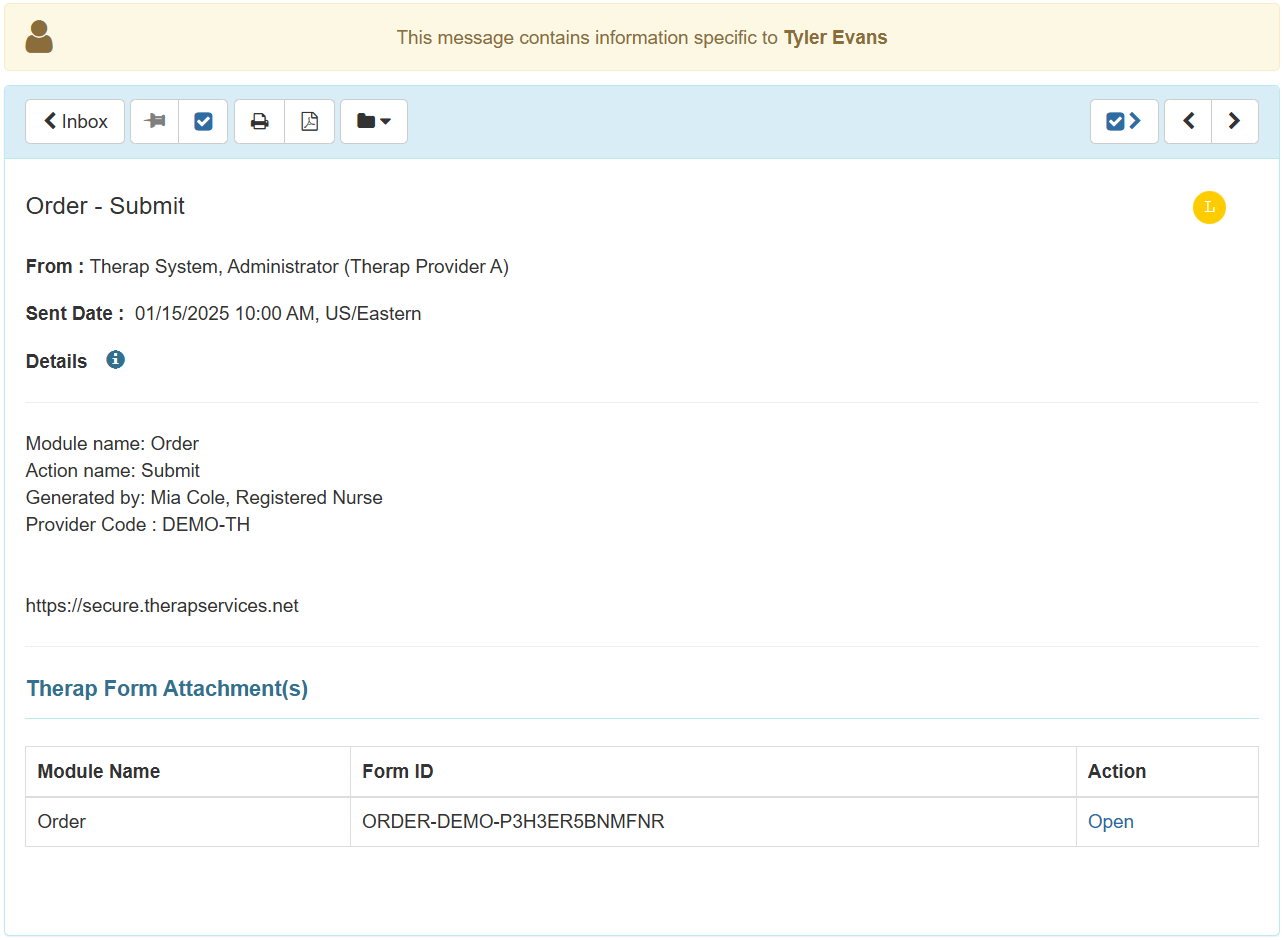
- Users with appropriate SComm roles will be able to avail a new SComm button at the bottom of Order forms, using which they will be able to send an Order form to another user within the agency via an ‘Individual Care’ type SComm.
- A new option titled ‘Order’ has been added to the dropdown list of the Module Name field on the ‘Configure Custom Notification Profile’ page. Users with the appropriate Order caseload-based roles will be able to configure the Order notifications for different actions. The Order caseload-based roles and the corresponding Notification Events are listed below:
Order Caseload-based Roles
Notification Events
Order View
- Approve
- Mark as Completed
Order Approve
- Submit
- Approve
- Discontinue
- Mark as Completed
Order Update
- Submit
Order Delete
- Delete
Once the Order notifications have been configured on the users’ Notification Profile, they will receive notifications for different actions taken for Order forms via their preferred media.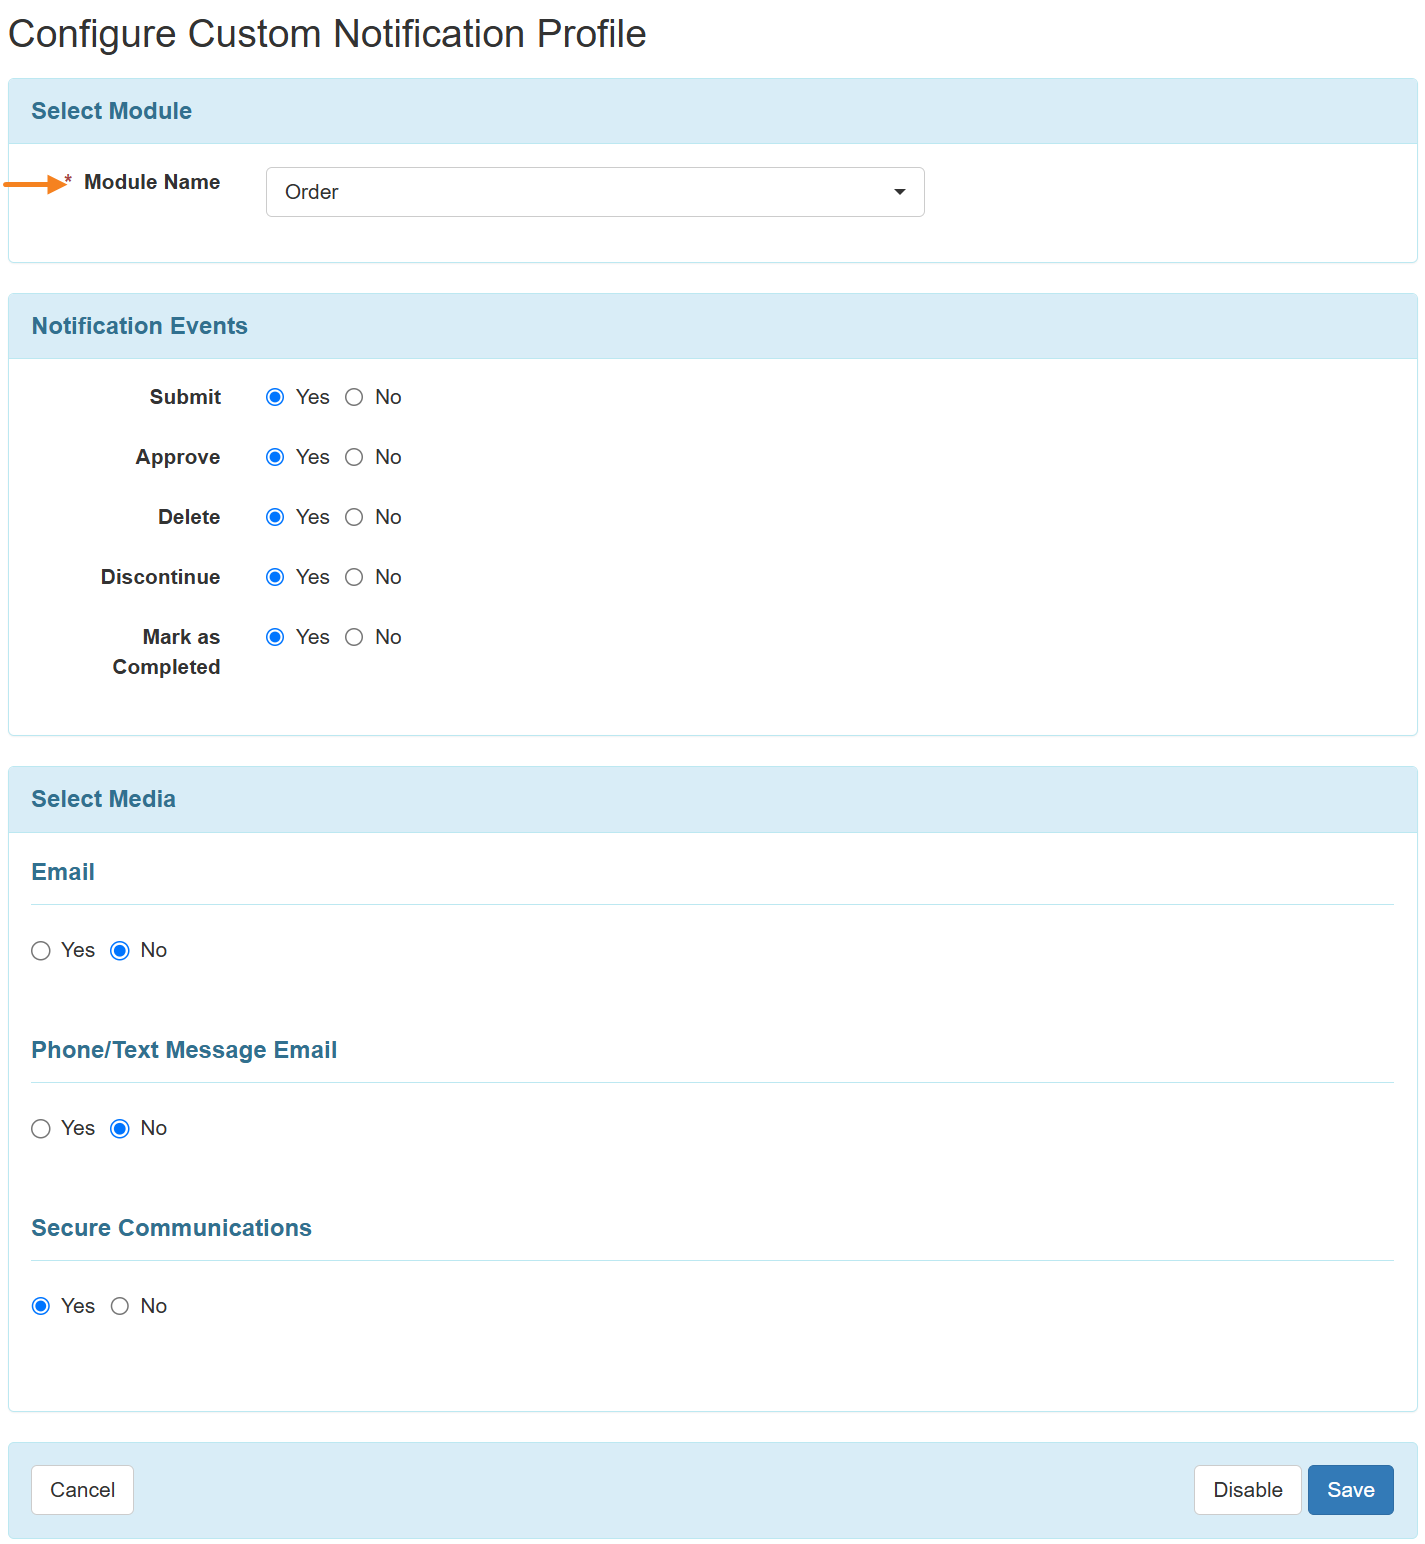
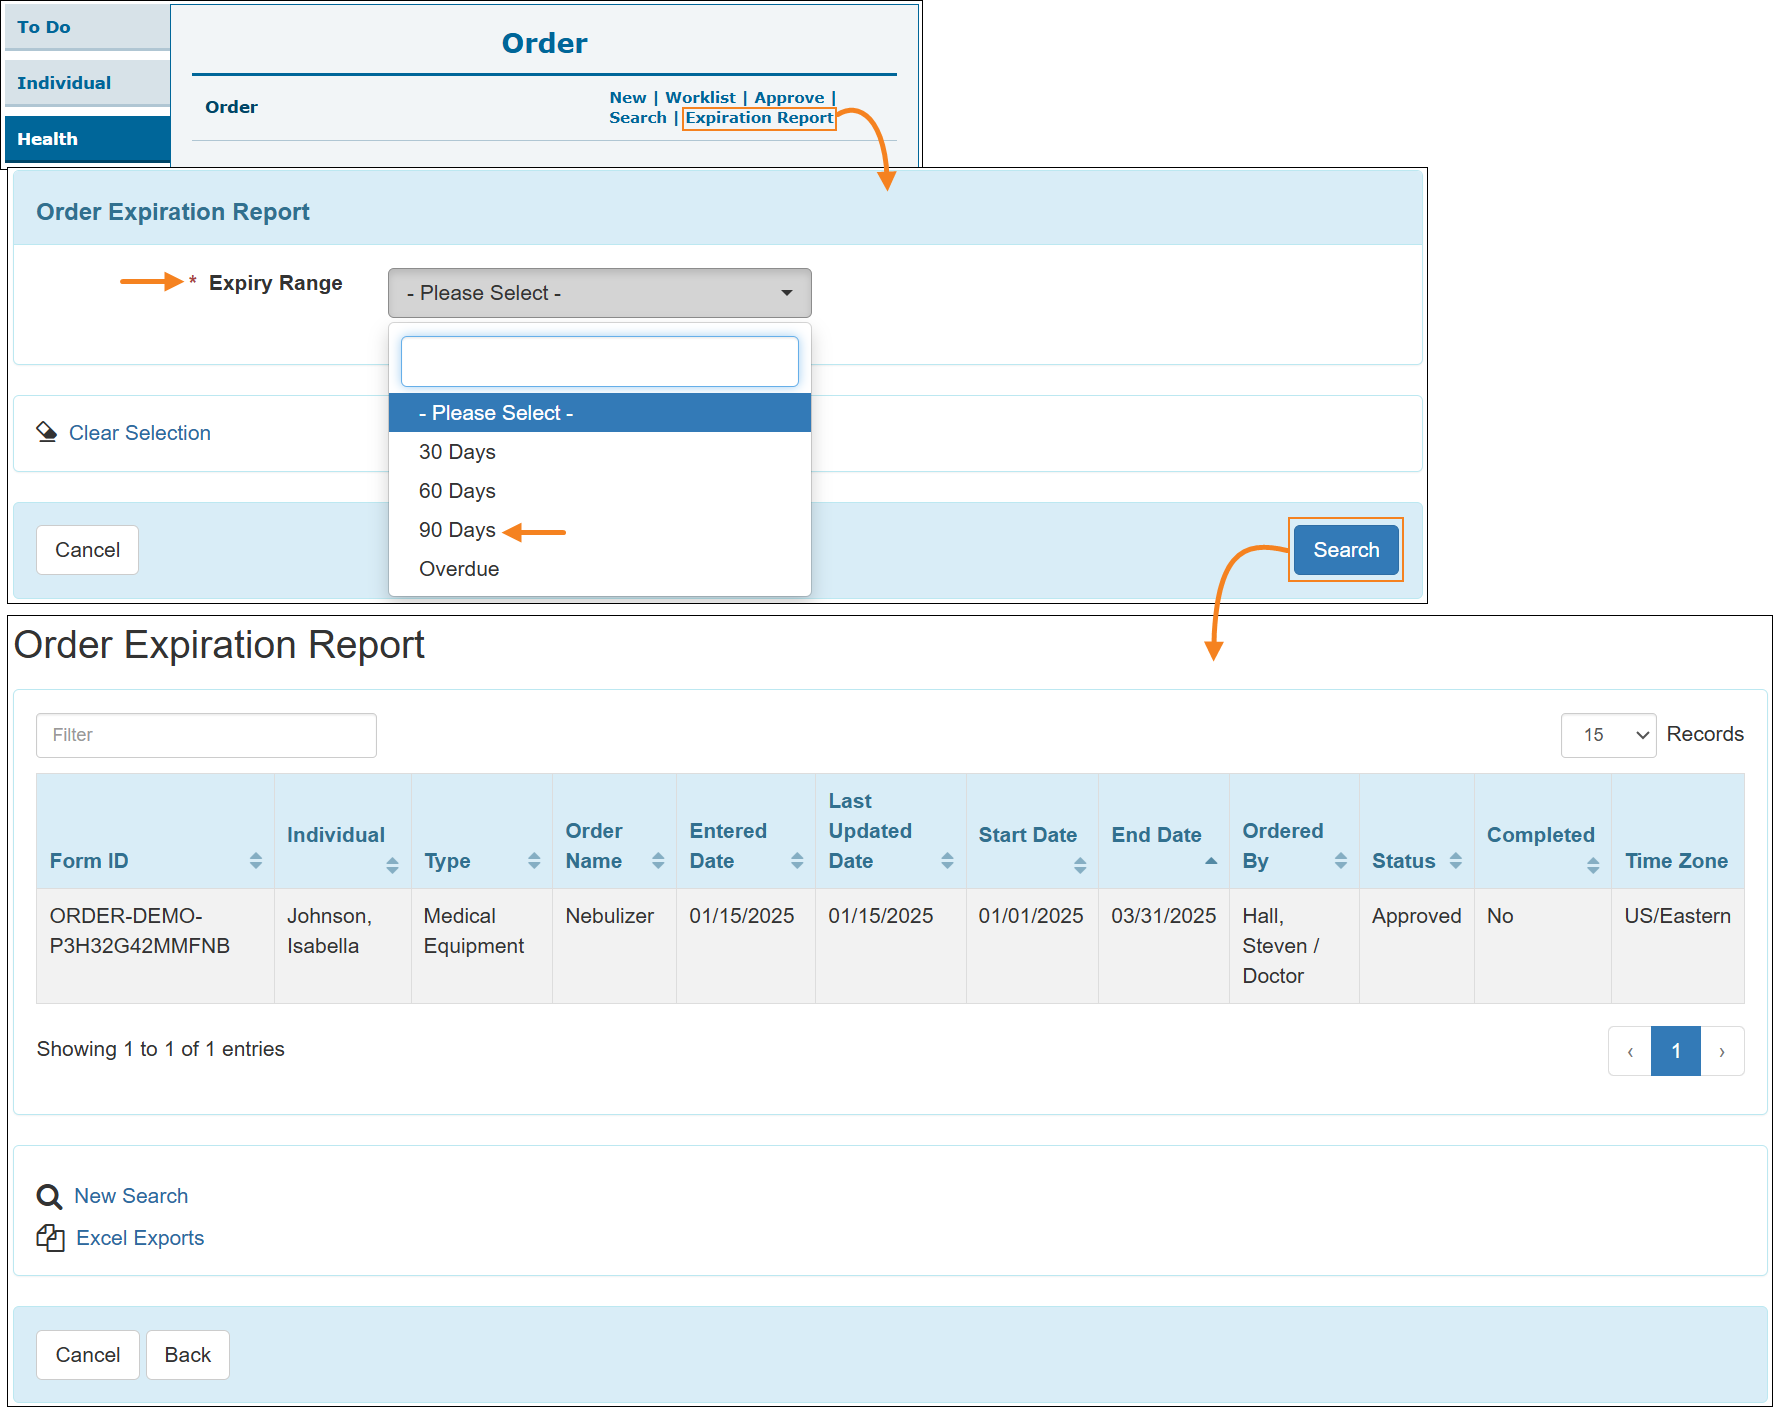
- Users with the Order View or the Order Approve caseload-based roles will avail a new link titled Expiration Report beside the Order option in the ‘Order’ section on the Health tab. This new link will enable users to generate the Order Expiration Report for the following expiry ranges:
- 30 Days: Selecting an Expiry Range of 30 days will display a list of approved Orders (Orders spanning over a date range that covers the current date) which are going to expire within the next 30 days.
- 60 Days: Selecting an Expiry Range of 60 days will display a list of approved Orders which are going to expire within the next 60 days.
- 90 Days: Selecting an Expiry Range of 90 days will display a list of approved Orders for which the End Date lies within the next 90 days.
- Overdue: Selecting the ‘Overdue’ option as Expiry Range will show a list of approved Orders for which the End Date is older than the current date. However, if the End Date of an Order does not fall within the last one year from the current date, then that order will not be included in the report.
Personal Finance
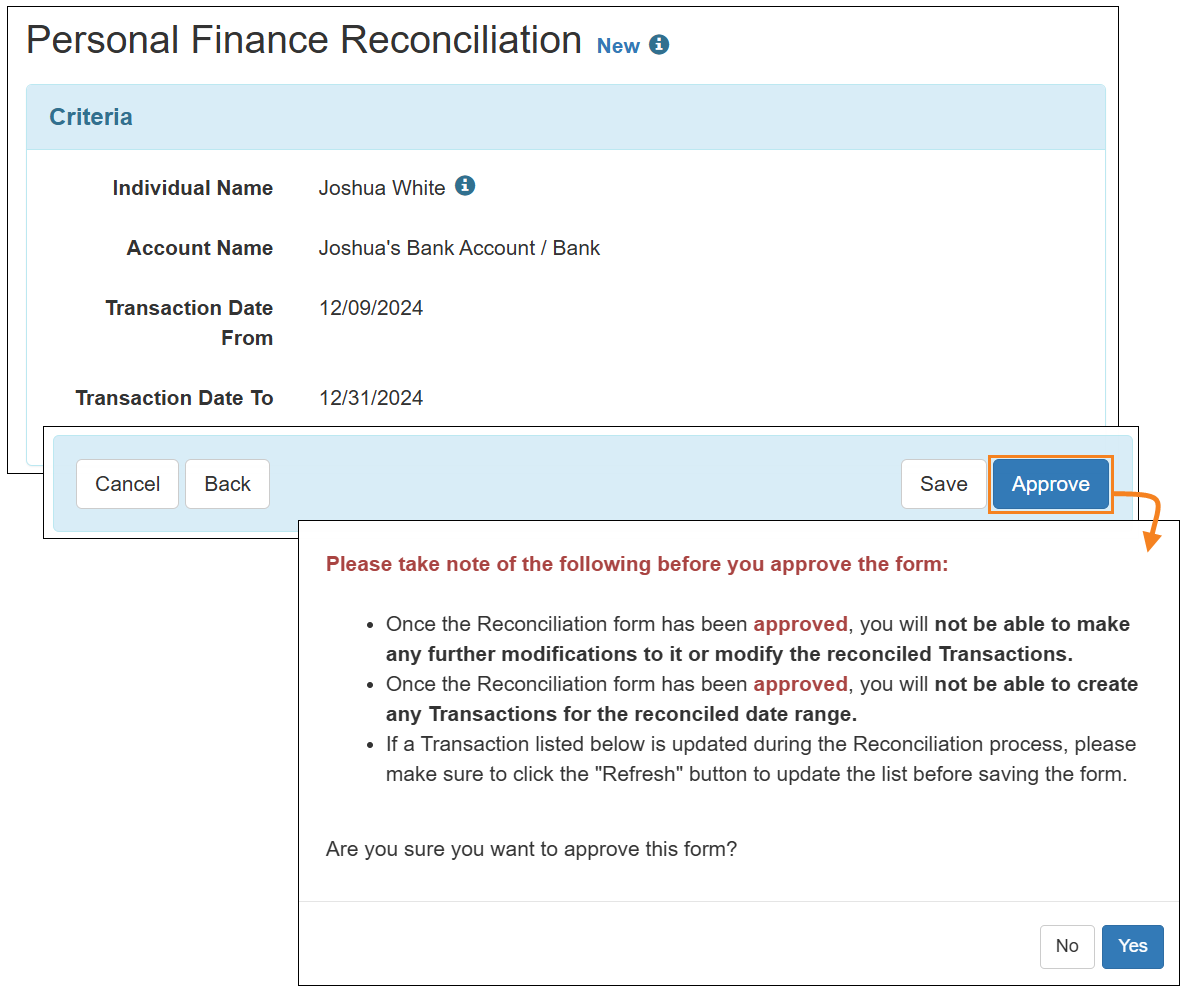
[Back to Top]- The following two messages have been added on the confirmation window which appears when approving the Personal Finance Reconciliation form:
- Once the Reconciliation form has been approved, you will not be able to make any further modifications to it or modify the reconciled Transactions.
- Once the Reconciliation form has been approved, you will not be able to create any Transactions for the reconciled date range.
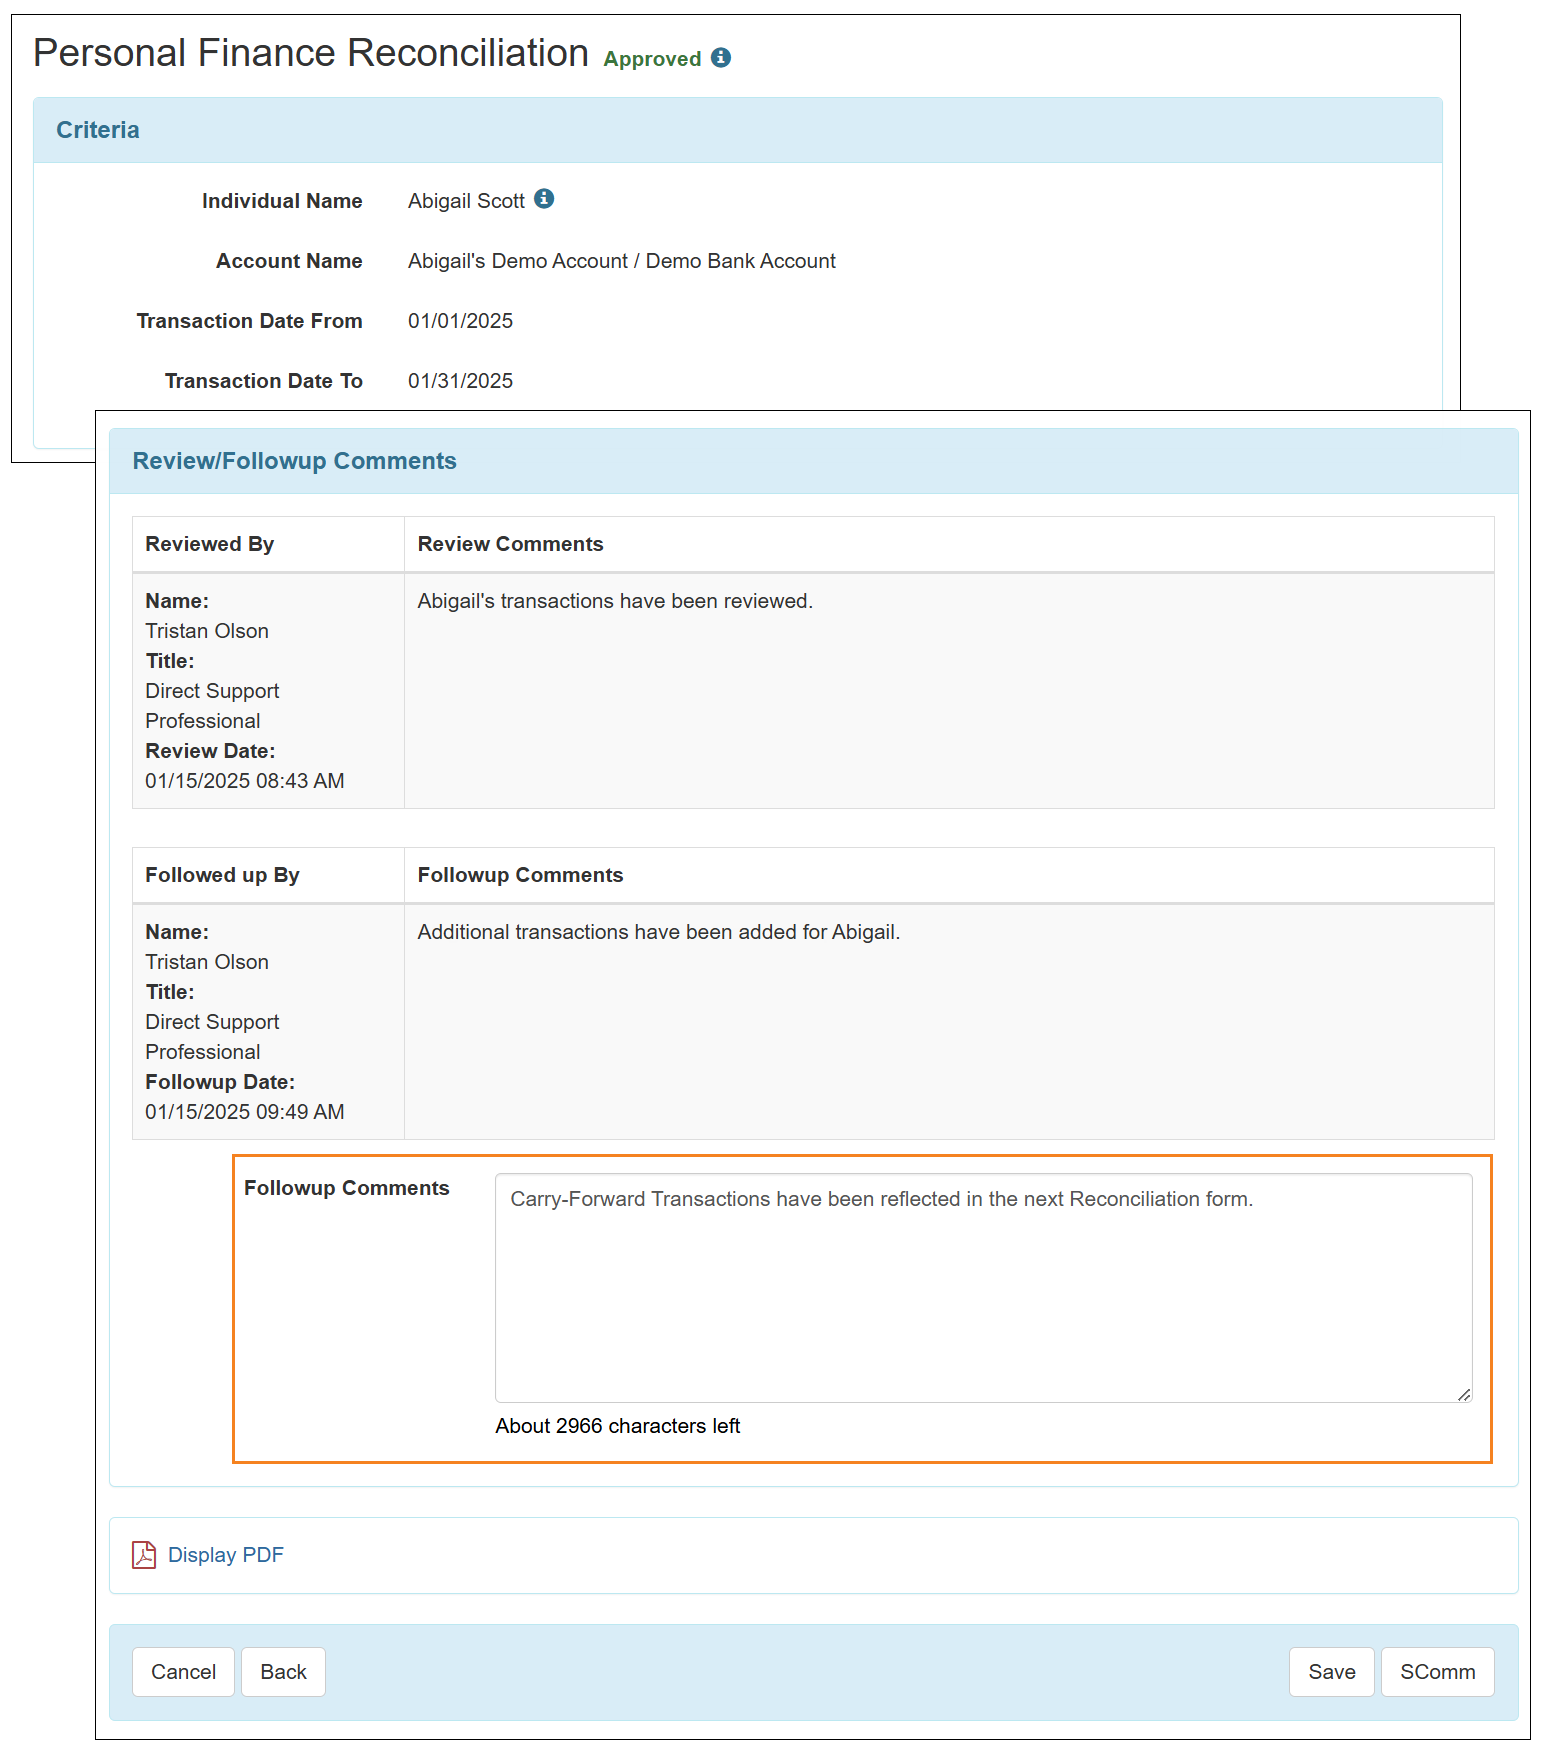
- The ‘Review Comments’ section of Personal Finance Reconciliation forms has been renamed to ‘Review/Followup Comments’.
- Users will now be able to add followup comments in the ‘Review/Followup Comments’ section of an approved ‘Personal Finance Reconciliation’ form if they are assigned with the PFin Reconciliation Approve caseload-based role.
Personal Focus Worksheet
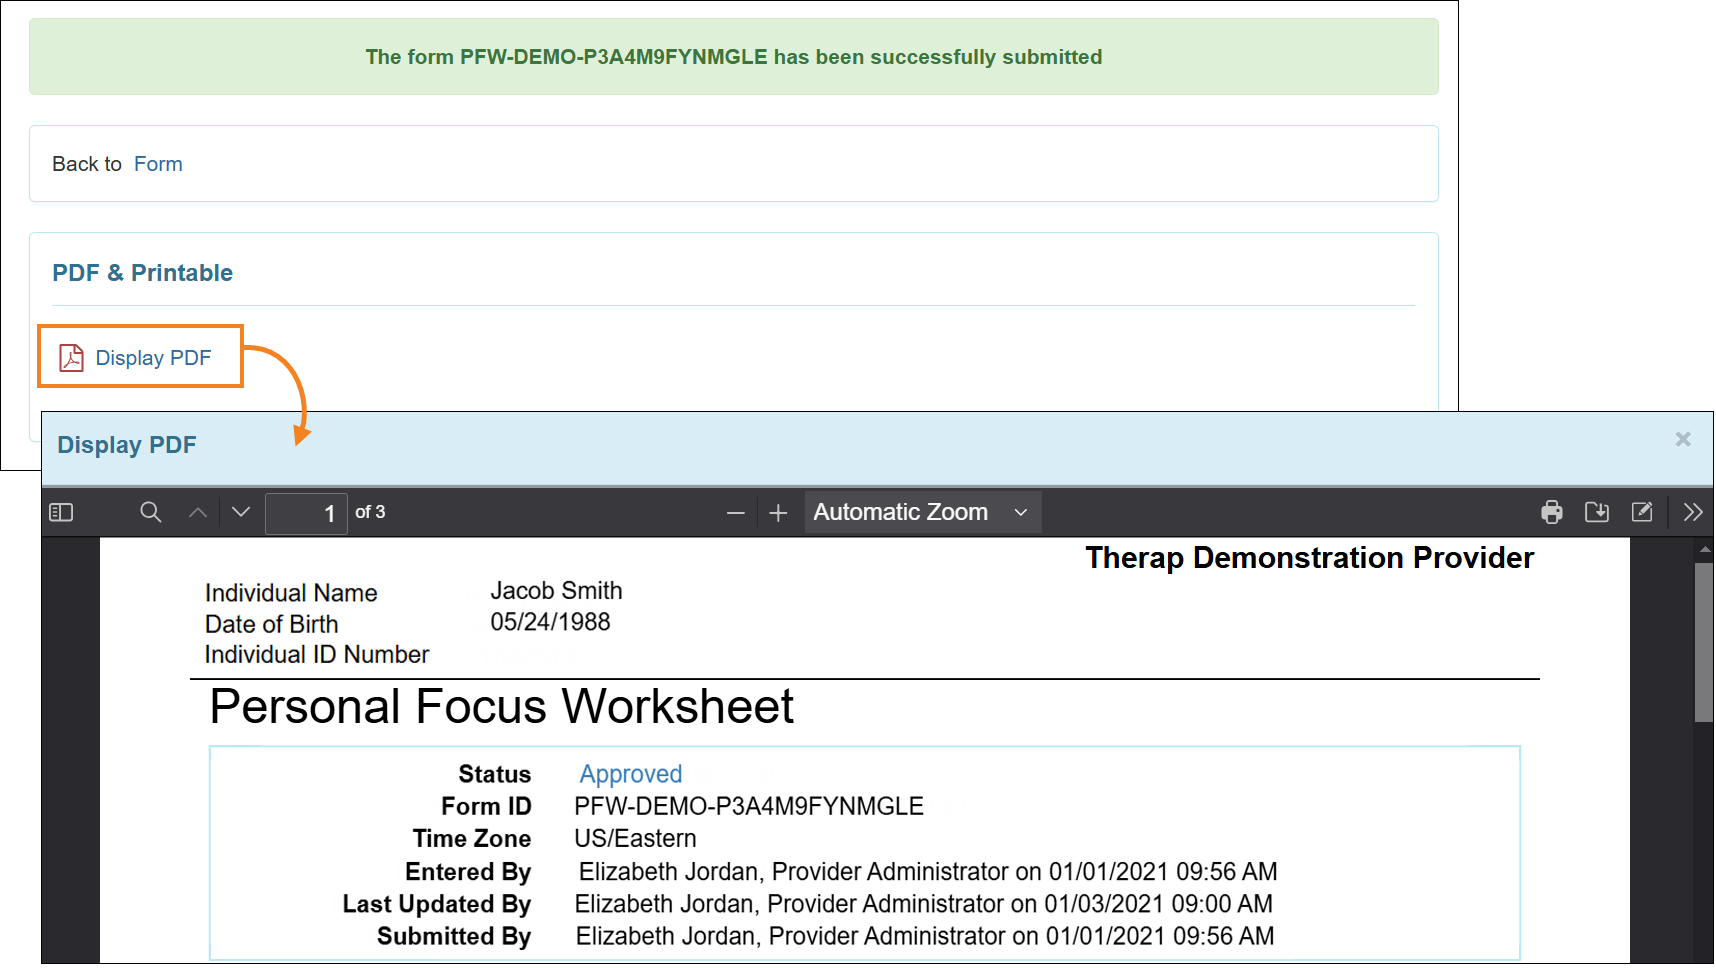
[Back to Top]- Users will now be able to view the PDF in the PDF viewer after clicking on the link shown on the success message pages of Personal Focus Worksheet.
Provider Preference
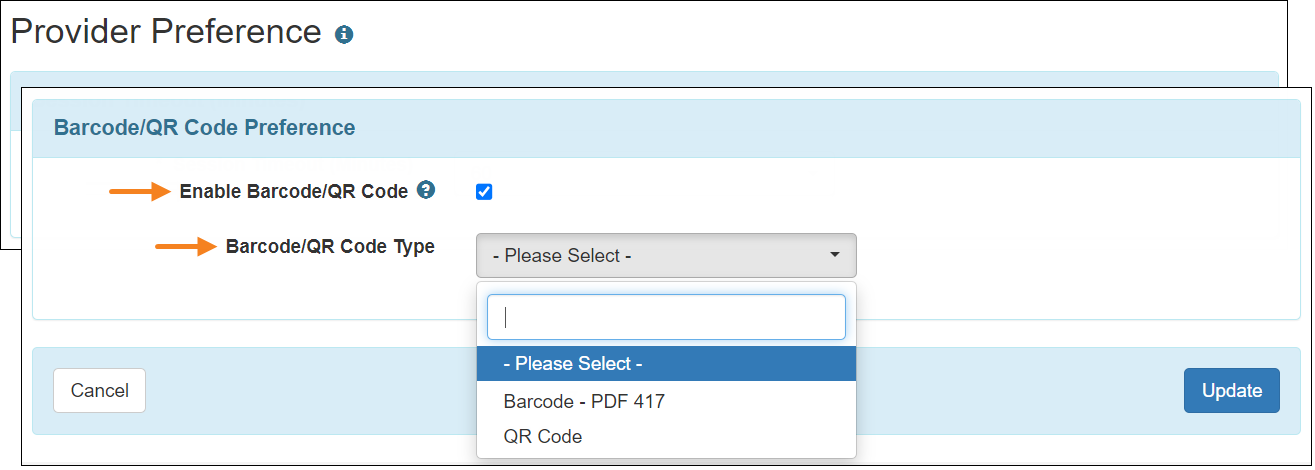
[Back to Top]- A new section titled ‘Barcode/QR Code Preference’ has been added in the ‘Provider Preference’ page. By clicking on the Enable Barcode/QR Code checkbox within this section, users can enable the QR/Barcode feature for the provider. After enabling QR/Barcode users can choose whether a Barcode or QR code should appear on MAR Medication List PDFs using the Barcode/QR Code Type dropdown field. The MAR Medication List PDFs with a Barcode/QR Code can only be generated if ‘Daily MAR’ is enabled for the agency.
Service Authorization
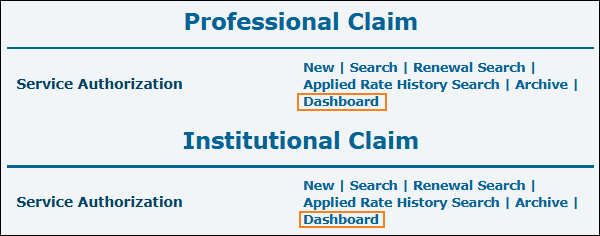
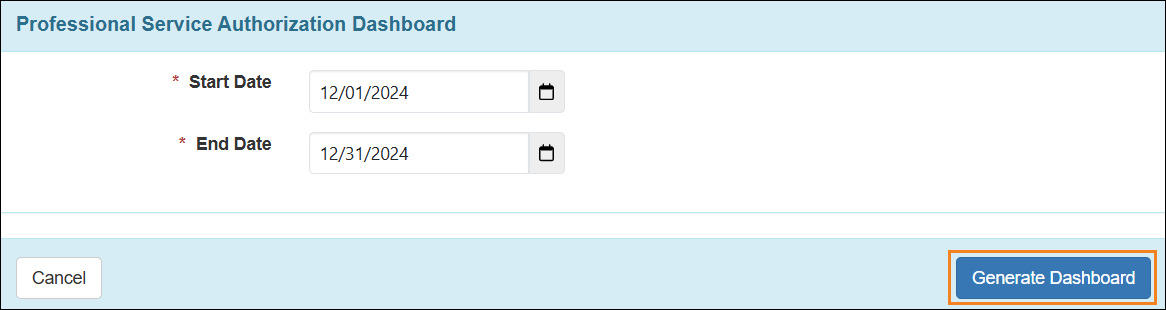
[Back to Top]- A new 'Service Authorization Dashboard' has been introduced. Users assigned with any of the Service Authorization Submit/Update/View/Approve caseload-based roles will see a new Dashboard link next to the Service Authorization option in the ‘Professional/Institutional Claim’ section of the Billing tab.
- Clicking on the Dashboard link will open the 'Professional/Institutional Service Authorization Dashboard' search page where users can enter a date range and generate the dashboard using the Generate Dashboard button. A maximum date range of one month can be selected to generate the Dashboard. The date range must be within the same month.
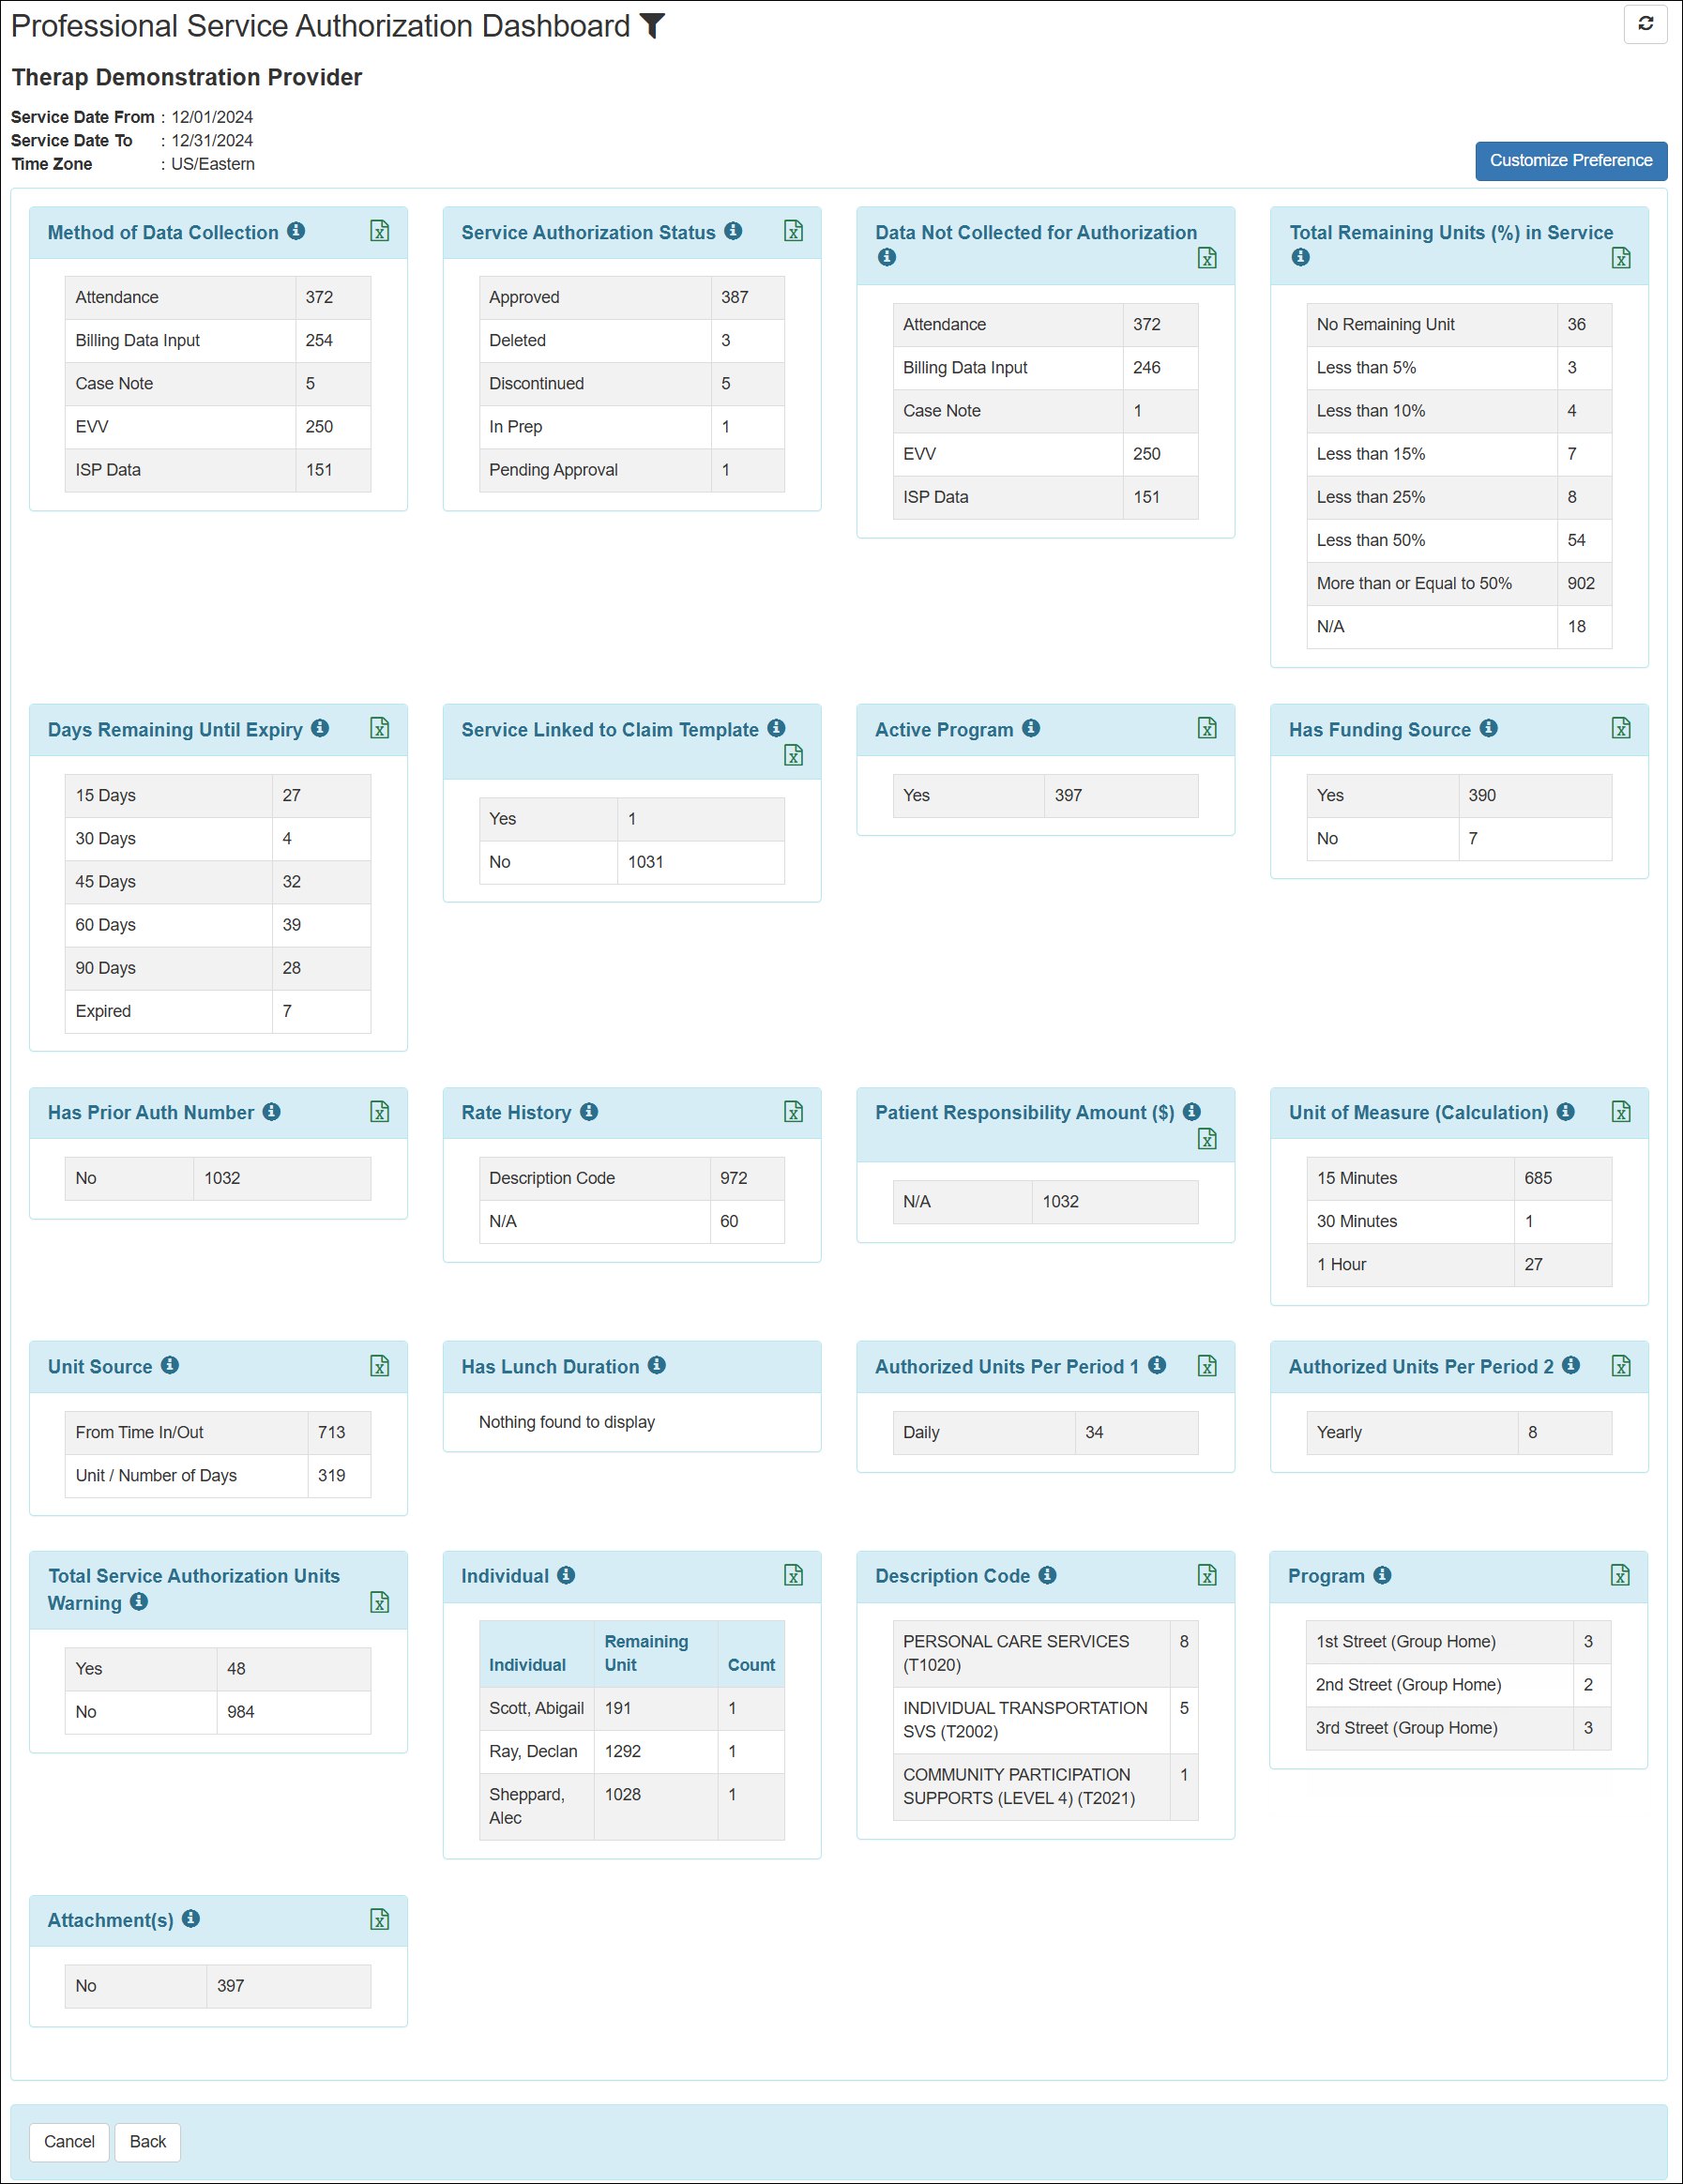
- Based on the date range entered, the Service Authorization Dashboard will display data counts for the following criteria:
- Method of Data Collection
- Service Authorization Status
- Data Not Collected for Authorization
- Total Remaining Units (%) in Service
- Days Remaining Until Expiry
- Service Linked to Claim Template
- Active Program
- Has Funding Source
- Has Prior Auth Number
- Rate History
- Patient Responsibility Amount ($)
- Unit of Measure (Calculation)
- Unit Source
- Has Lunch Duration
- Authorized Units Per Period 1
- Authorized Units Per Period 2
- Total Service Authorization Units Warning
- Individual
- Description Code
- Program
- Attachments
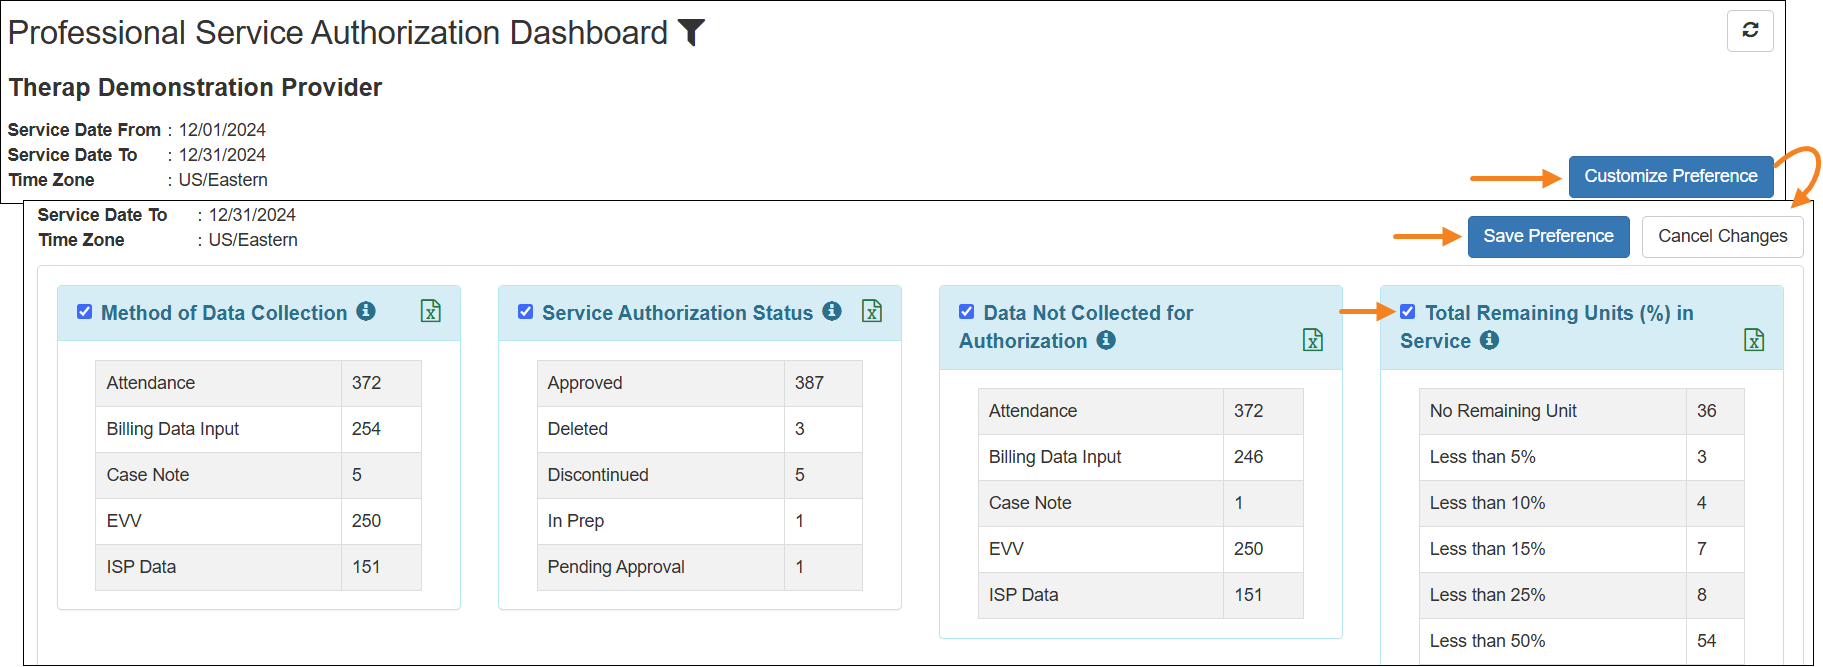
- Users may click on the Customize Preference button and uncheck the sections that they do not want to be displayed on the Service Authorization Dashboard. Re-checking the sections will bring back the sections. Clicking on the Save Preference button will apply the changes to the Dashboard.
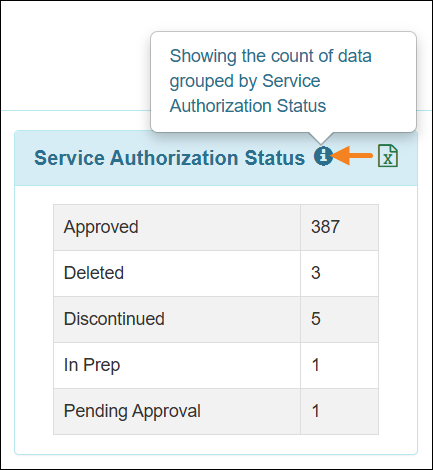
- Clicking on the 'i' icon on top of each section will show the detailed description of that section.
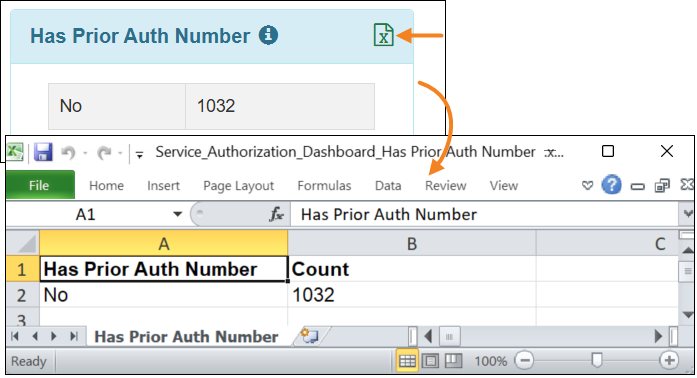
- Clicking on the Excel file icon on each section will download an Excel file with the data from that section.
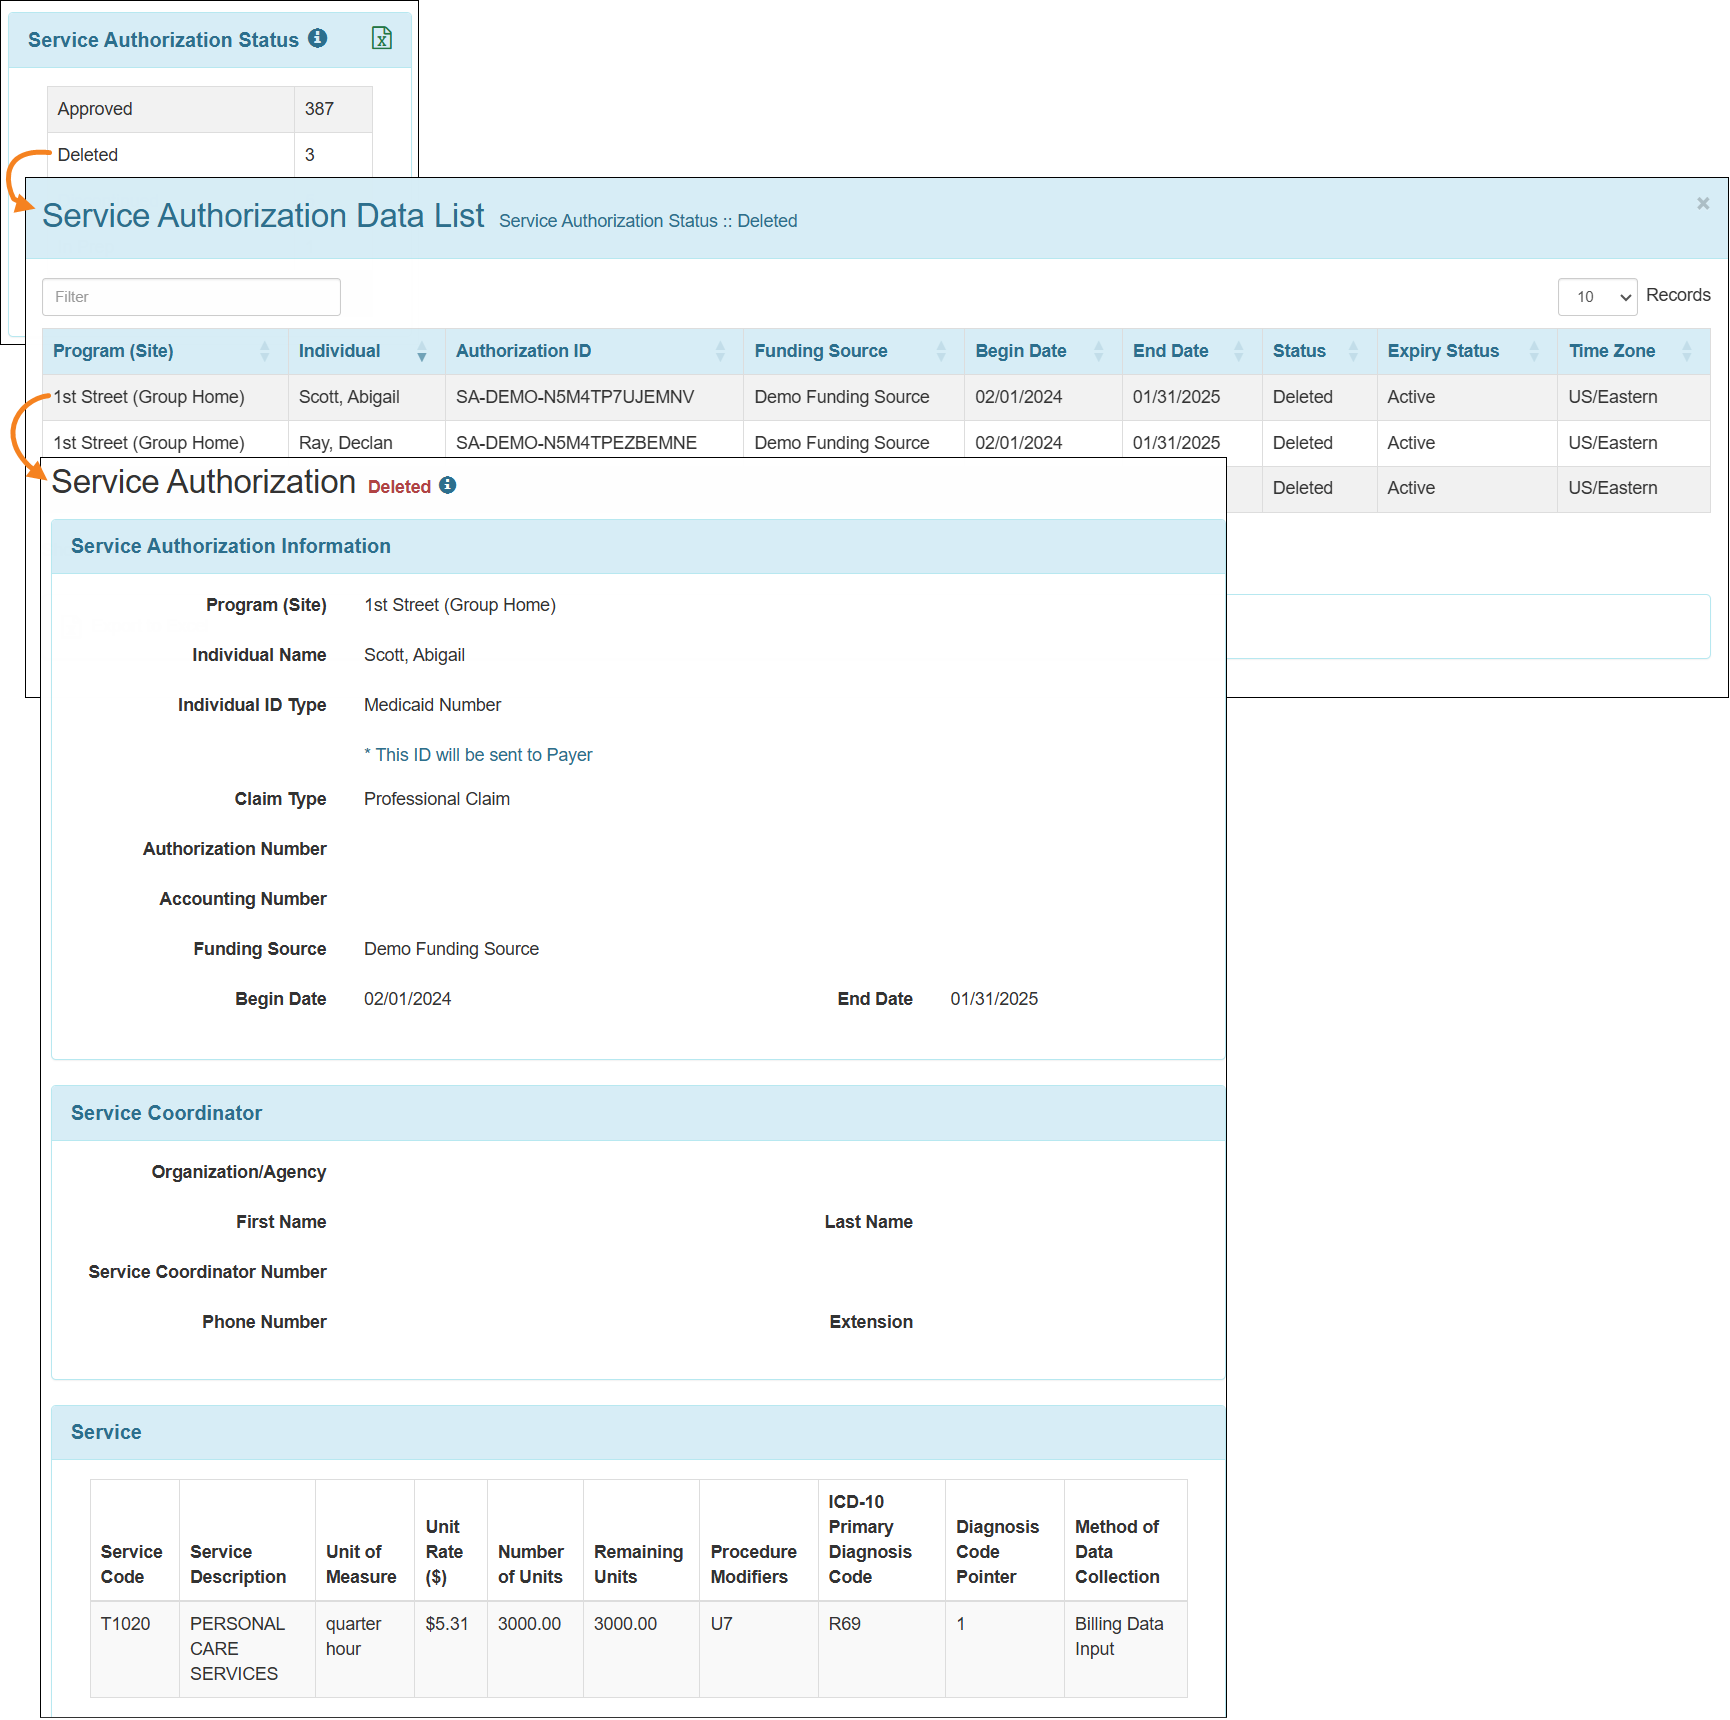
- Clicking on an item in a section will open a Service Authorization Data List. Clicking on a Service Authorization from that list will open the Service Authorization form.
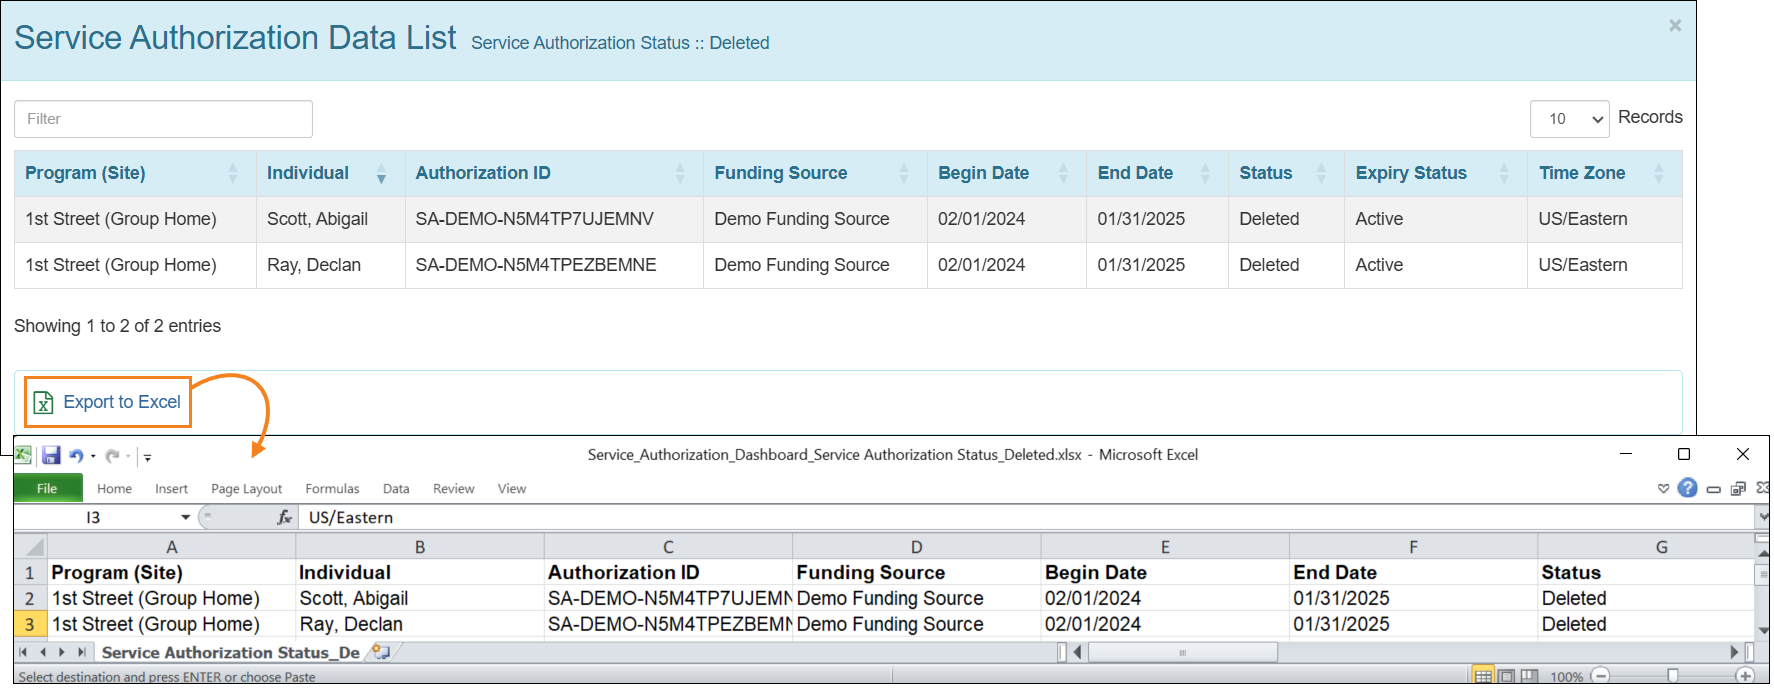
- Clicking on the Export to Excel link on the bottom of any Service Authorization Data List will download an Excel file of the information on the list.
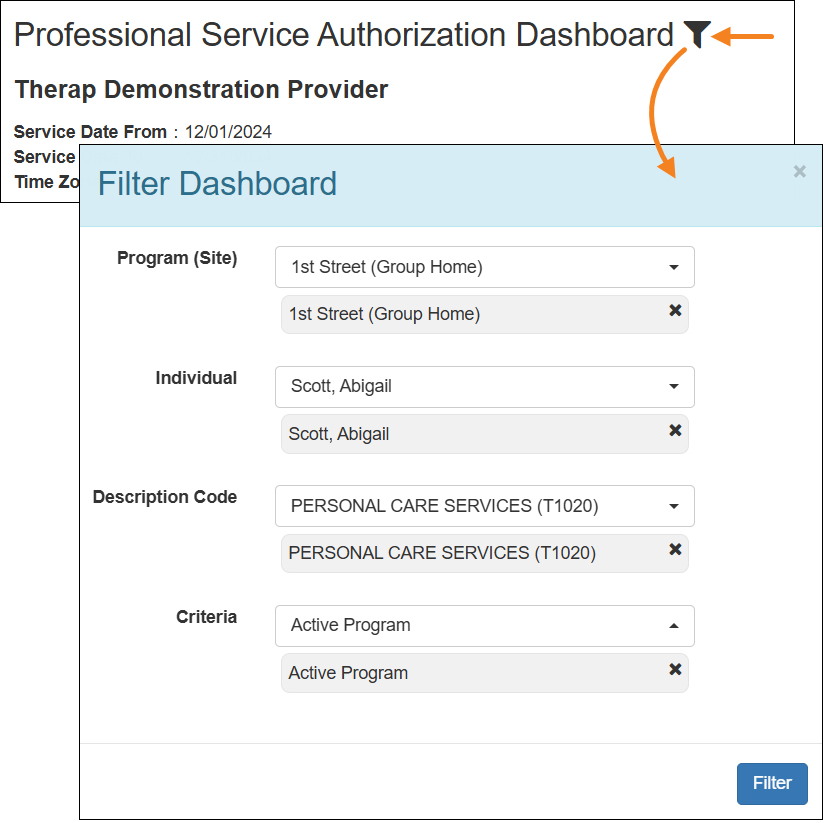
- The filter icon at the top of the Service Authorization Dashboard can be used to apply a filter to the Dashboard.
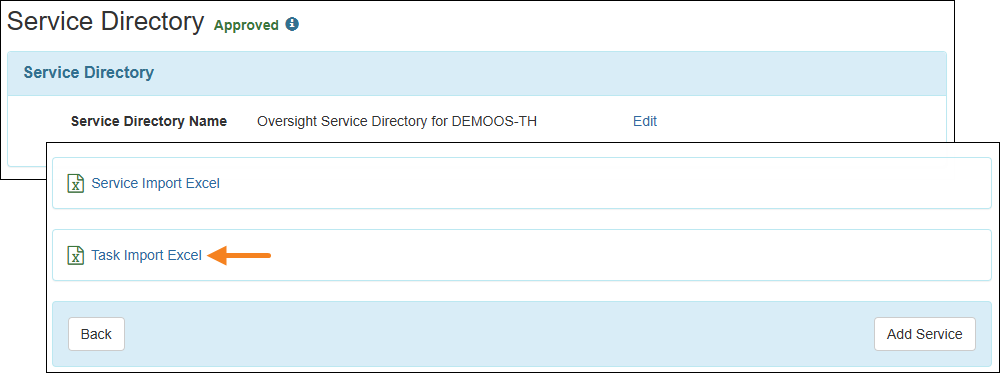
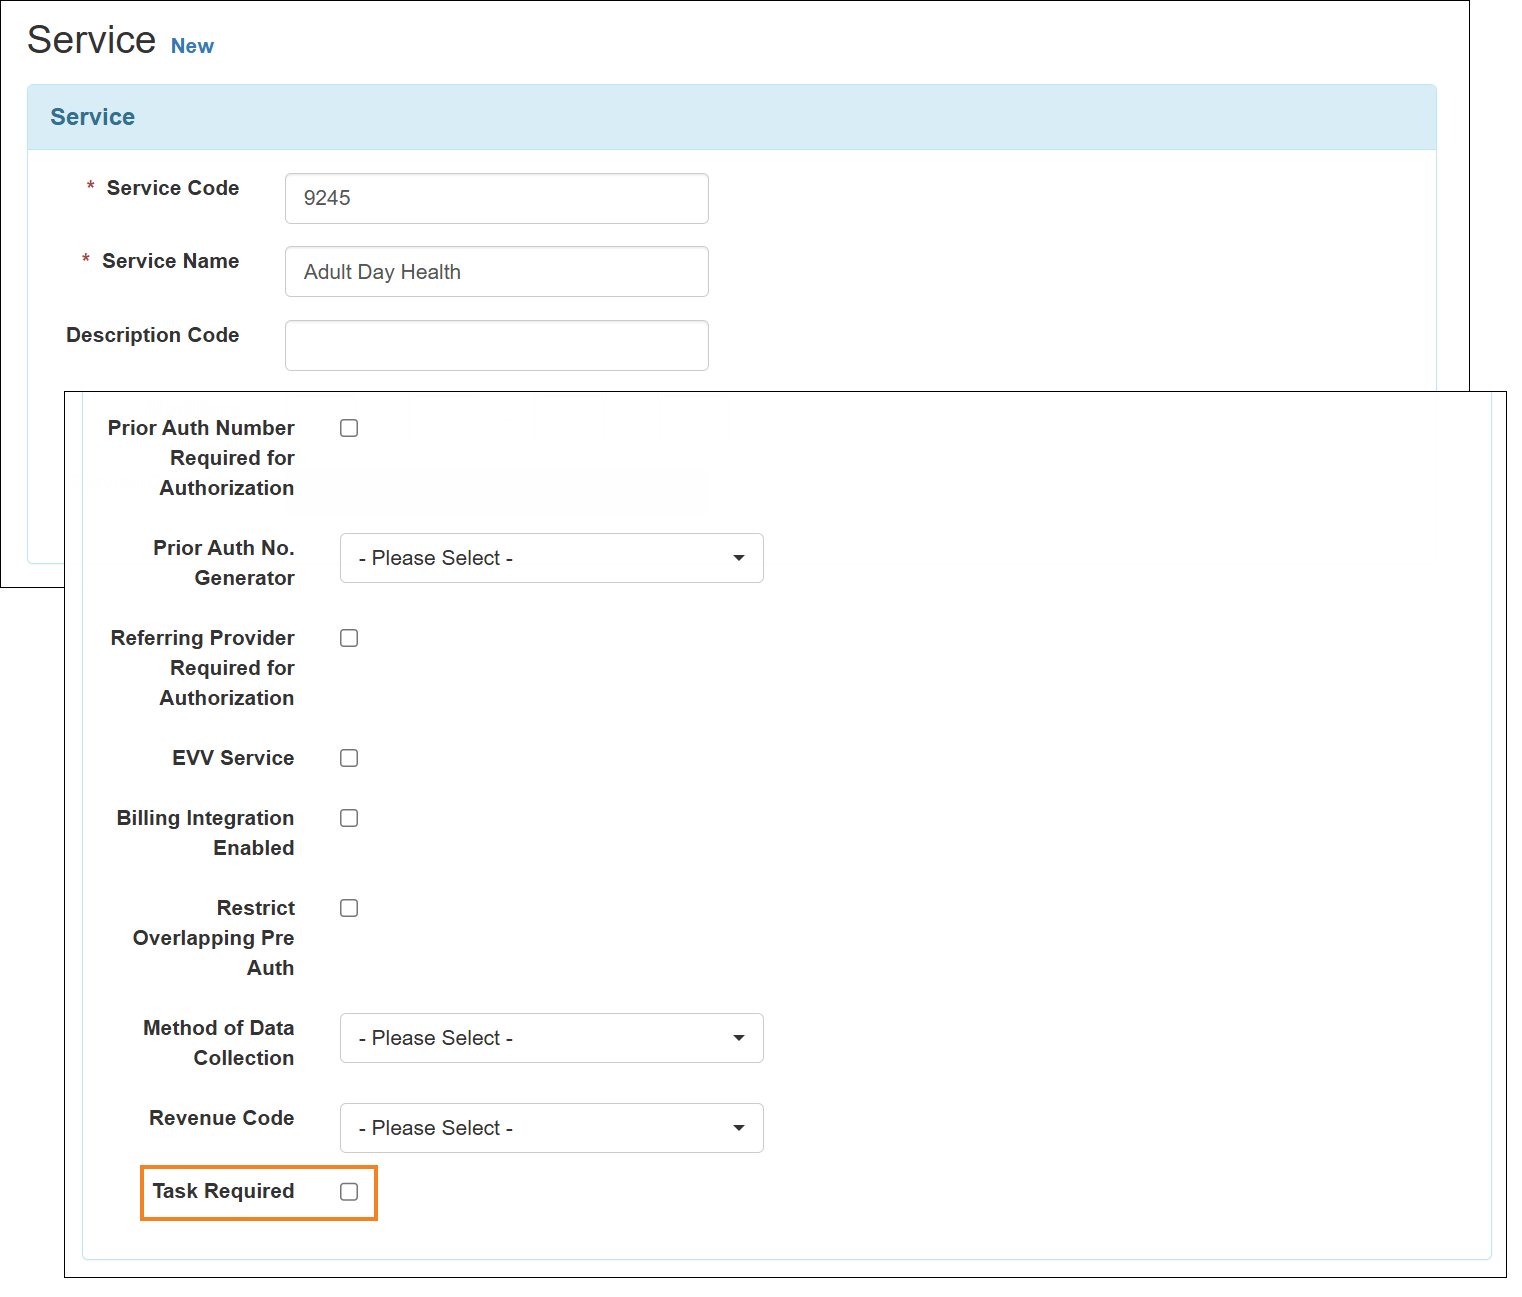
Service Directory
[Back to Top]- A new Task Required field has been added to the ‘Service’ form. If this field is checked on the Service form, then users are required to add Tasks in the ‘Pre Auth Task(s)’ section of the Pre Auth form.
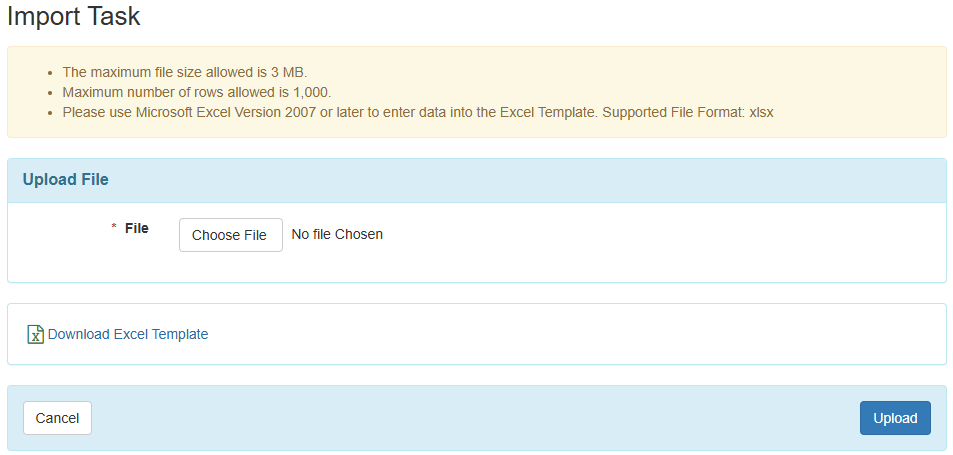
- A new Task Import Excel link has been added to the Service Directory form which will allow users to import tasks in the corresponding Service forms in bulk by uploading Excel files.