Therap for Canada 2023.6.2 Released!
| Release Date: 8/23/2023 |
- Billing
- Calendar
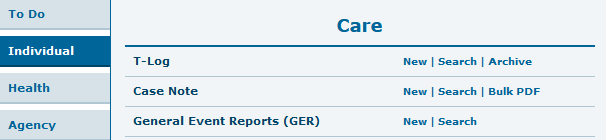
- Case Note
- Employment History
- External Provider Mapping New!
- External Individual Mapping New!
- General Event Reports (GER)
- GER Resolution
- Individual Demographic Form (IDF)
- Individual Home Page
- Individual Plan
- ISP Data
- ISP Data & Scheduling
- ISP Program & ISP Program Template
- Medication History
- Priority List
- Scheduling
- Training Management System (TMS)
Billing
[Back to Top]- The Service Description dropdown field available on different forms throughout the Billing module will now show the Procedure Modifier associated with the corresponding Service Description.
Calendar
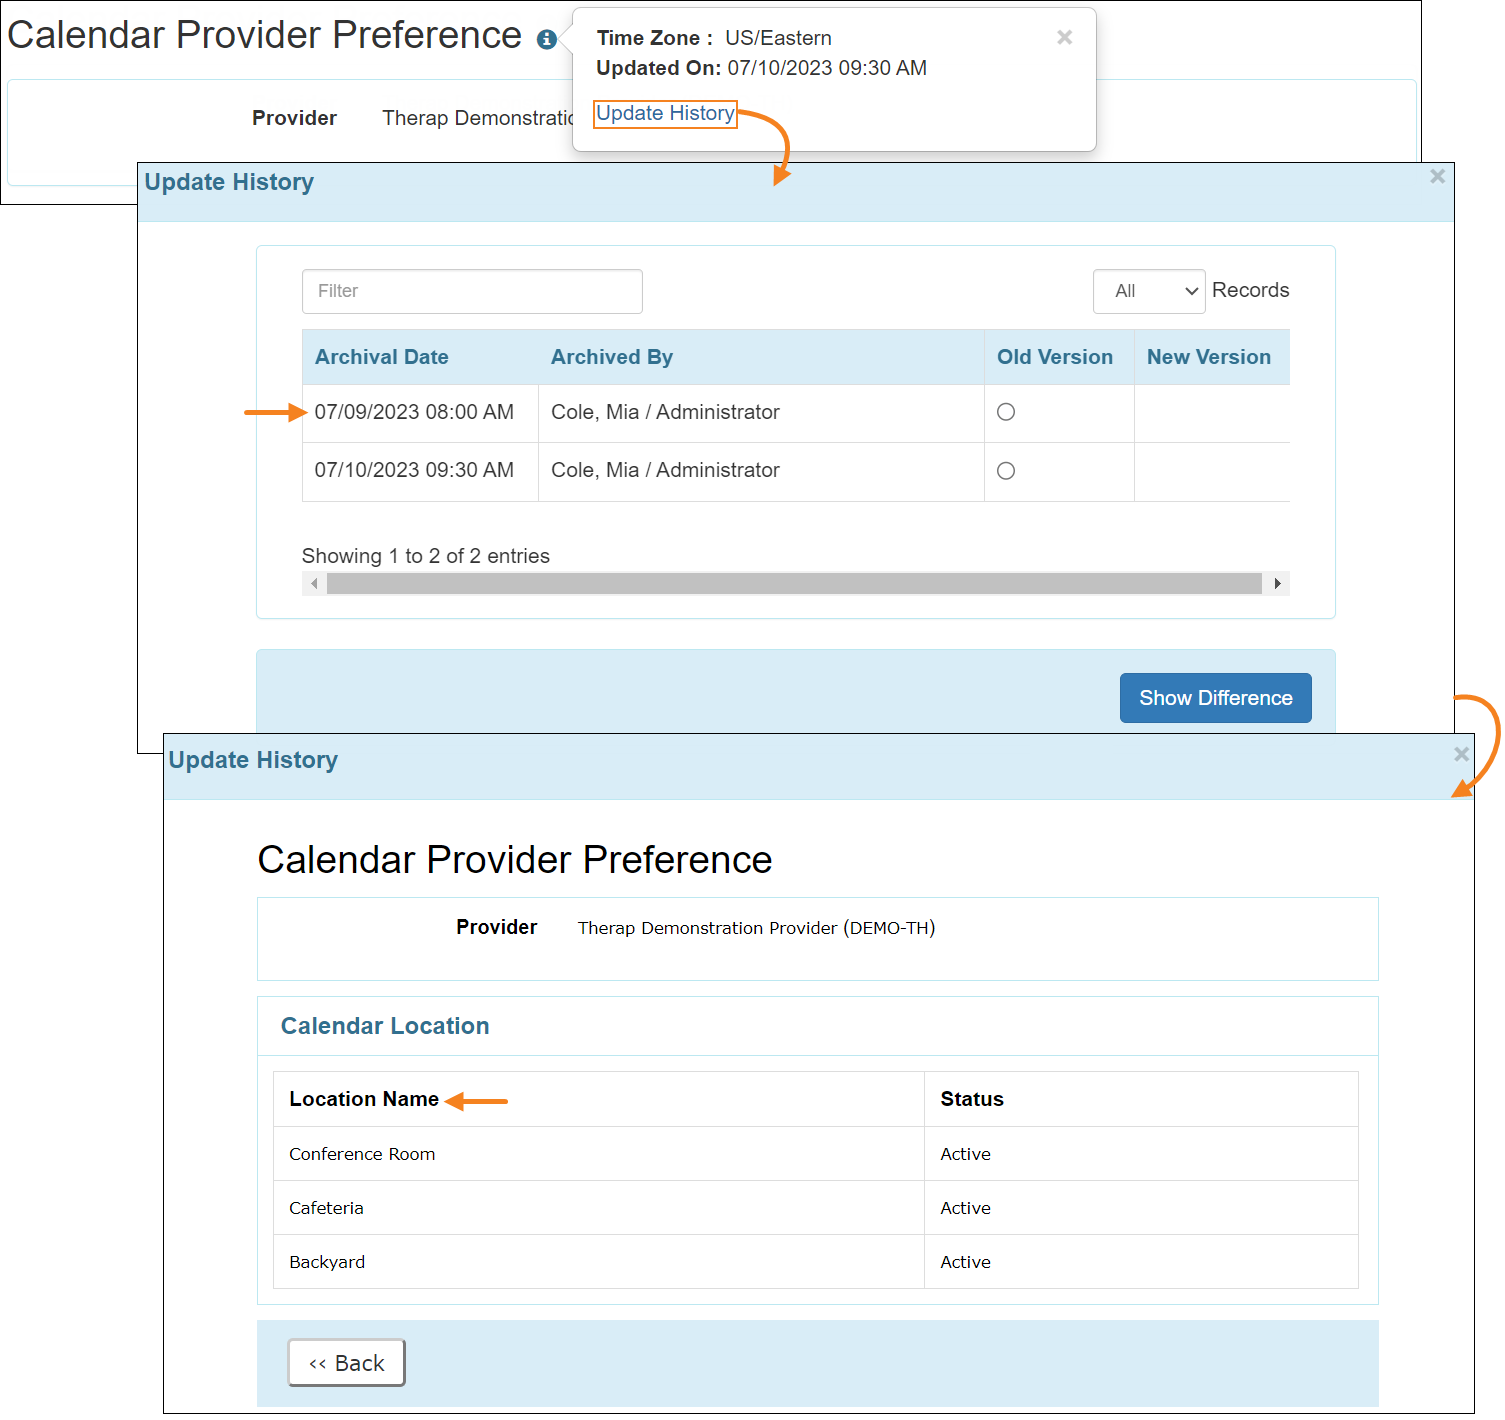
[Back to Top]- The Location column on the ‘Update History’ window accessed using the Update History link placed in the ‘i’ icon on the ‘Calendar Provider Preference’ page has been renamed to Location Name.
Case Note
[Back to Top]- Users will now need the Case Note Delete caseload-based role to view Deleted Case Notes. Previously, users with any of the Case Note caseload-based roles could view Deleted Case Notes.
- The Archive link for the Case Note option has been removed from the Individual tab. Users will still be able to view the archived Case Notes from the Update History.
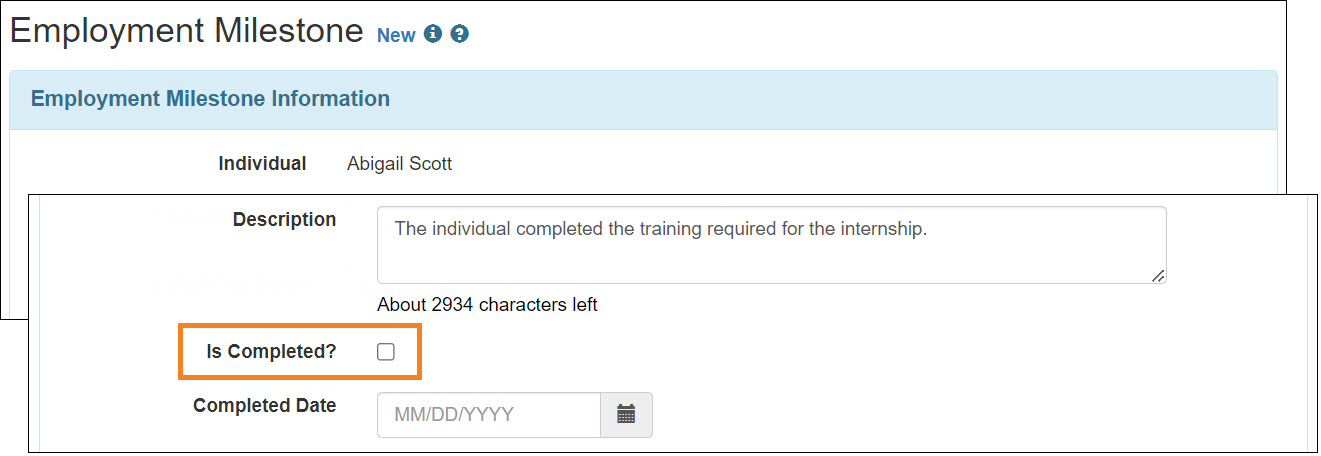
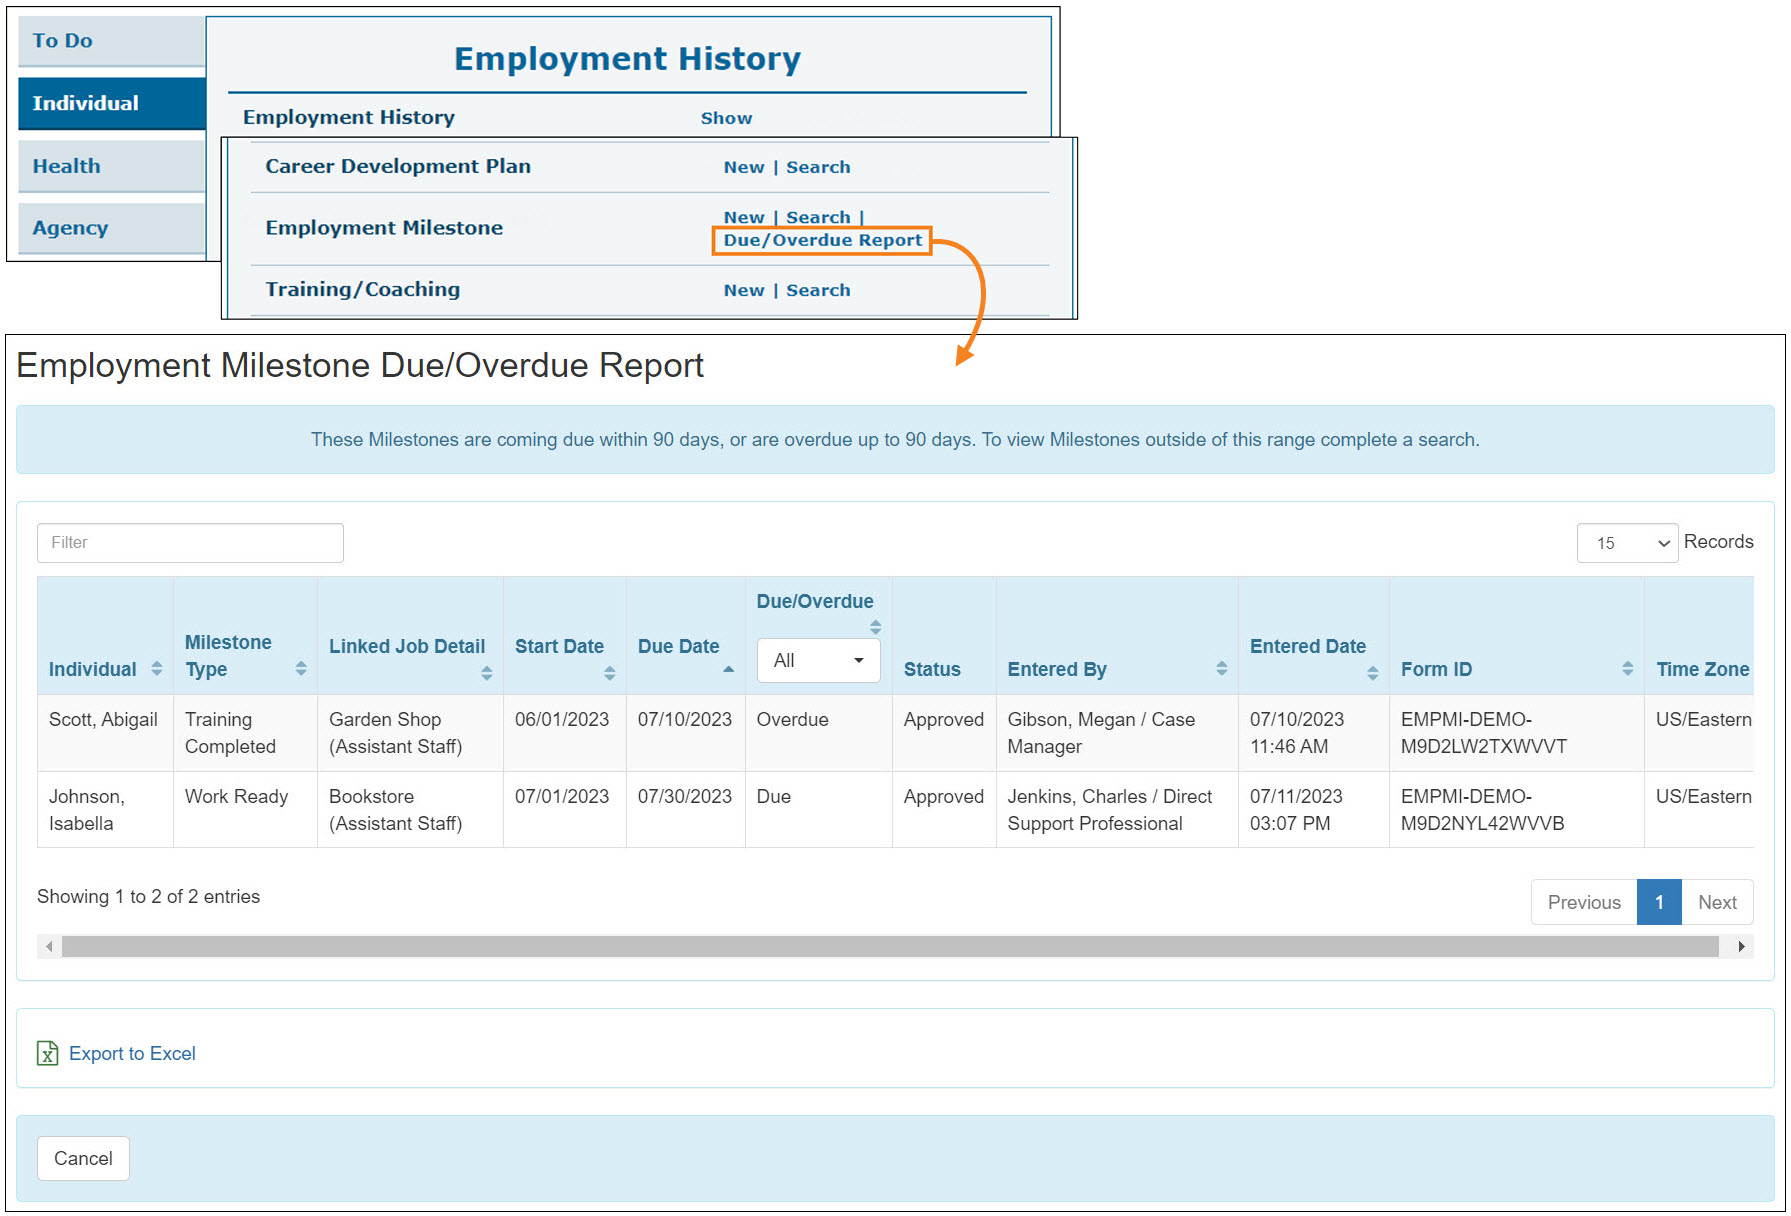
Employment History
[Back to Top]- The Is Completed? field of the Employment Milestone form will now show a checkbox instead of ‘Yes’ and ‘No’ radio buttons. The checkbox is unselected by default and if users do not check this as enabled, the Is Completed? information will show as ‘No’ in the Update History archives, ‘Employment Milestone Search’ results page, and the generated reports. For forms created prior to this release, if Is Completed? is selected as 'No' or kept blank, the checkbox will be displayed as unselected.
- A new link, Due/Overdue Report has been added beside the Employment Milestone option on the Individual tab. Users assigned with the Employment Submit, Employment Update, Employment Delete, or Employment View caseload-based role will be able to generate this report. The report will display Approved Employment Milestone forms depending on the following conditions:
- The current status of the individual should be 'Admitted'.
- The Is Completed? checkbox of the respective form should be unselected.
- The Due Date of the forms should be prior or after 90 days of the current date.
Due Date days prior to the current date will be displayed as Overdue in the Due/Overdue column. If Due Date is the current date or later than the current date, then Due will be displayed in the Due/Overdue column.
Users will be able to export the generated report in Excel using the Export to Excel link at the bottom.
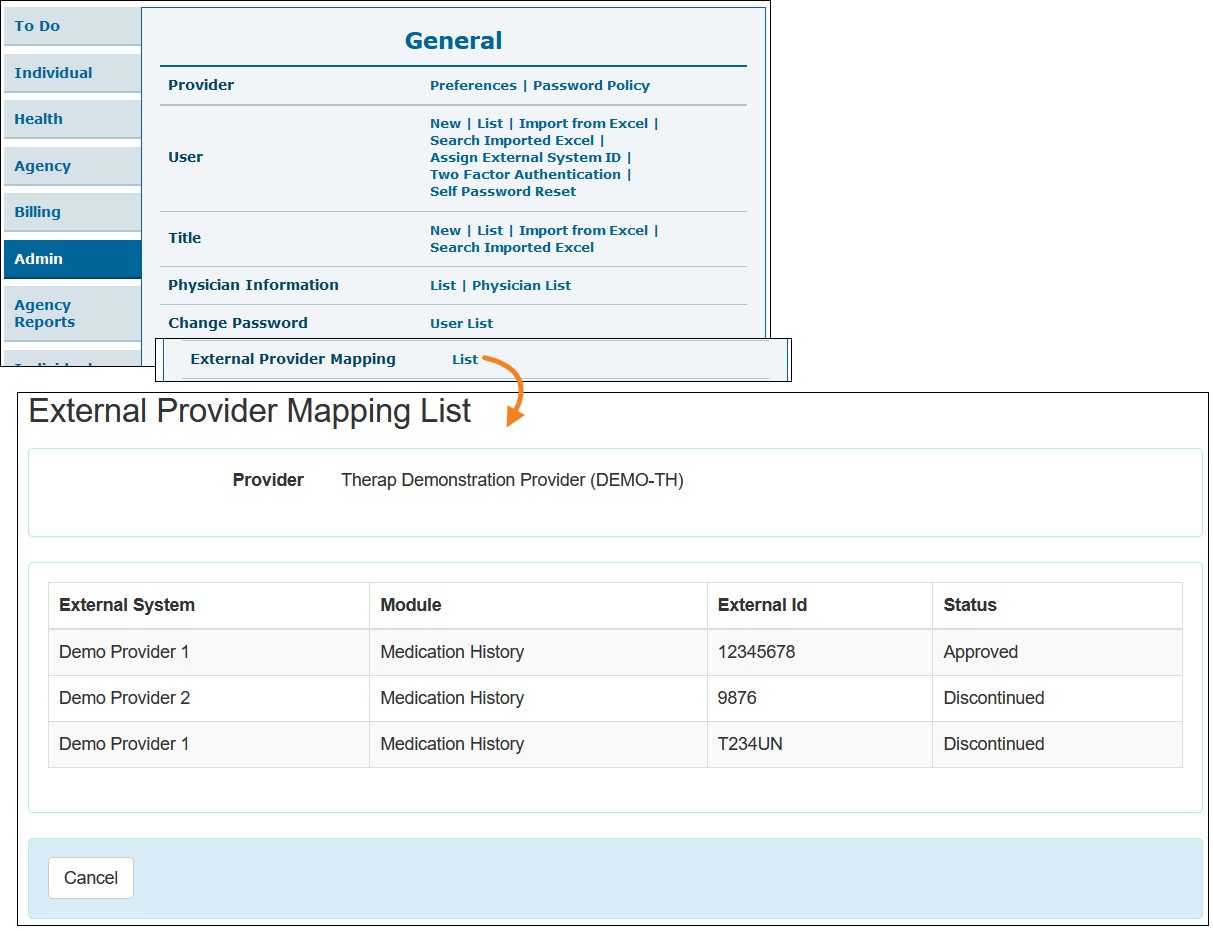
External Provider Mapping New!
[Back to Top]- Users with the Provider Setup administrative role will now find a new External Provider Mapping row in the ‘General’ section of the Admin tab. Using this option, users can view the External Provider Mapping List.
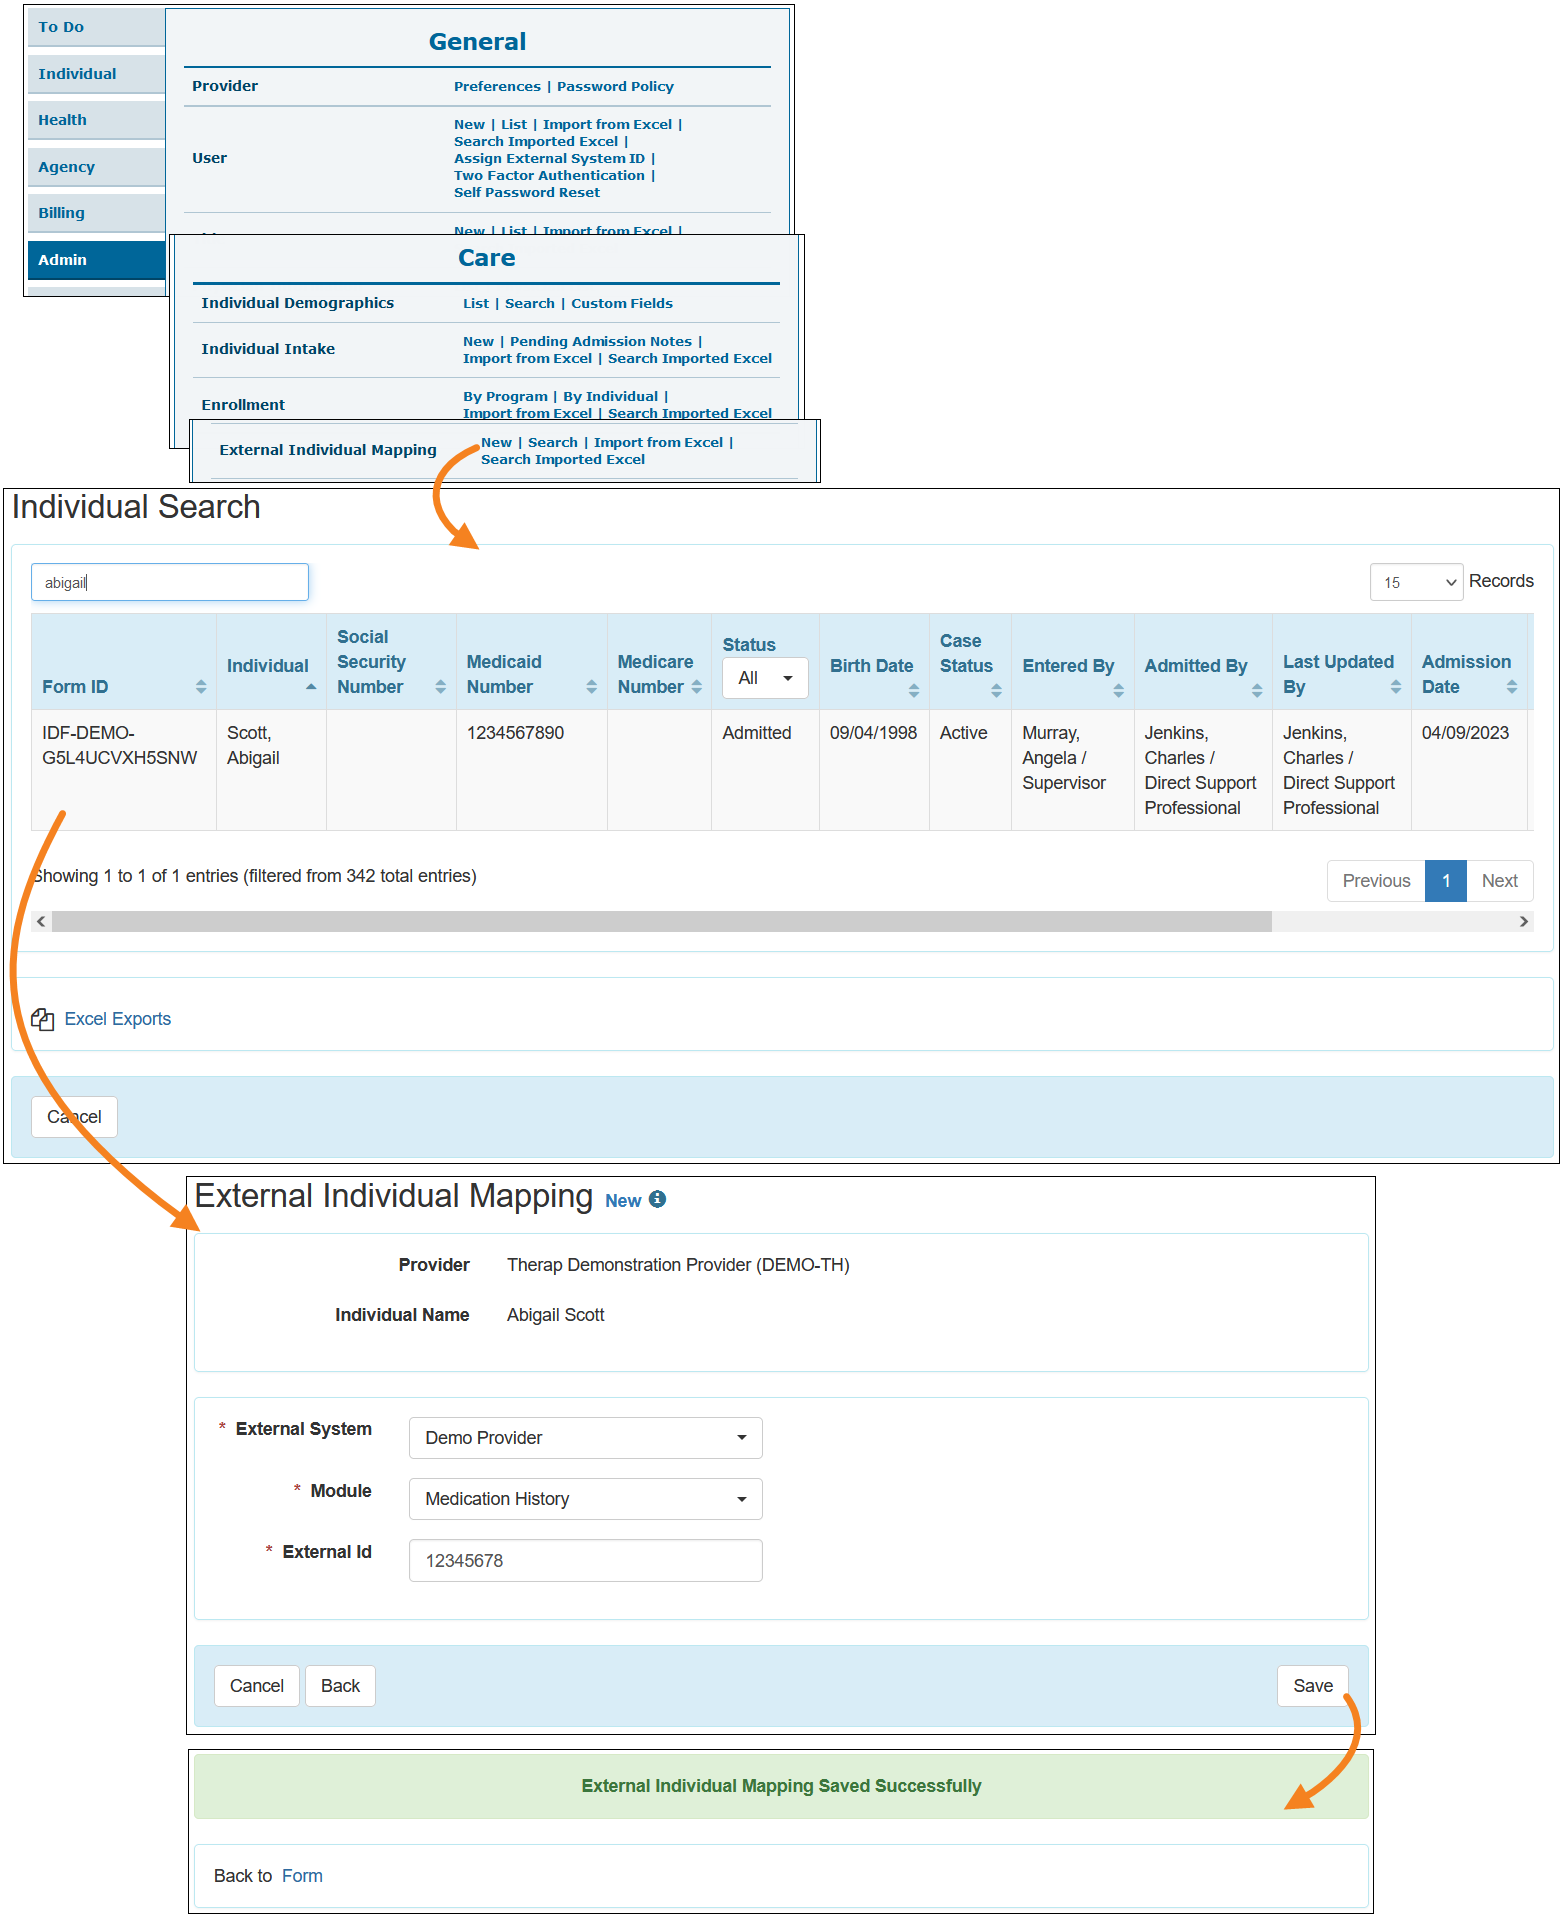
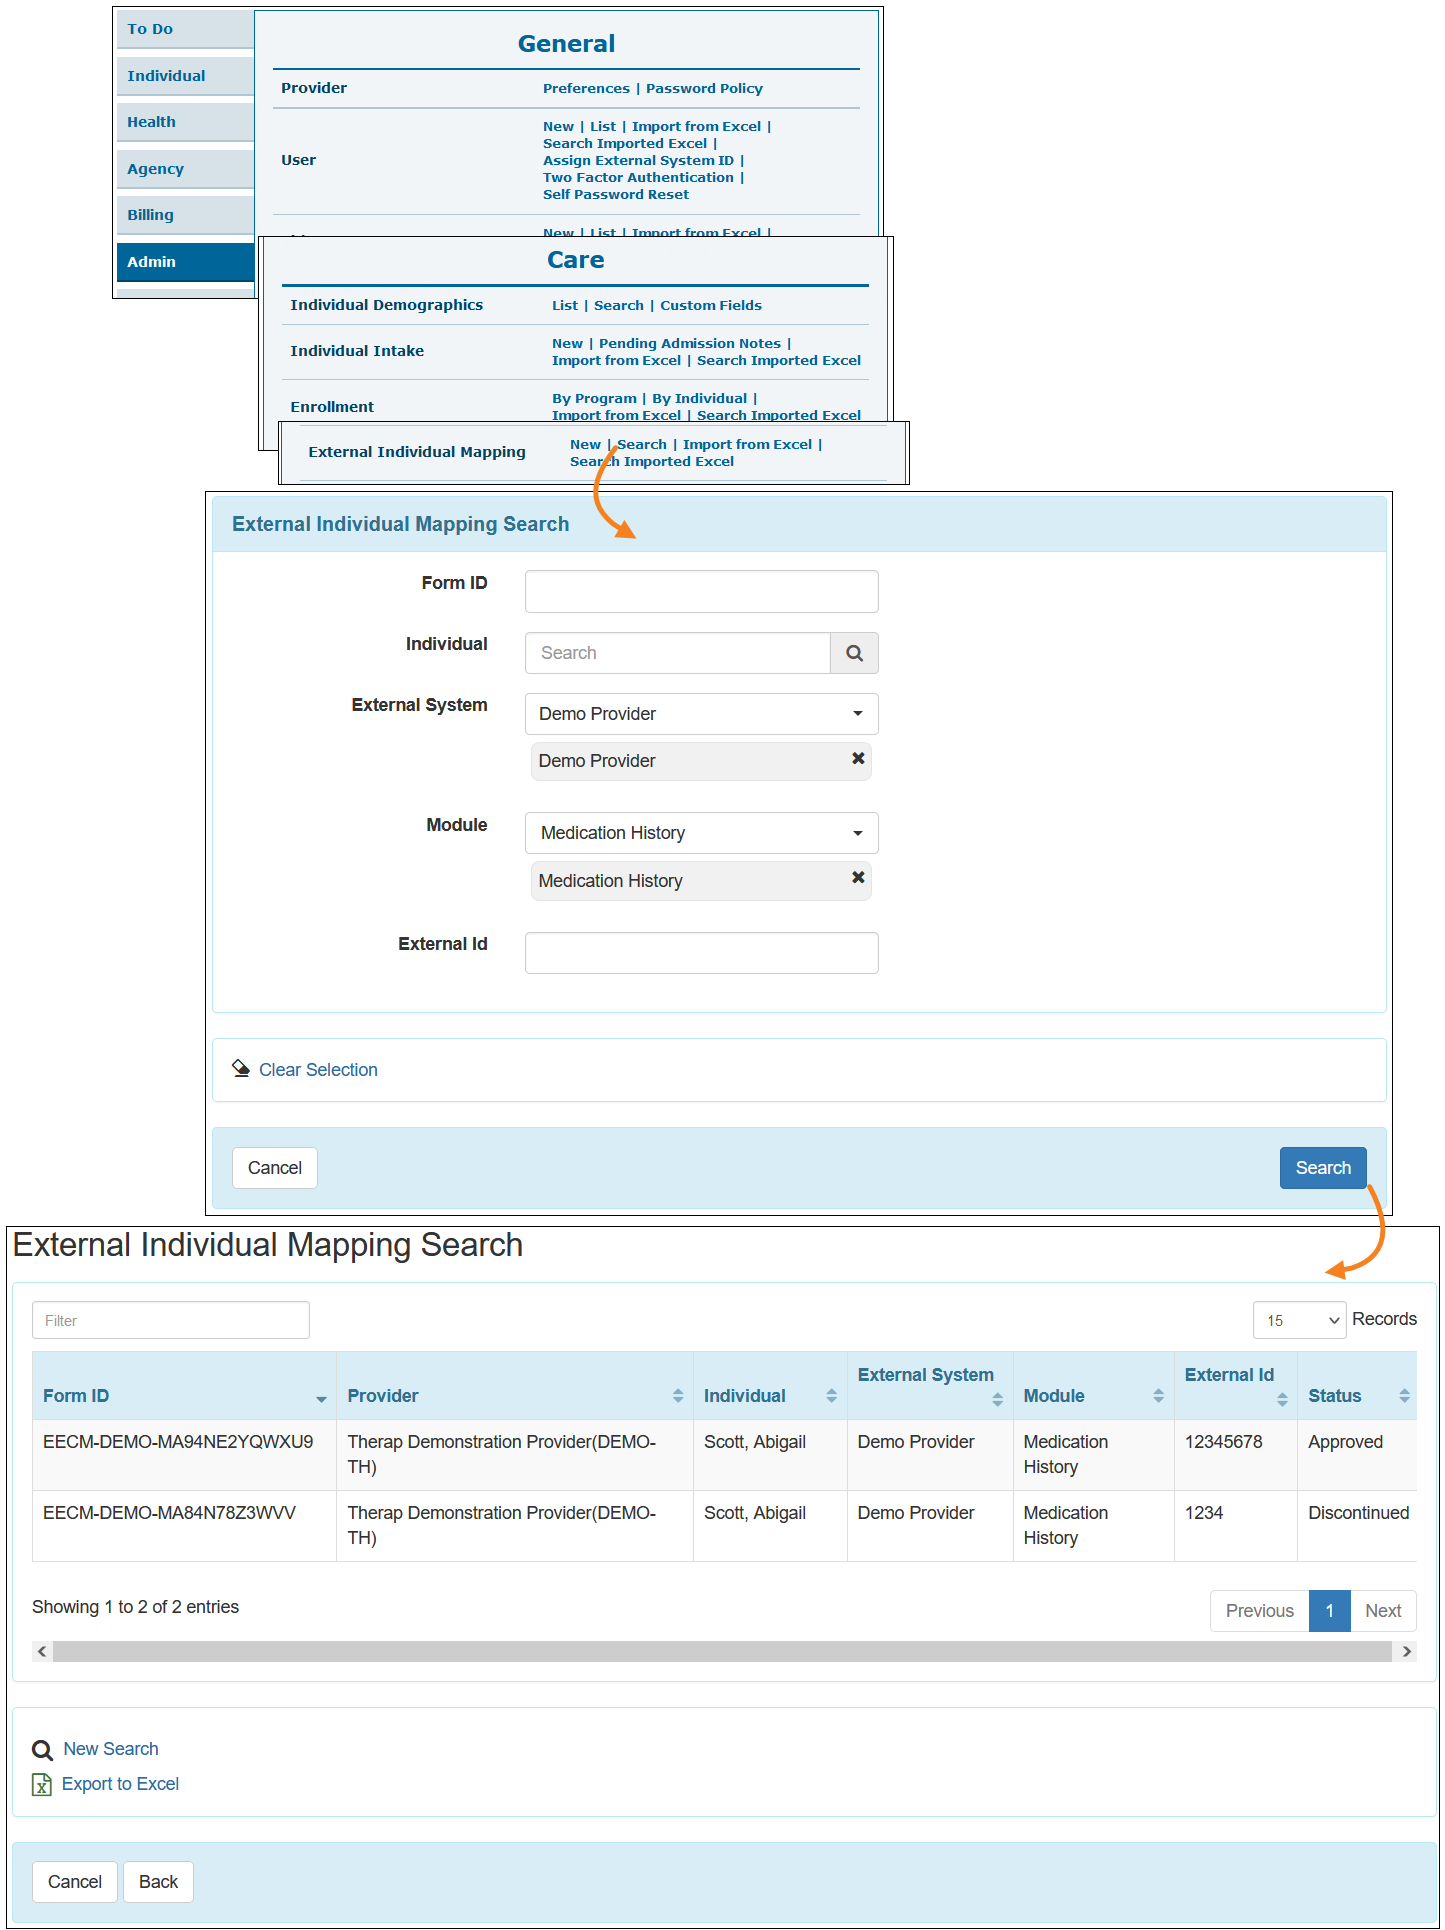
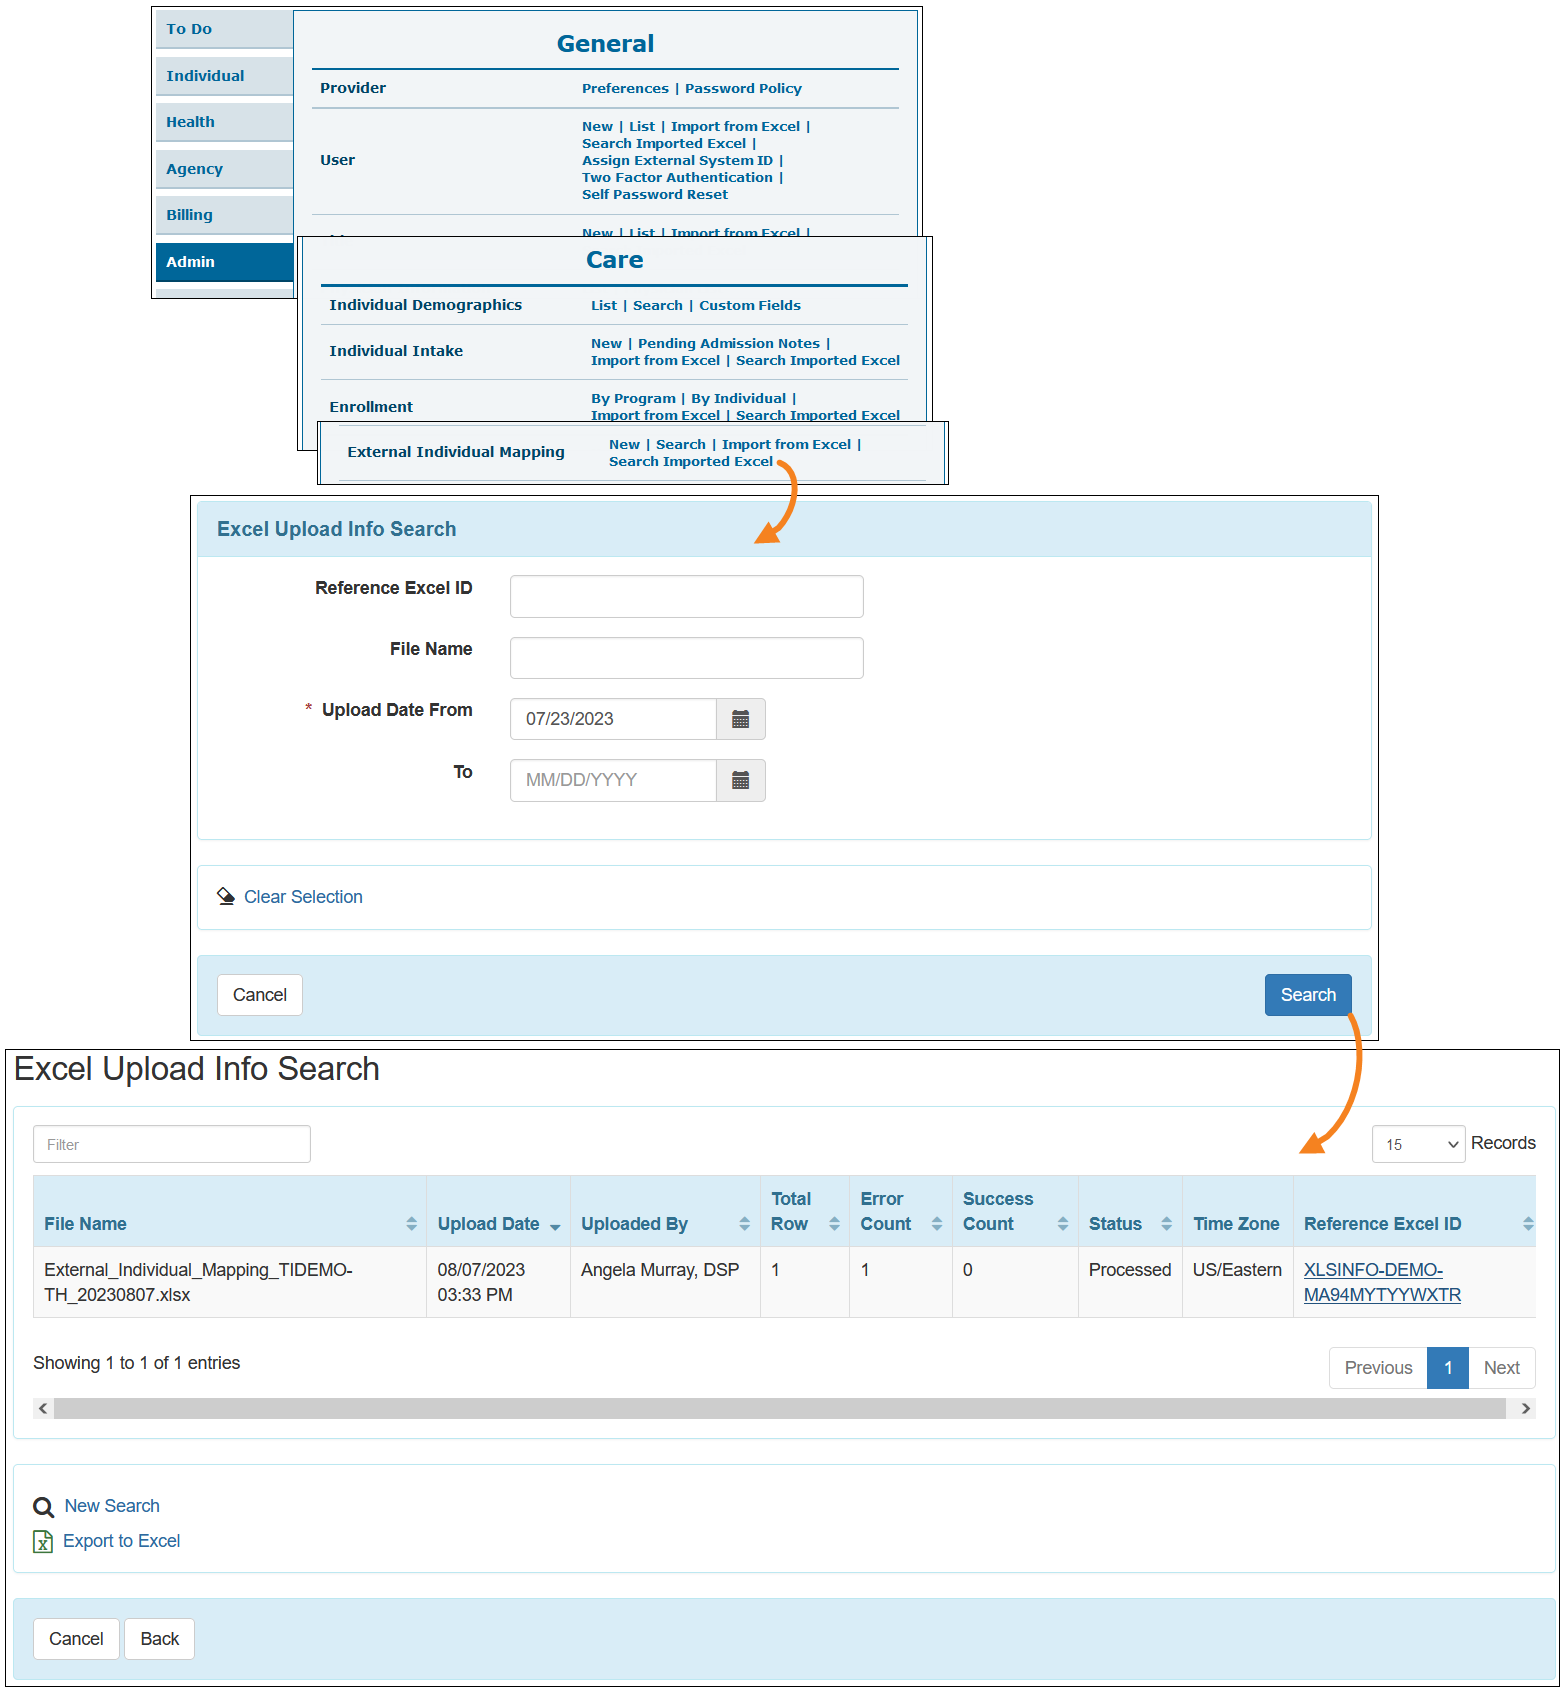
External Individual Mapping New!
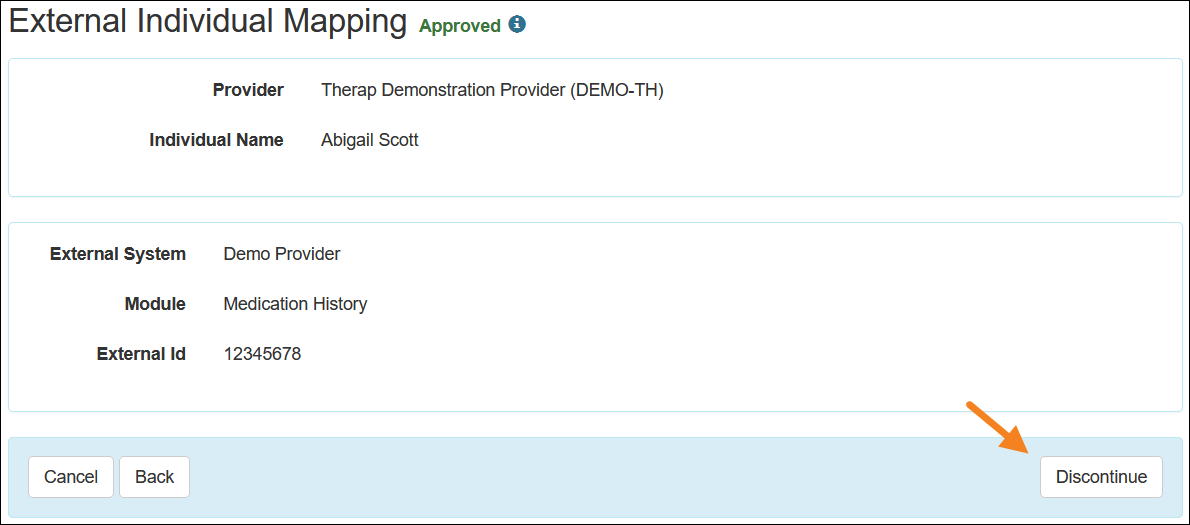
[Back to Top]- Users with the IDF Admin administrative role will now find a new External Individual Mapping row in the ‘Care’ section of the Admin tab. Users can create new External Individual Mapping using the New link.
An Approved External Individual Mapping form can be discontinued using the Discontinue button.
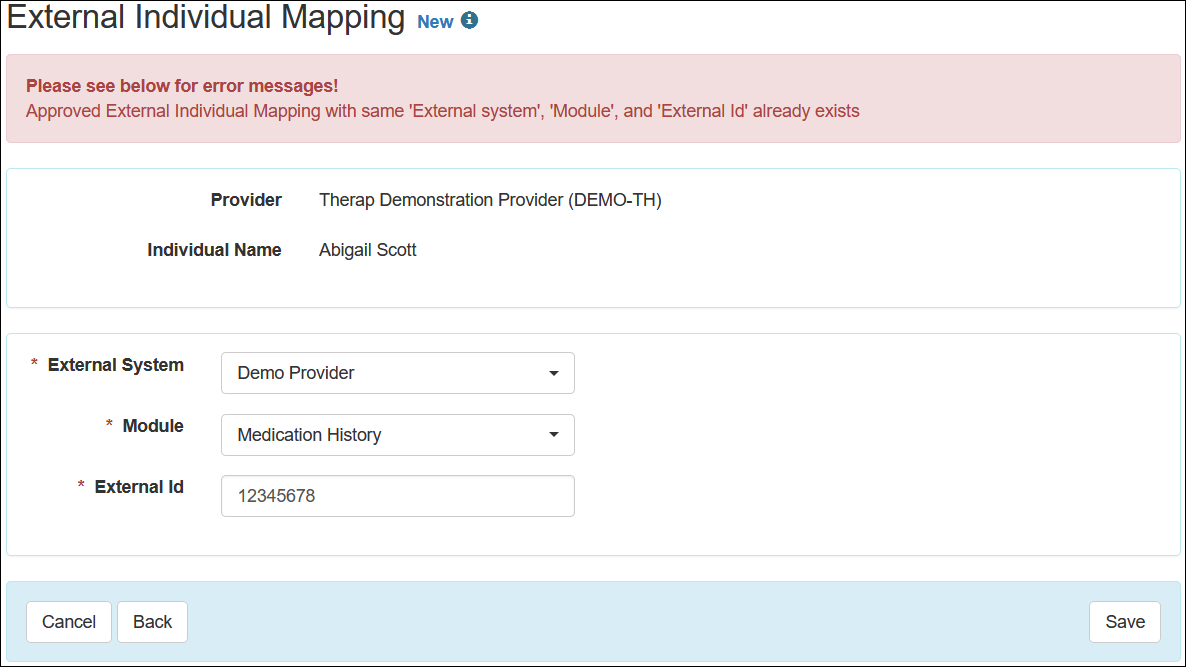
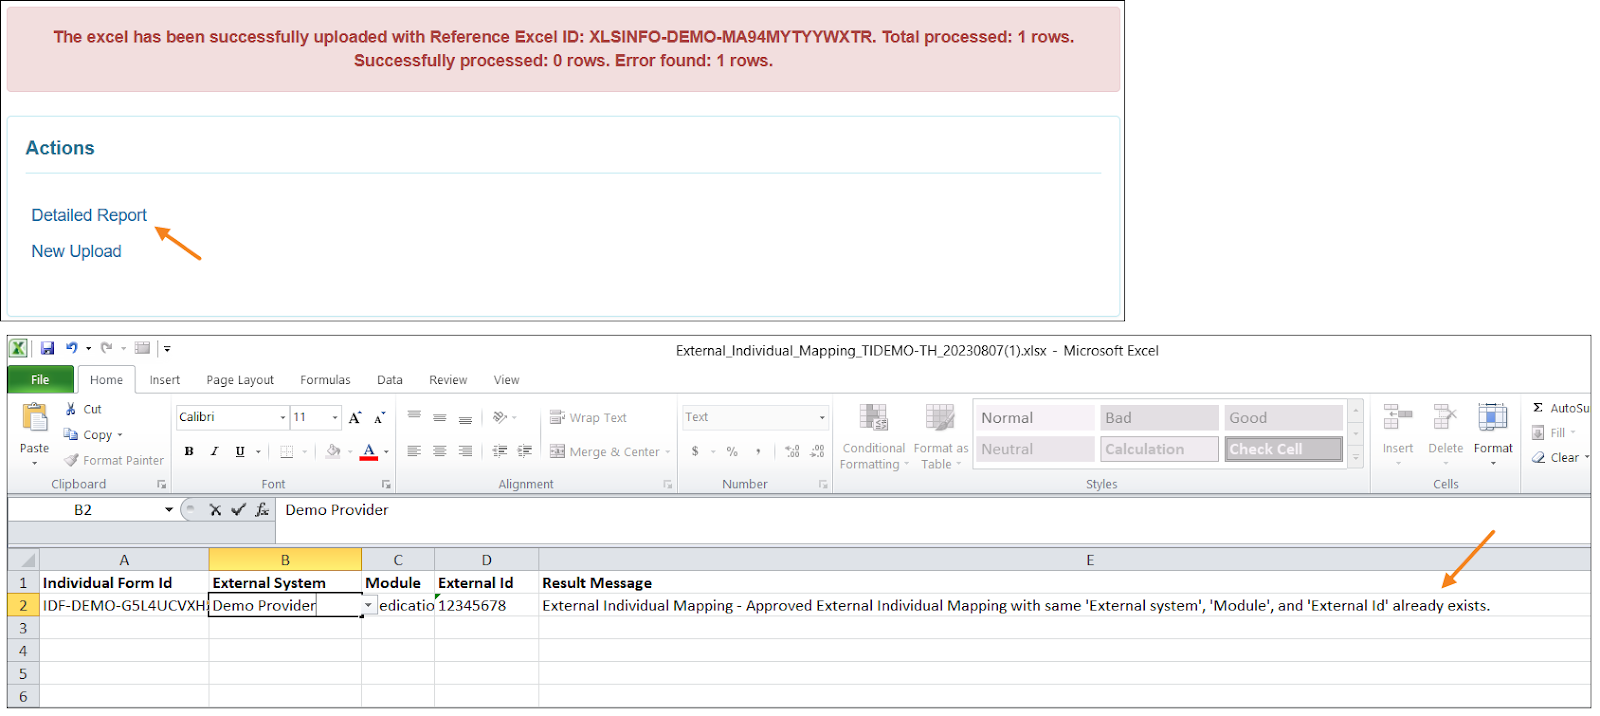
Users will receive an error message if they attempt to create an Approved External Individual Mapping with the same External system, Module, and External Id.
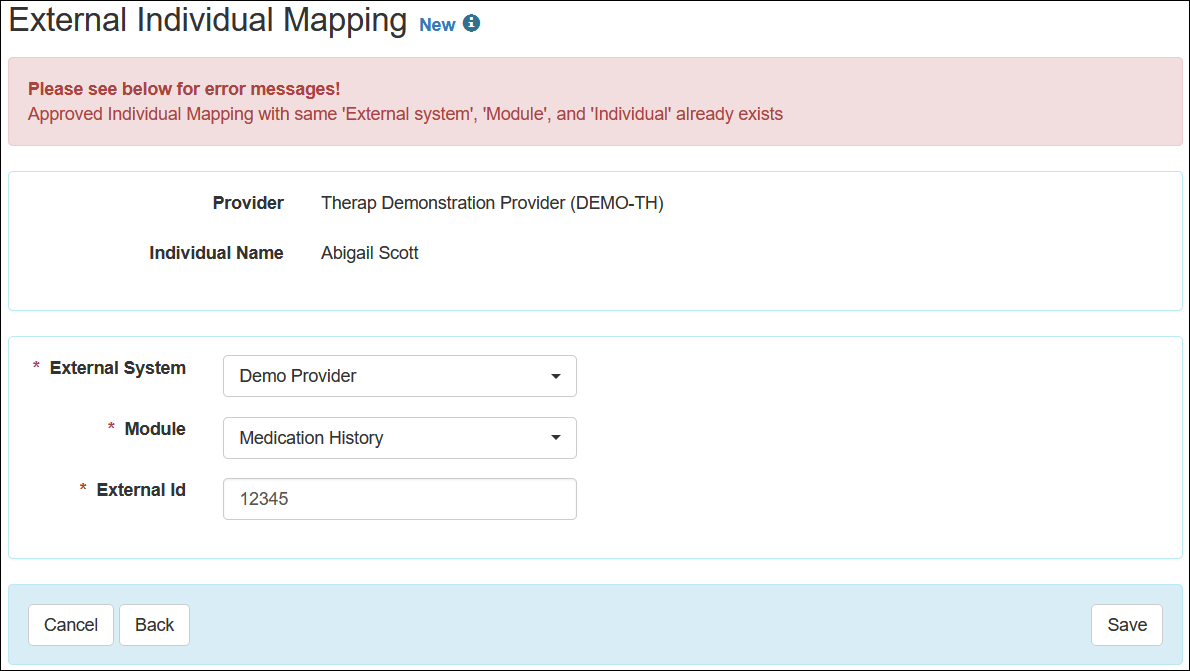
Users will receive an error message if they attempt to create an Approved Individual Mapping with the same External system, Module, and Individual.
- Users can search for the Approved and Discontinued External Individual Mapping using the Search link.
- Users can import External Individual Mapping from an Excel file using the Import from Excel link.
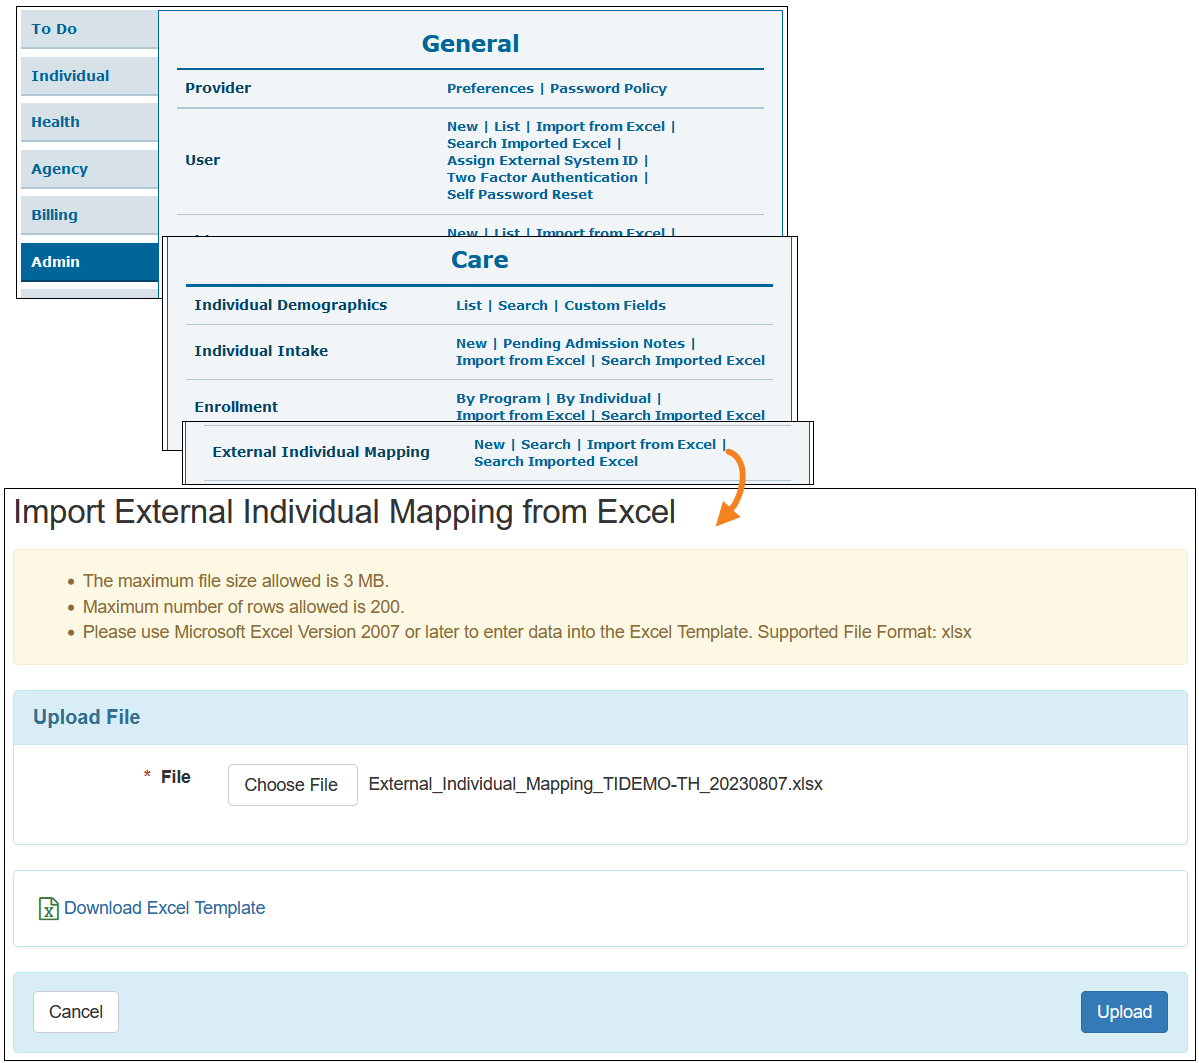
A success message will appear after successfully importing the External Individual Mapping information.
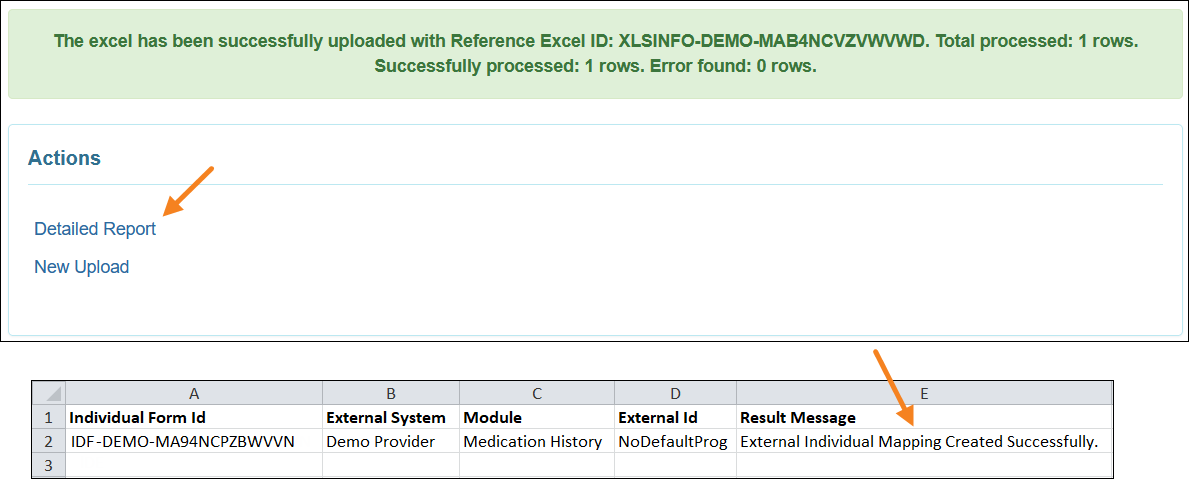
If an import fails, the reason can be viewed in the Result Message column of the Detailed Report Excel file.
- The imported Excel file can be searched using the Search Imported Excel link.
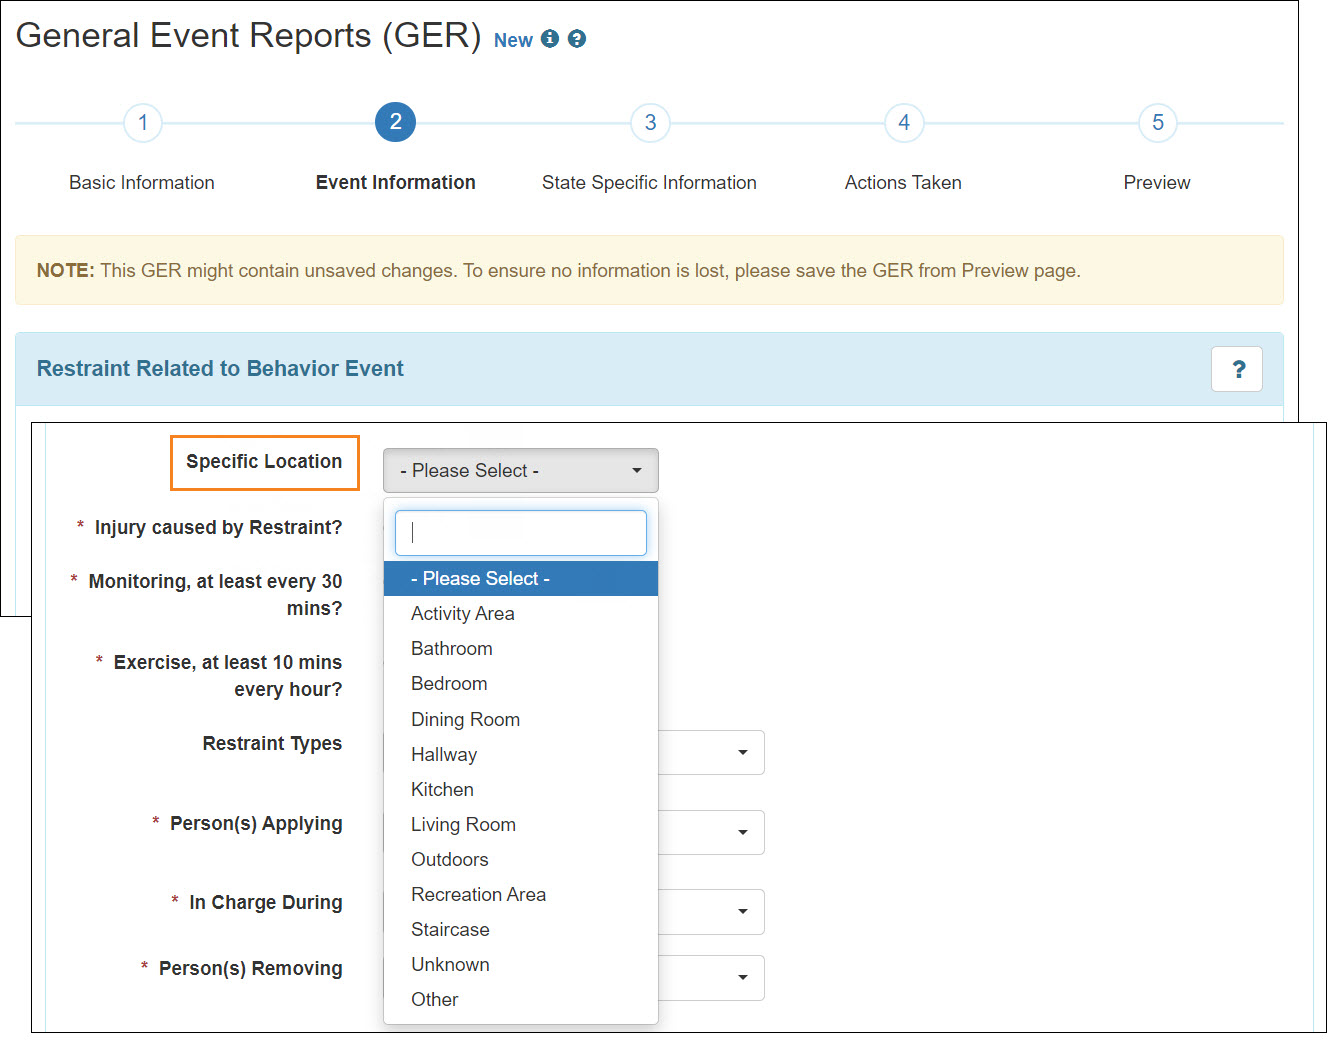
General Event Reports (GER)
[Back to Top]- A new dropdown field titled Specific Location has been added to the Restraint Related to Behavior Event type GERs.
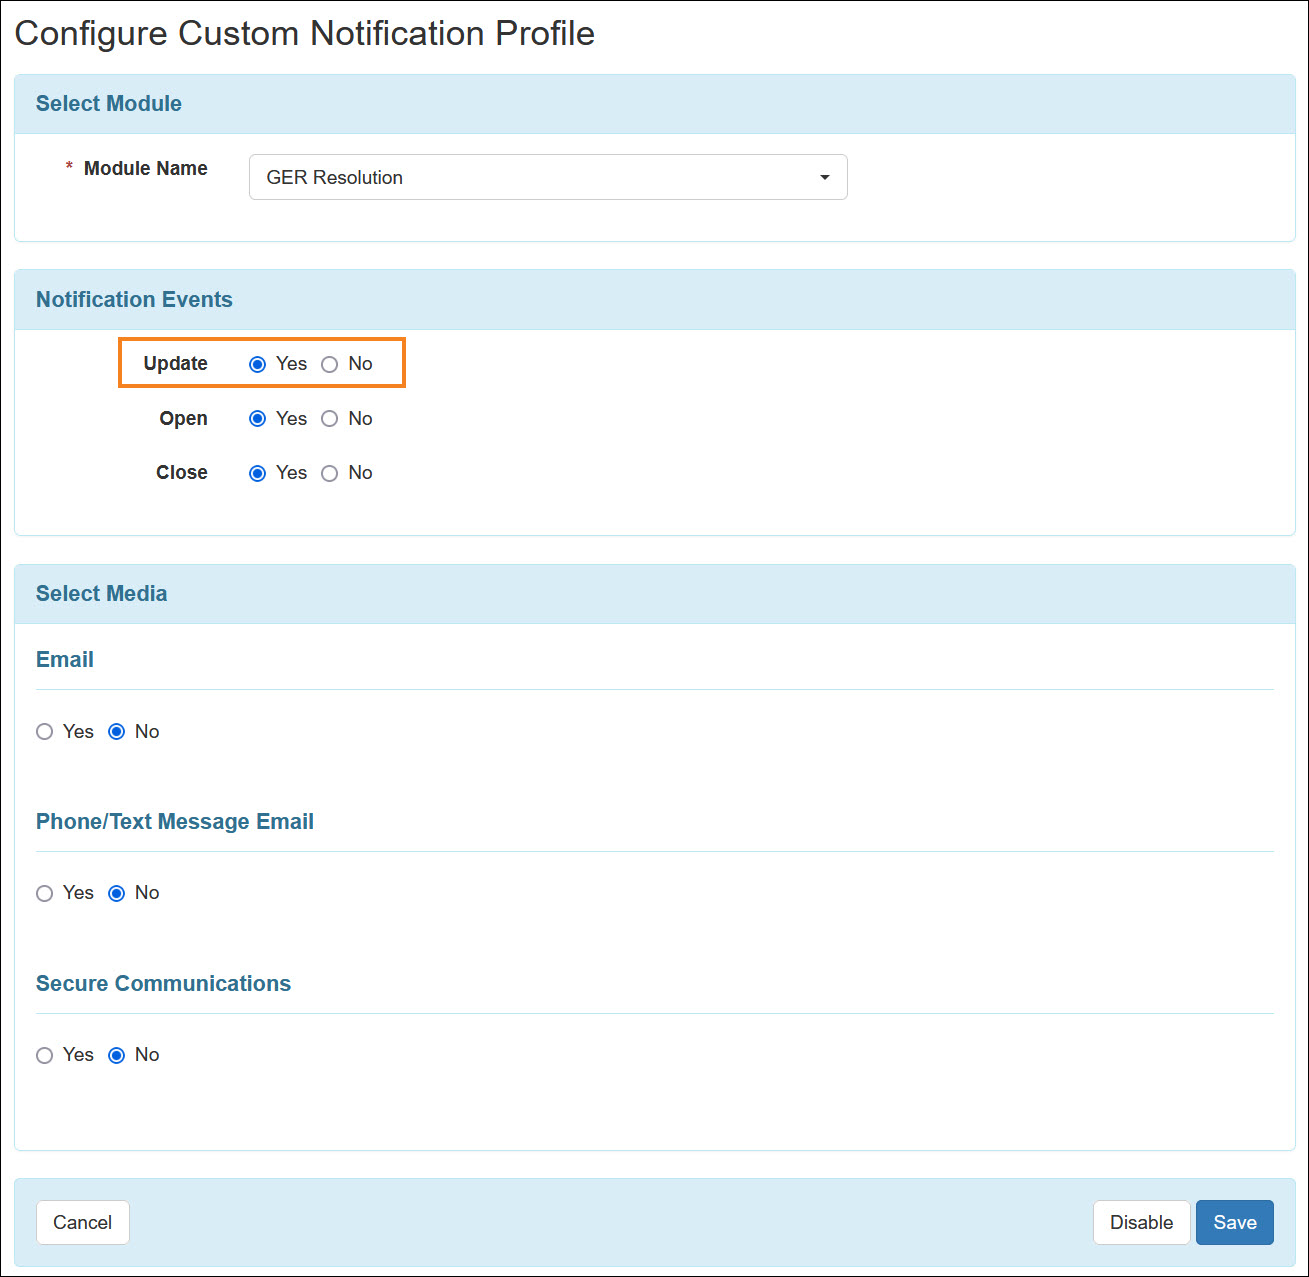
GER Resolution
[Back to Top]- A new Notification Event Update, has been added to the of the custom Notification Profile for the GER Resolution module. Using this option, users will be able to receive notifications once a GER Resolution has been updated.
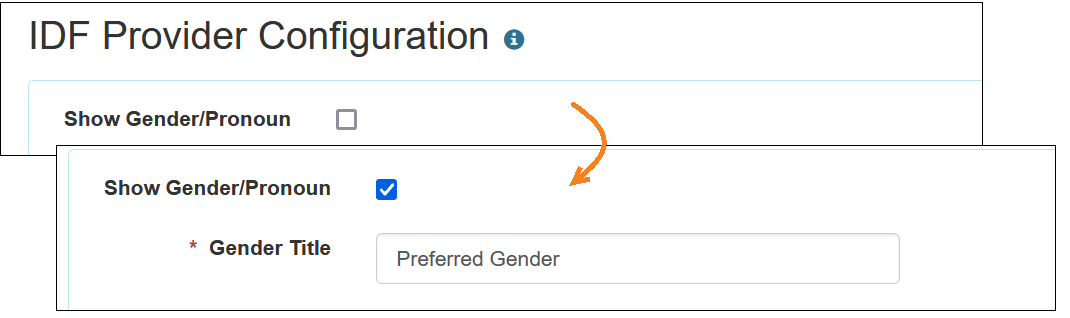
Individual Demographic Form (IDF)
[Back to Top]- A new Show Gender/Pronoun checkbox has been added on the ‘IDF Provider Configuration’ page. Selecting the checkbox will display a Gender Title field below the checkbox.
- When the Show Gender/Pronoun option has been enabled in the IDF Provider Configuration page, a Regular Provider user assigned with Provider Setup administrative role will be able to access the Gender Configuration and the Pronoun Configuration options from their Admin tab.
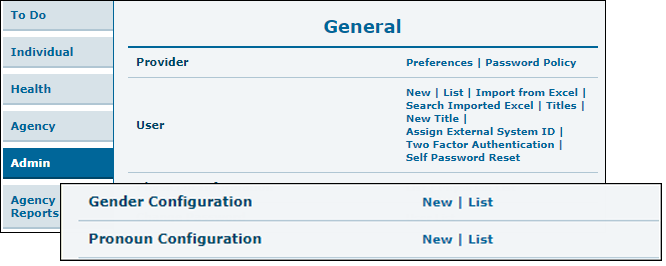
An Oversight Provider user will be able to access the Gender Configuration and the Pronoun Configuration options from the Oversight Dashboard.
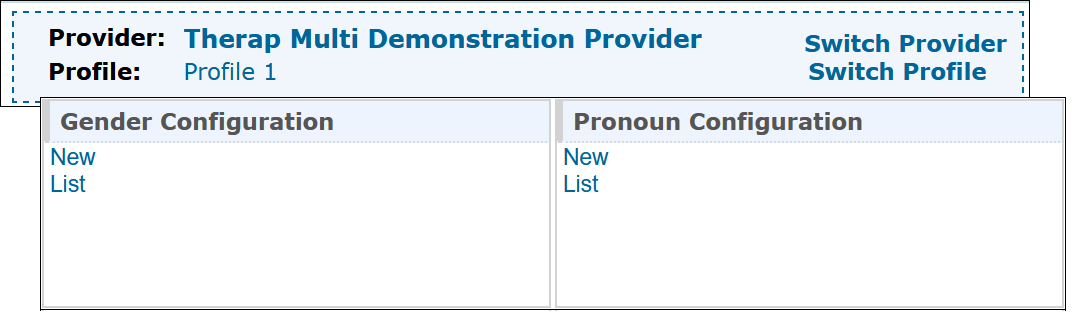
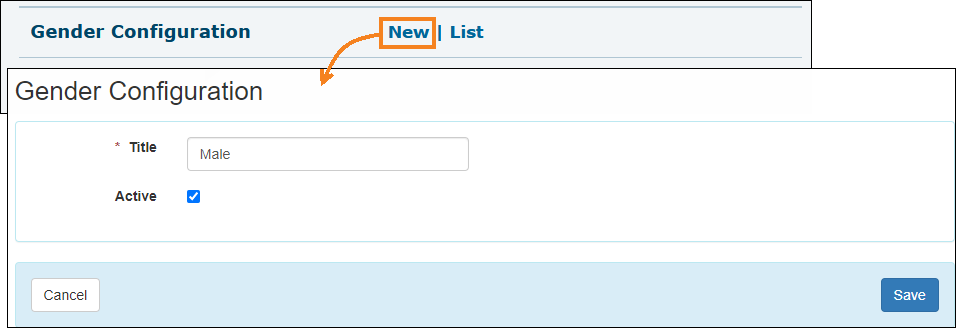
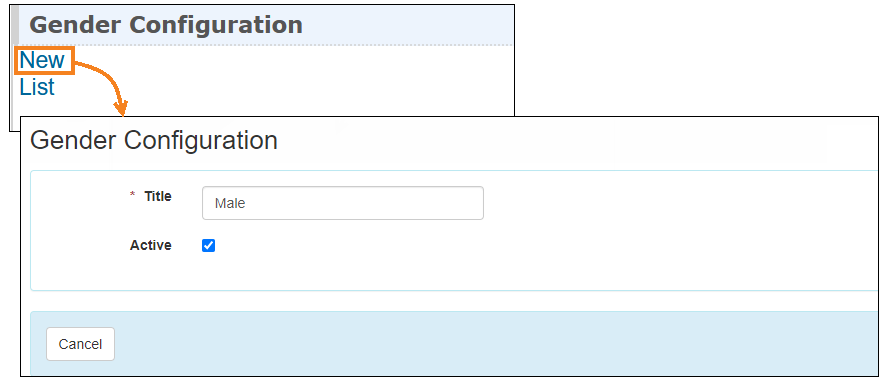
- Clicking on the New link beside the Gender Configuration option will allow the users to create a new Gender option. The Title for the Gender can be entered here, and selecting the Active checkbox will allow the user to save the Gender Configuration in Active status.
Oversight users will find the New link in the Gender Configuration section of the Oversight Dashboard.
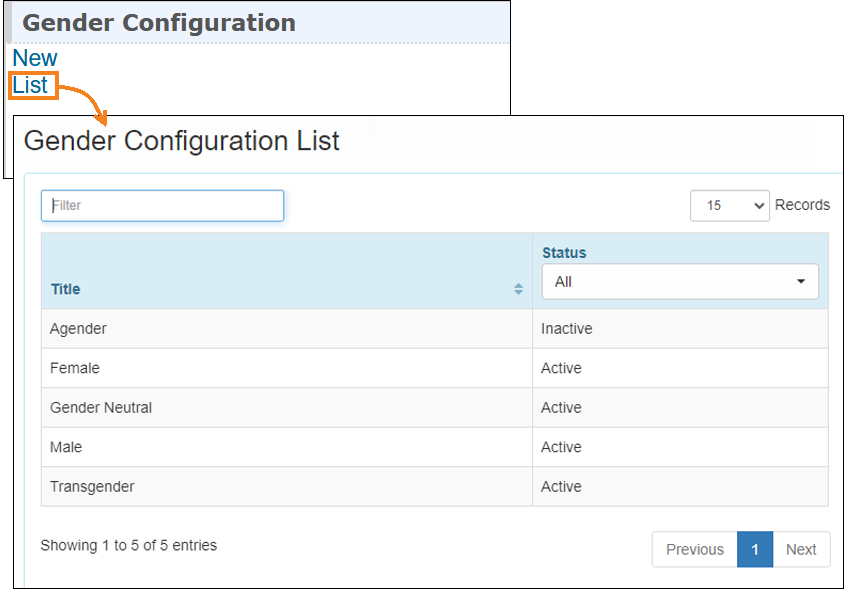
- Clicking on the List link beside the Gender Configuration option will display the ‘Gender Configuration List’ page showing the list of Active and Inactive Genders.
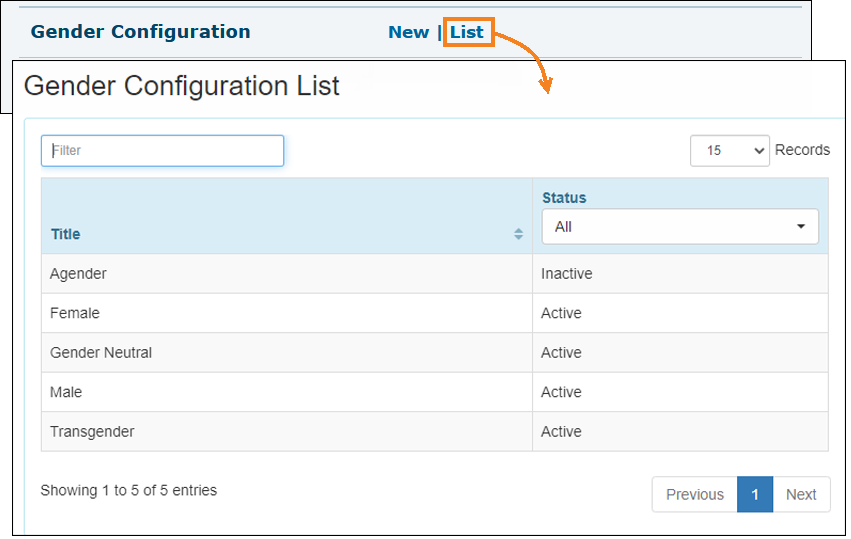
Oversight users will find the List link in the Gender Configuration section of the Oversight Dashboard.
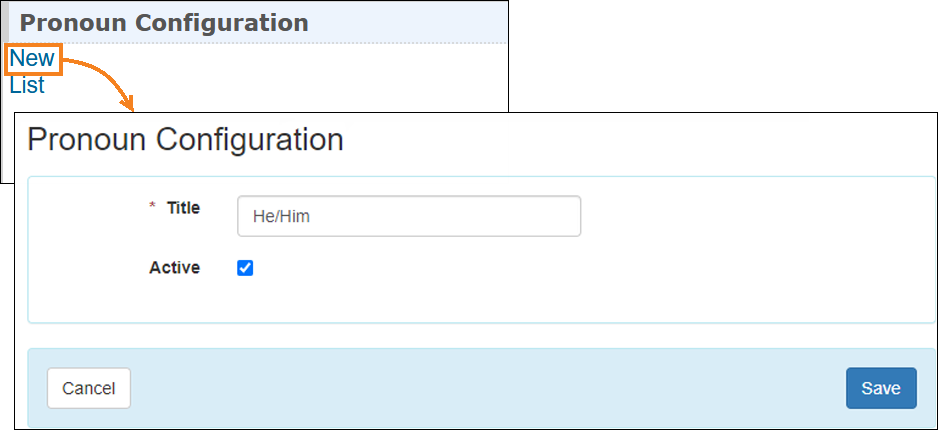
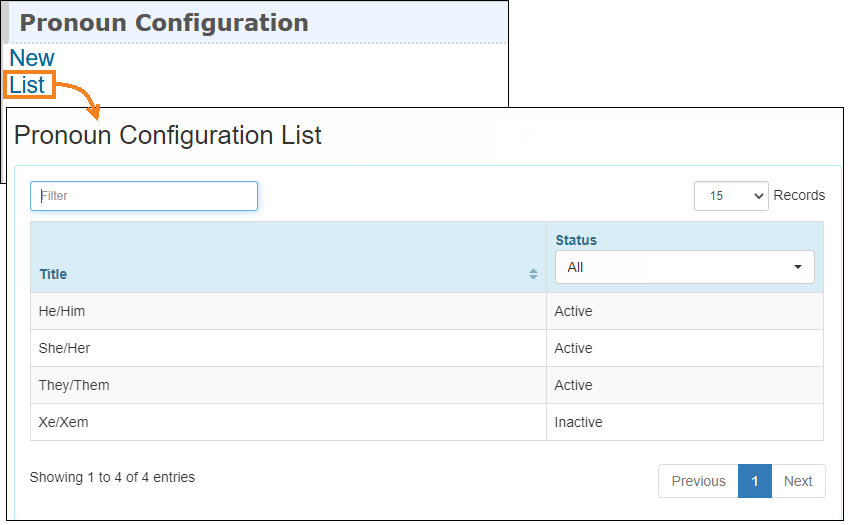
- Clicking on the New link beside the Pronoun Configuration option on the Admin tab will allow the users to create a new Pronoun option. The Title for the Pronoun can be entered here, and selecting the Active checkbox will allow the user to save the Pronoun Configuration in Active status.
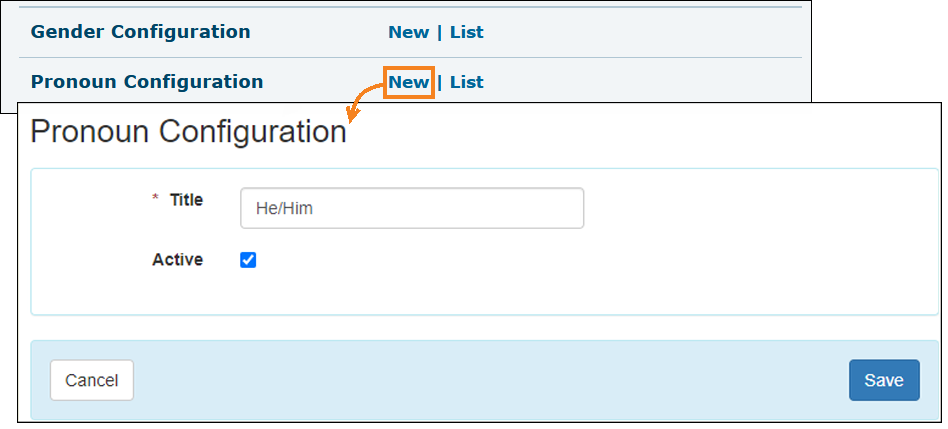
Oversight users will find the New link in the Pronoun Configuration section of the Oversight Dashboard.
- Clicking on the List link beside the Pronoun Configuration option will display the ‘Provider Configuration List’ page showing the list of Active and Inactive Pronouns.
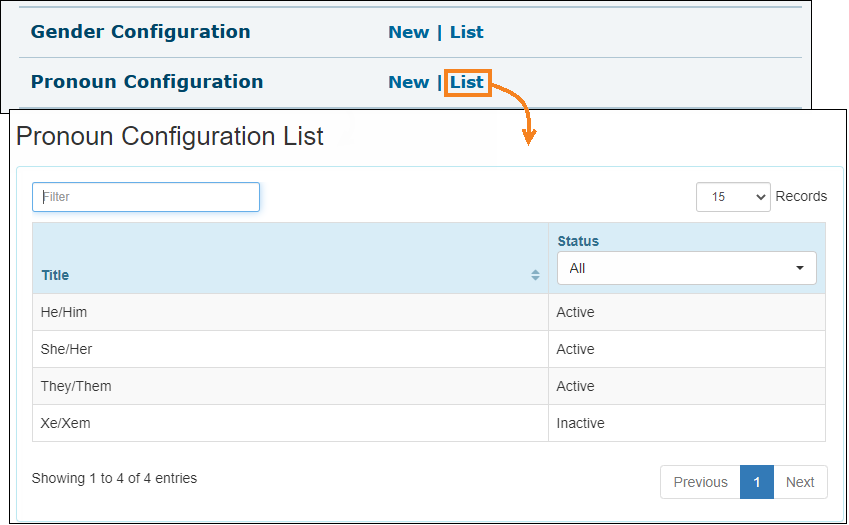
Oversight users will find the List link in the Pronoun Configuration’ section of the Oversight Dashboard.
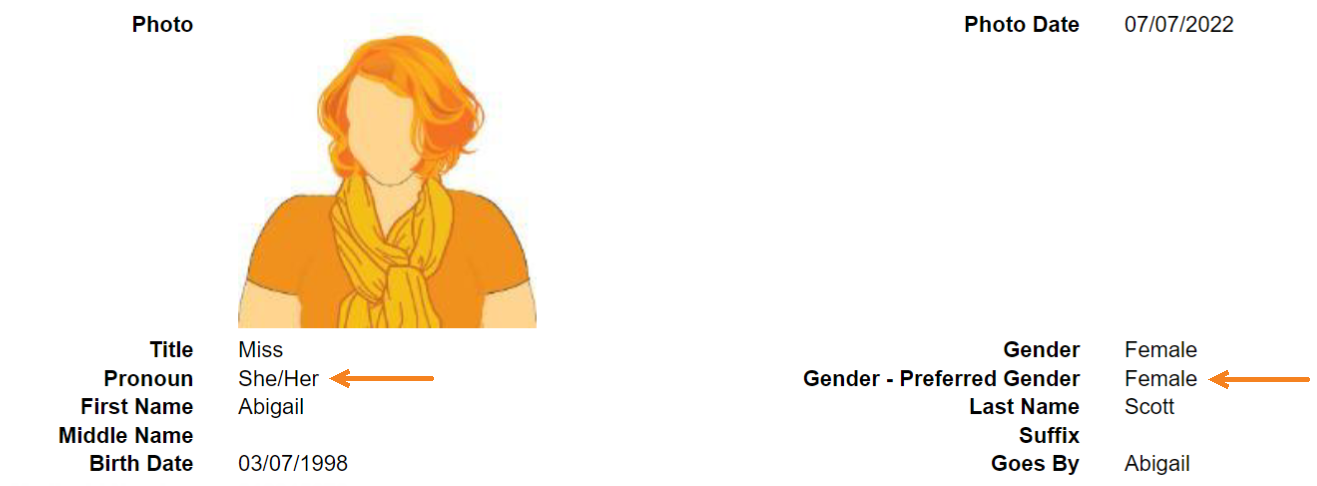
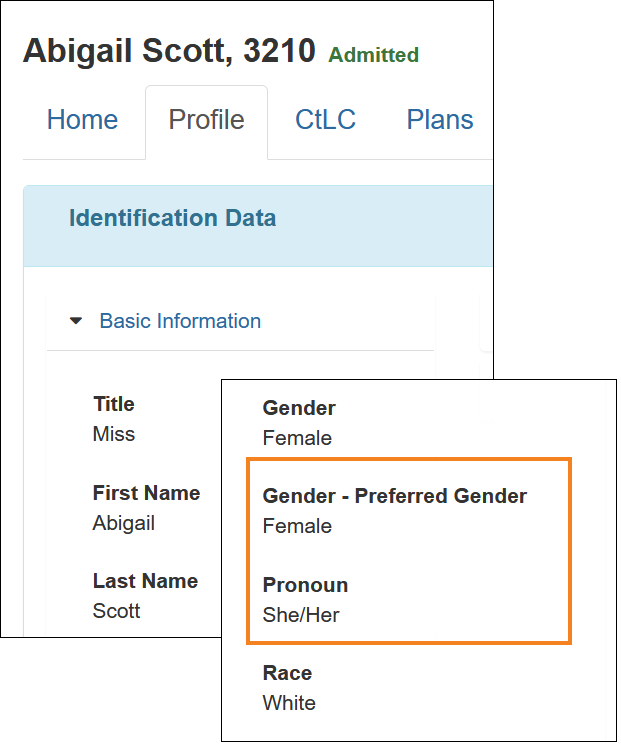
- Once the Gender Configuration and Pronoun Configuration lists are saved, the active Genders and Pronouns will appear in the new Pronoun and Gender (configured in IDF Provider Configuration) dropdown fields on the Individual Demographic Form (IDF), respectively.
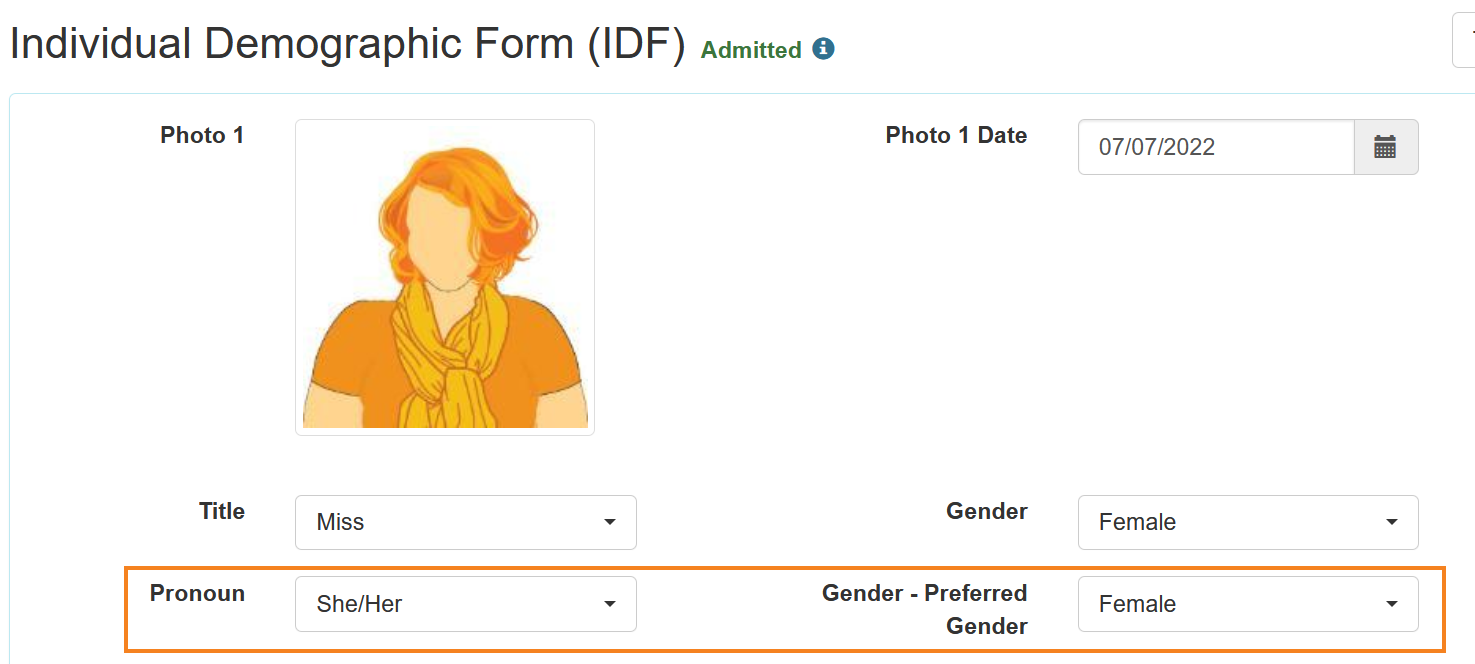
- The new Pronoun and the Gender information on the IDF are displayed on the following location:
- IDF PDF exports
- Profile tab of the Individual Home Page
- IDF PDF exports
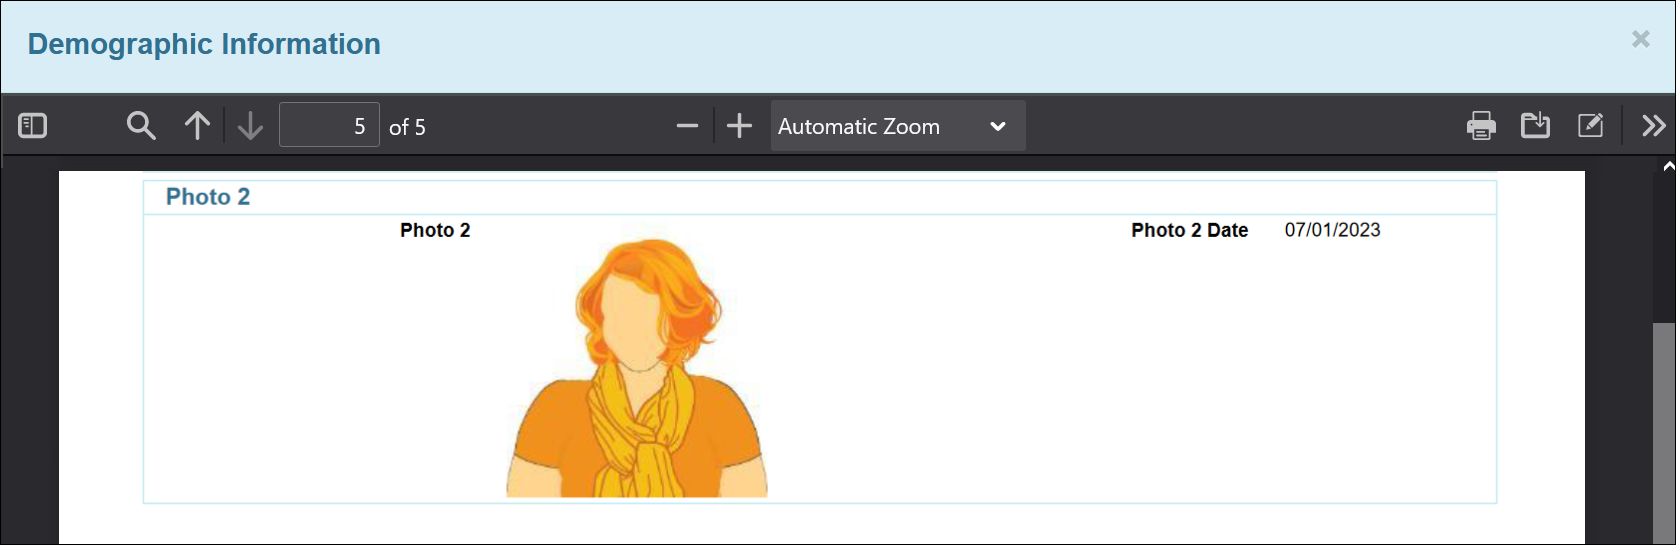
- A new Photo 2 option has been added as a PDF Item on the ‘IDF Provider Configuration’ page.
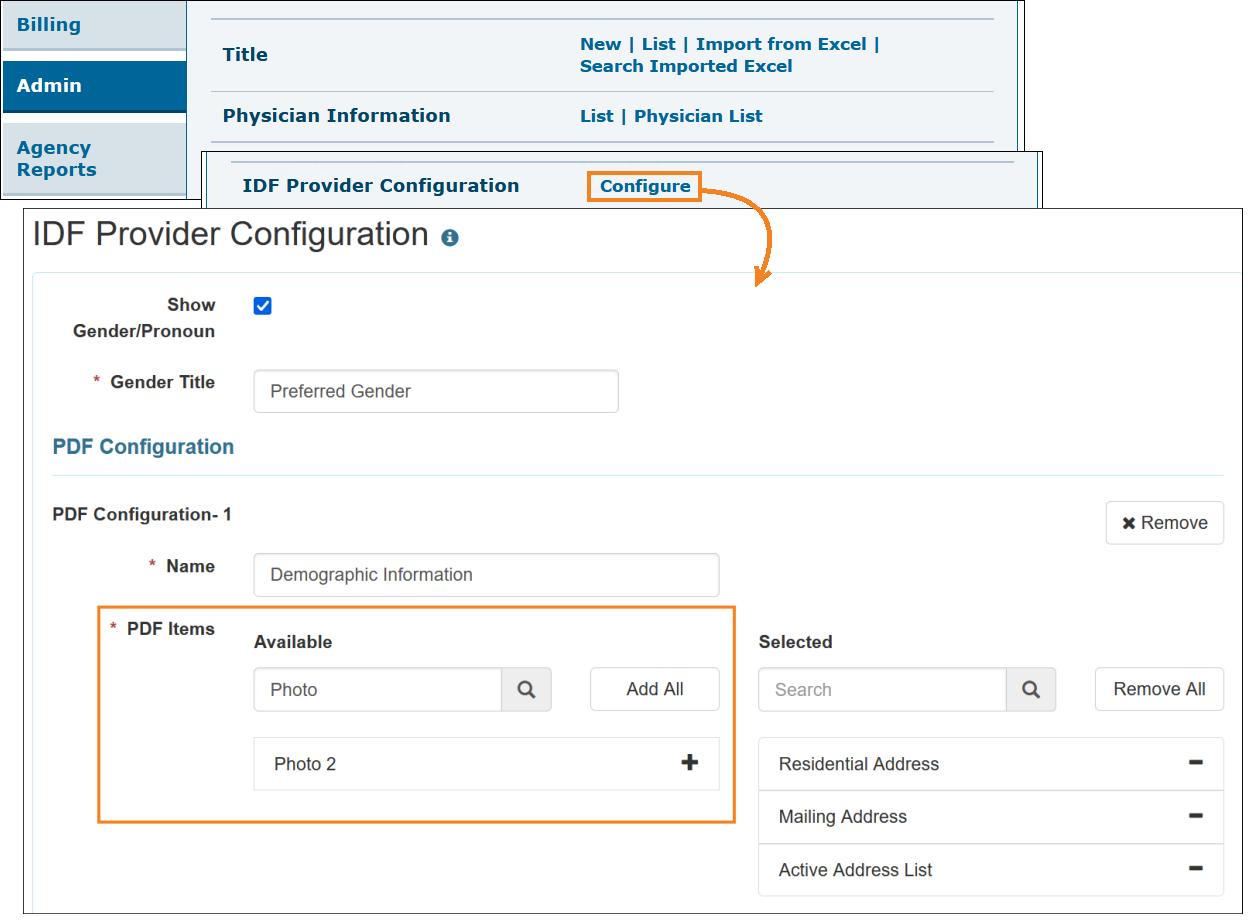
Adding the Photo 2 item to a PDF Configuration will add a new ‘Photo 2’ section to the PDF export for that configuration. Photo 2 and Photo 2 Date information from the IDF ‘Individual Details’ form will populate in this section.
Individual Home Page
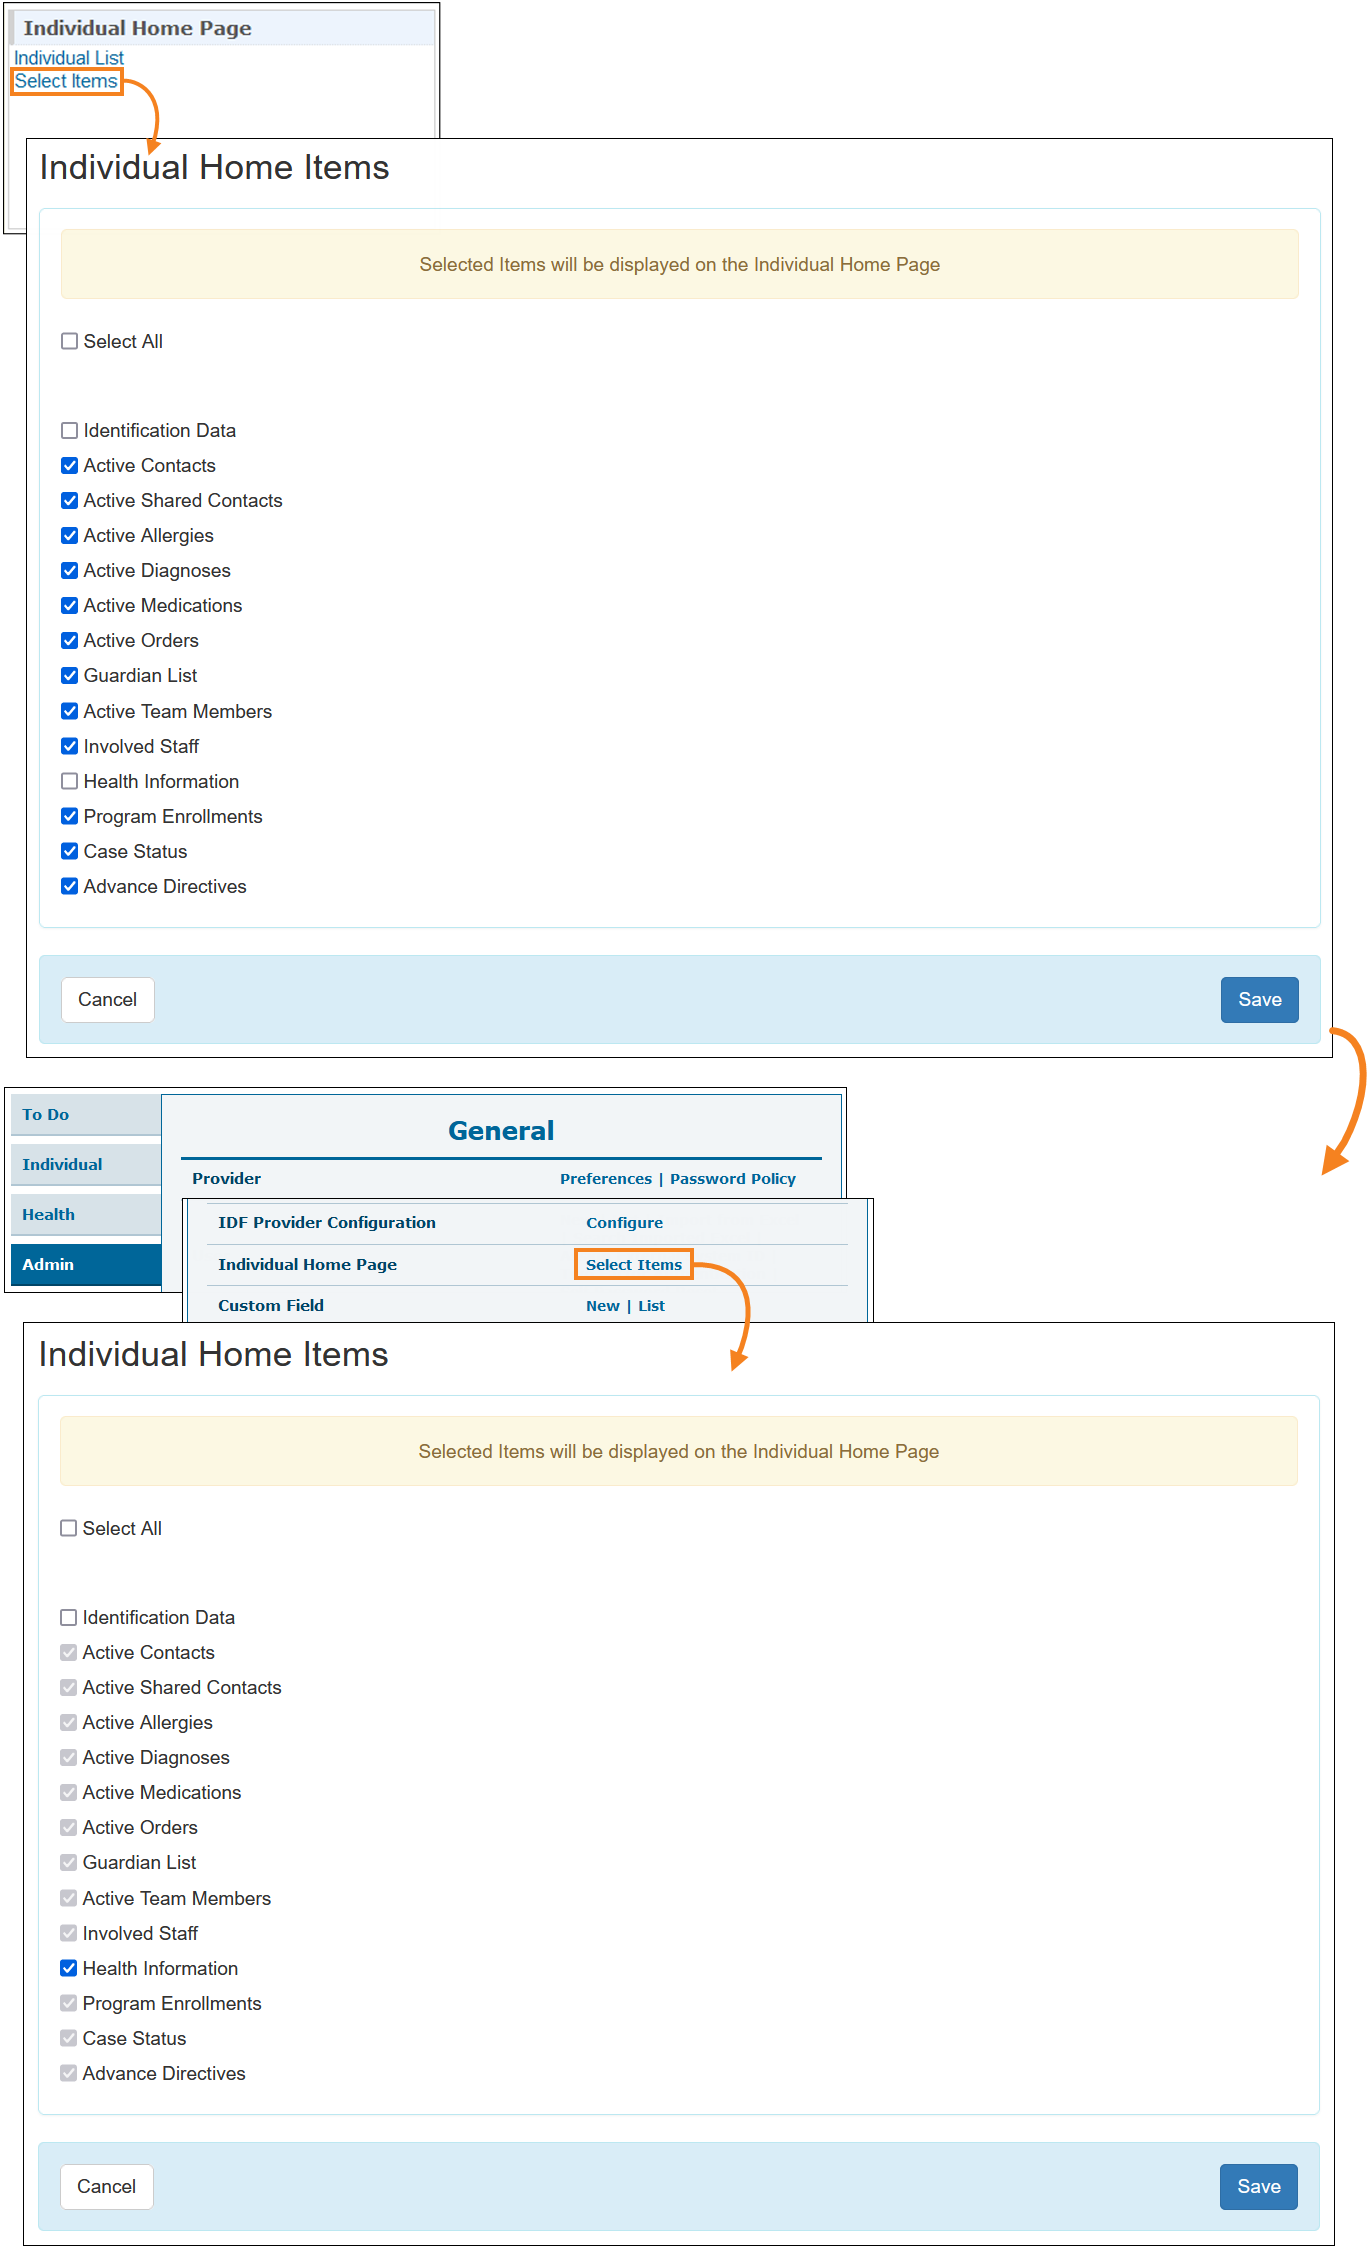
[Back to Top]- The Individual Home Items selected by the Oversight Providers, will be pre-selected for the Individual Home Items of its Linked Providers, and the selected items cannot be deselected from the Linked Provider accounts. If a Linked Provider has multiple Oversight Providers, then the combination of Individual Home Items selected in their associated Oversight Providers will be applicable for them. However, users will be able to select or deselect rest of the items that were not selected by any of their associated Oversight Providers.
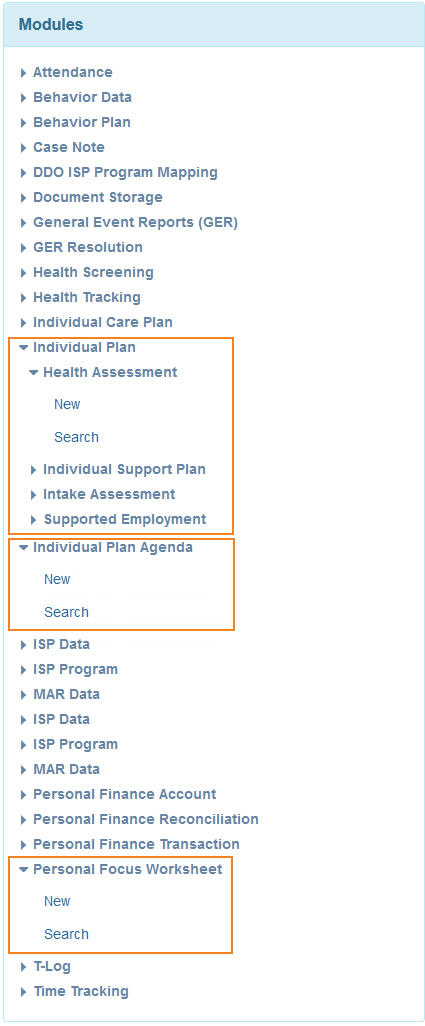
- The following new forms have been added in the 'Modules' section of the Home tab of the Individual Home Page:
- Individual Plan
- Individual Plan Agenda
- Personal Focus Worksheet
Individual Plan Agenda, Personal Focus Worksheet, and each template of Individual Plan can be expanded to show New and Search links. The agencies will need to have the modules enabled and users will need to be assigned with the appropriate module roles to access the links. The Individual Plan option will not be available if the agency does not have any Approved Plan Template.
- The following Approved forms will no longer show up in the 'Plans' section on the Plans tab of the Individual Home Page if the End Date has passed:
- Behavior Plan
- Individual Care Plan
- Individual Plan Agenda
- Personal Focus Worksheet
- Staff Action Plan
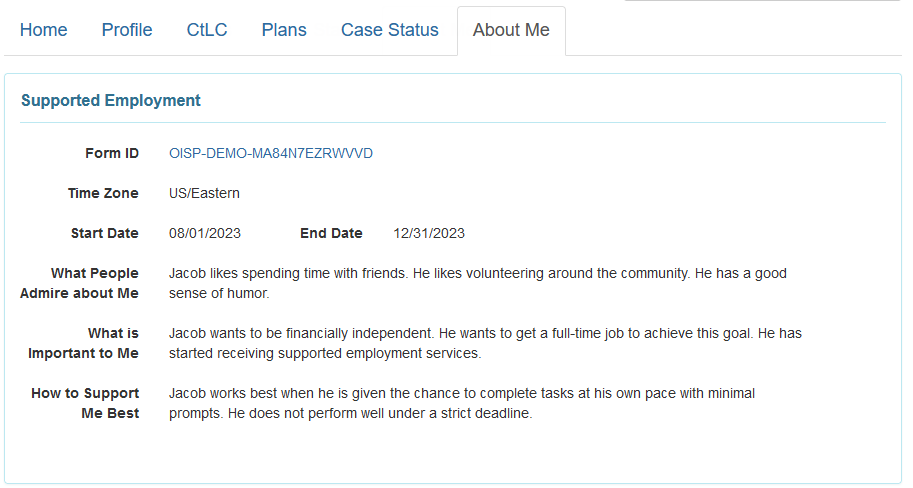
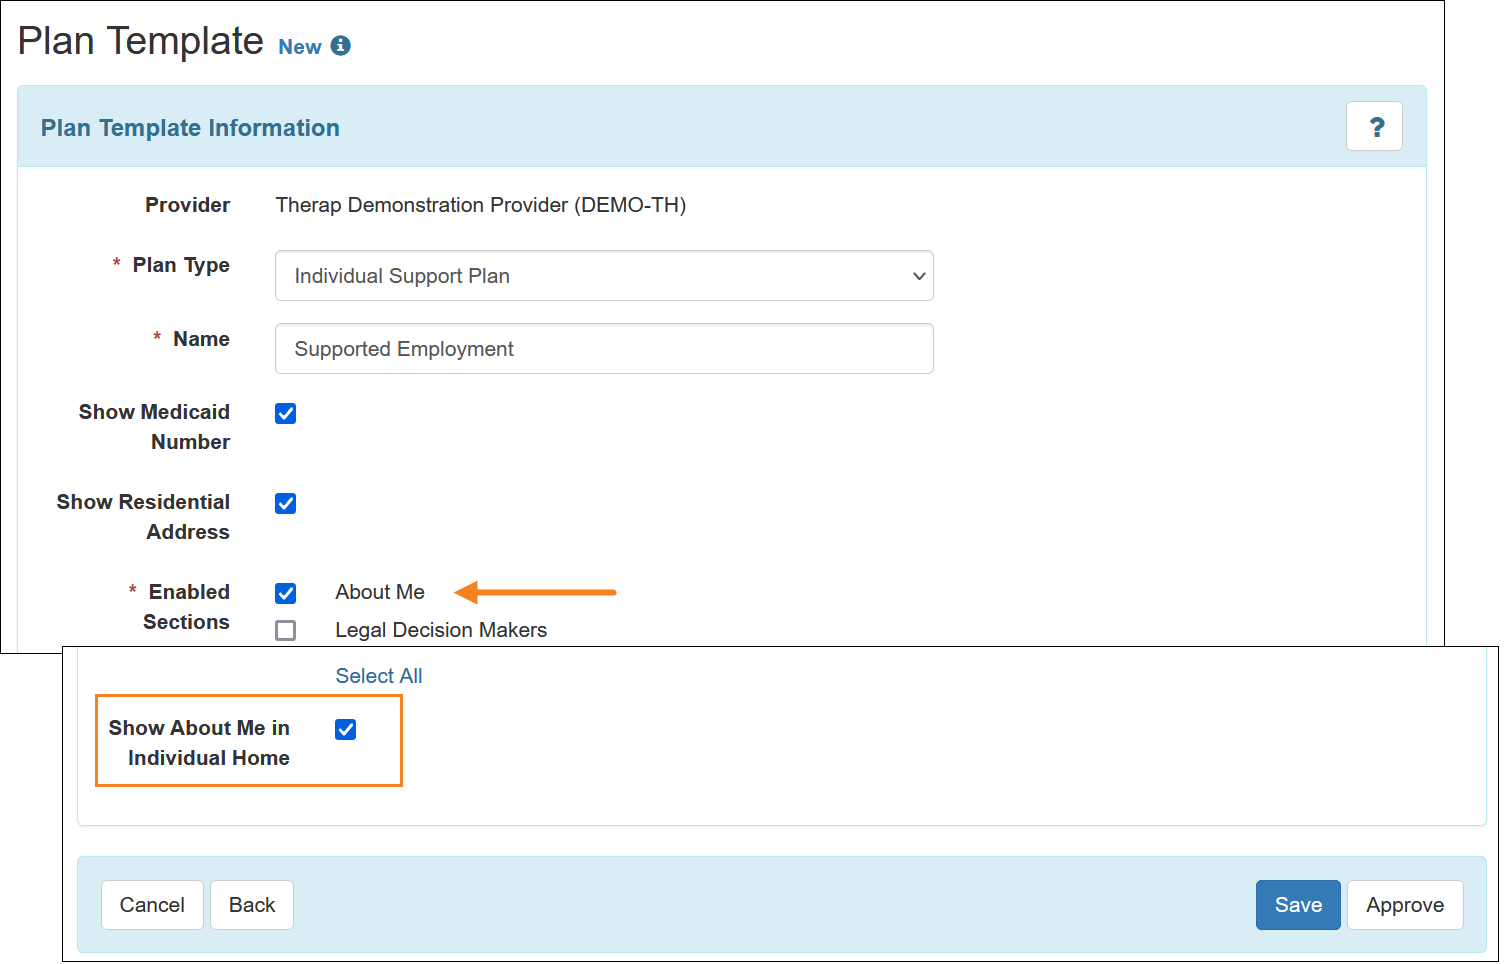
- A new tab, About Me, has been added on the Individual Home Page. This tab will show information from the 'About Me' section of Individual Plans if the following requirements are met:
- The Plan Template has Show About Me in Individual Home checkbox selected.
- The Individual Plan is in Approved status.
- The current date is within the Start Date and the End Date of the Individual Plan.
- Information has been entered in at least one field in the 'About Me' section of the Individual Plan.
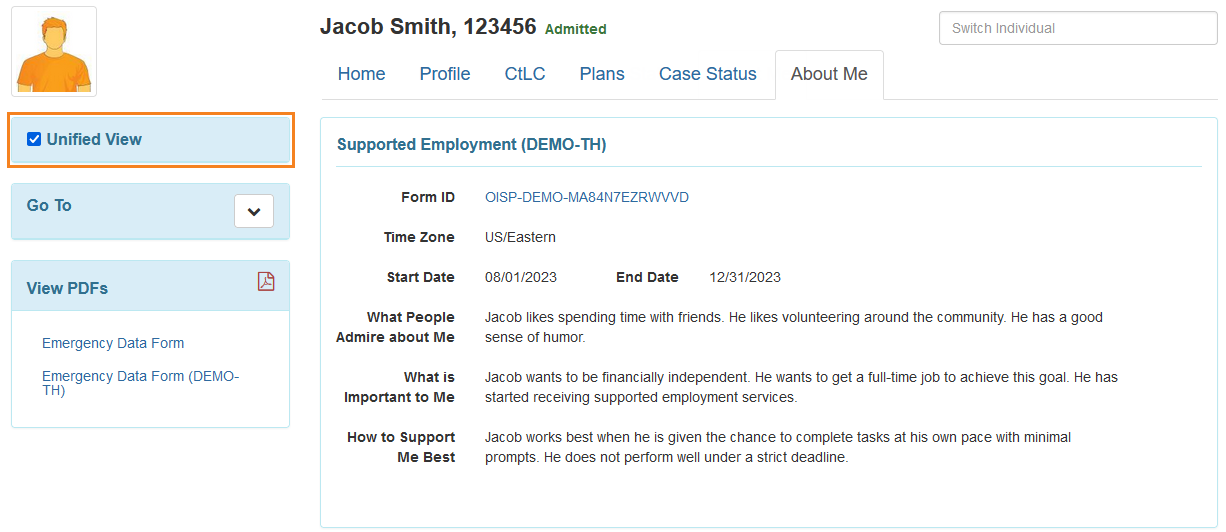
- Oversight and linked provider users will find a Unified View checkbox on the About Me tab for admitted individuals. This checkbox will not be available if users access the Individual Home Page by switching to a linked provider. If the checkbox is selected, then users will view the information from the Individual Plans created in other linked providers of the individual, if the Disable Individual Plan Form Sharing with Linked Providers checkbox has not been selected in the associated Plan Templates.
- The Activity Tracking search results will show the 'View' actions taken in the About Me tab.

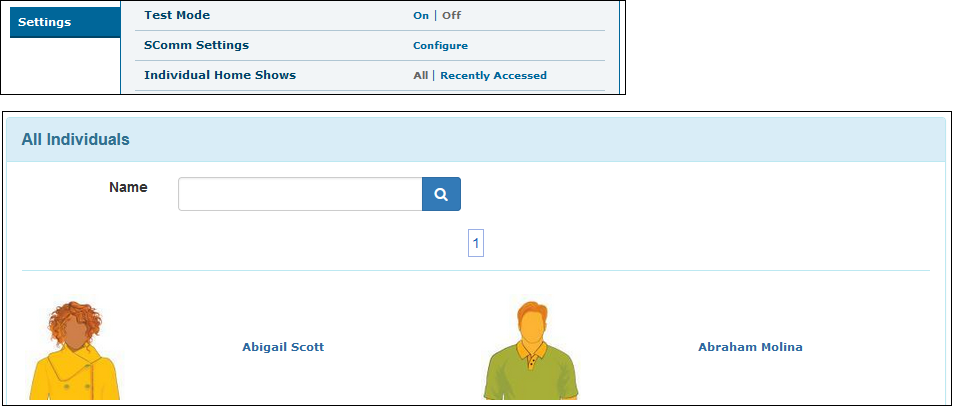
- If the All option is selected for the Individual Home Shows option in the Settings tab, then Case Manager type users will now be able to see all individuals in the Individual Home Page after switching to the Oversight Provider. Previously, they could only see the Recently Accessed Individuals.
Individual Plan
[Back to Top]- A new checkbox Show About Me in Individual Home will be available on the Plan Templates after selecting About Me from the Enabled Sections list. Selecting this checkbox will show information from the 'About Me' section of the associated Active Approved Individual Plans on the About Me tab of the Individual Home Page. In the Approved Plan Templates created before this release where About Me was selected in the Enabled Sections list, the Show About Me in Individual Home checkbox will be automatically selected.
ISP Data
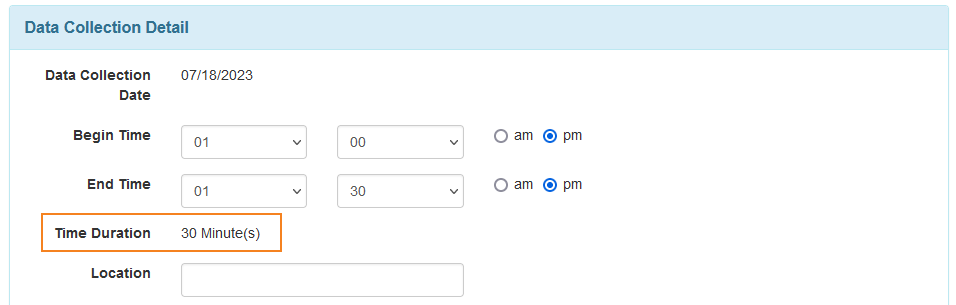
[Back to Top]- A new field, Time Duration, will be available on ISP Data Collection forms to show the time duration in minutes, if the Time Duration Format field is selected as Begin Time and End Time in corresponding ISP Programs. This new field cannot be edited by users and the value will be adjusted automatically after selecting or updating the Begin Time and the End Time on the ISP Data Collection forms. This field will be available in all ISP Data submitted before this release, generated PDFs, and archived forms.
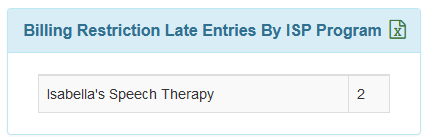
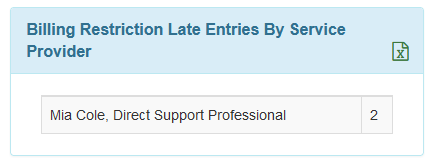
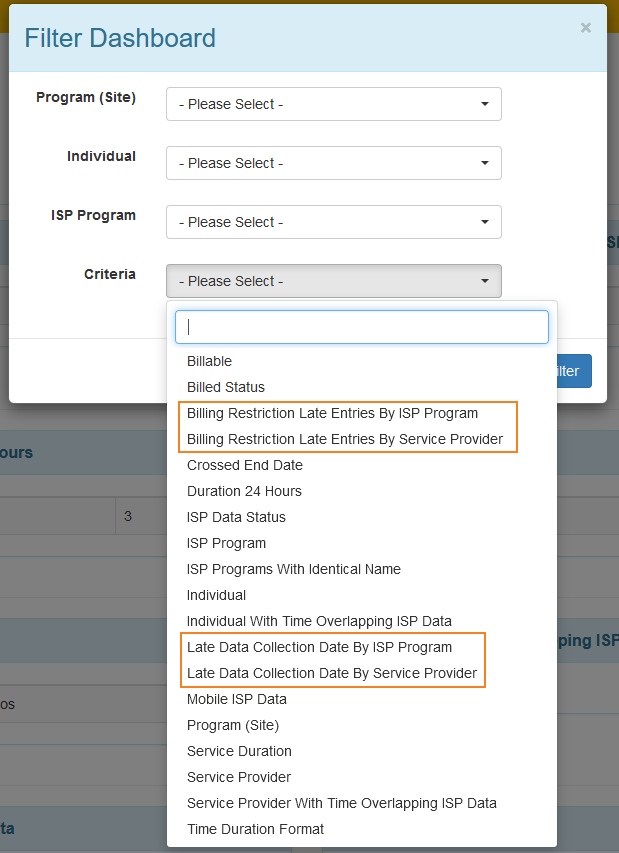
- The following sections have been added on the ISP Data Dashboard:
- Billing Restriction Late Entries By ISP Program: This section will list the count of the ISP Data which have been submitted after the billing restriction days limit has passed and the ISP Programs for which these ISP Data were submitted.
- Billing Restriction Late Entries By Service Provider: This section will list the count of the ISP Data which have been submitted after the billing restriction days limit has passed along with the name and title of the Service Provider who submitted these ISP Data.
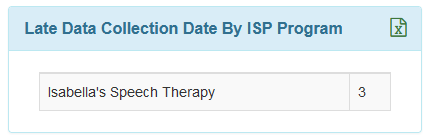
- Late Data Collection Date By ISP Program: This section will list the count of the ISP Data which have been submitted after the Data Collection Date and the name and the ISP Programs for which these ISP Data were submitted.
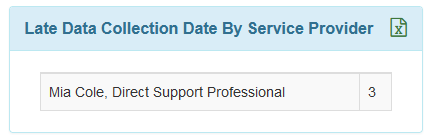
- Late Data Collection Date By Service Provider: This section will list the count of the ISP Data which have been submitted after the Data Collection Date along with the name and title of the Service Provider who submitted these ISP Data.
- Billing Restriction Late Entries By ISP Program: This section will list the count of the ISP Data which have been submitted after the billing restriction days limit has passed and the ISP Programs for which these ISP Data were submitted.
- The 4 new sections will also be available in the Criteria dropdown list of the 'Filter Dashboard' popup window.
ISP Data & Scheduling
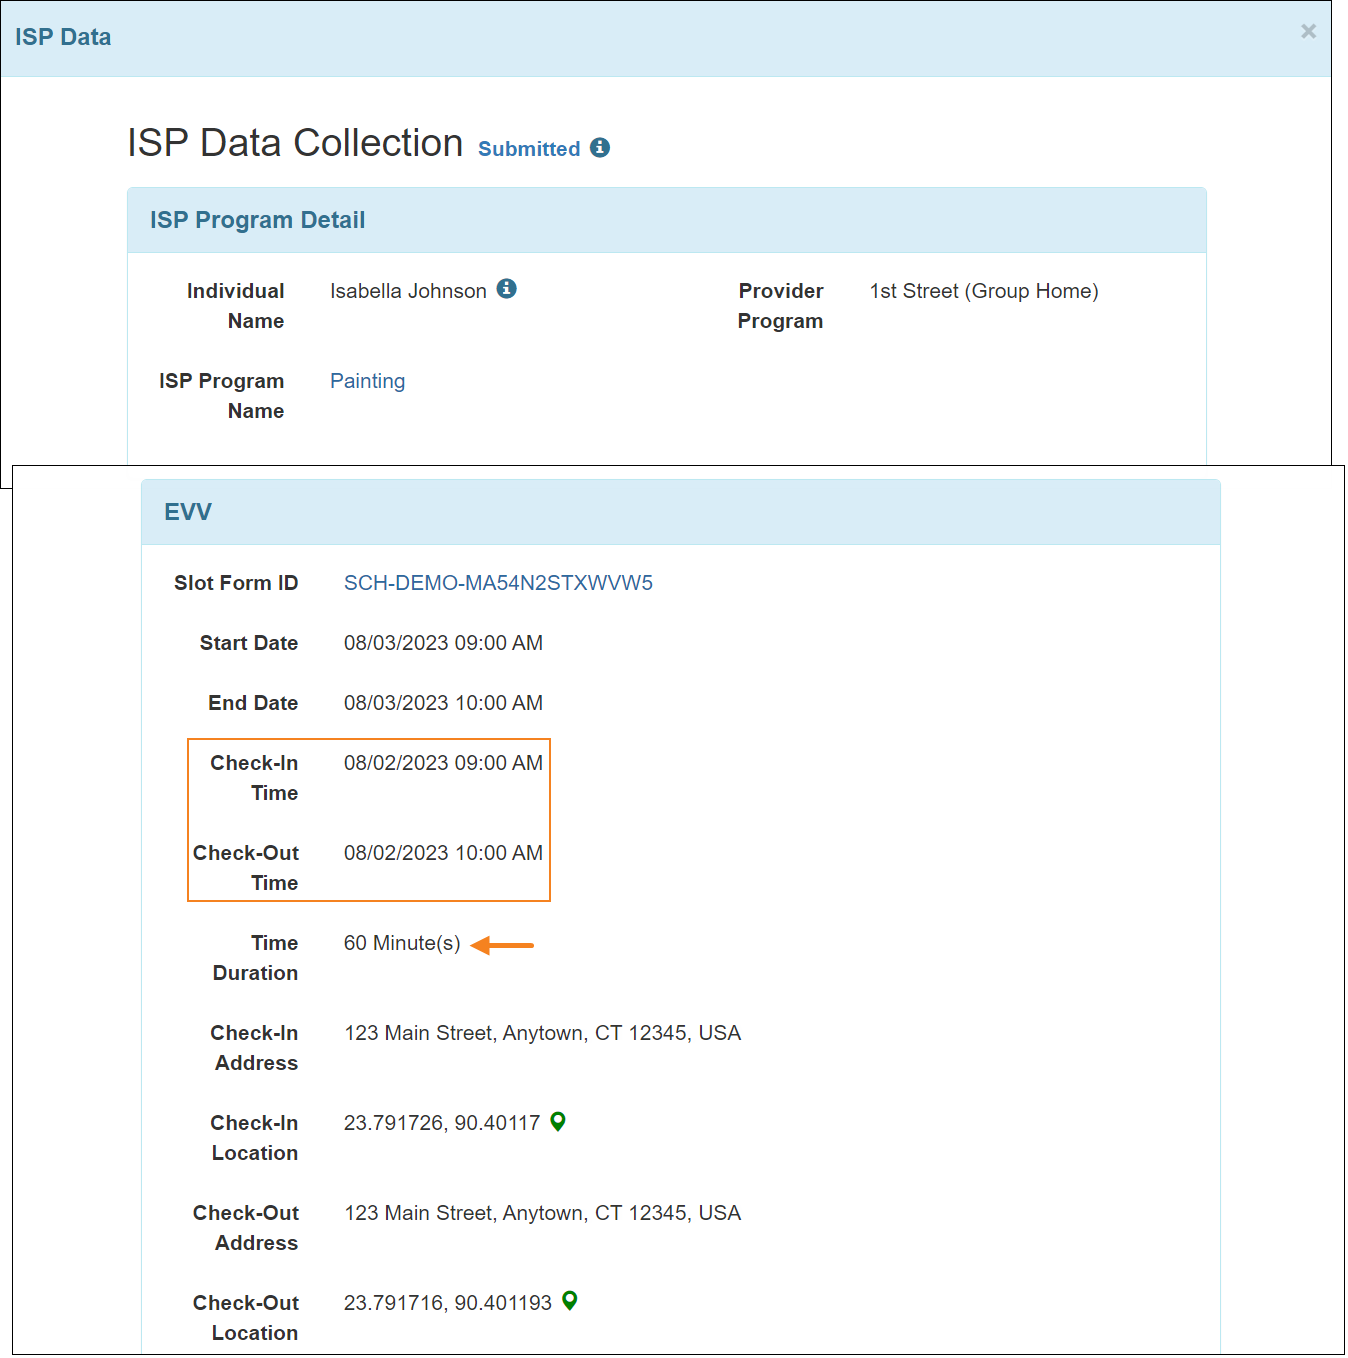
[Back to Top]- A new read-only field titled Time Duration has been added in the ‘EVV’ section of the ‘ISP Data Collection’ form associated with ISP Programs that have been configured to collect ISP Data through a Schedule Slot form. This field will appear on the page if both Check-In and Check-Out have been completed for the associated Schedule Slot and will show the duration between the Check-In and Check-Out times. If the Check-In/Check-Out times of a Schedule Slot are updated manually, then the value in the Time Duration field will be automatically updated. This field will be available in all ISP Data submitted before this release, generated PDFs, and archived forms.
ISP Program & ISP Program Template
[Back to Top]- The maximum number of Tasks that can be added to an ISP Program or an ISP Program Template has been increased to 60. Previously, a maximum of 50 Tasks could be added to these forms.
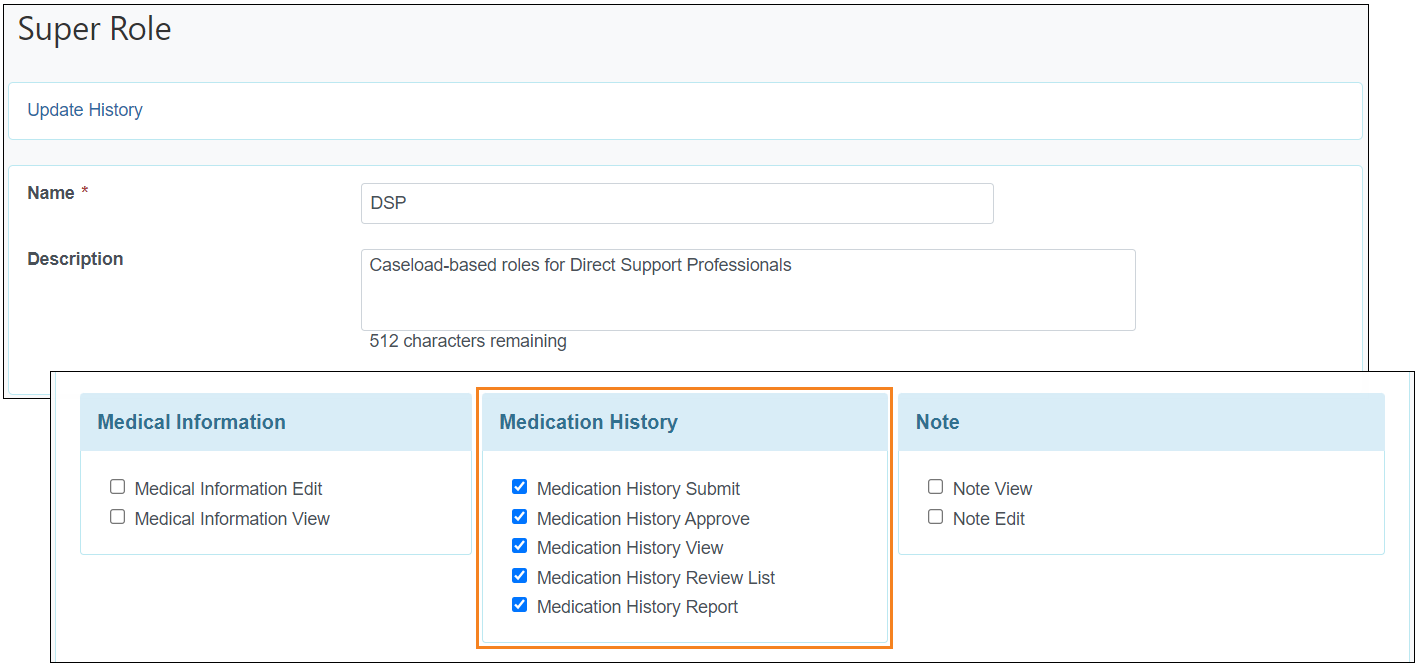
Medication History
[Back to Top]- A new section titled 'Medication History' has been added to the 'Super Role' pages where the following caseload-based roles have been added:
- Medication History Submit
- Medication History Approve
- Medication History View
- Medication History Review List
- Medication History Report
These roles are also available as Shareable Super Roles.
The newly added roles will not be effective for the Medication History module at this moment, and the functionalities of the Health Tracking roles for the Medication History module will remain the same as it previously was. However, in a future release, the Medication History module will no longer be associated with the Health Tracking roles and will only depend on the Medication History caseload-based roles that are added in this release.
Users will be able to perform the following actions once the roles are in effect:
- Medication History Submit: Create and Submit New Medication History forms; Update, Delete, and Submit Draft and Returned Medication History forms; Import Medication History from Excel; Create New Medication Order forms; Generate Active Medications PDF and create New Medication Review forms; Receive counts for Draft and Returned Medication History forms; View Medication History, Medication Order, and Medication Review forms, except for the forms in Deleted status; Receive notifications for approving, returning, and discontinuing Medication History forms.
- Medication History Approve: Approve, Return, and Update Pending Approval Medication History forms; Update, Delete, and Discontinue Approved Medication History forms; Update and Delete Approved Medication Order and Medication Review forms; Receive counts for Pending Approval Medication History forms; View Medication History, Medication Order, and Medication Review forms; Receive notifications for submitting, approving, deleting, and discontinuing Medication History forms.
- Medication History View: View Medication History, Medication Order, and Medication Review forms, except for the forms in Deleted status.
- Medication History Review List: Review Medication History forms; View Medication History, Medication Order, and Medication Review for except for the forms in Deleted status; Receive notifications for reviewing Medication History forms.
- Medication History Report: Generate Report and Custom Report.
- Medication History Submit + Medication History Approve: Discontinue & Copy Approved Medication History forms.
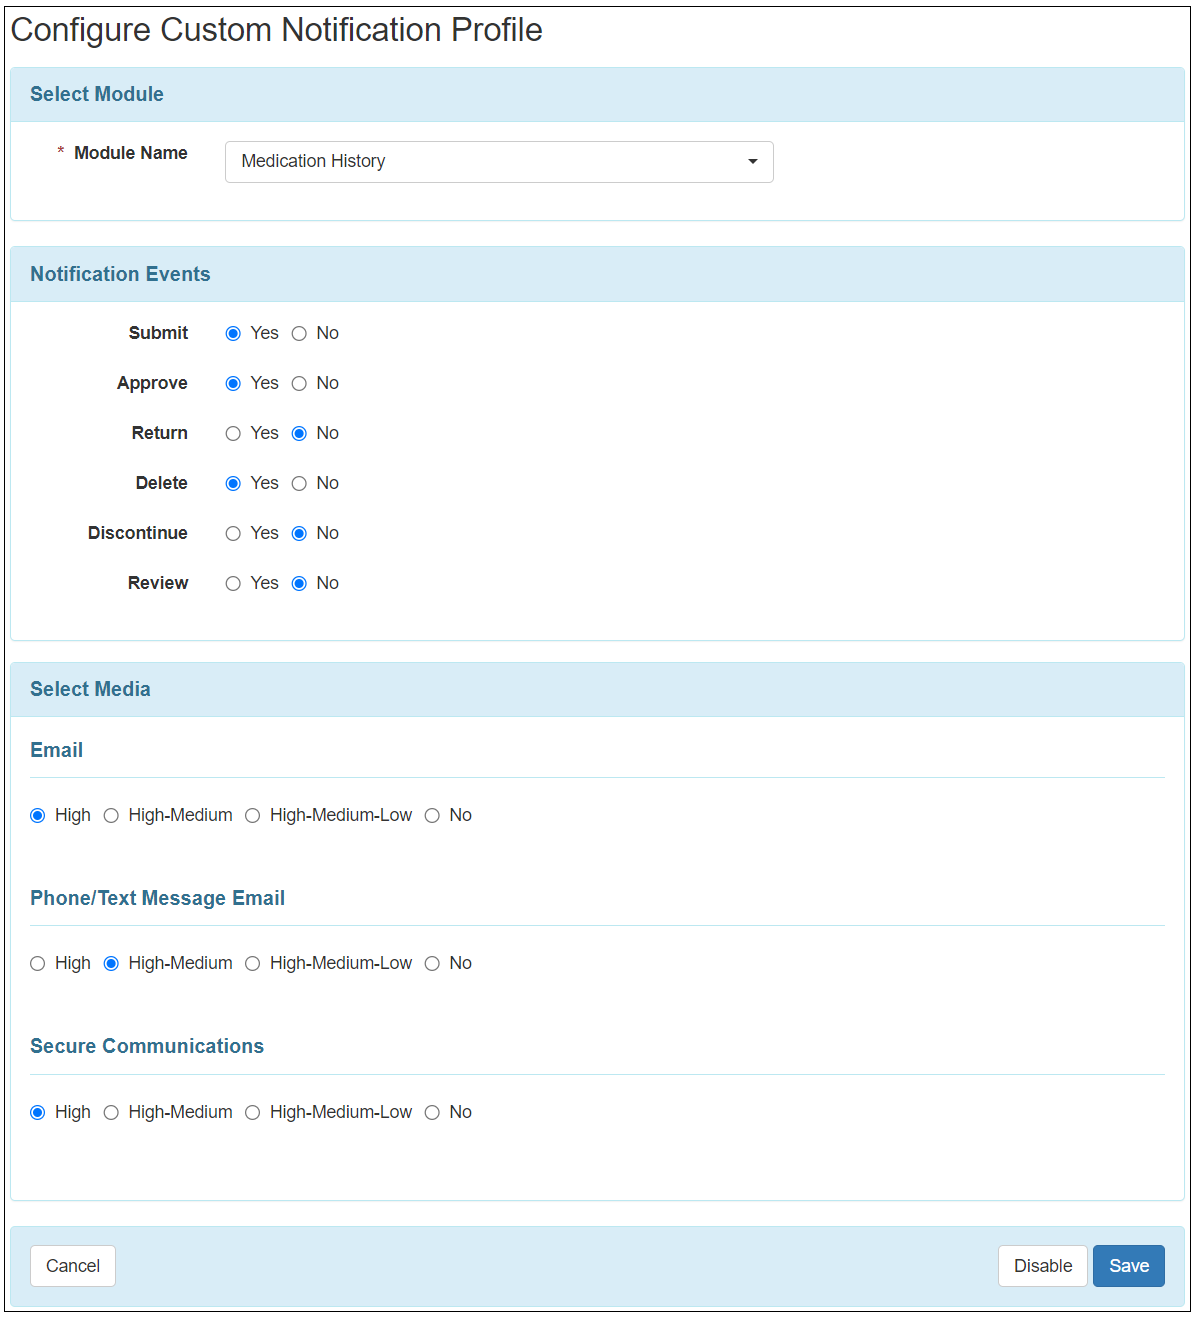
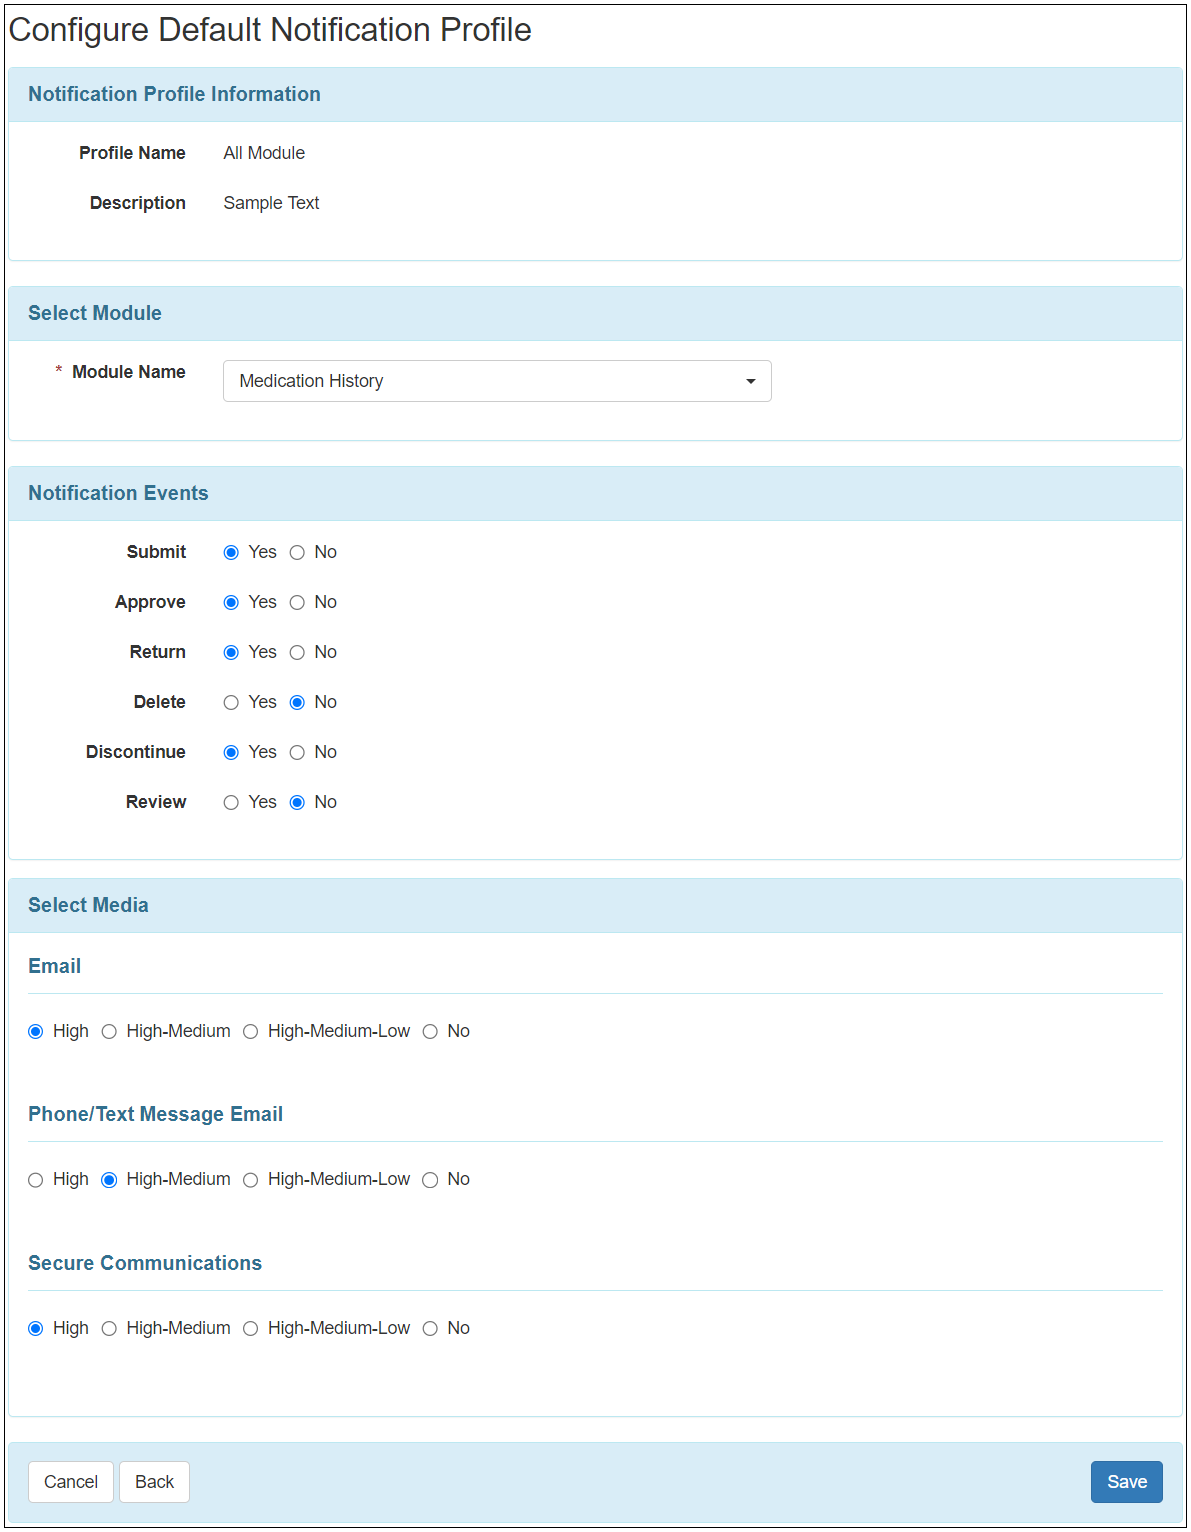
- A new option titled Medication History has been added to the dropdown list of the Module Name field on the ‘Configure Custom Notification Profile’ and ‘Configure Default Notification Profile’ pages. Users assigned with appropriate Medication History roles will be able to configure the Medication History notifications for different actions using this option. However, configured notifications for the Medication History module will not be effective at this moment. In a future release, when the Medication History roles will be effective for the Medication History module, the notification profile for the Medication History module will also be effective for the configured Notification Events.
Priority List
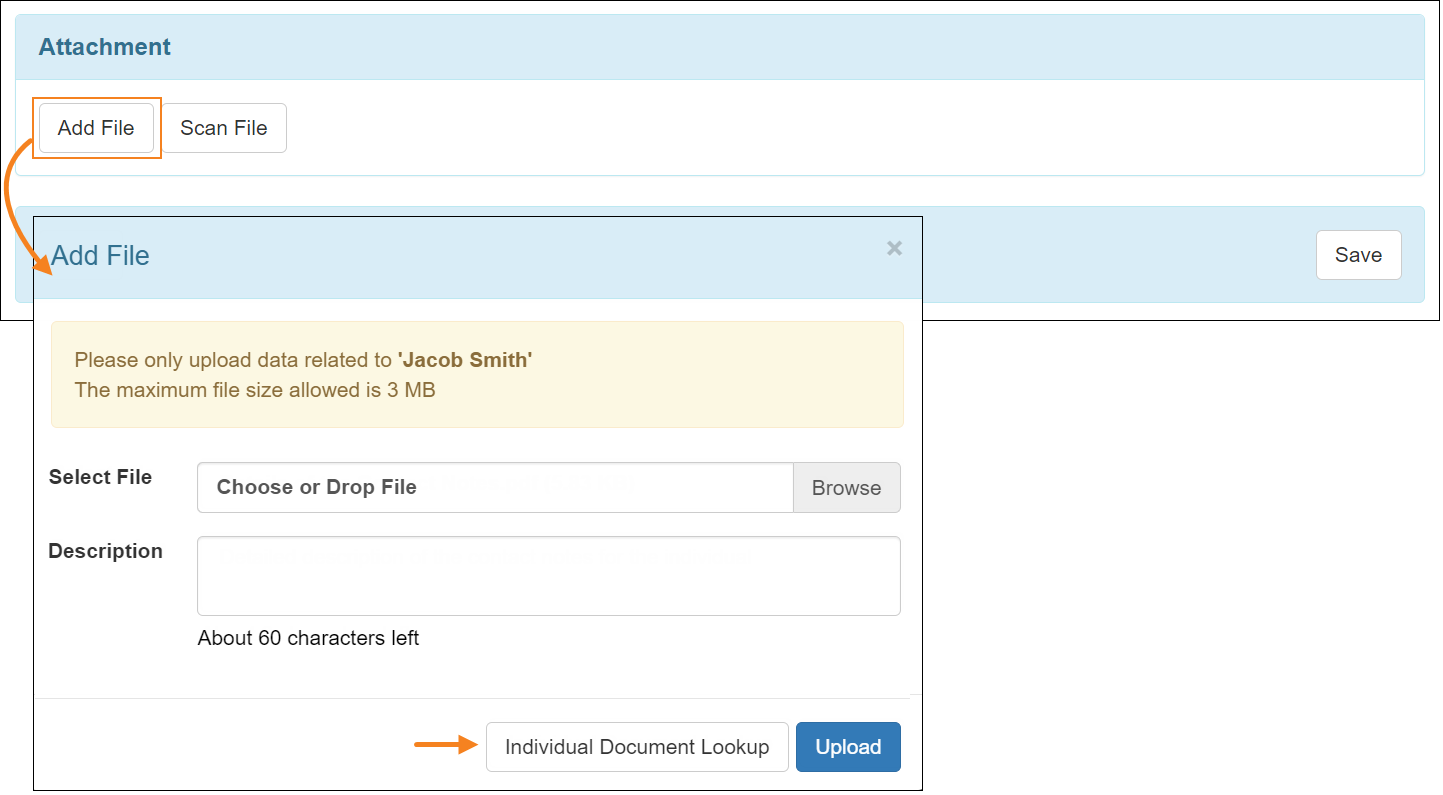
[Back to Top]- A new ‘Attachment’ section has been added to the Contact Note of a Priority List where users will be able to upload or scan files using the Add File or Scan File button respectively. File size of an attachment cannot exceed 3 MB.
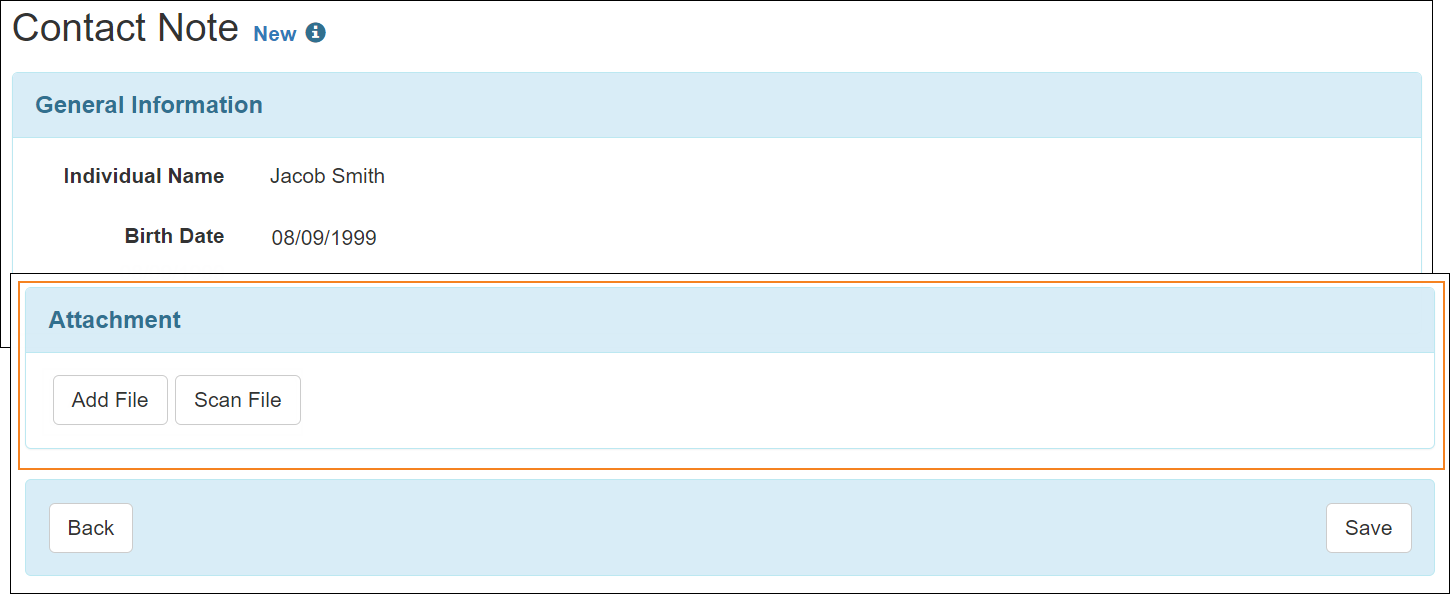
- Users will also be able to add attachments from the Document Storage using the Individual Document Lookup button on the ‘Add File’ pop-up window.
Scheduling
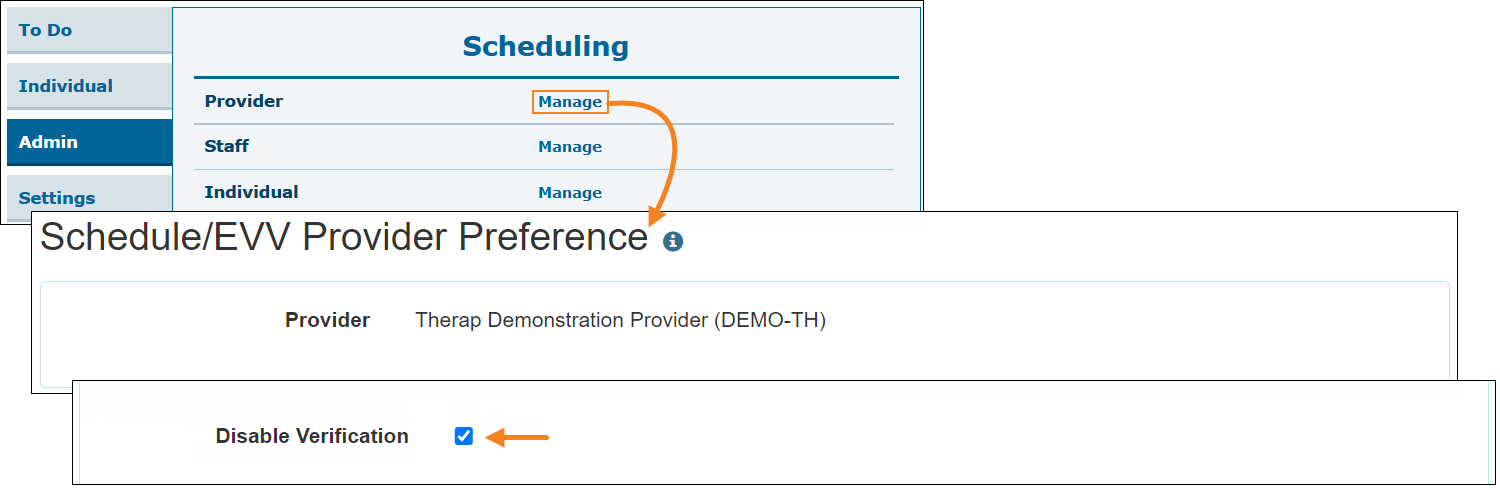
[Back to Top]- A new field titled Disable Verification has been added to the ‘Schedule/EVV Provider Preference’ page. If this new field is selected from the Therap web application, then the ‘Verification’ section will no longer appear for schedules on the ‘Agenda Record’ page in the mobile applications and therefore users will not be able to collect signature or voice verification for the schedules.
- Once a TeleHealth Location has been saved, updated, or deleted, the following success messages will now appear on a new page instead of appearing on the same page.
- TeleHealth Location successfully saved.
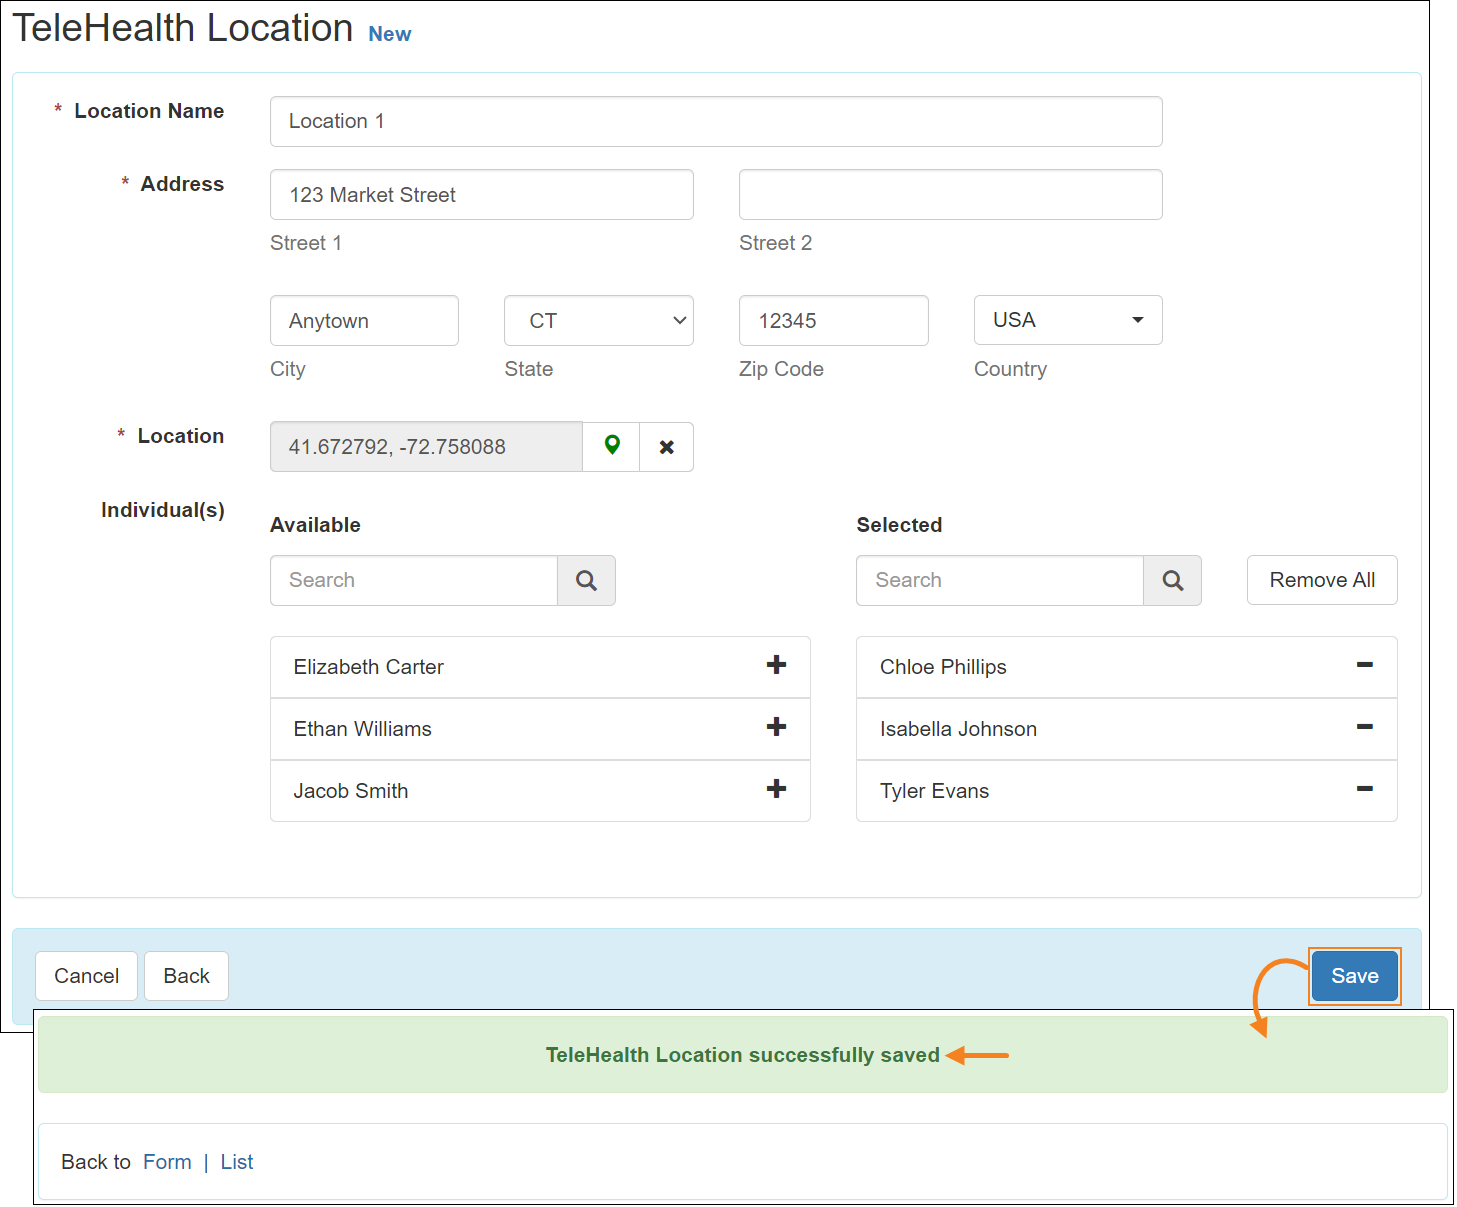
- TeleHealth Location successfully updated.
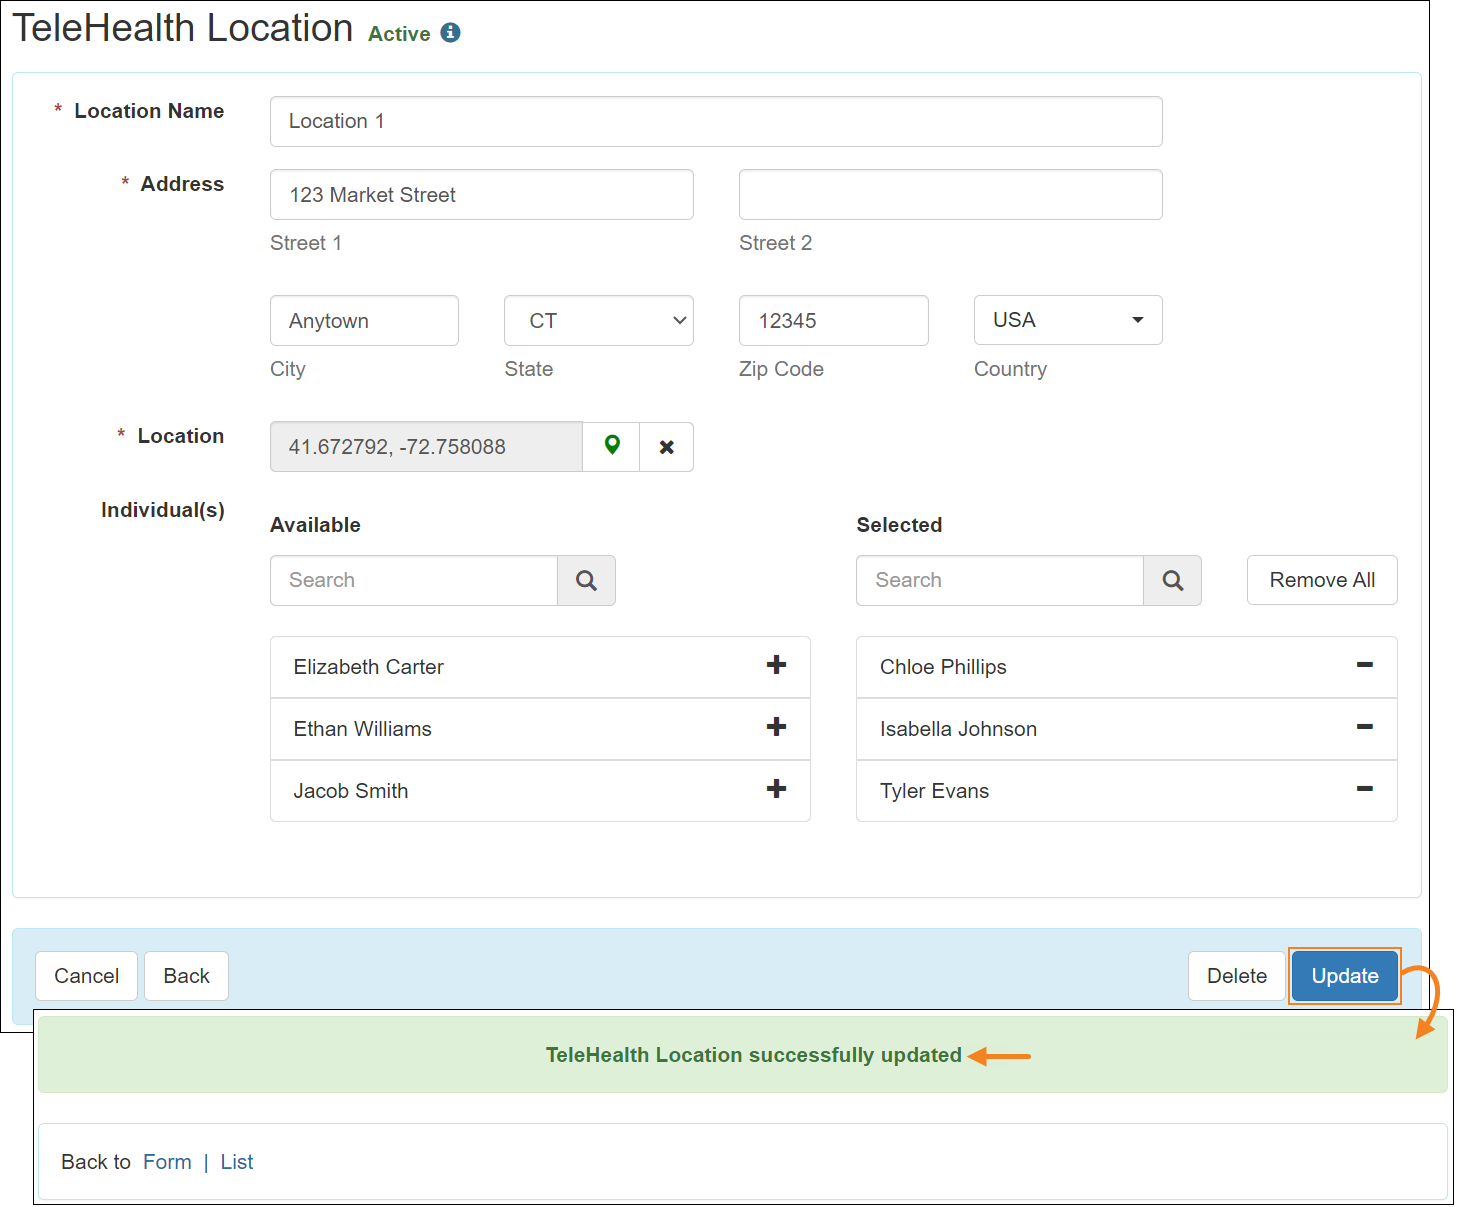
- TeleHealth Location successfully deleted.
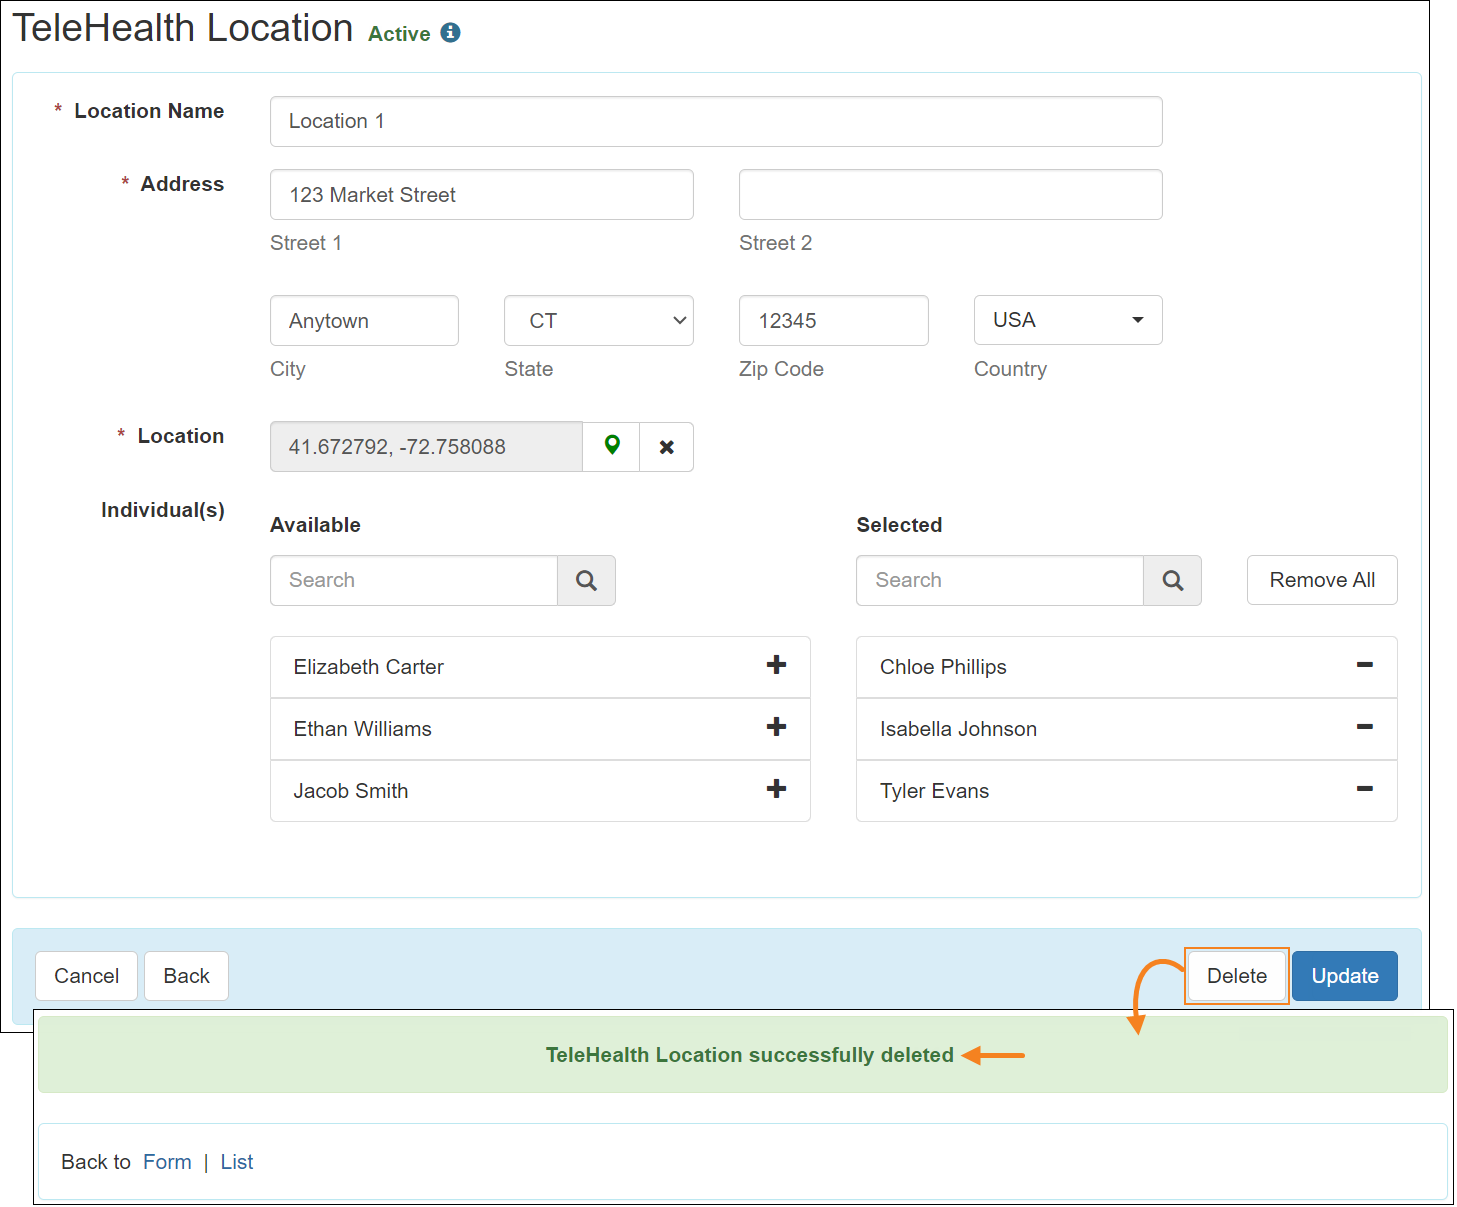
- TeleHealth Location successfully saved.
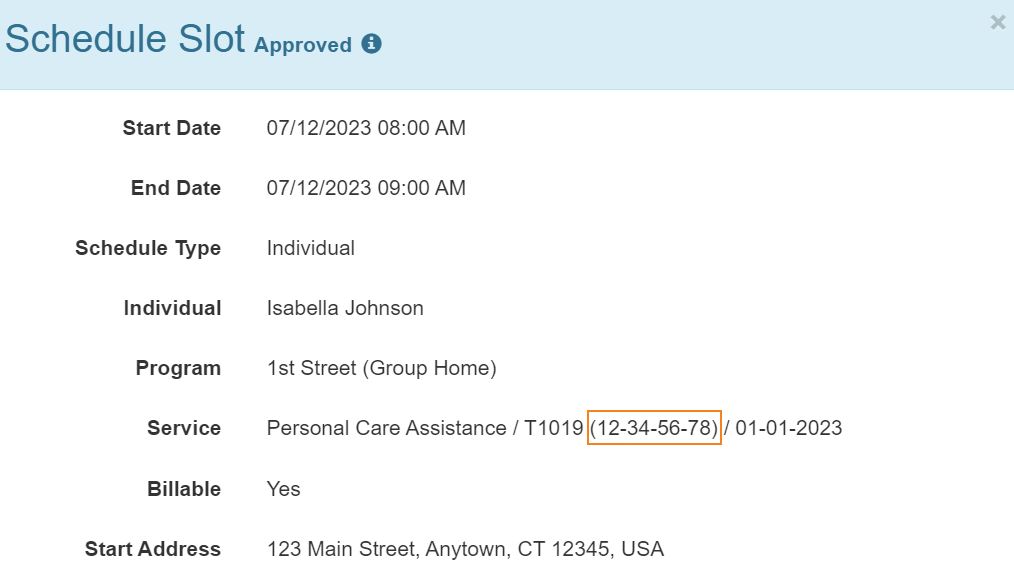
- The Procedure Modifiers entered in the ‘Service Authorization’ form for a service will now be displayed in parentheses beside the service description code in the Service field on Schedule Slot forms. The Procedure Modifiers will populate in the dropdown list of the Service field while creating or editing Schedule Slots, and in the archived Schedule Slots accessed using the Update History feature as well. They will also appear in the slots displayed on the scheduling grid and in the information box shown while hovering over the slots.
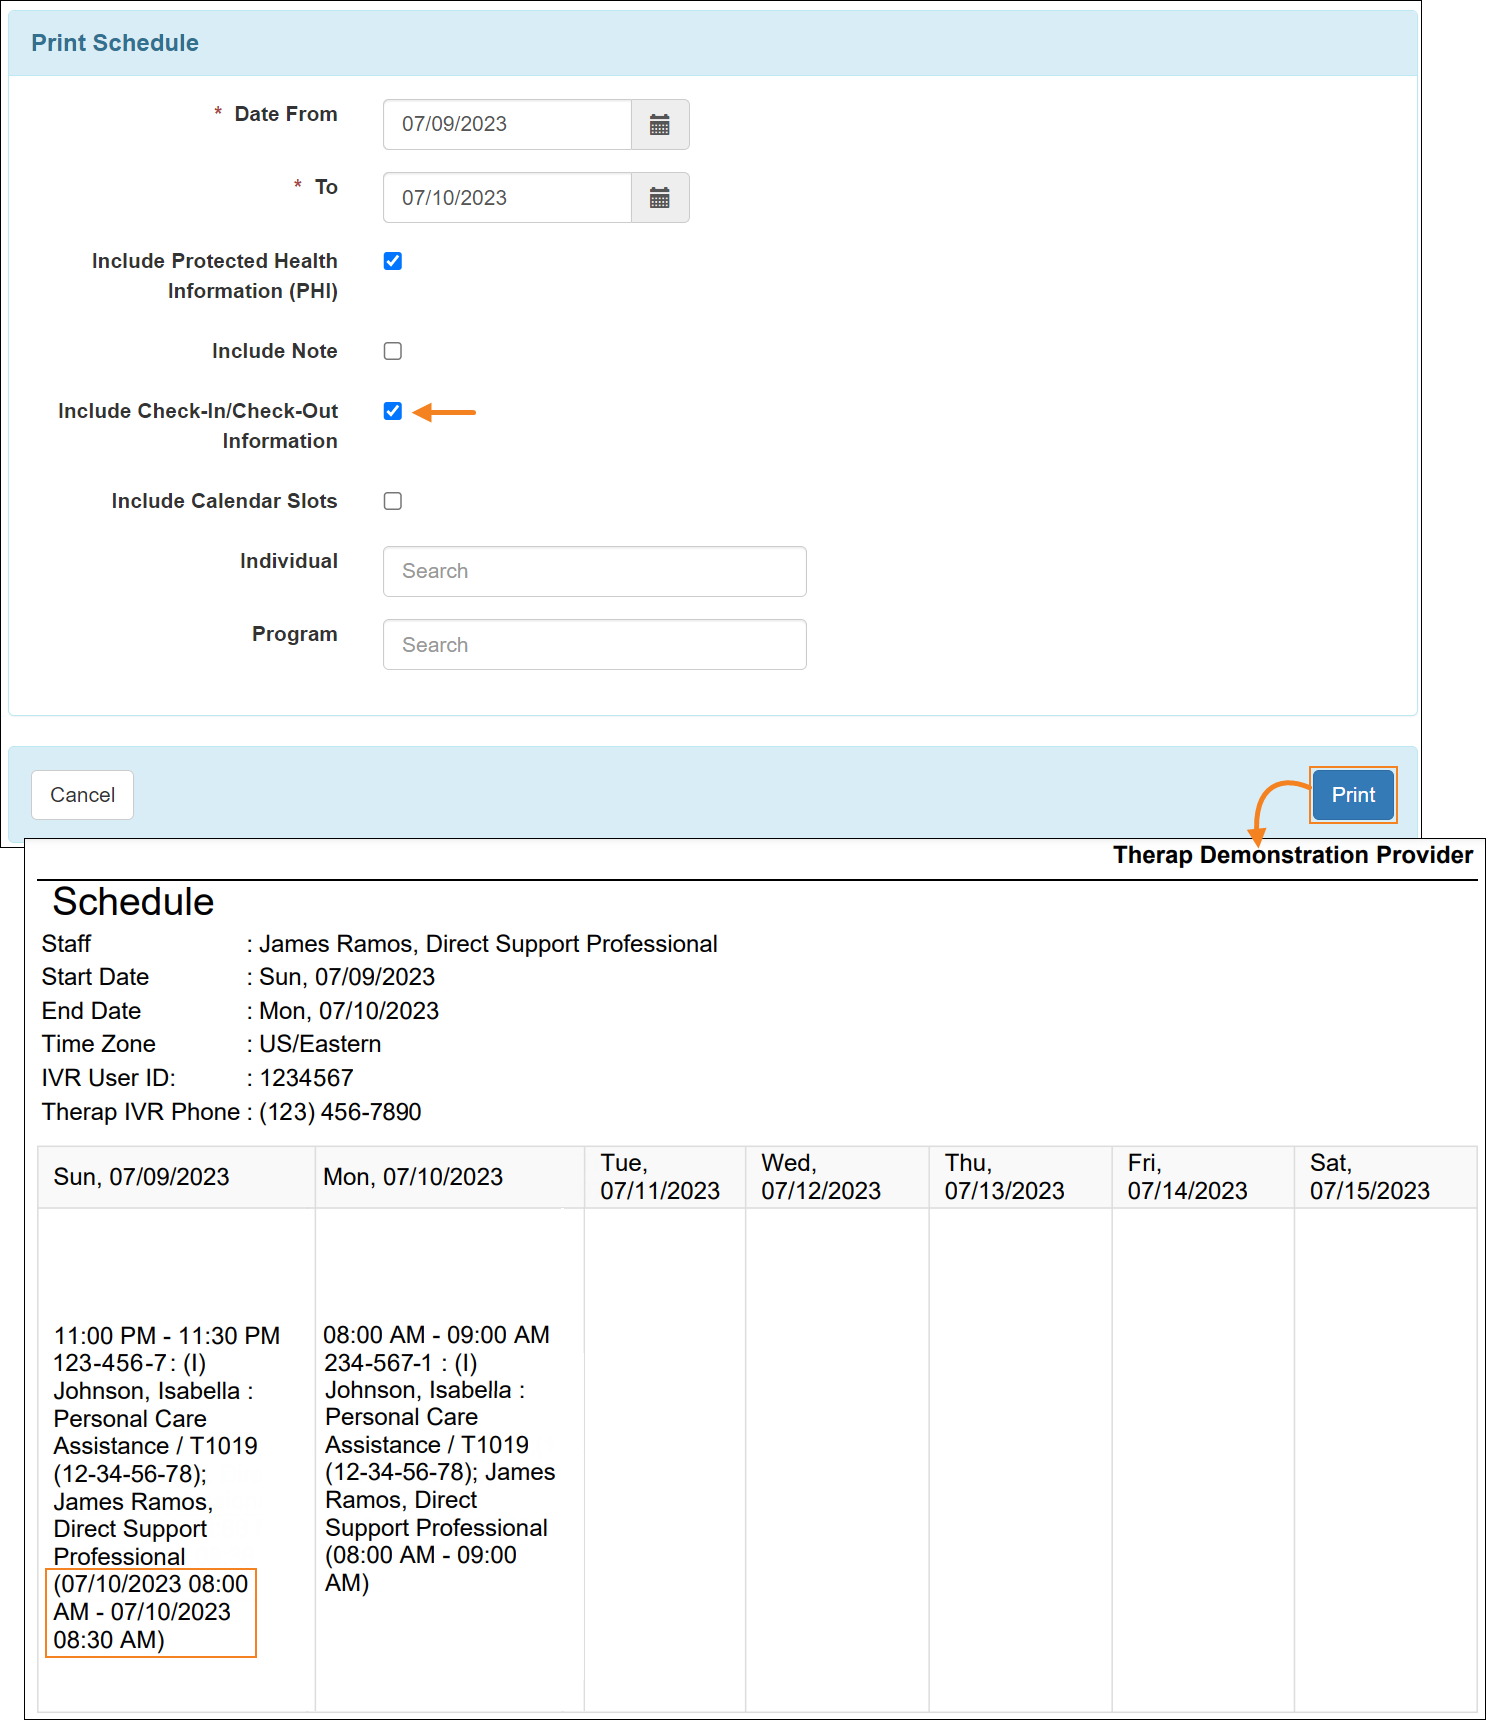
- If the Include Check-In/Check-Out Information field is enabled on the ‘Print Schedule’ page accessed from the Admin tab, Individual tab, or the Dashboard, then the PDF file downloaded using the Print button at the bottom of this page will now display the Check-In and Check-Out dates for Schedule Slots where the dates entered in the Start Date and End Date fields do not match with the corresponding Check-In/Check-Out dates.
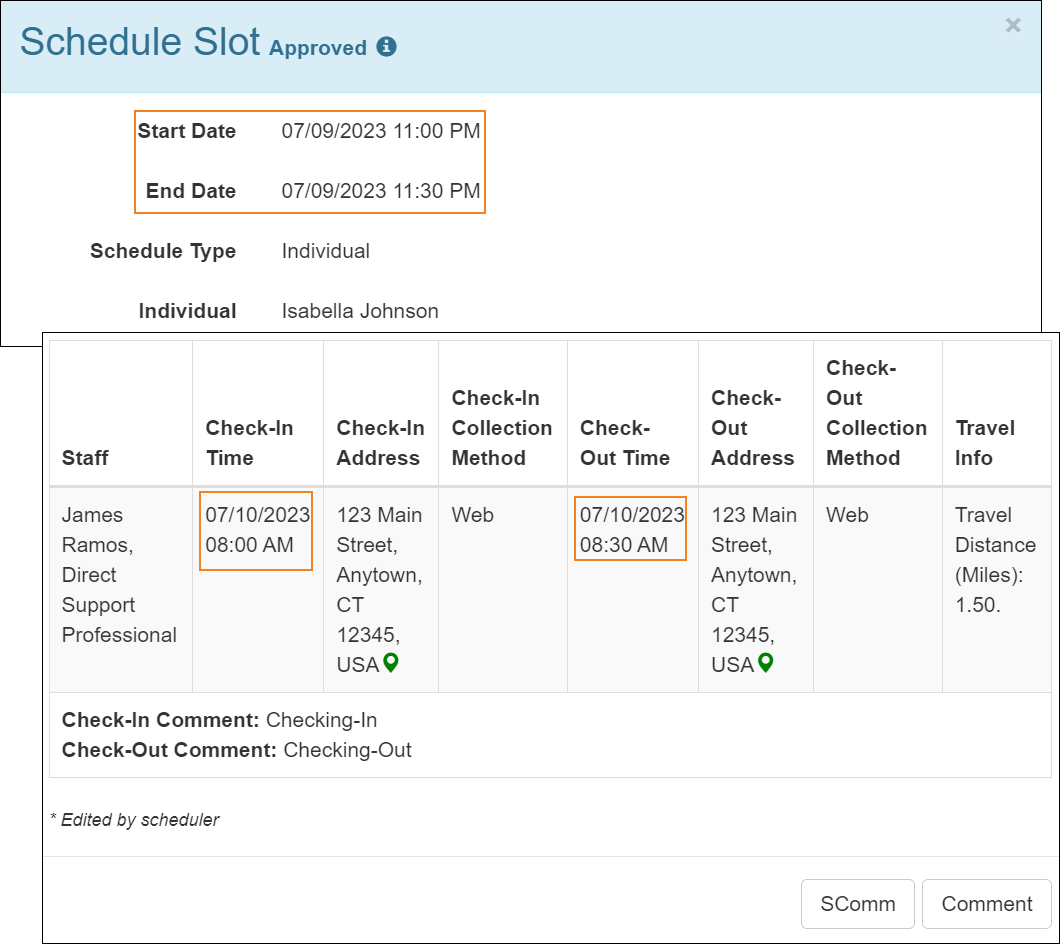
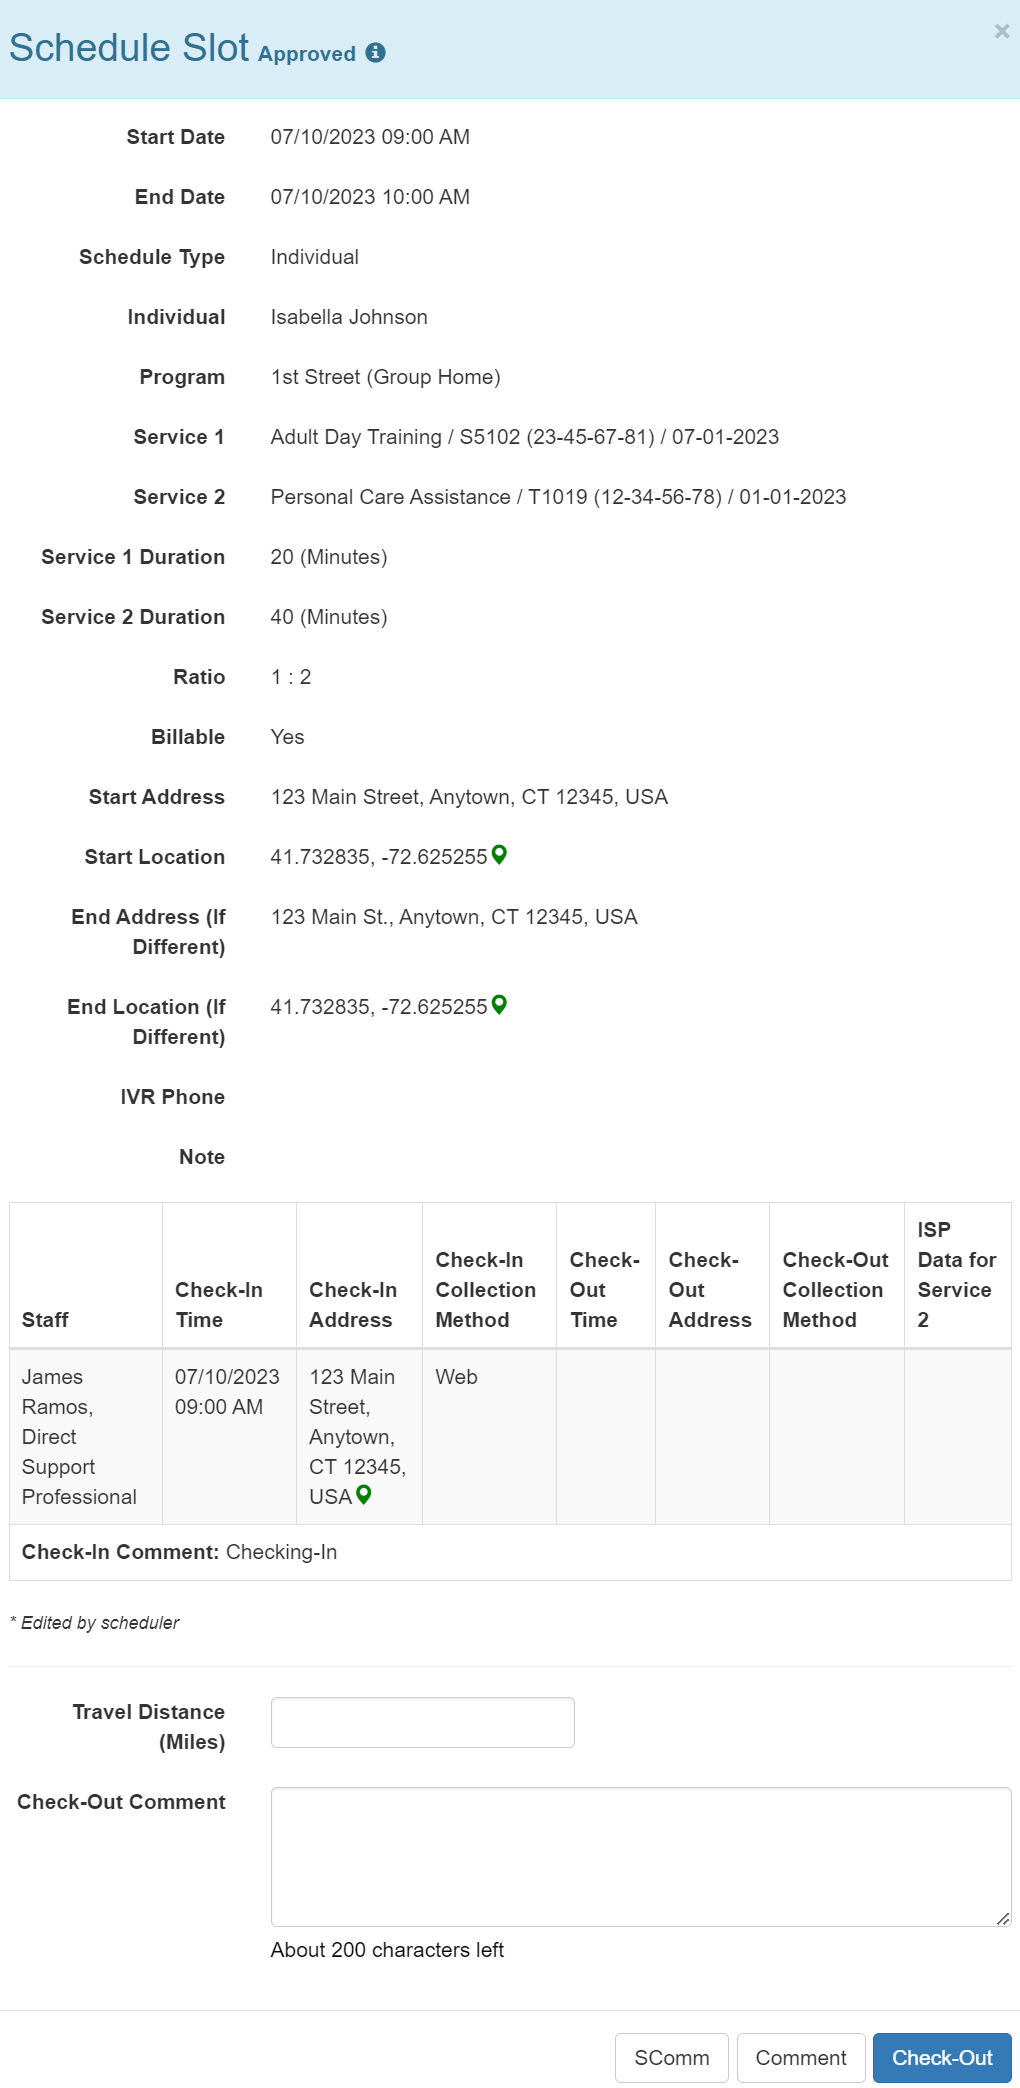
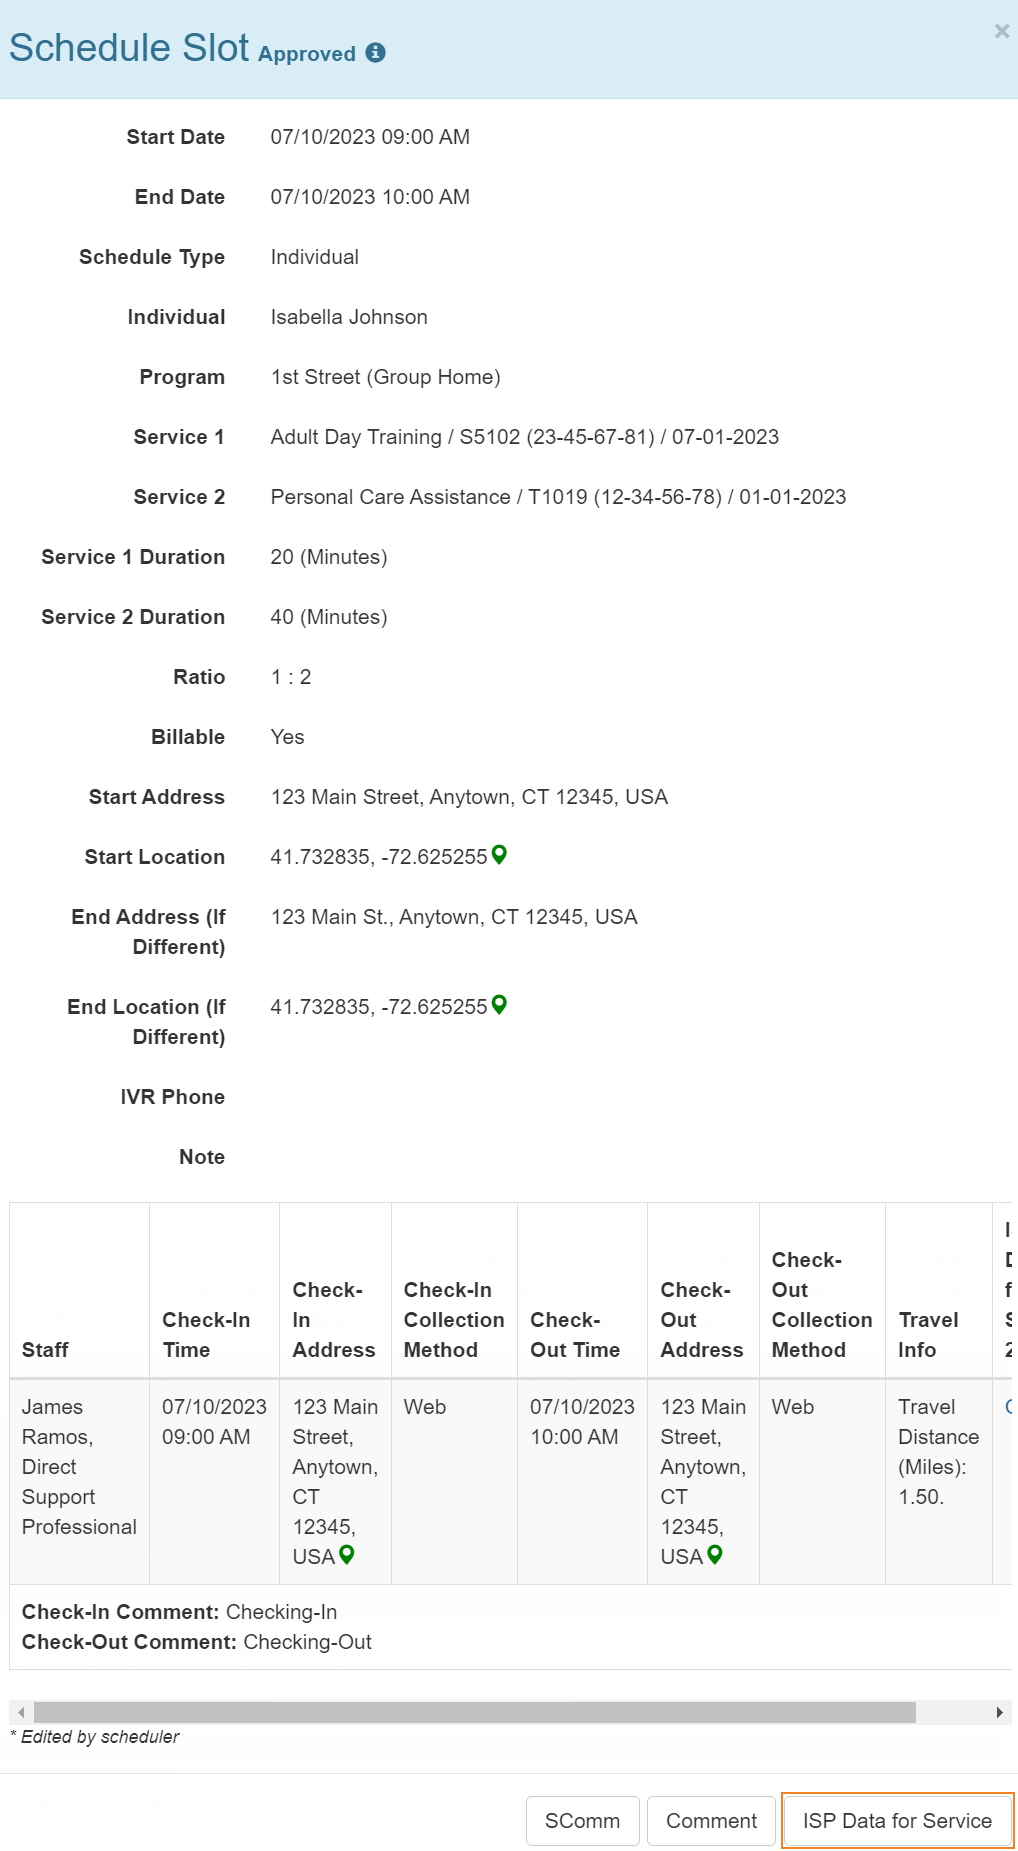
- For multiservice Schedule Slot forms where only the service assigned to the Service 2 field is configured to submit ISP Data, the ISP Data for Service button will no longer appear at the bottom prior to Check-Out. It will appear once Check-Out has been completed.
- The following validation messages have been updated:
Previous Message Updated Message You have Programs in this Template which are not showing in this Schedule You have Program(s) in this Template which are not showing in this Schedule You have Individuals in this Template who are not showing in this Schedule You have Individual(s) in this Template who are not showing in this Schedule You have staff in this template who are not showing in this schedule You have Staff in this Template who are not showing in this schedule Another template already exists with same name! Please choose a different name Another Template already exists with same name! Please choose a different name. Are you sure you want to delete this template? Are you sure you want to delete this Template?
Training Management System (TMS)
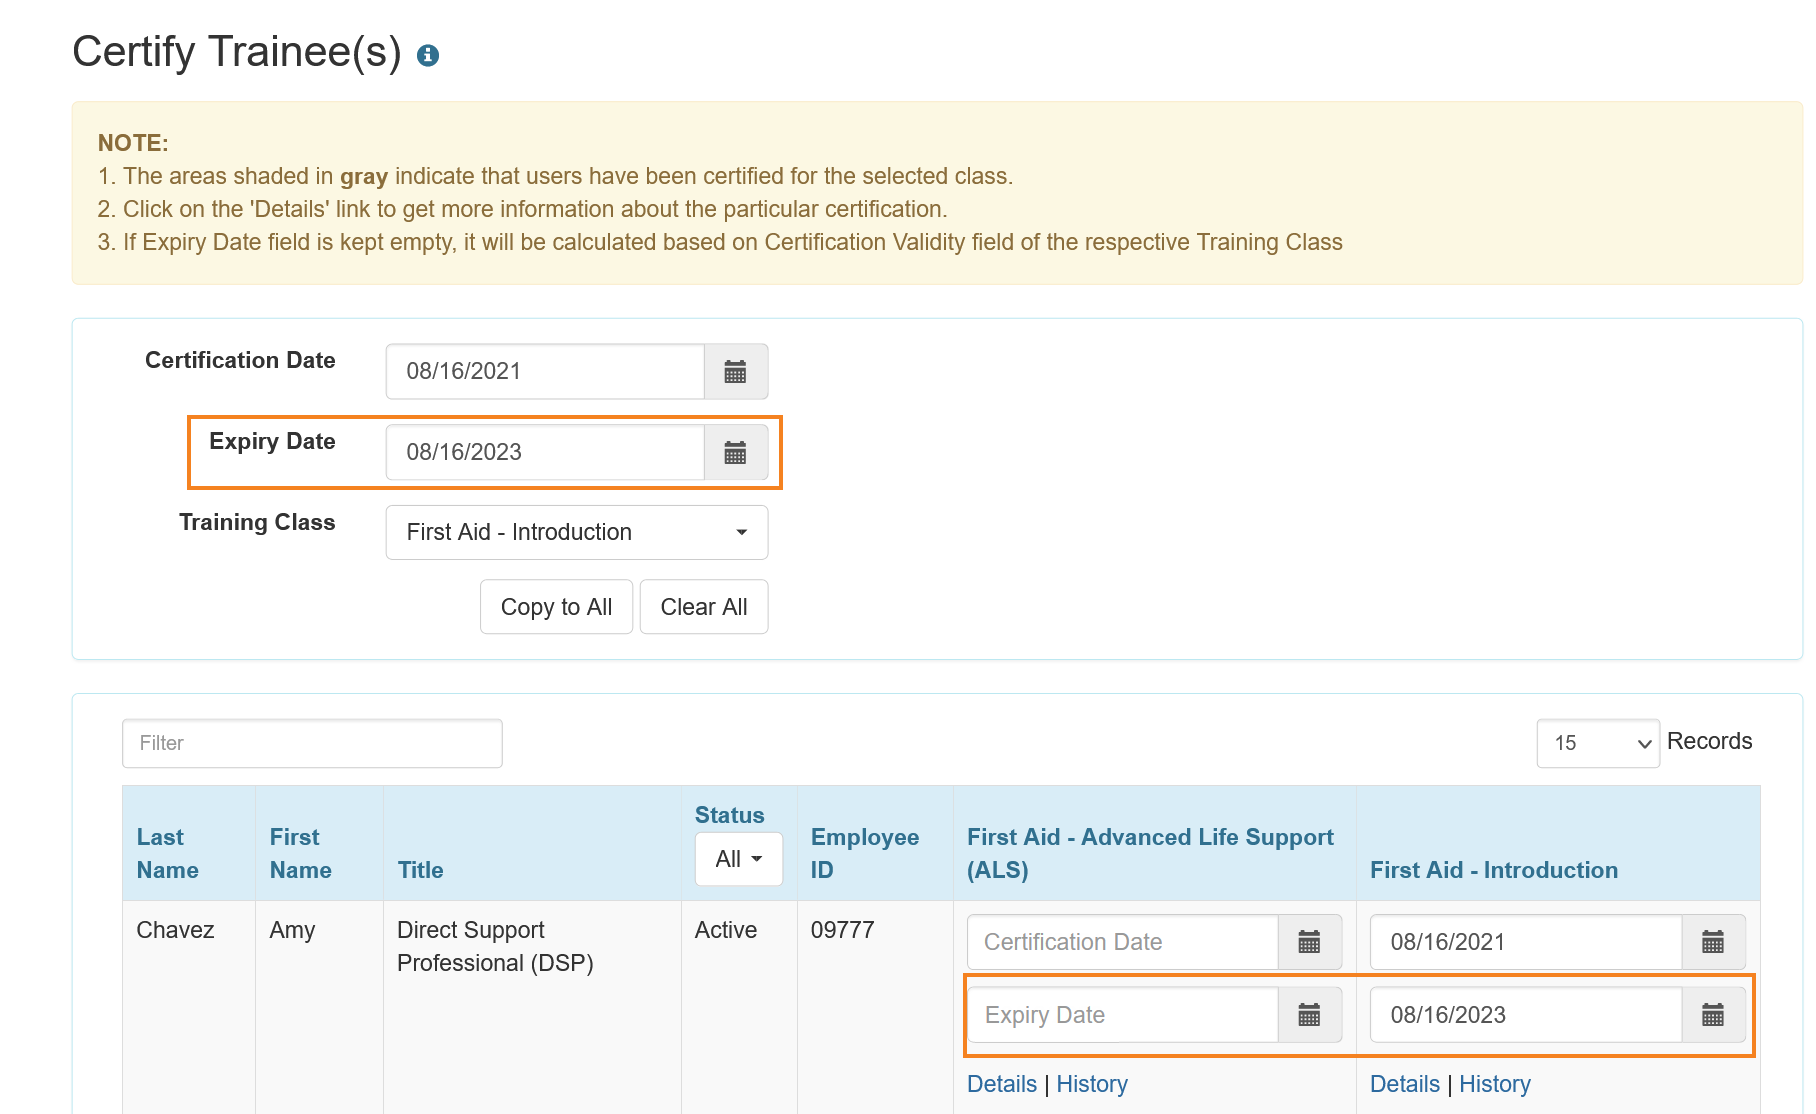
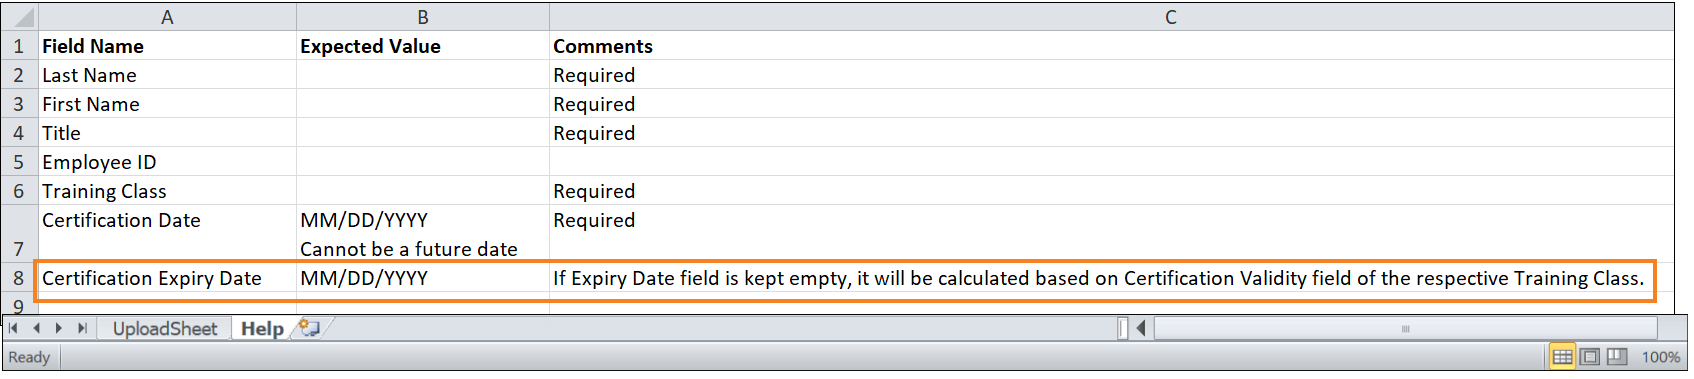
[Back to Top]- A new Expiry Date field has been added under the Certification Date field on the ‘Certify Trainee(s)’ page. Users will be able to manually enter Expiry Dates for certificates using this field. These certificates will be unaffected when the validity periods of existing training certificates are recalculated.
- The Note at the top of the ‘Certify Trainee(s)’ page has been updated and will now list the following point: If Expiry Date field is kept empty, it will be calculated based on Certification Validity field of the respective Training Class.

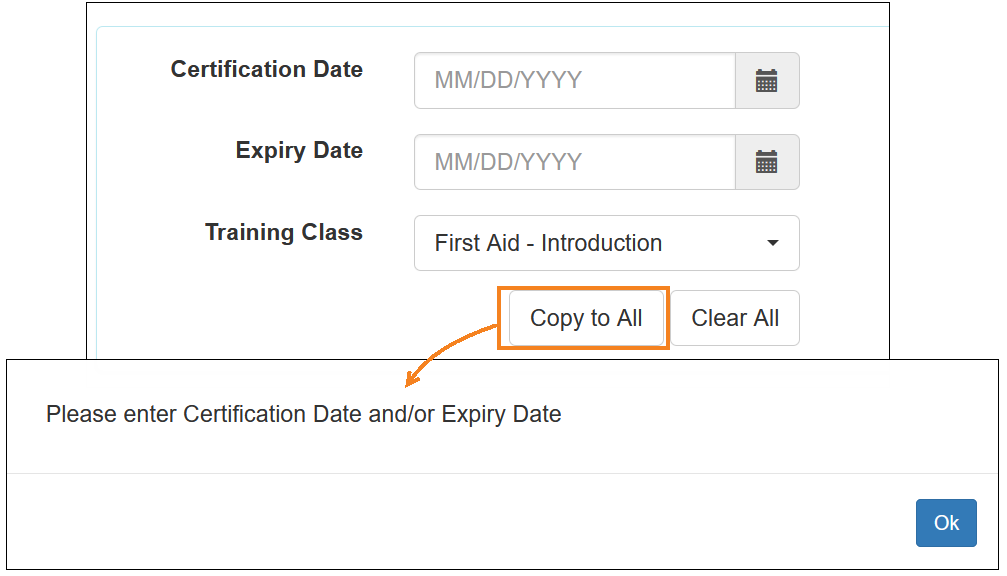
- Pressing the Copy to All button without entering the Certification Date and Expiry Date will show an updated message: Please enter Certification Date and/or Expiry Date.
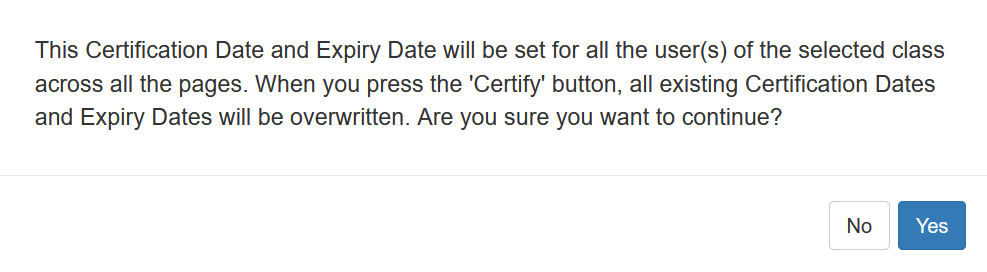
- After entering the Certification Date, Expiry Date and selecting a Training Class, clicking on the Copy to All button will show an updated confirmation message: This Certification Date and Expiry Date will be set for all the user(s) of the selected class across all the pages. When you press the 'Certify' button, all existing Certification Dates and Expiry Dates will be overwritten. Are you sure you want to continue?
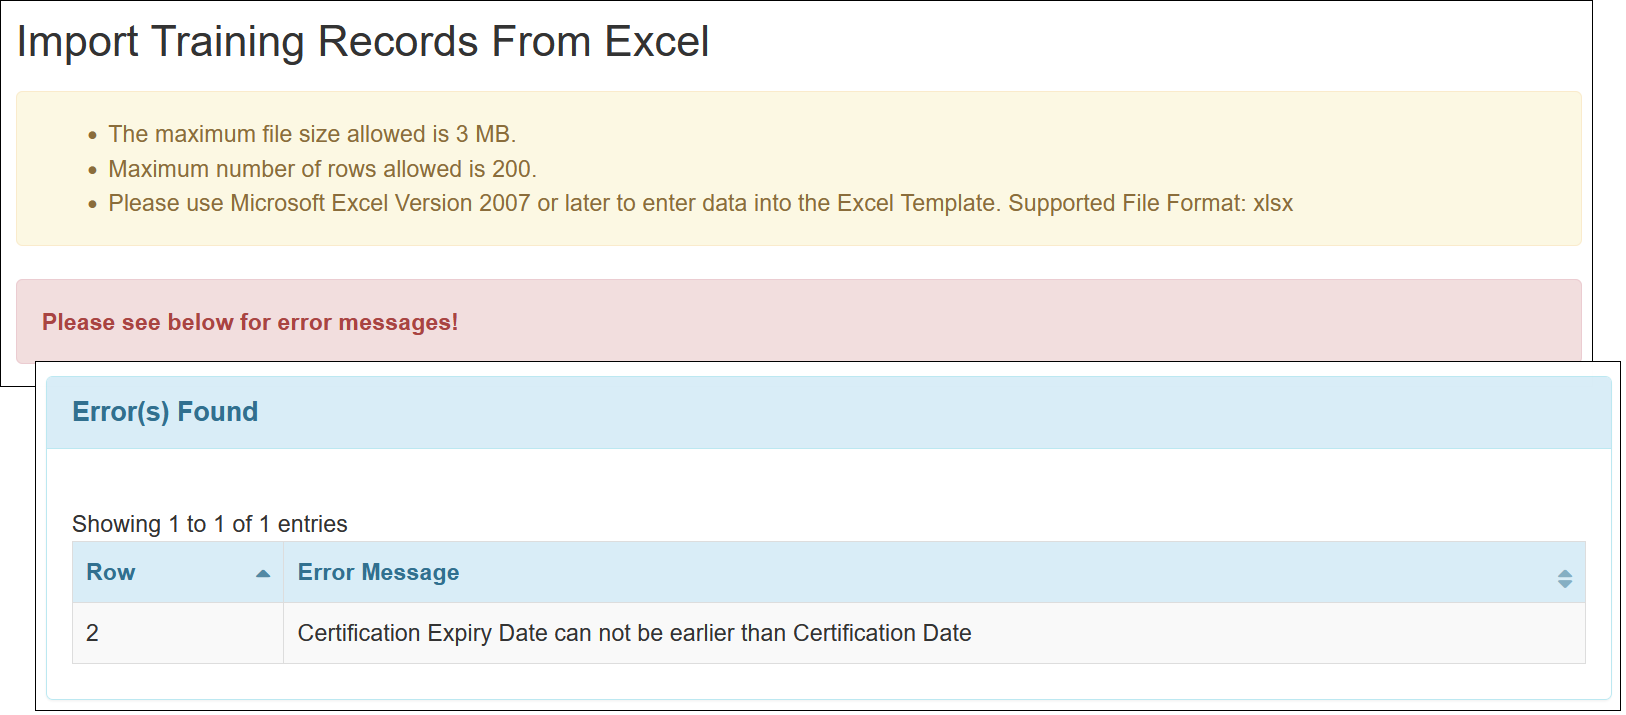
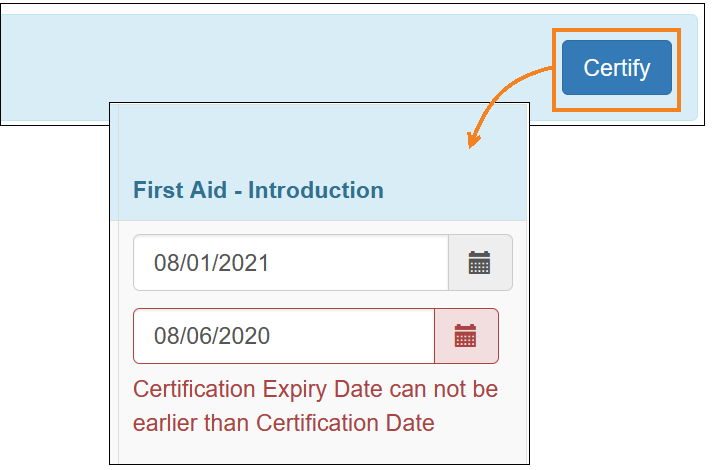
- The following error message will be displayed if the Expiry Date is set to an earlier date than the Certification Date: Certification Expiry Date can not be earlier than Certification Date.
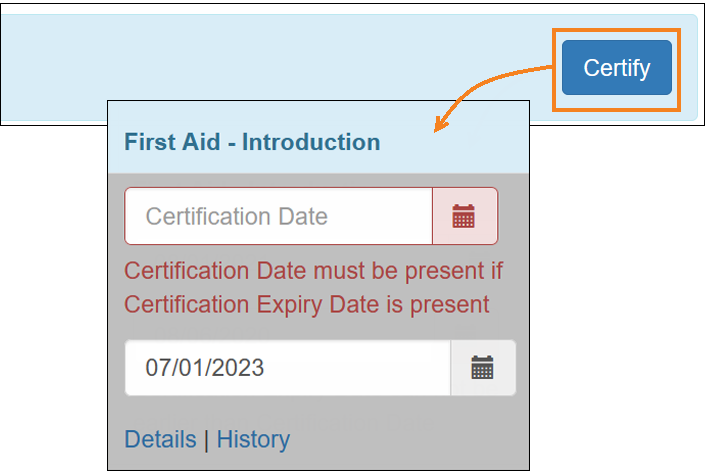
- Pressing the Certify button after entering an Expiry Date without Certification Date will display the following error message: Certification Date must be present if Certification Expiry Date is present.
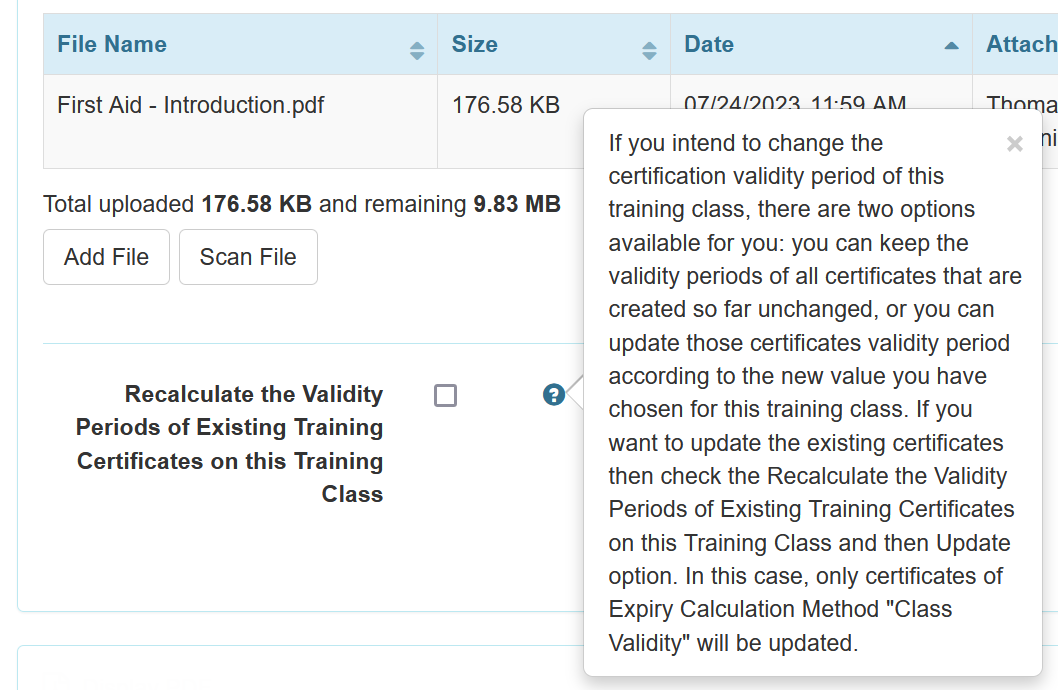
- The note related to the Recalculate the Validity Periods of Existing Training Certificates on this Training Class checkbox on the Training Class form has been updated.
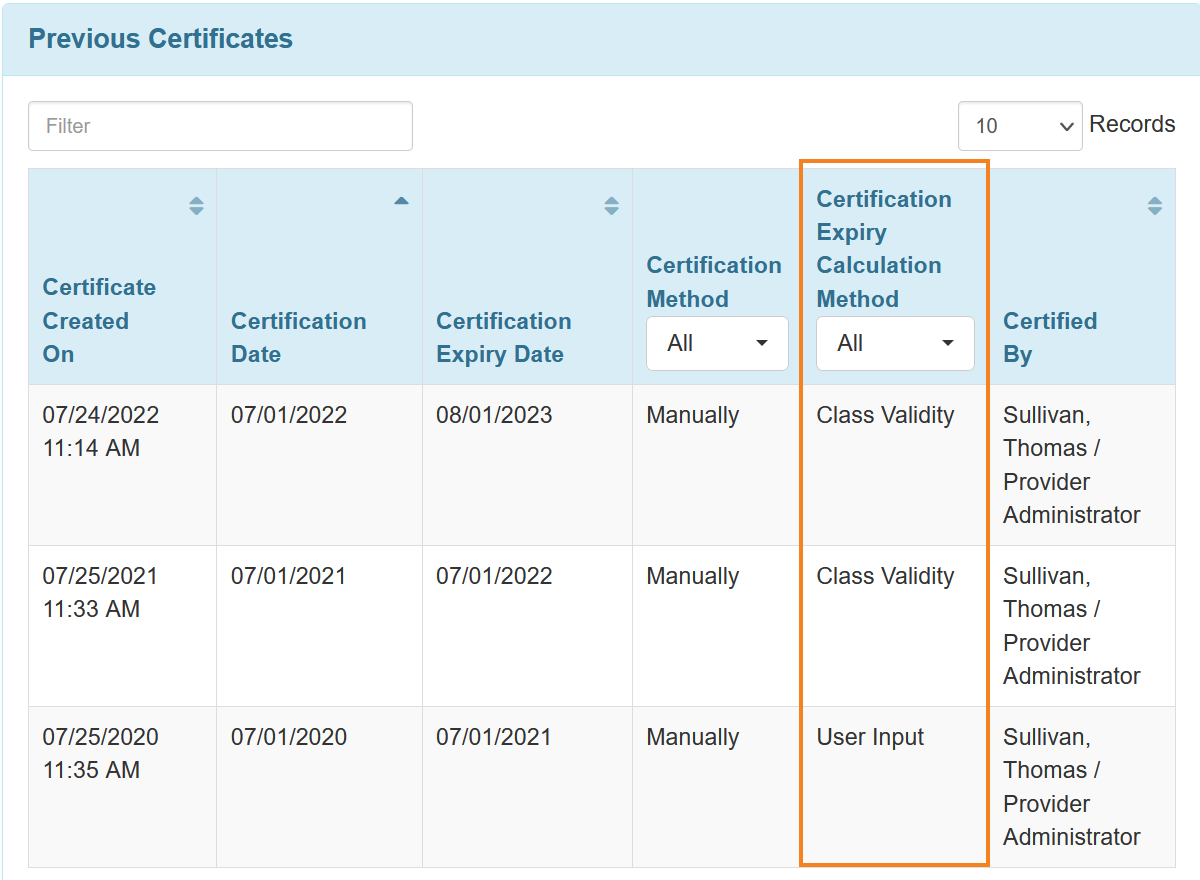
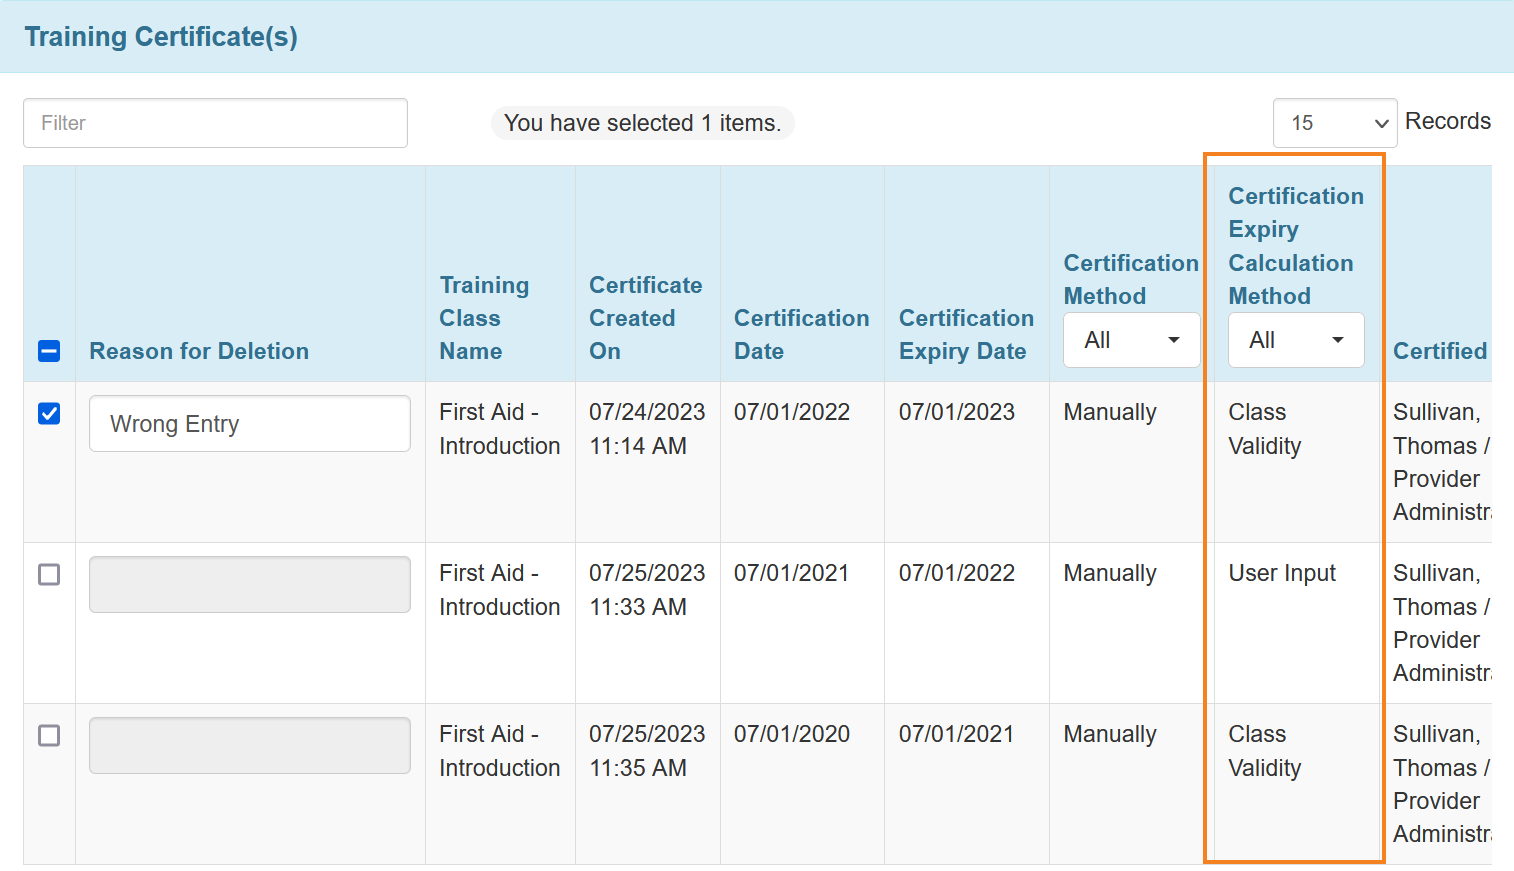
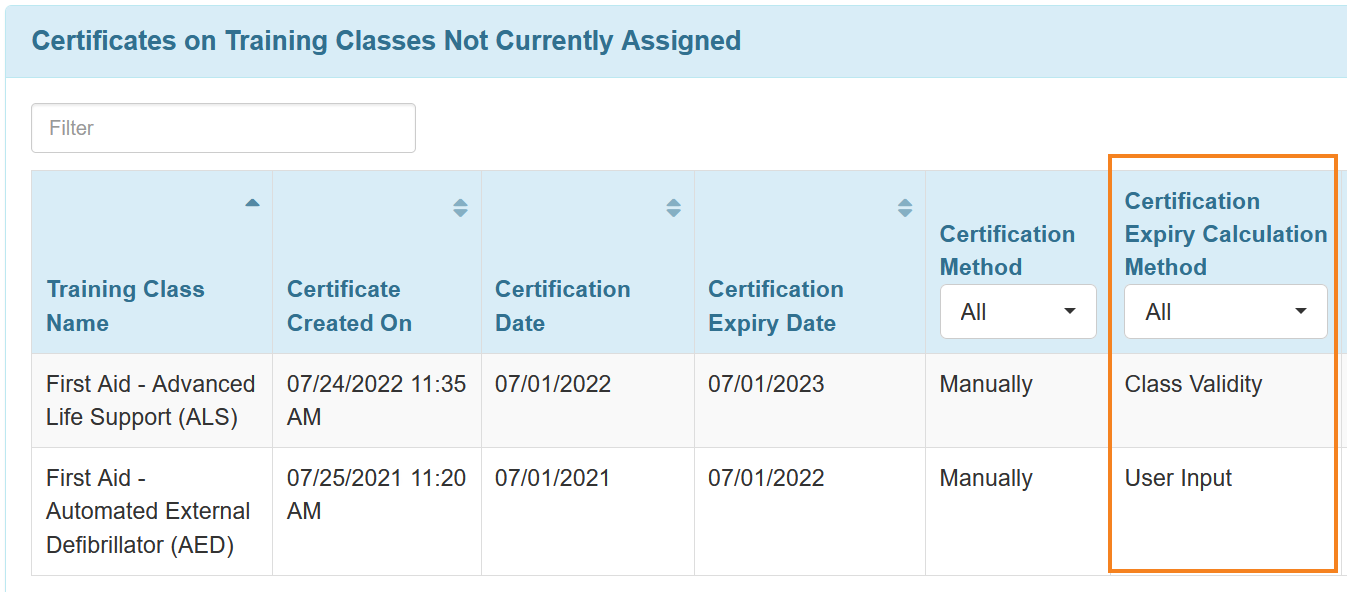
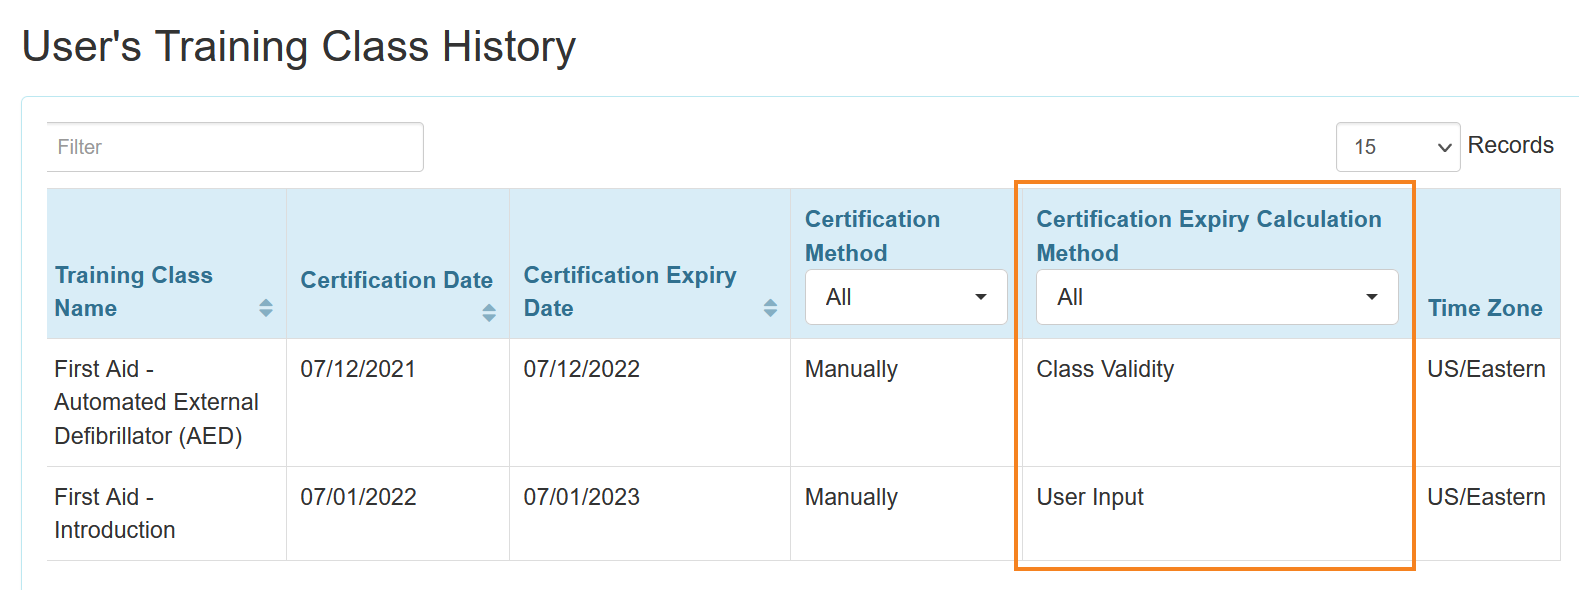
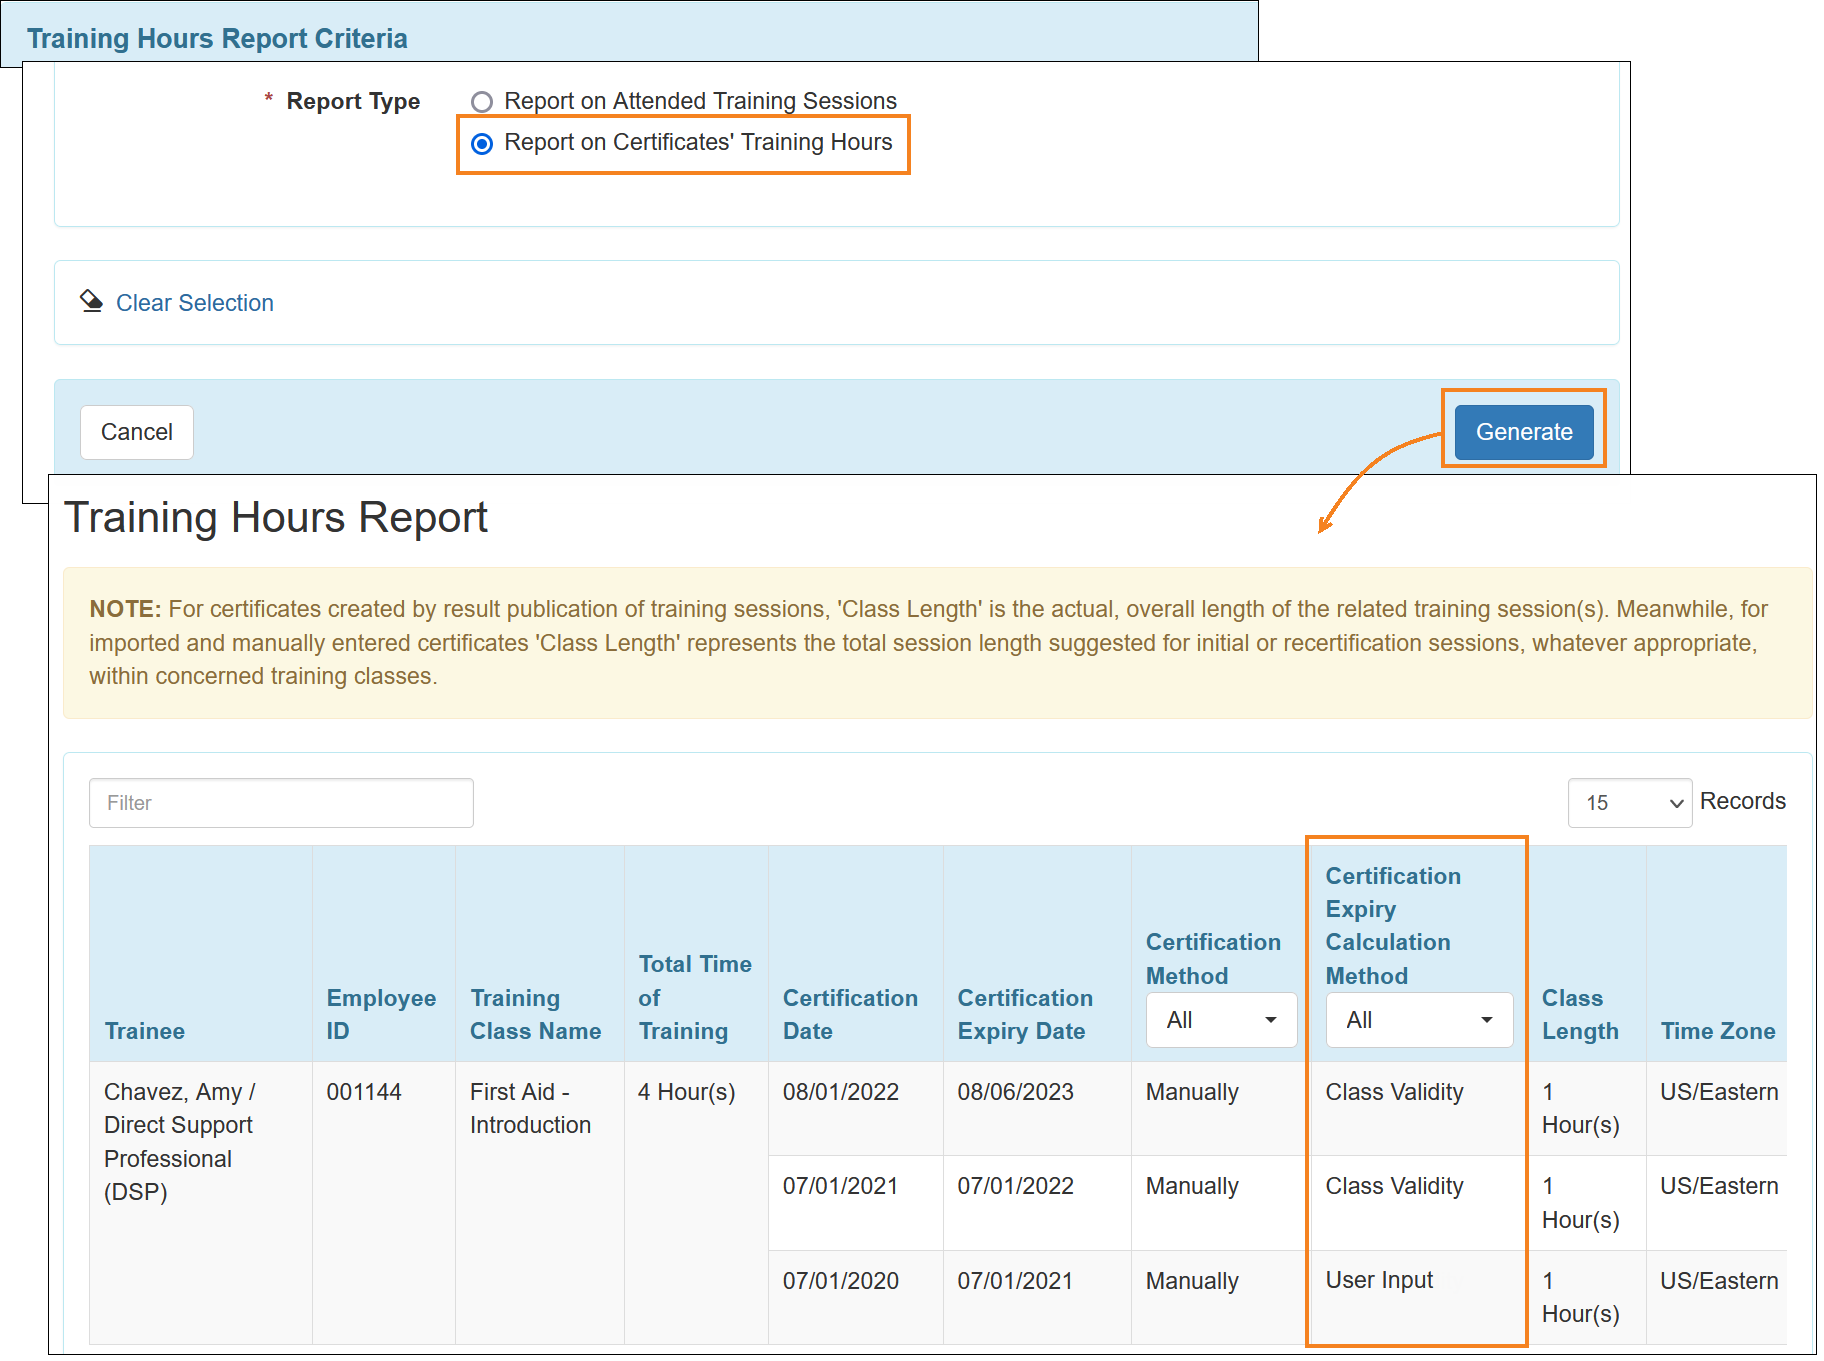
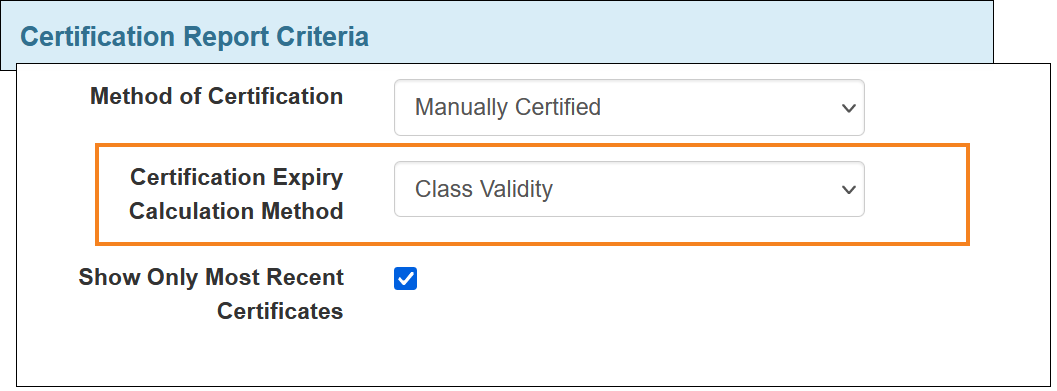
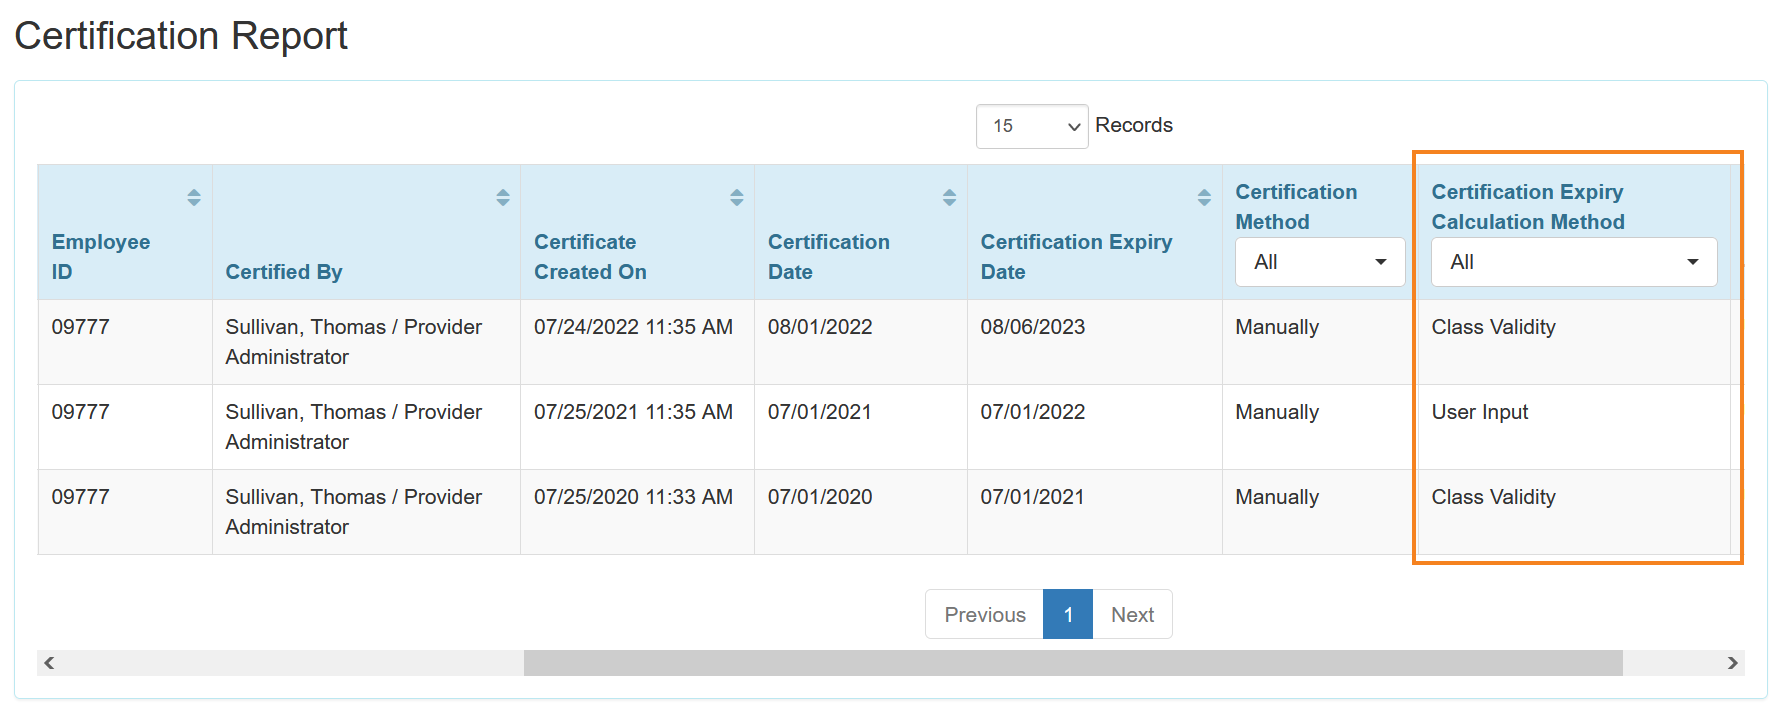
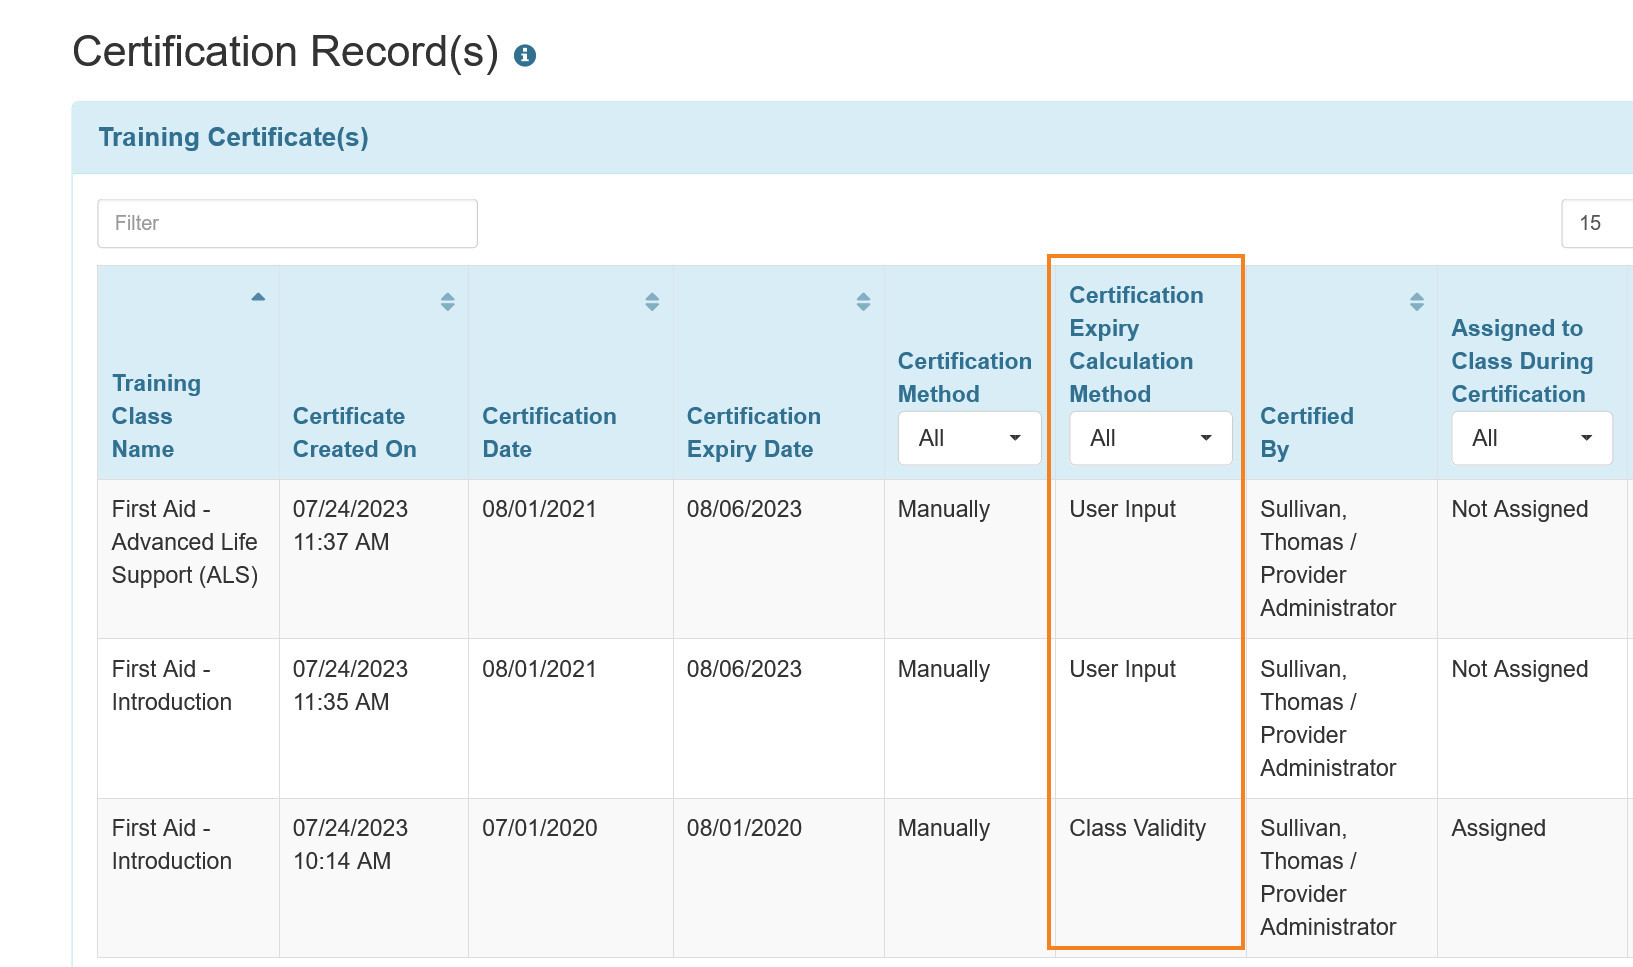
- Certification Expiry Calculation Method information, with User Input and Class Validity values, has been added to the following locations:
- ‘Previous Certificates’ section of the ‘Trainee Information’ form accessed by clicking on the Details link for a Training Class under the ‘Certify Trainee(s)’ form.
- ‘Training Certificate(s)’ section of the ‘Delete Certification Record(s)’ form accessed by clicking on the History link for a Training Class under the ‘Certify Trainee(s)’ form.
- ‘Certificates on Training Classes Not Currently Assigned’ section under Training Profile.
- User's Training Class History accessed using the Training History link under the ‘Classes’ section under the right panel of the Dashboard.
- ‘Training Hours Report’ with the Report Type selected as Report on Certificates' Training Hours, accessed from the ‘Report’ Training Hours Report link on the Agency tab.
- ‘Certification Report Criteria’ search page accessed using the ‘Report’ Certification Report link on the Agency tab.
- ‘Certification Report’ accessed using the ‘Report’ Certification Report link on the Agency tab.
- ‘Certification Record(s)’ form accessed using the ‘History’ Certification Record(s) link on the Agency tab.
- ‘Previous Certificates’ section of the ‘Trainee Information’ form accessed by clicking on the Details link for a Training Class under the ‘Certify Trainee(s)’ form.
- Certification Expiry Date information has been added to following tabs of the Excel file for importing certificates:
- UploadSheet tab

- Help tab
- UploadSheet tab
- If the Certification Expiry Date is entered as an earlier date than the Certification Date in the Excel file for importing certificates, the following error message will be displayed under the 'Error(s) Found' section: Certification Expiry Date can not be earlier than Certification Date.