Therap for Canada 2024.4.4 Released!
| Release Date: 5/15/2024 |
- Attendance
- Billing
- Case Note
- Drug Count New!
- Employment History
- General Events Reports (GER)
- Individual Demographic Form (IDF)
- Individual Plan
- ISP Data
- ISP Program
- Medication History
- Personal Finance
- Priority List
- Provider Administration
- Scheduling
- Service Directory
- User Privilege
- Vital Signs
Attendance
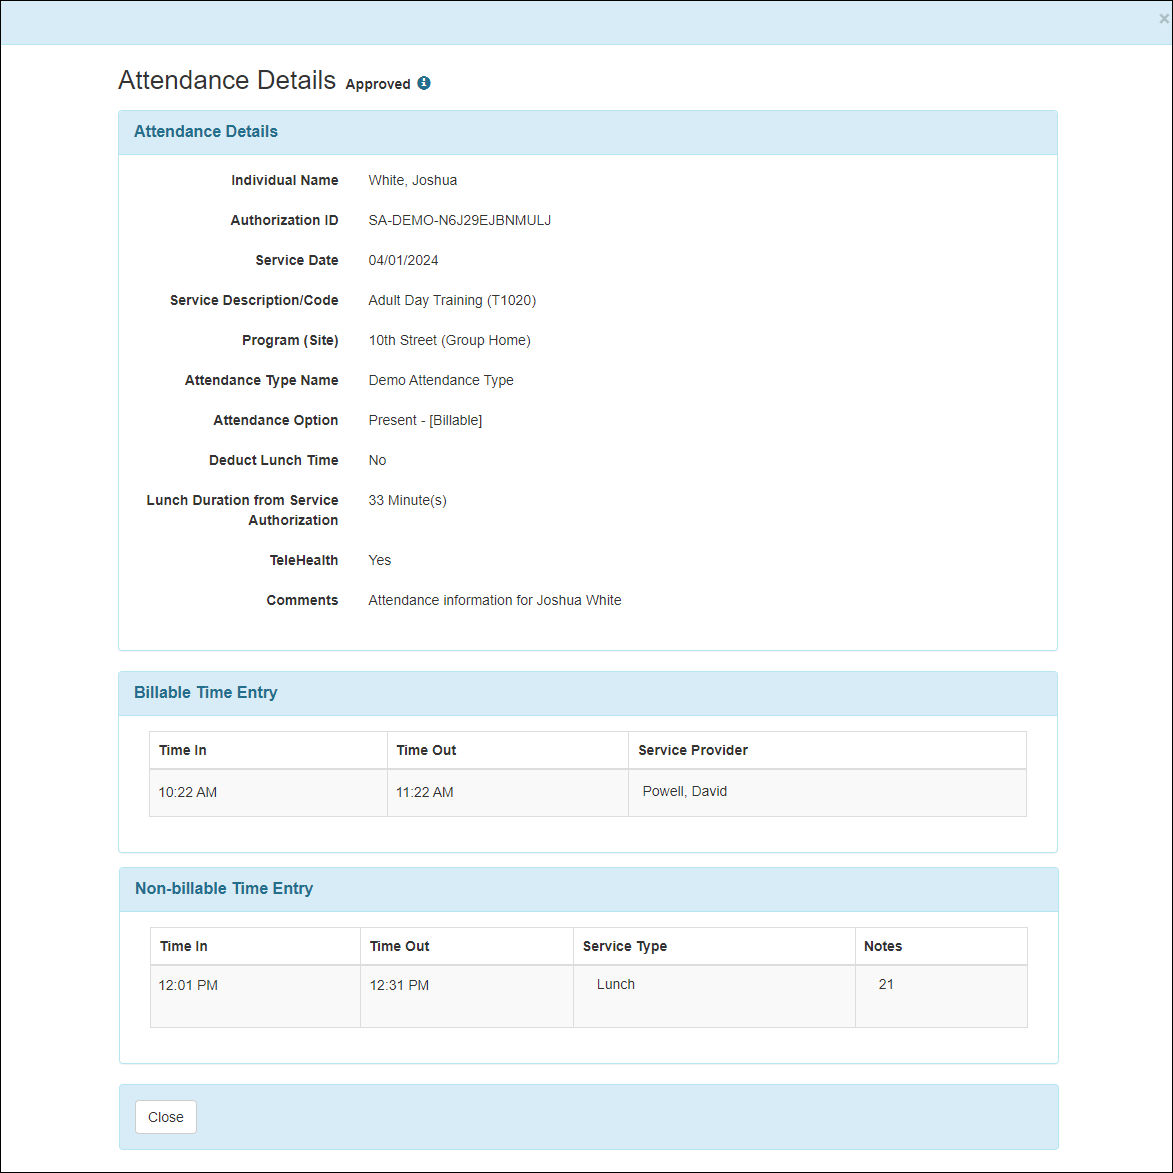
[Back to Top]- The user interface of the 'Attendance Details' page within the Attendance grid has been updated.
Billing
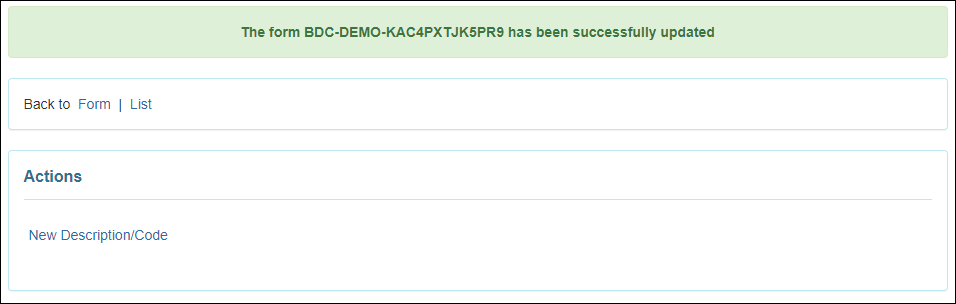
[Back to Top]- A page with the confirmation message and relevant links will be shown instead of the 'Description/Code List' page when a new 'Service Description/Code' is created or when a 'Service Description/Code' is updated, deleted, deactivated, or reactivated.
- Two new links titled Import from Excel and Search Imported Excel have been added beside the Duration Calculation Rule option in the ‘Billing’ section of the Admin tab.
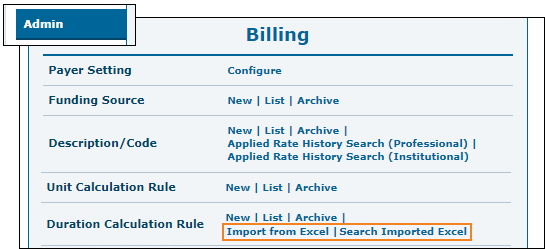
- Users will now be able to import Duration Calculation Rules by uploading Excel files.
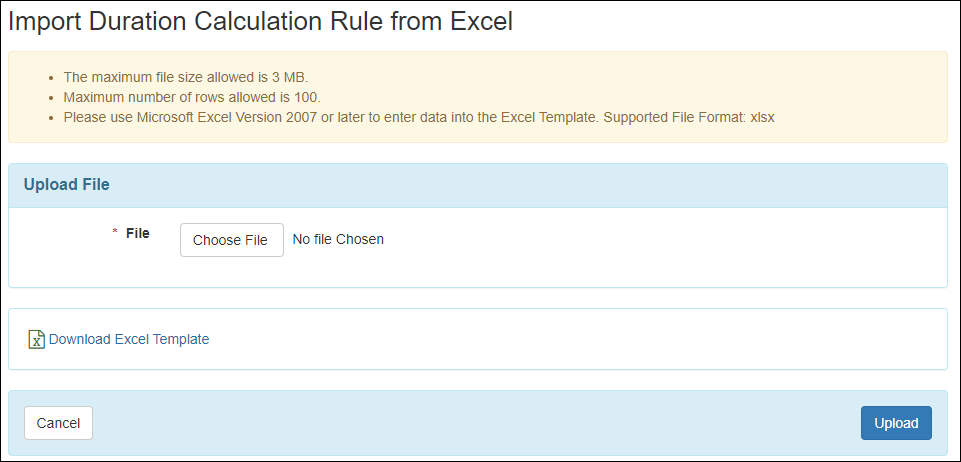
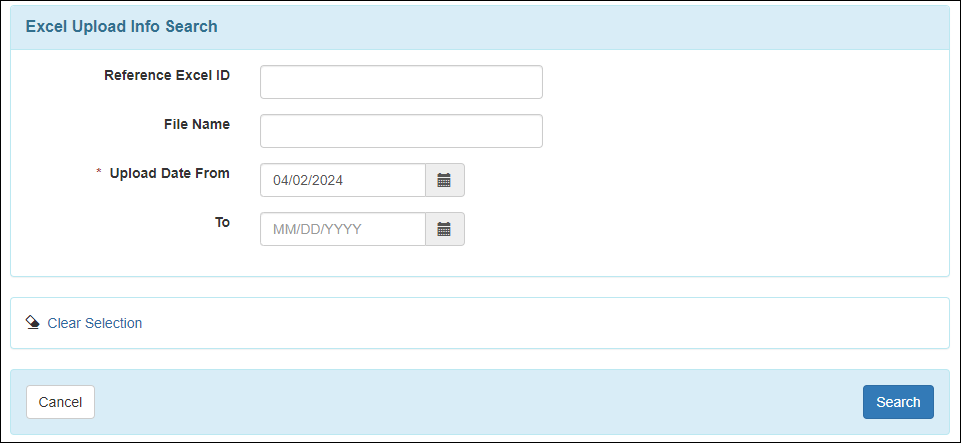
- Users will also be able to search for the uploaded Excel files.
Case Note
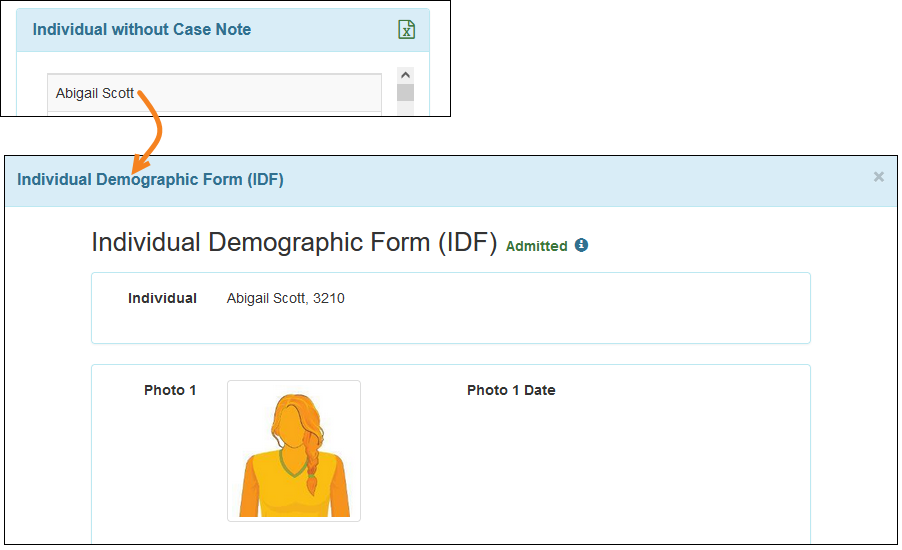
[Back to Top]- In the ‘Individual without Case Note’ section of the Case Note Dashboard, clicking on an individual’s name will open a read-only version of the Individual Demographic Form (IDF) of that individual in a pop-up window.
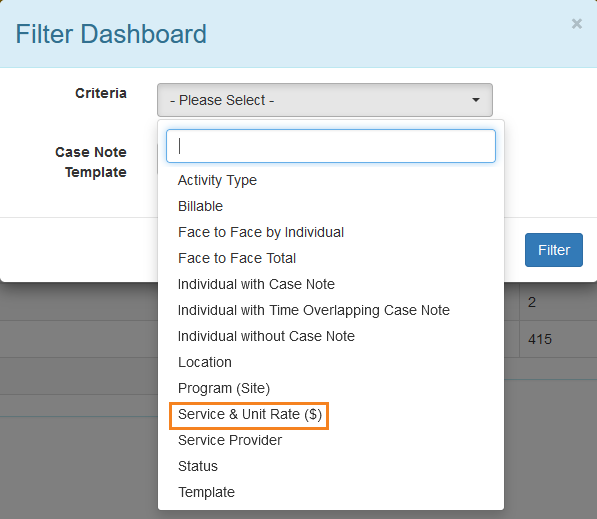
- A new section titled ‘Service & Unit Rate ($)’ has been added on the Case Note Dashboard to show information from the Service & Unit Rate ($) field of Case Notes and corresponding counts.
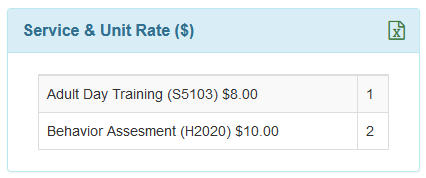
The ‘Service & Unit Rate ($)’’ option has been added to the Criteria dropdown field of the ‘Filter Dashboard’ popup window.
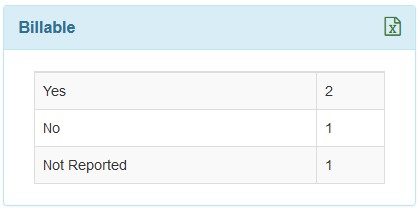
- For fields with ‘Yes’ and ‘No’ options in Case Notes, the options in the corresponding sections of the Case Note Dashboard have been sorted in the following order: ‘Yes’, ‘No’, ‘Not Reported’. Previously, these options used to be listed alphabetically.
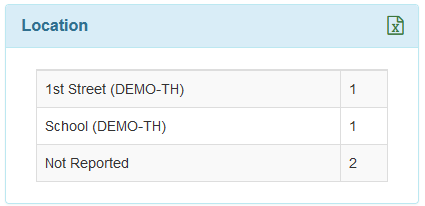
For fields with multiple options in Case Notes, the options in the corresponding sections of the Case Note Dashboard will be listed alphabetically and the ‘Not Reported’ option will be listed last. Previously, all the options including the ‘Not Reported’ option used to be listed alphabetically.
- If a user switches to another provider and generates the Case Note Dashboard, then the Comments column of the ‘Activity Tracking Search’ results page will show the provider’s name and code.

Drug Count New!
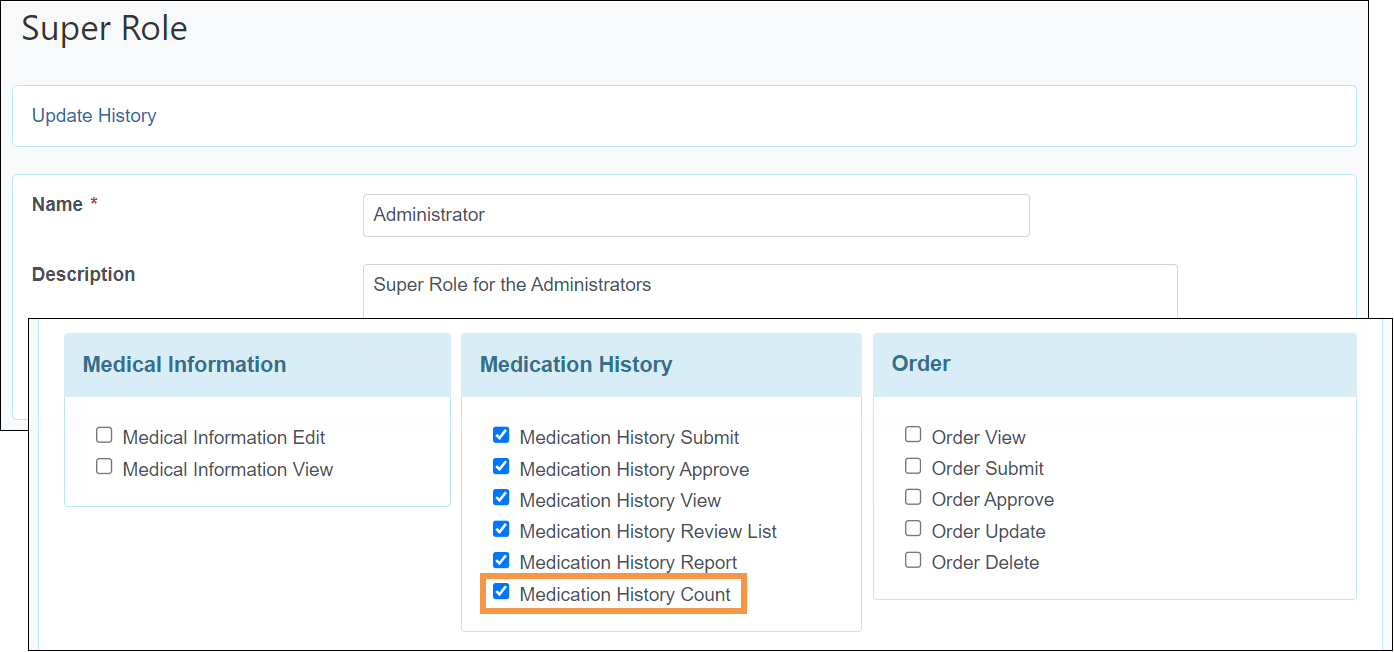
[Back to Top]- Drug Count for medications has been introduced in this release. A new caseload-based role titled Medication History Count has been added in the ‘Medication History’ section of the ‘Super Role’ pages.
- Users assigned with the Medication History Count role will have a new Drug Count option in the ‘Medication History’ section of the Health tab. Users will be able to add new drug counts and search for the recorded drug counts using the New and Search links, respectively.

- Clicking on the New link next to the Drug Count option, users will be able to select an individual to record a new count for Approved and Discontinued Medication History forms with Drug Count enabled.
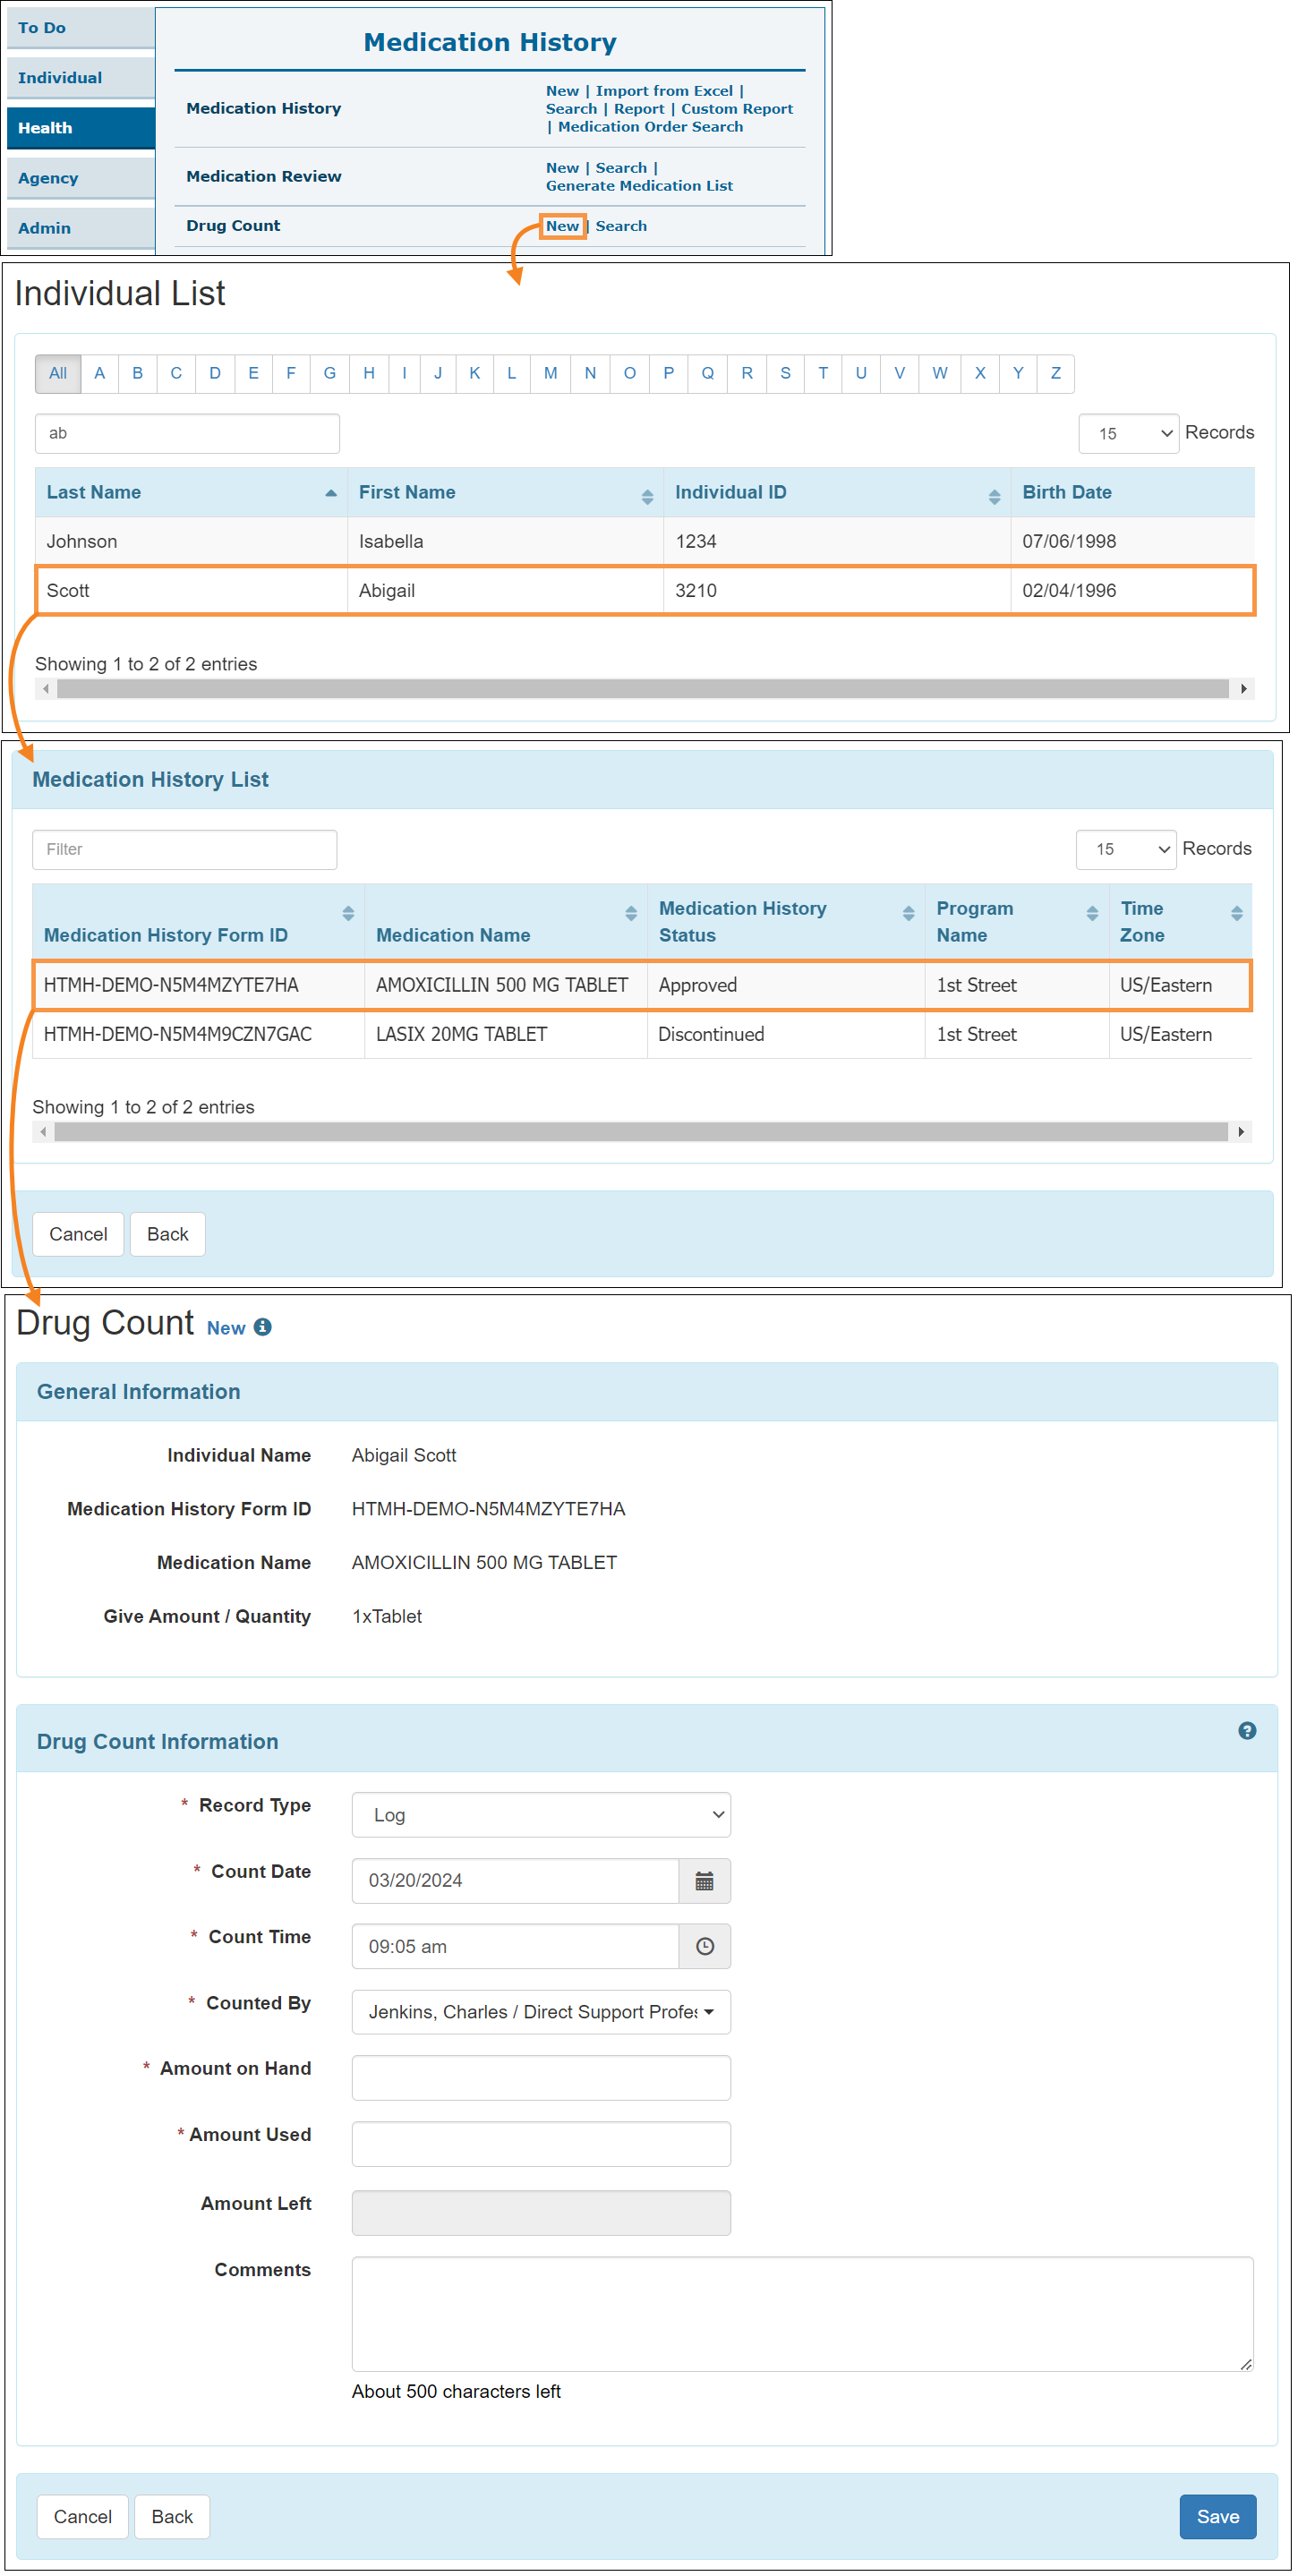
- The following will be applicable for a New Drug Count form:
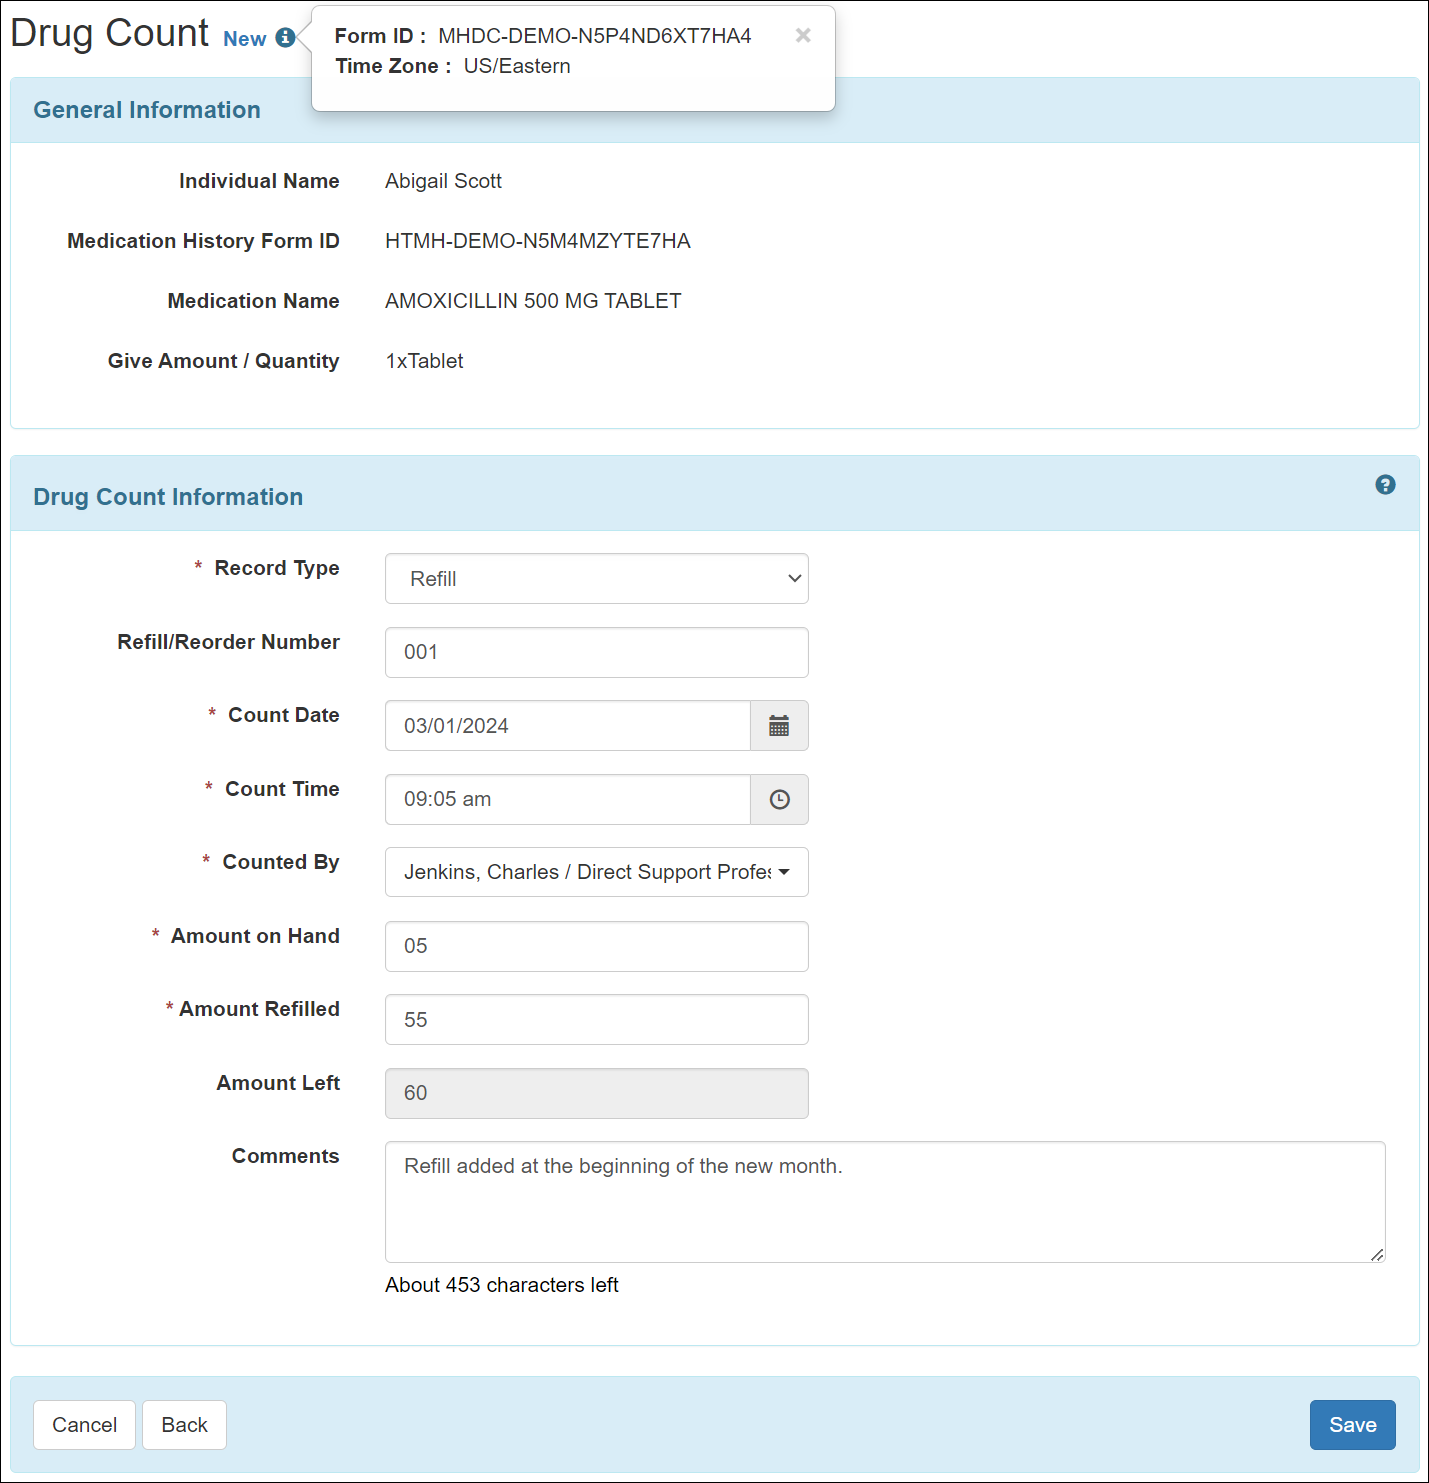
- The Time Zone field on the popup after clicking on the 'i' icon on top of the page will display the Time Zone of the selected Medication History form.
- Information displayed in the ‘General Information’ will appear from the selected Medication History form.
- Users can record Log, Refill, Wasted, Destroyed, and Returned type Drug Count using the Record Type dropdown field.
- The Count Date and Count Time fields will auto-populate the current date and time based on the Time Zone of the Drug Count form. However, users will also be able to update it as necessary.
- The Count By dropdown field will display the users who are assigned with the Medication History Count role. The user who is recording the form will be selected in this field by default.
- The Amount field in between Amount on Hand and Amount Left will appear based on the selected Record Type of the Drug Count form.
- The Amount Left field will auto-calculate the left amount based on the information entered in the associated Amount fields.
- Amount can be recorded within a maximum of 2 decimal numbers.
- If Record Type is selected as Refill, then a Refill/Reorder Number field will appear in between the Record Type and Count Date fields.
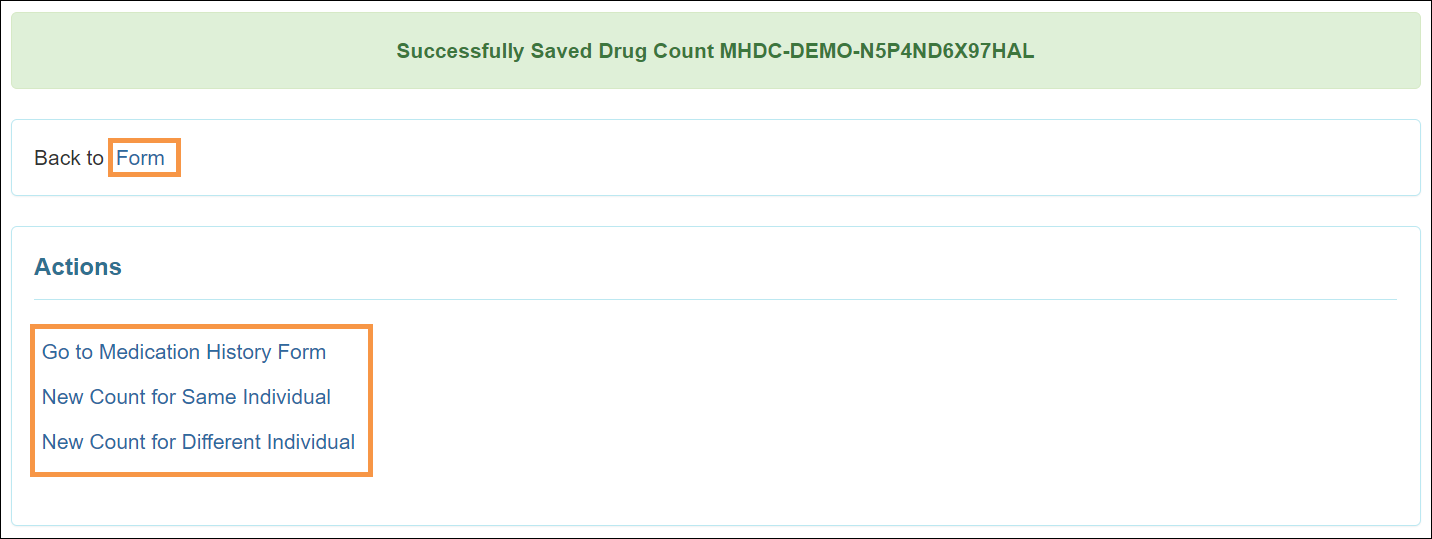
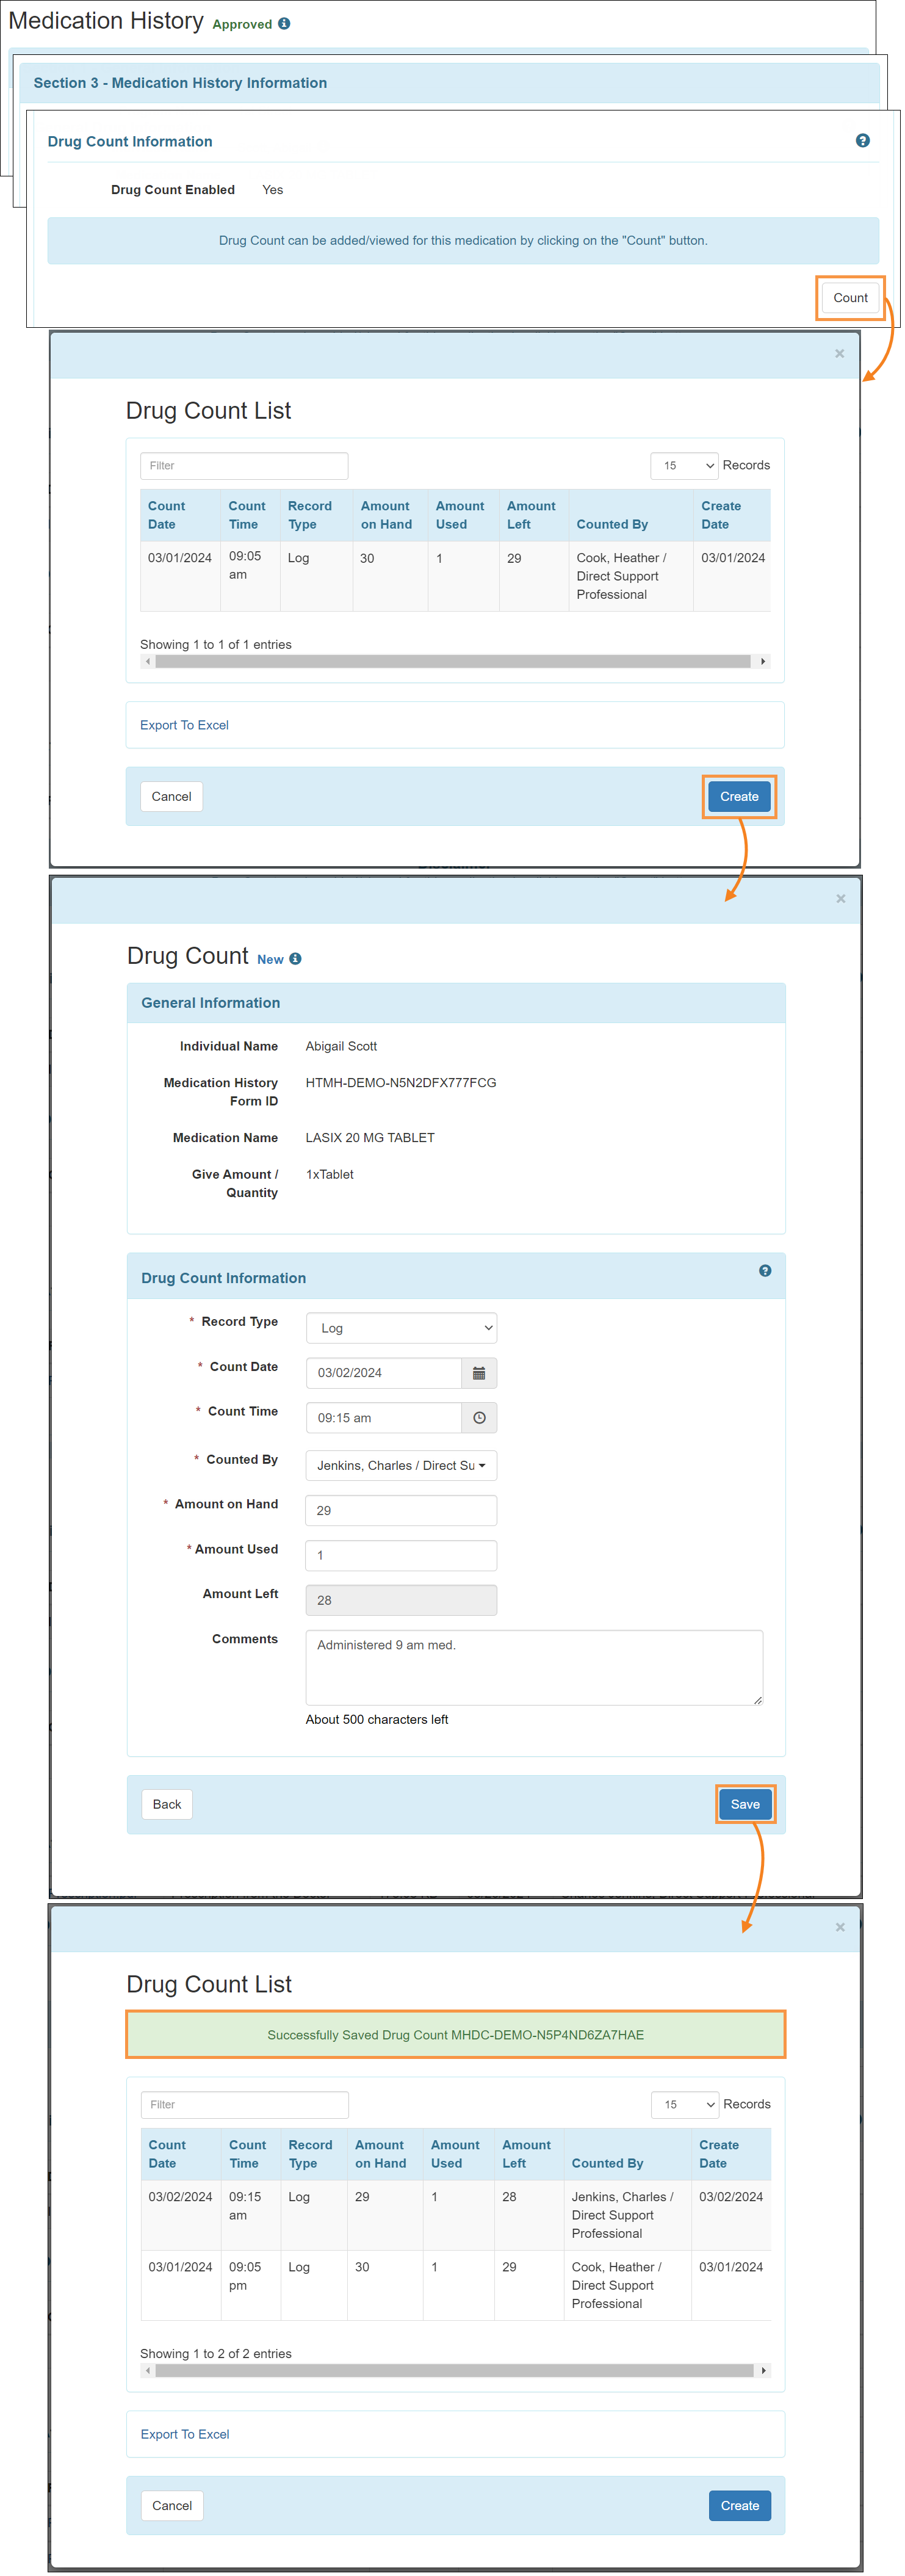
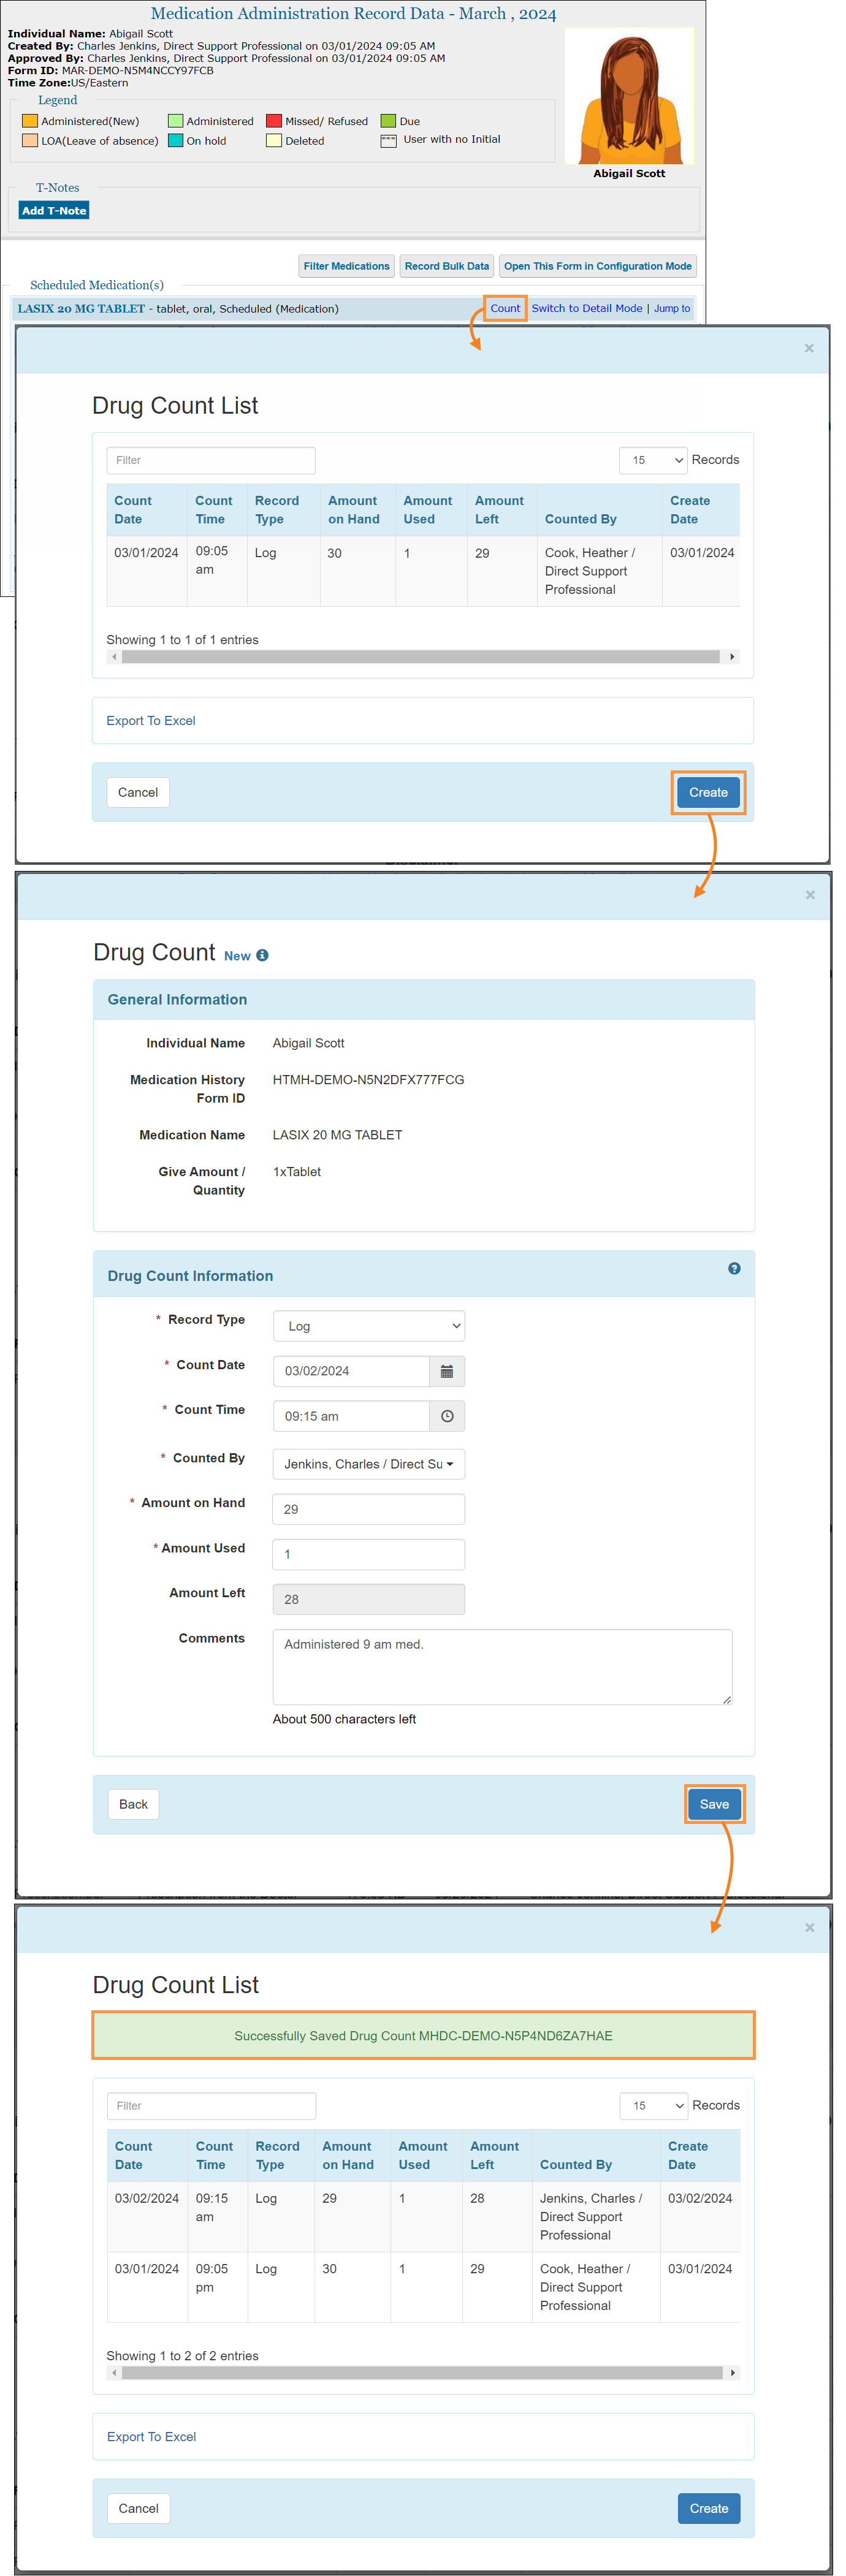
- Once the Drug Count form is saved, a success message will be displayed on the next page, where users can access a Back to Form link to navigate back to the saved Drug Count form. Users can also use the links in the ‘Actions’ section to add another count for the same or different individual or access the respective Medication History form if they have sufficient privileges.
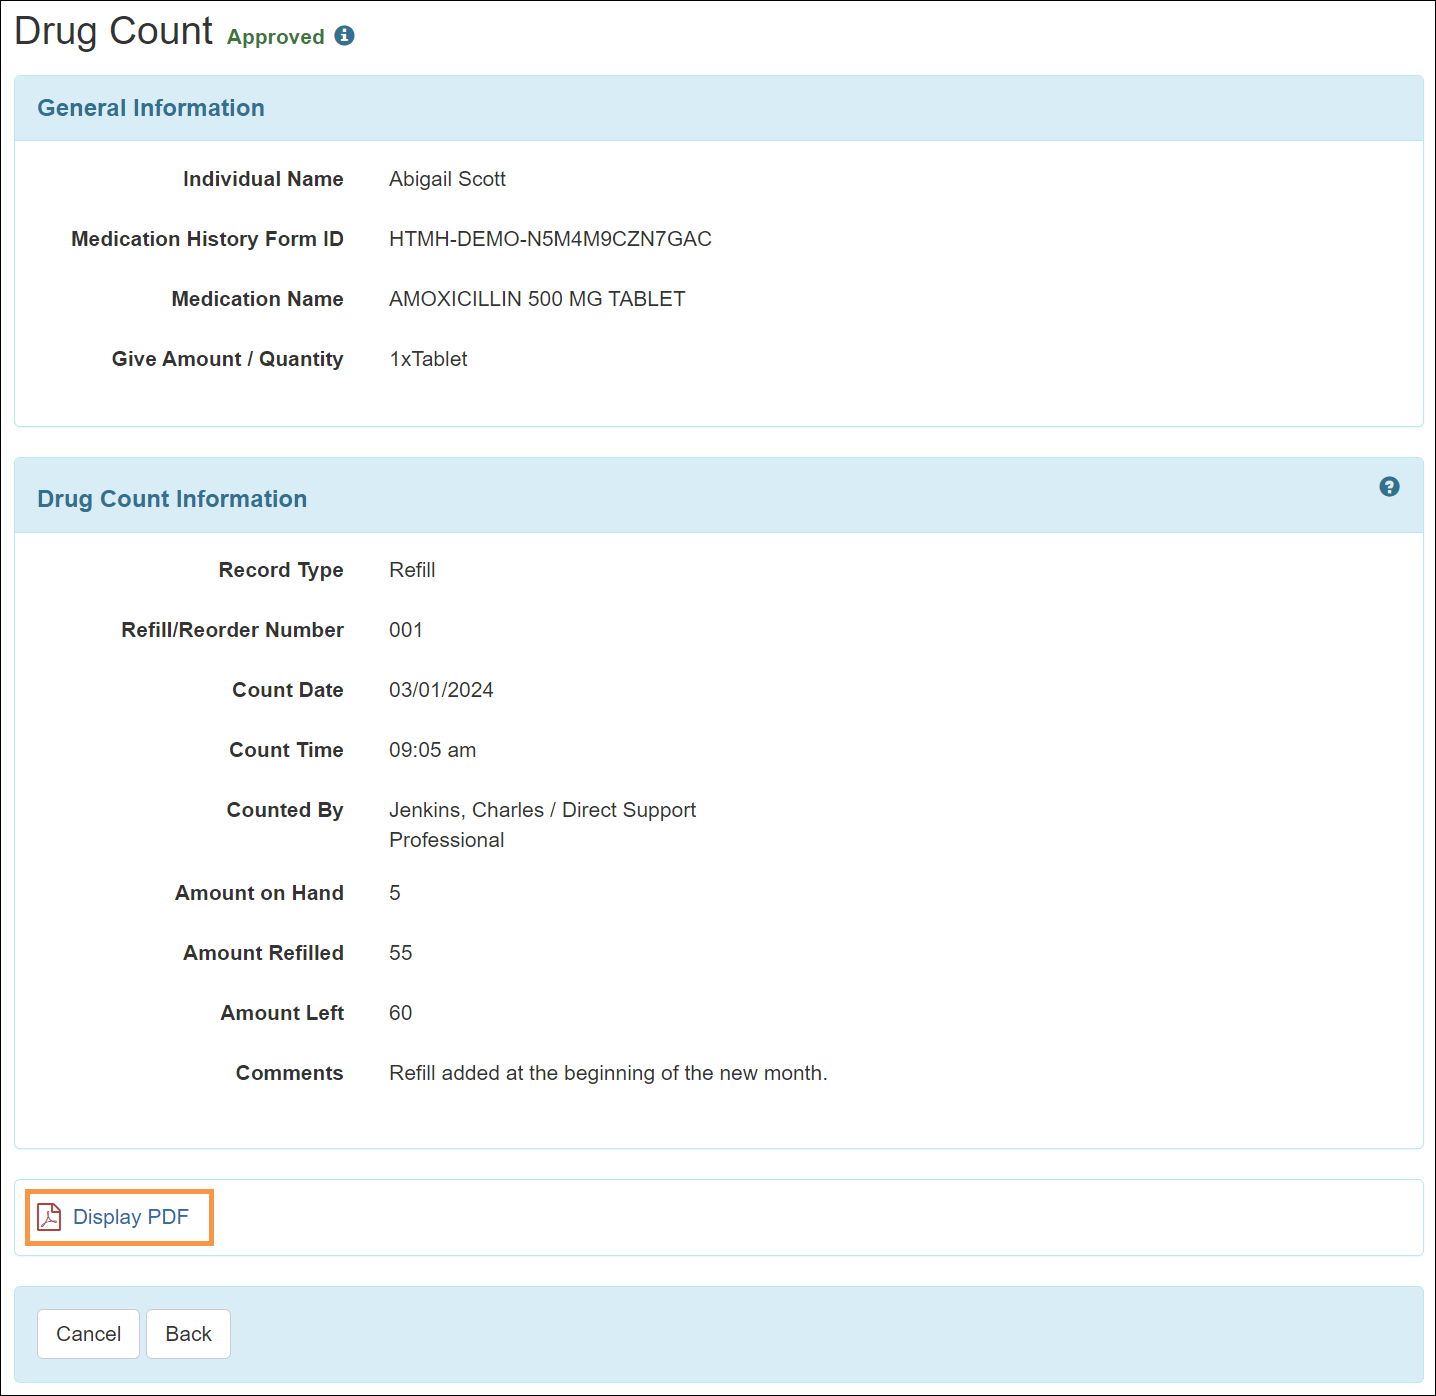
- Saved Drug Counts will remain in the system in Approved status, and users will not be able to update or delete a Drug Count form. Users can generate a PDF of the Approved Drug Count form by using the Display PDF button at the bottom.
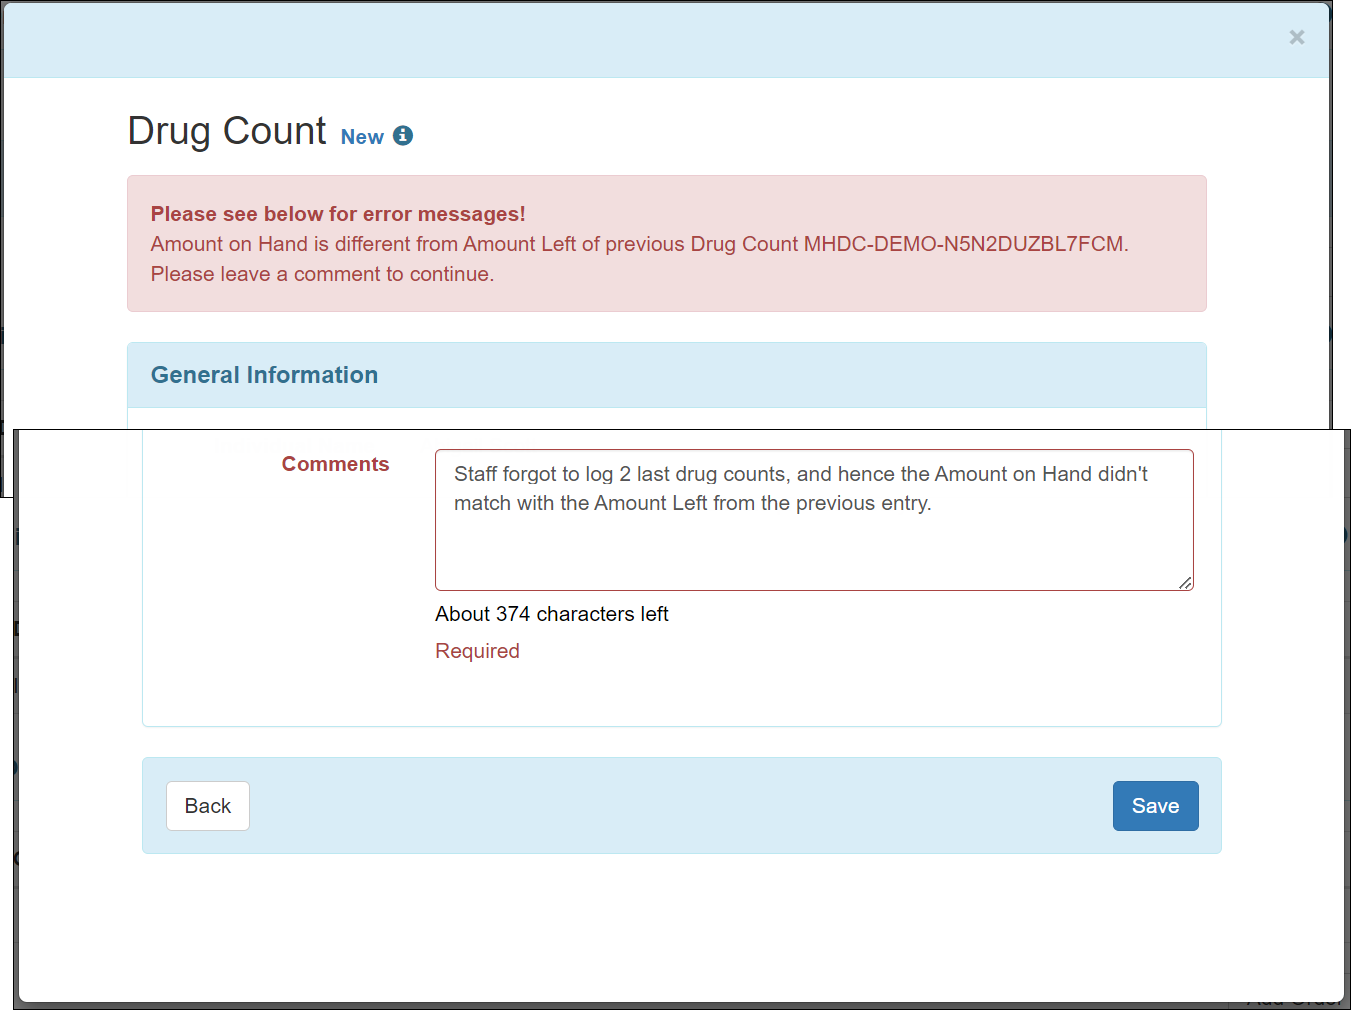
- If users record a Drug Count where the Amount on Hand is different from the Amount Left information of the previous record (based on the latest Count Date and Count Time), then they will receive a confirmation warning message.
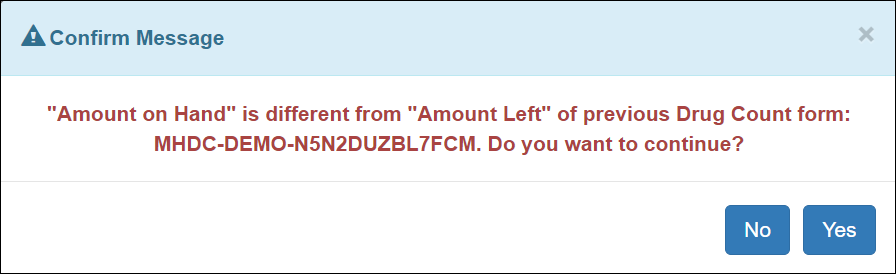
To save the Drug Count while keeping inconsistency between the Amount on Hand value and the Amount Left value on previous entry, users must leave a comment in the Comments textbox of the Drug Count form.
- Clicking on the Search link next to the Drug Count option, users will be able to search for the recorded Drug Count(s).
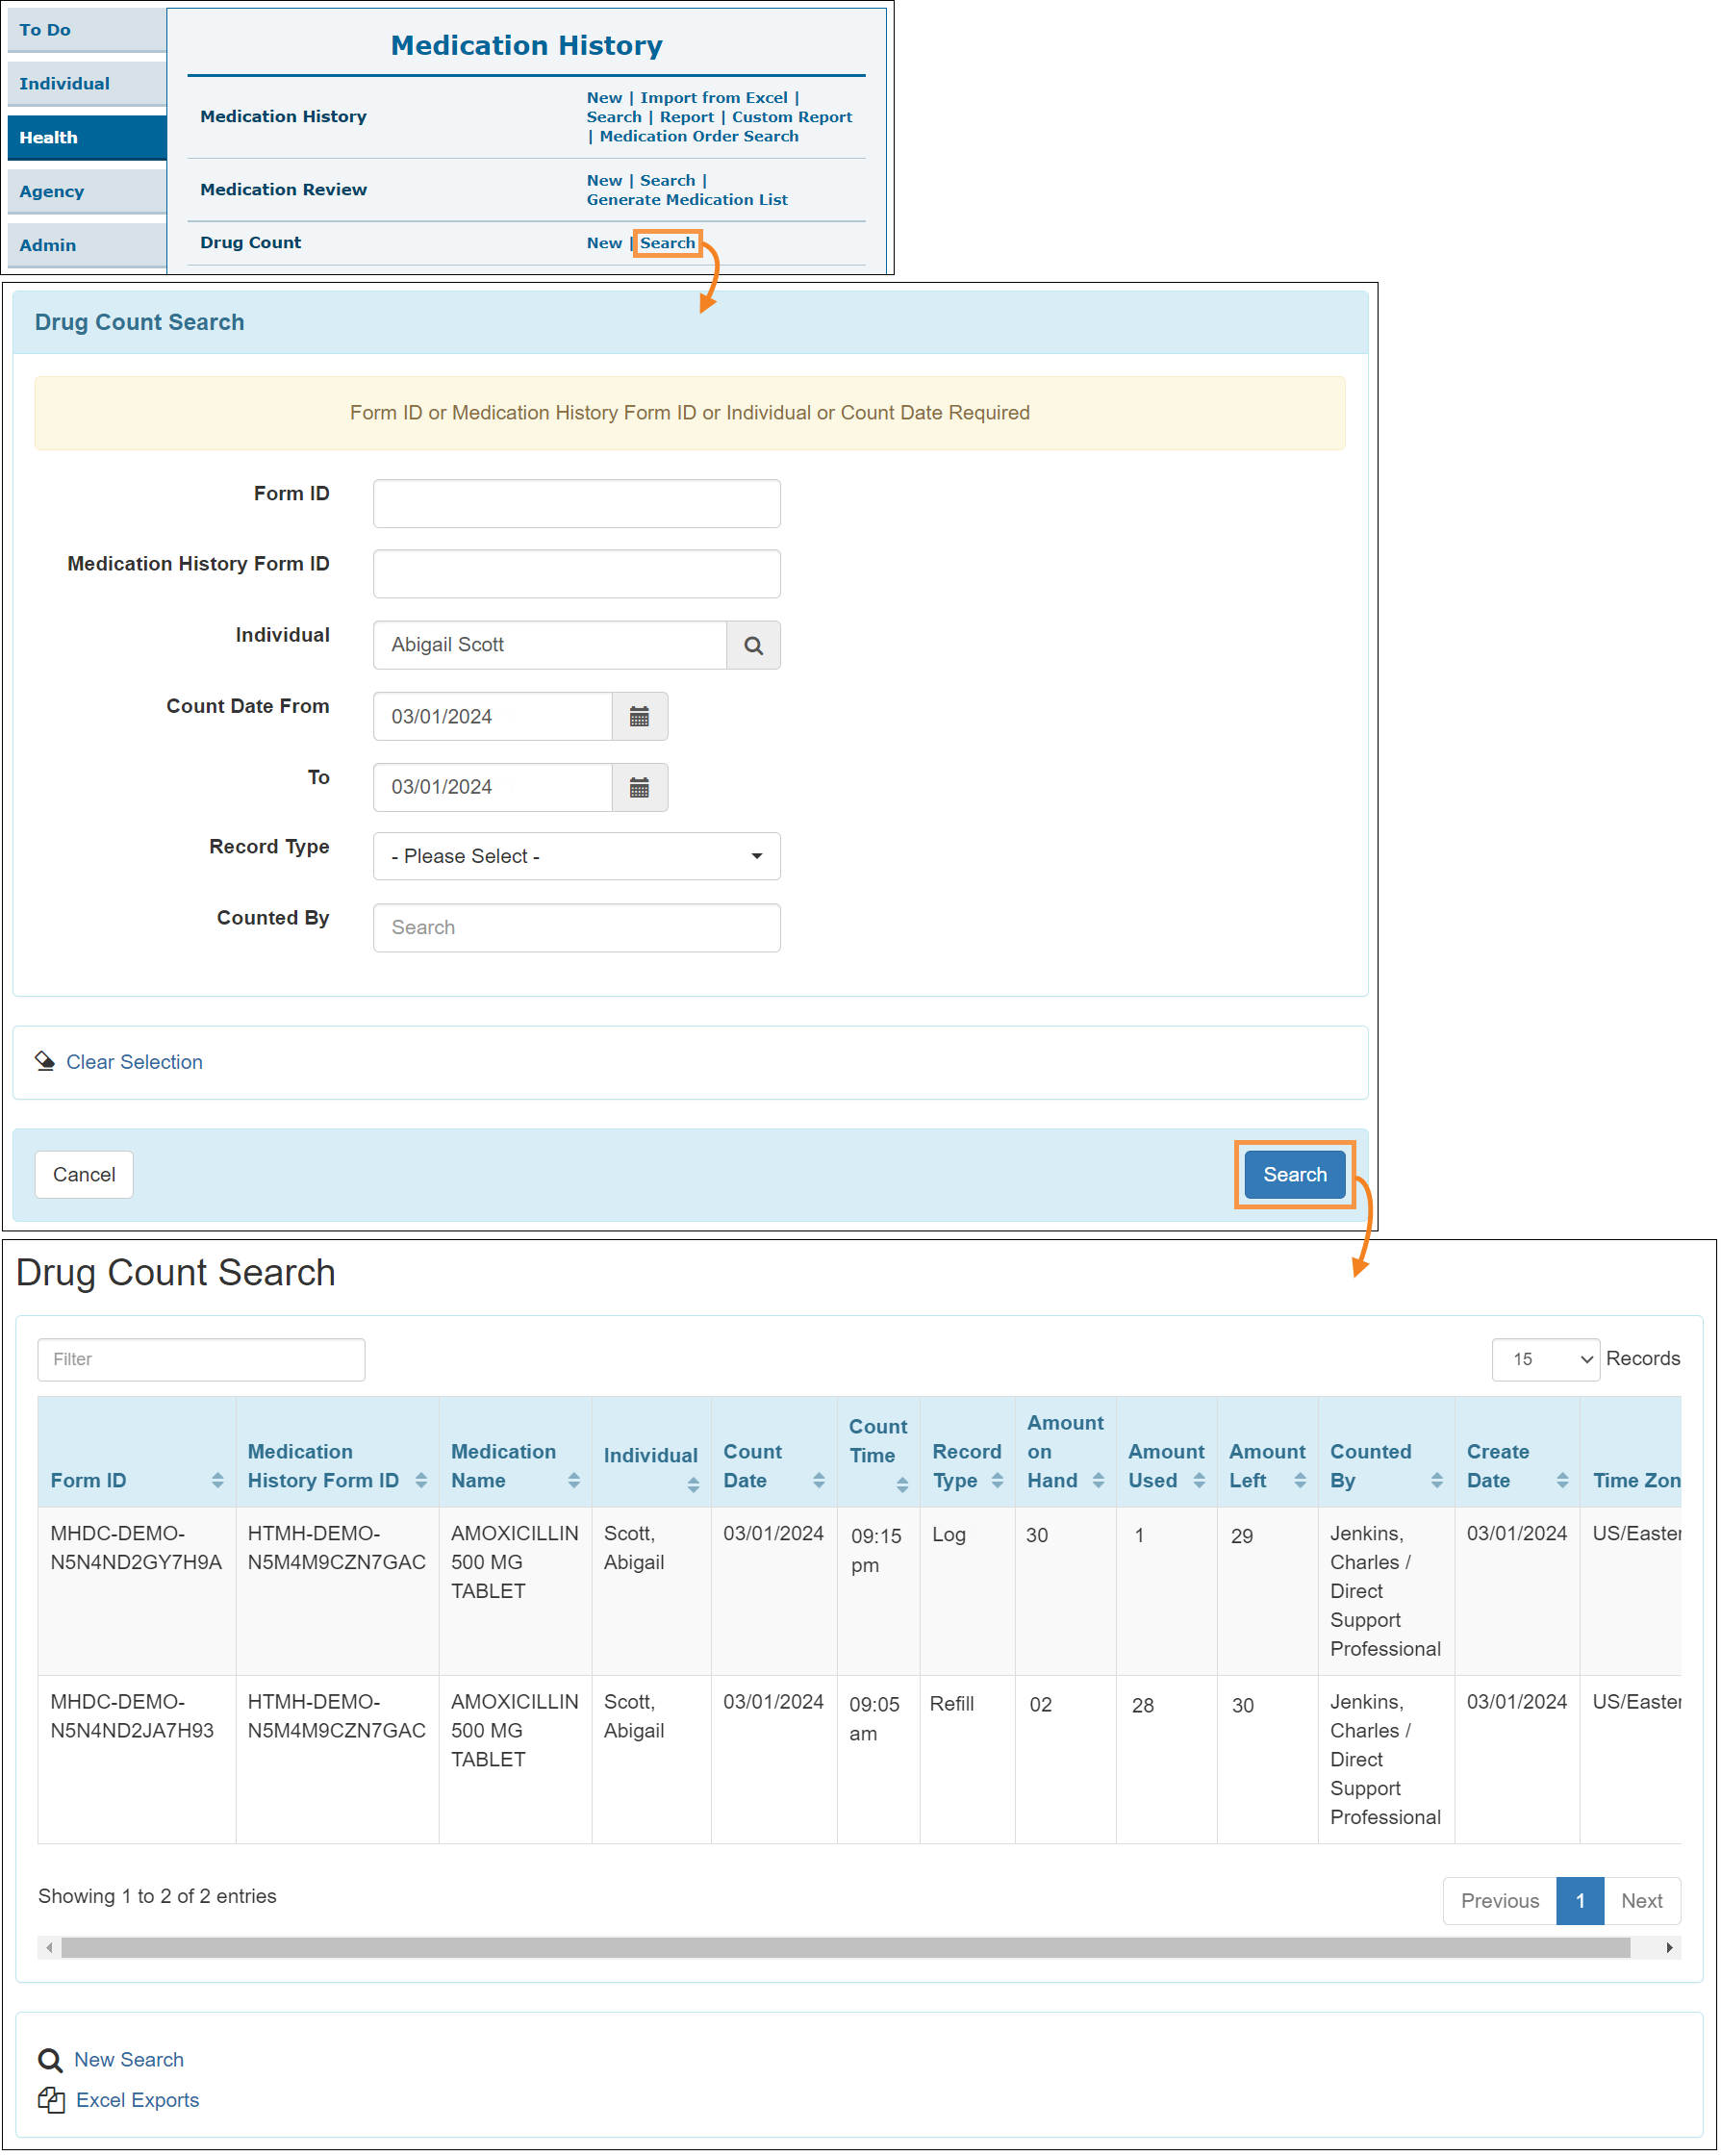
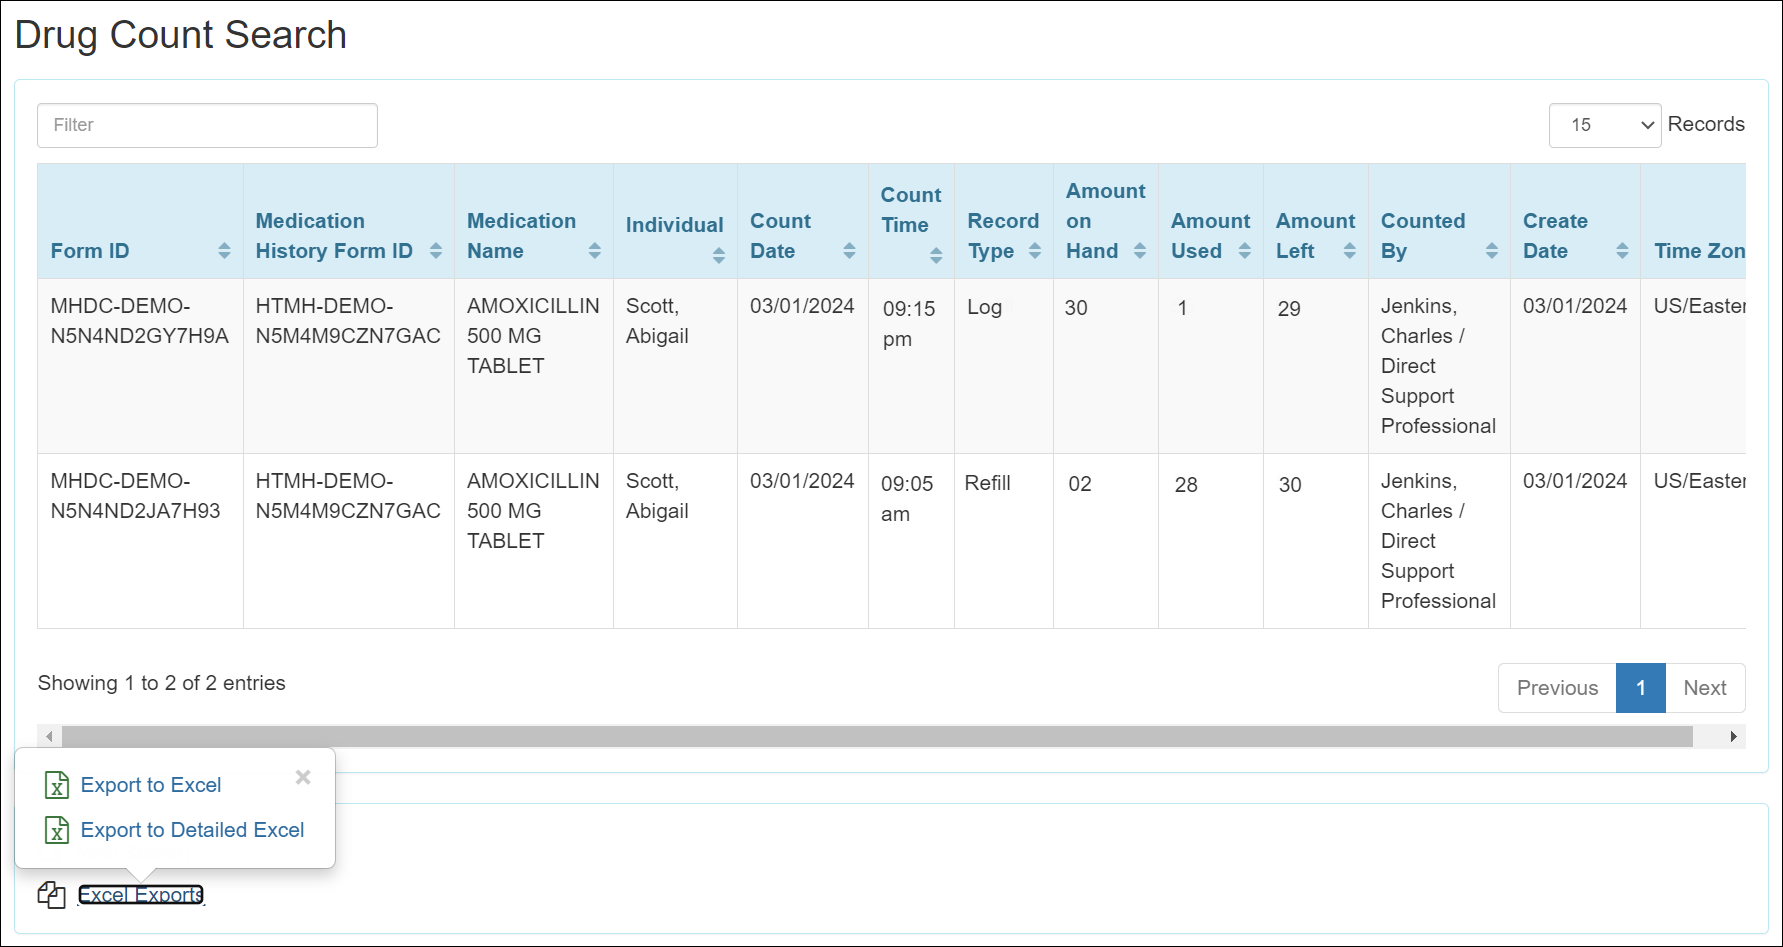
- On the ‘Drug Count Search’ results page, the Drug Counts will be listed in ascending order of the latest Count Date and Count Time. Users assigned with appropriate privileges will be able to export the displayed Drug Counts into an Excel or Detailed Excel using the Excel Exports link at the bottom of the page.
- Users assigned with the Medication History Count role will also be able to record and view the recorded Drug Count from the Medication History form and MAR form. Upon saving a Drug Count from Medication History or MAR, a success message will be displayed on top of the ‘Drug Count List’ page, and the recorded Drug Counts will appear on top of the list based on the latest Count Date and Count Time. Users assigned with appropriate privileges will be able to use the Export Excels link to export the Drug Count list into Excel.
- Medication History Form: Drug Count can be recorded from the read-only mode of the Approved and Discontinued Medication History forms, and the recorded Drug Count(s) can be viewed from the Approved and Discontinued Medication History forms and Deleted Medication History forms that were approved before deletion.
- MAR form: Drug Count can be viewed and recorded from the Data Entry mode of the MAR form.
- Medication History Form: Drug Count can be recorded from the read-only mode of the Approved and Discontinued Medication History forms, and the recorded Drug Count(s) can be viewed from the Approved and Discontinued Medication History forms and Deleted Medication History forms that were approved before deletion.
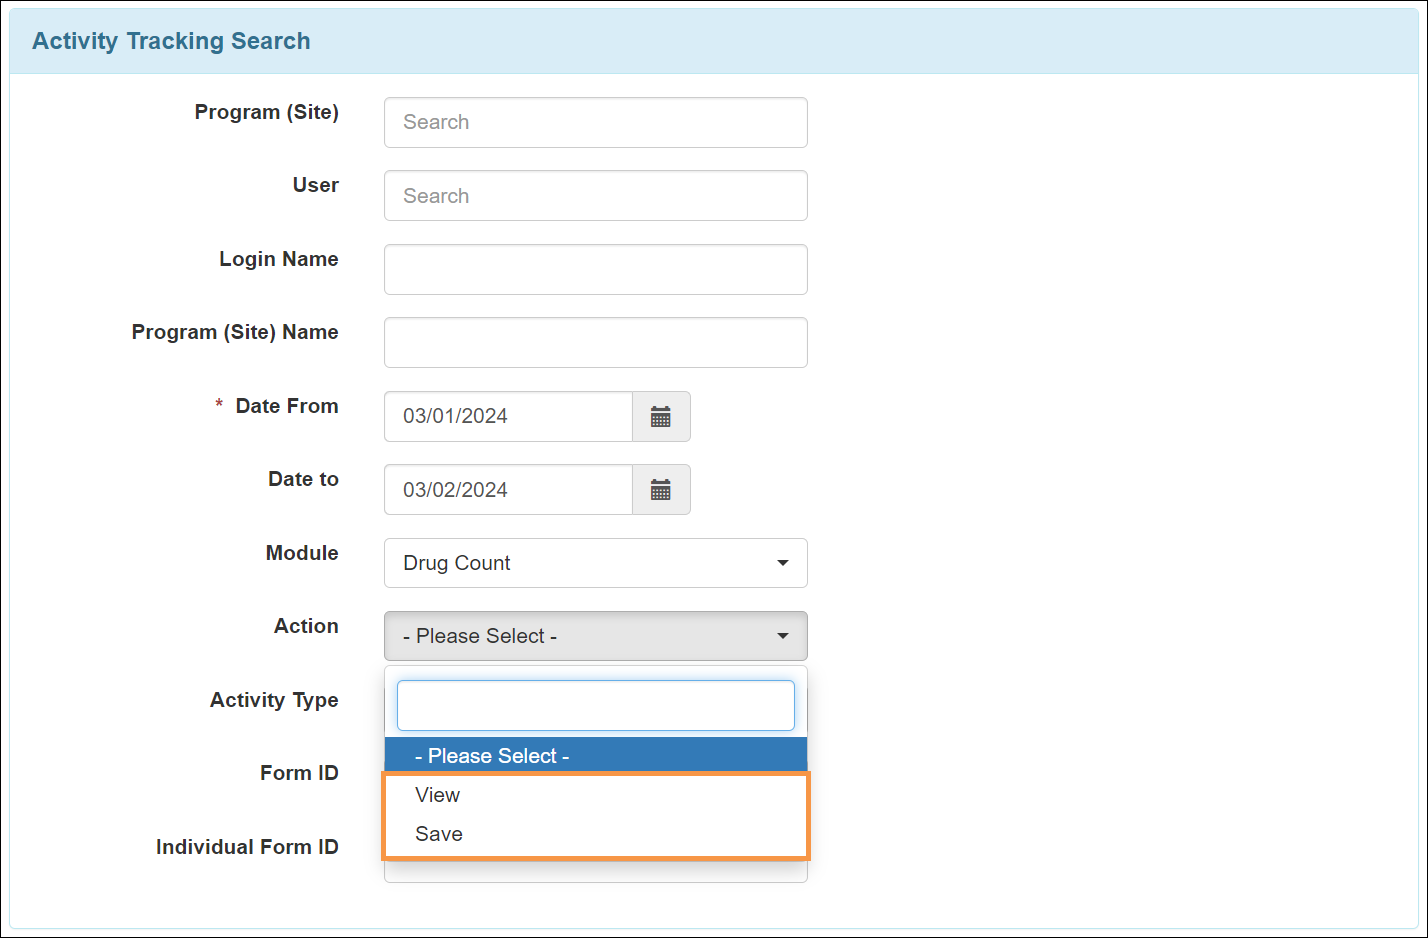
- Drug Count has been added as a new option in the Module drop down field on the ‘Activity Tracking Search’ page.

- The following actions have been added in the Action dropdown field of the 'Activity Tracking Search' page for the Drug Count module:
- Save
- View
Employment History
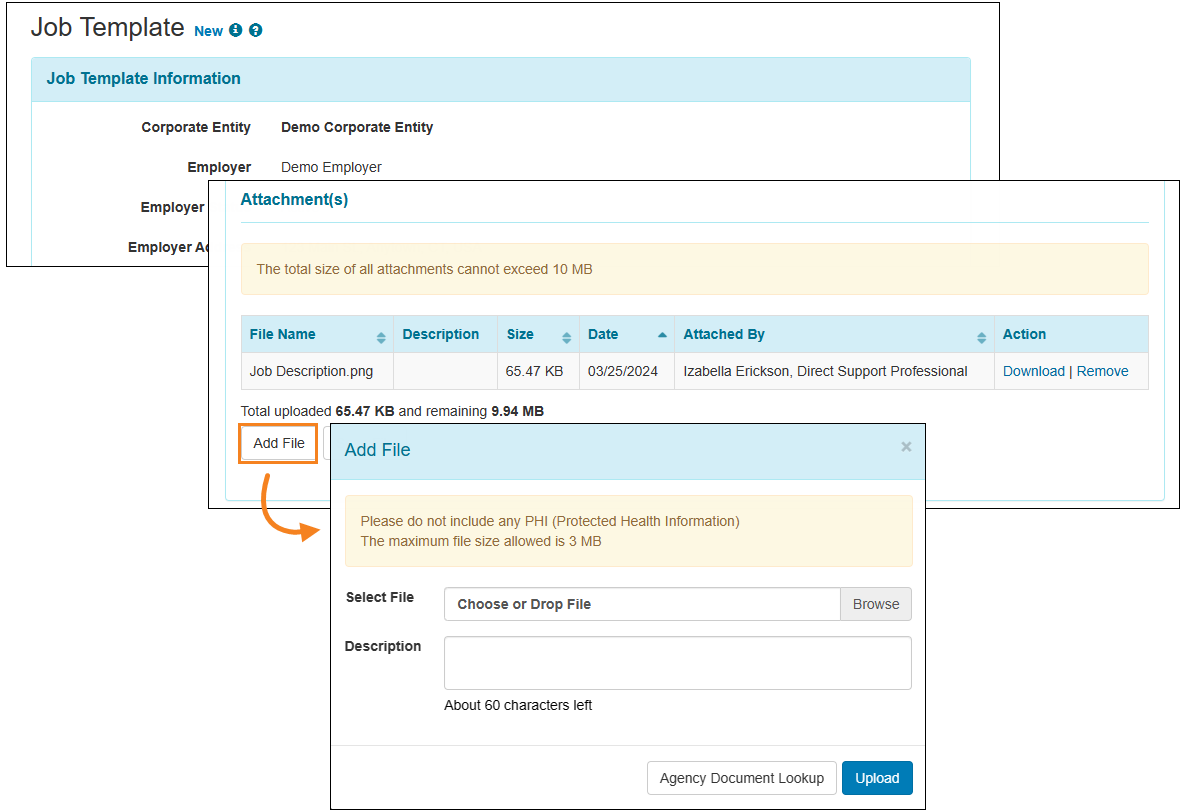
[Back to Top]- Users can now add multiple attachments with a maximum file size of 3MB for one attachment and 10MB for all attachments combined to the ‘Job Template’ form located on the Agency tab and the following Employment History forms located on the Individual tab:
- Additional Information
- Application and Interview
- Benefits Counseling
- Career Development Plan
- Employment Milestone
- Employment Referral
- Funding Source
- Job Detail
- Training/Coaching
- Variance
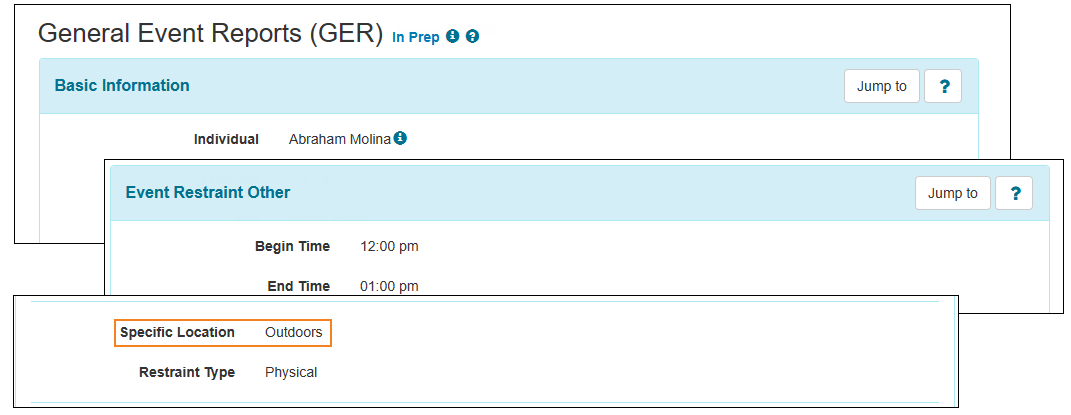
General Events Reports (GER)
[Back to Top]- The Specific Location field will now also be copied to the new GER while copying 'Restraint Related to Behavior' or 'Restraint Other' Event Type GERs for different individuals.
Individual Demographic Form (IDF)
[Back to Top]- When an individual is imported into the application from an Excel file, the Location field in the ‘Residential Address’ section of that individual's Individual Demographic Form (IDF) will be automatically populated with geographical coordinates based on the data entered in the Residential Street 1, Residential Street 2, Residential City, Residential State, Residential Zip, and Residential Country columns of the Excel file.
Individual Plan
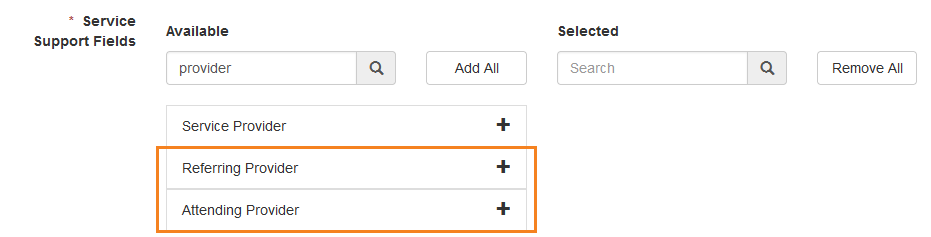
[Back to Top]- Two new options, ‘Referring Provider’ and ‘Attending Provider’, have been added to the Service Support Fields multi-select list in Plan Templates.
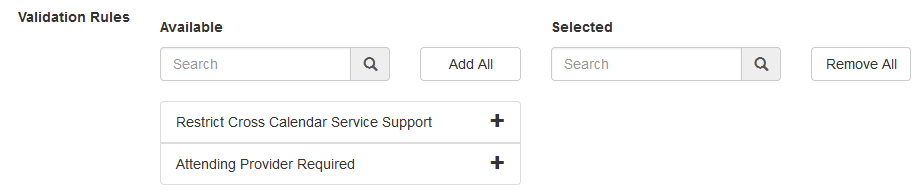
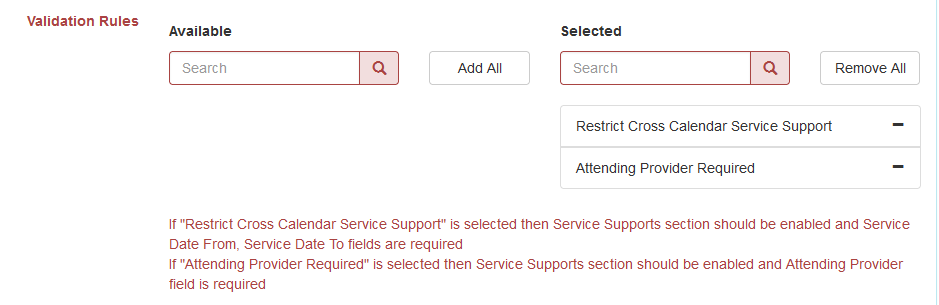
- A new multi-select field titled Validation Rules has been added on the Plan Template with two options: ‘Restrict Cross Calendar Service Support’ and ‘Attending Provider Required’. Selecting the ‘Restrict Cross Calendar Service Support’ option will prevent users from creating Individual Plans with Service Support forms spanning multiple calendar years and selecting the ‘Attending Provider Required’ option will make the Attending Provider field required in the Service Support forms of the associated Individual Plans.
If the ‘Restrict Cross Calendar Service Support’ option is selected, then the ‘Service Supports’ checkbox needs to be selected from the Enabled Sections list, and ‘Service Date From’ and ‘Service Date To’ options need to be selected from the Service Support Fields list. If the ‘Attending Provider Required’ option is selected, then the ‘Service Supports’ checkbox needs to be selected from the Enabled Sections list and the ‘Attending Provider’ option needs to be selected from the Service Support Fields list. Otherwise, users will receive error messages when saving or approving the Plan Template.
- Selecting the new ‘Referring Provider’ and ‘Attending Provider’ options in the Plan Template will add Referring Provider and Attending Provider dropdown fields in the Service Support form of associated Individual Plans. The options in these dropdown lists will populate from the associated oversight provider.
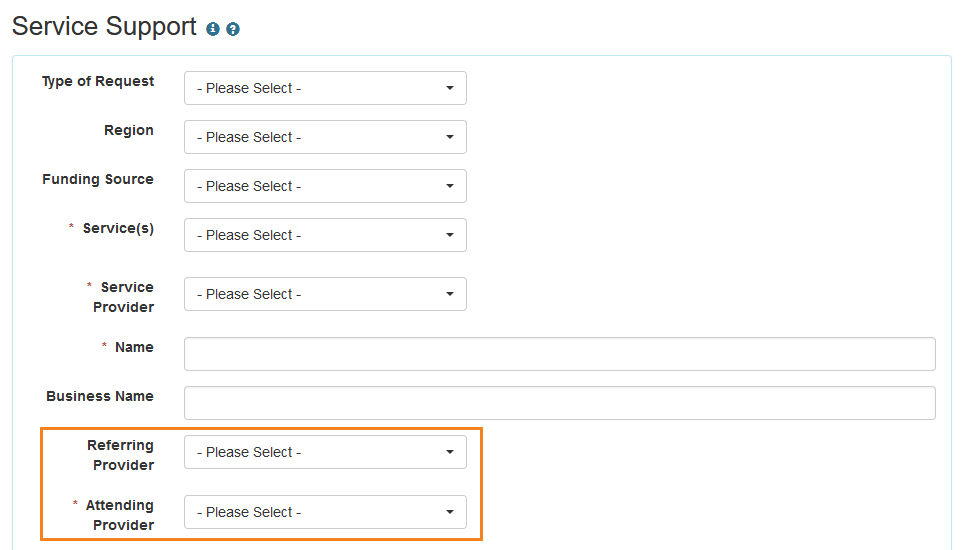
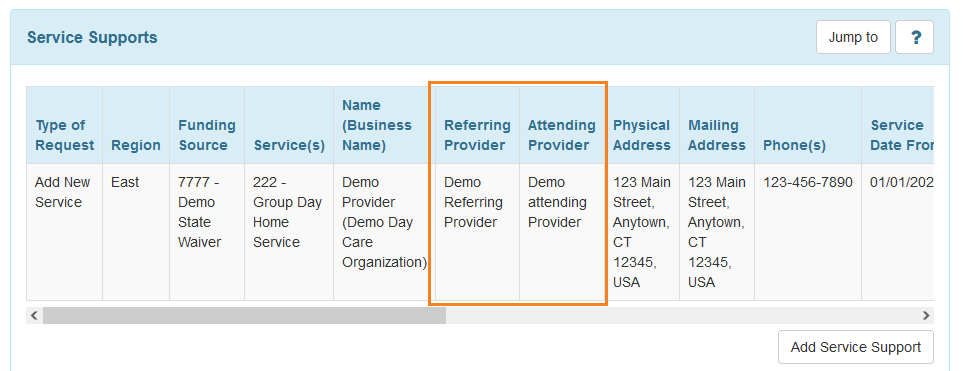
Two new columns, Referring Provider and Attending Provider, will be available in the ‘Service Supports’ section of the Individual Plans if the options are selected in the associated Plan Template.
- Previously, Rates from the Rate table in Service Directory could be added in the Service Support form if Funding Source, Service(s), and Service Date From were selected. After this release, Rates will be populated based on selected service’s Rate Type. To add Rate, Service(s) and Service Date From fields must be selected. There are 6 Rate Types:
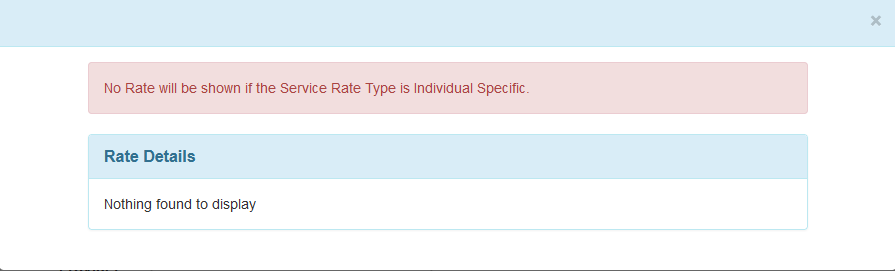
- If a Service with an Individual Specific Rate Type is selected in the Service(s) field, then no Rates will be populated and an error message will be displayed in the ‘Rate Details’ popup window stating: No Rate will be shown if the Service Rate Type is Individual Specific.
- If a Service with a Service Specific Rate Type is selected in the Service(s) field, then the Rates created for that Service will be populated.
- If a Service with a Service Provider Specific Rate Type is selected in the Service(s) field, users will also need to select the Service Provider, then the Rates created for that Service with the same Service Provider will be populated.
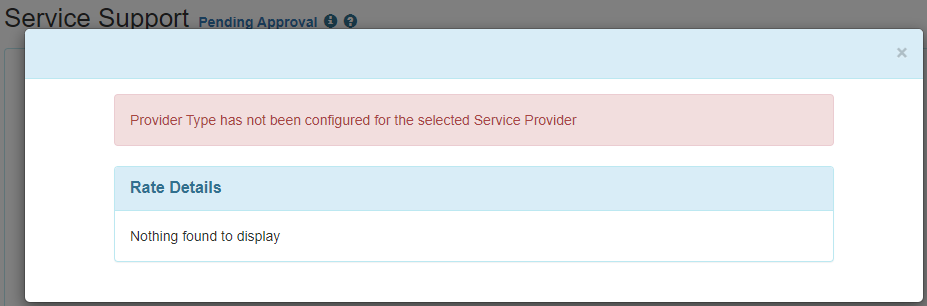
- If a Service with a Service Provider Type Specific Rate Type is selected in the Service(s) field, users will also need to select the Service Provider, then the Rates created for that service with the same Service Provider Type of the selected Service Provider will be populated.
If the selected Service Provider does not have any Service Provider Type, then clicking on the Add Rate button will show an error message stating: Provider Type has not been configured for the selected Service Provider.
- If a Service with a Waiver and Service Specific Rate Type is selected in the Service(s) field, users will also need to select the Funding Source, then the Rates created for that service with the same Funding Source will be populated.
- If a Service with an Authorized Waiver Service Specific Rate Type is selected in the Service(s) field, then all the available Rates created for that Service will be populated.
- If a Service with an Individual Specific Rate Type is selected in the Service(s) field, then no Rates will be populated and an error message will be displayed in the ‘Rate Details’ popup window stating: No Rate will be shown if the Service Rate Type is Individual Specific.
- When copying an Individual Plan with Referring Provider and Attending Provider selected, the selected items will be copied if they are in Approved status.
ISP Data
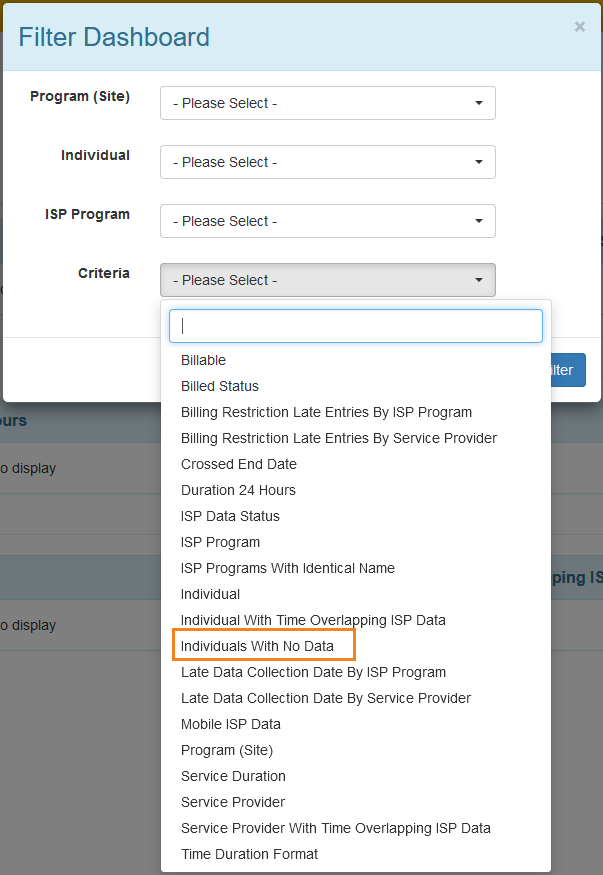
[Back to Top]- A new section titled ‘Individuals With No Data’ has been added on the ISP Data Dashboard to show the list of individuals who have no ISP Data with a Data Collection Date within the date range of the Dashboard. Clicking on an individual’s name will open a read-only version of the Individual Demographic Form (IDF) of that individual in a popup window.

- The ‘Individuals With No Data’’ option has been added to the Criteria dropdown field of the ‘Filter Dashboard’ popup window.
ISP Program
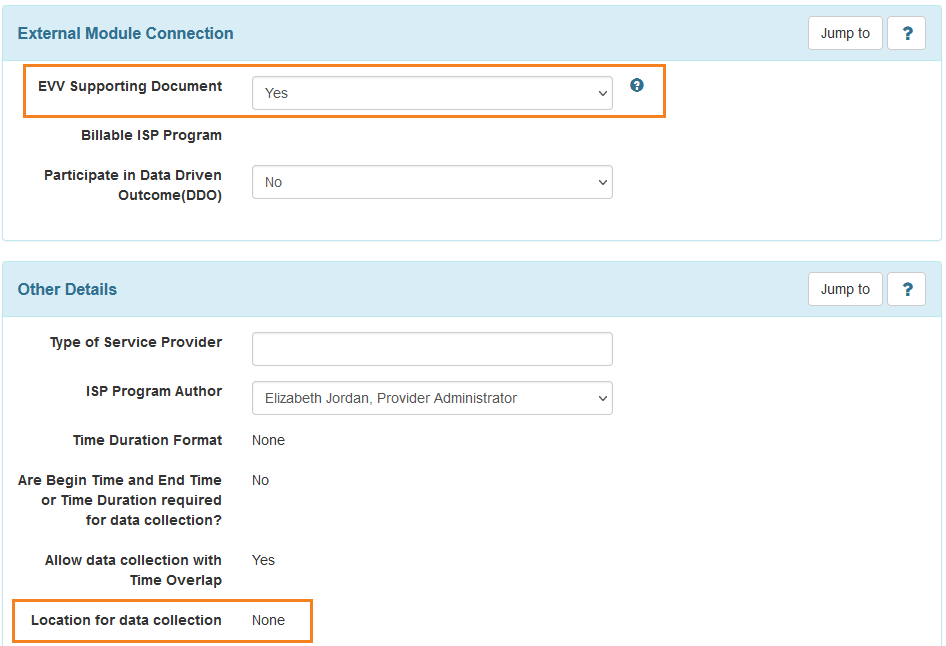
[Back to Top]- If the 'Yes' option is selected for the EVV Supporting Document field in ISP Programs and ISP Program Templates, then the 'None' option will be automatically selected for the Location for data collection field instead of the 'Optional' option. ISP Programs and ISP Program Templates created before this release will not be affected. However, when applying or copying ISP Program Templates or copying ISP Programs created before this release where the 'Yes' option is selected for the EVV Supporting Document field, the 'Optional' option of the Location for data collection field will automatically change to 'None' in the New ISP Program.
Medication History
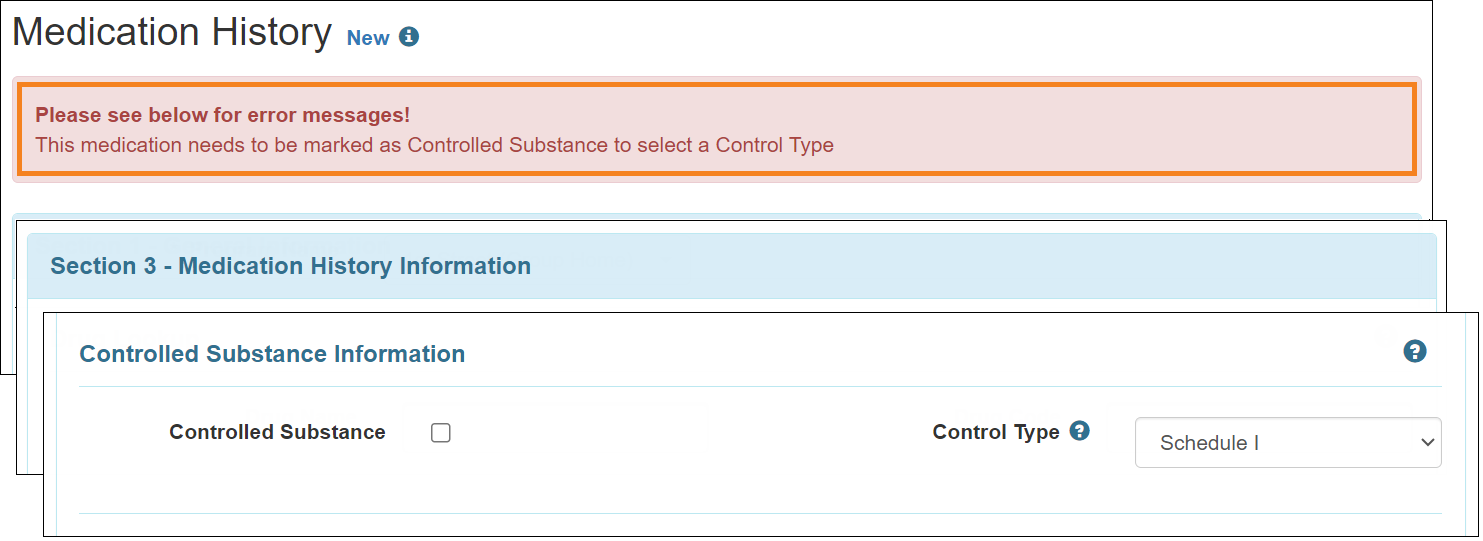
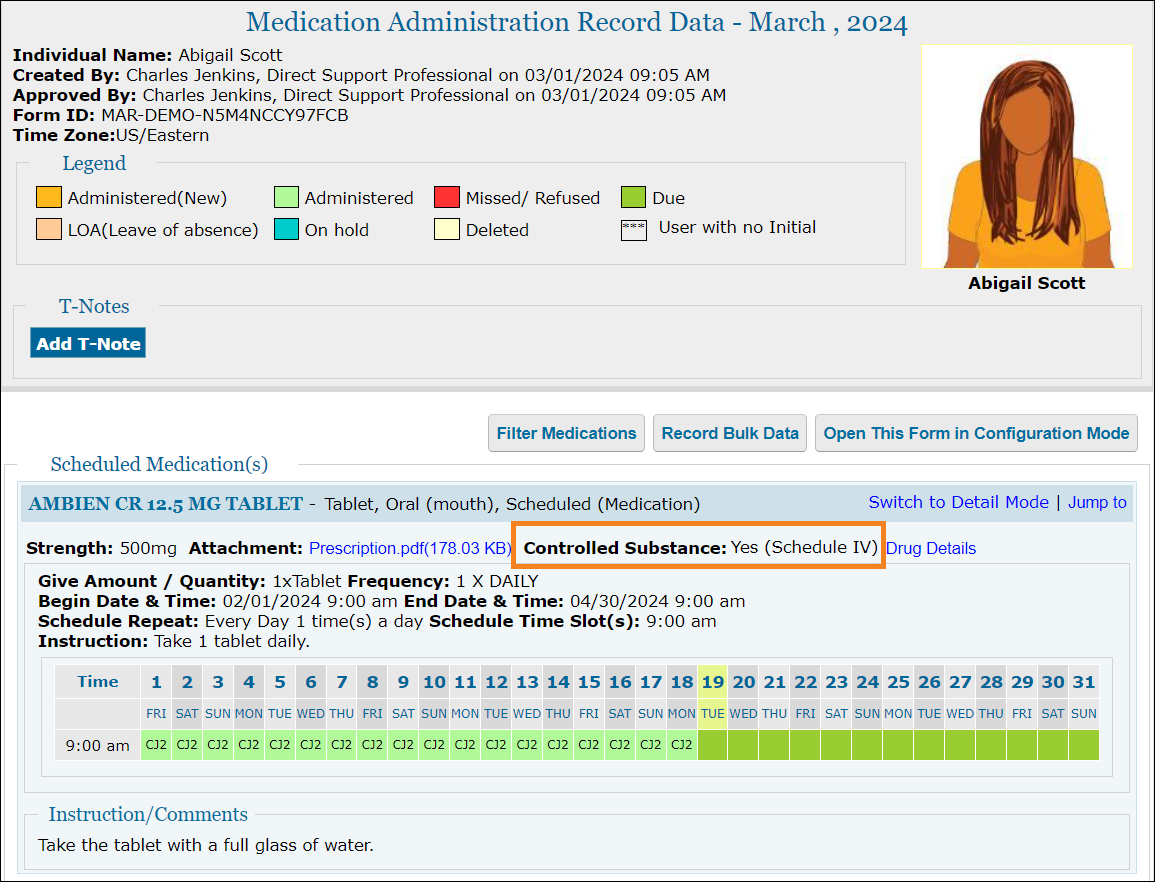
[Back to Top]- A new ‘Controlled Substance Information’ subsection has been added in the ‘Section 3 - Medication History Information’ section of the Medication History form. Users will now be able to mark a medication as control substance by using the Controlled Substance checkbox and select the type of controlled substance using the Control Type dropdown field.
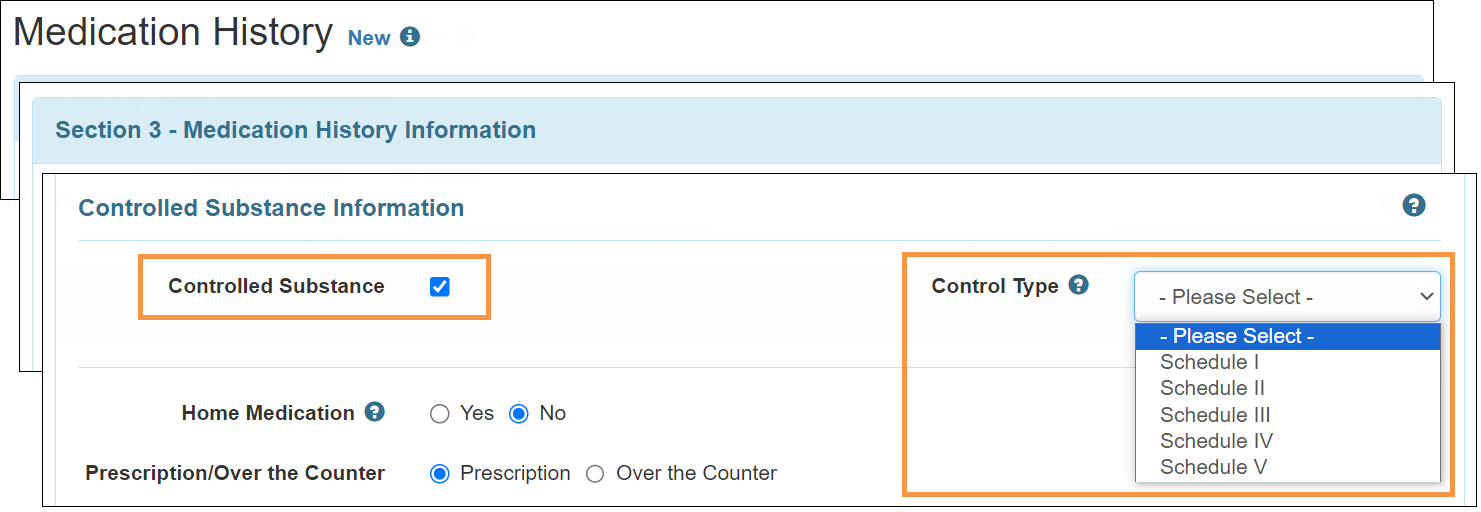
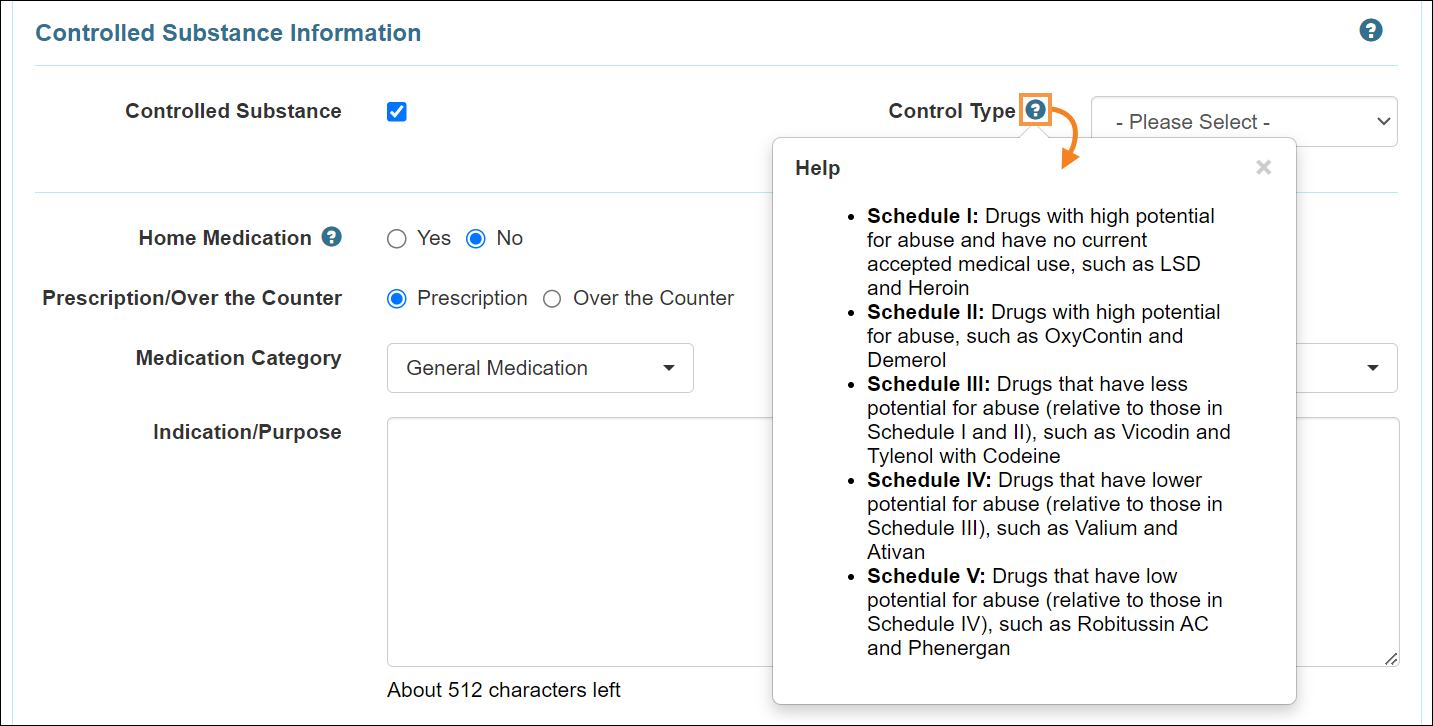
The significance of the options listed in the Control Type dropdown field can be viewed by clicking on the ? icon next to the field.
- If Control Type is selected but the medication is not marked as Controlled Substance, then while attempting to save, submit, update, or approve the form, users will receive an error message stating: ‘This medication needs to be marked as Controlled Substance to select a Control Type’.
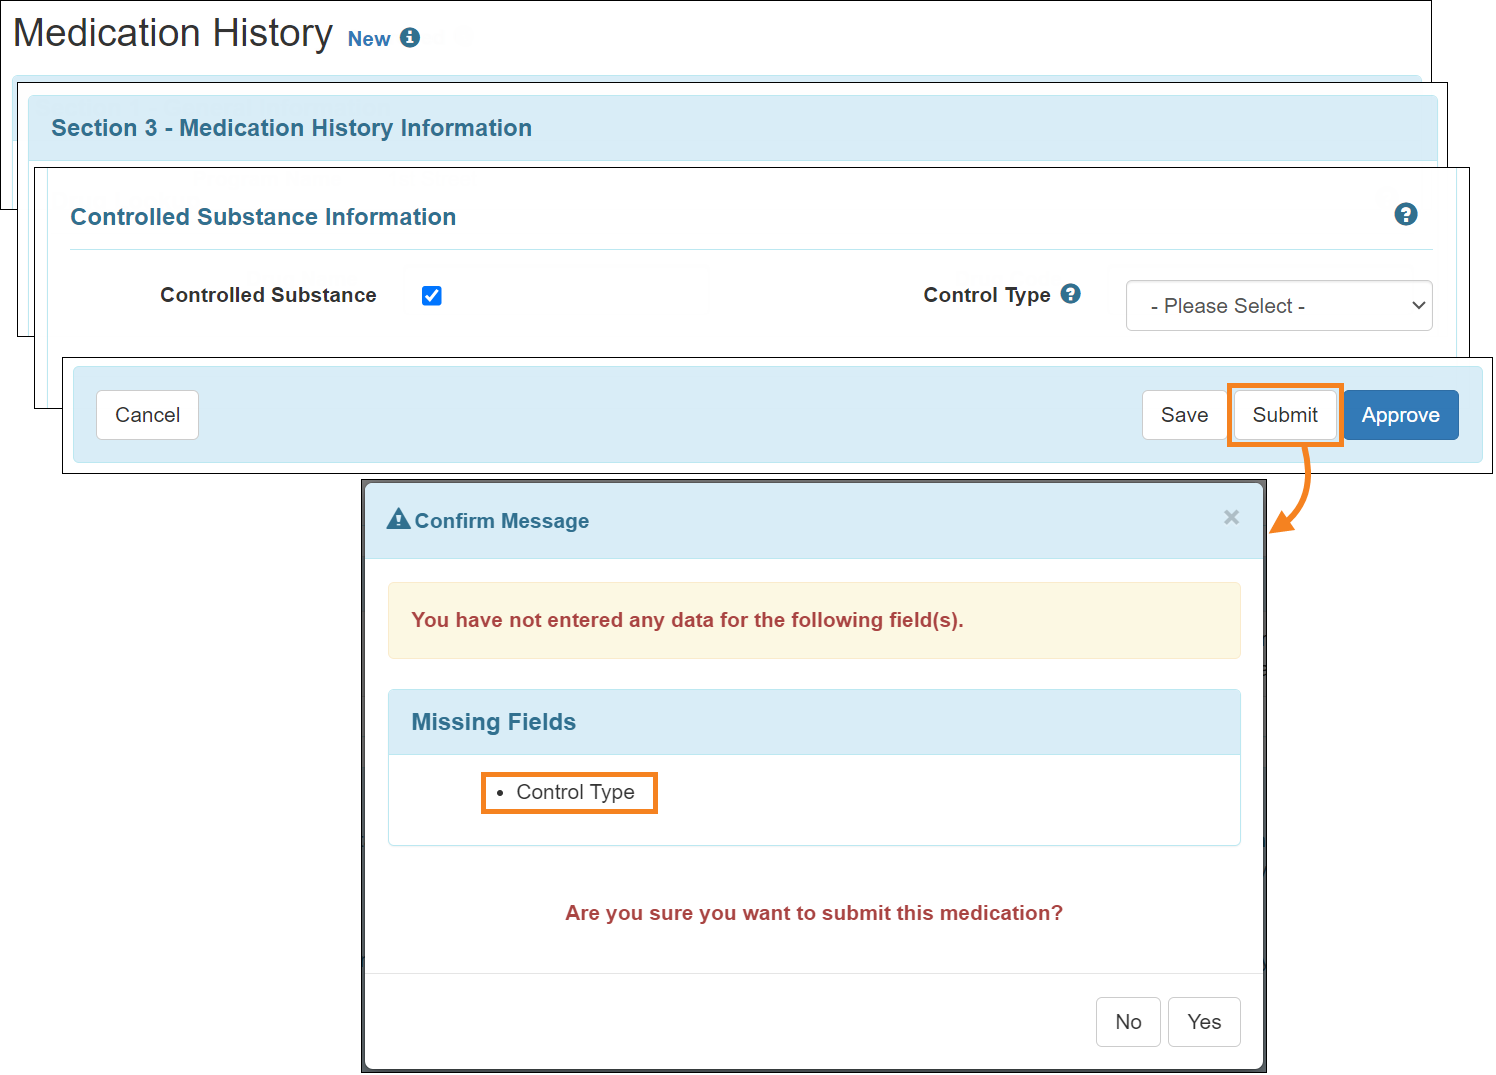
- If medication is marked as Controlled Substance but Control Type is unselected, then ‘Control Type’ will appear as a missing field while users attempt to submit or approve the form.
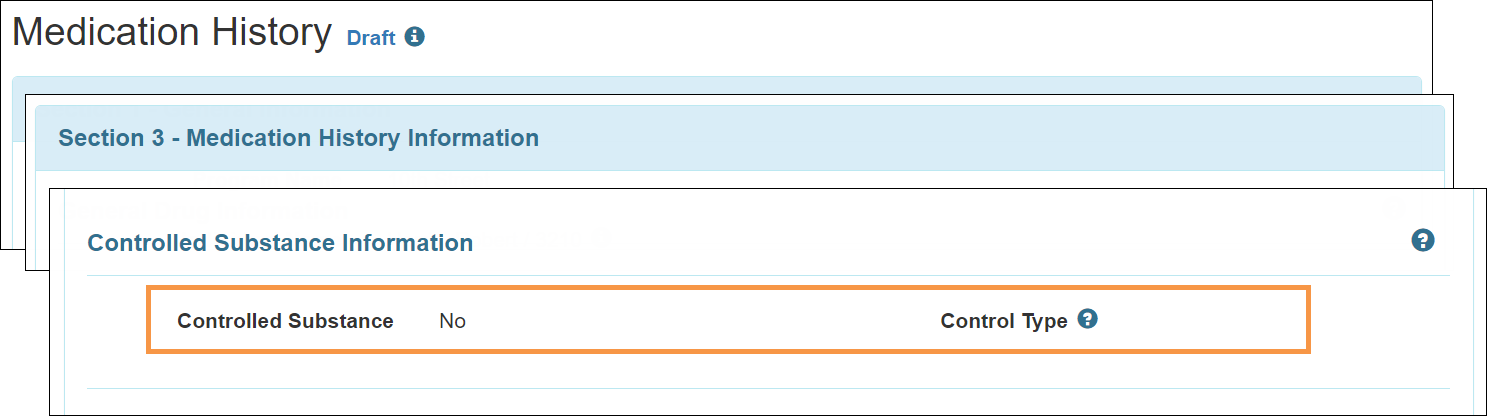
- For the Medication History forms created prior to this release, the Controlled Substance field will be selected as ‘No’ by default. However, users will be able to update it from the editable mode of Draft, Pending Approval, Returned, and Approved Medication History forms.
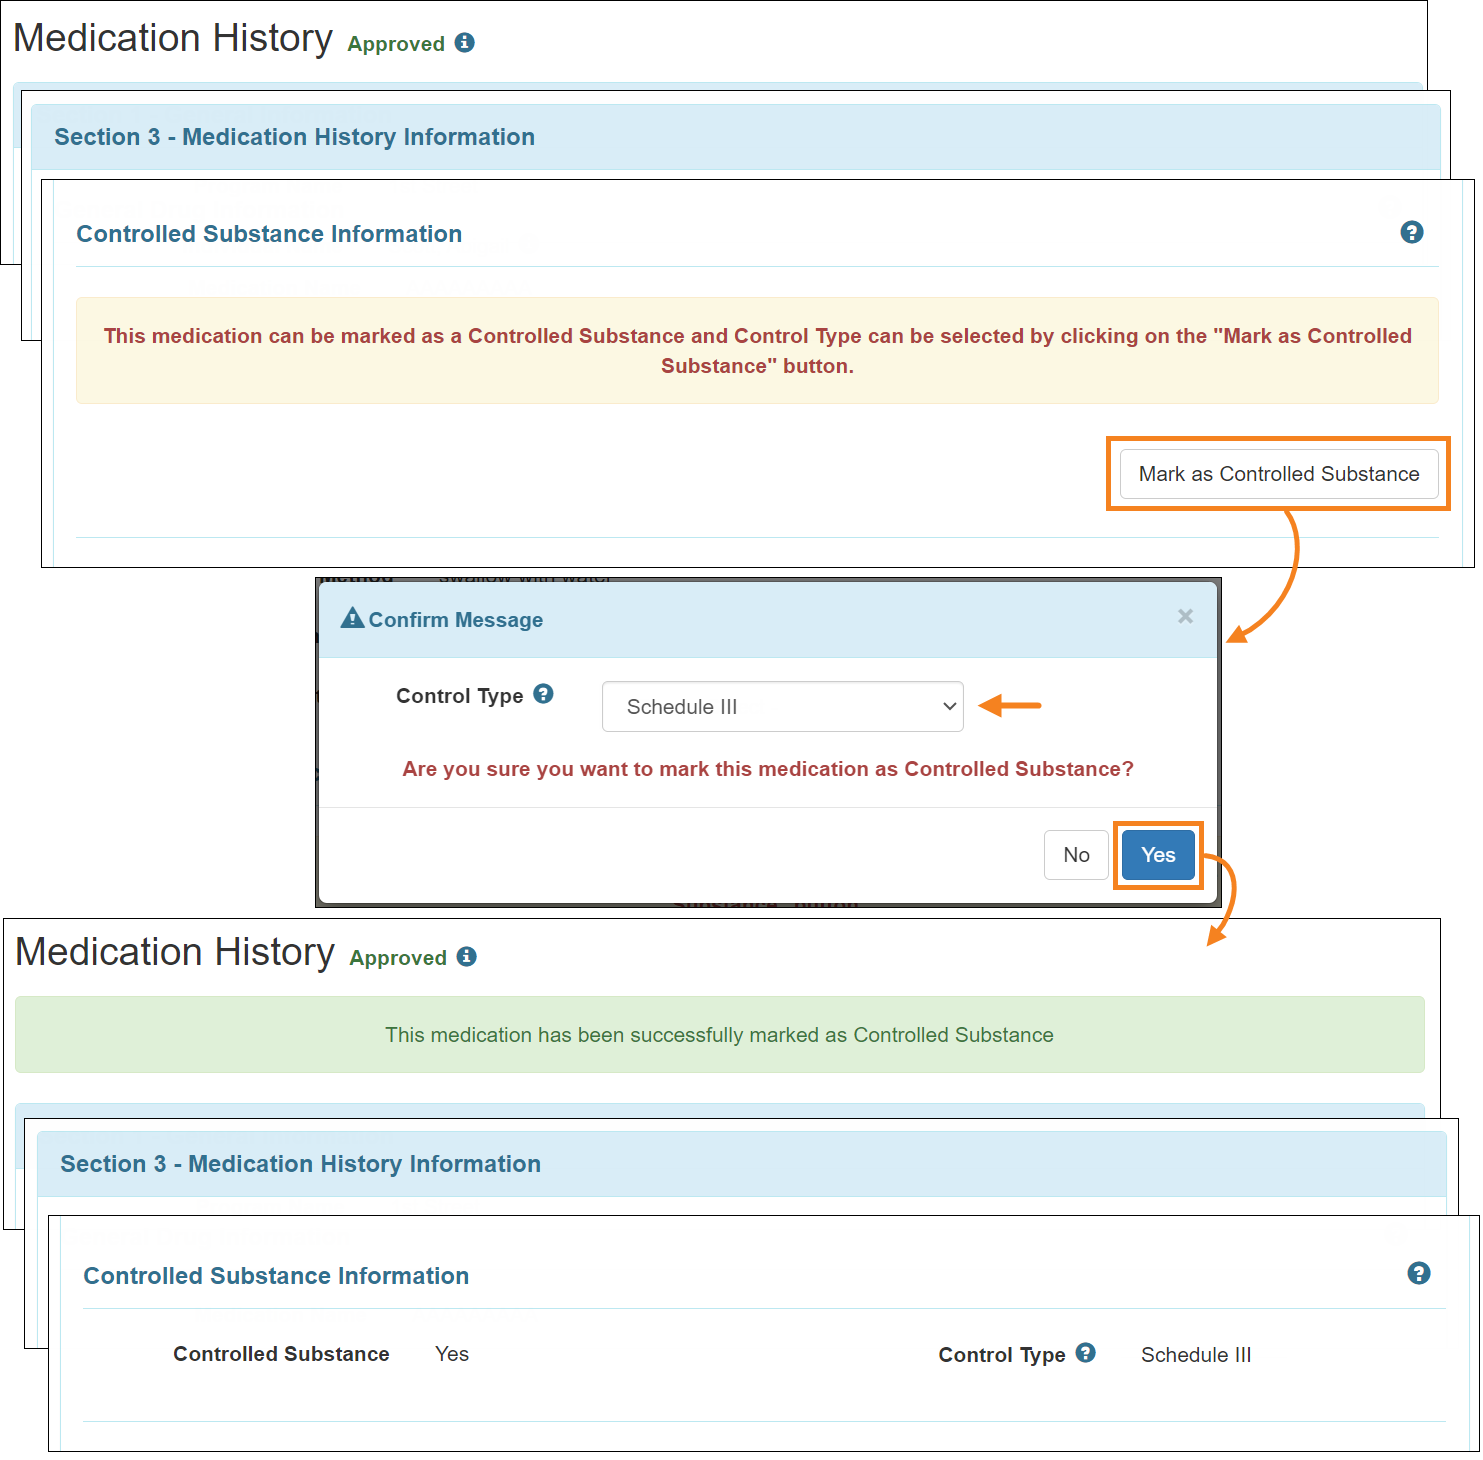
- For the Approved medications that have been recorded on MAR prior to this release, users with the Medication History Approve caseload-based role will see the Mark as Controlled Substance button in read-only mode of those Medication History forms. Using this button, users will be able to mark the medication as Controlled Substance and select the Control Type. Once the medication has been marked as a controlled substance, users will receive a success message on top of the Medication History form. However, this action will not lock the MAR form.
- If Controlled Substance Information is available for a medication, it will be displayed on the MAR for the respective medication. This information will also be available in the printable PDF and Update History archives of the MAR form.
- A new ‘Drug Count Information’ subsection has been added in the ‘Section 3 - Medication History Information’ section of the Medication History form. Users will now be able to enable drug count for a medication using the Drug Count Enabled checkbox.
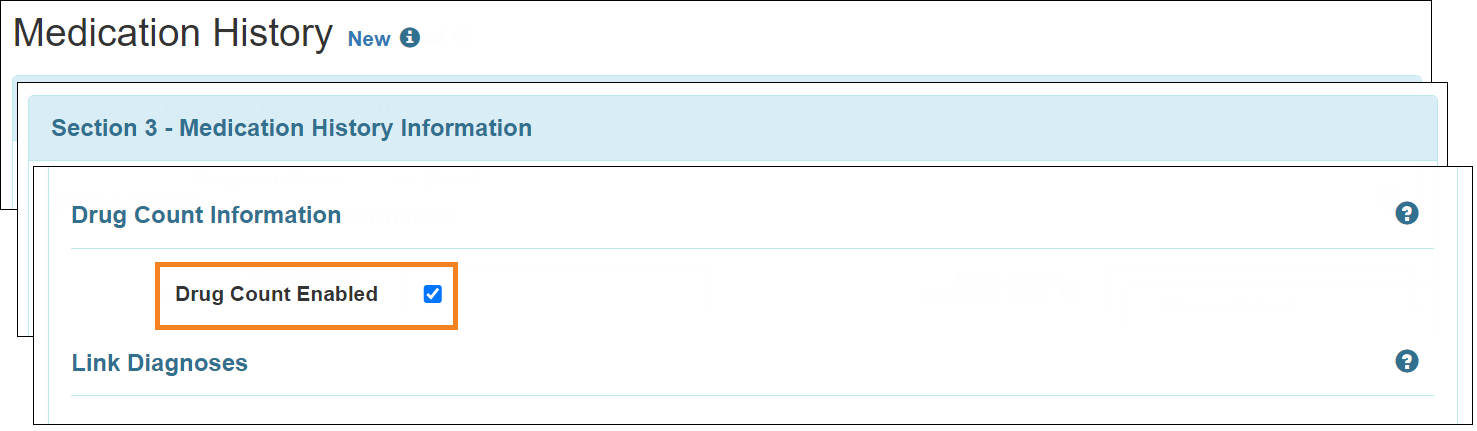
If users are not assigned with the Medication History Count caseload-based role, they will not see the Count button in Approved and Discontinued Medication History forms and Deleted Medication History forms that were approved before deletion. You may refer to the Drug Count section for more information.
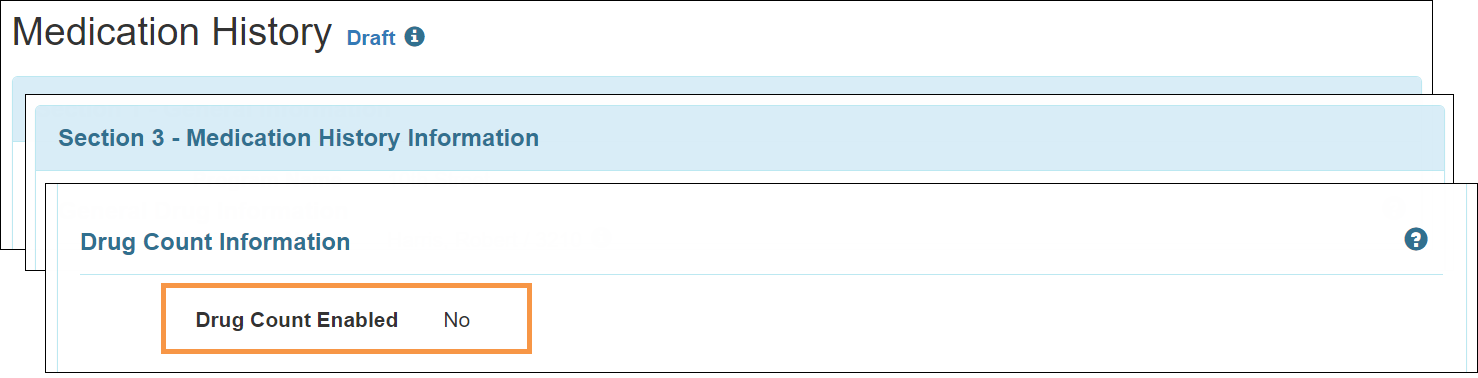
- For the Medication History forms created prior to this release, the Drug Count Enabled field will be selected as ‘No’ by default. However, users will be able to update it from the editable mode of Draft, Pending Approval, Returned, and Approved Medication History forms.
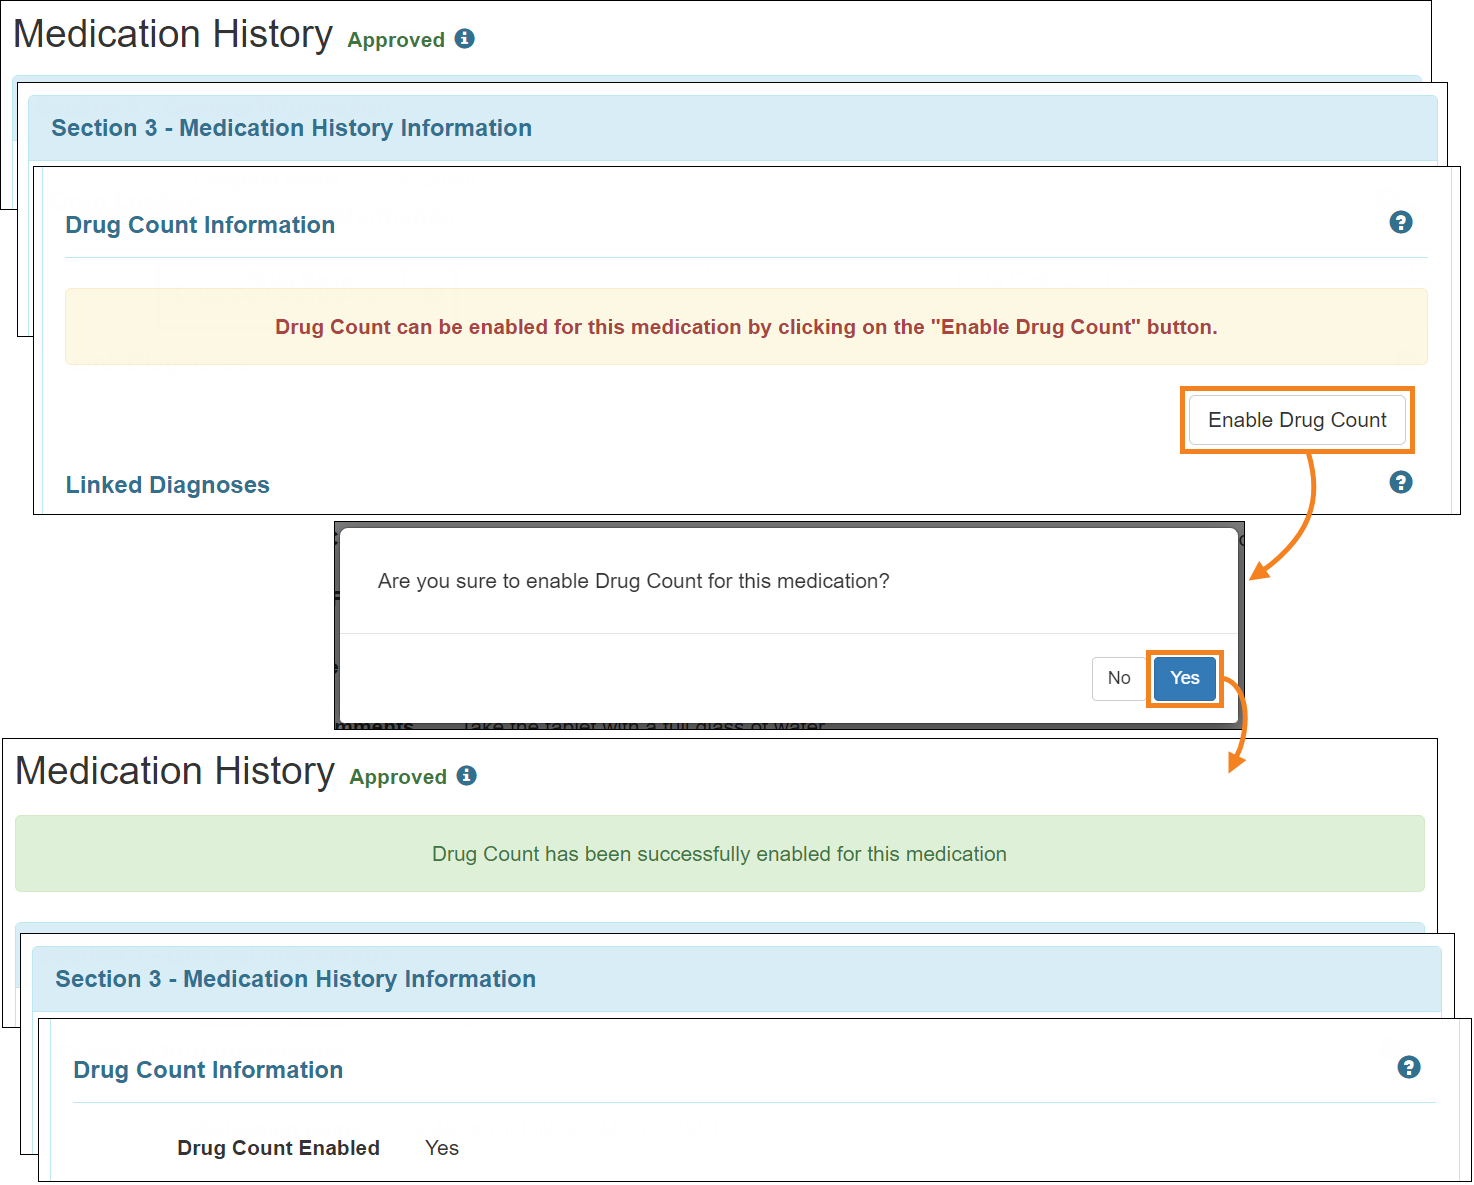
- For the Approved medications that have been recorded on MAR prior to this release, users with the Medication History Approve caseload-based role will see an Enable Drug Count button in read-only mode of those Medication History forms. Using this button, users will be able to enable Drug Count for the medication. Once Drug Count has been enabled, users will receive a success message on top of the Medication History form. However, this action will not lock the MAR form.
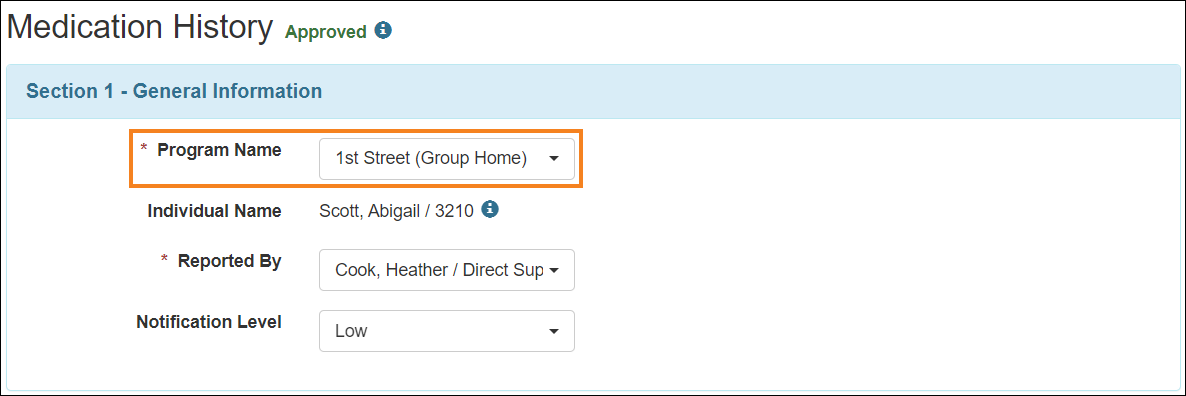
- The Program Name field in the ‘General Information’ section of the Medication History form can now be updated in the editable mode of Draft, Pending Approval, Returned, and Approved Medication History forms.
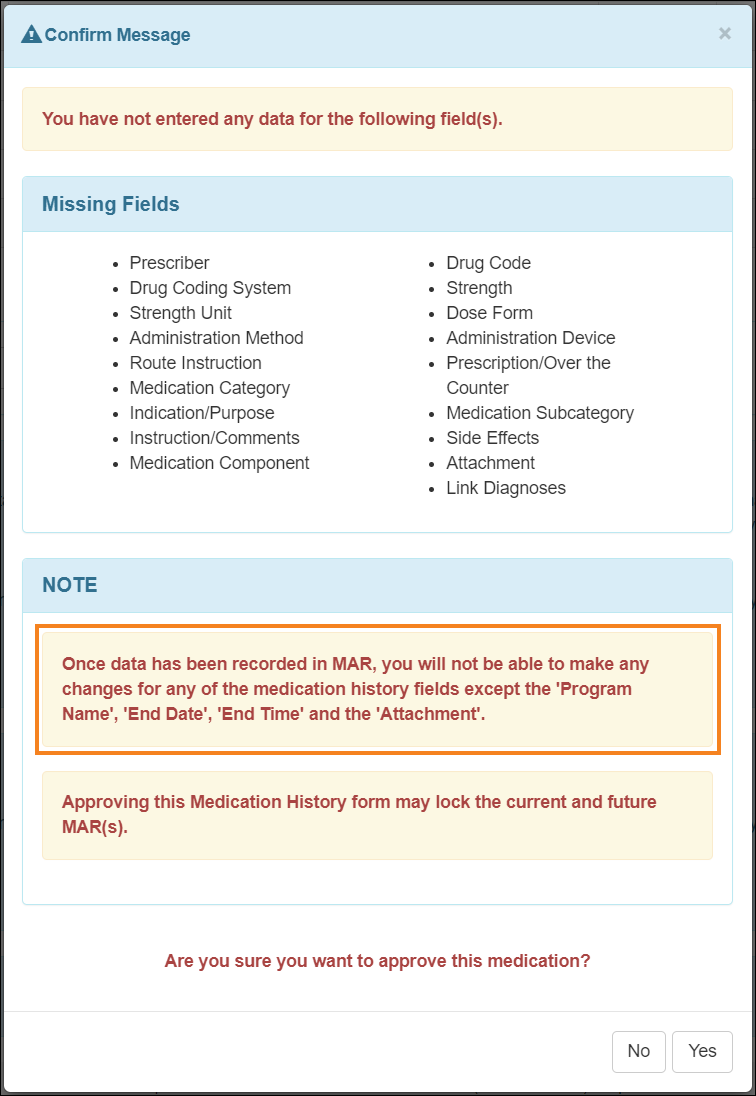
- The 'Confirmation Message' note appearing while approving a Medication History form has been updated to: ‘Once data has been recorded in MAR, you will not be able to make any changes for any of the medication history fields except the 'Program Name', 'End Date', 'End Time' and the 'Attachment'.’
- If the Program Name is updated in a Medication History form linked in an Approved MAR, then the MAR form will get locked.
Personal Finance
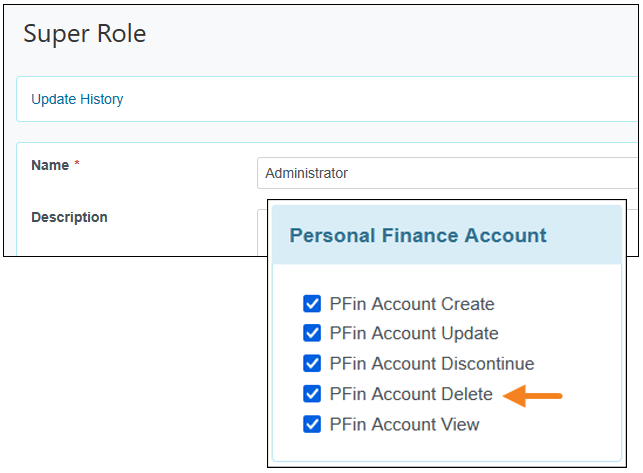
[Back to Top]- A new caseload-based role titled PFin Account Delete has been added in the 'Personal Finance Account' section of the 'Super Role' pages. This role will allow users to delete Personal Finance Accounts in ‘Draft’ and ‘Approved’ status.
Users will be able to delete Approved Personal Finance Accounts if they have no transaction records or reconciliation.
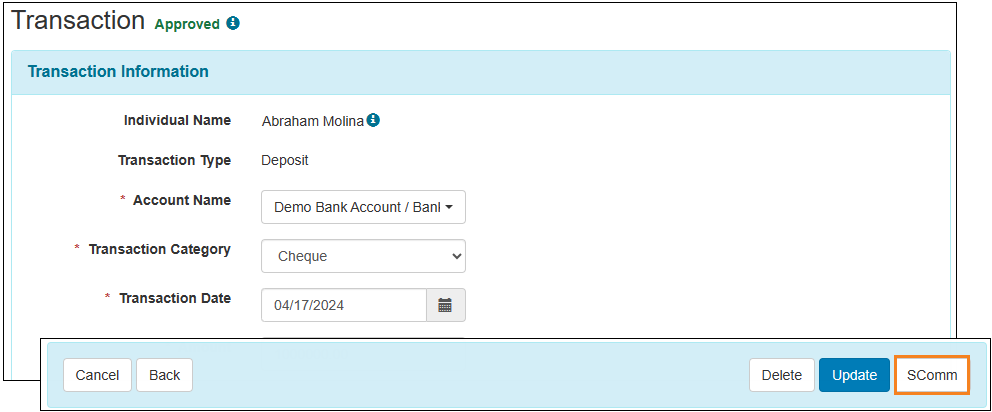
- A new SComm button has been added on 'Personal Finance Account' forms of all status.

- A new SComm button has been added to ‘Transaction’ forms in Approved and Deleted status.
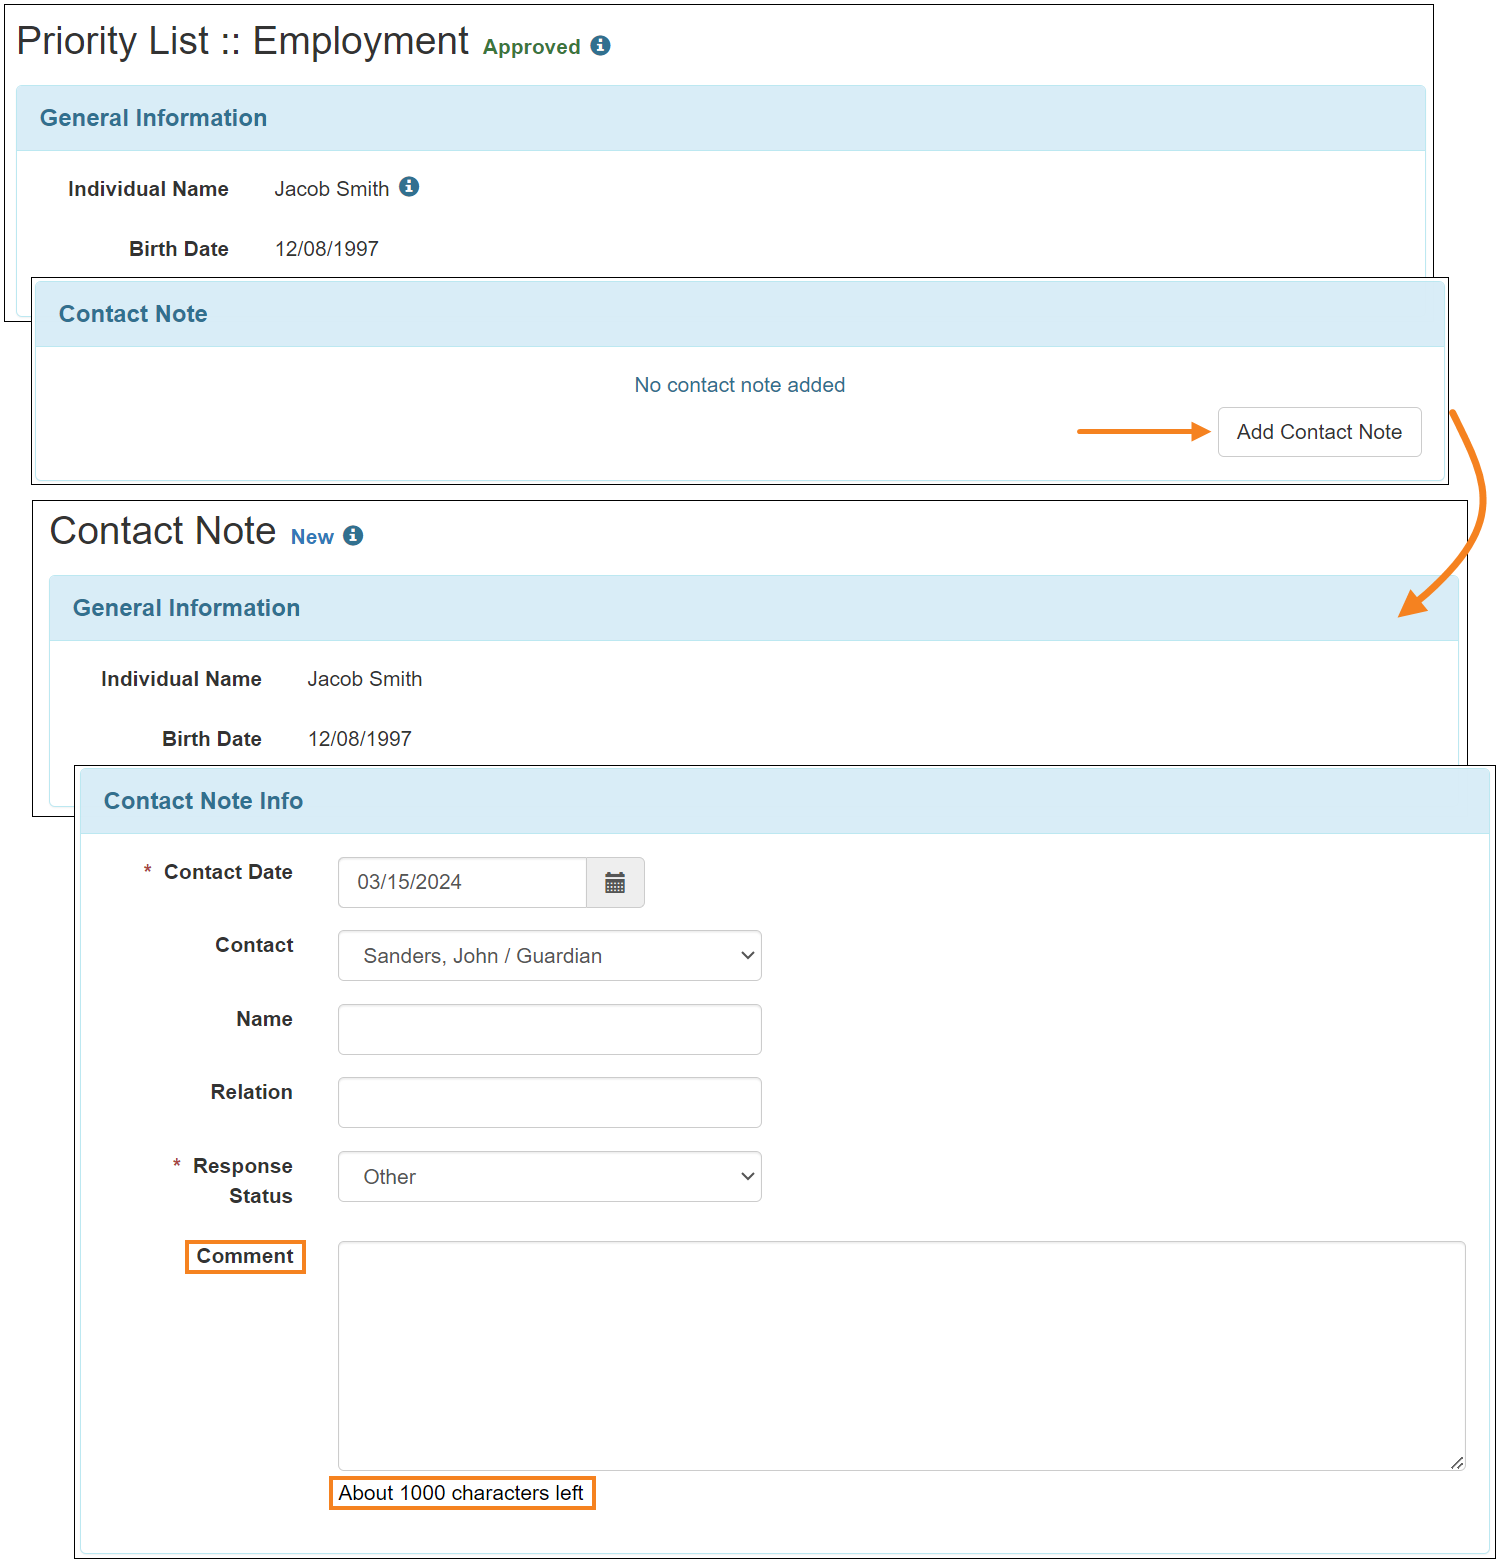
Priority List
[Back to Top]- The maximum character limit has been increased from 500 characters to 1,000 characters for the Comment field of the Contact Note of the Priority List form.
Provider Administration
[Back to Top]
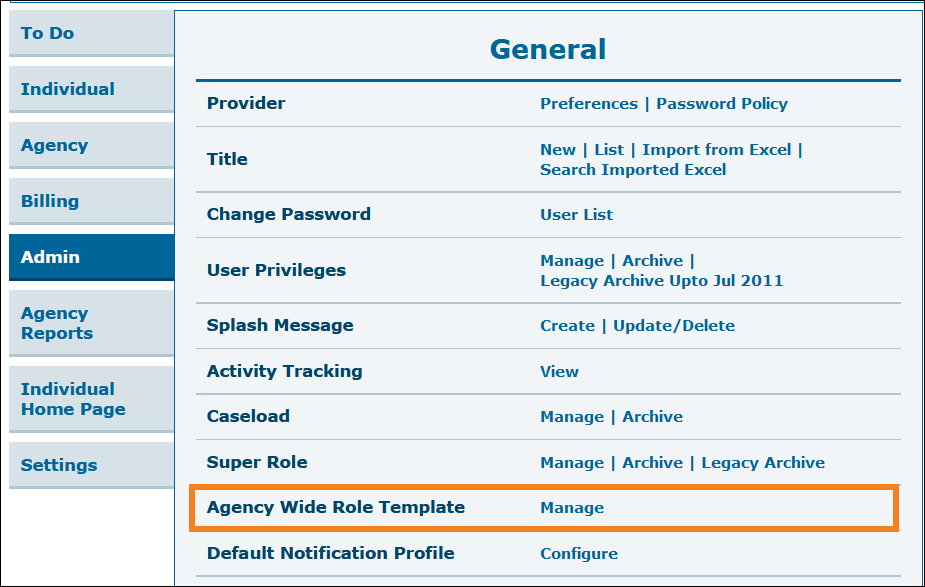
The Agency Wide Role Template is an optional feature. Users can still manually assign Agency Wide and Administrative Roles in the User Privilege.
- Users with the Provider Setup Administrative Role will now find a new Agency Wide Role Template row in the ‘General’ section of the Admin tab. Clicking on the Manage link on the row will allow users to create Agency Wide Role Templates.
- After clicking on the Manage link, users will be taken to an ‘Agency Wide Role Template List’ page displaying all the Agency Wide Role Templates created in the provider. The following options will be available on this page:
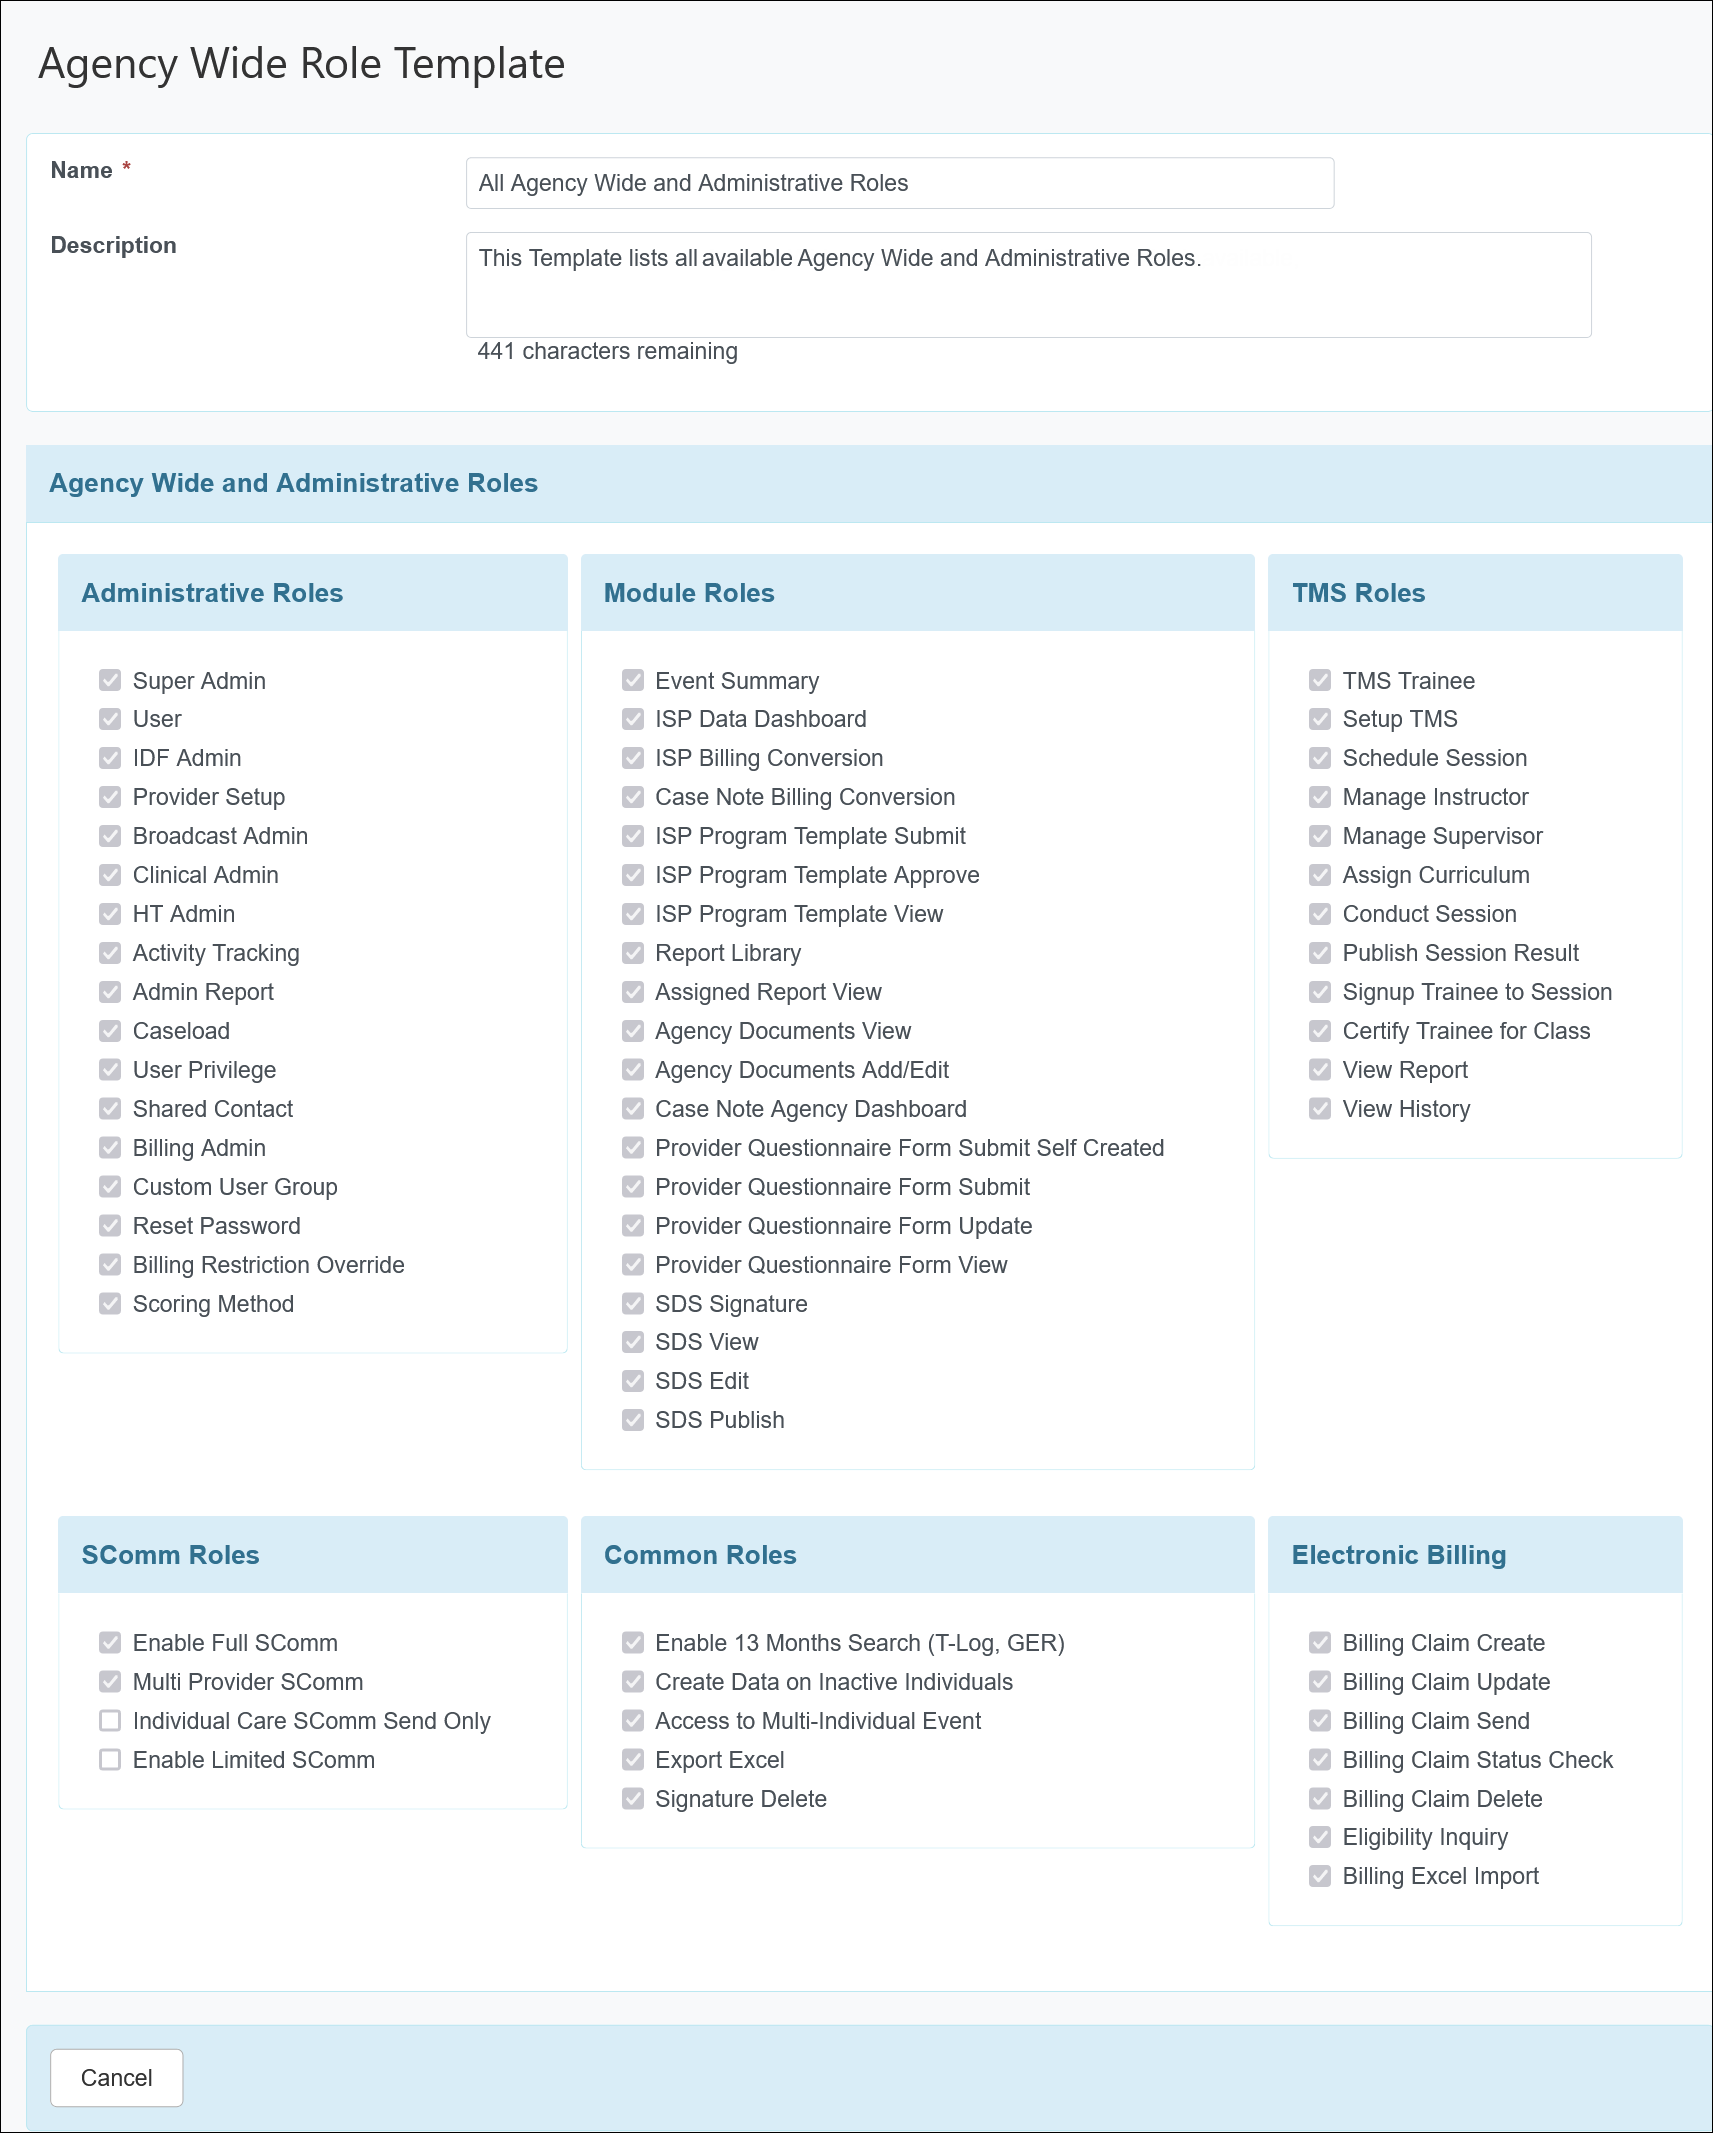
- Create New Template: Create new Agency Wide Role Template. Clicking on this button will direct users to the ‘Agency Wide Role Template’ page where they can select Agency Wide and Administrative Roles that need to be assigned to the Template.
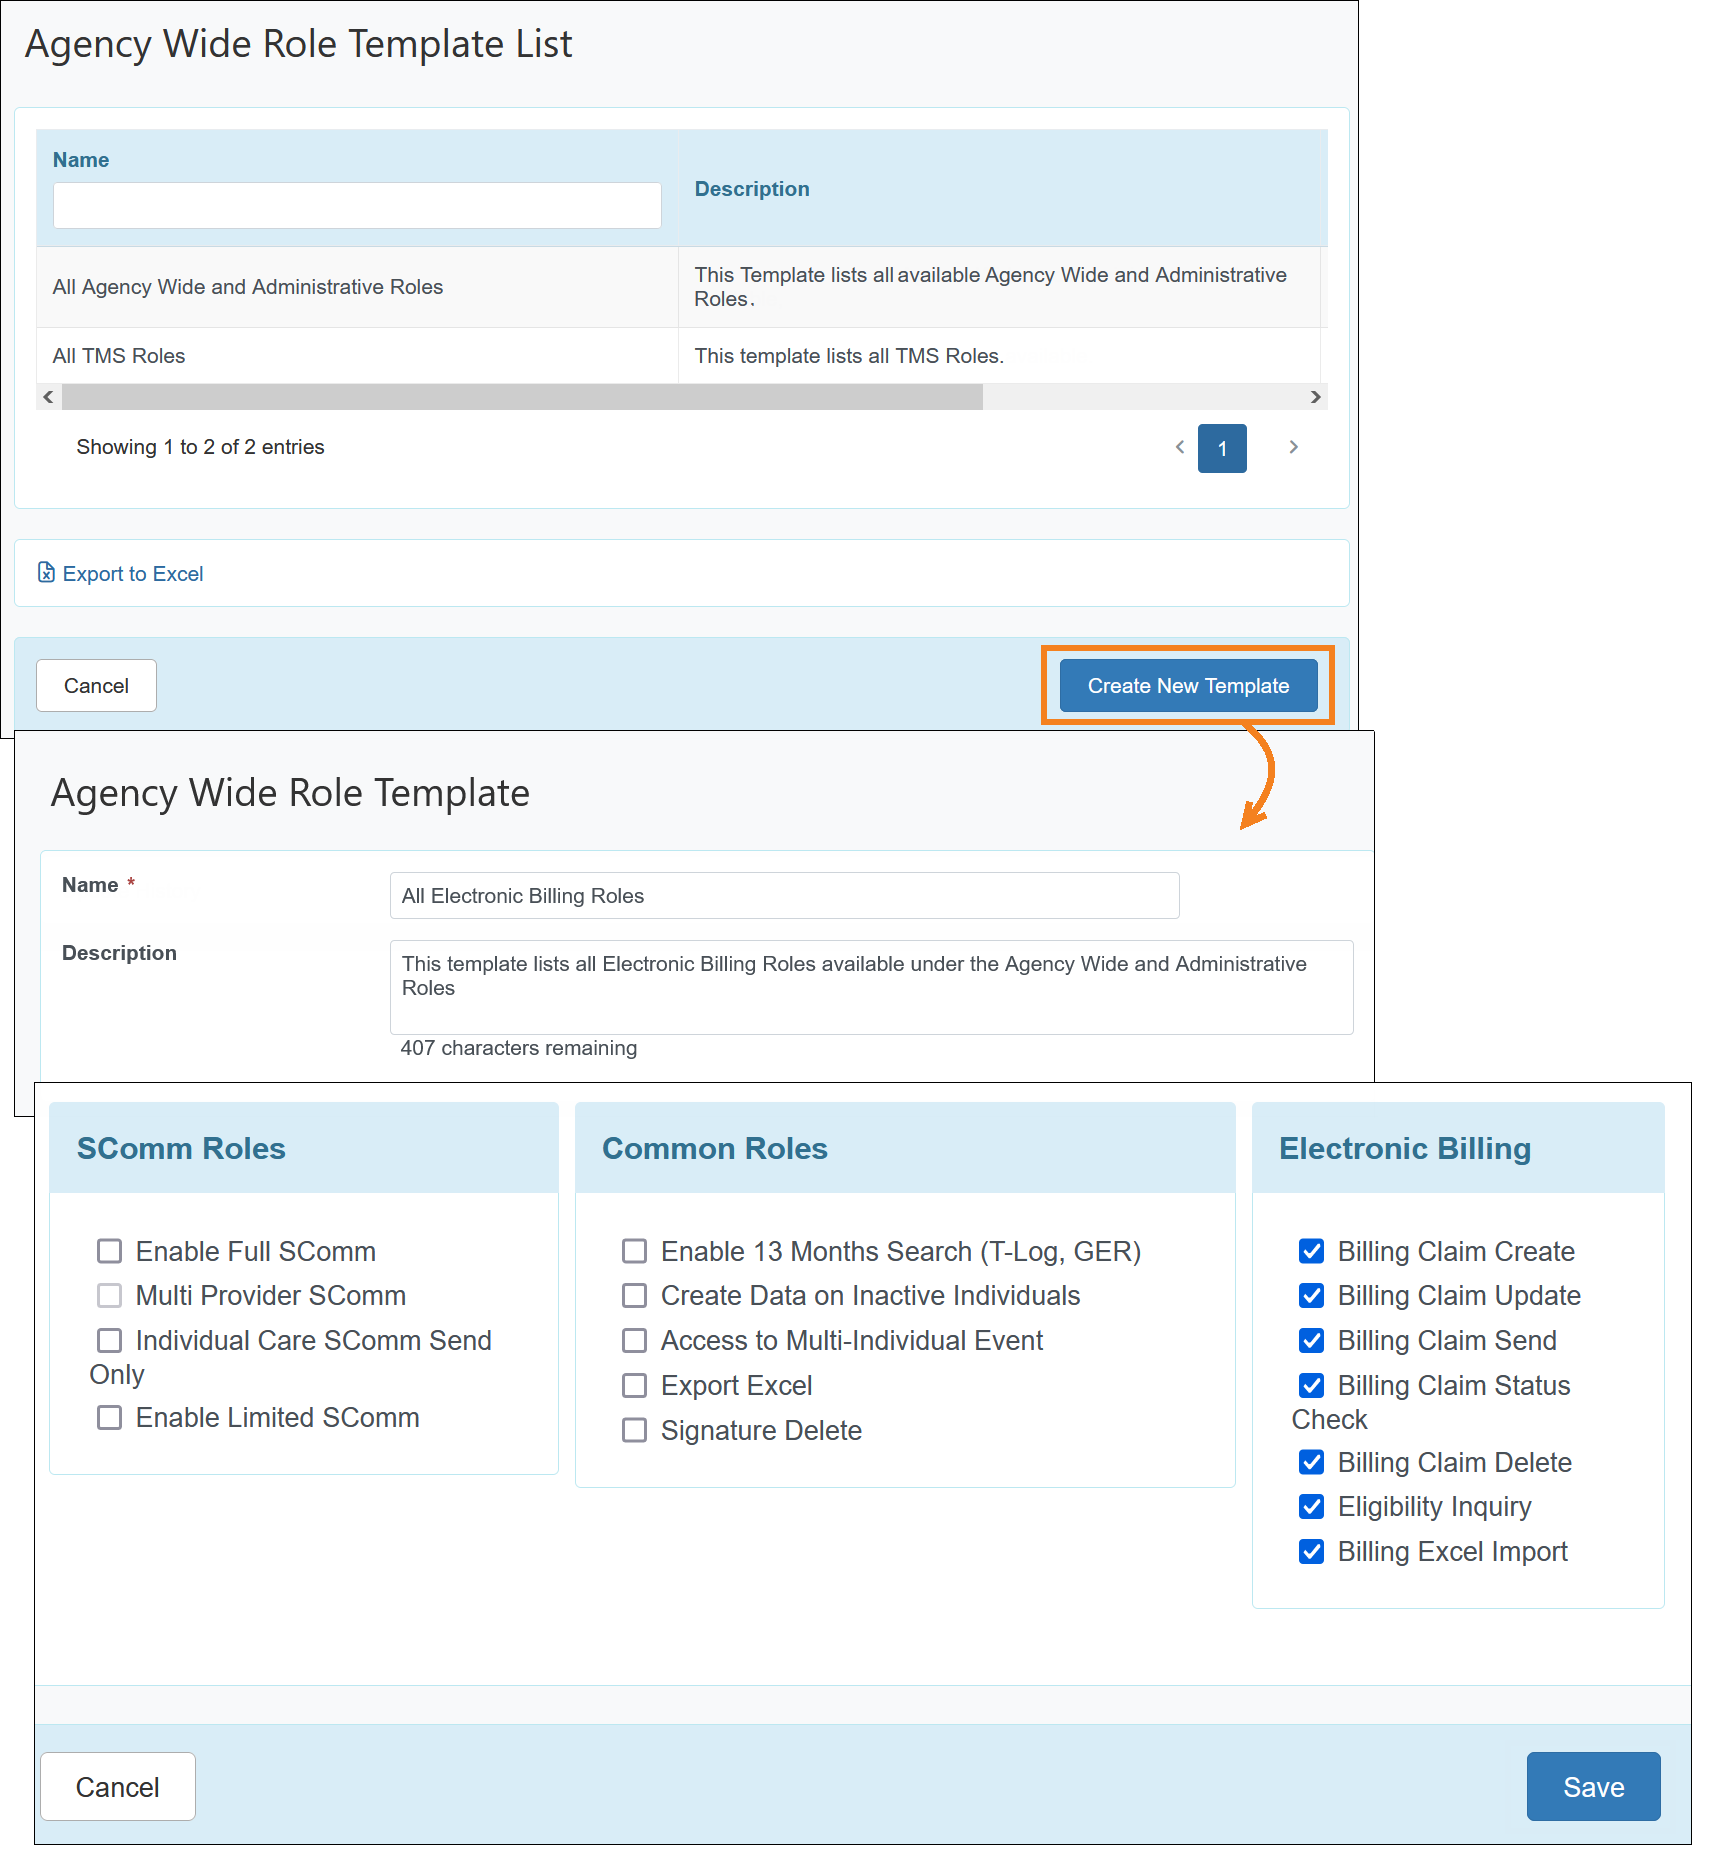
A user assigned with the Provider Setup and Super Admin Administrative Roles will be able to assign the Super Admin role to an Agency Wide Role Template. Users who are not assigned with the Super Admin role will not be able to select this role for assignment.

Users will receive a warning message if they try to save an empty Template without selecting an Agency Wide and Administrative Role: This template is empty. If you are sure to save this empty template click 'Save' again.

- Edit: Update an Agency Wide Role Template.
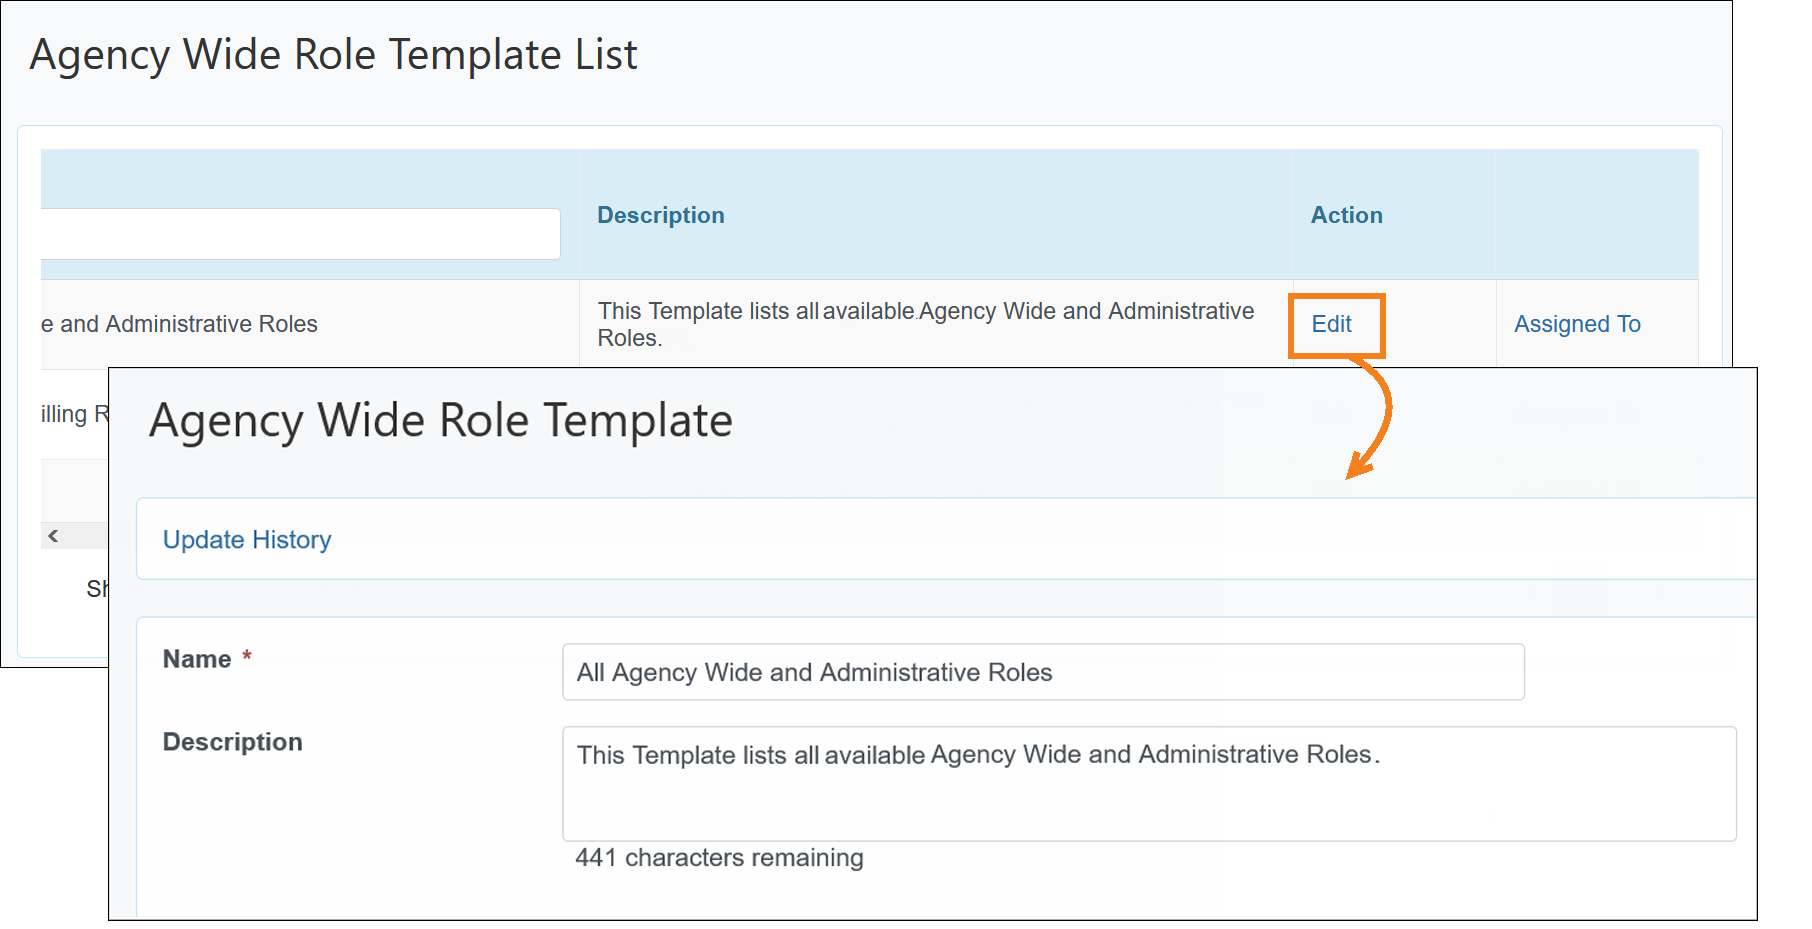
If the Super Admin Administrative Role has been selected for a Template, users without the Super Admin Administrative Role will not be able to update the Template or access the Update History link.
Users can Save the changes after updating the Template or Delete the Template if it has not been assigned to a user. Updating the Template will automatically update the ‘Agency Wide and Administrative Roles’ section of the User Privileges where the Template is assigned.

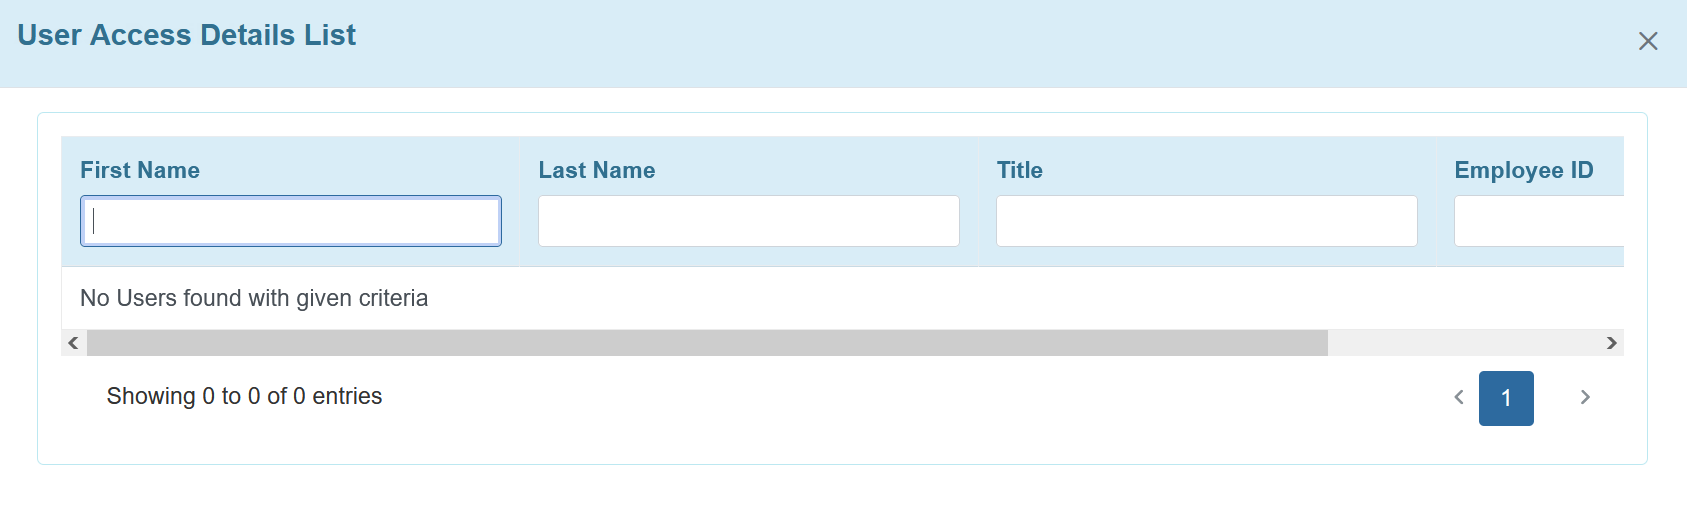
- Assign To: Displays the list of users who are assigned with the Template.
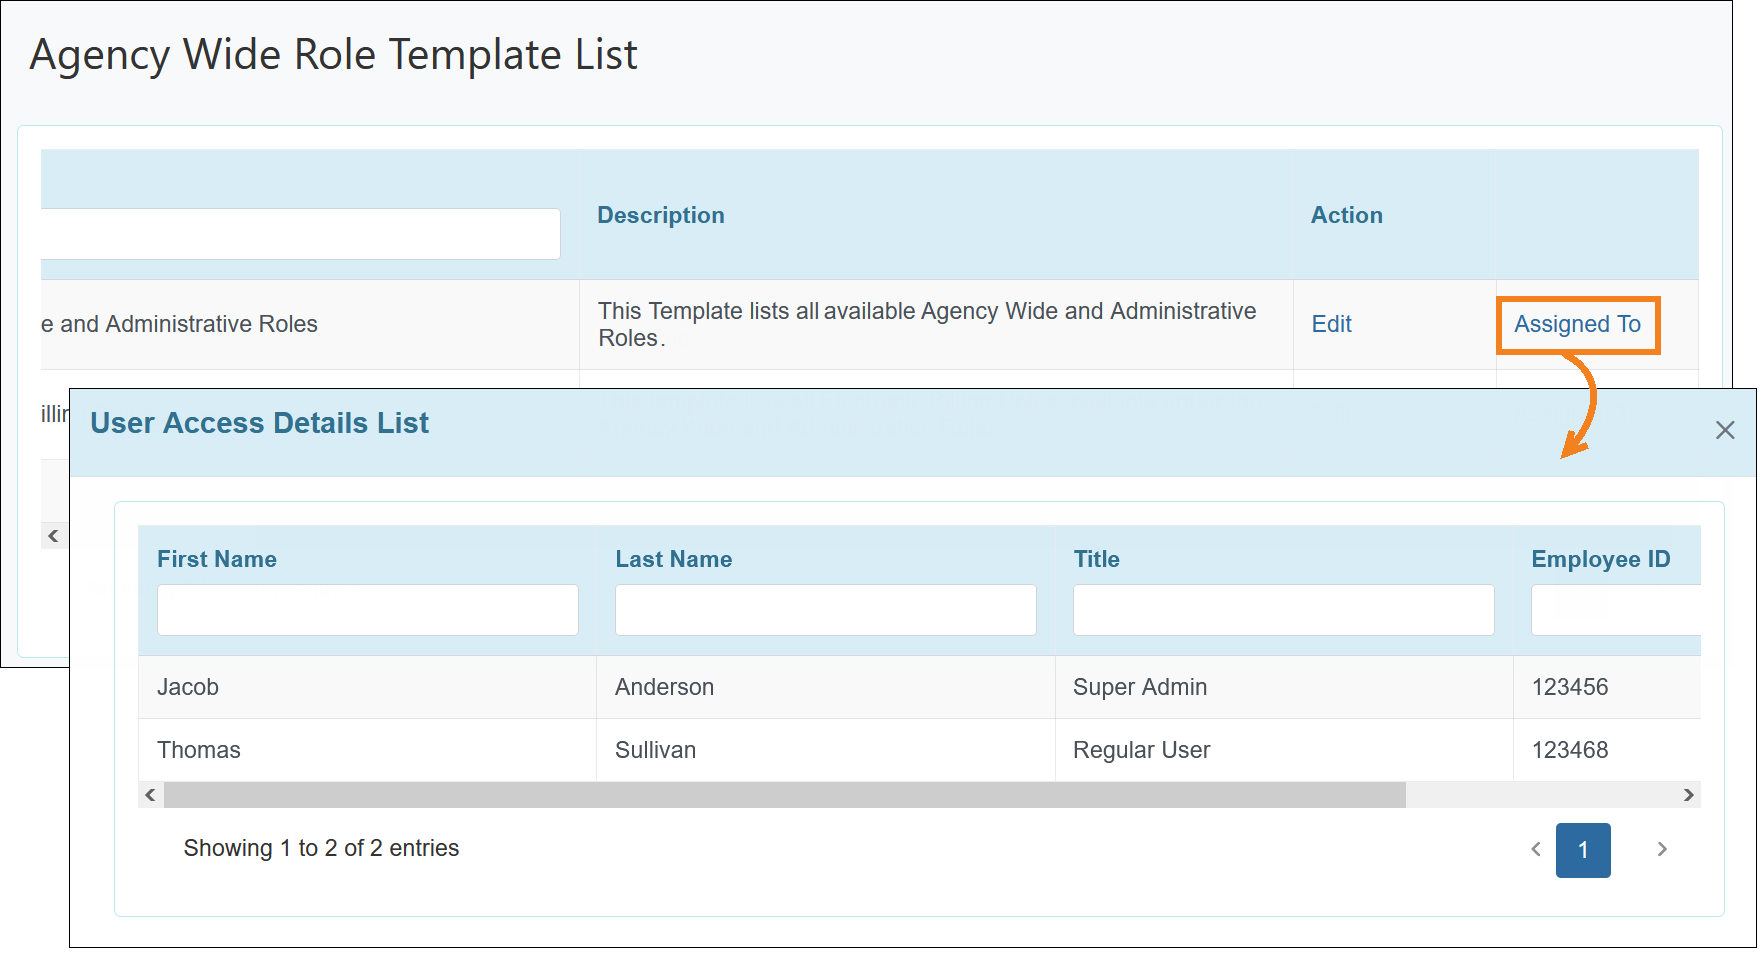
A message will be displayed if no users are assigned with the Template: No users found with given criteria.
- Create New Template: Create new Agency Wide Role Template. Clicking on this button will direct users to the ‘Agency Wide Role Template’ page where they can select Agency Wide and Administrative Roles that need to be assigned to the Template.
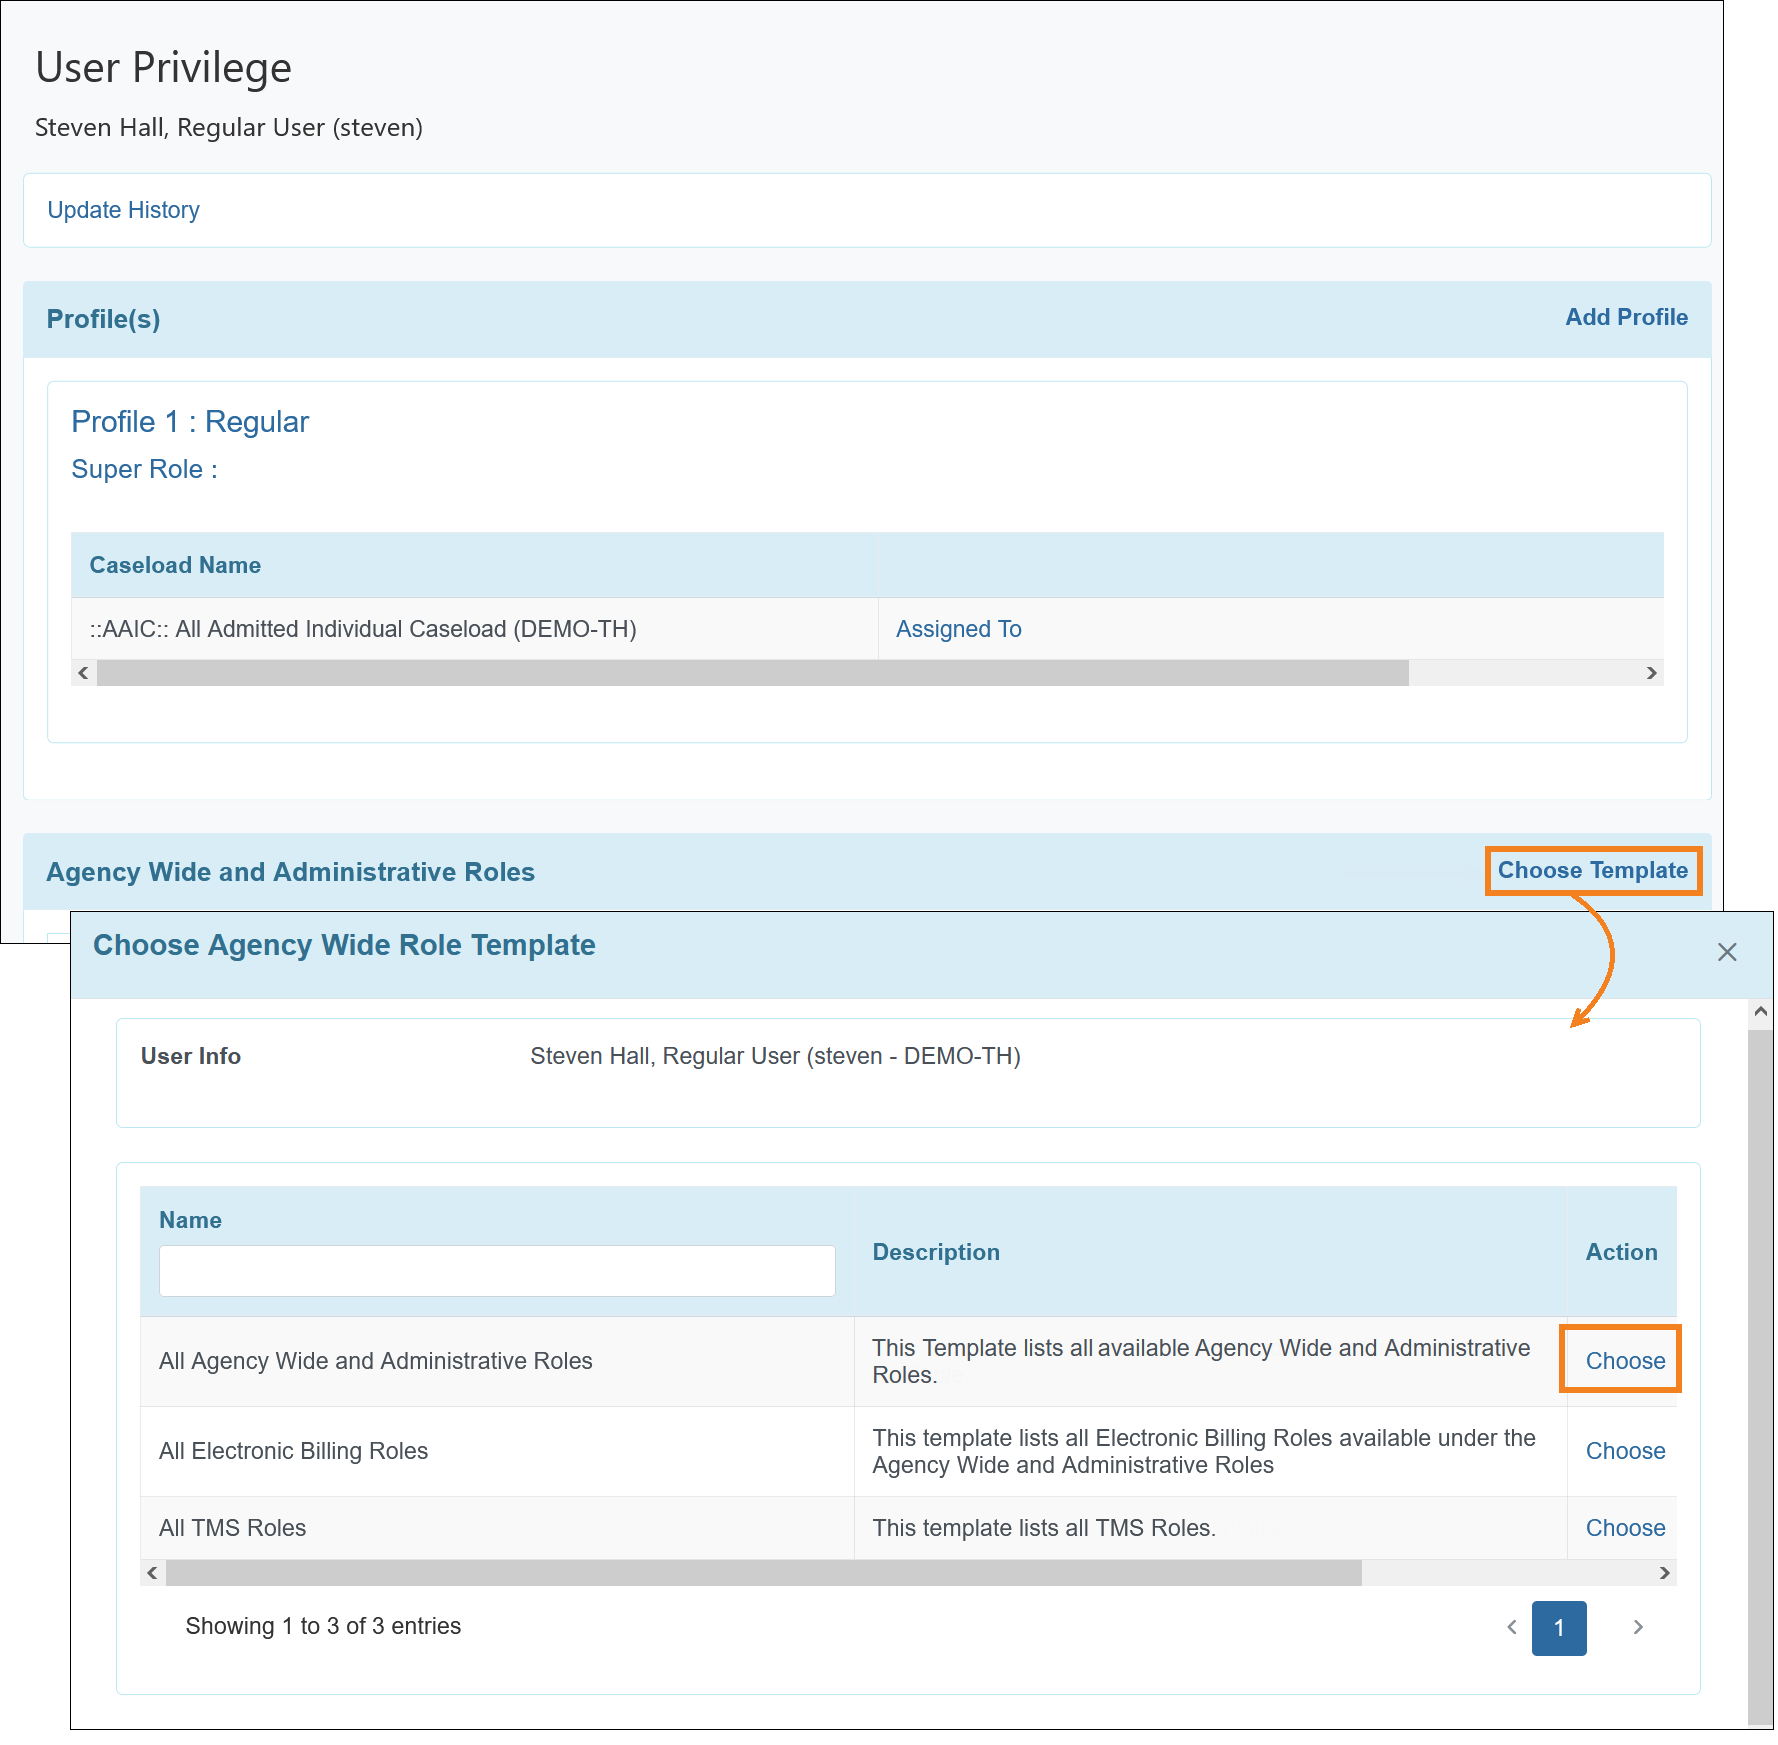
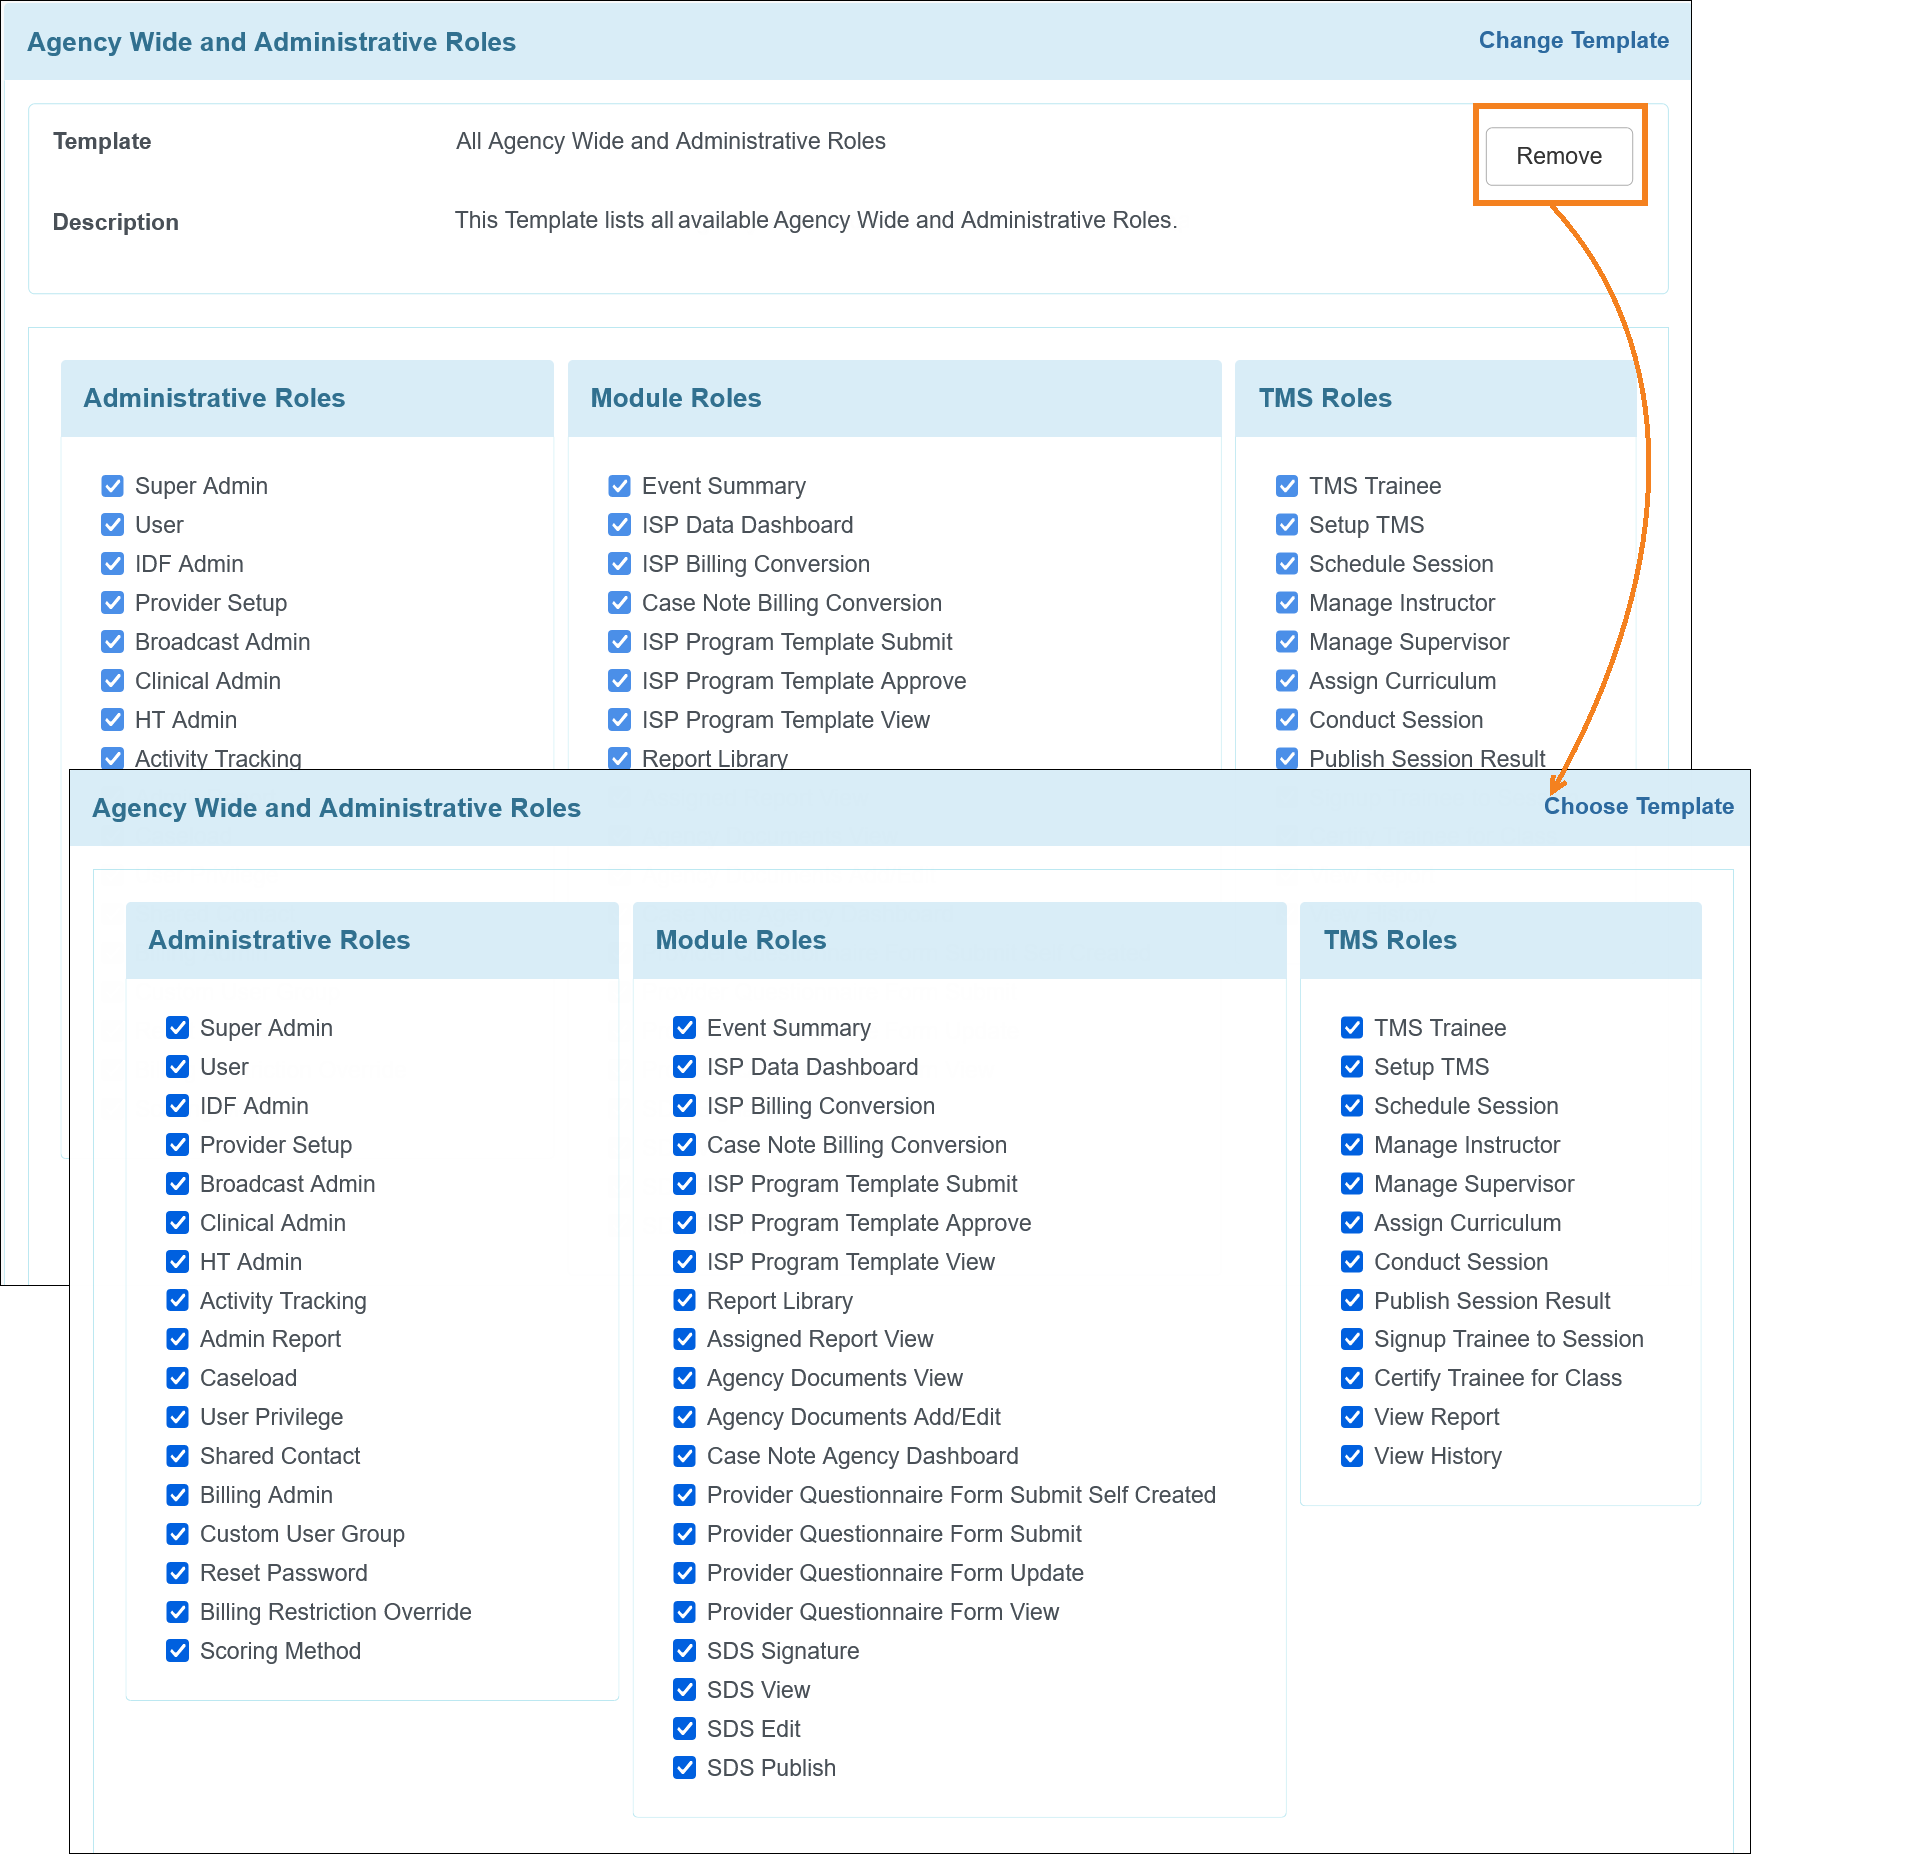
- Users assigned with the User Privilege Administrative Role can now assign other users an Agency Wide Role Template using the Choose Template link beside the ‘Agency Wide and Administrative Roles’ section title on the User Privilege page. Clicking on the Choose Template link will open the ‘Choose Agency Wide Role Template’ window where users can Choose the Template that needs to be assigned. Templates with the Super Admin Administrative Role selected will not be available for users if they are not assigned with an additional Super Admin Administrative Role.
- Once a Template has been assigned, the ‘Agency Wide and Administrative Roles’ section will become non-editable. Users may click on the Change Template link or the Remove button to update this section.
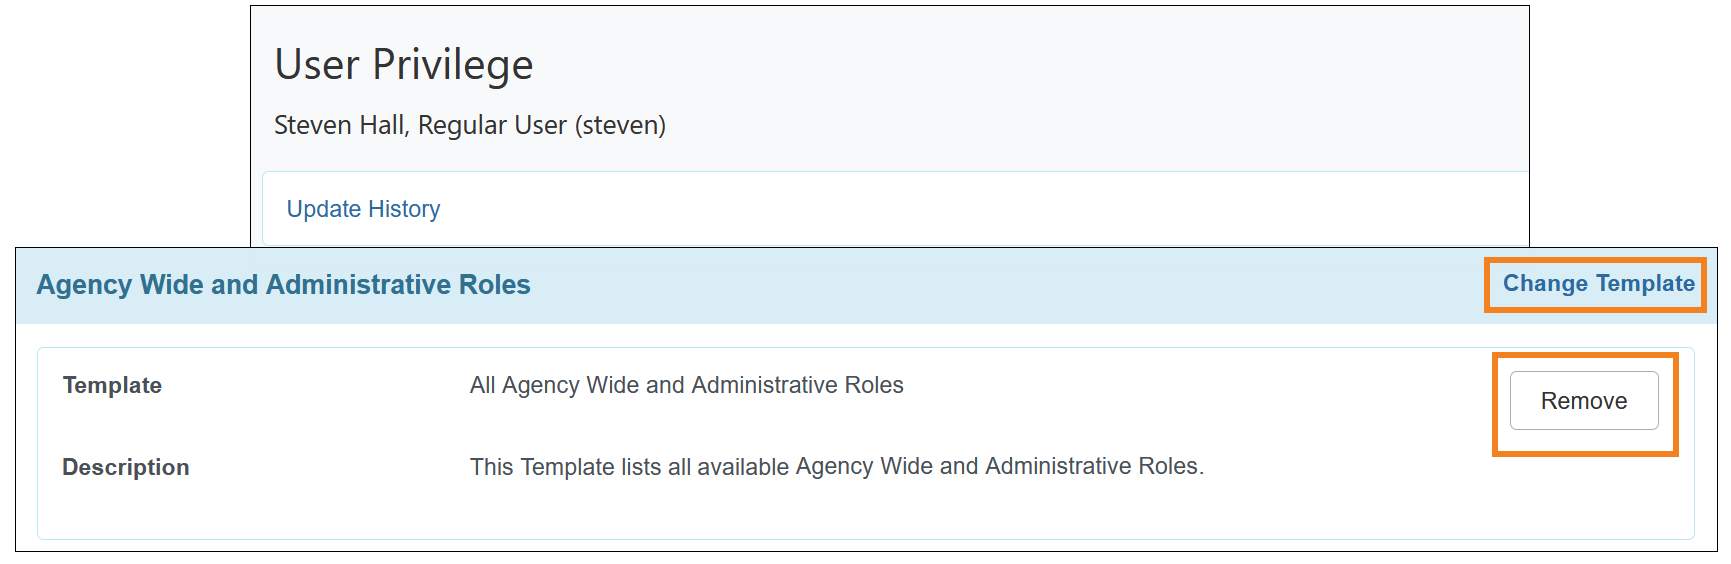
Even If users Remove the assigned Template, the assigned Agency Wide and Administrative Roles will remain selected. Users will have to manually select or deselect the Agency Wide and Administrative Roles to update this section.
- If a Template is assigned to a user in their User Privilege, any updates made to the Template will also reflect in the roles selected in the 'Agency Wide and Administrative Roles' section for that user.
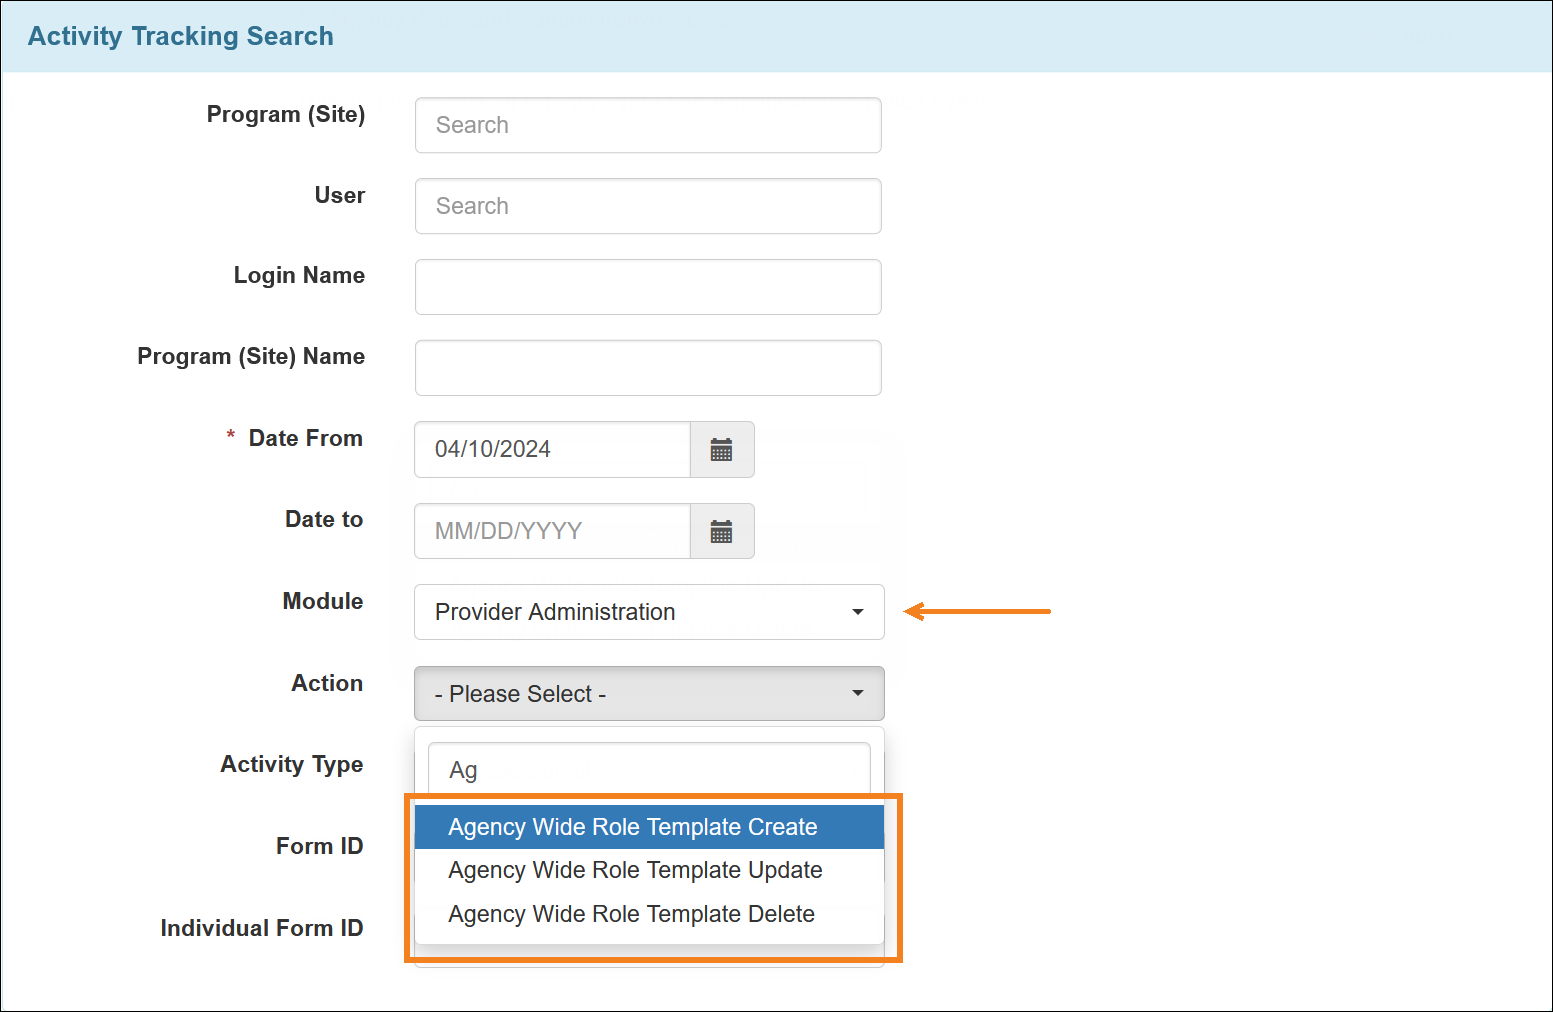
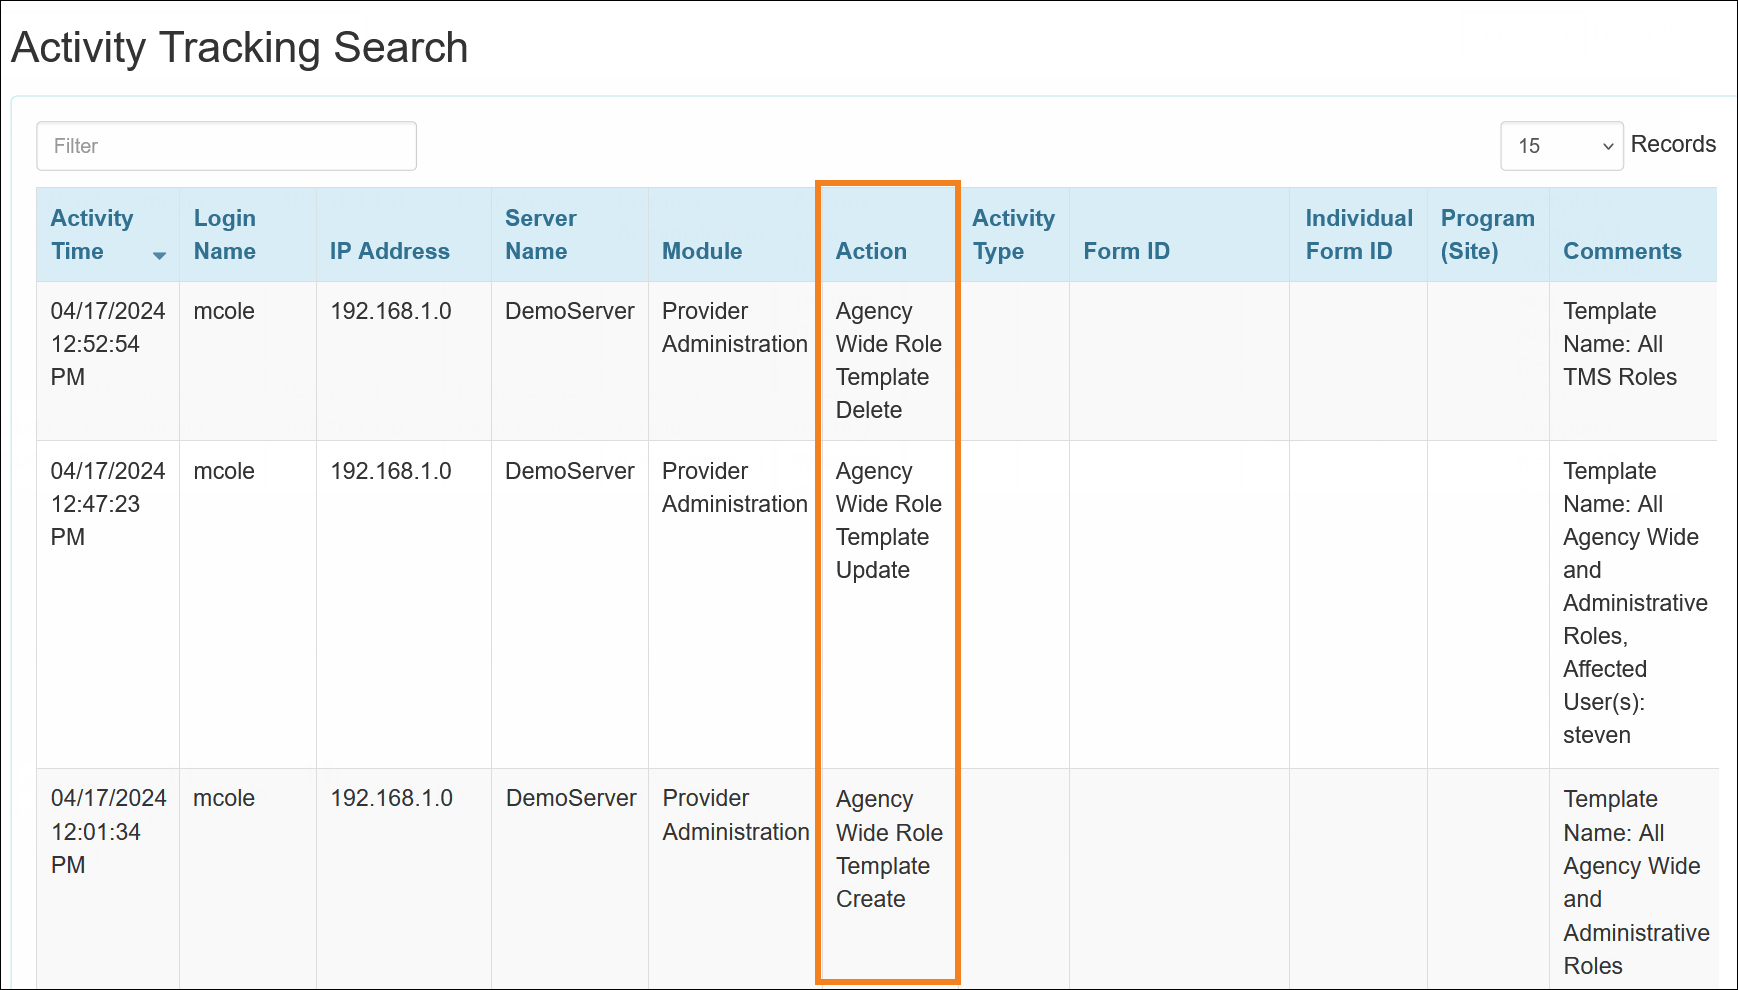
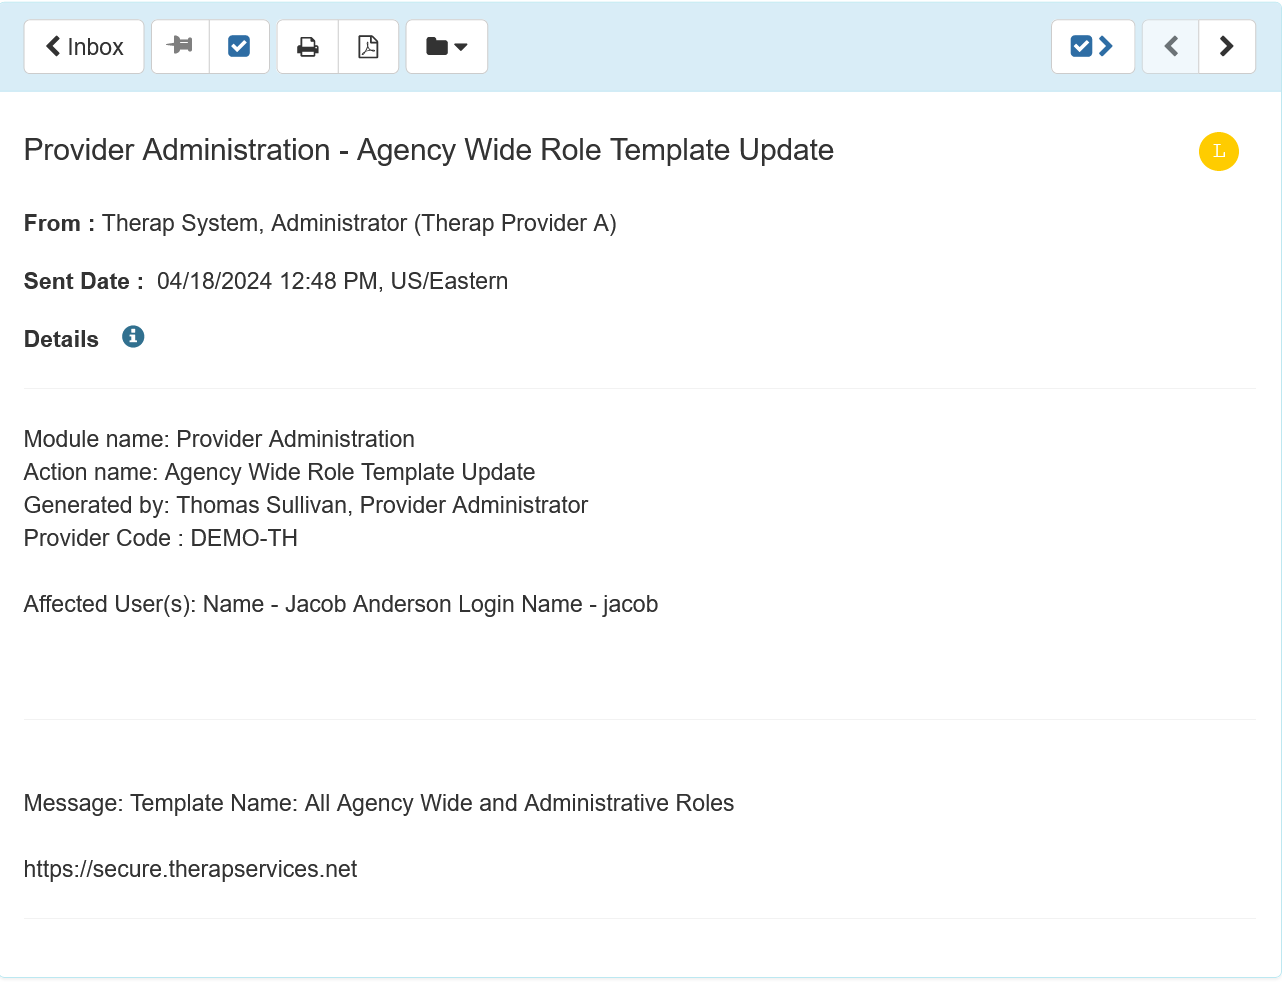
- In the ‘Activity Tracking Search’ page and the search result page, the following options will be available in the Action dropdown field for the Provider Administration Module:
- Agency Wide Role Template Create
- Agency Wide Role Template Update
- Agency Wide Role Template Delete
- The following new Notification Events with the options Yes and No have been added for the Provider Administration module on the ‘Configure Custom Notification Profile’ page:
- Agency Wide Role Template Create
- Agency Wide Role Template Update
- Agency Wide Role Template Delete
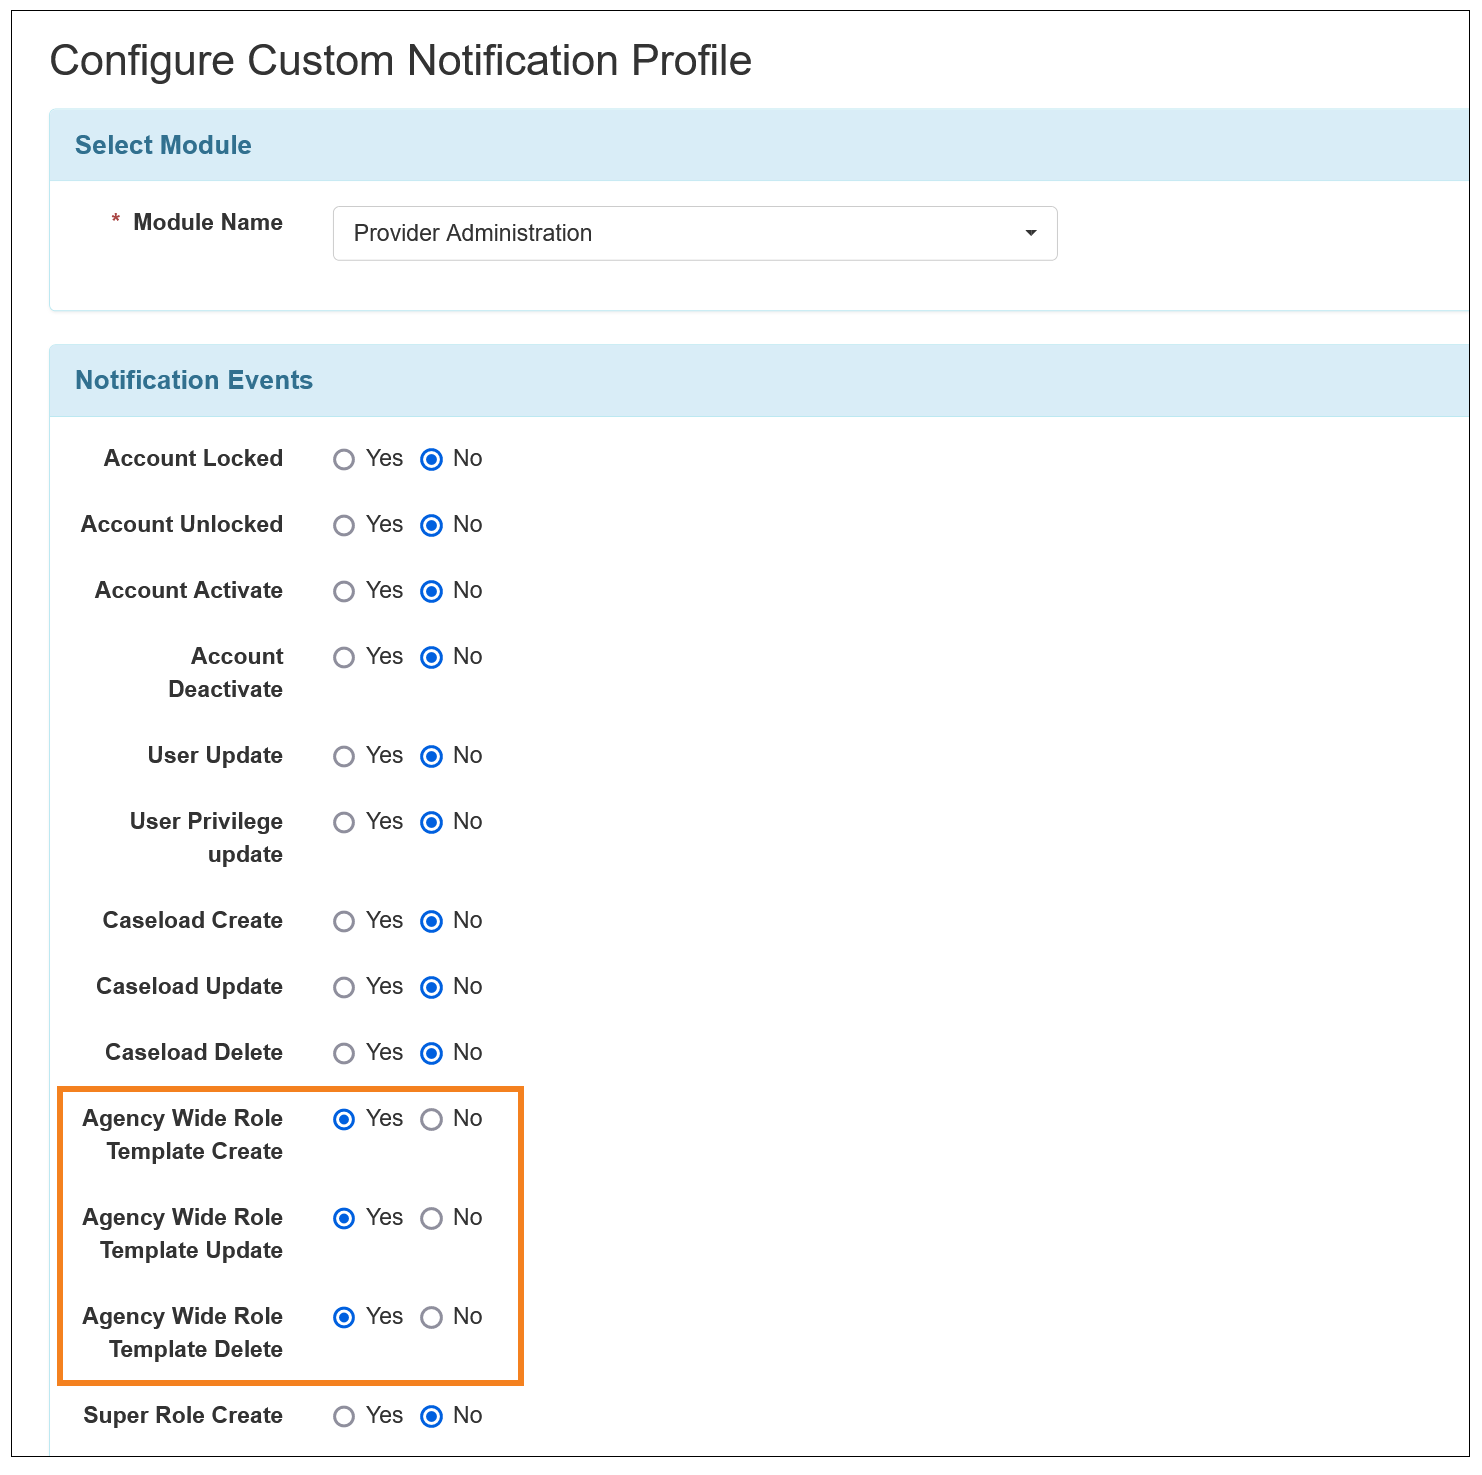
- Selecting Yes for these events will allow users to receive a notification when that event occurs.
Scheduling
[Back to Top]- A new field titled Require Verification before Check-Out (Individual) has been added on the ‘Schedule/EVV Provider Preference’ page. If this field is enabled for an agency, then users at that agency will be required to collect ‘Signature’ or ‘Voice’ verification for ‘Individual’ type Schedule Slots before completing Check-Out using the ‘Mobile’, ‘FVV’, and ‘TeleHealth’ methods from the Therap mobile app.
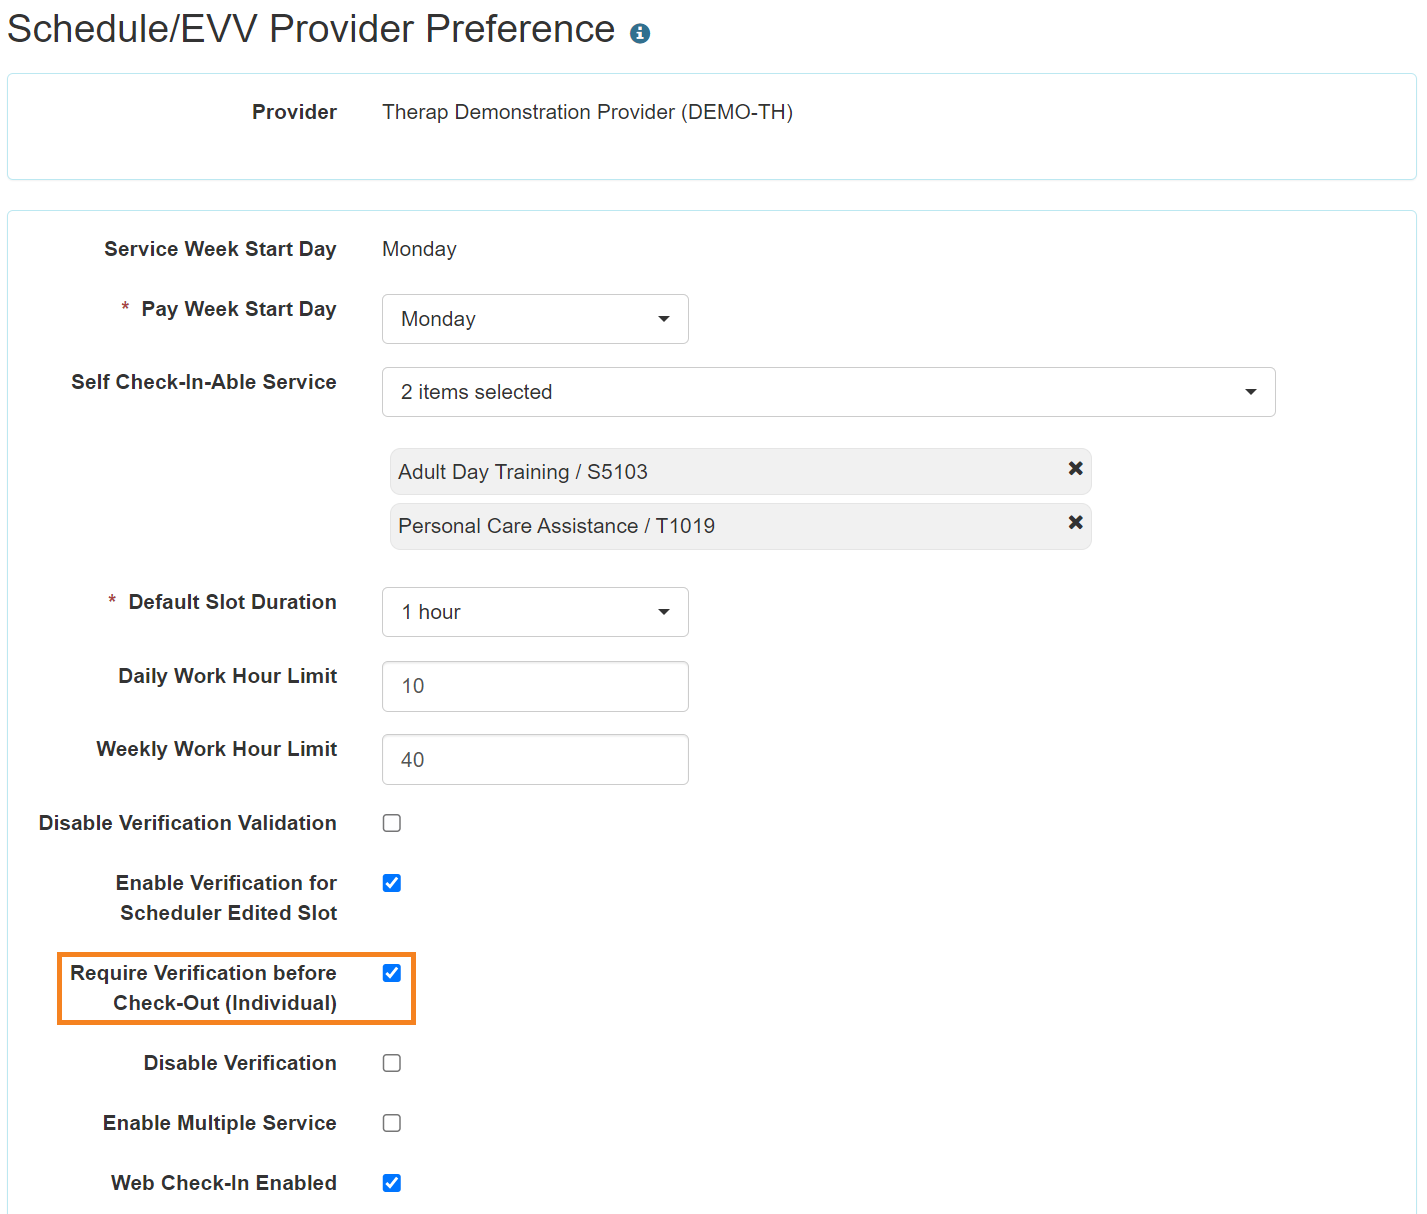
- Users will first need to uncheck the Disable Verification field to be able to enable the newly added Require Verification before Check-Out (Individual) field. If they attempt to enable both of the fields at the same time, then they will be displayed with an error message stating You cannot enable Require Verification before Check-Out (Individual) if Verification is disabled.

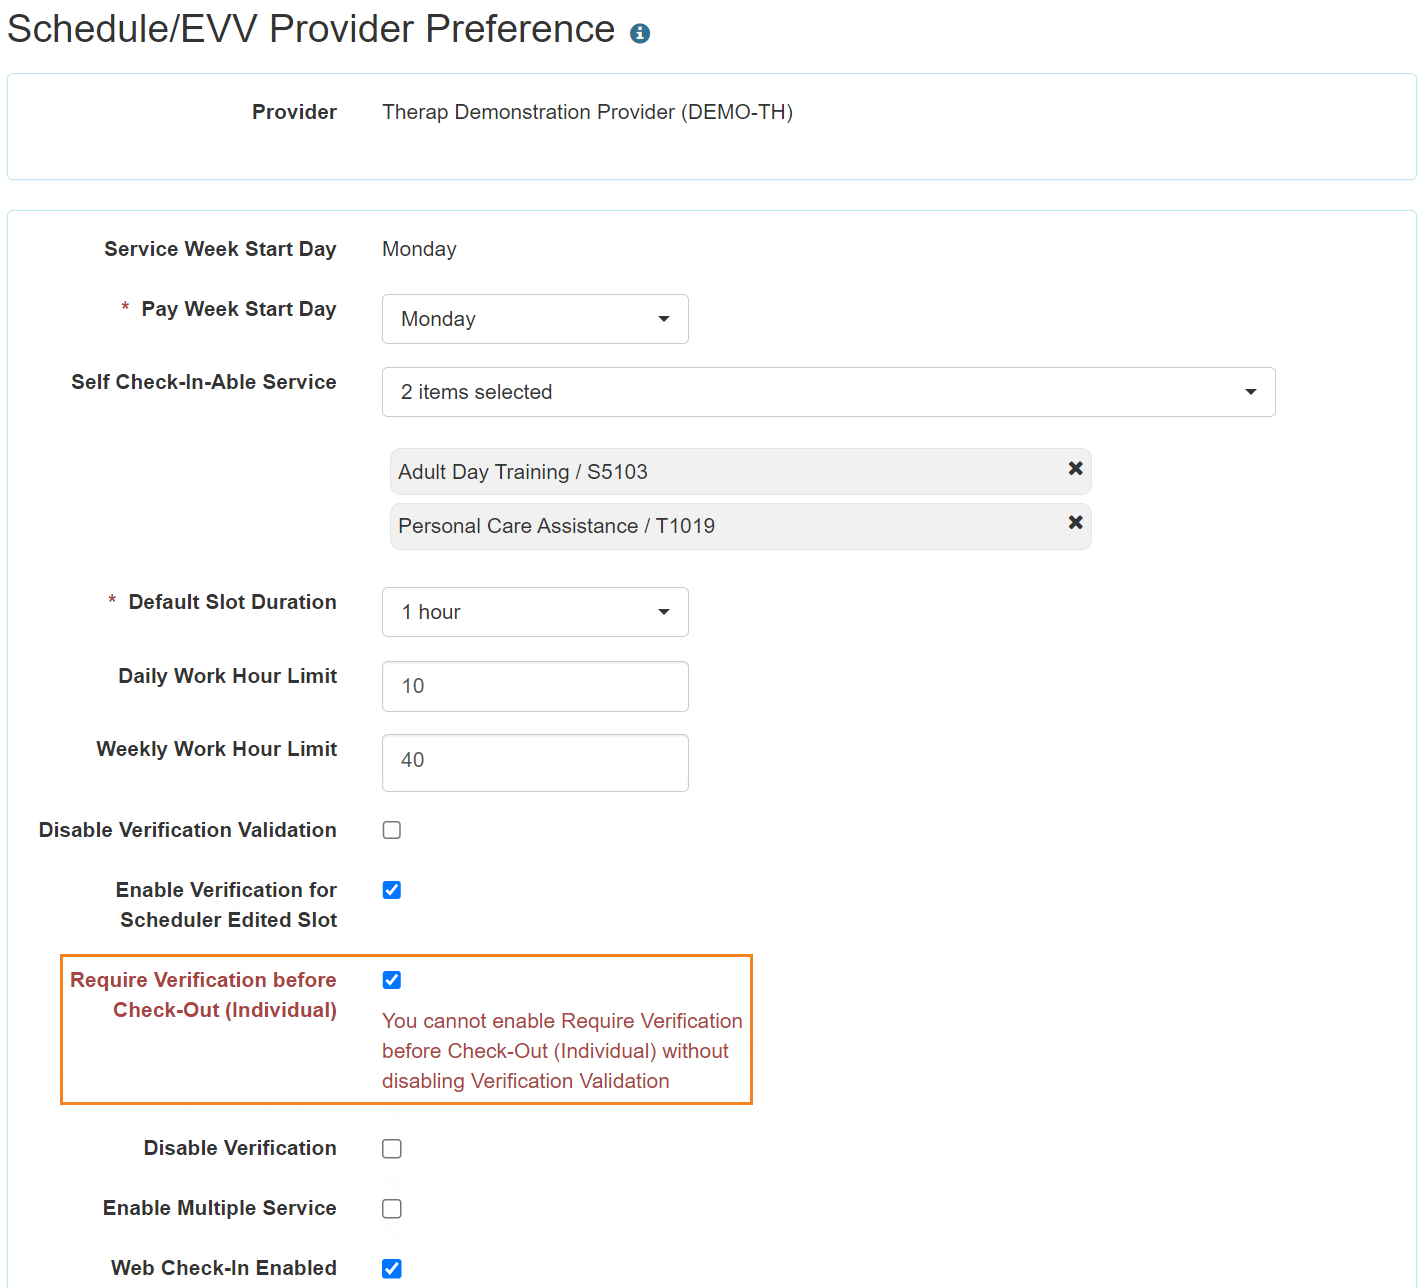
- Users will also first need to check the Disable Verification Validation field to be able to enable the newly added Require Verification before Check-Out (Individual) field. If they attempt to enable the Require Verification before Check-Out (Individual) field without enabling the Disable Verification Validation field, then they will be displayed with an error message stating You cannot enable Require Verification before Check-Out (Individual) without disabling Verification Validation.
- Users will first need to uncheck the Disable Verification field to be able to enable the newly added Require Verification before Check-Out (Individual) field. If they attempt to enable both of the fields at the same time, then they will be displayed with an error message stating You cannot enable Require Verification before Check-Out (Individual) if Verification is disabled.
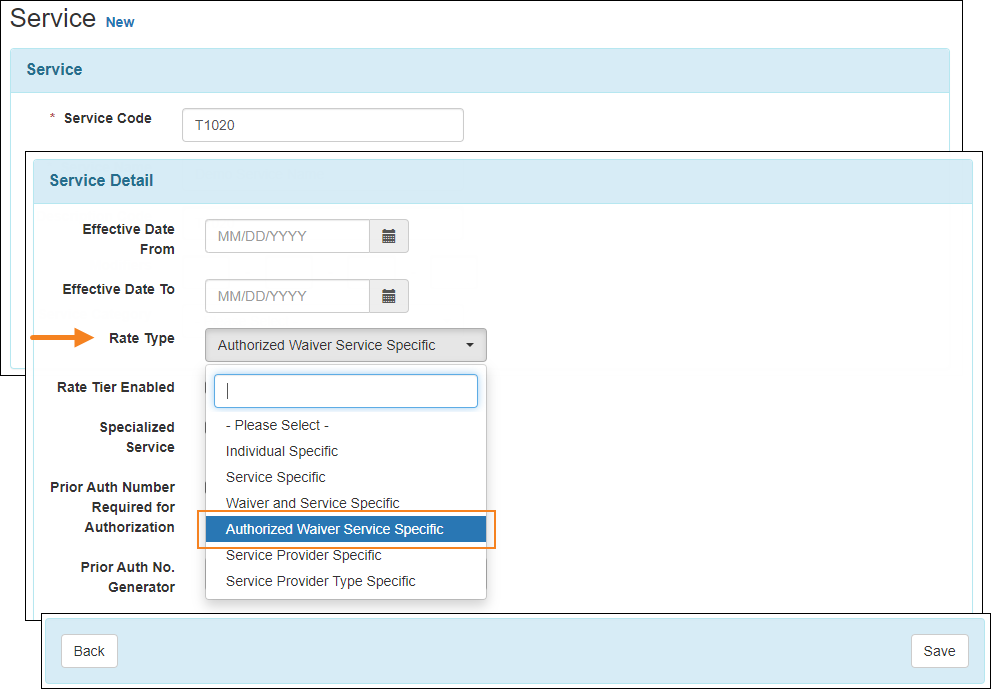
Service Directory
[Back to Top]- A new option ‘Authorized Waiver Service Specific’ has been added to the Rate Type dropdown field on the ‘Service’ form.
User Privilege
[Back to Top]- Several Provider Setup Administrative Role functionalities have been moved under three new Administrative Roles on the 'User Privilege' page:
- Broadcast Admin
- Clinical Admin
- HT Admin
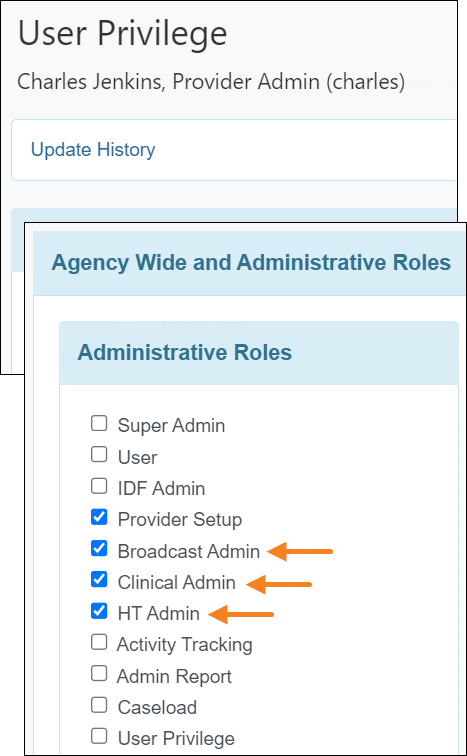
These three roles will be enabled by default for active users who currently have the Provider Setup Administrative Role enabled.
- The following options will now be available for users assigned with the Provider Setup Administrative Role and the three new roles:
- Provider Setup: Access Age Group, Agency Document Type, Calendar Provider Preference, Custom Field, Gender Configuration, GER Event Category Rule, IDF Provider Configuration, Individual Home Page, Provider Custom Message, Password Policy, Program, Pronoun Configuration, Provider Preference, Service Directory, Shared Contact Type, Site, Super Role, and Titles options on the Admin tab.
- Broadcast Admin: Access Splash Message and Signup Agreement options on the Admin tab.
- Clinical Admin: Access Case Note Template, Consent Type, Employment History Preference, Individual Document Type, Individual Plan, Level of Care Template, Location Library, Priority List, Questionnaire, and Restraint List options on the Admin tab.
- HT Admin: Access Consultation Form Configuration, Intake/Elimination Provider Configuration, and Intake/Elimination Individual Configuration options on the Admin tab.
- Users currently assigned with the IDF Admin Administrative Role will need to be assigned with the HT Admin Administrative Role after the release to be able to access the Intake/Elimination Individual Configuration option in the ‘General’ section of the Admin tab.
Vital Signs
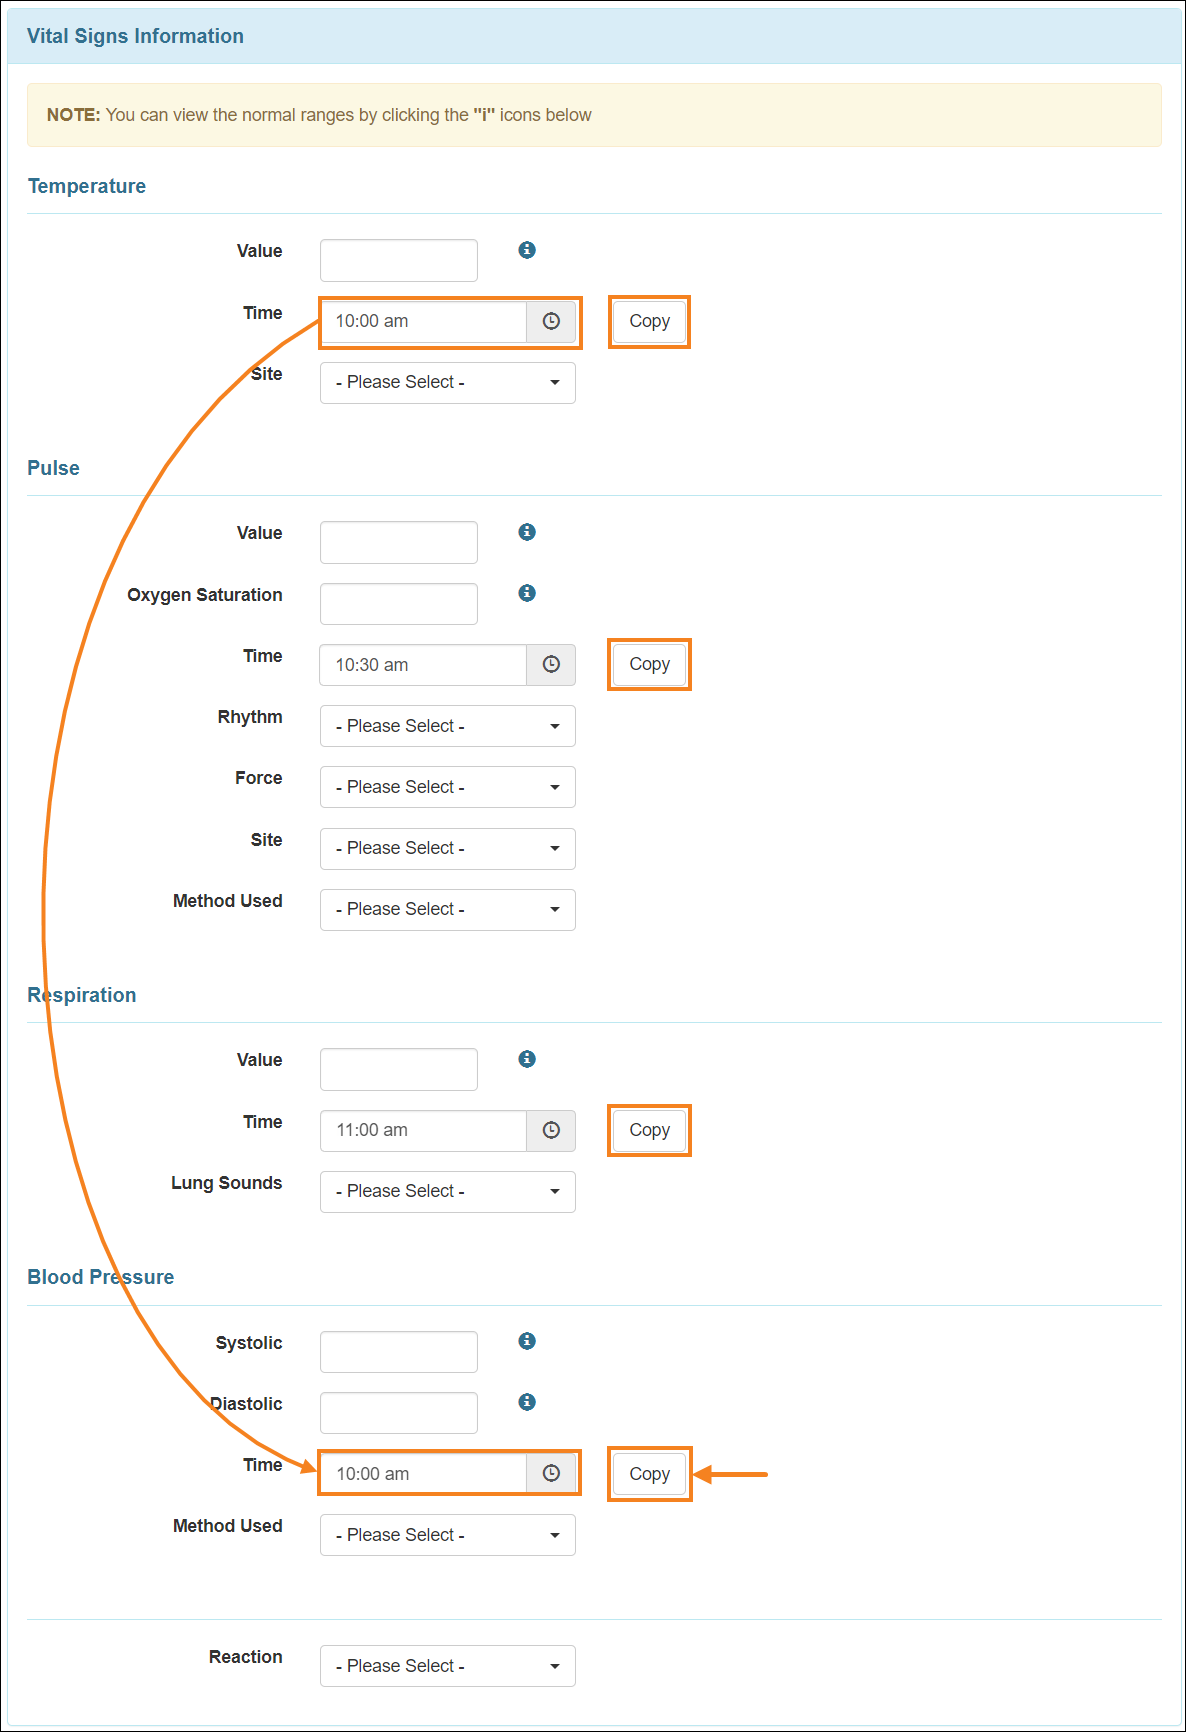
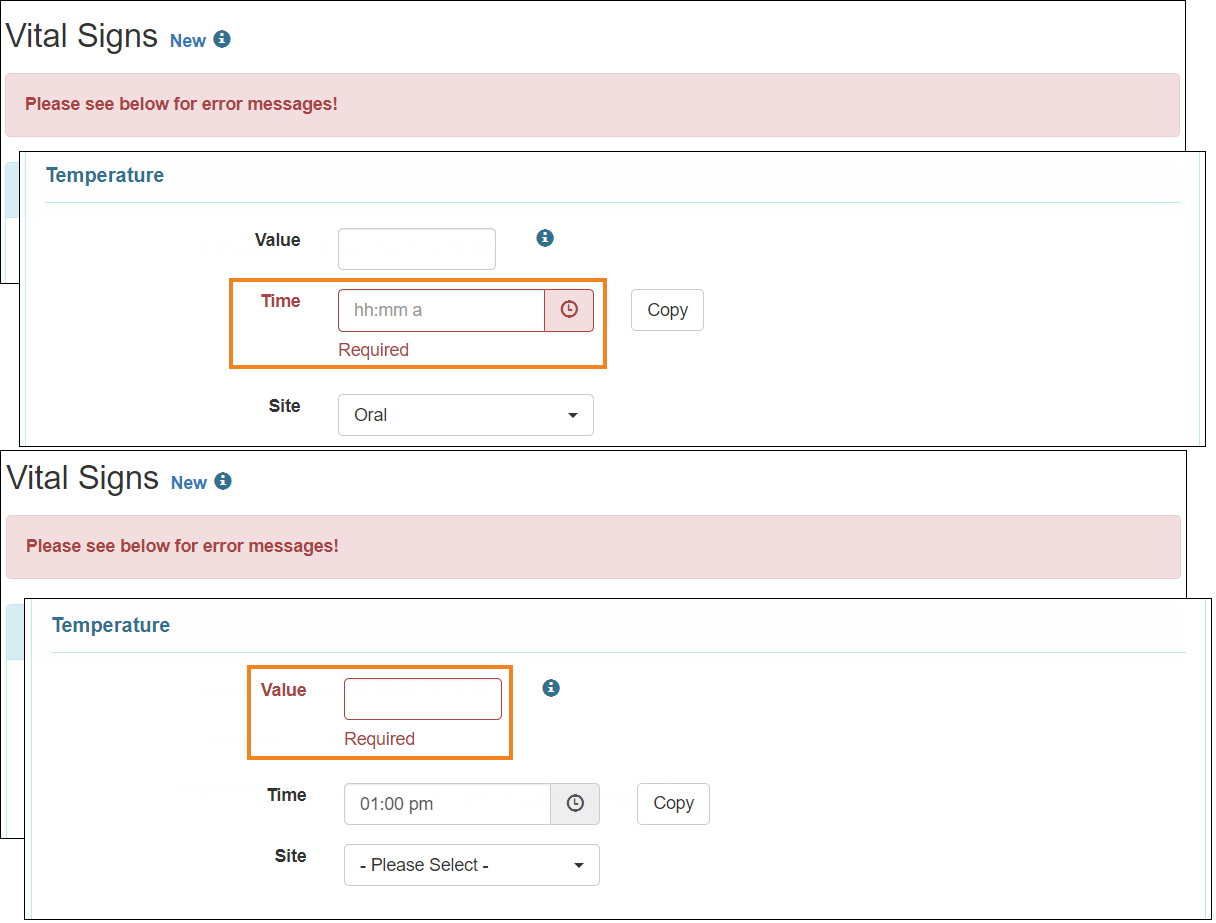
[Back to Top]- The Time fields appearing in each sub-section of the Vital Signs form will no longer be displayed as a required field and the time information within the Time field will no longer auto-populate. However, if users enter Vital Signs value without entering the respective Time or enter a Time without entering the respective value, then they will receive error messages while attempting to save or submit the form.
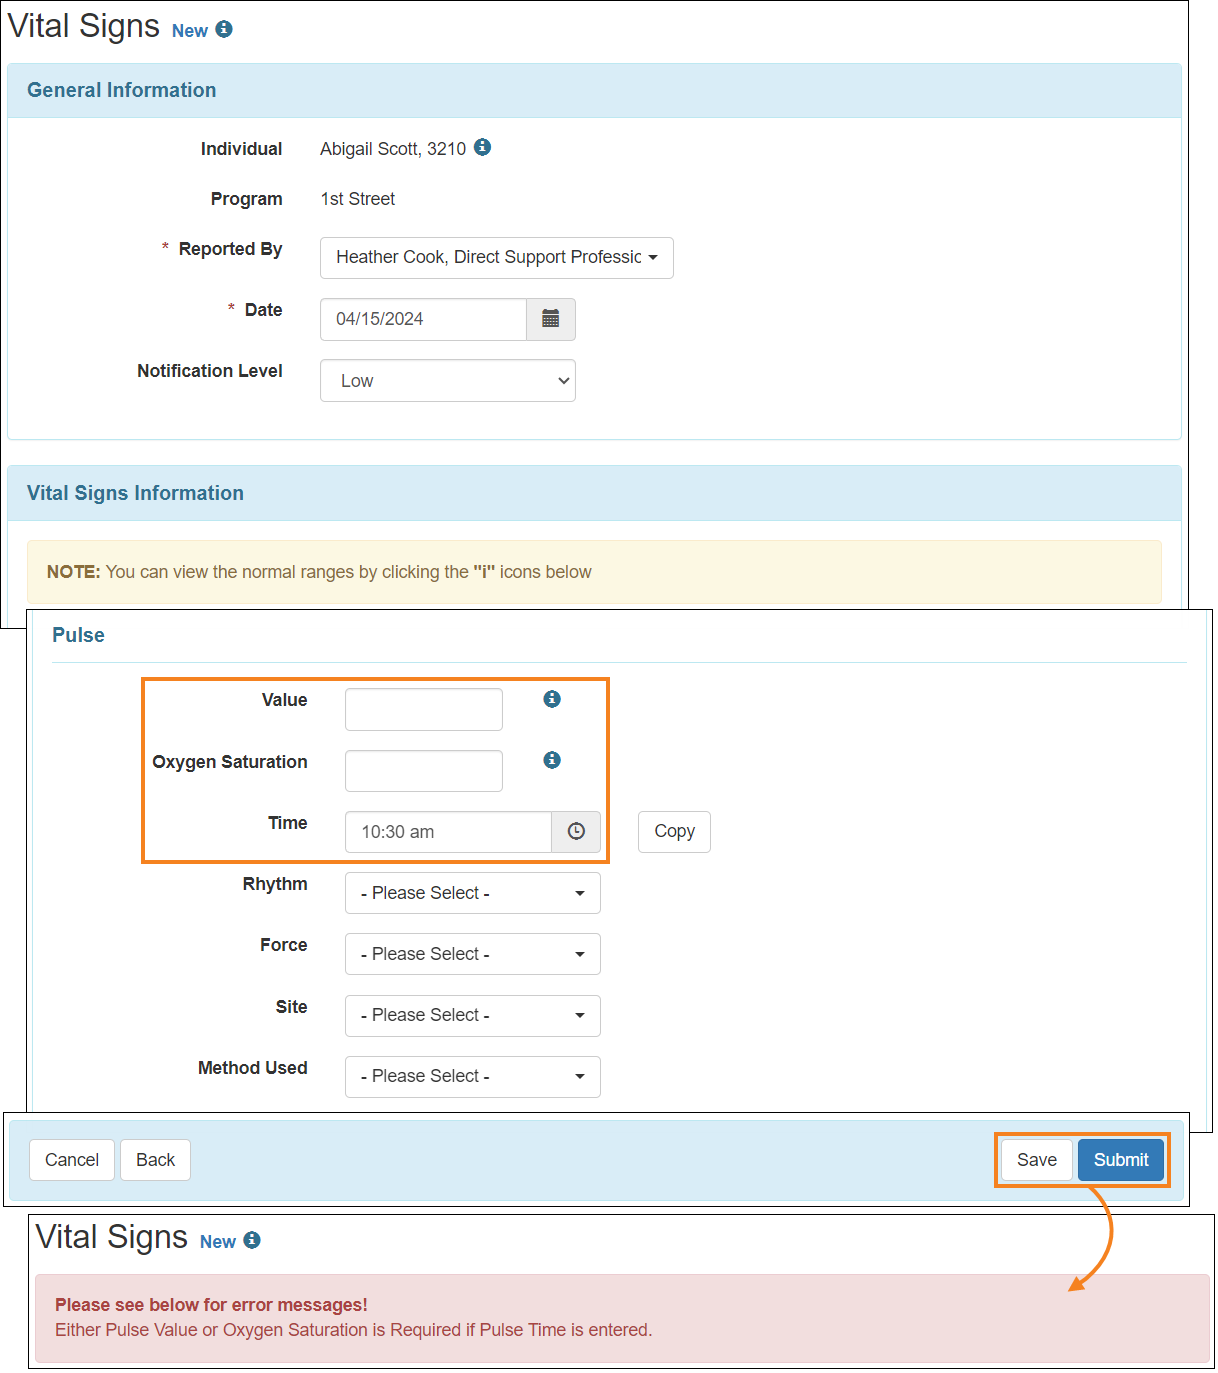
- Users will now require entering either the Value or the Oxygen Saturation information if they enter Time in the ‘Pulse’ sub-section of the Vital Signs form. However, if users enter Time, but attempt to save or submit the form without entering Pulse Value or Oxygen Saturation, they will receive an error message stating: 'Either Pulse Value or Oxygen Saturation is Required if Pulse Time is entered.'
- The Copy To All button next to the Time field in the ‘Temperature’ sub-section has been removed and a new Copy button has been added next to each Time field in the ‘Vital Signs Information’ section. Using the new Copy button, users will be able to copy the first entered Time value within the form.