Therap for Canada 2024.0.2 Released!
| Release Date: 1/4/2024 |
- Activity Tracking
- Appointments
- Behavior Plan & General Event Reports (GER)
- Billing
- External Individual Mapping
- General Event Reports (GER)
- Health Tracking
- Immunization
- Individual Demographic Form (IDF)
- Individual Home Page
- Individual Plan
- Intake/Elimination
- Login
- Medication History
- Medication Order
- Medication Review
- Notification
- Password Policy
- Personal Finance
- Priority List
- Referral
- Scanner Interface
- Scheduling
- Self Password Reset
- Service Directory
- T-Log
- Training Management System (TMS)
- Two Factor Authentication (2FA)
- User
Activity Tracking
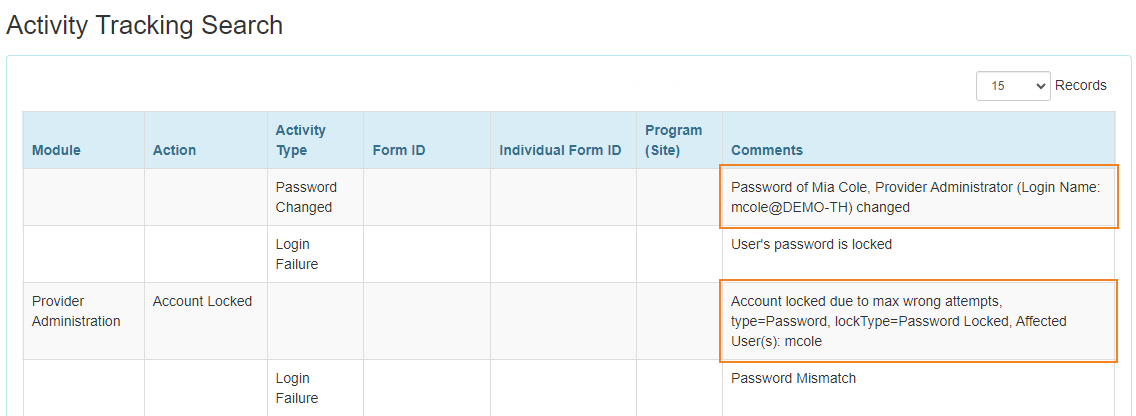
[Back to Top]- The Comments for the following Activity Tracking logs have been updated:
- For the Action Account Locked, the Comments column will now include ‘lockType’ information of the user’s action.
- For the Activity Type Password Changed, the Comments column will now include the Provider Code of the affected user.
Appointments
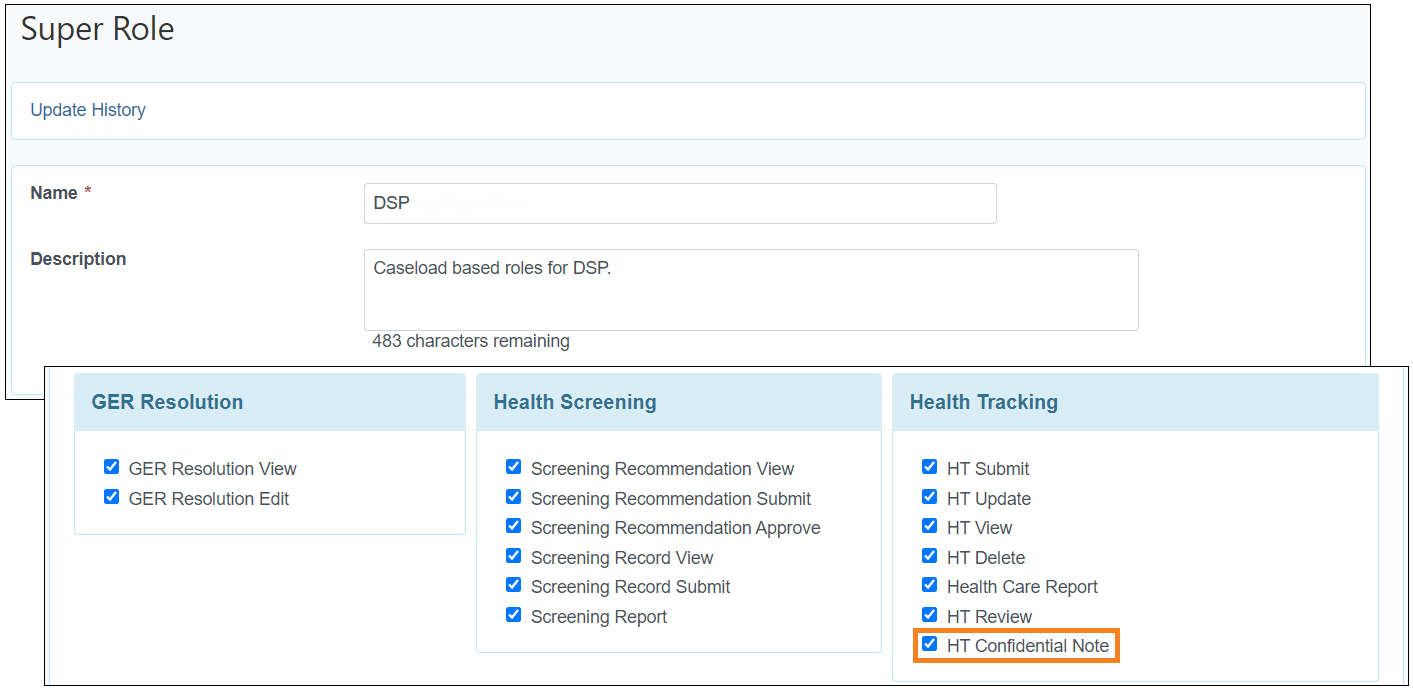
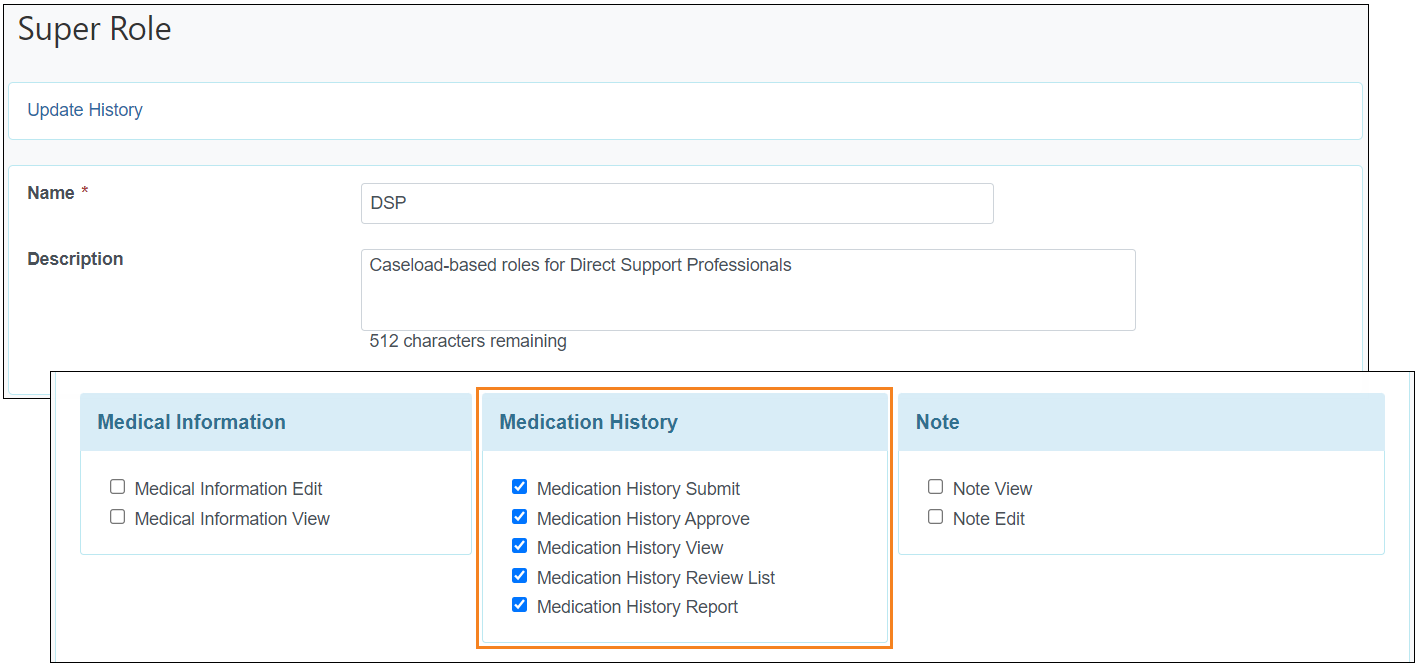
[Back to Top]- A new caseload-based role titled HT Confidential Note has been added in the ‘Health Tracking’ section of the ‘Super Role’ page.
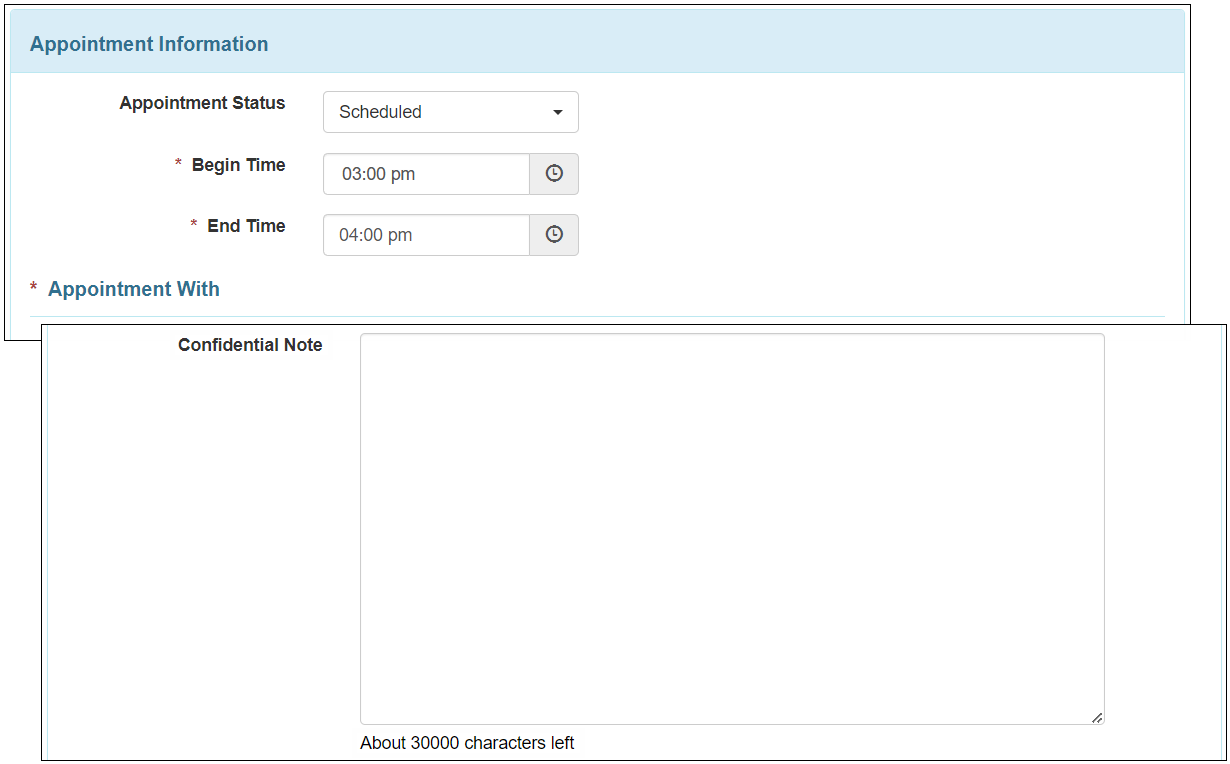
- A new field titled Confidential Note has been added which will allow users to enter up to 30,000 characters in the ‘Appointment Information’ section of the Appointments form. Users will be able to enter information in this field without the HT Confidential Note caseload-based role while creating a new Appointments form. However, users need to have this role assigned to view the entered note in In Prep, Approved, or Deleted Appointments forms including the PDF and Update History archives of the forms.
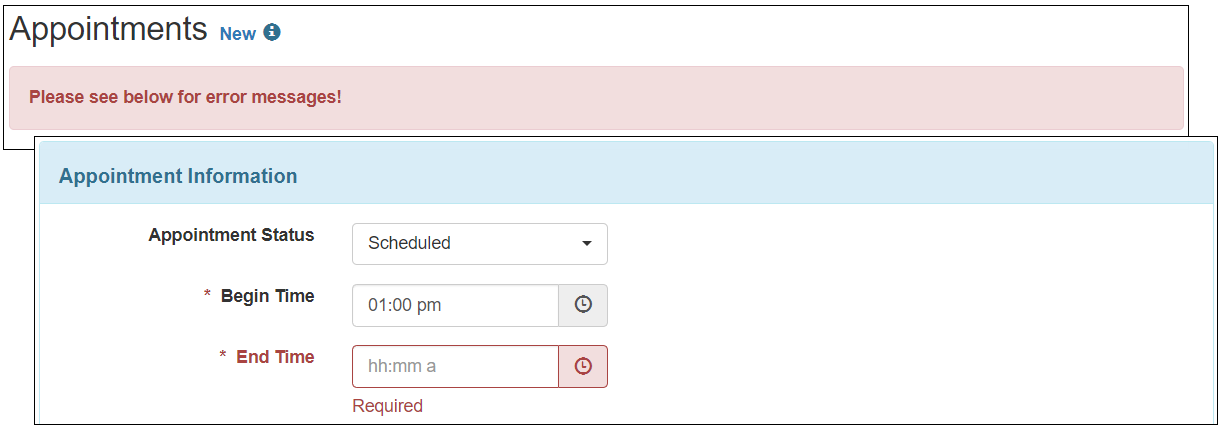
- The End Time field in the ‘Appointment Information’ section is now a required field. Users will receive an error message while saving, submitting, or deleting the Appointments while keeping this field blank.
- For Appointments created from the Calendar View option, the End Time field will be automatically set to 1 hour after the Begin Time. If an Appointment is created for 11:00 PM or later, then the End Time will be automatically set to 11:59 PM.
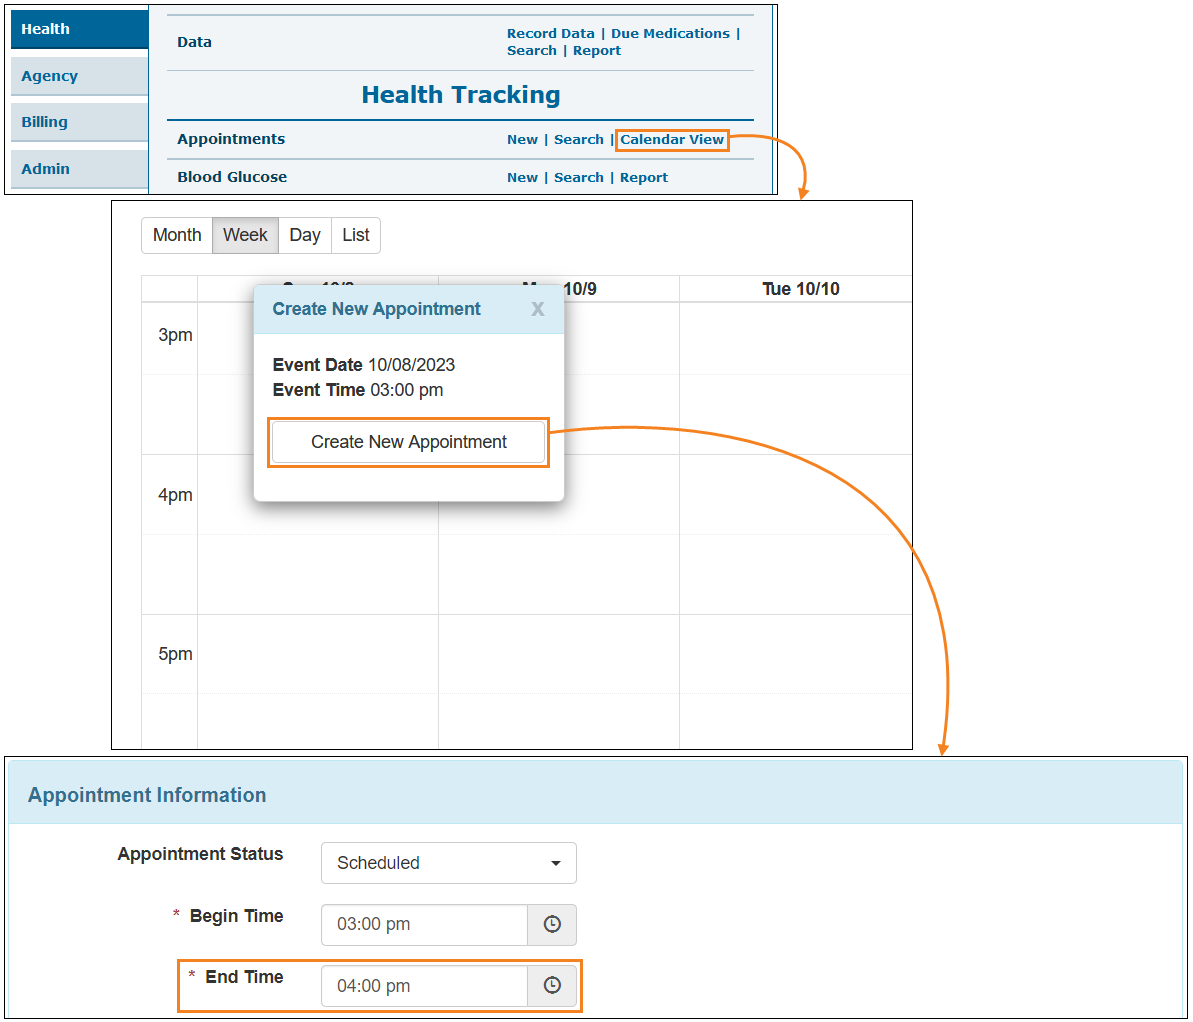
- If users enter a Begin Time in the Appointments form where End Time is currently blank, then the End Time will be automatically set to 1 hour later than the selected Begin time. However, if Begin Time is set to 11:00 pm or later, then the End Time will be automatically set to 11:59 pm.
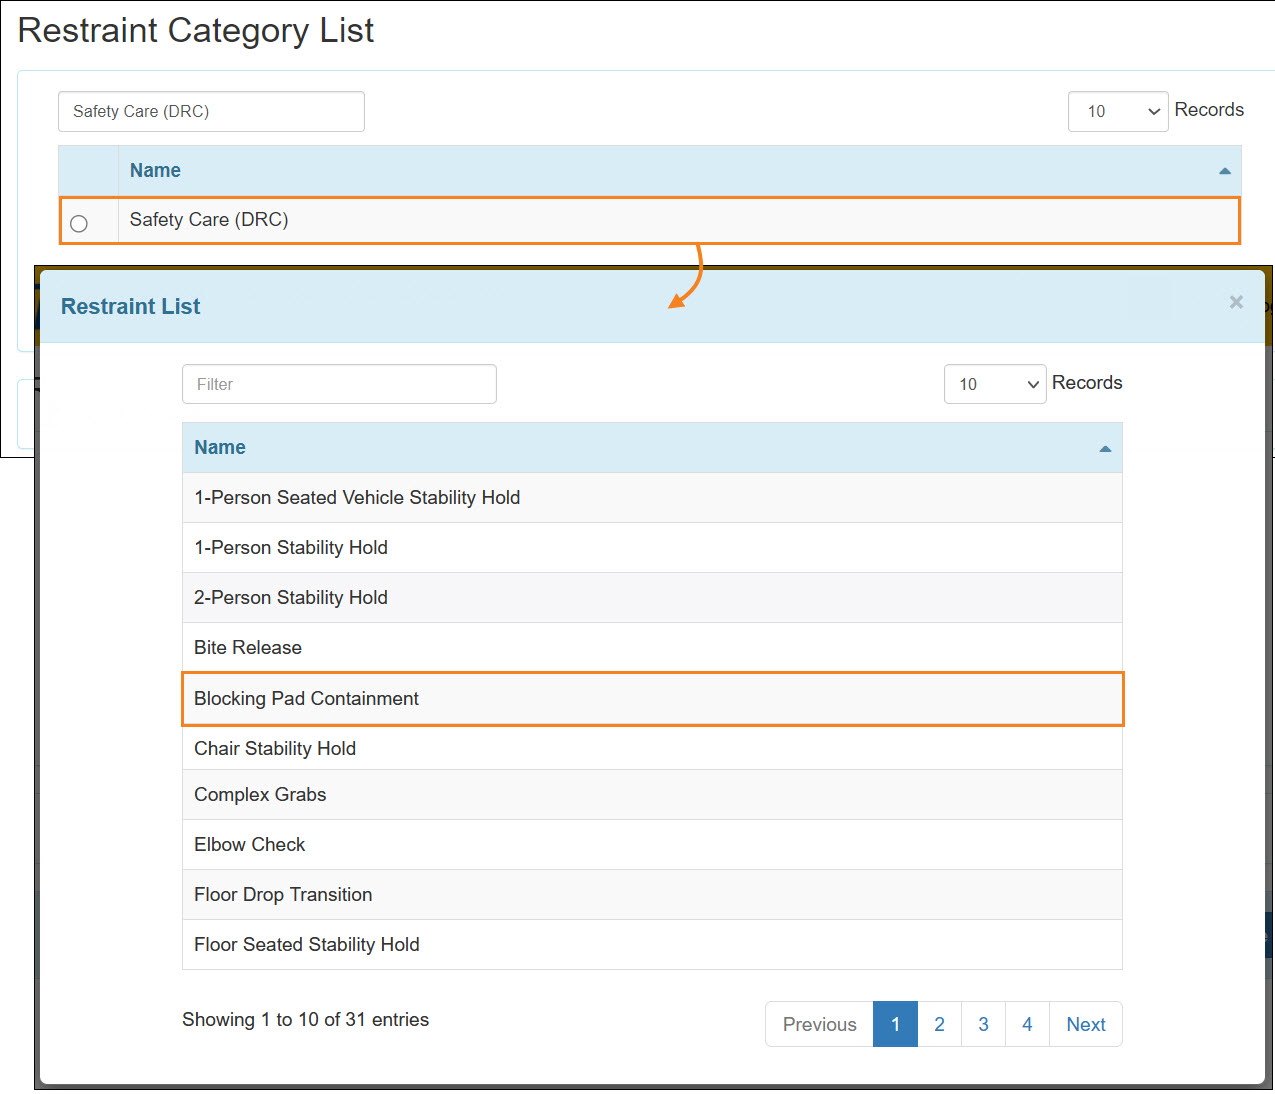
Behavior Plan & General Event Reports (GER)
[Back to Top]- A new Restraint Type titled Blocking Pad Containment has been added to the Restraint Category titled ‘Safety Care (DRC)’.
Billing
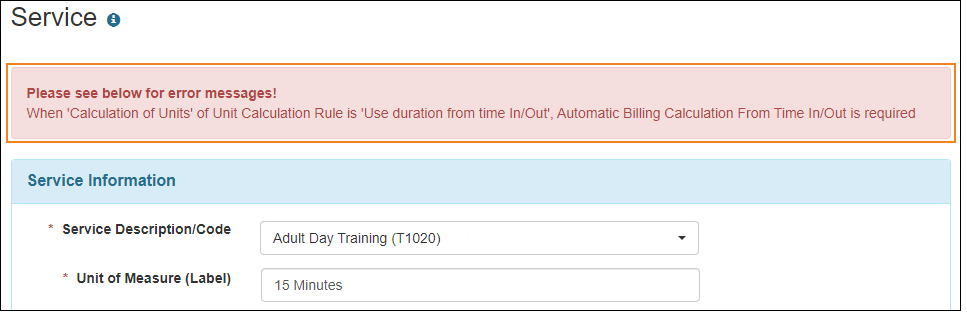
[Back to Top]- When the Method of Data Collection within the ‘Service’ form of the Service Authorization is selected as ‘ISP Data’, ‘Case Note’, or ‘EVV’ and Unit Calculation Rule is selected as ‘Use duration from time In/Out’, then the system will show the following validation message if any options have not been selected in the ‘Automatic Unit Calculation From Time In/Out’ section:
When 'Calculation of Units' of Unit Calculation Rule is 'Use duration from time In/Out', Automatic Billing Calculation From Time In/Out is required.
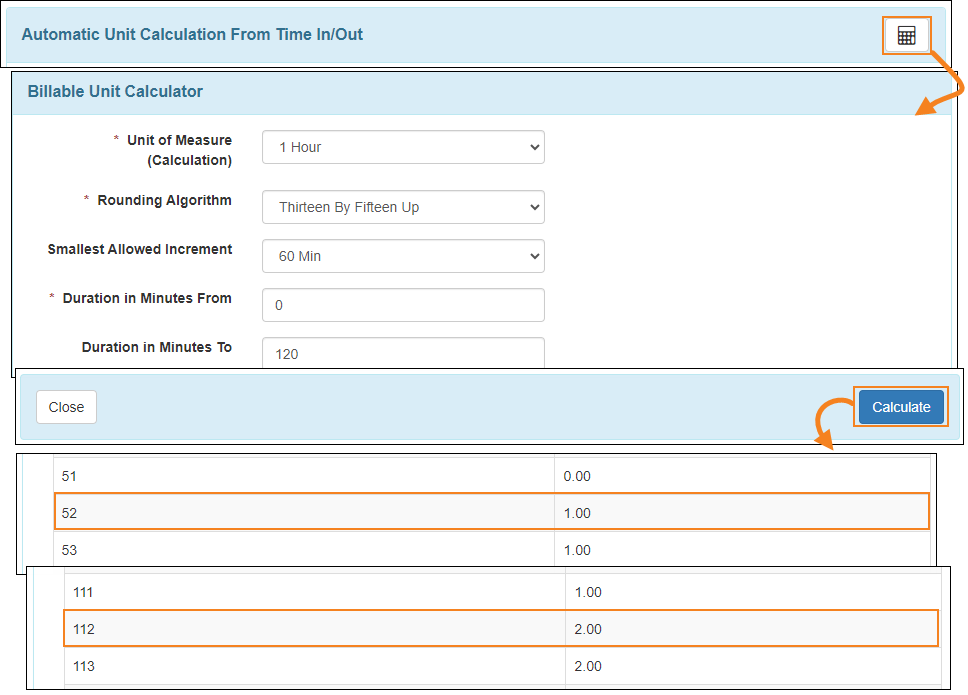
- A new Rounding Algorithm ‘Thirteen By Fifteen Up’ has been added under the ‘Automatic Unit Calculation From Time In/Out’ section of the ‘Service Description/Code’ form and ‘Service’ form of the Service Authorization. If the ‘Unit of Measure (Calculation) field is selected as ‘1 Hour’, Smallest allowed increment is selected as ‘60 min’, and the Rounding Algorithm is selected as ‘Thirteen By Fifteen Up’, then at 52 minutes 1 unit will be generated. The second unit will be generated at 1 hour and 52 minutes and so on.
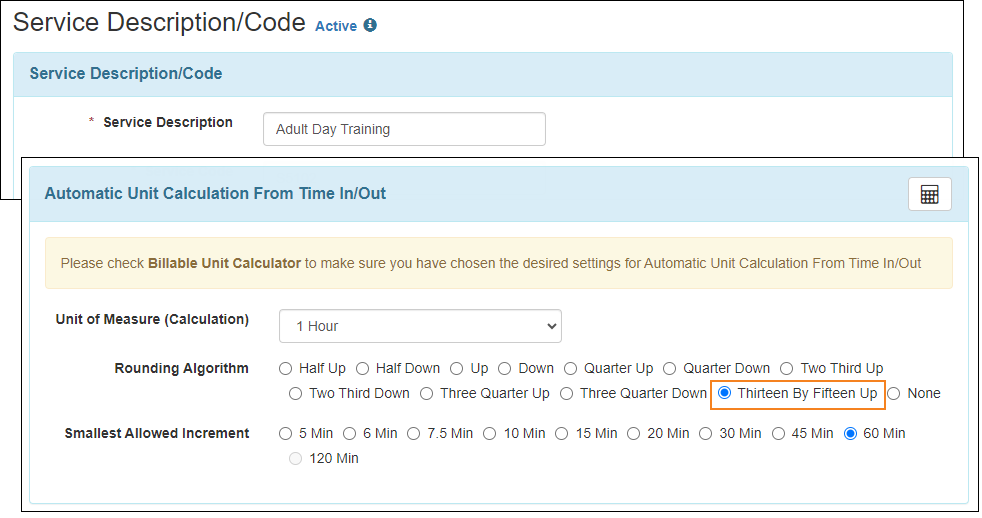
Users can use the 'Billable Unit Calculator' option by clicking on the calculator icon in the 'Automatic Unit Calculation From Time In/Out' section to test the configurations and their results for entered service minutes.
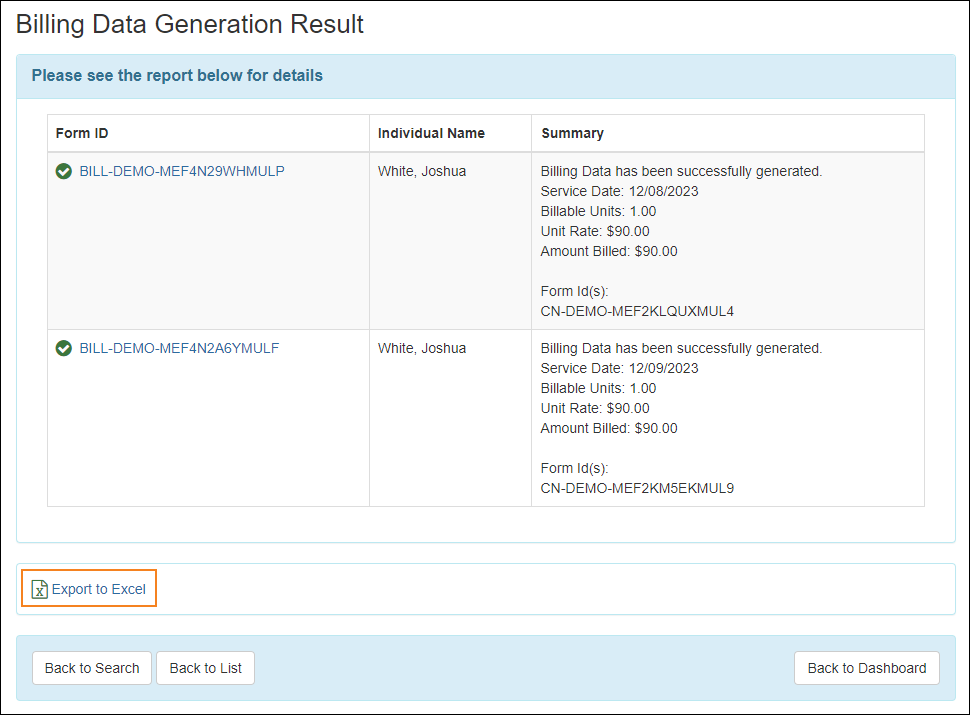
- Users will be able to export information being displayed on the ‘Billing Data Generation Result’ page into an Excel file by clicking on the Export to Excel link on the bottom of the page.
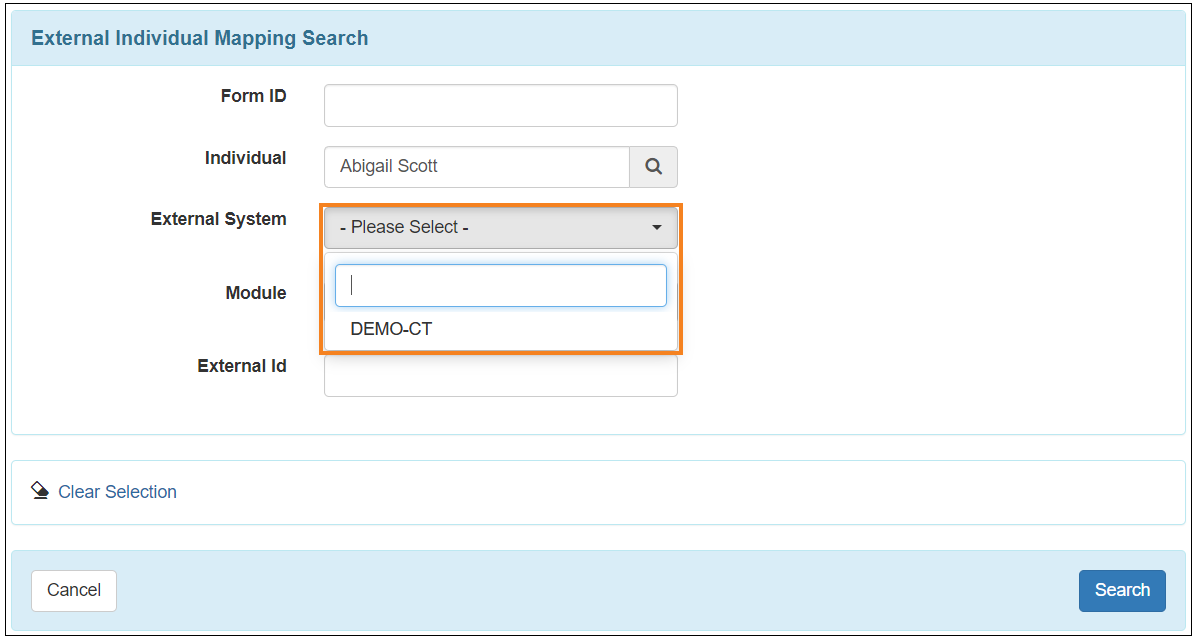
External Individual Mapping
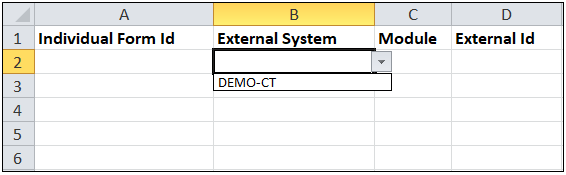
[Back to Top]- The External System dropdown field of the External Individual Mapping form will only show the external systems for which Approved External Provider Mapping is available for a provider.
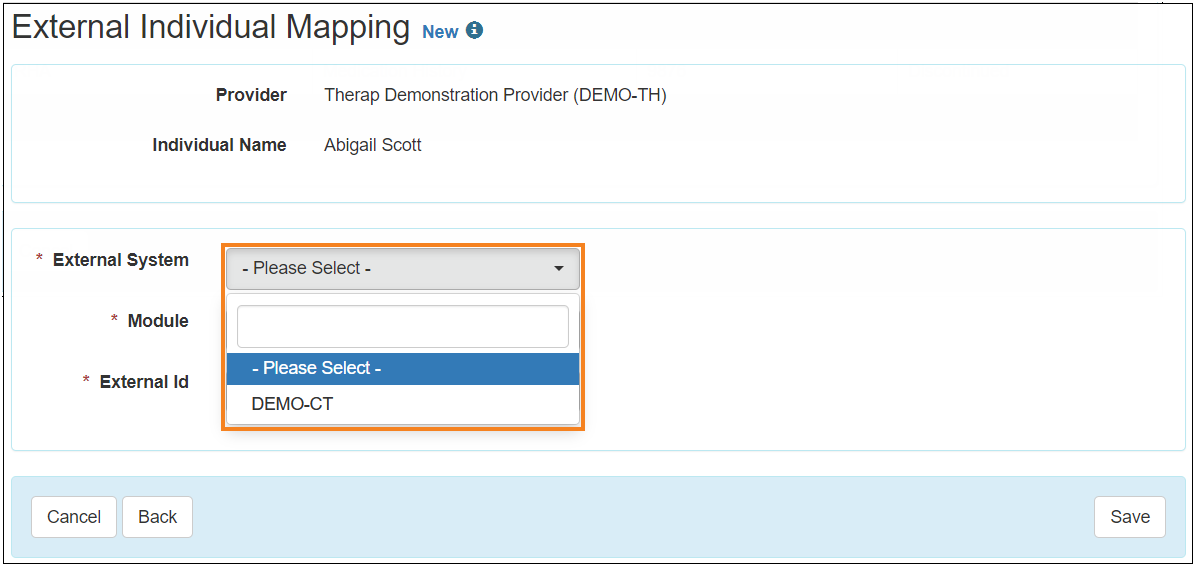
This will also reflect in the External System column of the Excel Template while importing External Individual Mapping using the Import from Excel option.
- On the 'External Individual Mapping Search' page, the External System dropdown field will show the external systems for which Approved or Discontinued External Provider Mappings are available for the provider.
General Event Reports (GER)
[Back to Top]- In the ‘GER Preference’ section of the ‘Provider Preference’ page, the subsection titled ‘Notify in case of’ has been renamed to ‘Required Notification(s) :: Person/Entity to Notify Configuration’.
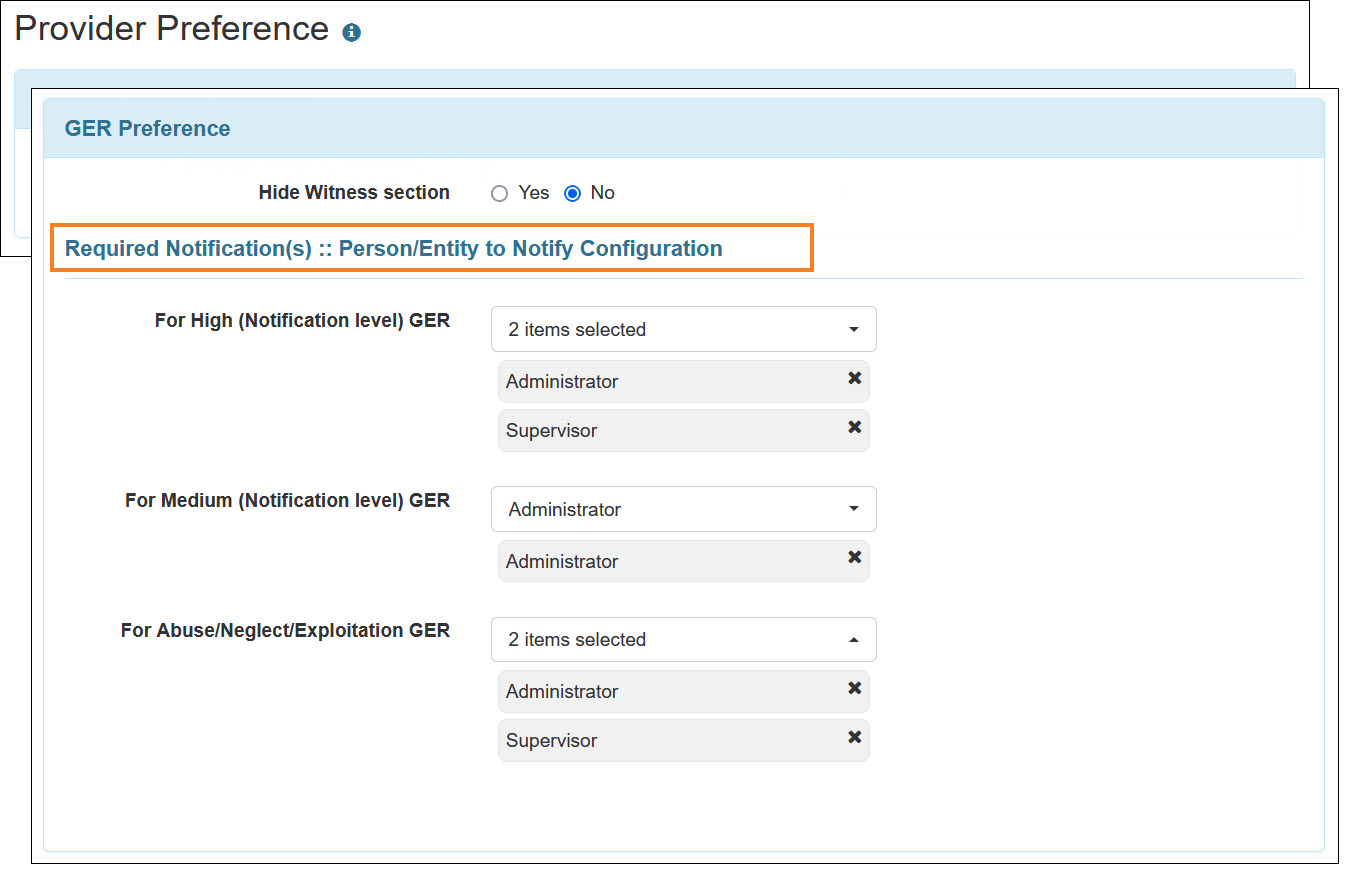
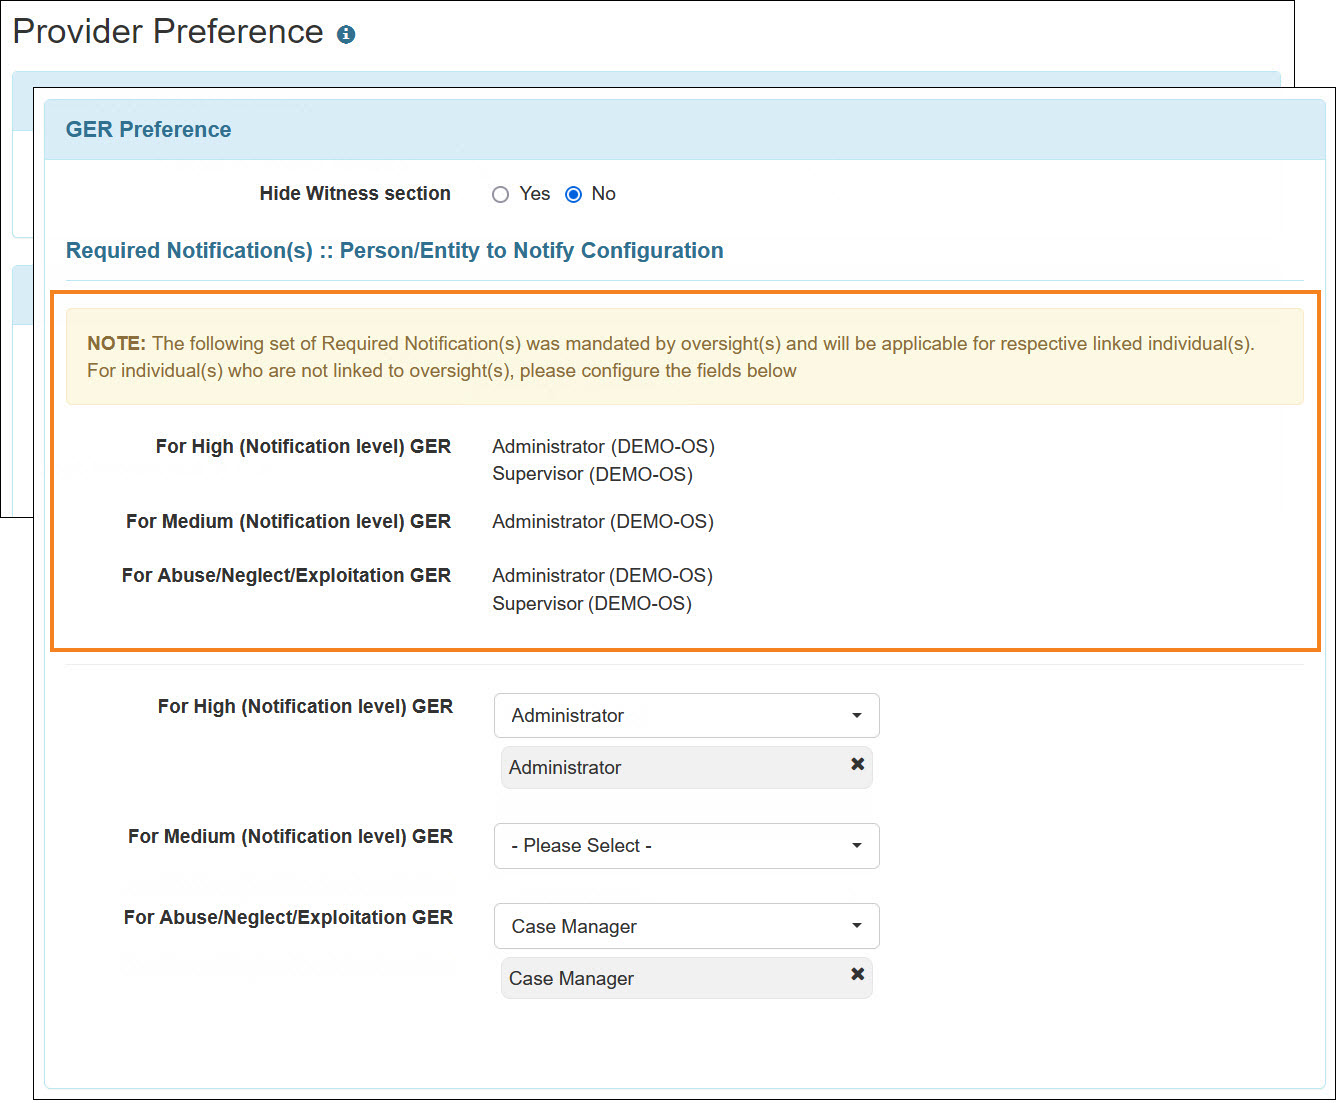
- The required notification(s) configured from the ‘GER Preference’ section of the ‘Provider Preference’ page of an Oversight Provider, will be applicable by default for the linked individual(s) of the providers linked to that Oversight Providers. Regular Provider users will be able to add required notifications for the individuals not linked to the Oversight Provider; however, the notification preferences applicable for the linked individual(s) cannot be removed by the linked provider users.
The Provider Code of Oversight Provider from which notification preferences have been configured will be displayed next to the applicable notification options in parenthesis ‘()’. If multiple linked Oversight Providers have configured the same notification preference, then the respective Provider Codes will be displayed as comma separated values. However, if no notification preference is configured from the linked Oversight Provider, then the respective provider’s notification preferences will be applicable.
- GER Event Category Rule will now be available for the users in Oversight Providers. Users assigned with the Provider Setup administrative role will be able to access the ‘GER Event Category Rule’ page using the GER Event Category Rule link from the Provider Preference section of their Oversight Dashboard.
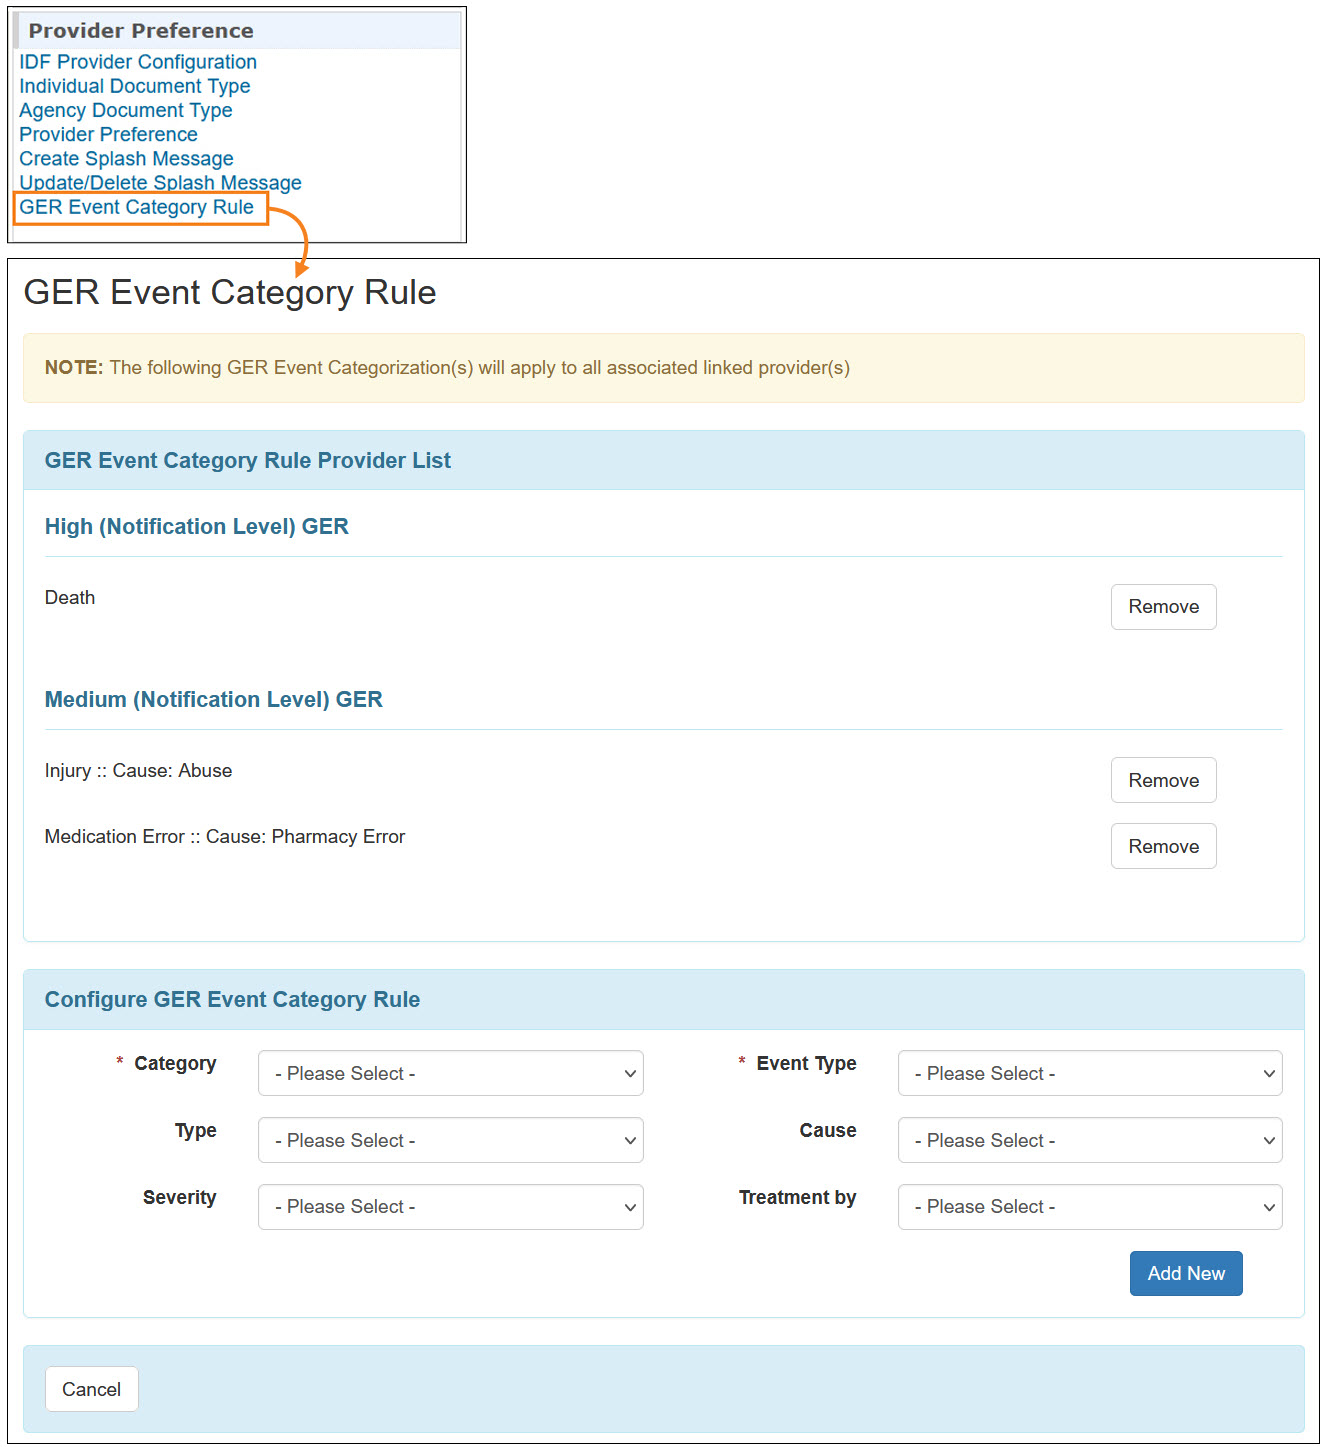
- The event category rule defined from the Oversight Provider’s GER Event Category Rule, will be applicable by default for the linked individual(s) of the providers linked to that Oversight Provider. Linked provider users will be able to add event category rules for the individuals not linked to the Oversight Provider; however, the event category rules applicable for the linked individual(s) cannot be removed by the linked provider users. The configured event category rule from the Oversight Provider will be displayed in the ‘GER Event Category Rule Oversight Provider List’ section.
The Provider Code of Oversight Provider from which the category rule has been configured will be displayed in parenthesis ‘()’ next to the configured event category option. If multiple linked Oversight Providers have configured the same category rule, then the respective Provider Codes will be displayed as comma separated values. However, if no event category rule is configured from the linked Oversight Provider, then the Provider’s GER Event Category Rule will be applicable.
The following Note will be displayed to the Regular Providers when GER Event Category Rule is configured by their linked Oversight Providers:
‘NOTE: The following GER Event Categorization(s) have been defined by the oversight provider(s) and will apply to individual(s) who are linked to them’. - For Event Injury type GERs, if users select the Discovered option for This event was field on the 'Event Information' page, then they must enter the discovered date and time in the Discovered Date/Time field. Otherwise, they will receive an error message. Previously, this feature was only available for the users in Connecticut.
For Event Other type GERs, the This event was field on the 'Event Information' page is now a required field. If users select the Discovered option for this field, then they must enter the discovered date and time in the Discovered Date/Time field. Otherwise, they will receive an error message.
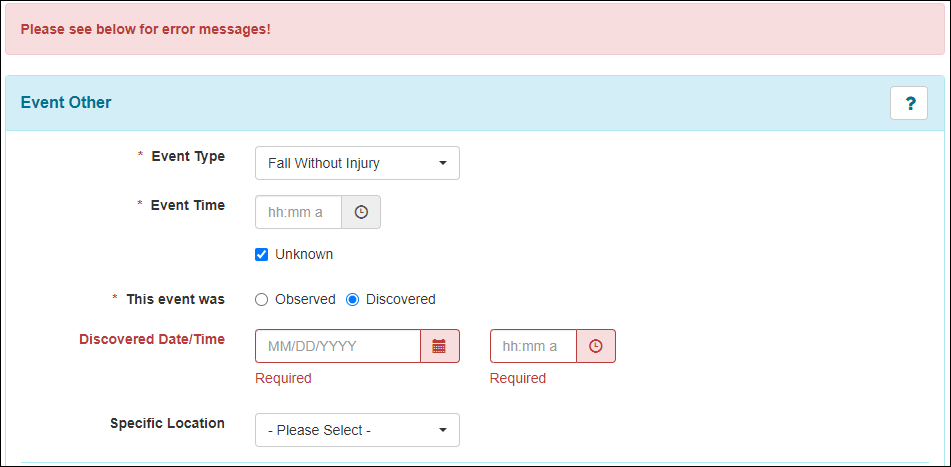
- The radio buttons adjacent to the This event was field on the 'Event Information' page for Event Injury and Event Other type GERs, can now be deselected after being selected.
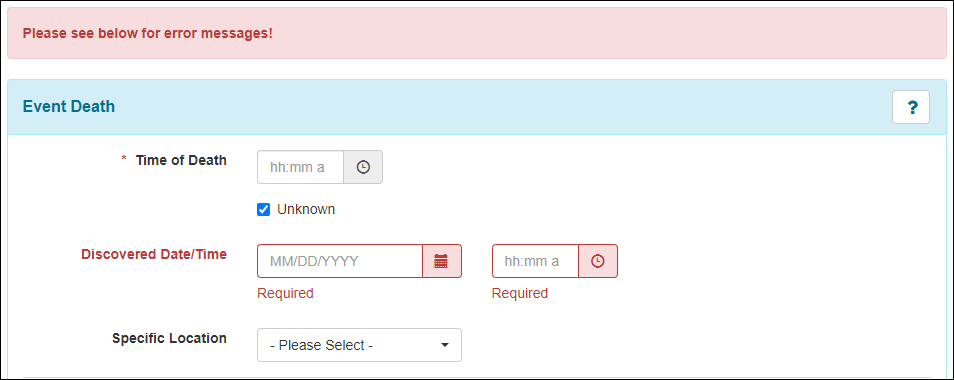
- For Event Death type GERs, if Unknown is selected for the Time of Death field on the 'Event Information' page, then users must enter the discovered date and time in the Discovered Date/Time field. Otherwise, they will receive an error message.
Health Tracking
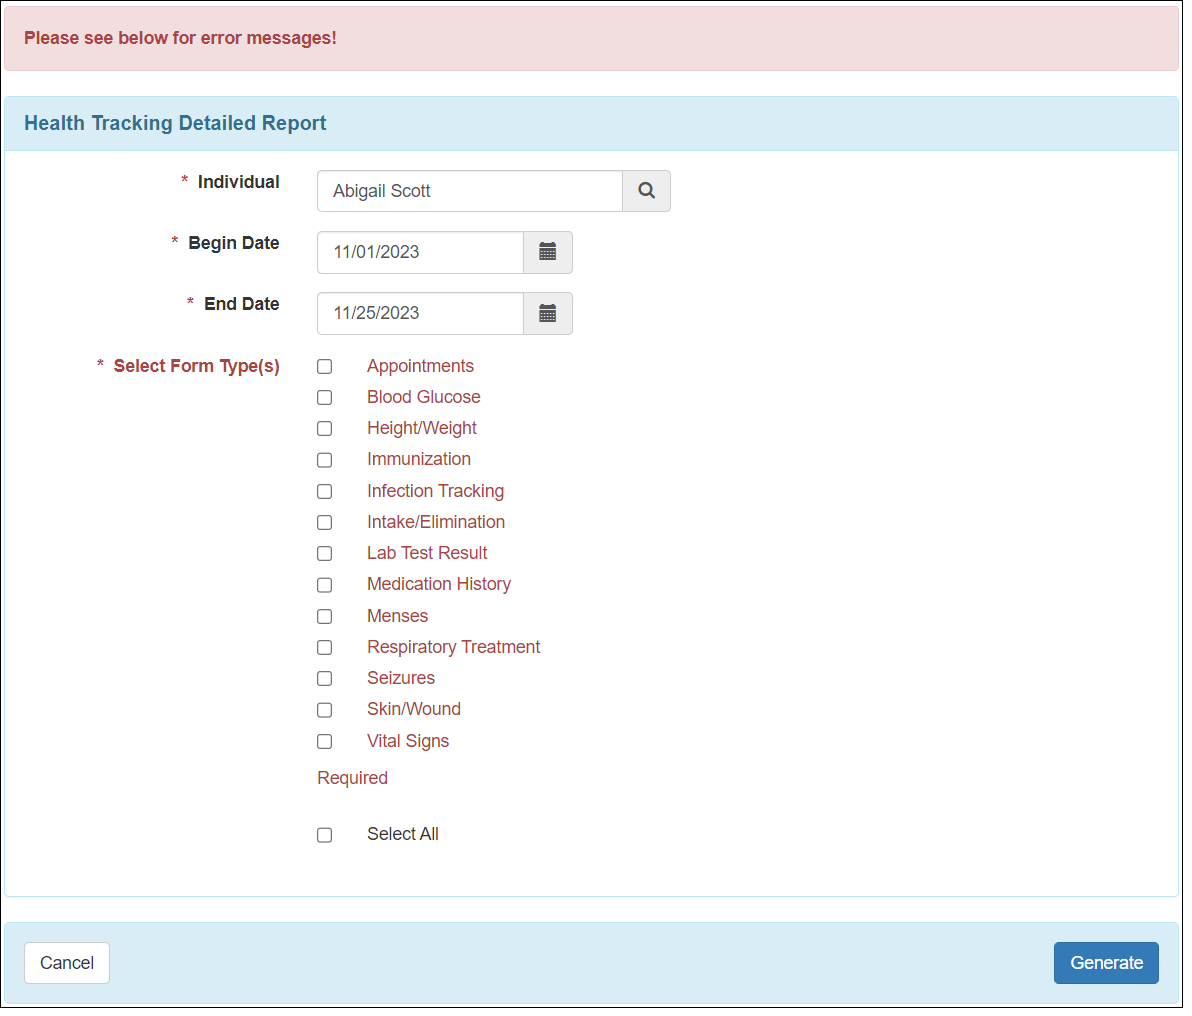
[Back to Top]- On the ‘Health Tracking Detailed Report’ page, the Select Form Type(s) dropdown field will appear as checkboxes and it is now a required field. Users will receive an error message upon clicking on the Generate button without selecting any of the checkboxes. By clicking on the ‘Select All’ checkbox, users will be able to select all the form types.
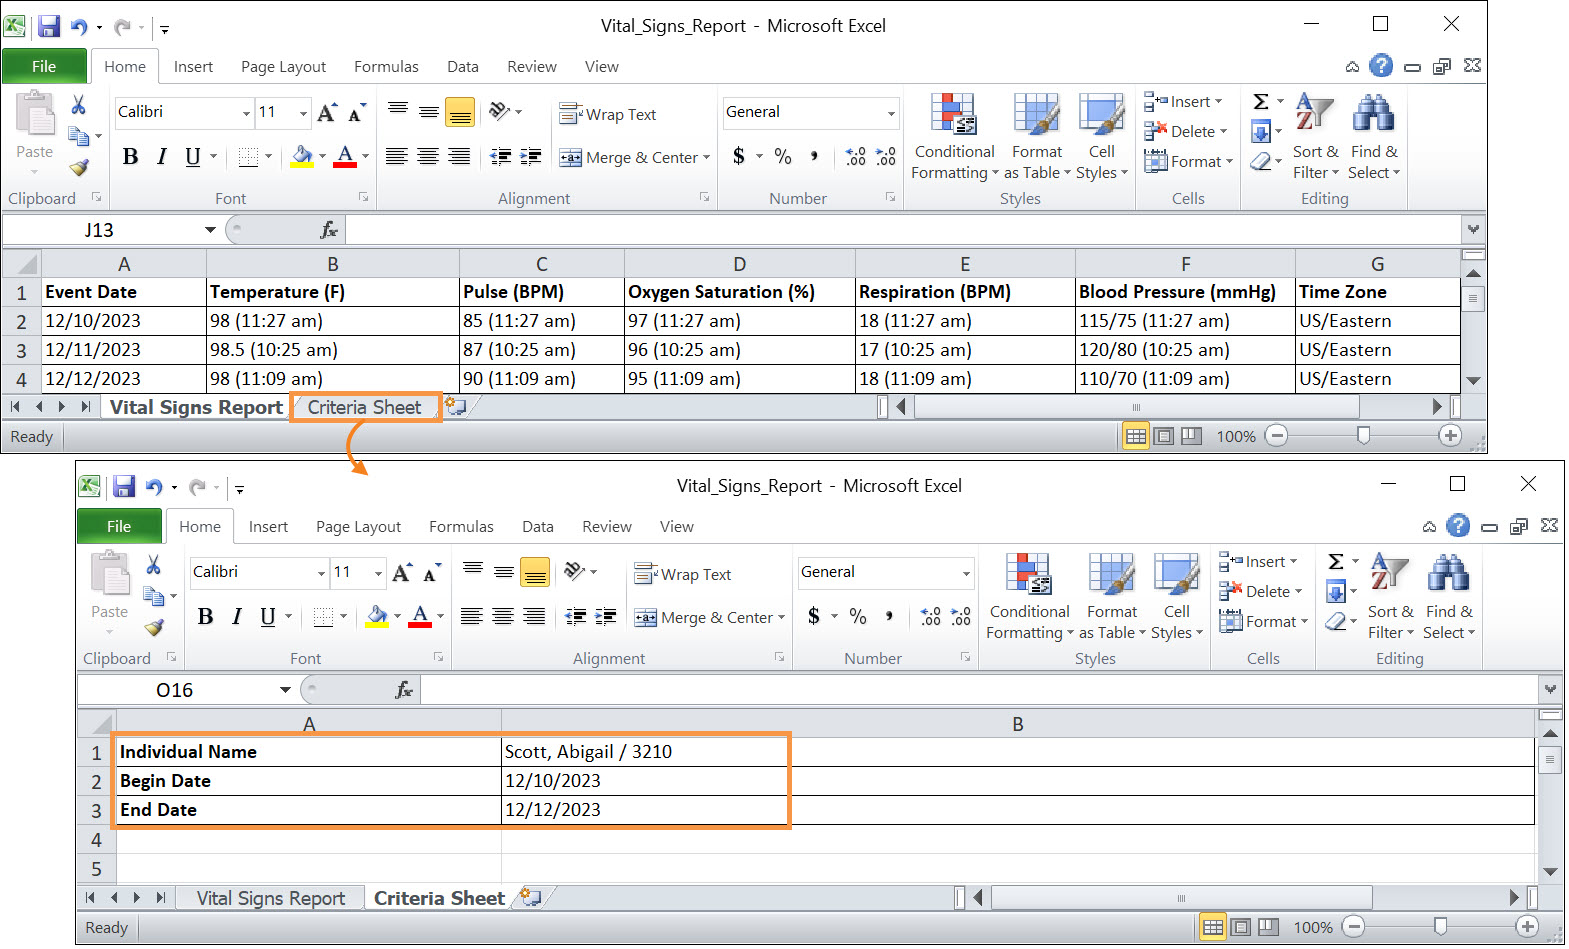
- A new 'Criteria Sheet' page has been added to the exported Excel reports generated from the Report option of the following Health Tracking modules:
- Blood Glucose
- Height/Weight
- Infection Tracking
- Intake/Elimination
- Lab Test Result
- Vital Signs
The following information will be displayed on the 'Criteria Sheet' page, based on the searched parameters:- Individual Name
- Begin Date
- End Date
Immunization
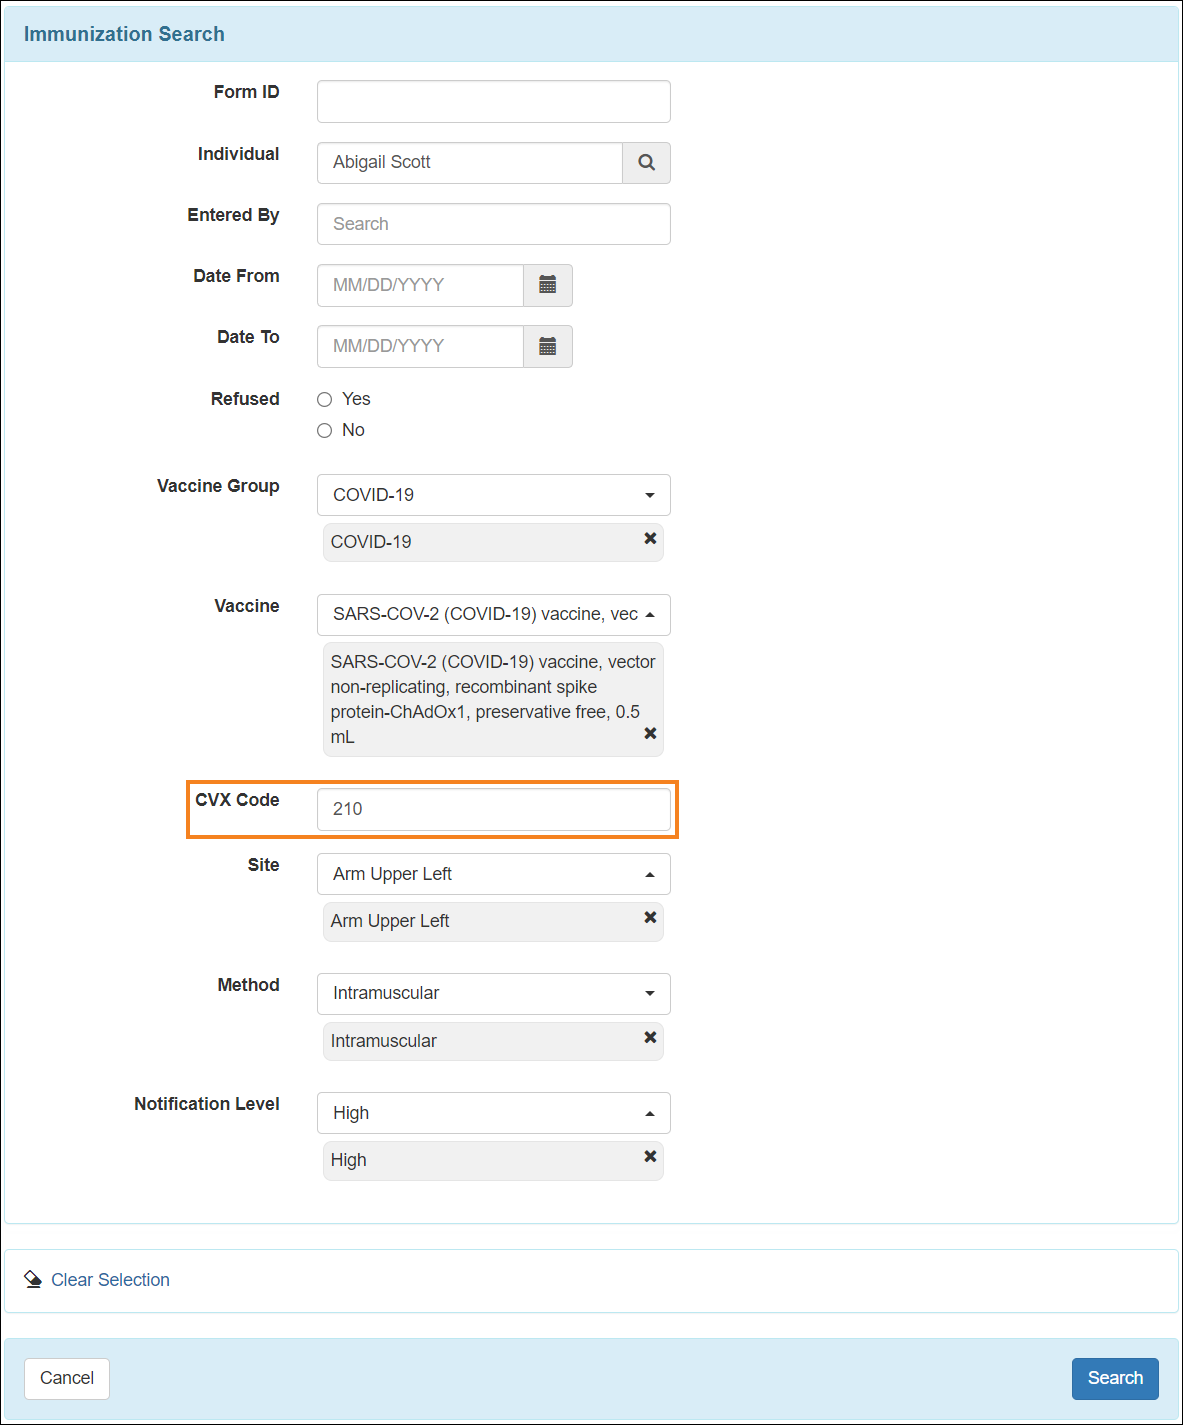
[Back to Top]- A new field titled CVX Code has been added as a search parameter on the ‘Immunization Search’ page.
Individual Demographic Form (IDF)
[Back to Top]- A new Individual Status History PDF Item can now be added to PDF Configurations in the IDF Provider Configuration module.
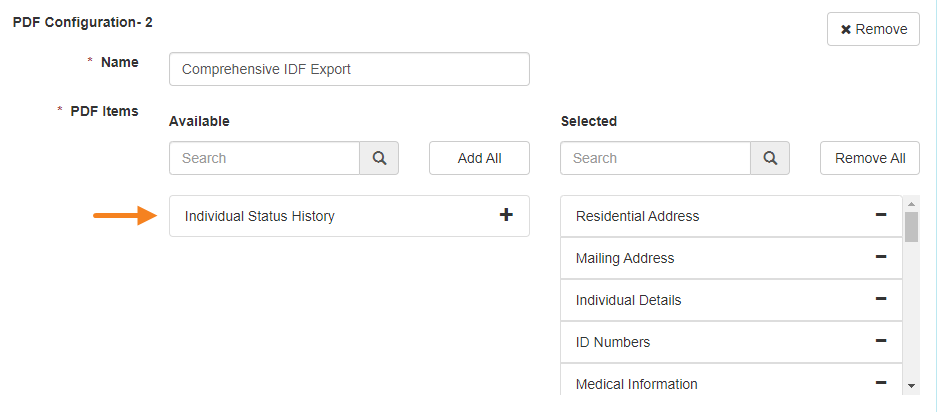
- PDF exports of the PDF Configurations to which the Individual Status History PDF Item is added will now include individuals' IDF 'Individual Status History' information.

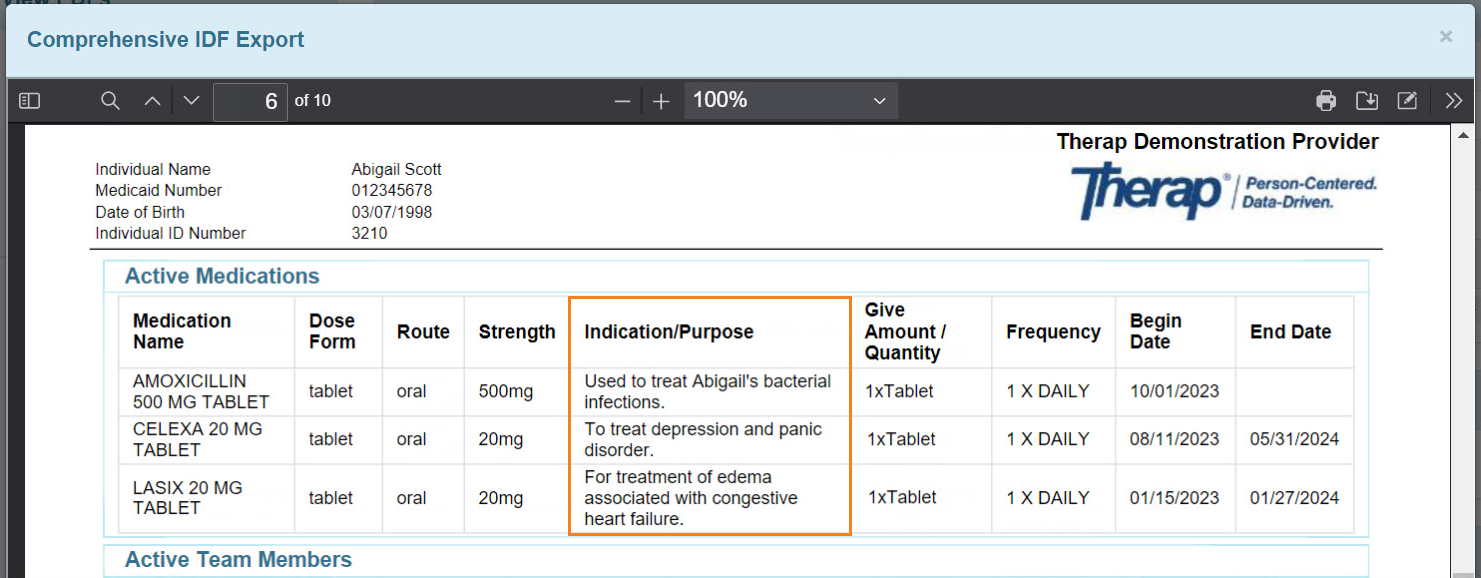
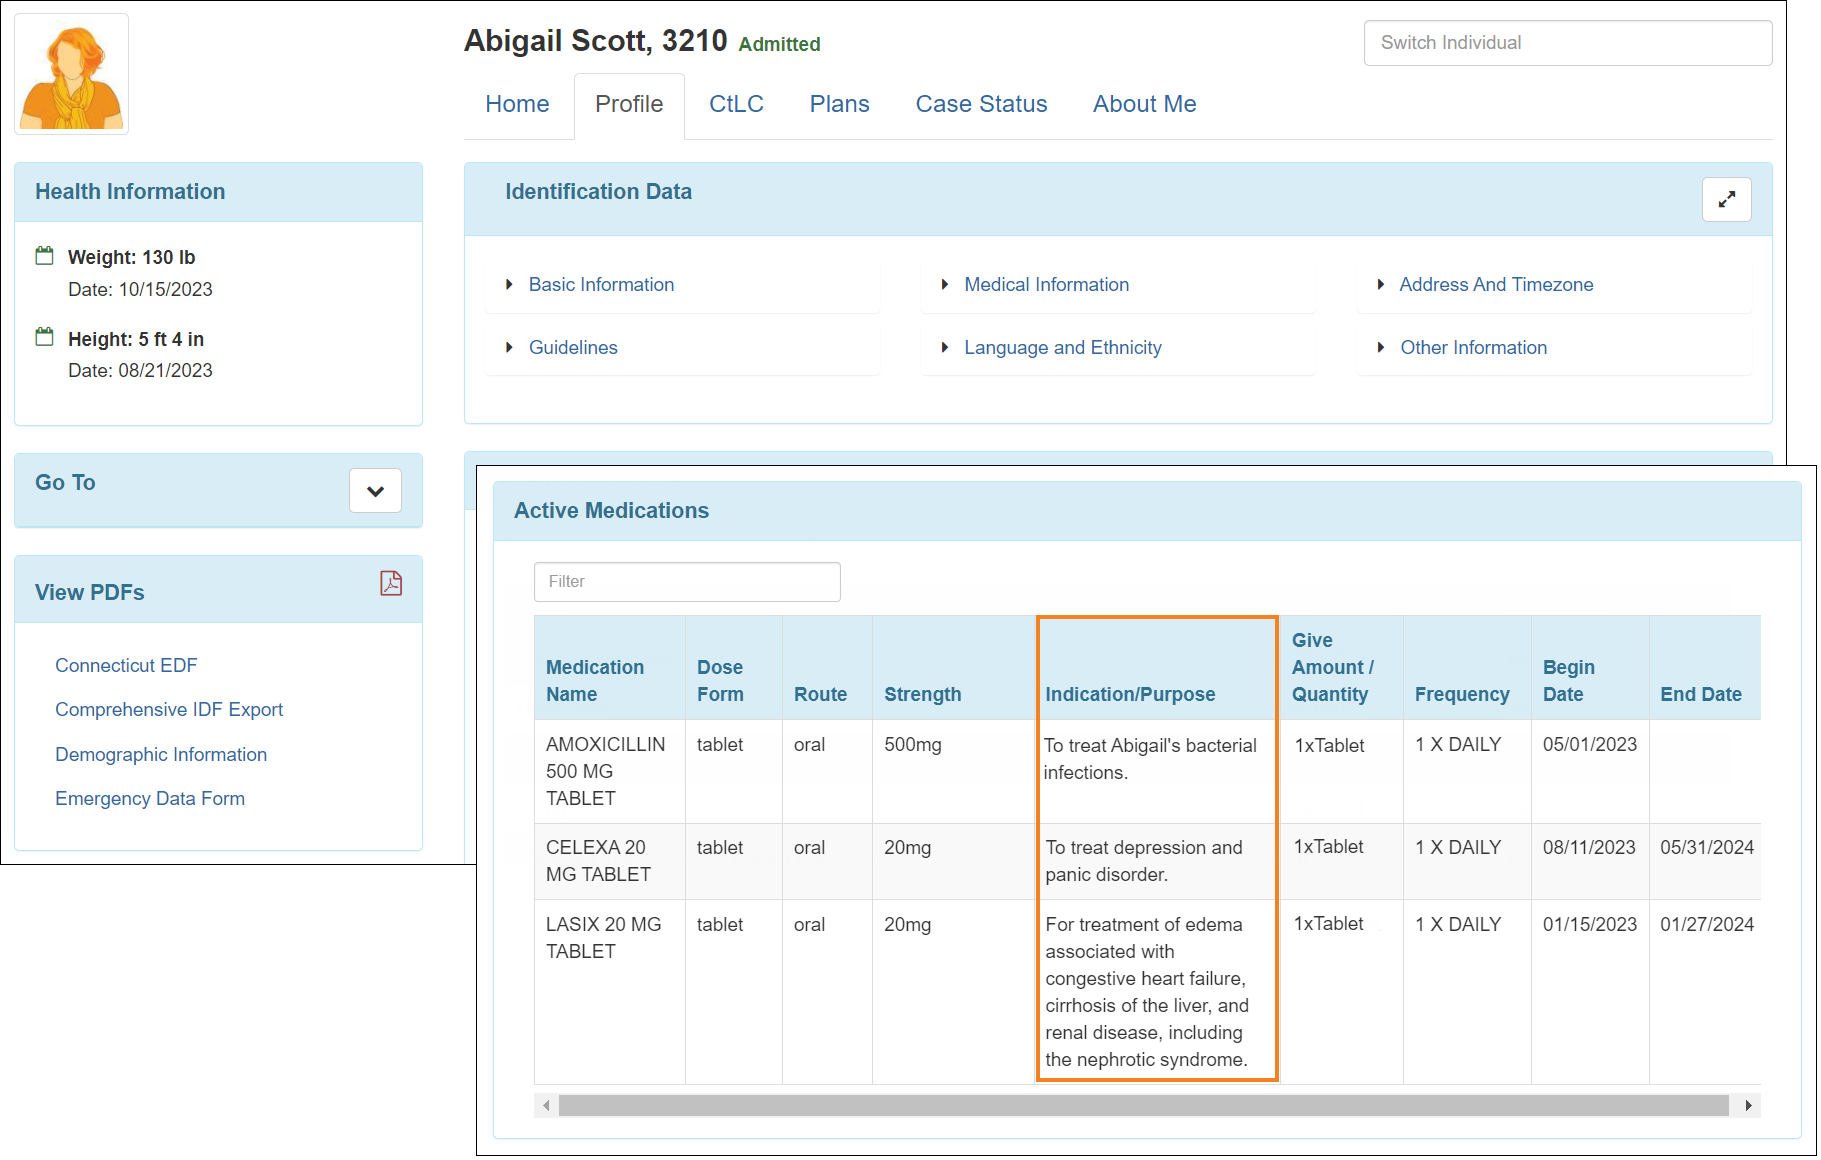
- A new Indication/Purpose column has been added in the 'Active Medications' section of the PDF exports of those PDF Configurations to which the Active Medications PDF Item is added.
Individual Home Page
[Back to Top]- A new column titled Indication/Purpose has been added to the ‘Active Medications’ section on the ‘Profile’ tab of the Individual Home Page.
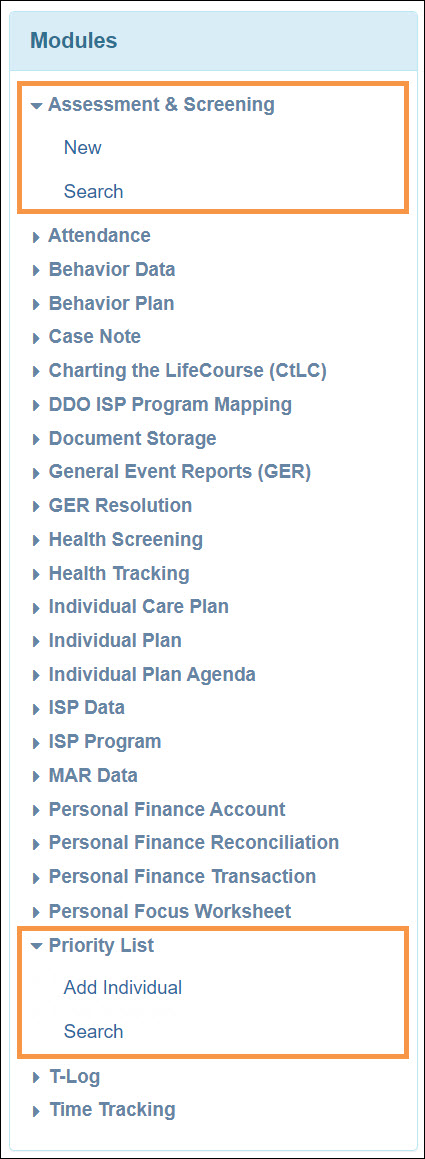
- The following options have been added in the 'Modules' section of the Home tab of the Individual Home Page:
- Assessment & Screening
- Priority List
The Assessment & Screening option can be expanded to show the New and Search links, and the Priority List option can be expanded to show the Add Individual and Search links. Users assigned with the appropriate Assessment & Screening and Priority List caseload-based roles will be able to view and access these links.
Individual Plan
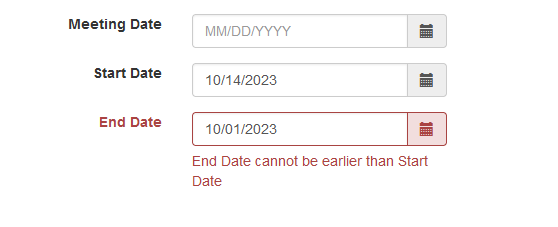
[Back to Top]- If the selected End Date is earlier than the Start Date in an Individual Plan, then an error message will be displayed under the End Date field stating: End Date cannot be earlier than Start Date.
Previously, the message used to appear under the Start Date field stating: Start Date cannot be later than End Date.
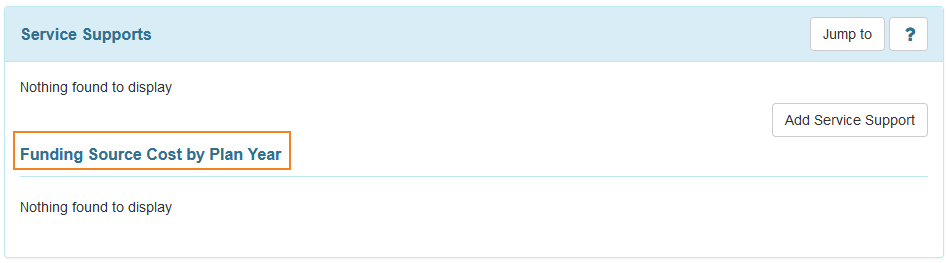
- Users will now be able to add a maximum of 75 Service Supports in the 'Service Supports' section of an Individual Plan. Previously, a maximum of 50 Service Supports could be added.
- In the 'Service Supports' section, the 'Cost by Funding Source' subsection has been renamed to 'Funding Source Cost by Plan Year'.
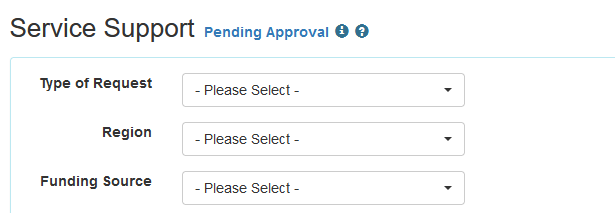
- On the 'Service Support' form, the Region field will now appear before the Funding Source field.
Intake/Elimination
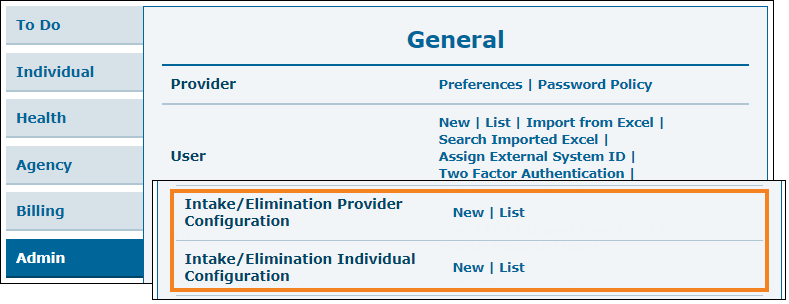
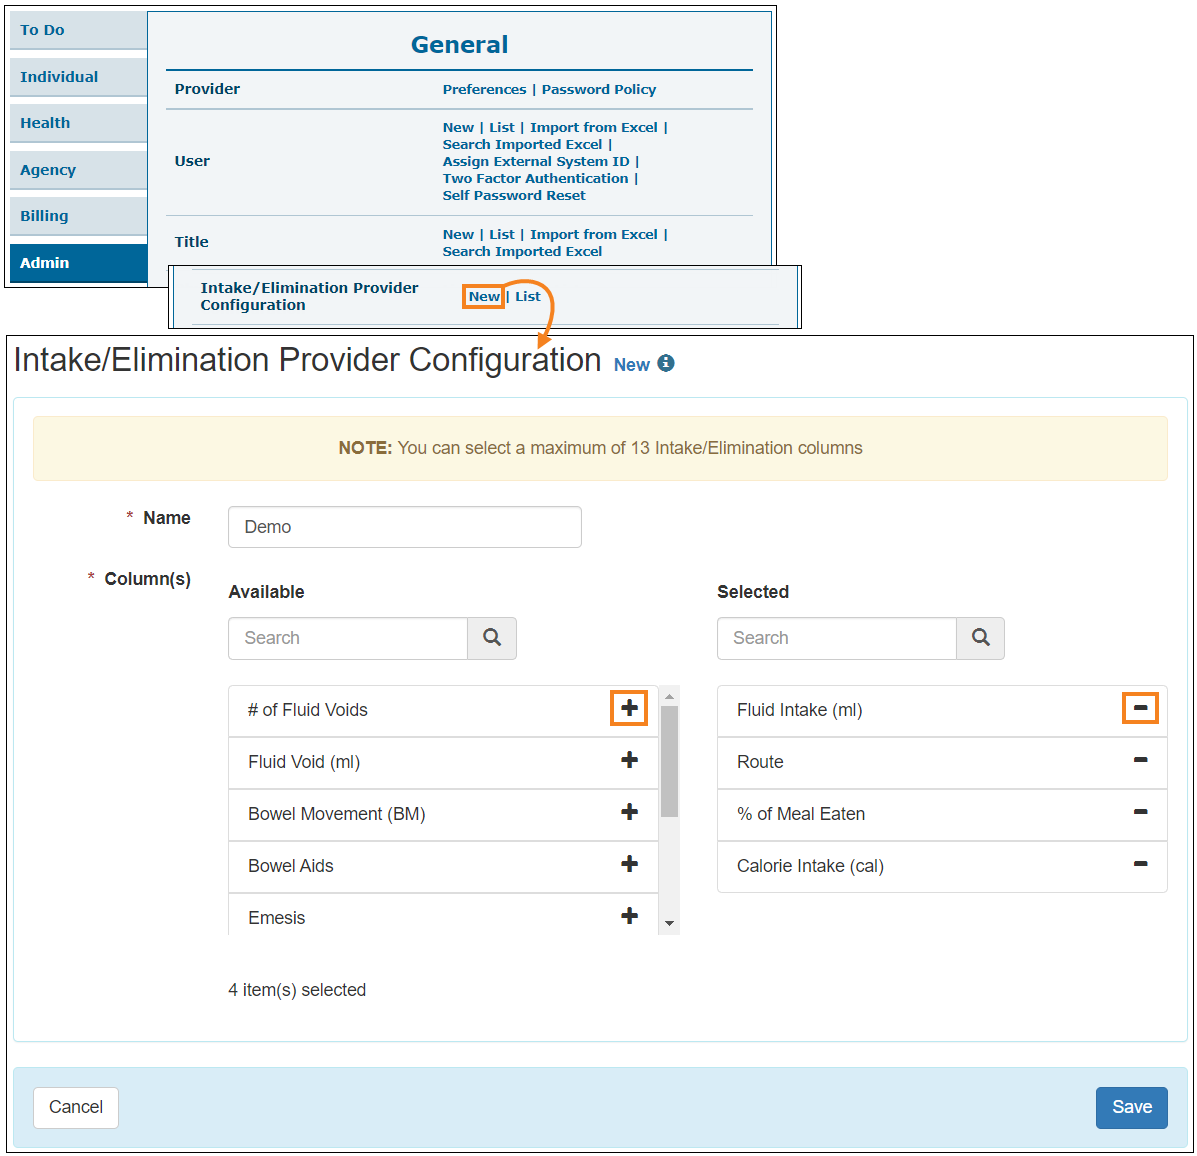
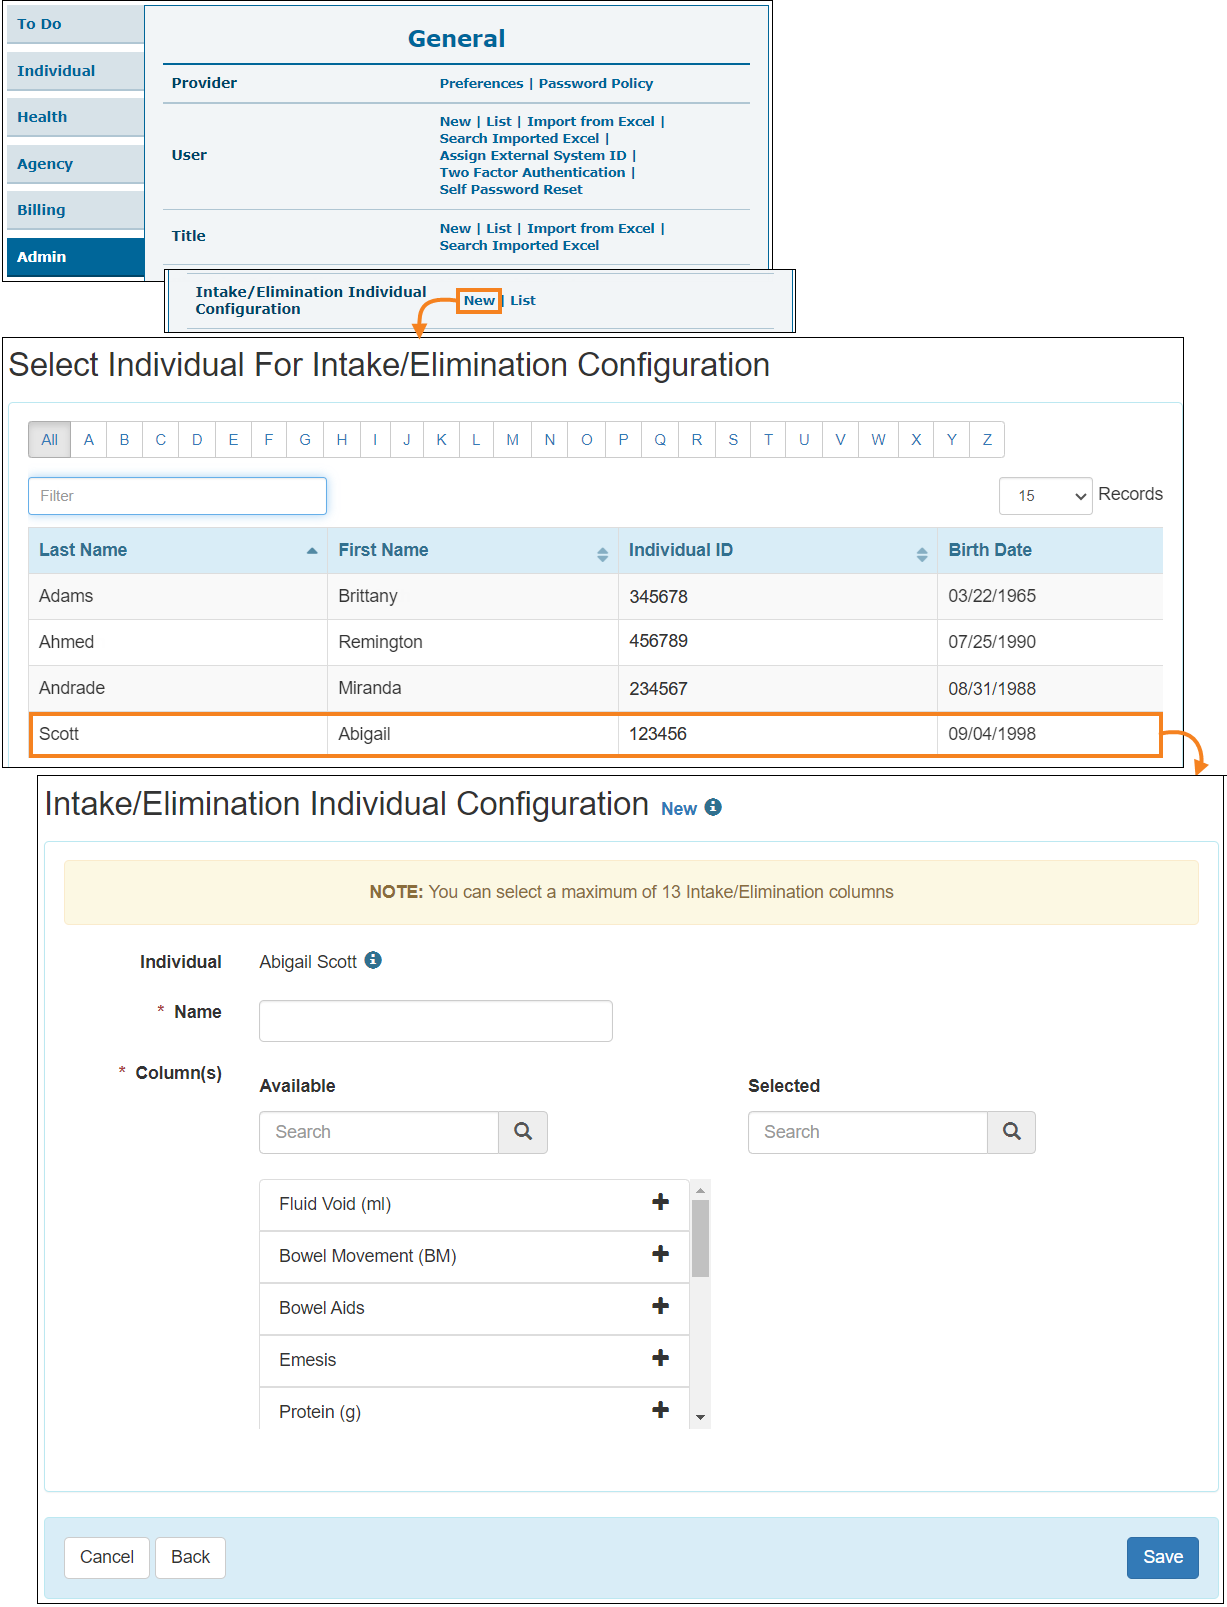
[Back to Top]- Two new options titled Intake/Elimination Provider Configuration and Intake/Elimination Individual Configuration have been added in the ‘General’ section of the Admin tab.
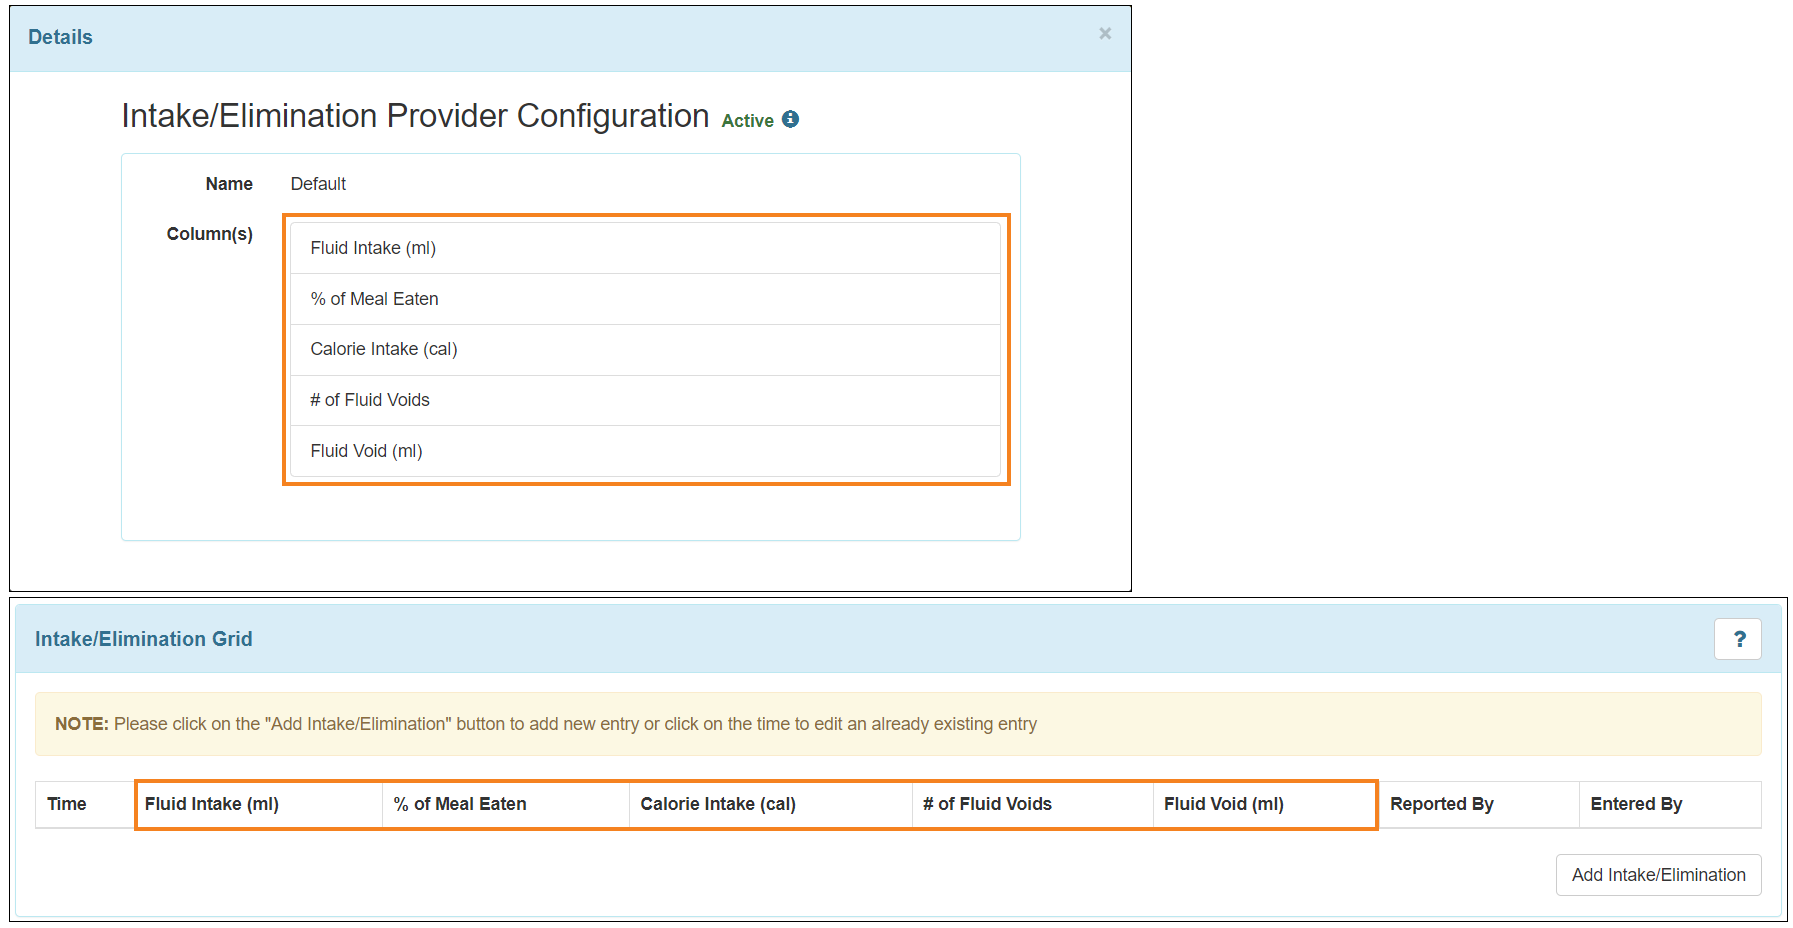
- Users assigned with the Provider Setup administrative role will be able to create new configurations for their Provider using the Intake/Elimination Provider Configuration option. The configuration allows for a selection of up to 13 Column(s). A maximum number of 10 configurations can be created for a provider.
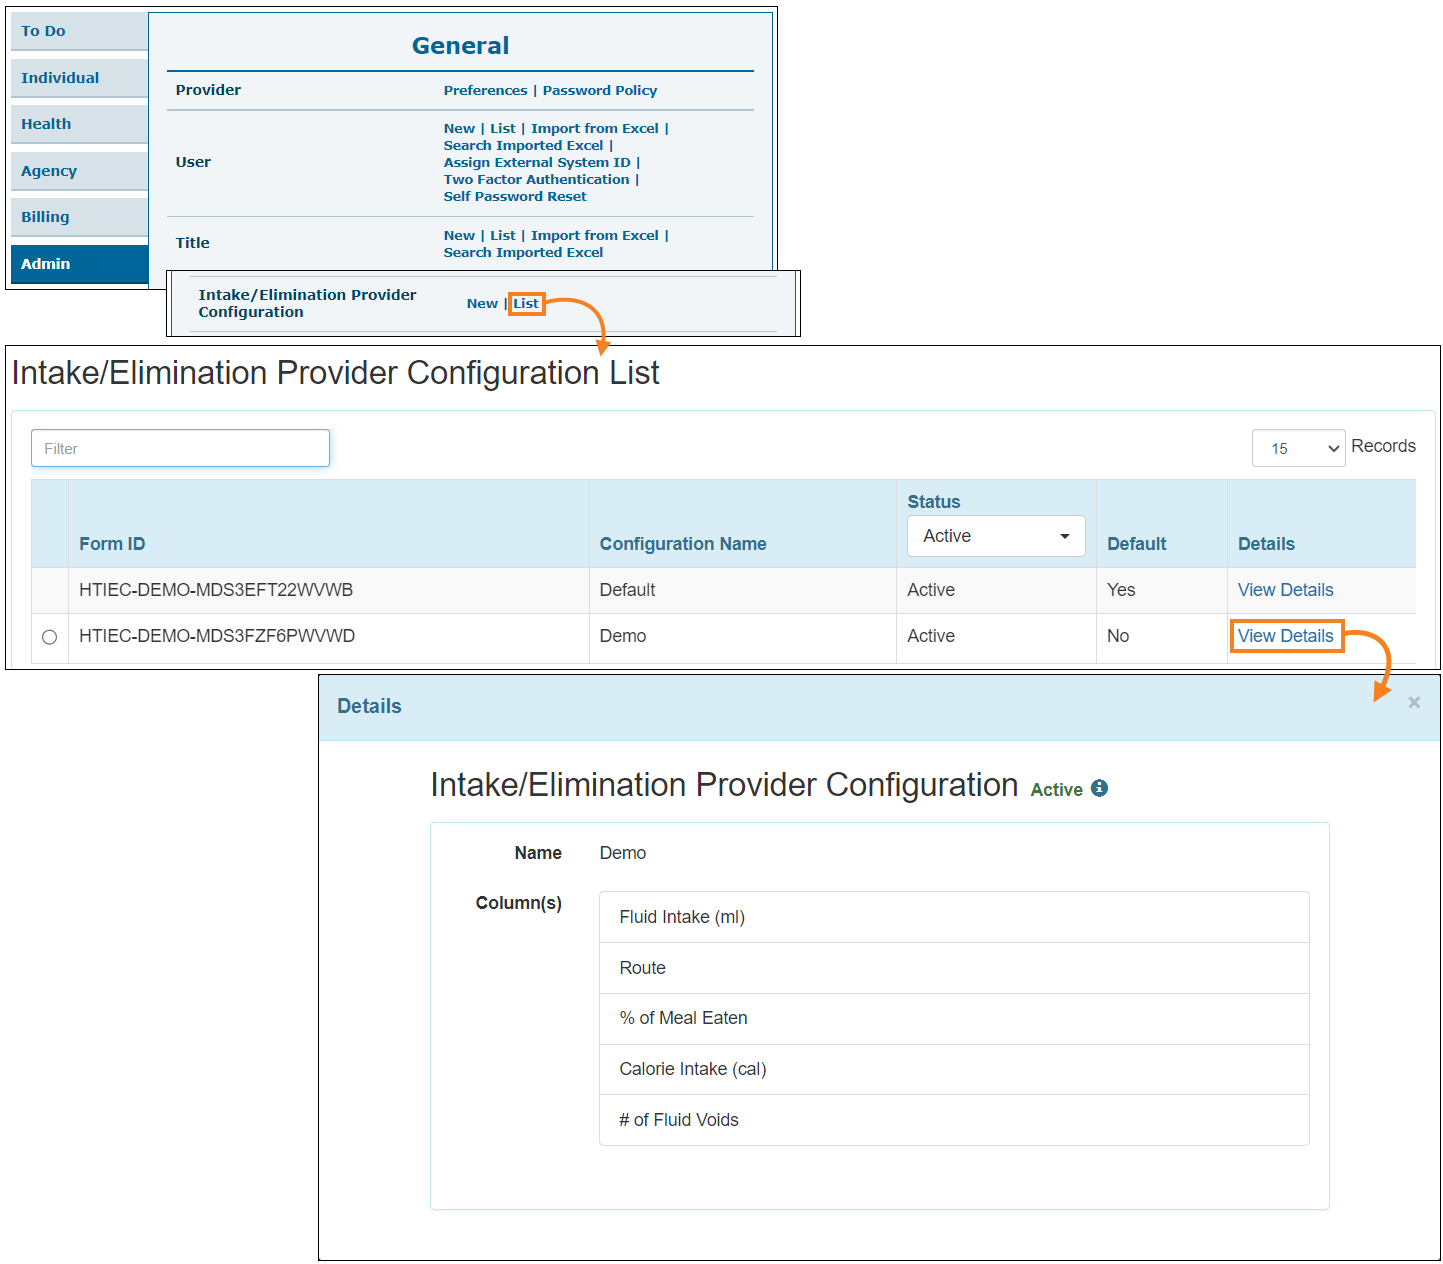
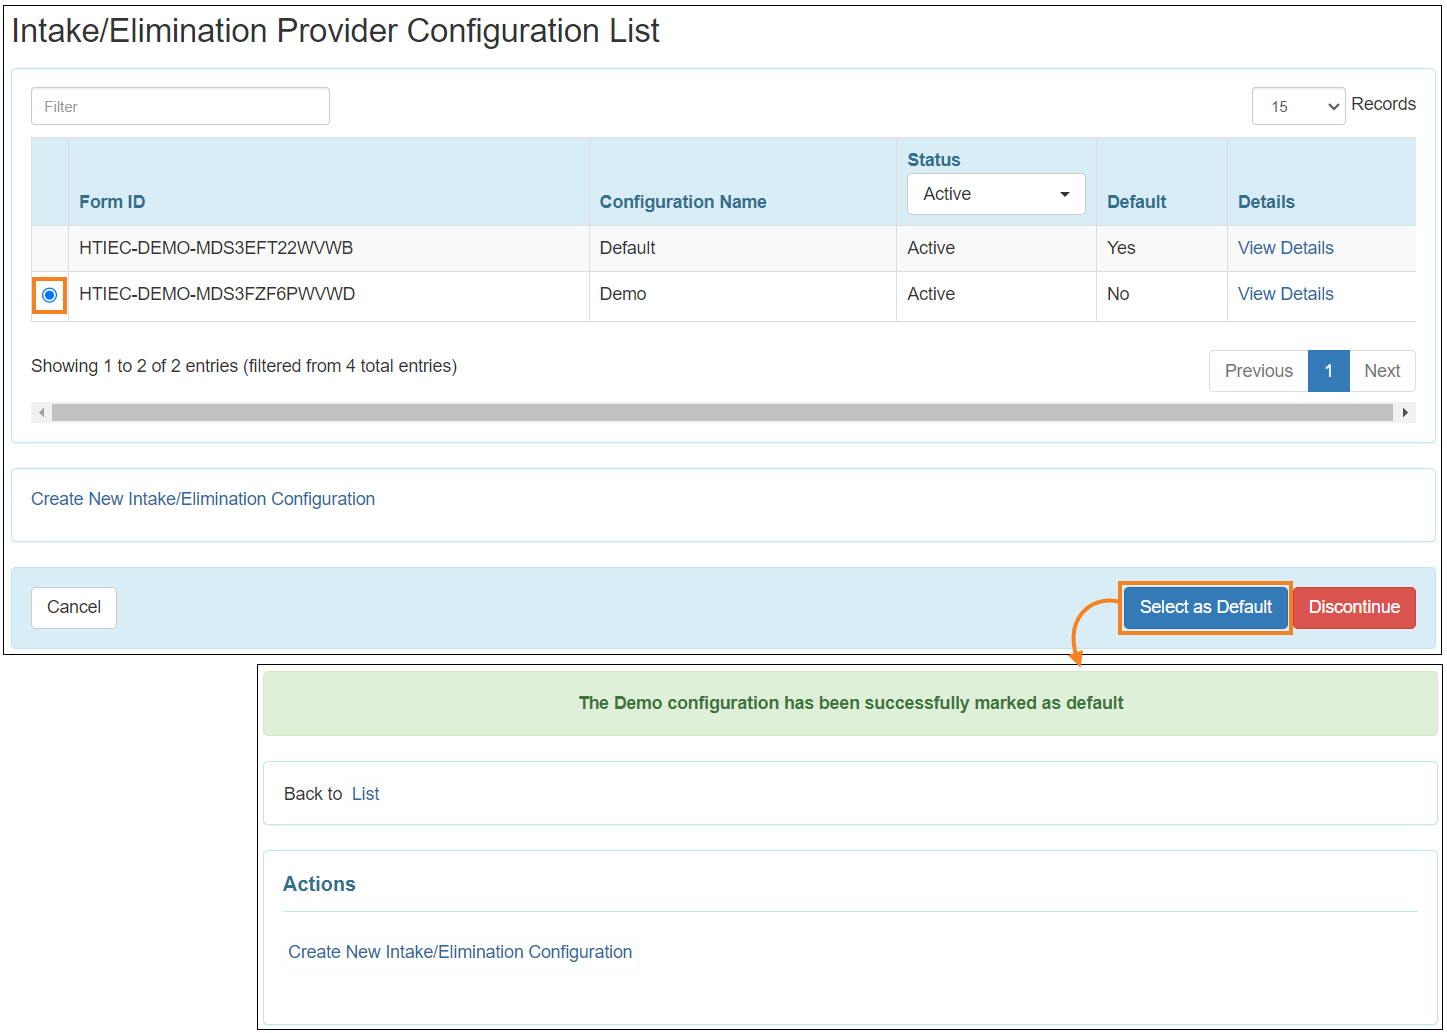
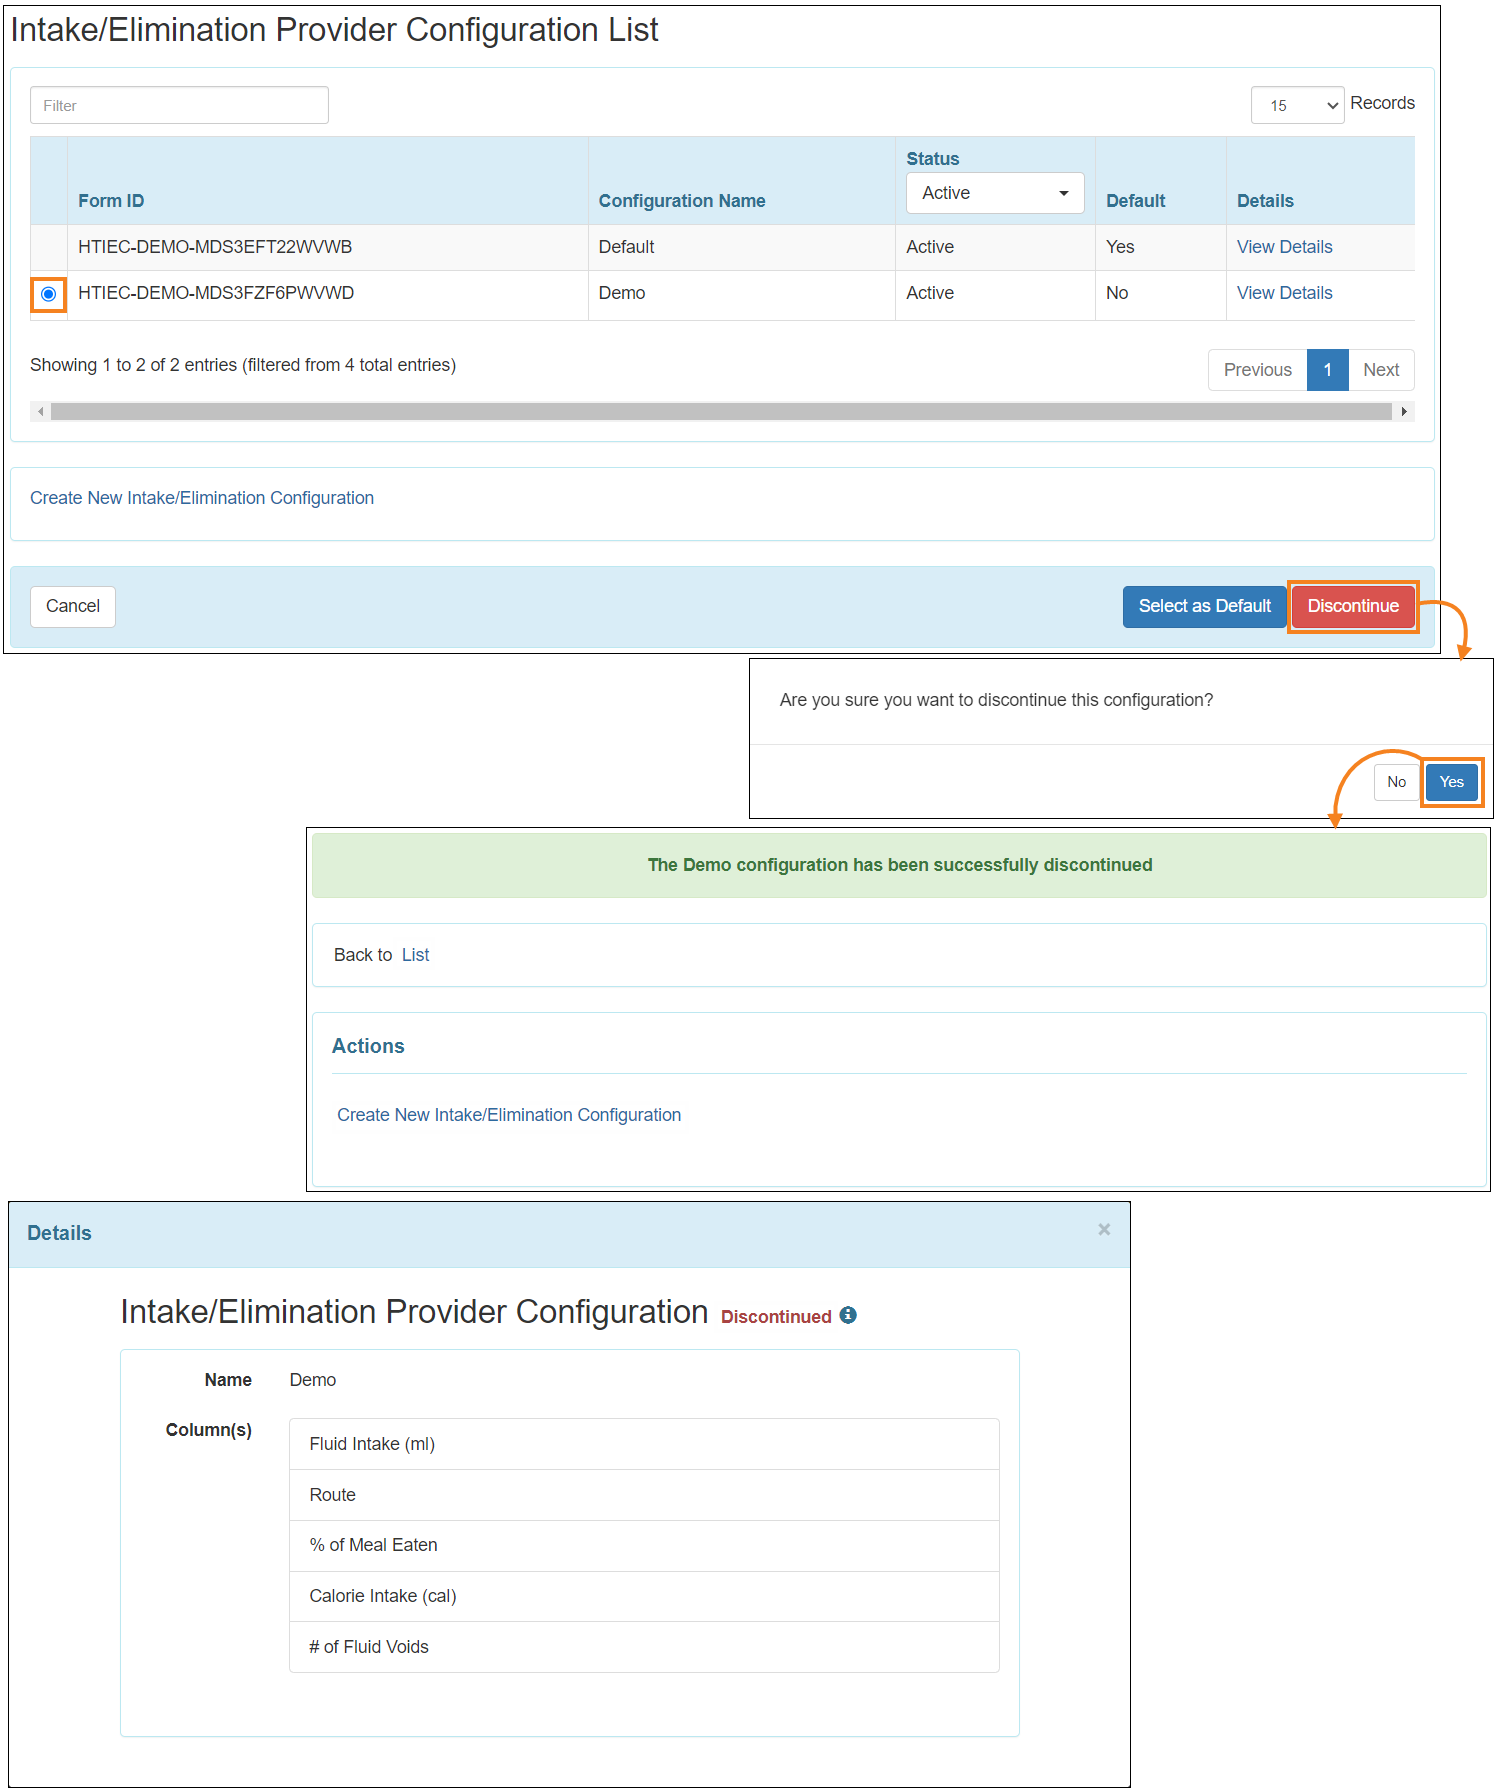
- Clicking on the List link beside the Intake/Elimination Provider Configuration option will open the ‘Intake/Elimination Provider Configuration List’ page. Users can view the details of the configurations by clicking on the View Details link in the Details column. Saved Intake/Elimination Provider Configurations will appear in the system in Active status, which can be viewed in read-only mode.
- If there are multiple active configurations available for a provider, then users will be able to set a default provider configuration by selecting a configuration from the list, and then clicking on the Select as Default button located at the bottom of the 'Intake/Elimination Provider Configuration List' page.
Providers created before this release will have a default Intake/Elimination Provider Configuration selected for their agency. However, providers created after this release will not have a default configuration created and will need to create a new provider configuration. - Users assigned with the IDF Admin administrative role will be able to create new configurations for individuals using the Intake/Elimination Individual Configuration option. The configuration allows for a selection of up to 13 columns. Users can have a maximum of one Active configuration created for each individual.
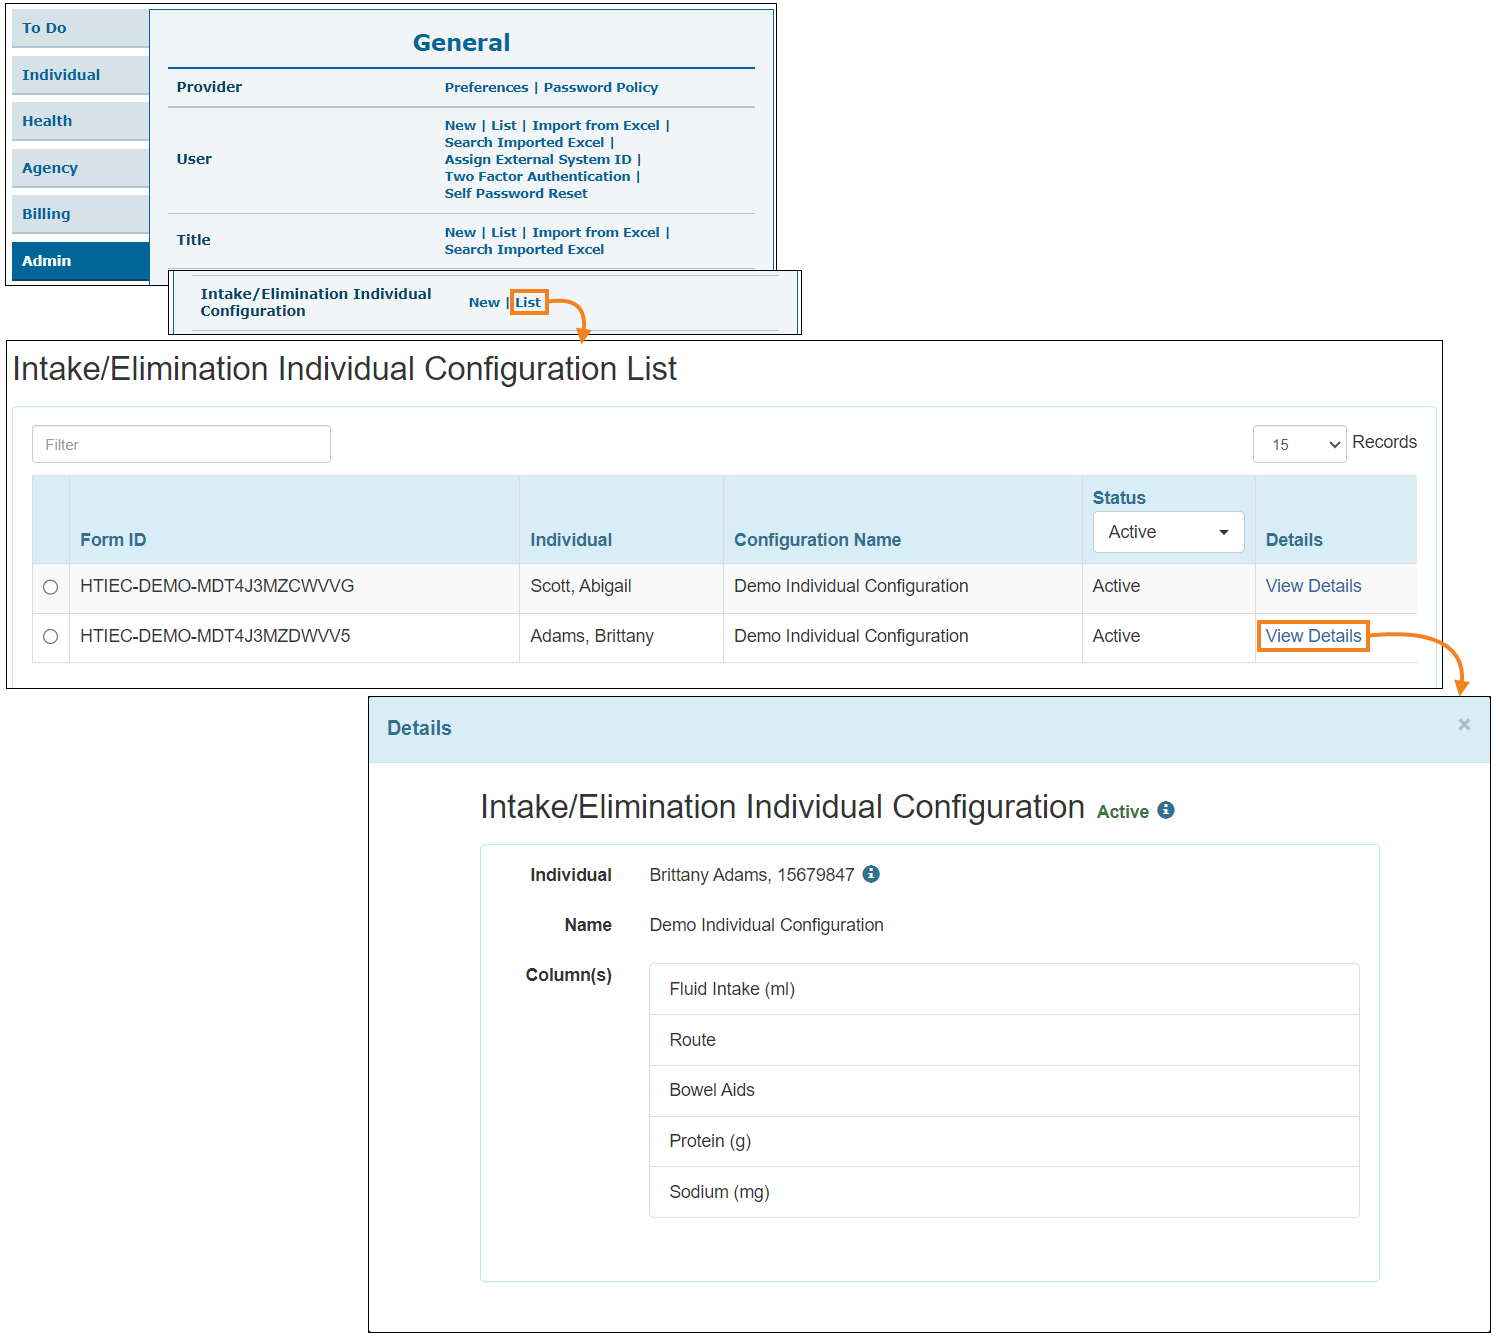
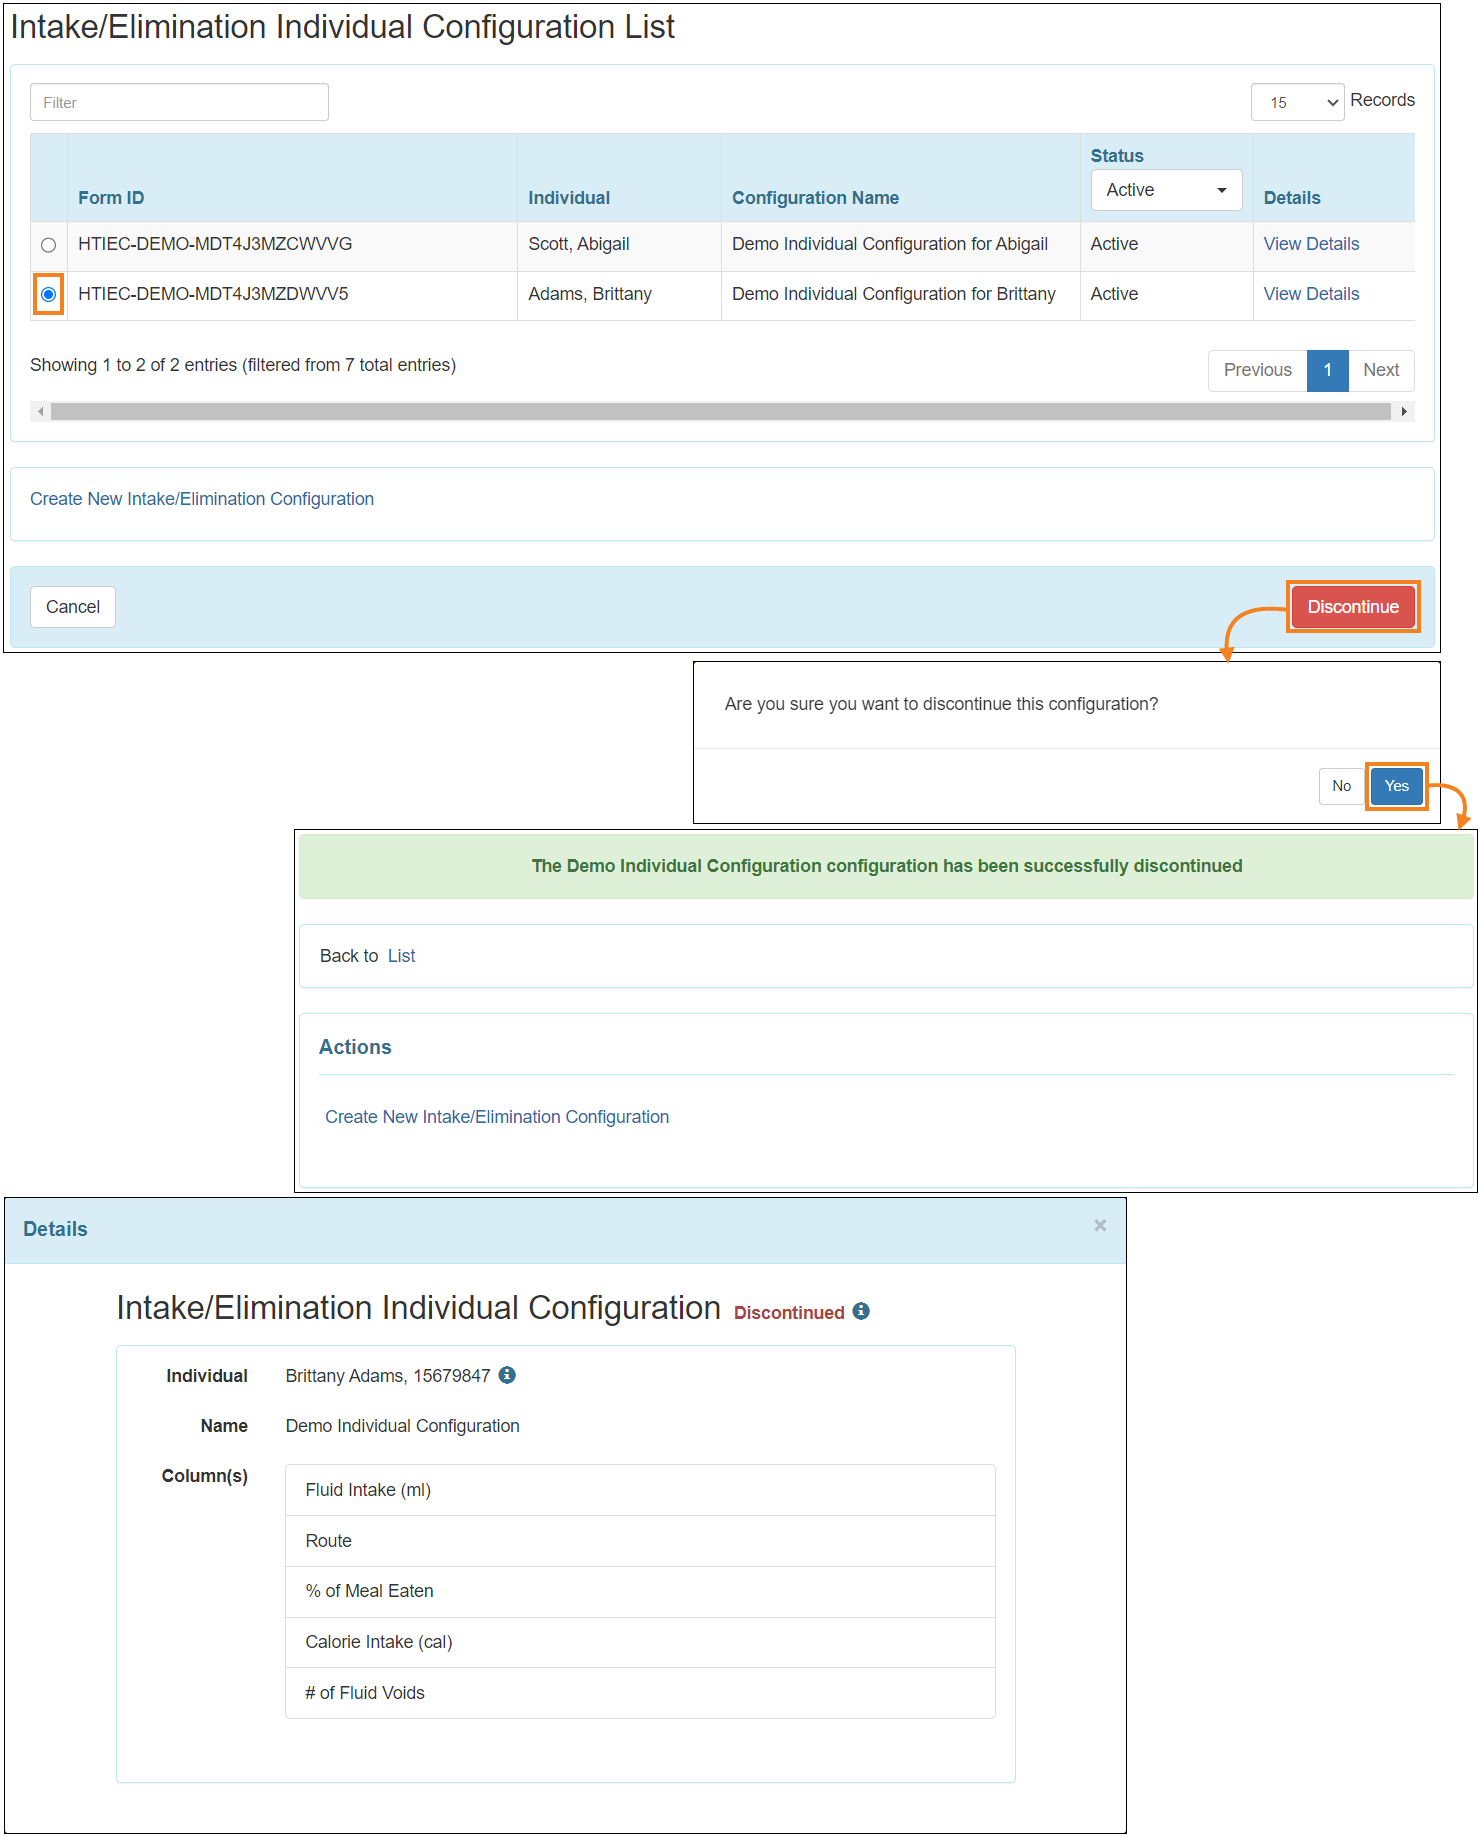
- Clicking on the List link beside the Intake/Elimination Individual Configuration option will open the ‘Intake/Elimination Individual Configuration List’ page. Users can view the details of the configurations by clicking on the View Details link in the Details column. Saved Intake/Elimination Individual Configurations will appear in the system in Active status which can be viewed in read-only mode.
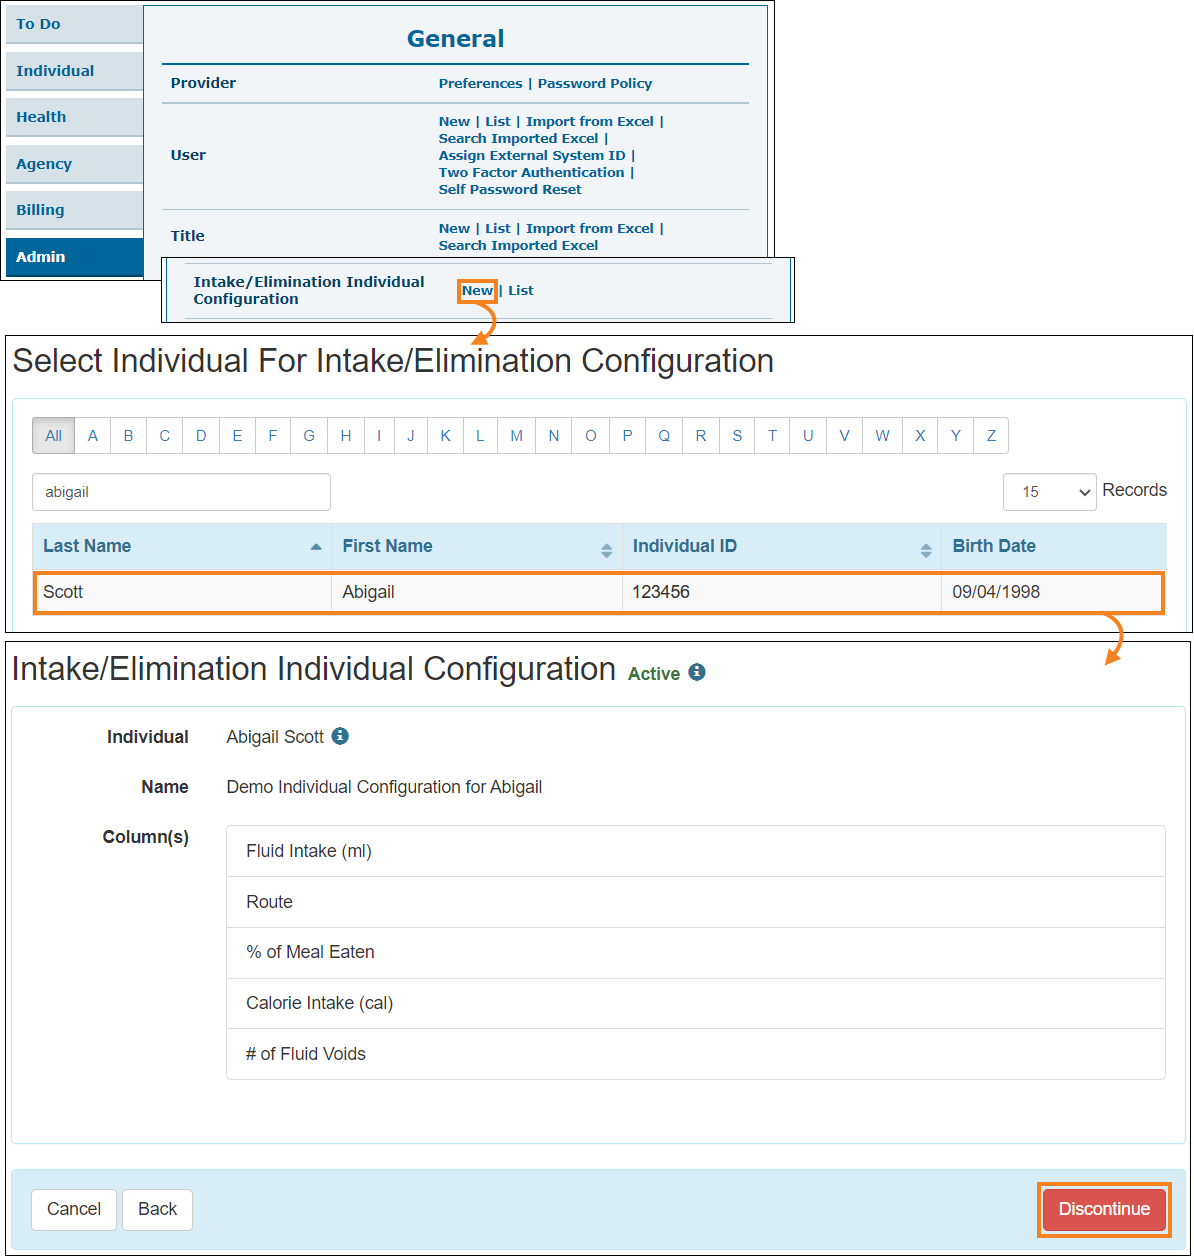
- There cannot be more than one active Intake/Elimination Individual Configuration for an individual at a time. If an Active Individual Configuration already exists for that individual, then selecting the individual will open that configuration form. Users will need to discontinue the form to create a new configuration.
- Users may discontinue Provider and Individual Configurations by clicking on the Discontinue button at the bottom of their corresponding configuration list page. Upon discontinuing a configuration, the status of the form will be changed from ‘Active’ to ‘Discontinued’. The default Provider Configuration cannot be discontinued. To discontinue it, users will need to select another Provider Configuration as default.
Intake/Elimination Provider Configuration List:
Intake/Elimination Individual Configuration List:
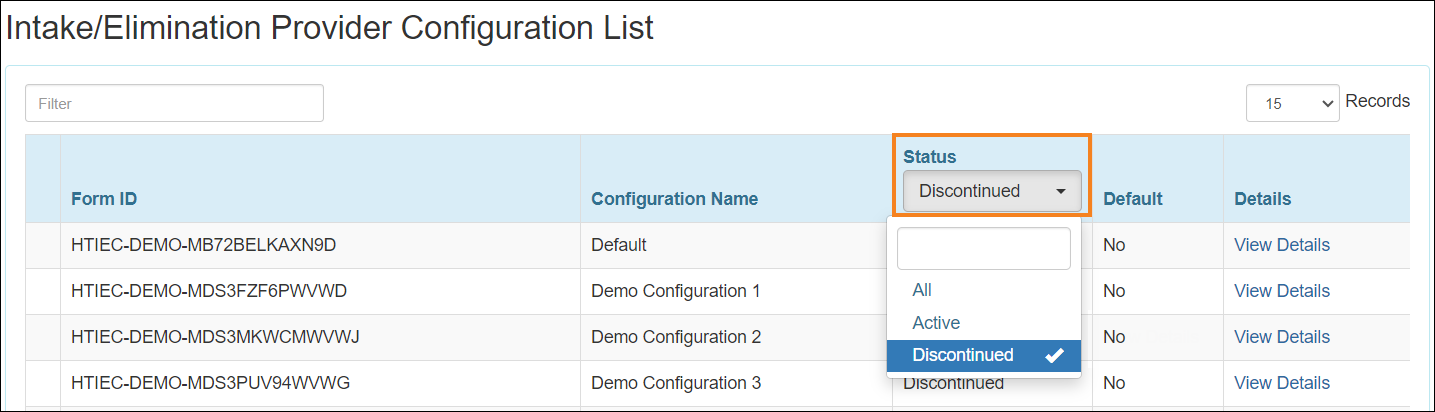
- Discontinued Individual or Provider Intake/Elimination configuration(s) can be viewed by filtering the Status column of the respective page.
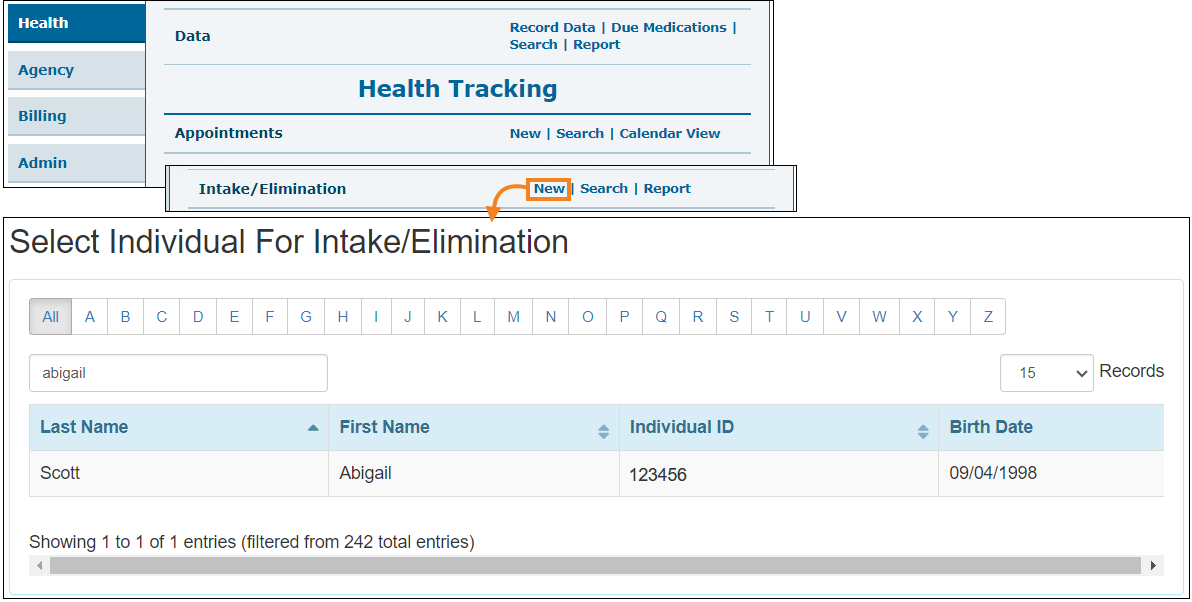
- While creating a new Intake/Elimination form, clicking on the New link will directly open up the ‘Select Individual For Intake/Elimination’ page. Selecting a program while entering Intake/Elimination information will no longer be necessary.
- The 'Select Date of Intake/Elimination' page has been renamed to 'Select Date and Configuration of Intake/Elimination’ and the following changes have been made on this page:
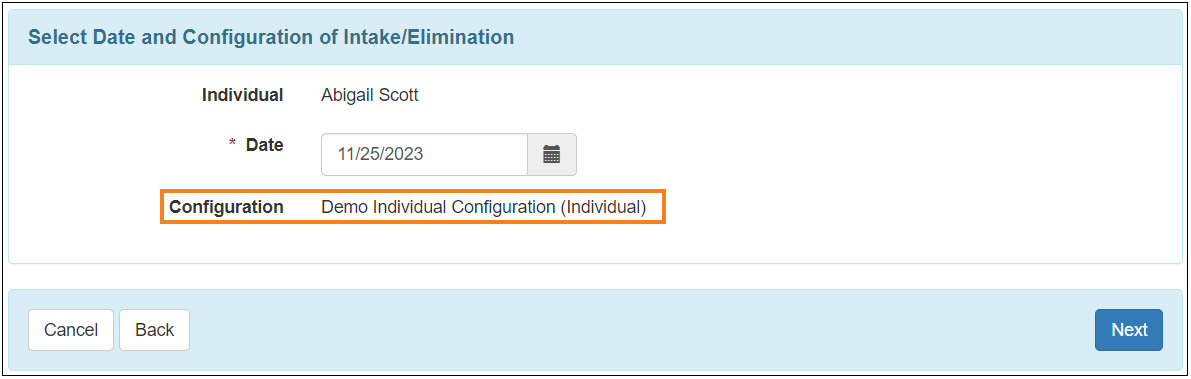
- A new field titled Configuration has been added to show the applicable configuration(s) for the selected individual. Whether the selected configuration is provider-specific or individual-specific, will be displayed within a parenthesis '()' beside it.
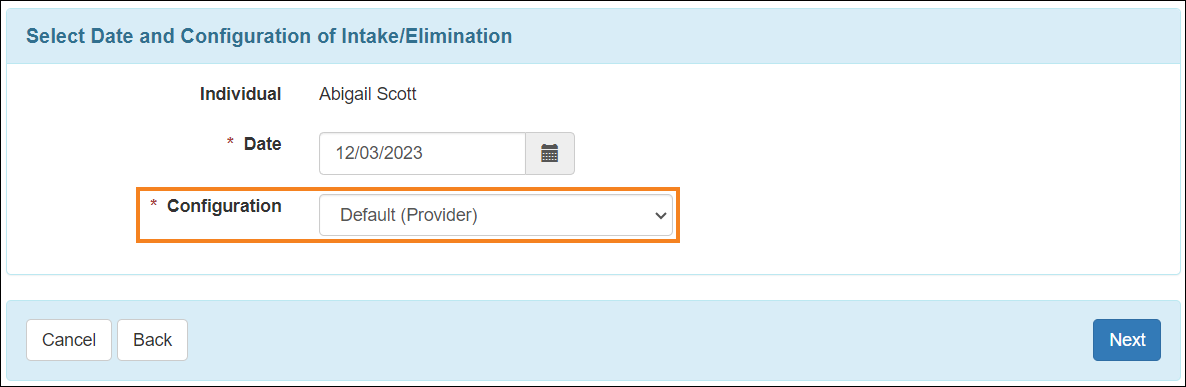
- If a selected individual does not have an active Individual Configuration, then Default Provider Configuration will be preselected. If more than one active configuration is available for a provider, then one can be selected from the Configuration dropdown field.

- If individuals have an active Individual Configuration, that specific configuration will be automatically selected for the Configuration field, and it cannot be changed unless the Individual Configuration is discontinued.
- If an Intake/Elimination form has been submitted once for a particular Date, the selected Configuration for that date will remain in read-only mode when users attempt to document data on that same form again.

- A new field titled Configuration has been added to show the applicable configuration(s) for the selected individual. Whether the selected configuration is provider-specific or individual-specific, will be displayed within a parenthesis '()' beside it.
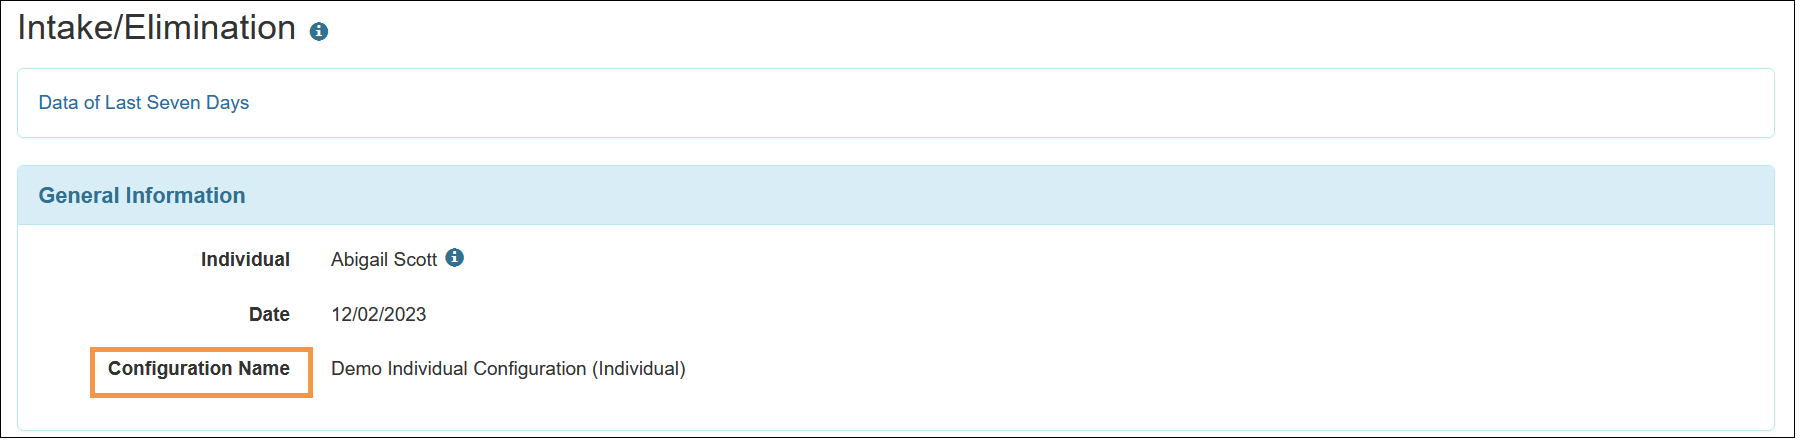
- A new field titled Configuration Name has been added to the ‘General Information’ section of the Intake/Elimination form which will display the name of the configuration that has been selected on the 'Select Date and Configuration of Intake/Elimination' page.
- The columns which have been selected in the configuration will appear on the ‘Intake/Elimination Grid’ section of the Intake/Elimination form.
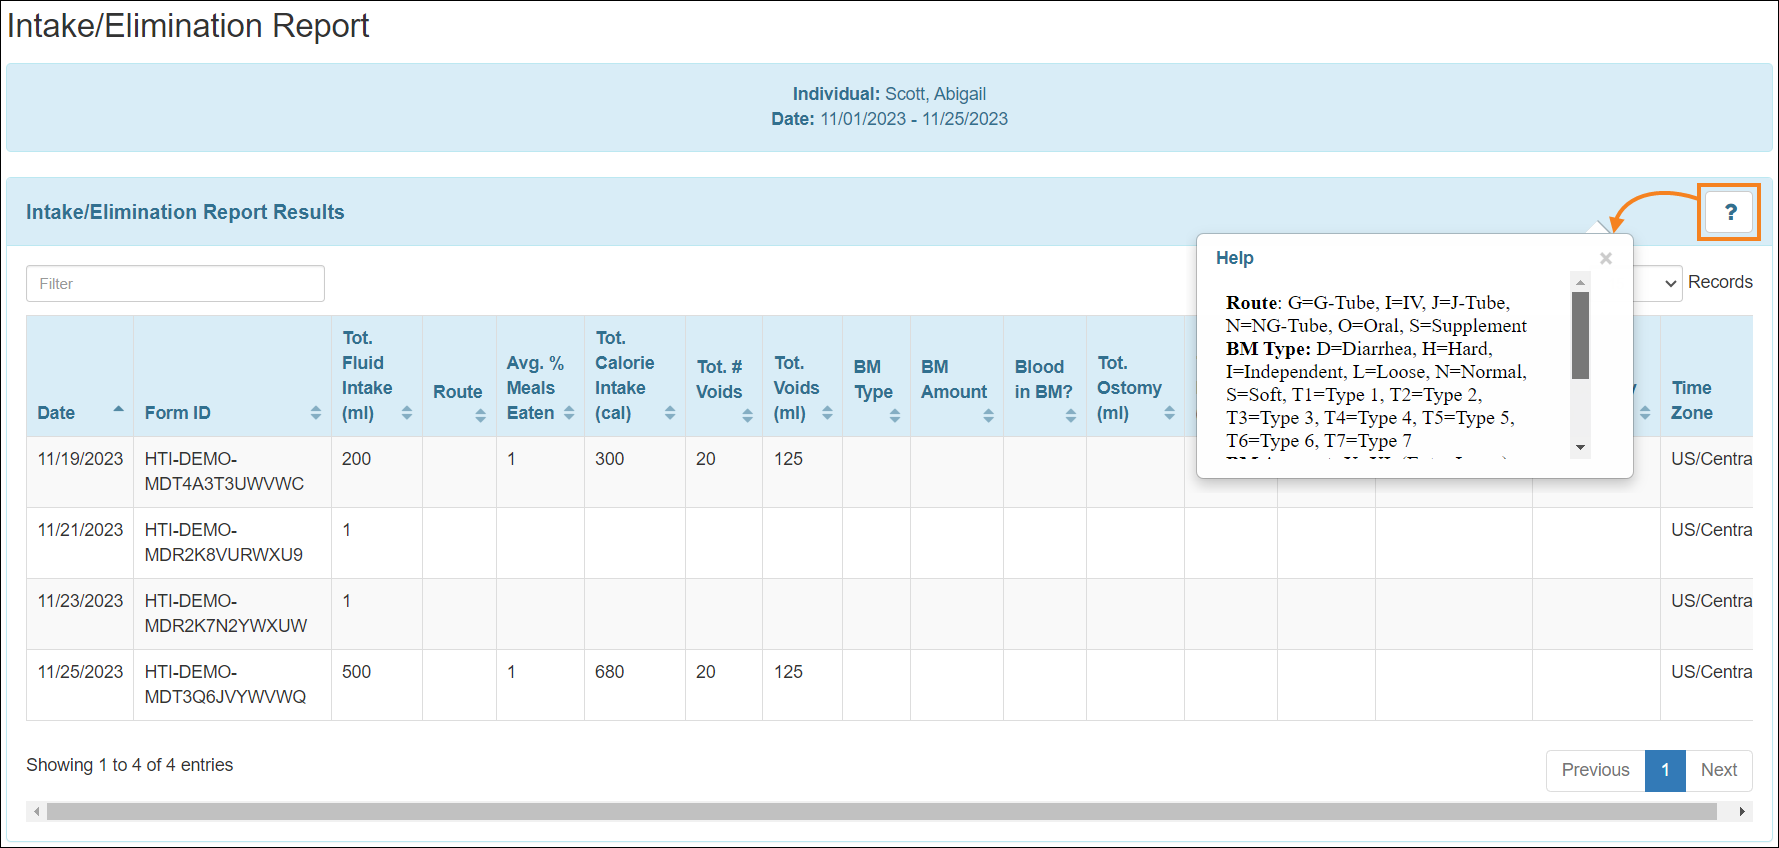
- A new ? button has been added at the top right corner of the ‘Intake/Elimination Grid’ section. Indications for the Route, BM Type, BM Amount, Bowel Aids, and Emesis that were previously displayed under the ‘Intake/Elimination Grid’, will now be displayed in a ‘Help’ popup after clicking on the ? button.

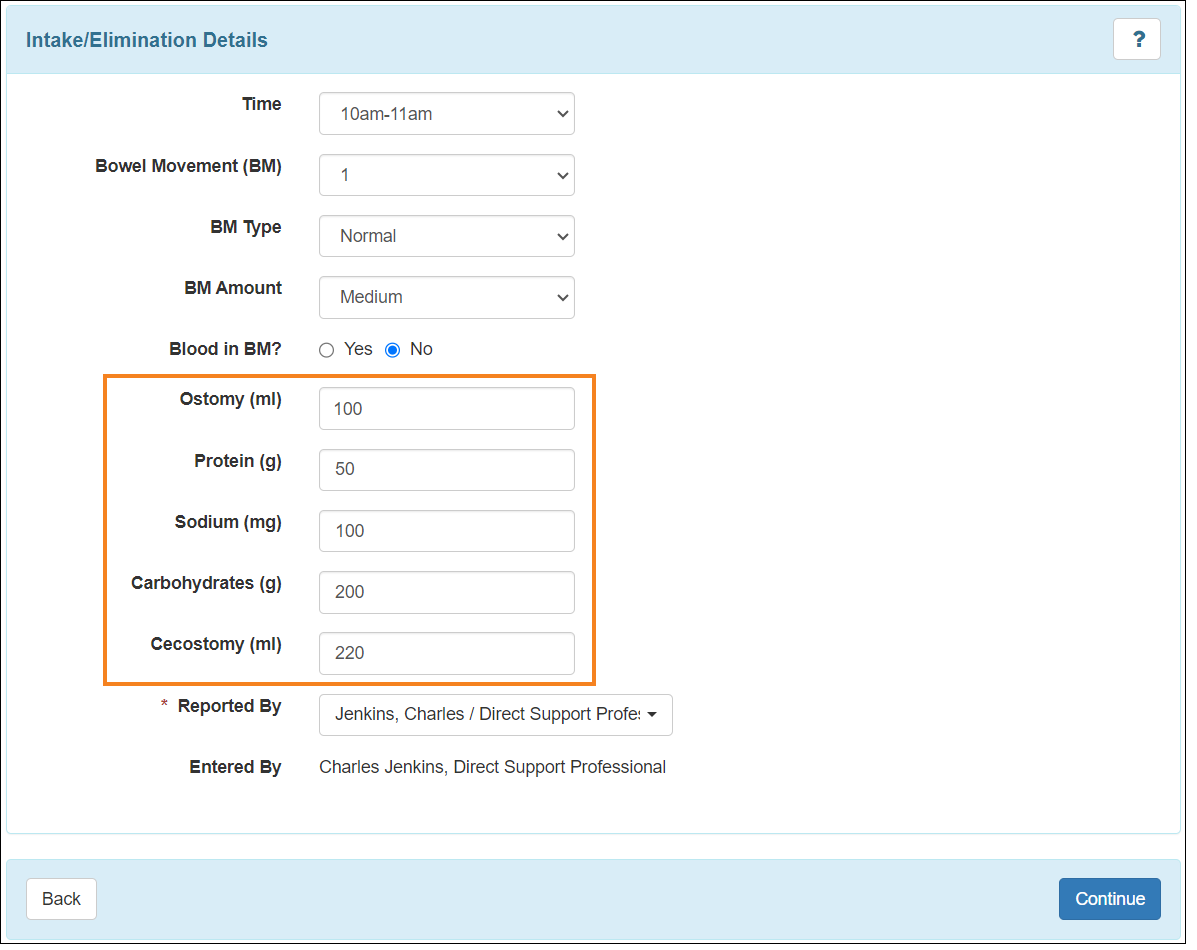
- Based on the applied Intake/Elimination configuration, the following new fields can be entered in the ‘Intake/Elimination Details’ section of the Intake/Elimination form:
- Ostomy (ml)
- Protein (g)
- Sodium (mg)
- Carbohydrate (g)
- Cecostomy (ml)
Ostomy (ml) field will show when Bowel Movement (BM) is selected between 1 to 9.
- The total number of row(s) added to an Intake/Elimination form will be displayed next to the Total Intake/Elimination row(s): field in the ‘Intake/Elimination Grid’ section.
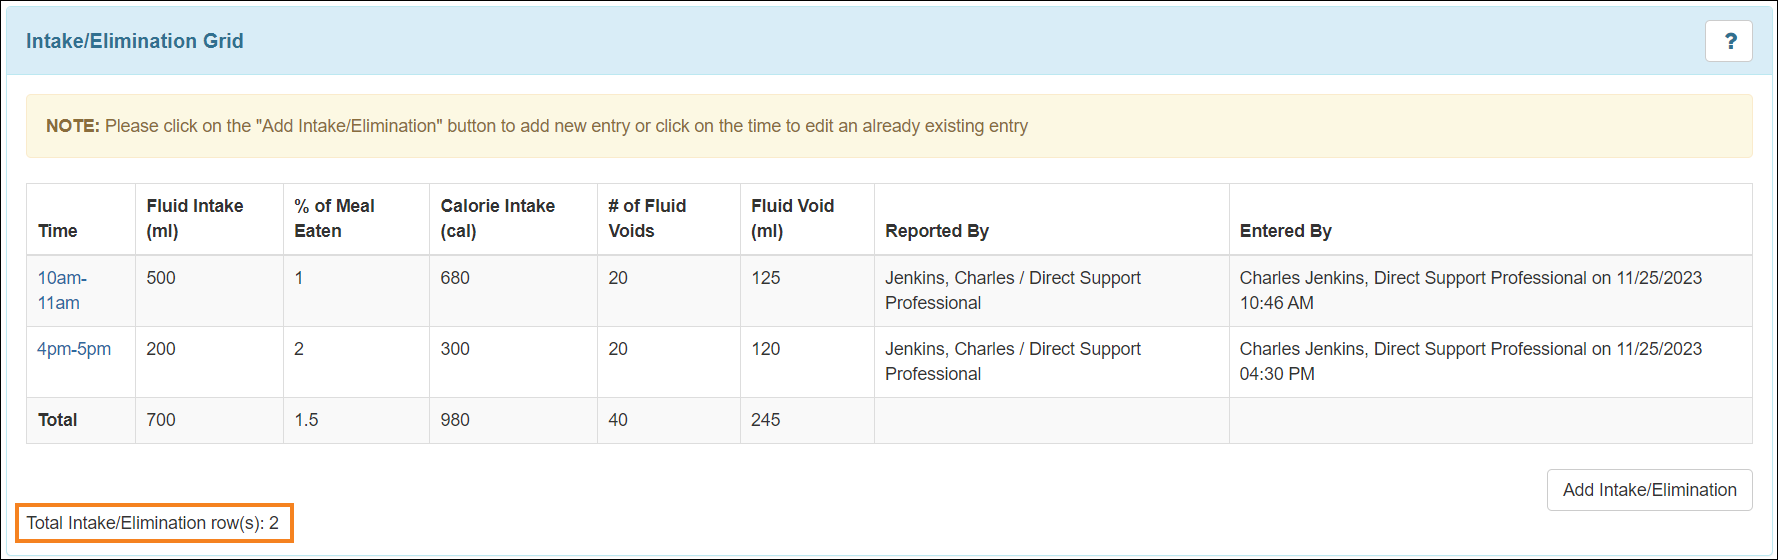
- The Total row will now be displayed in the grid when at least one Intake/Elimination data entry exists. In cases where no values have been entered for any column, then instead of showing ‘0’, the Total row will be empty for that column.
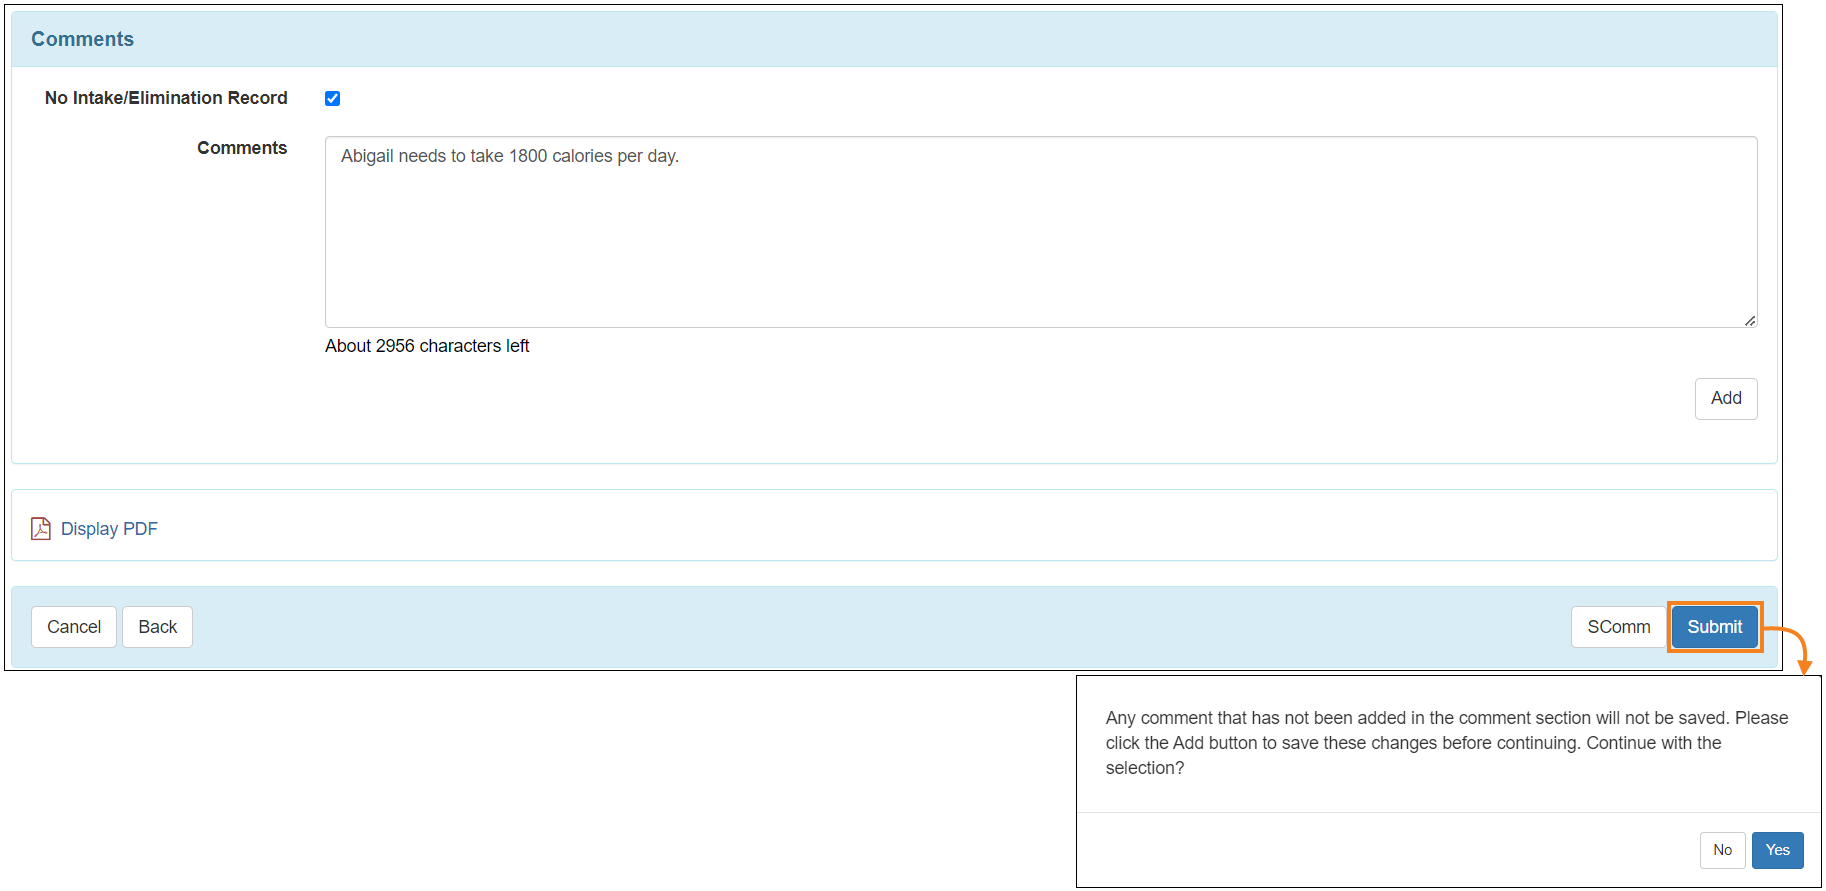
- While submitting Intake/Elimination forms with a comment, users will receive a warning message if their comment was not saved using the Add button.
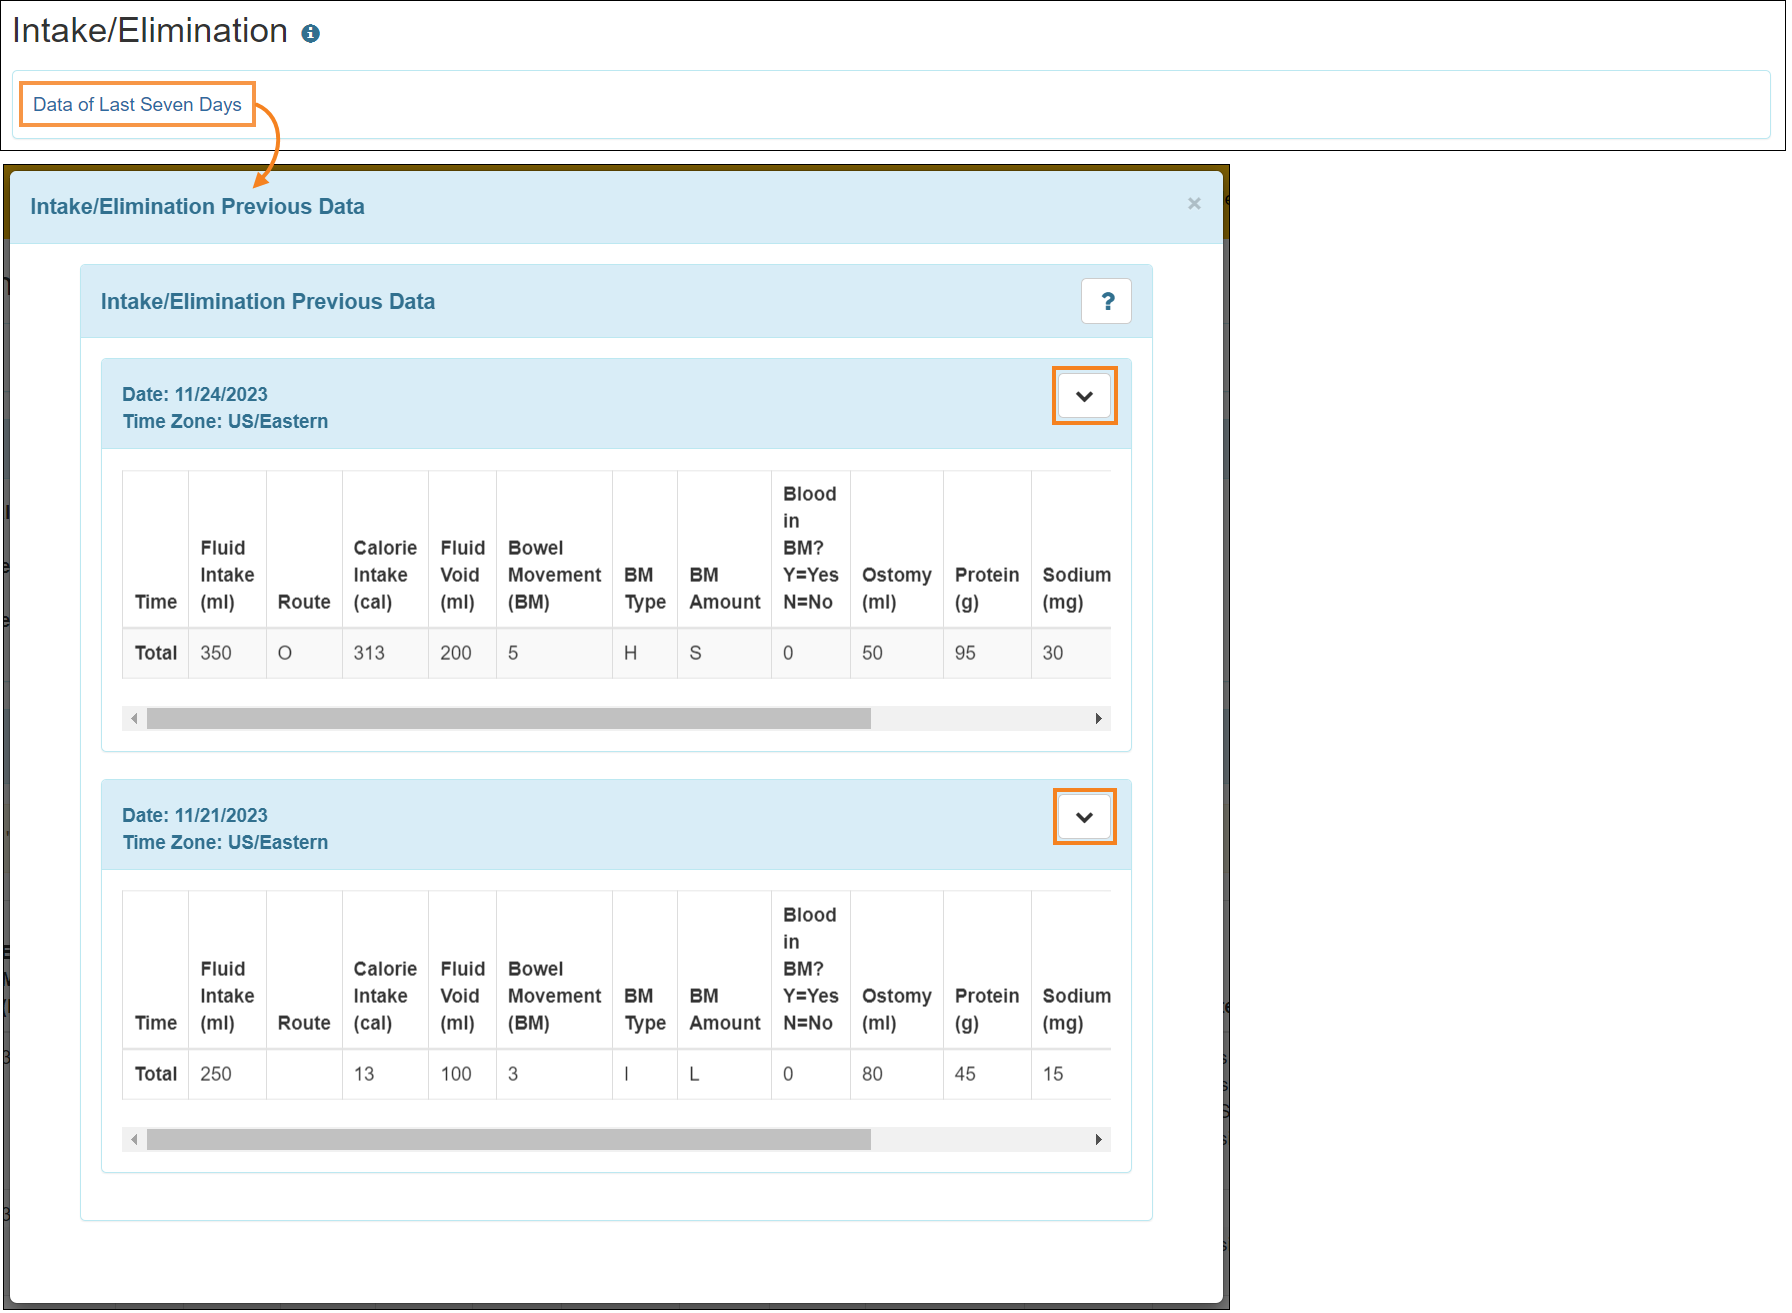
- The Data of Last Three Days link has been renamed to Data of Last Seven Days and will now show the submitted data for the last seven days in the ‘Intake/Elimination Previous Data’ section. Users can expand to view the detailed entries for specific dates by clicking on the dropdown arrow icon.
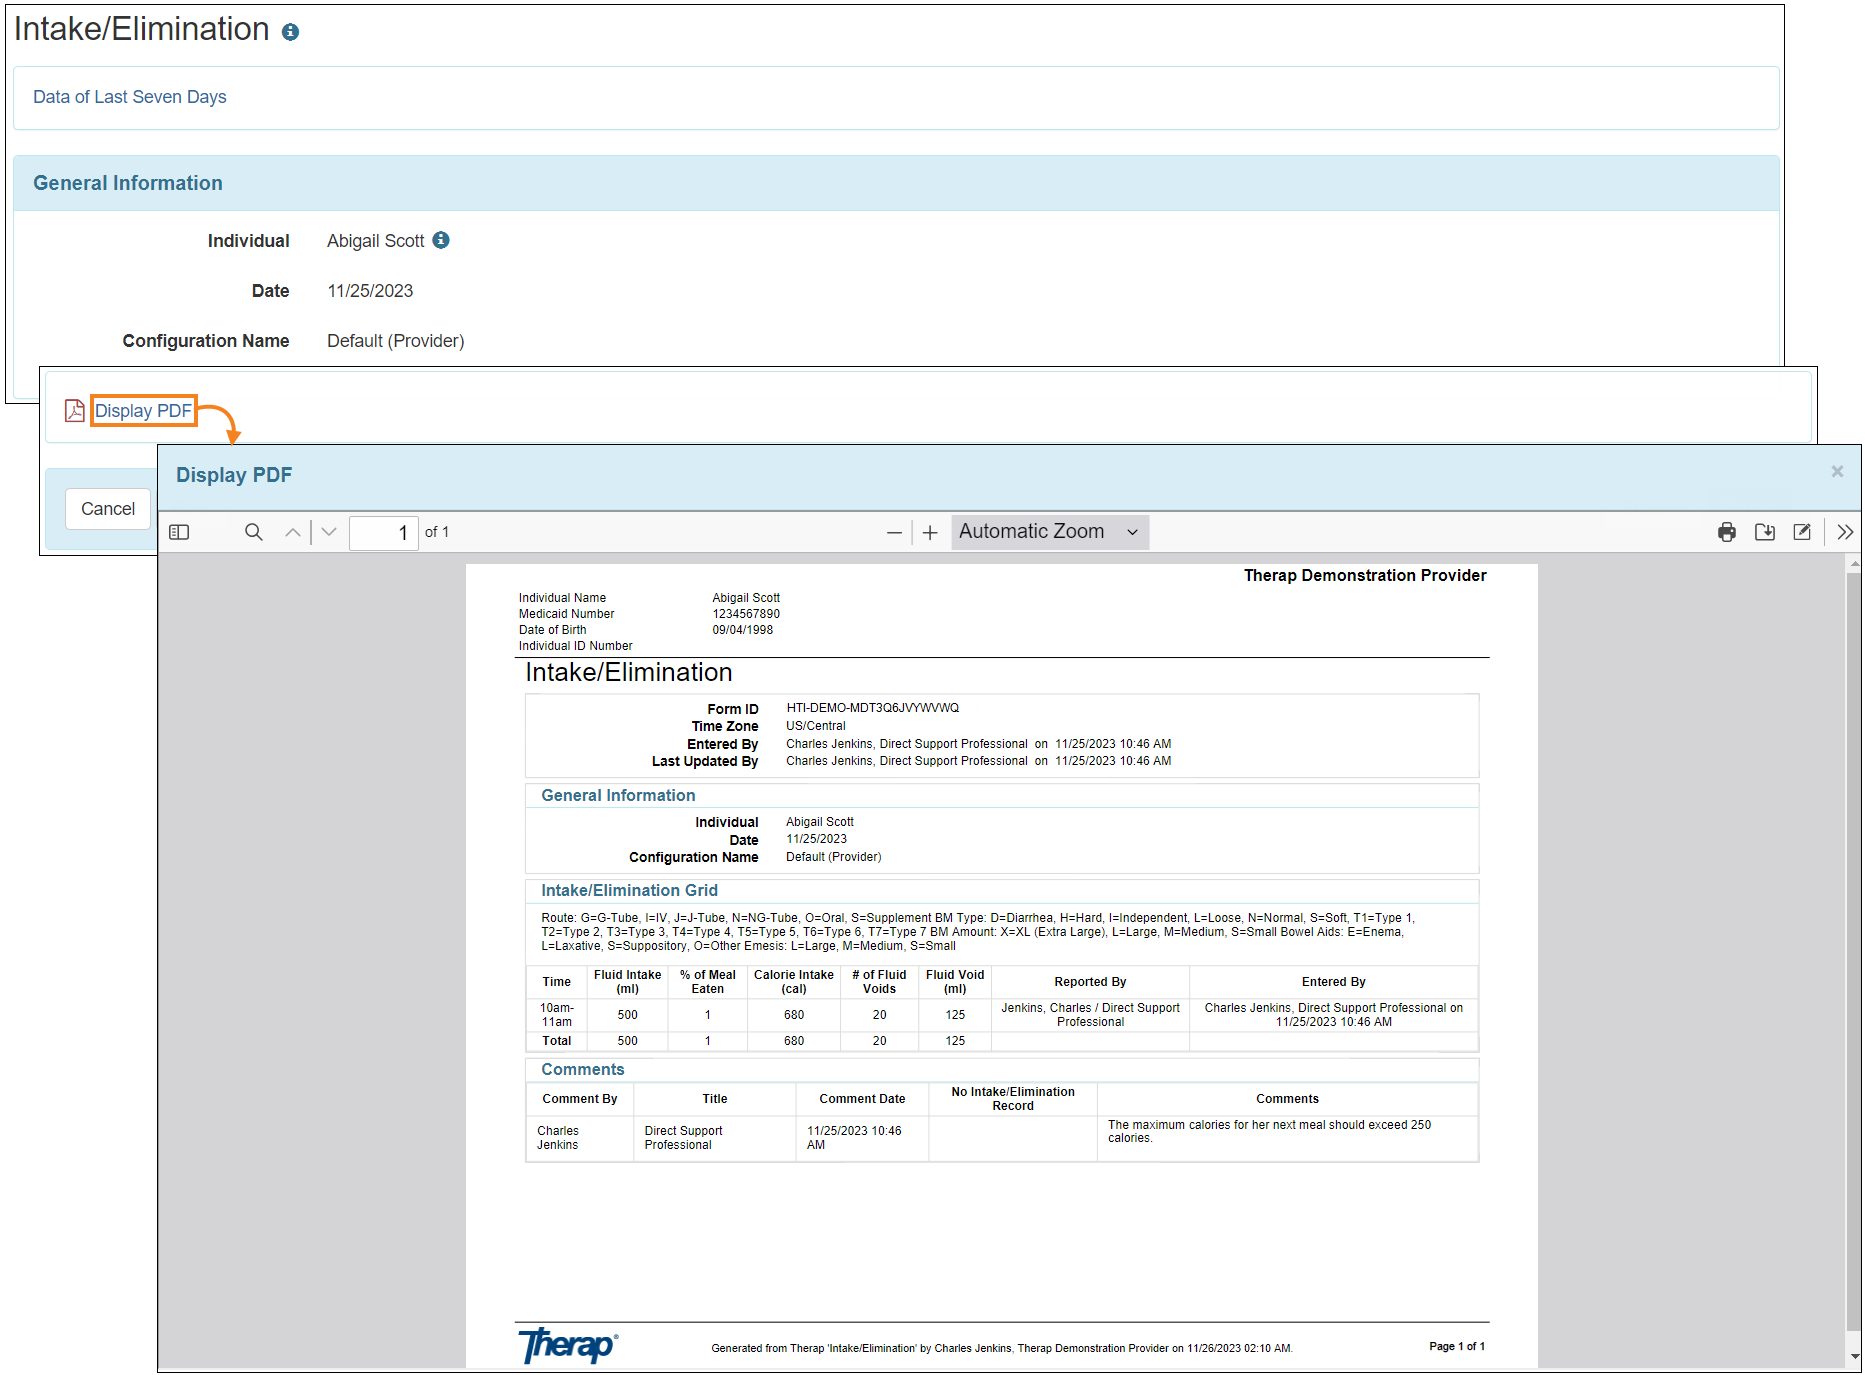
- Clicking on the Display PDF link at the bottom of the Intake/Elimination form, users will now be able to view the PDF in the PDF Viewer.
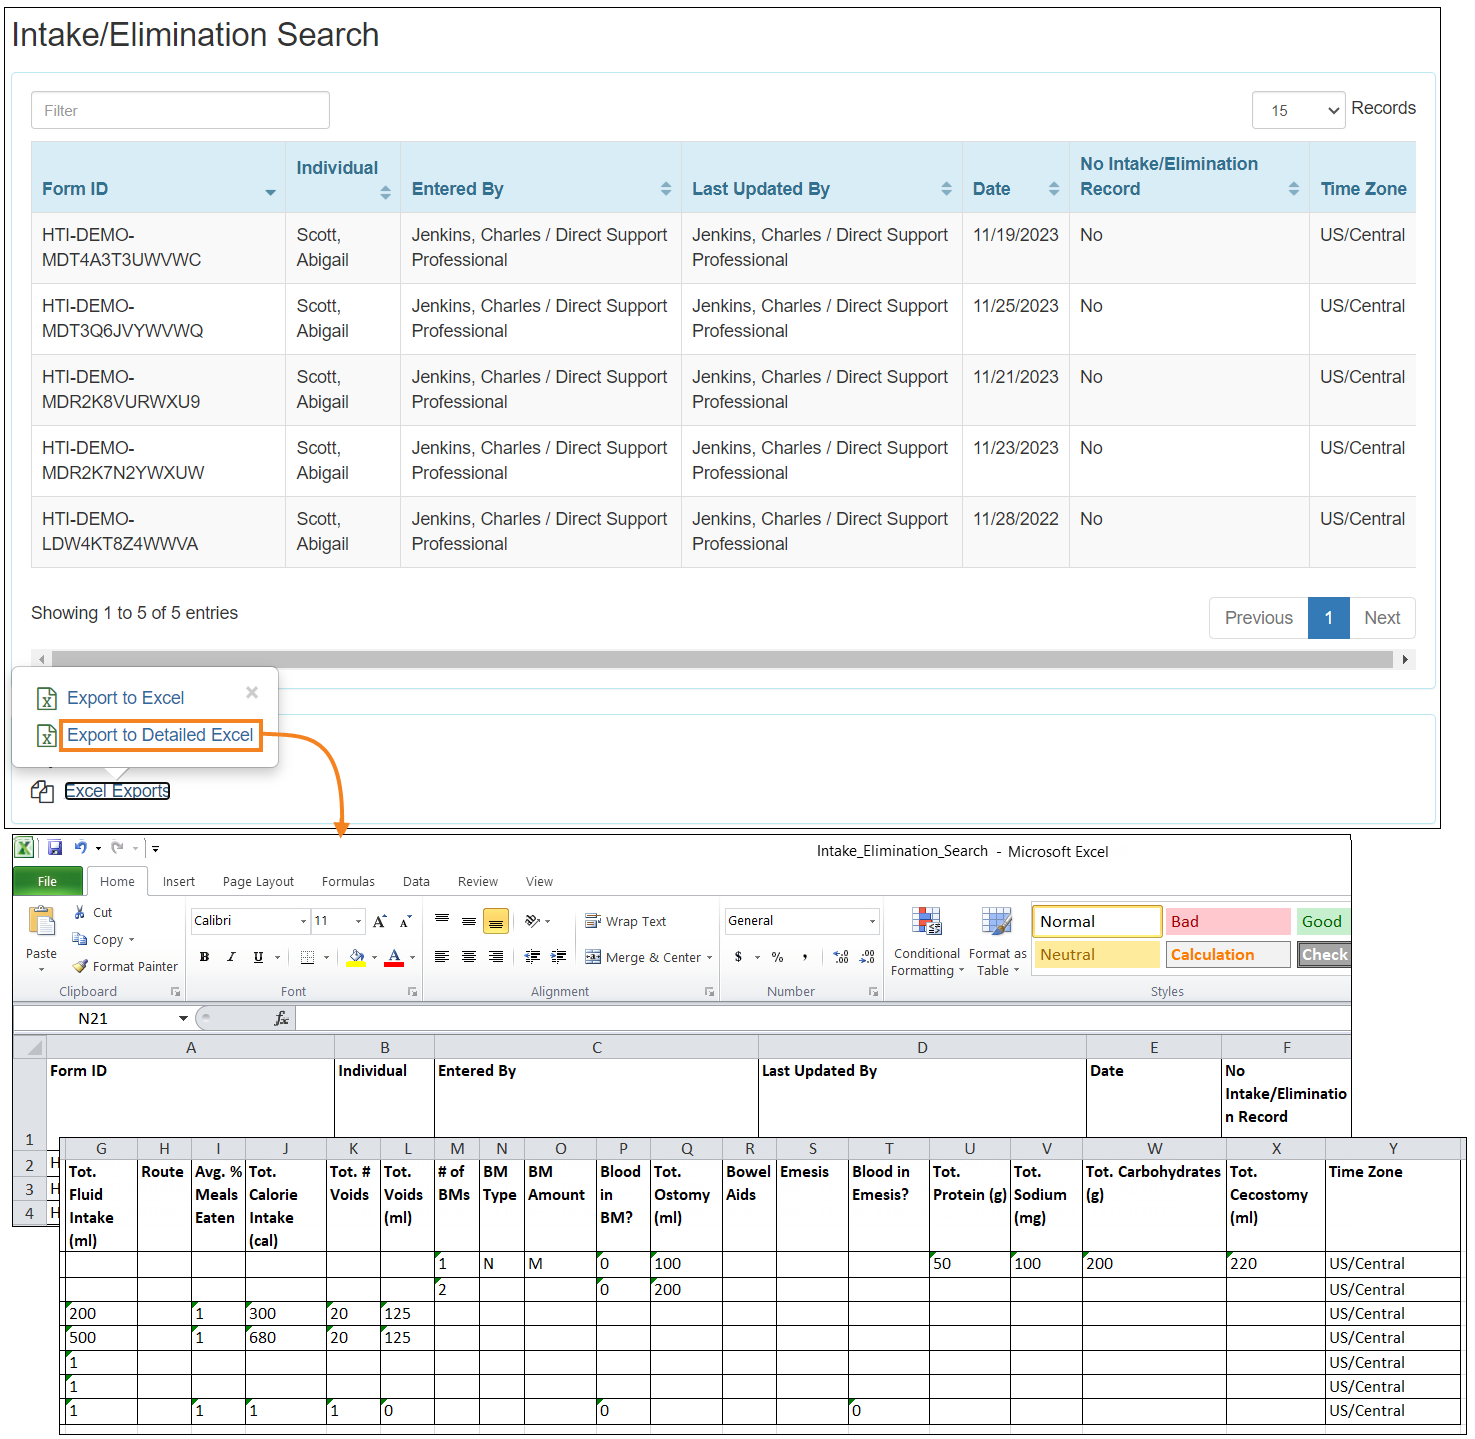
- The Excel report generated by clicking on the Export to Detailed Excel link in the ‘Intake/Elimination Search’ page will now show all the 18 columns in the downloaded Excel file.
- On the ‘Intake/Elimination Report Criteria’ page, a maximum of 14 columns can be selected from the Column(s) dropdown field, and a NOTE has been added at the top of the page indicating this information. Users will receive an error message upon clicking on the Generate button if more than 14 columns have been selected. The following changes have been made to the Column(s) dropdown list:
- The following columns have been renamed:
- Tot. Fluid Intake (ml)
- Avg. % Meals Eaten
- Tot. Calorie Intake (cal)
- Tot. # Voids
- Tot. Voids (ml)
- The following new columns have been added:
- Tot. Ostomy (ml)
- Tot. Protein (g)
- Tot. Sodium (mg)
- Tot. Carbohydrates (g)
- Tot. Cecostomy (ml)
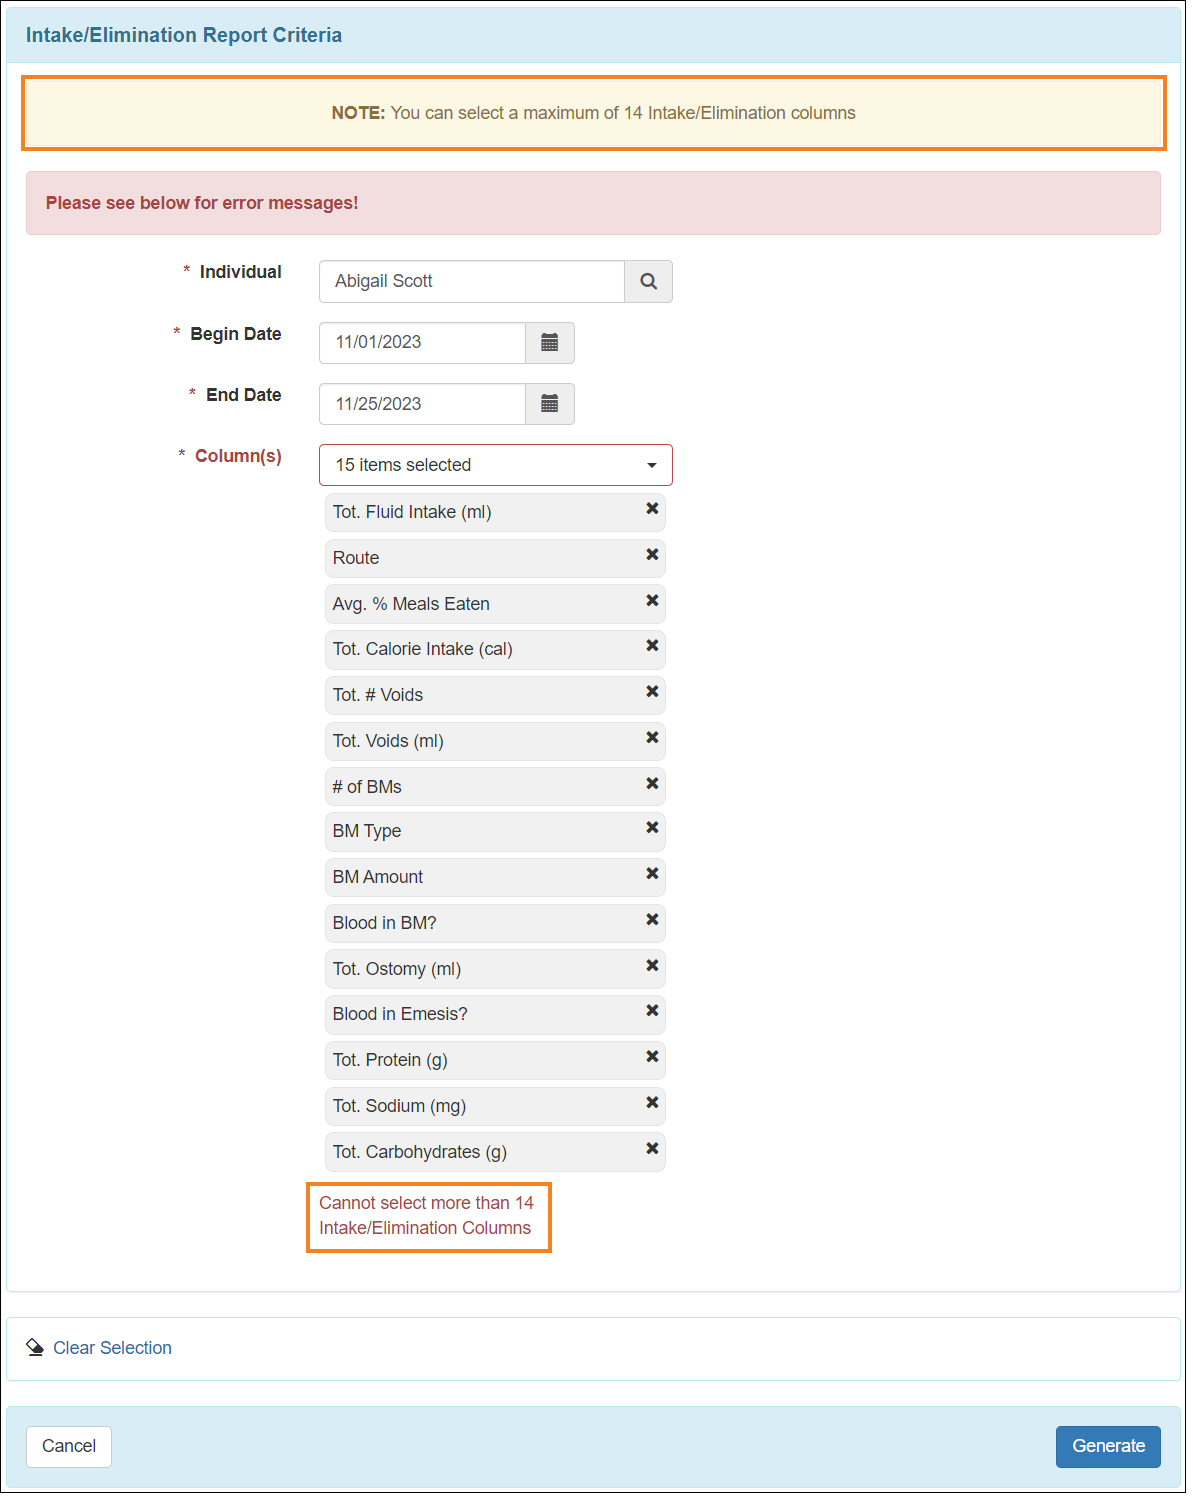
- The following columns have been renamed:
- A ? button has been added at the top right corner of the ‘Intake/Elimination Report Results’ section which will show the indications for Route, BM Type, BM Amount, Bowel Aids, and Emesis.
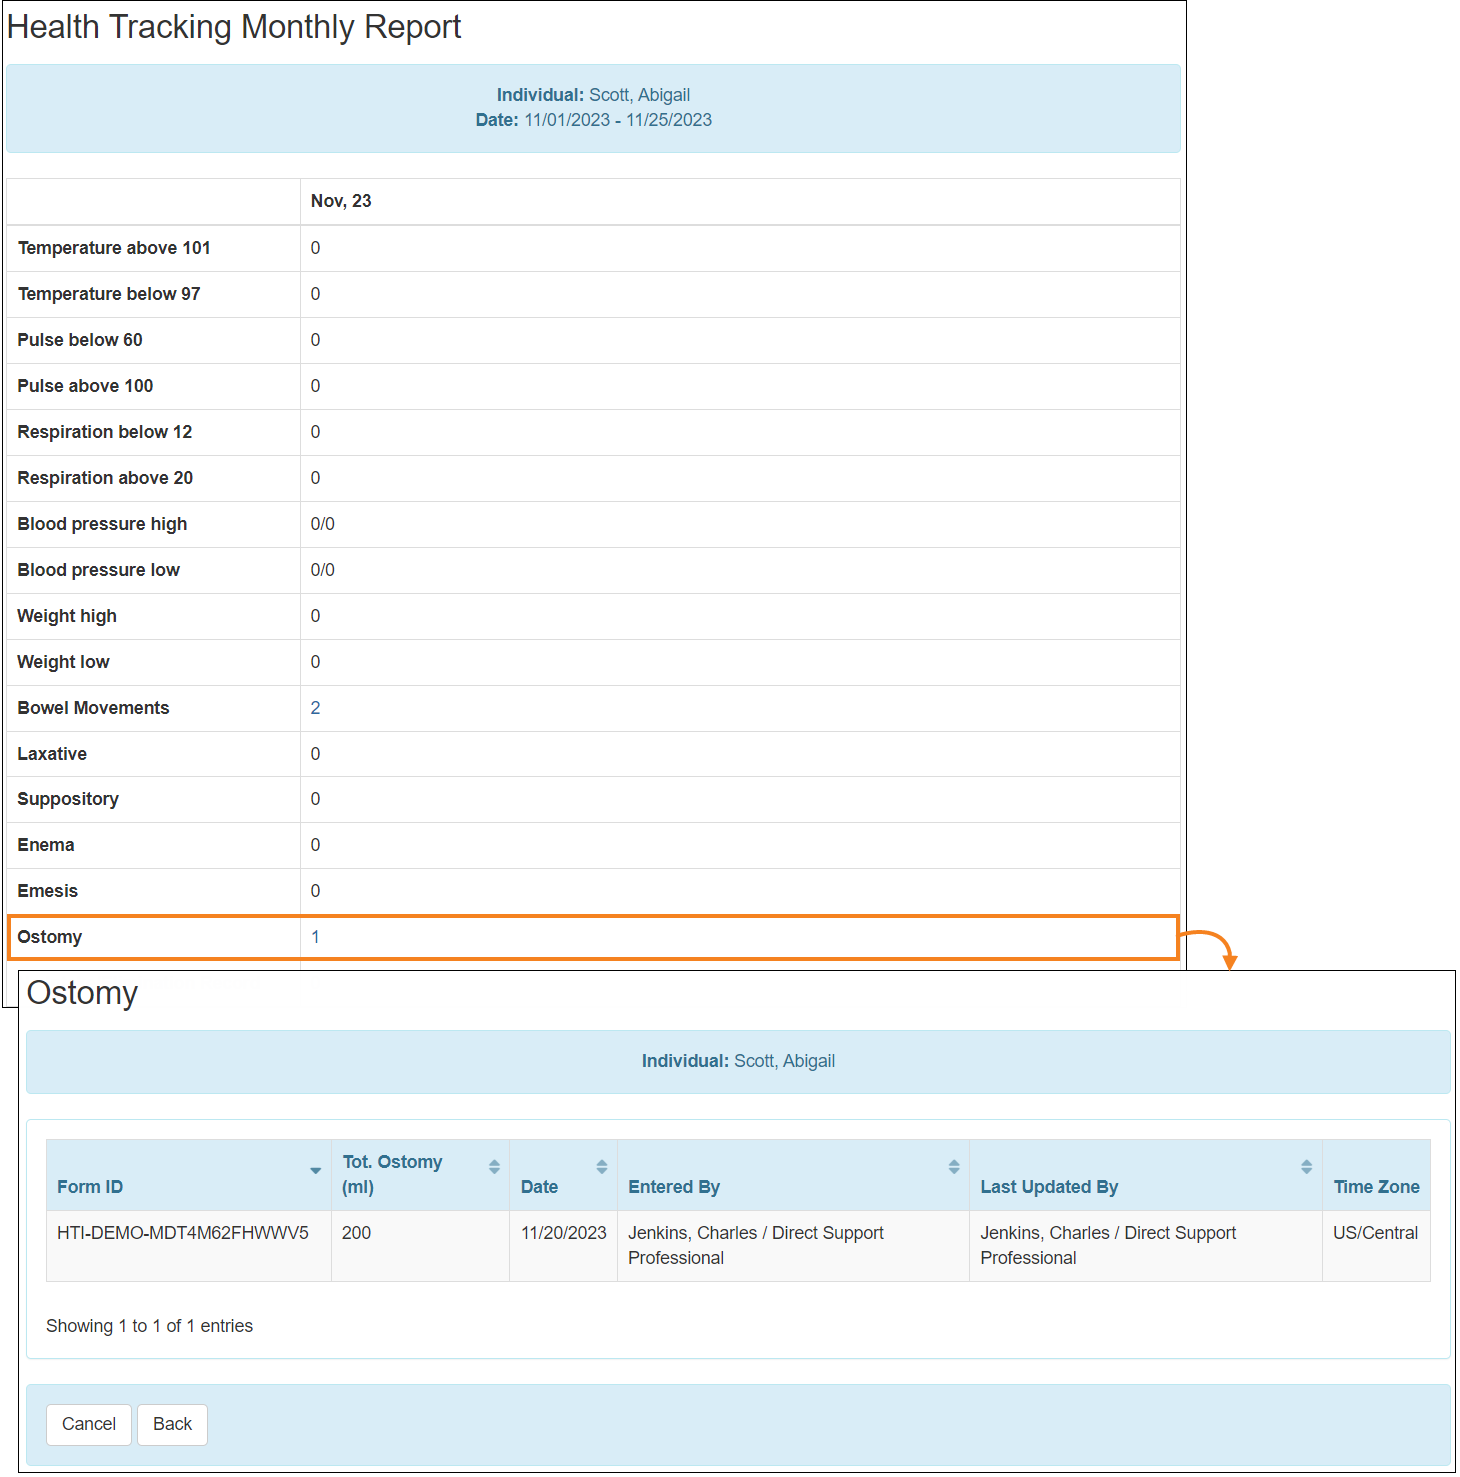
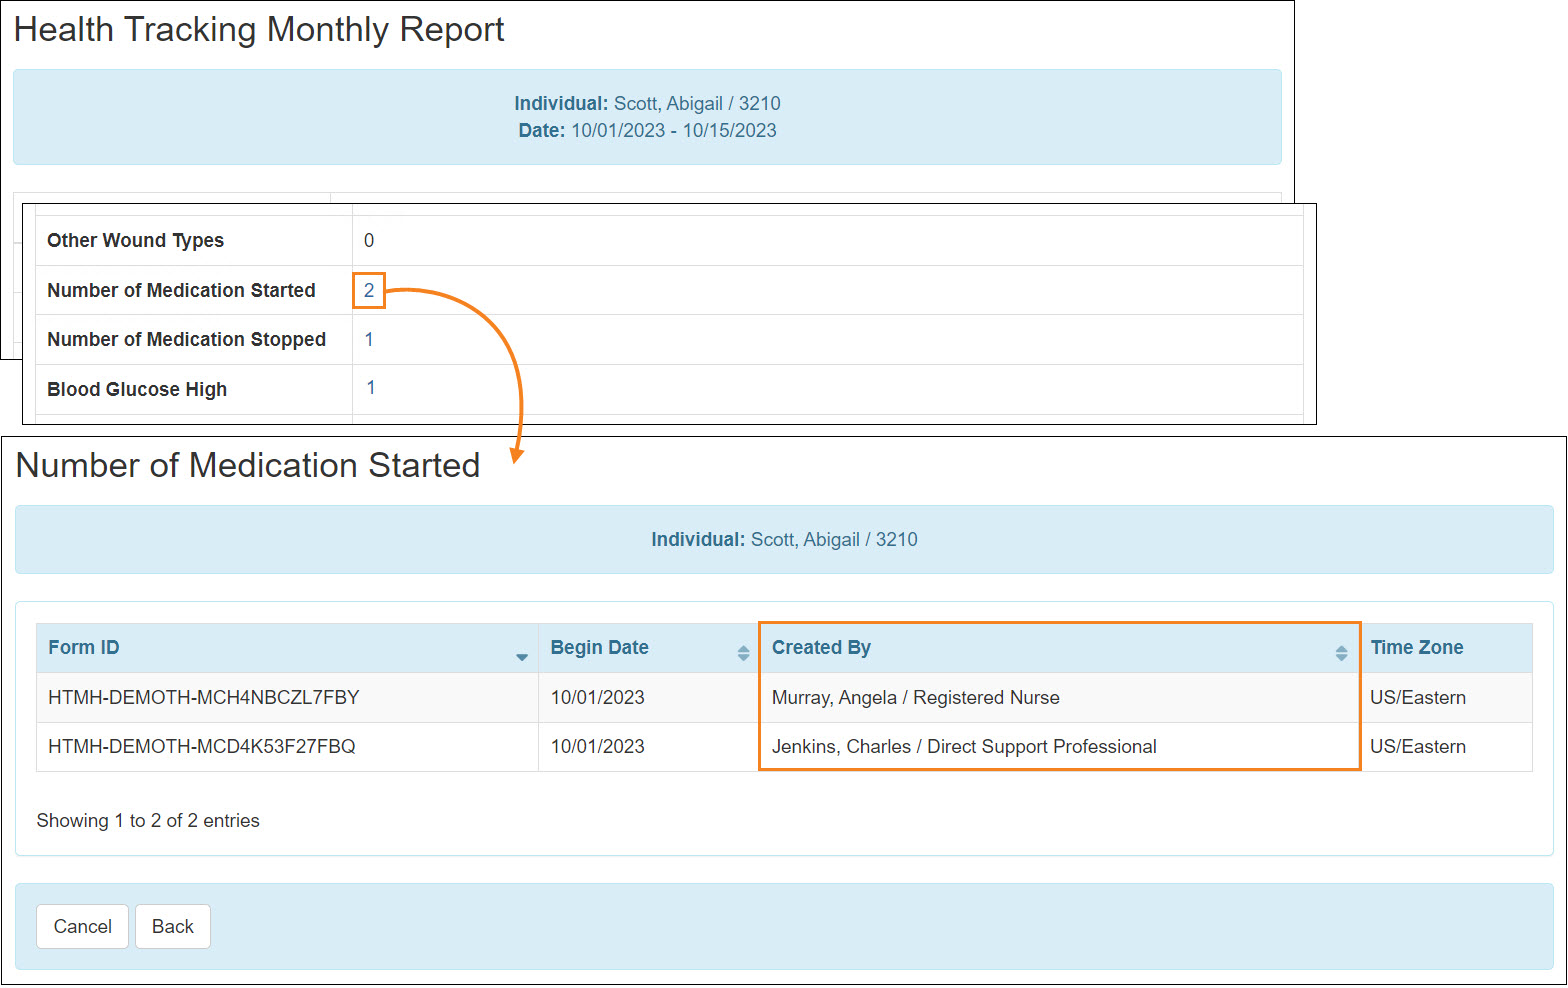
- Ostomy has been added in the Health Tracking Monthly Report page. Users will be able to view the Intake/Elimination forms added with Ostomy by clicking on the count(s) beside the Ostomy link.
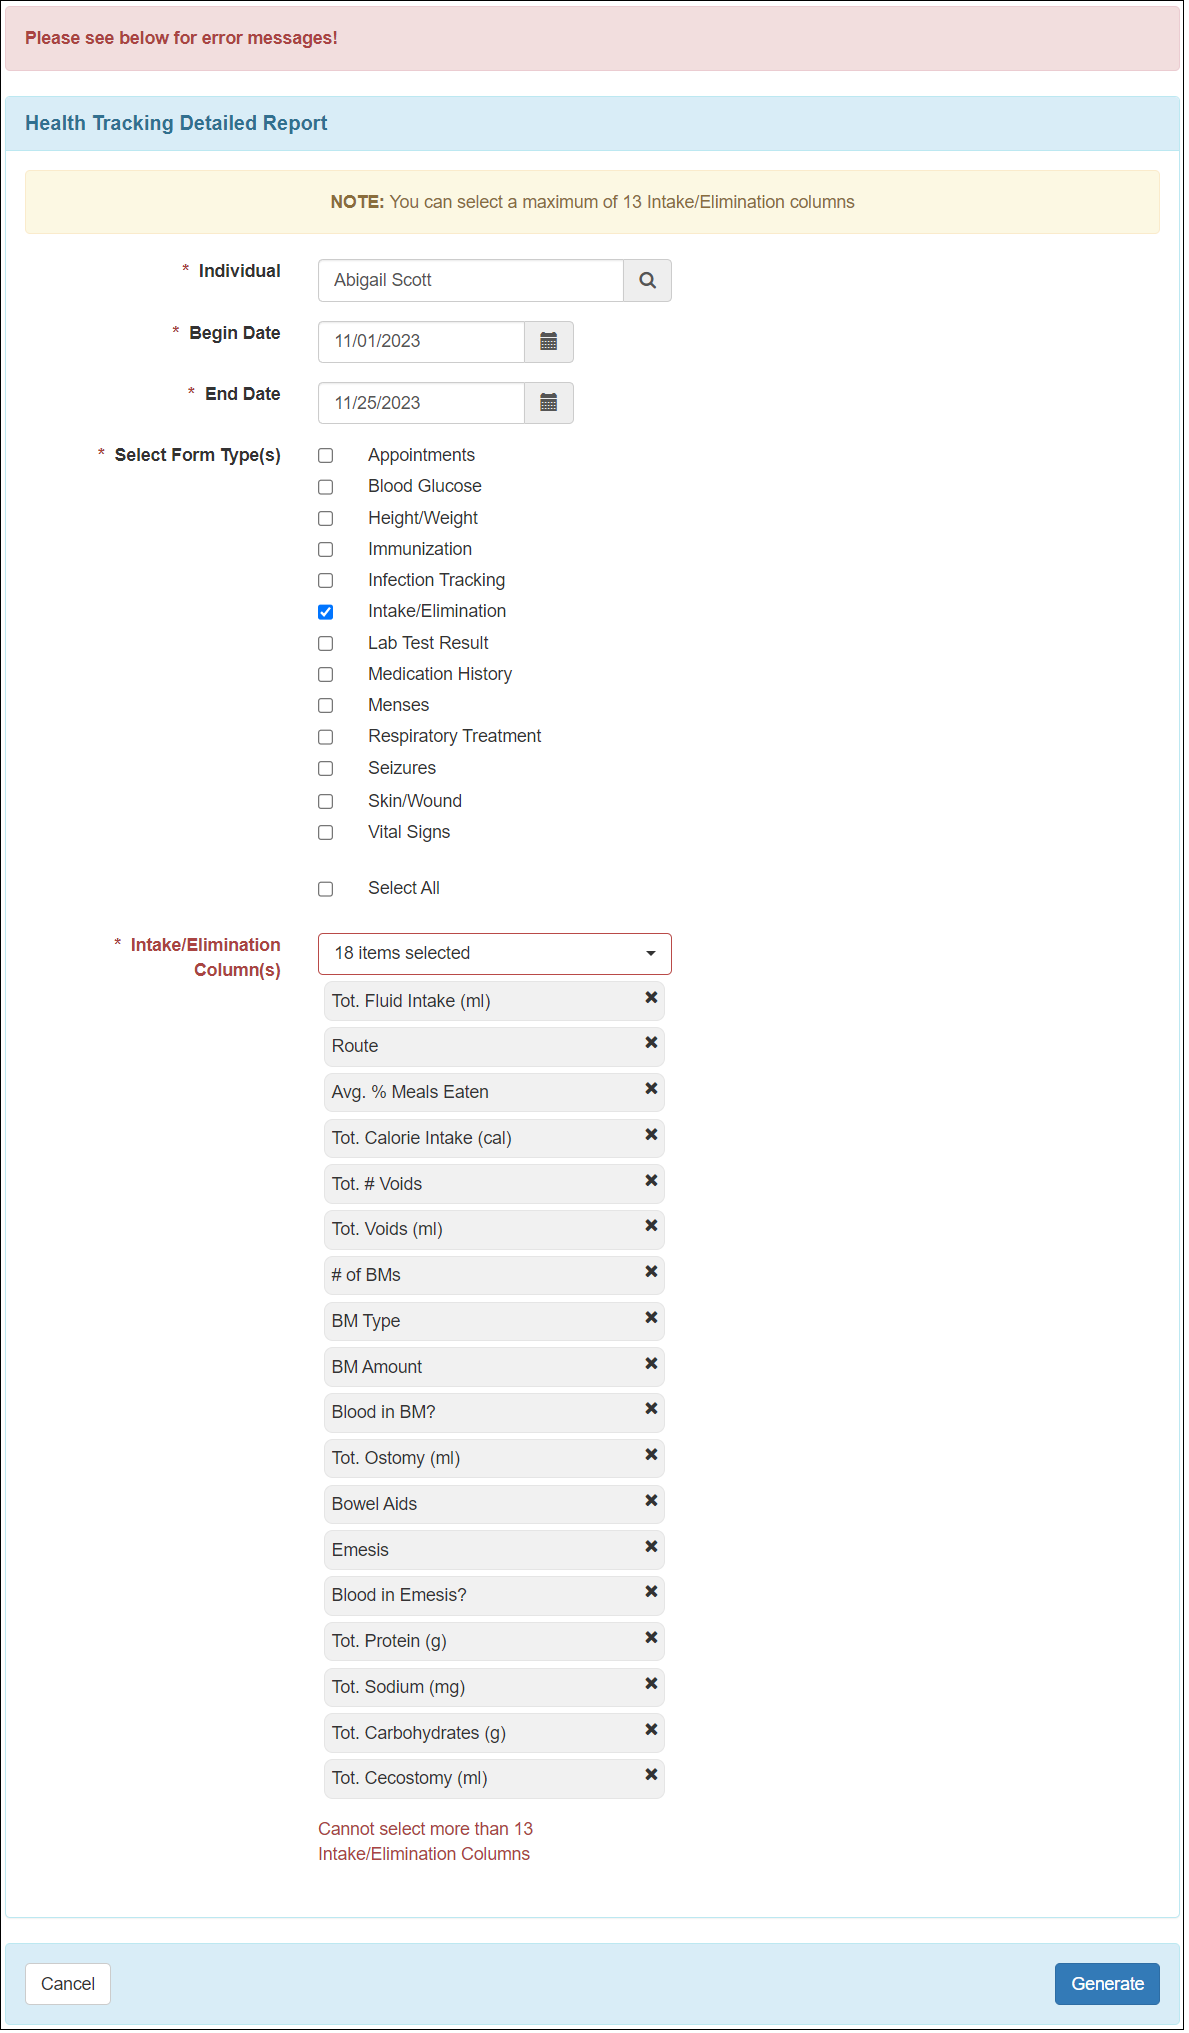
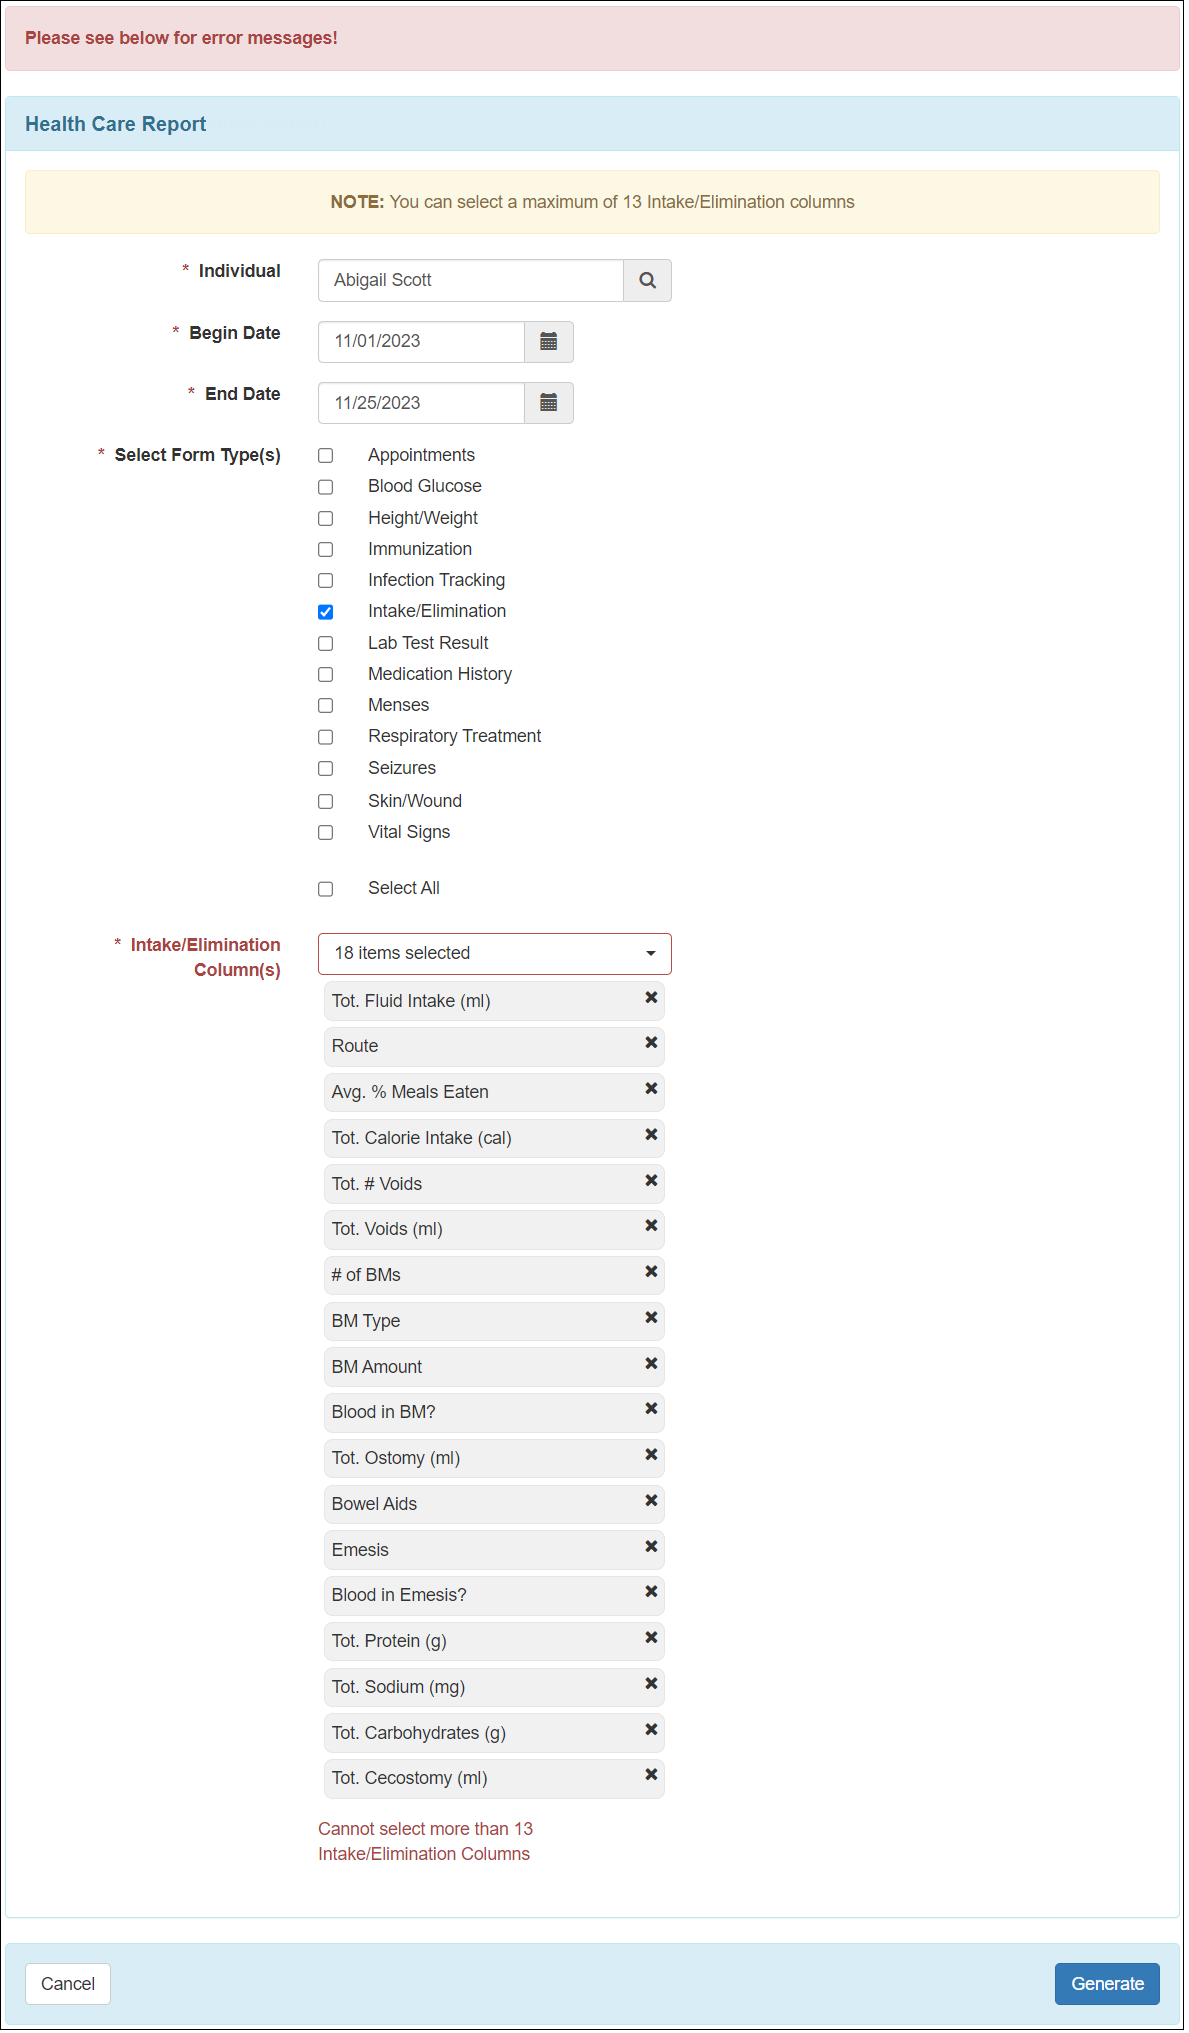
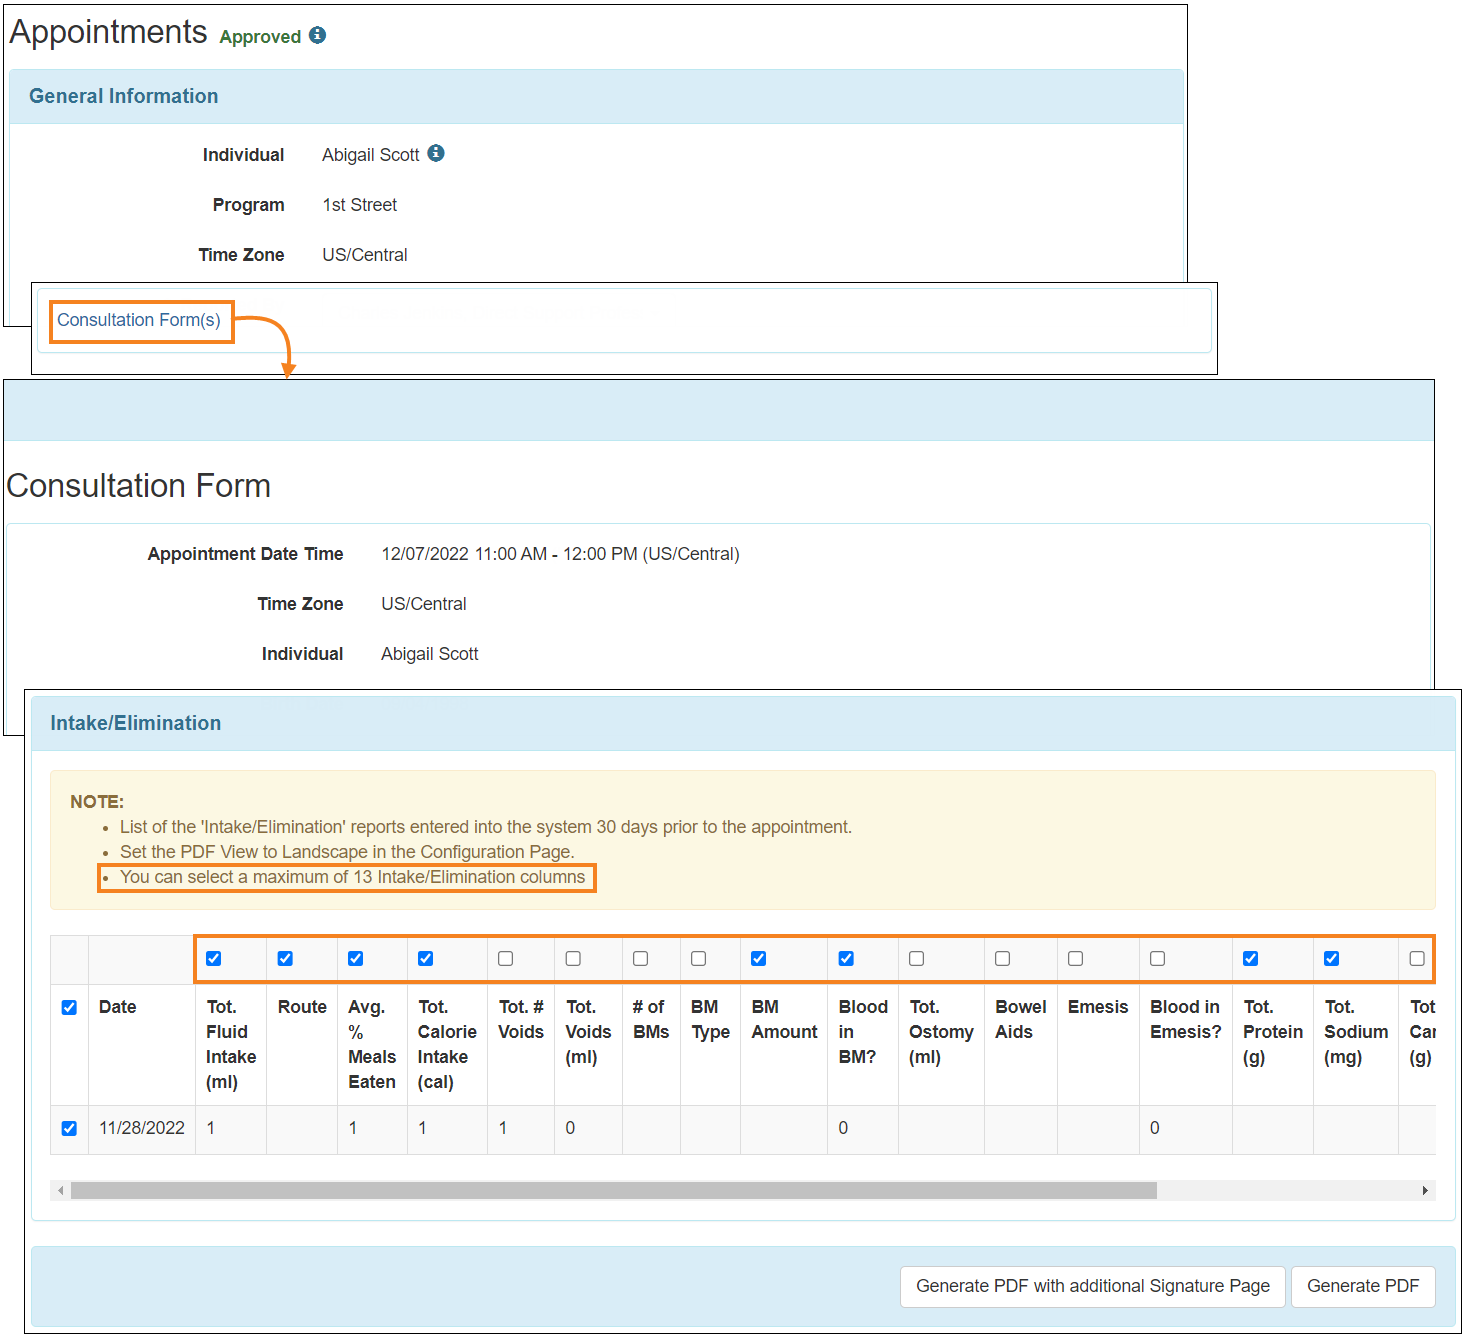
- When generating the Health Tracking Detailed and Health Care Report, if the Intake/Elimination checkbox is selected, users will now need to choose output columns from the Intake/Elimination Column(s) dropdown field. A NOTE will be displayed on top of the report criteria page stating: ‘You can select a maximum of 13 Intake/Elimination columns’. Users will receive an error message if more than 13 columns are selected.
Health Tracking Detailed Report:
Health Care Report:
- On the ‘Review List’ page, the newly added Intake/Elimination columns and their total values will appear under the Summary column.
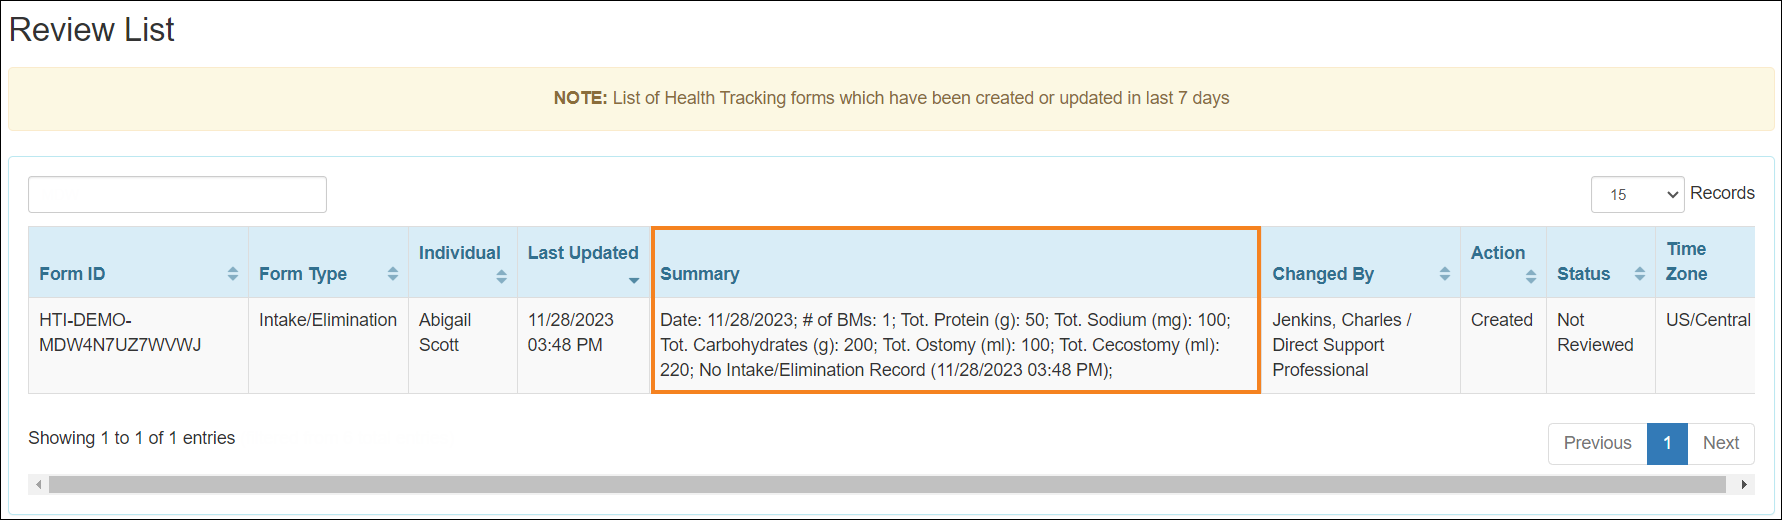
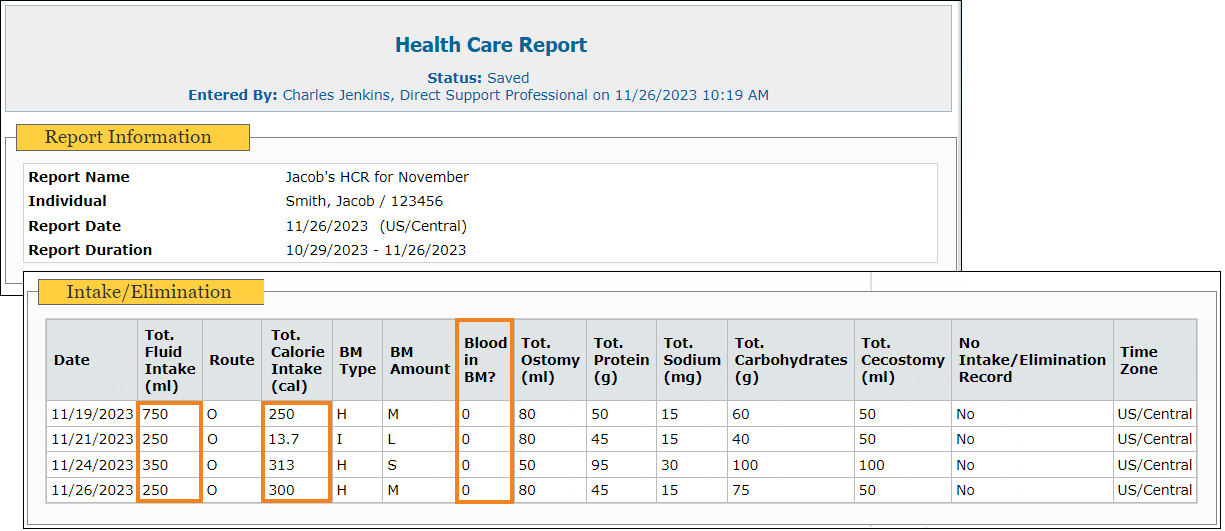
- The following columns will now be displayed under the ‘Intake/Elimination’ section of the Health Care Report if they are selected from the 'Health Care Report' criteria page:
- Blood in BM?
- Blood in Emesis?
- Tot. Ostomy (ml)
- Tot. Protein (g)
- Tot. Sodium (mg)
- Tot. Carbohydrates (g)
- Tot. Cecostomy (ml)
If users enter integer values in the Intake/Elimination form, they will now display as integers instead of decimals under the ‘Intake/Elimination’ section of the Health Care Report.
- Users will now be able to select a maximum of 13 columns out of 18 columns to appear on the generated PDF of the Consultation form. The Note displayed on top of the ‘Intake/Elimination’ section has been updated.
Login
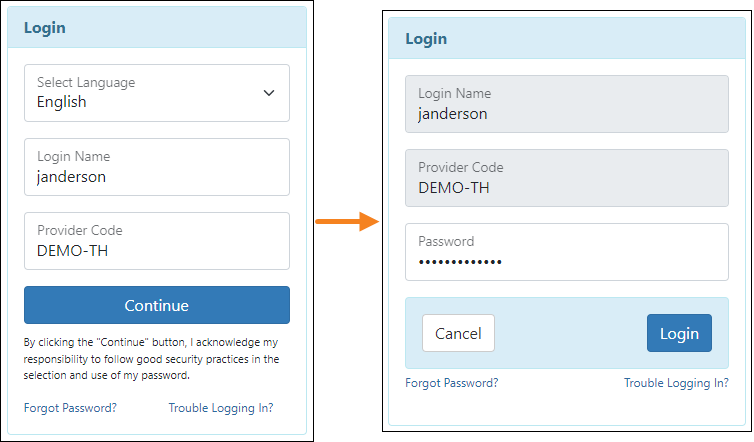
[Back to Top]- The interface for the Therap login page has been updated. Users will now have to enter their Login Name and Provider Code on the login page, click on Continue, enter their Password in a new window, and then click on the Login button on the new window to log into the system.
Medication History
[Back to Top]- Users will now require the Medication History caseload-based roles to access the Medication History module. Users with only Health Tracking (HT) roles will no longer have access to the Medication History.
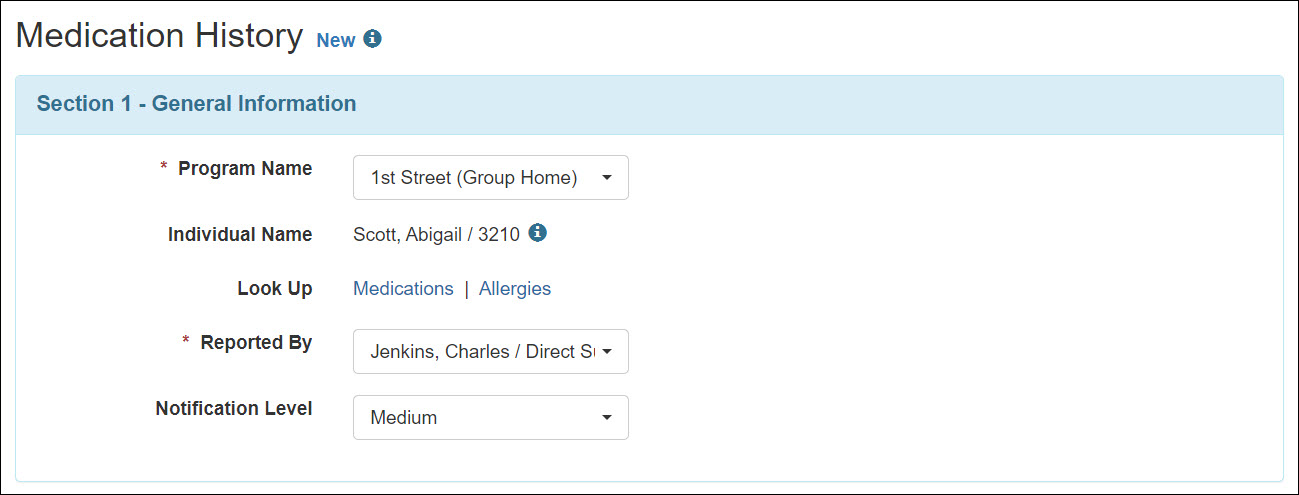
- The Date field has been removed from the ‘Section 1 - General Information’ section of the Medication History form.
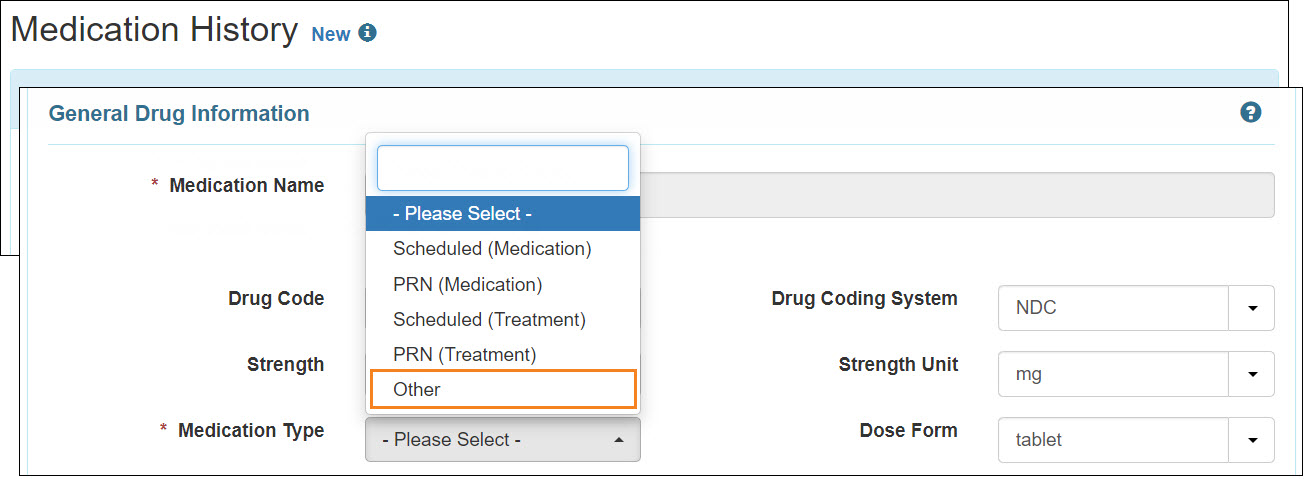
- The Medication Type under the ‘General Drug Information’ section is now a required field. Previously, selecting no option in the Medication Type field would categorize a medication as 'Other' type. Now, Other has been added as a new option to this field. Users will need to select this option to categorize a medication as 'Other' type.
- The following changes have been made to the Medication History form workflow:
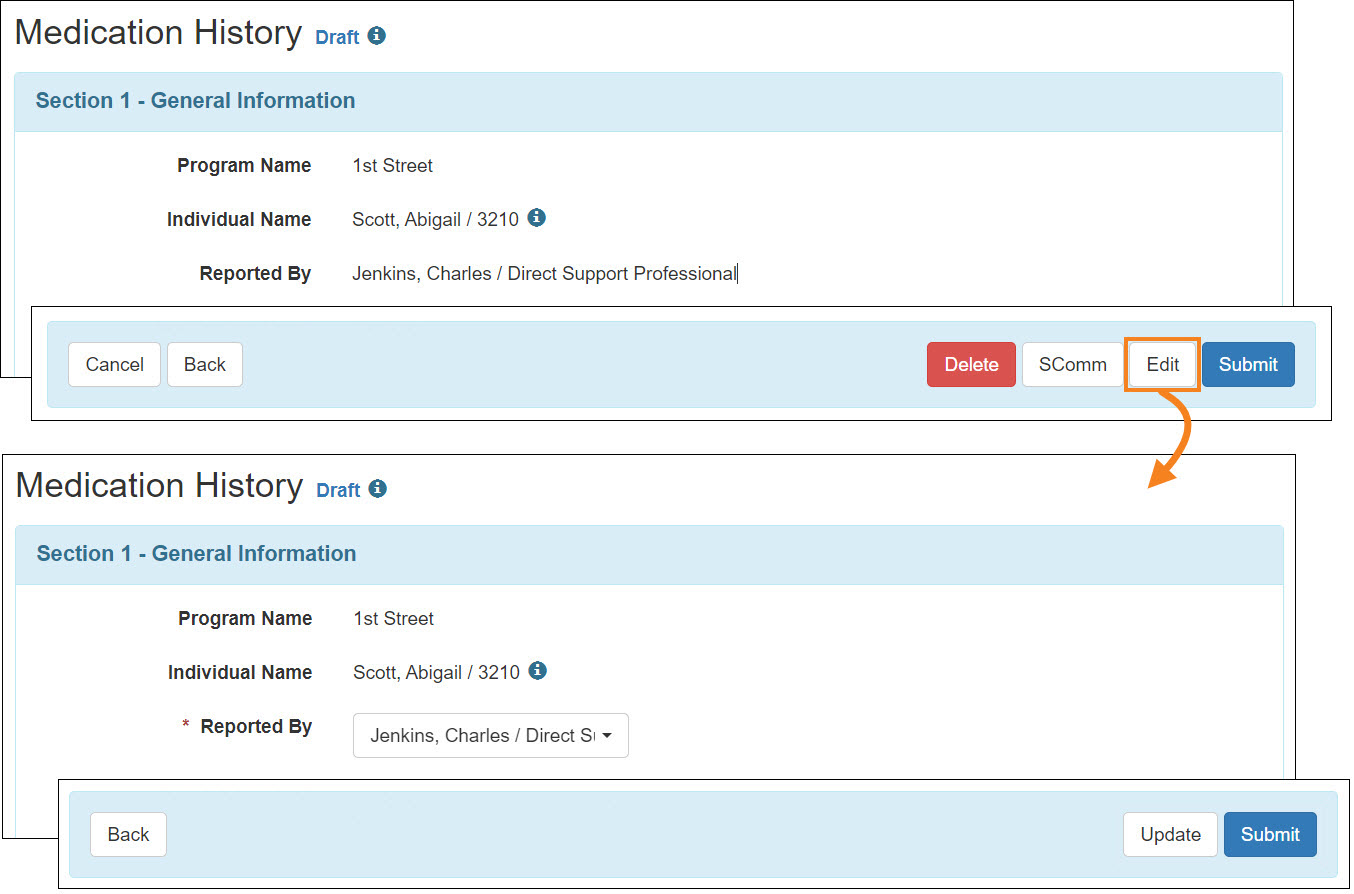
- Saving a New form will now change the status to Draft instead of In Prep. Draft forms can be edited, submitted, or deleted using the Edit, Submit, and Delete buttons respectively. The In Prep forms created prior to this release will be shown in Draft status.

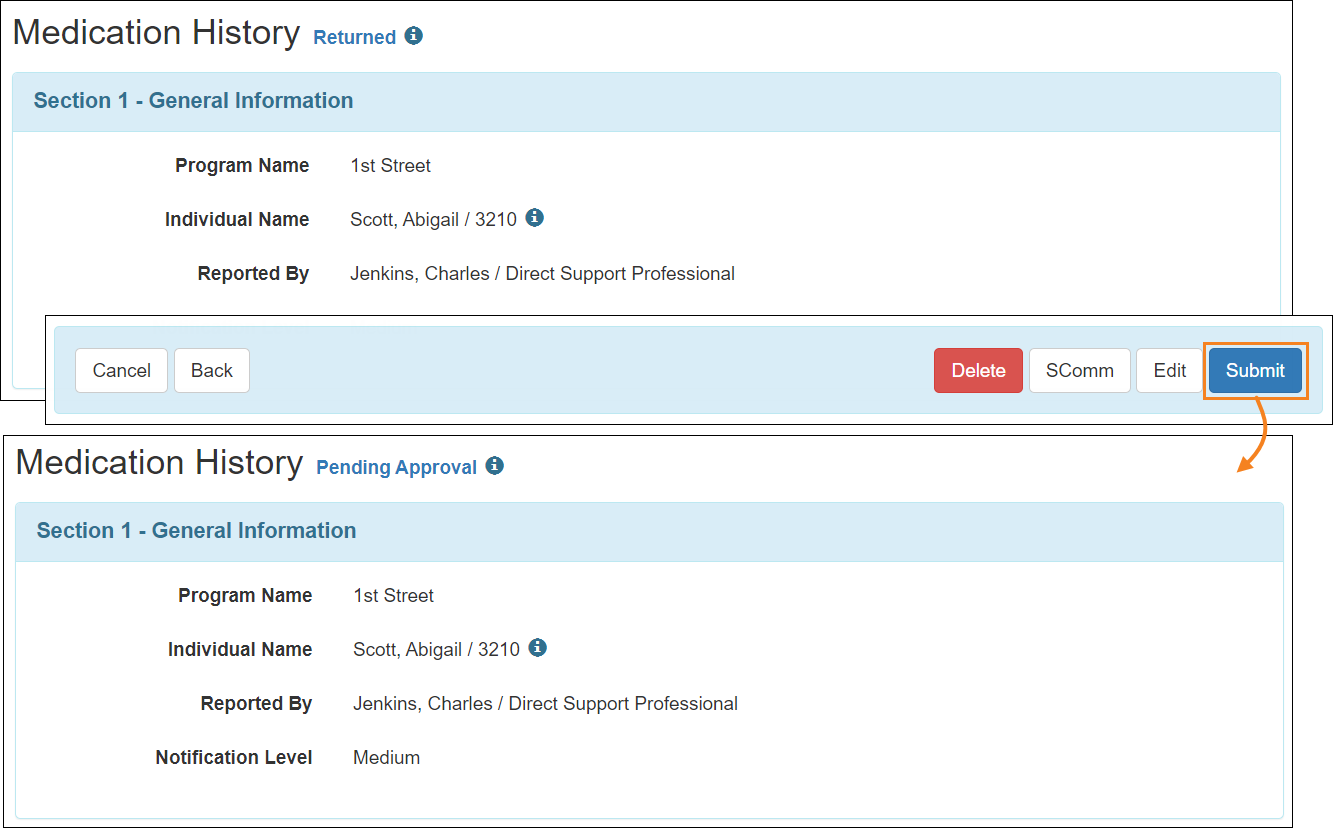
- Submitting a New, Draft, or Returned Medication History form will change its status to Pending Approval. Pending Approval forms will not appear on the MAR until they have been approved and so MAR will no longer be locked due to submitting a Medication History form.
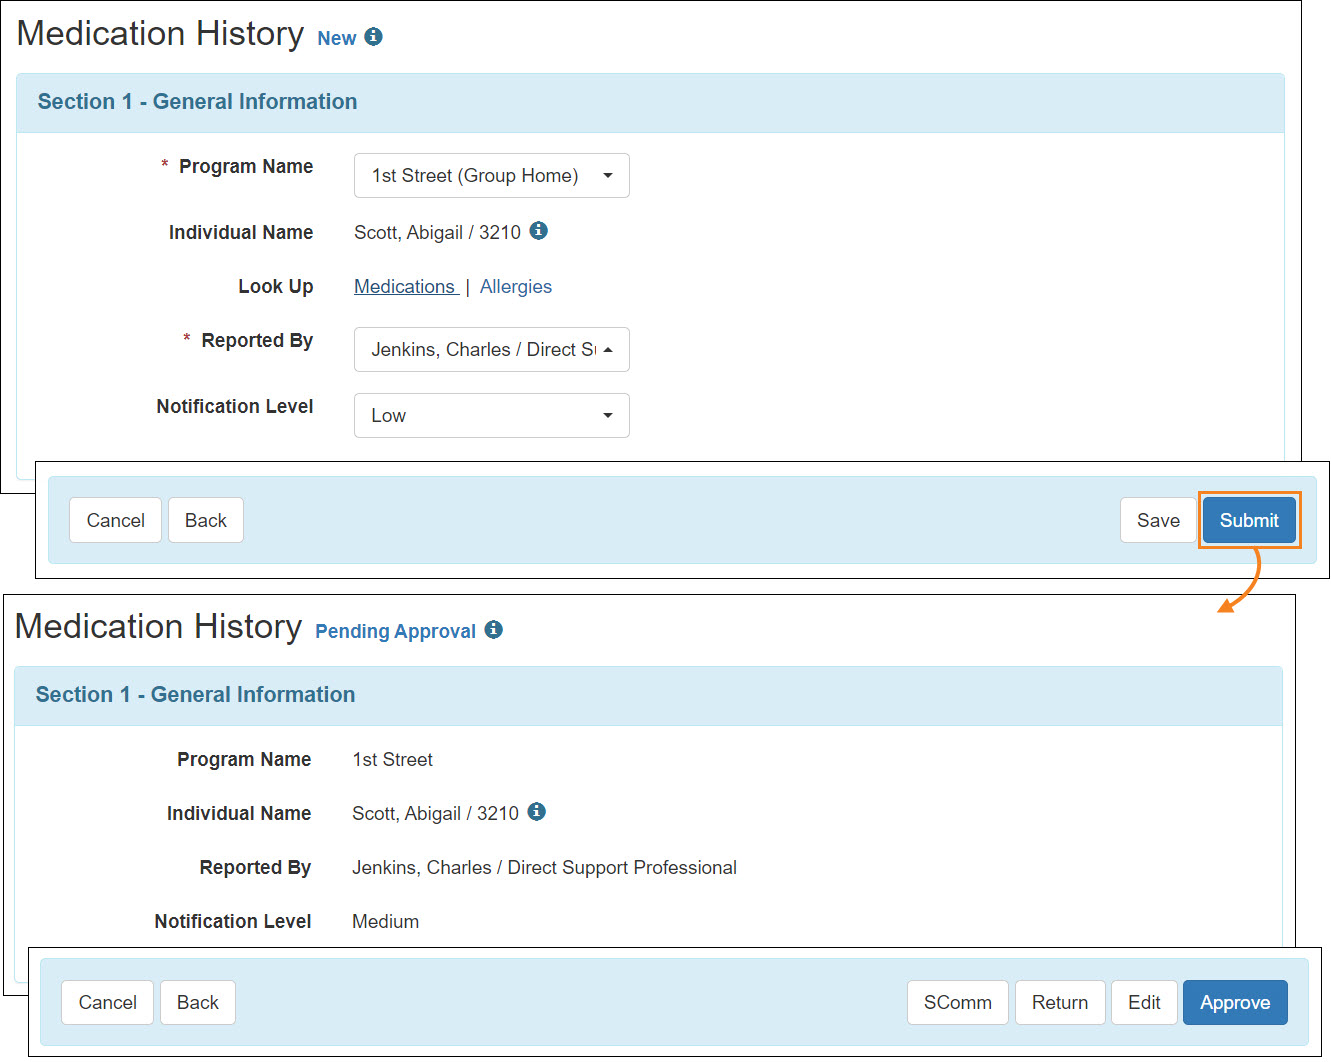
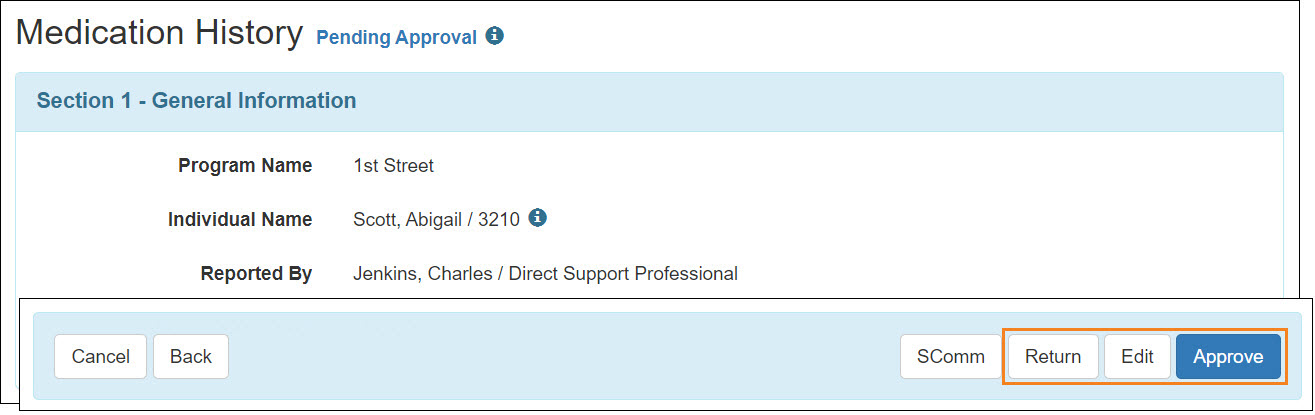
- Pending Approval forms can be updated using the Edit button, returned to the submitter using the Return button, and approved using the Approve button. Forms in Pending Approval status cannot be deleted. Approving a Medication History form may lock the current and future MAR(s).
- Returned forms can be edited using the Edit button or deleted using the Delete button. Submitting a Returned form after necessary updates will change the status back to Pending Approval.
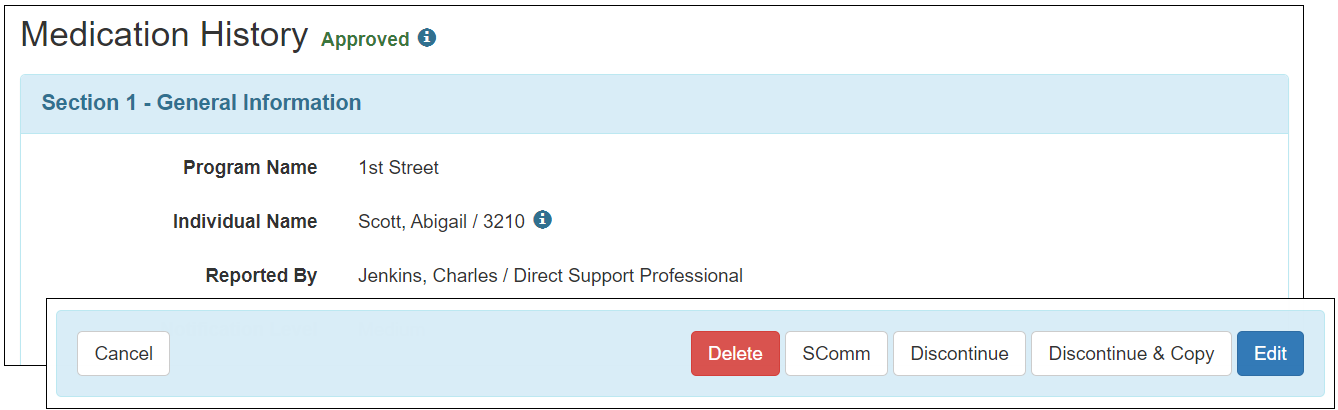
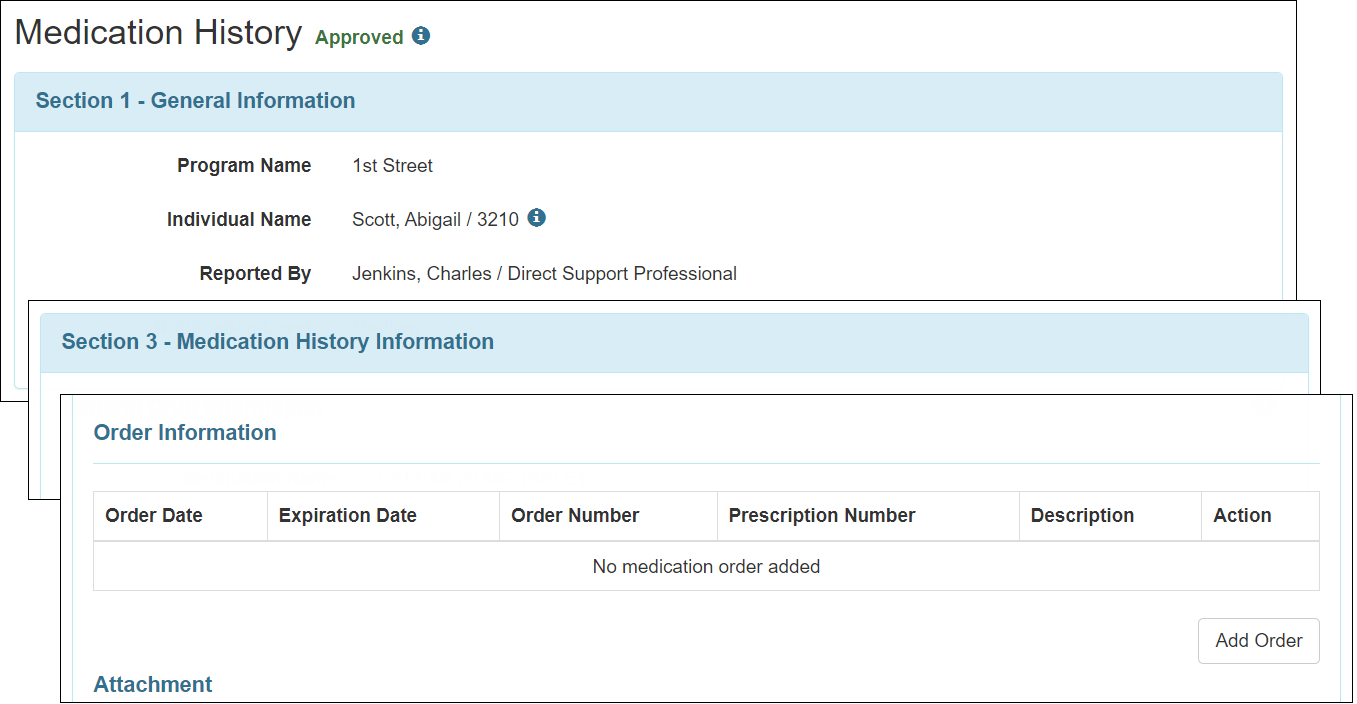
- Approved Medication History forms can be edited using the Edit button. The Delete & Copy button has been removed from Approved forms.
- Saving a New form will now change the status to Draft instead of In Prep. Draft forms can be edited, submitted, or deleted using the Edit, Submit, and Delete buttons respectively. The In Prep forms created prior to this release will be shown in Draft status.
- The Medication History forms in Draft, Returned, Pending Approval, and Approved statuses will now be displayed in read-only mode. To update the form, users need to switch to the editable mode by clicking on the Edit button and update using the Update button. For Draft and Returned forms, users can also submit the form directly from the editable mode using the Submit button.
- The buttons at the bottom of the Medication History form have been reorganized and the color of the Delete button has been changed to red.
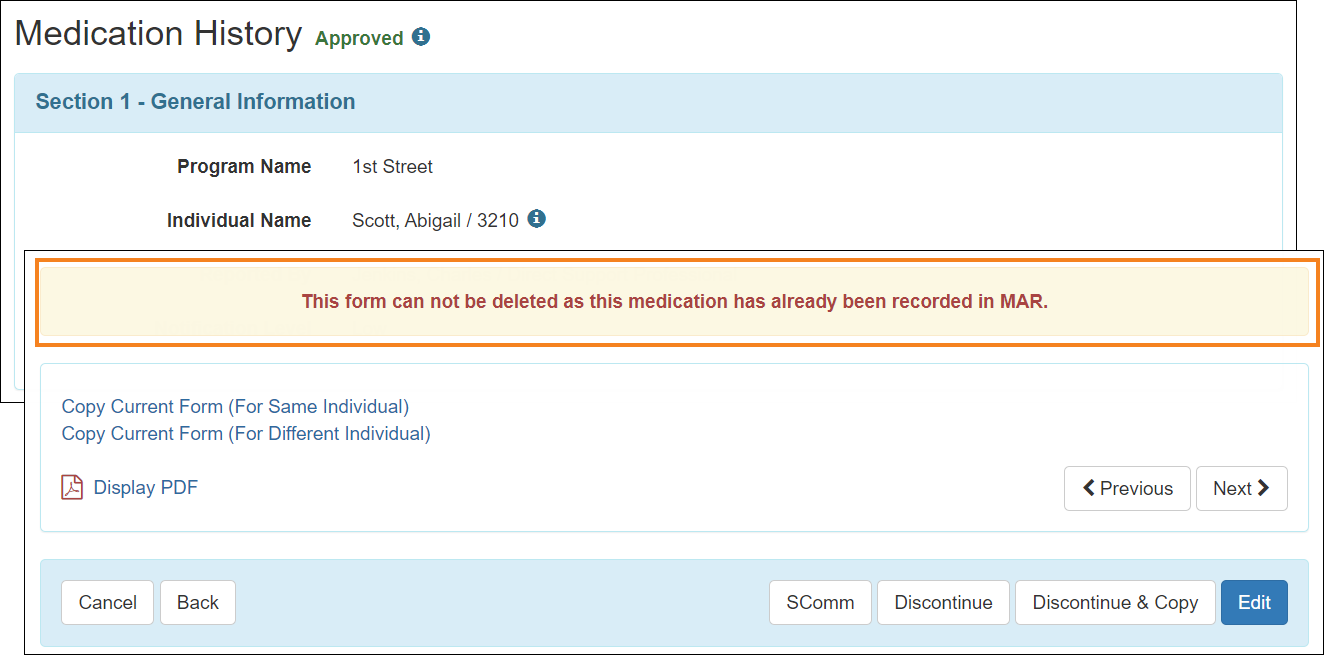
- Users assigned with the Medication History Approve caseload-based role will now receive the following warning message on the Approved Medication History form only if the medication has already been recorded in MAR:
‘This form can not be deleted as this medication has already been recorded in MAR.’
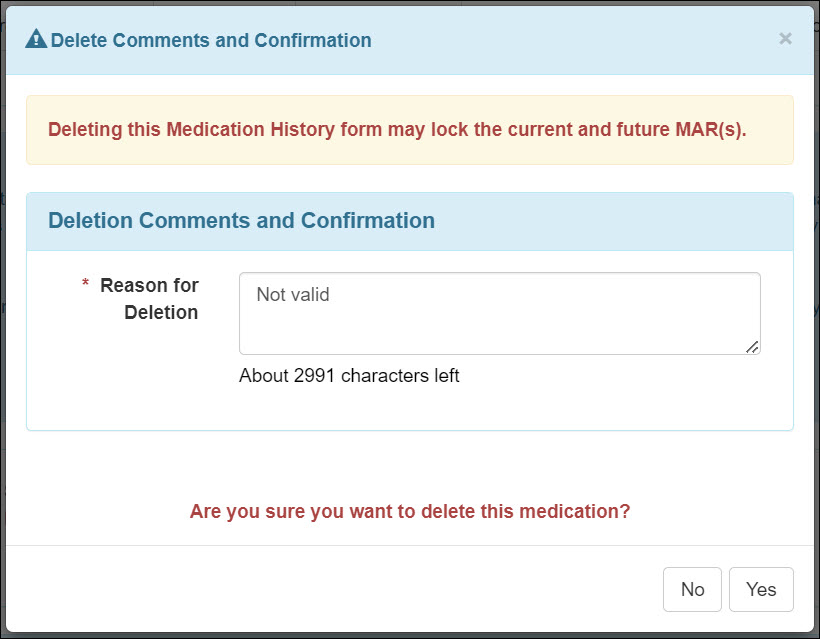
- In the ‘Delete Comments and Confirmation’ popup window that appears when deleting Medication History forms, the section titled ‘HT Form Deletion Comments and Confirmation’ has been renamed to ‘Deletion Comments and Confirmation’. The following message will now only show while deleting the Approved Medication History forms:
‘Deleting this Medication History form may lock the current and future MAR(s).’
- On the ‘Confirmation Message’ popup window while submitting or approving a Medication History form, the following changes have been made:
- The ‘Medication Type’ has been made required in the ‘Missing Fields’ subsection.
- In the ‘Past End Date’ section of the ‘Confirmation Message’ popup window, the medication End Date will now be displayed in a parenthesis ‘()’.
- The ‘Note’ and the ‘Past End Date’ sections will now only show while approving the form.
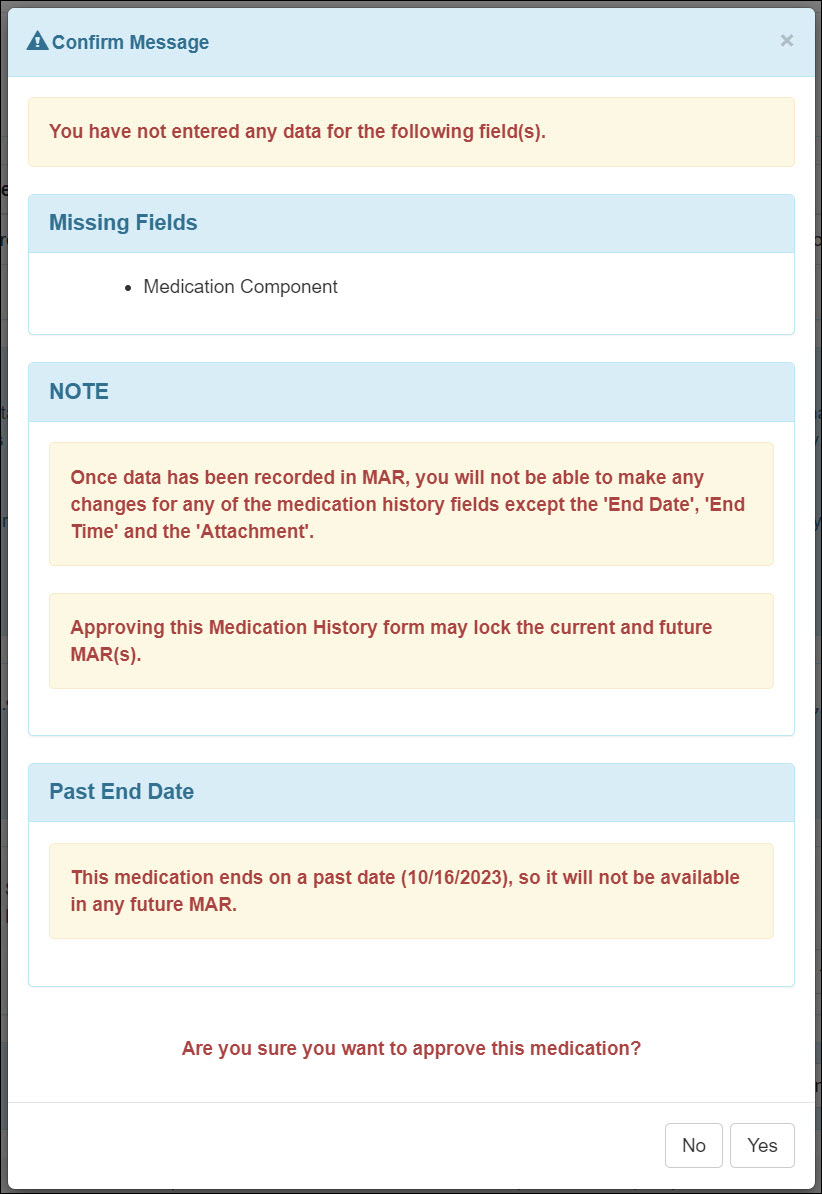
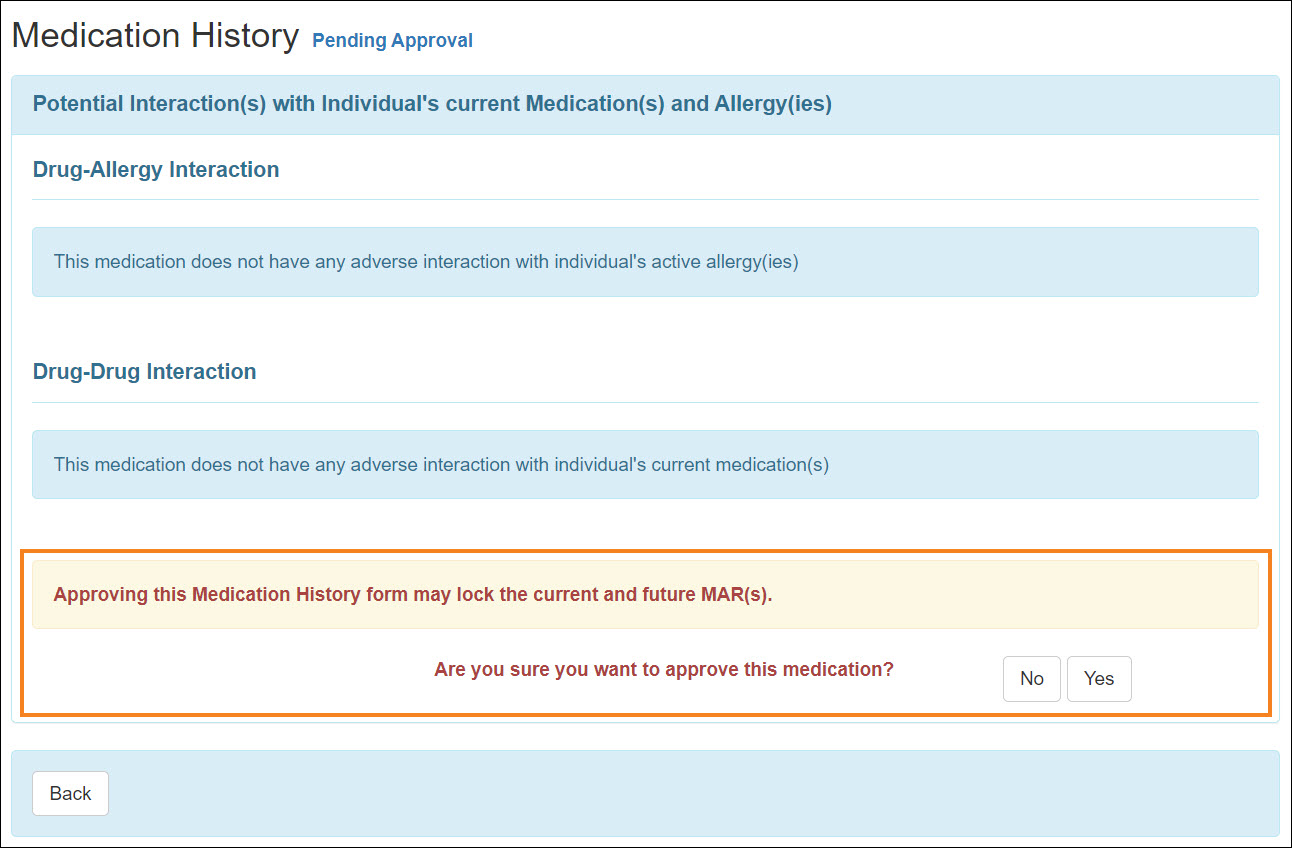
Submitting a Medication History form with all fields completed will skip the pop-up confirmation. - In the ‘Potential Interaction(s) with Individual's current Medication(s) and Allergy(ies)’ section that appears when submitting a Medication History form, the following changes have been made:
- The following note will no longer be displayed while attempting to submit Medication History forms:
‘Submitting this Medication History form may lock the current and future MAR(s).’ - The following note will be displayed when attempting to approve Medication History forms:
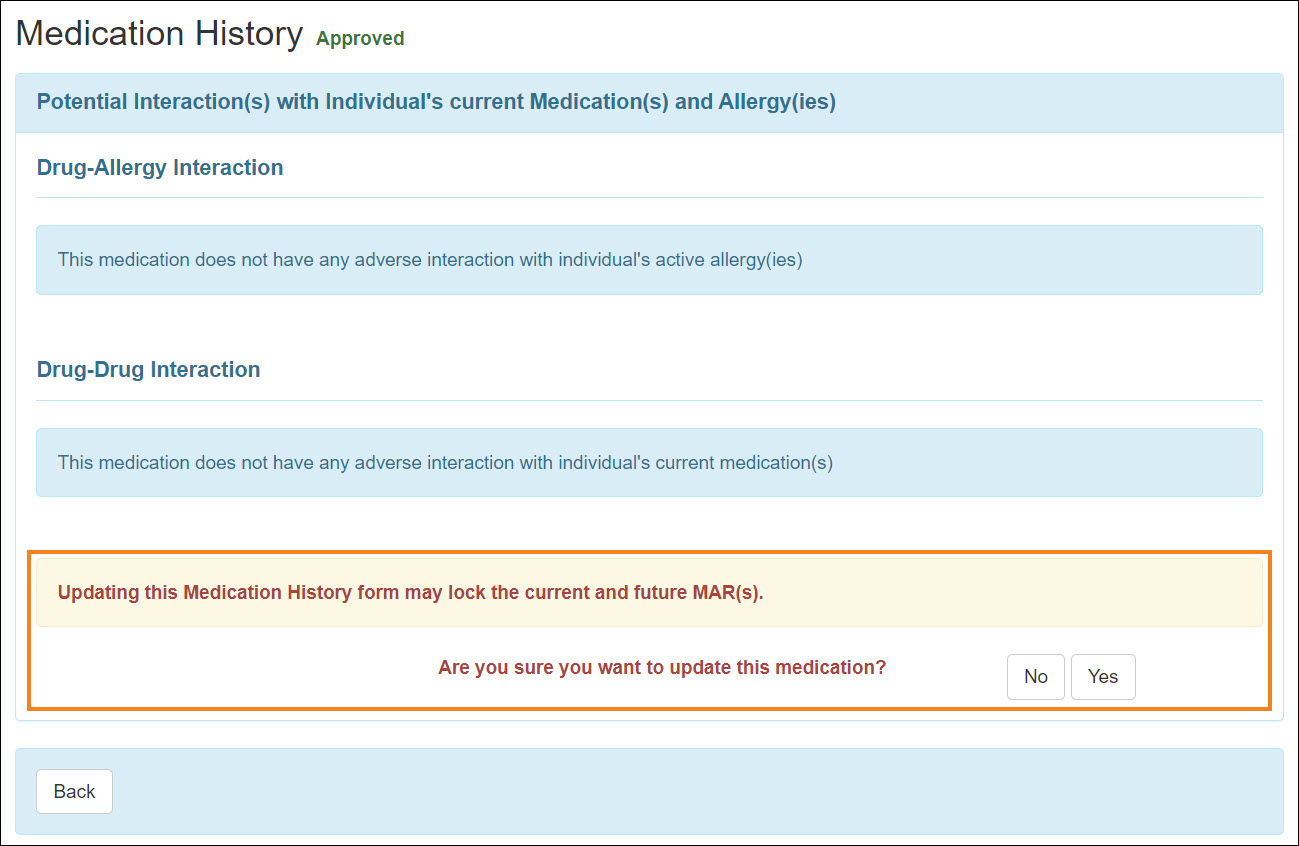
‘Approving this Medication History form may lock the current and future MAR(s).
Are you sure you want to approve this medication?’
- The following message will be displayed while attempting to update Approved Medication History forms:
‘Updating this Medication History form may lock the current and future MAR(s).
Are you sure you want to update this medication?’
- The following note will no longer be displayed while attempting to submit Medication History forms:
- The Copy Current Form (For Same Individual), Copy Current Form (For Different Individual), and Display PDF links at the bottom of the Medication History form will only be displayed in read-only mode.
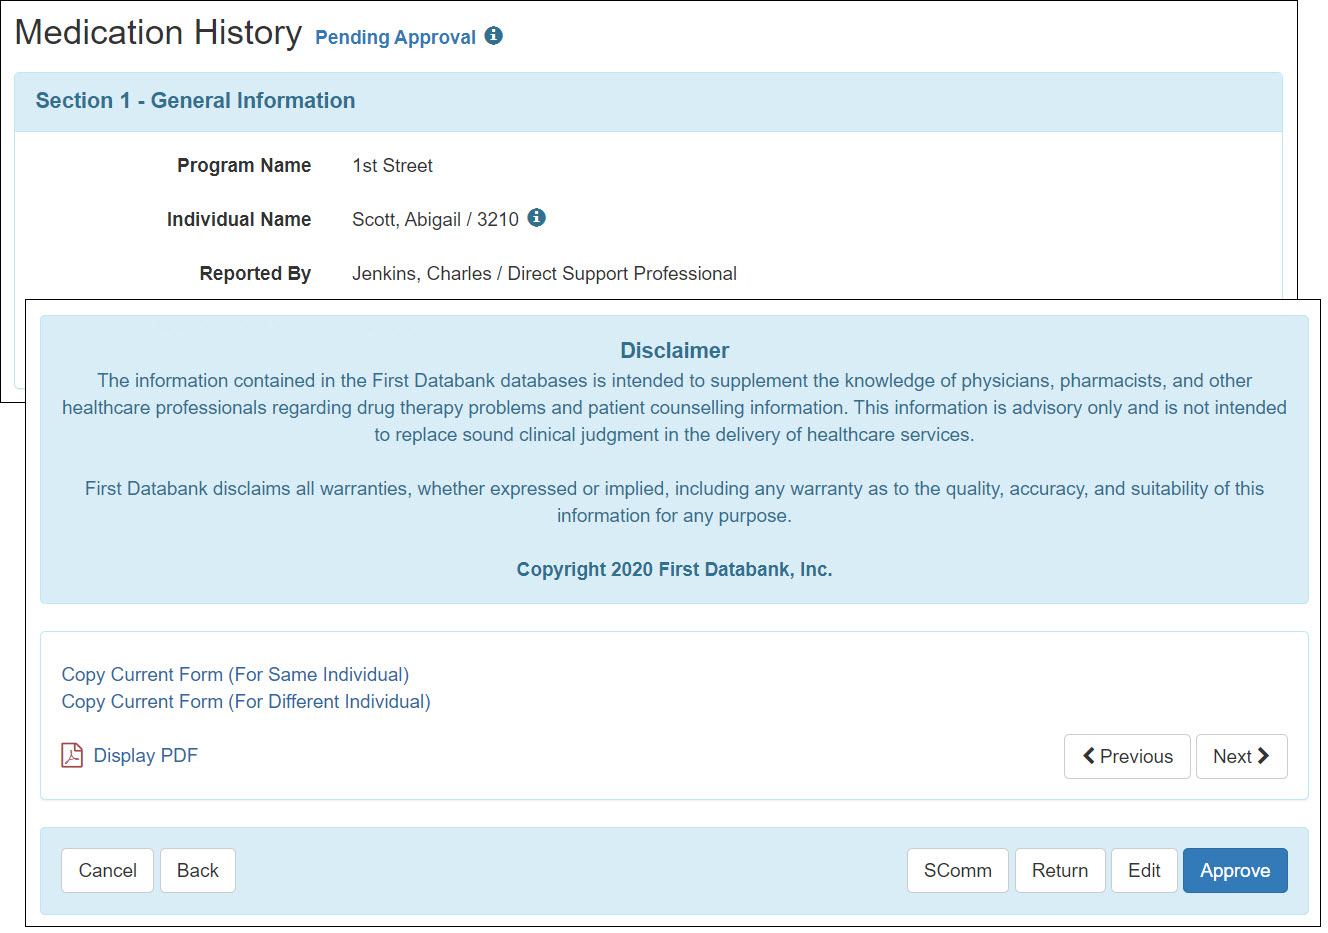
On the success page, users with the Medication History Submit caseload-based role will have access to the Medication History, Copy Current Form (For Same Individual), and Copy Current Form (For Different Individual) links. However, after deleting a Medication History form, the Copy Current Form (For Same Individual) and Copy Current Form (For Different Individual) links will no longer be shown.
- The following changes have been made to the pop-up displayed after clicking on the ‘i’ information icon of the Medication History form:
- Only Form ID and Time Zone information will be shown in New Medication History forms.
- Entered By has been renamed to Created By.
- Submitted By and Returned By information for user’s actions have been added.
- For Medication History forms approved before the release, the Submitted By field will now show the Approved By information.
- Last Updated By will now be available after the first save or submit actions.
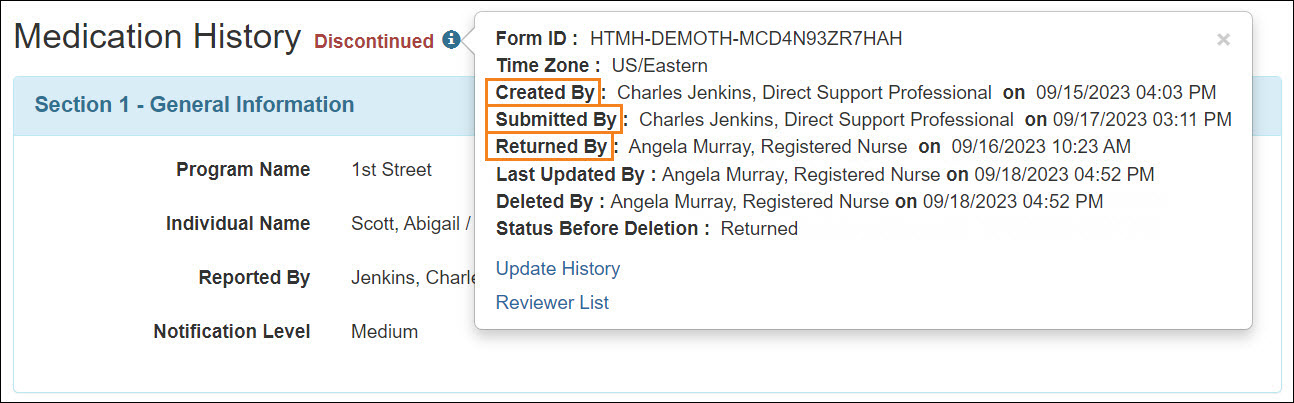
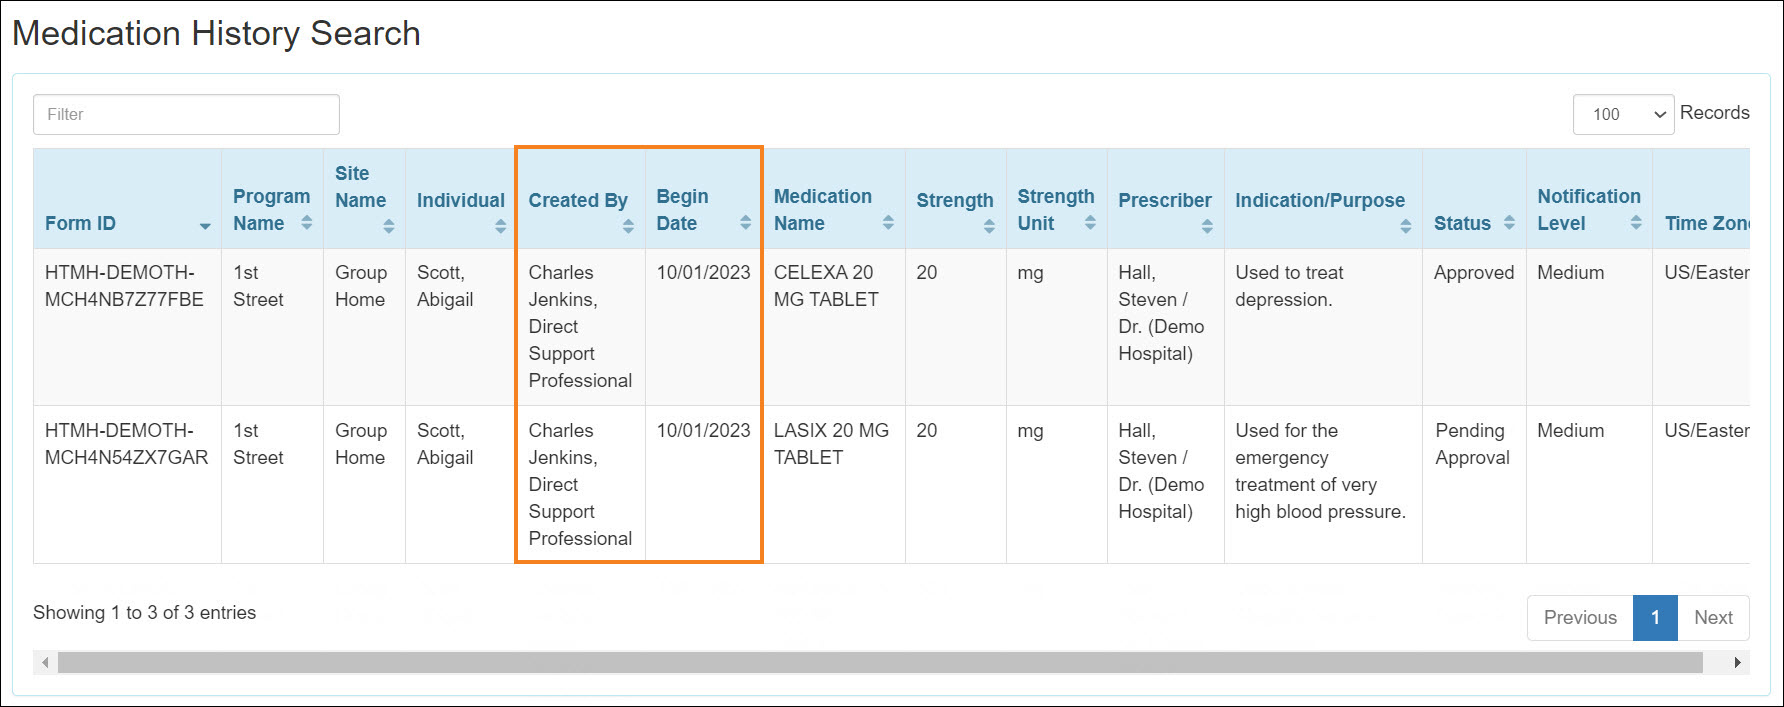
The updated information will also be displayed in the Display PDF and the Update History archives. - The following changes have been made to the ‘Medication History Search’ page:
- The Entered By field has been renamed to Created By.
- The Submit Date From and To fields have been removed.
- Begin Date From and To fields have been added.
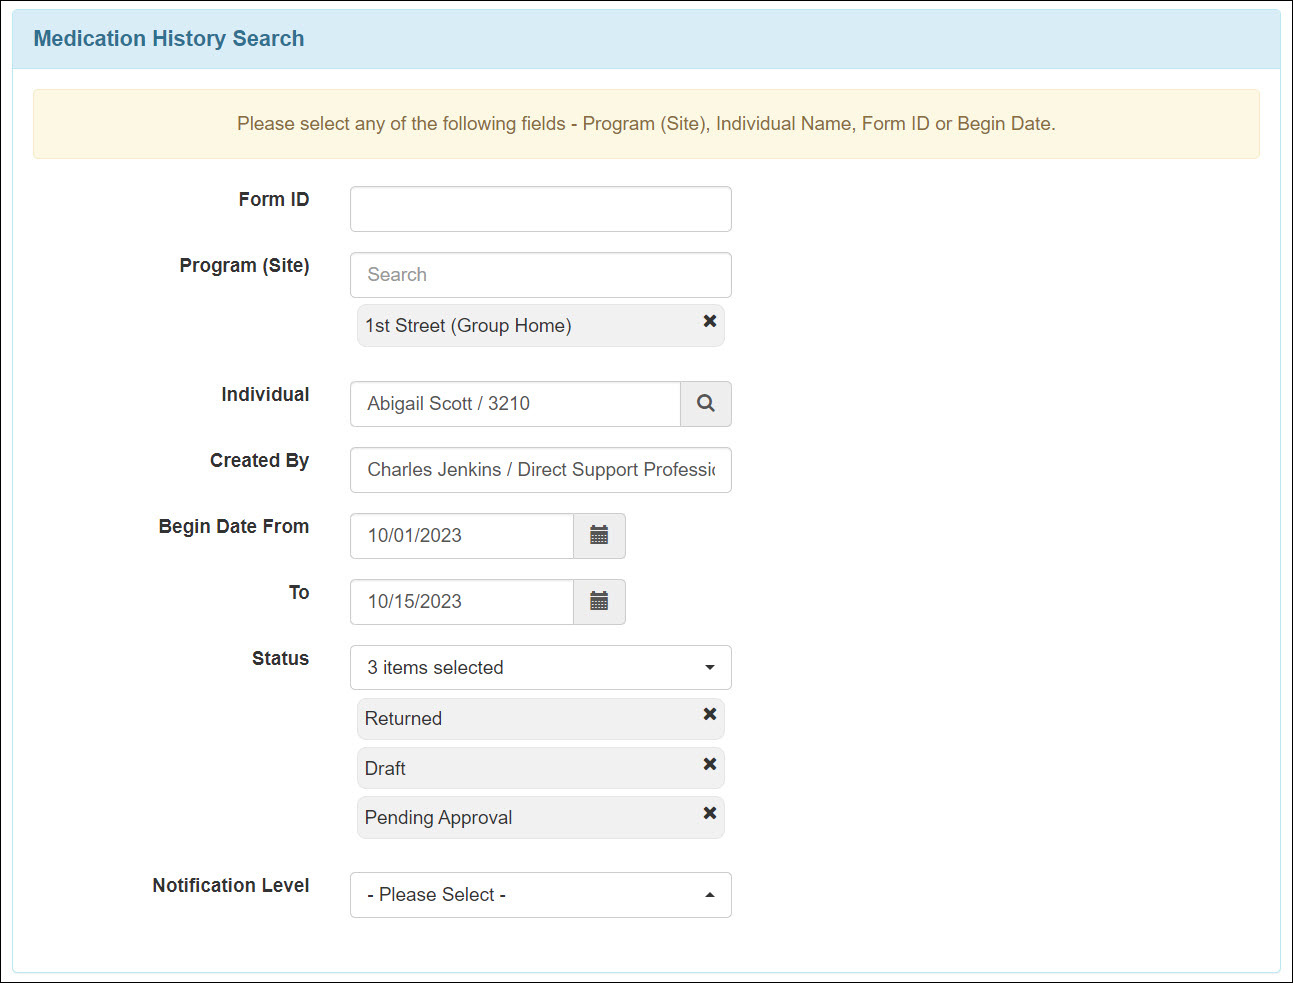
- The following changes have been made to the ‘Medication History Search’ results page:
- The Entered By column has been renamed to Created By.
- The Date column has been removed and the Begin Date showing the Begin Date of the Medication History form has been added.
The revised column names will be reflected in both the Excel Exports and detailed reports for Medication History.
- Users will now receive counts on the To Do tab for the Medication History forms for all the individuals they have access to through their assigned caseloads. The following counts will be displayed:
- Draft
- Returned
- Pending Approval

- The Archive link for the Medication History option is no longer available. To view the current and previous archive versions, users will have to refer to the Update History of the Medication History forms.
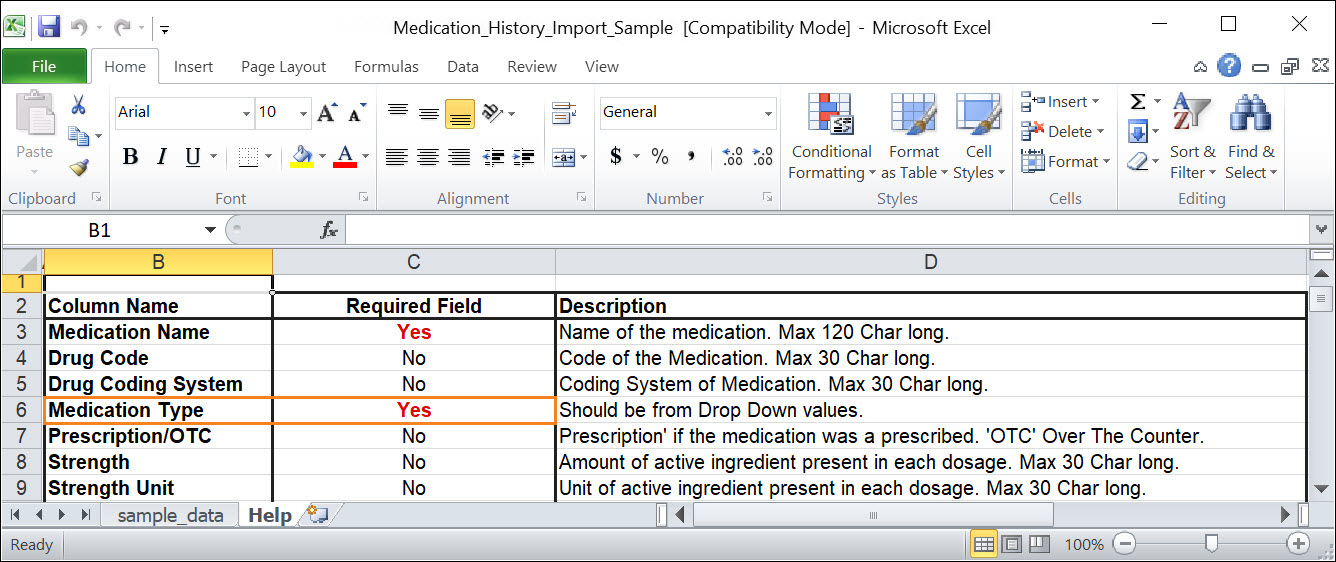
- As Medication Type is now a required field for the Medication History form, if users import Medication History forms without selecting the Medication Type, they will receive an error message.
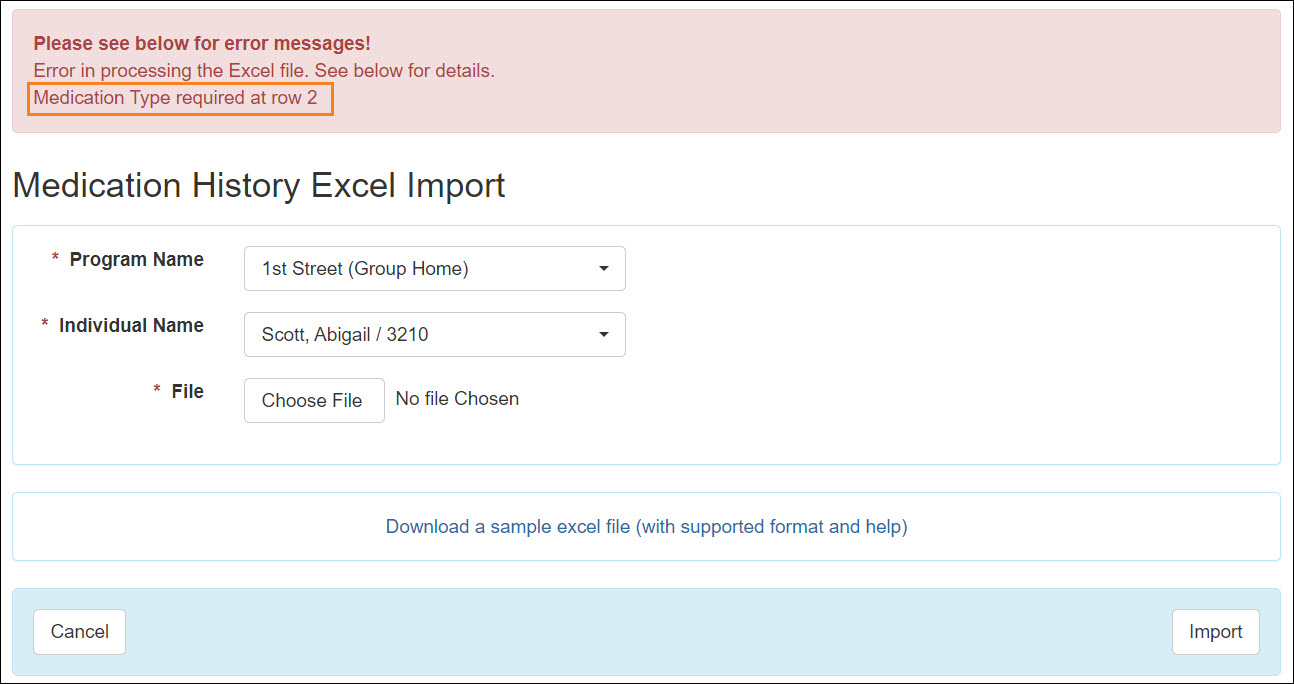
In the ‘Help’ sheet of the Medication History Excel Import Sample Excel file, Medication Type will now be displayed as a required field.
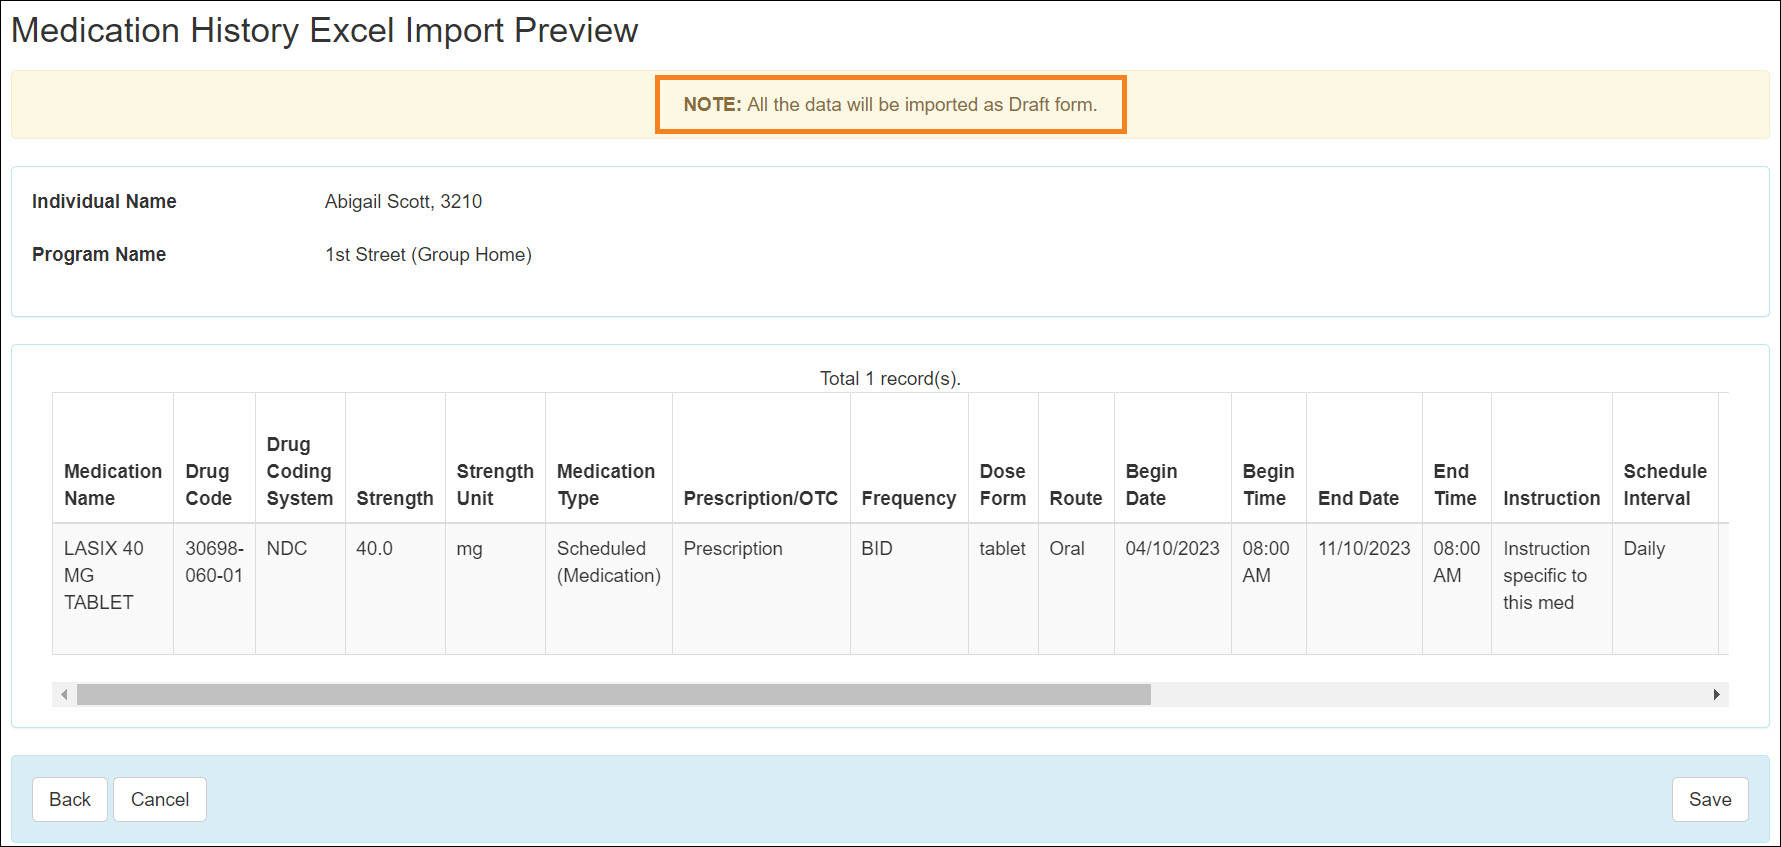
- Medication History forms will now be imported in the Draft status. In the ‘Medication History Excel Import Preview’ page, the Note on top has been updated to:
‘Note: All the data will be imported as Draft form.’
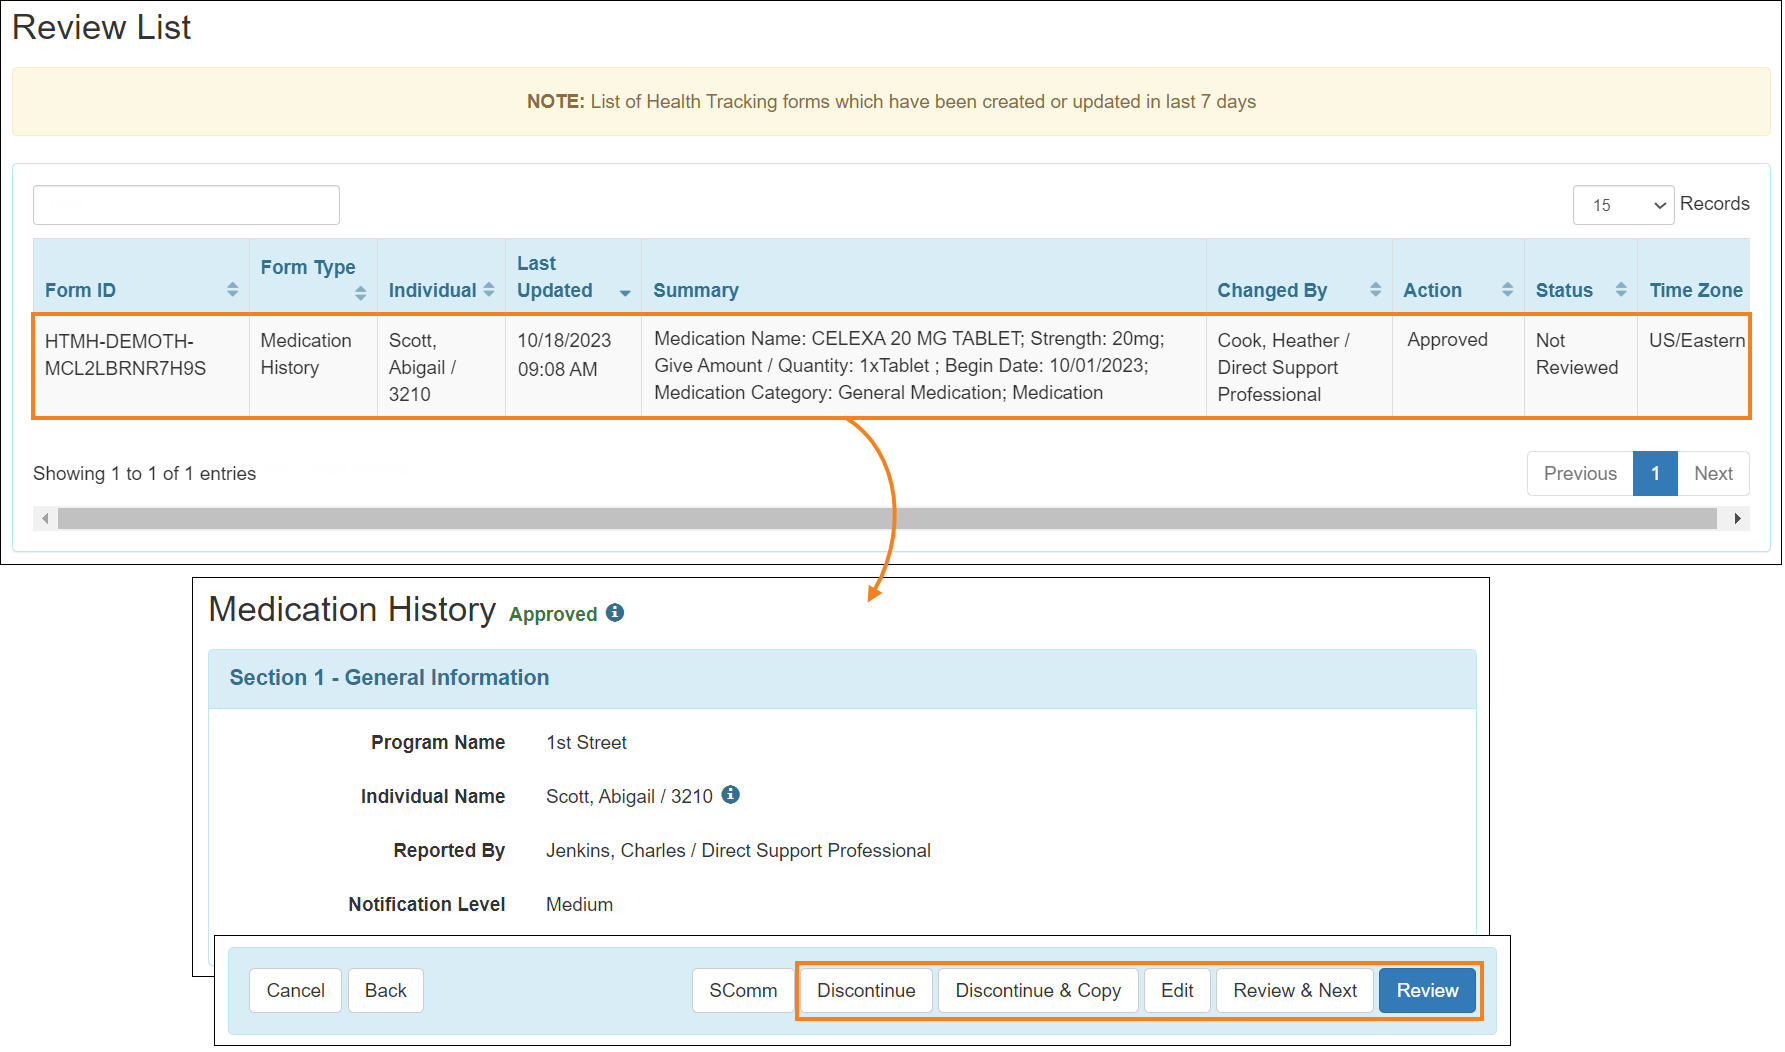
- In the ‘Review List’ page of the Health Tracking Review for Medication History, the following actions will now be applicable for the newly created Medication History forms in the Action column:
- Saved
- Submitted
- Returned
- Updated
- Approved
- Discontinued

- Medication History forms accessed from the Health Tracking 'Review List' page will now display the available action buttons depending on a user's role, including the Review and Review & Next buttons.
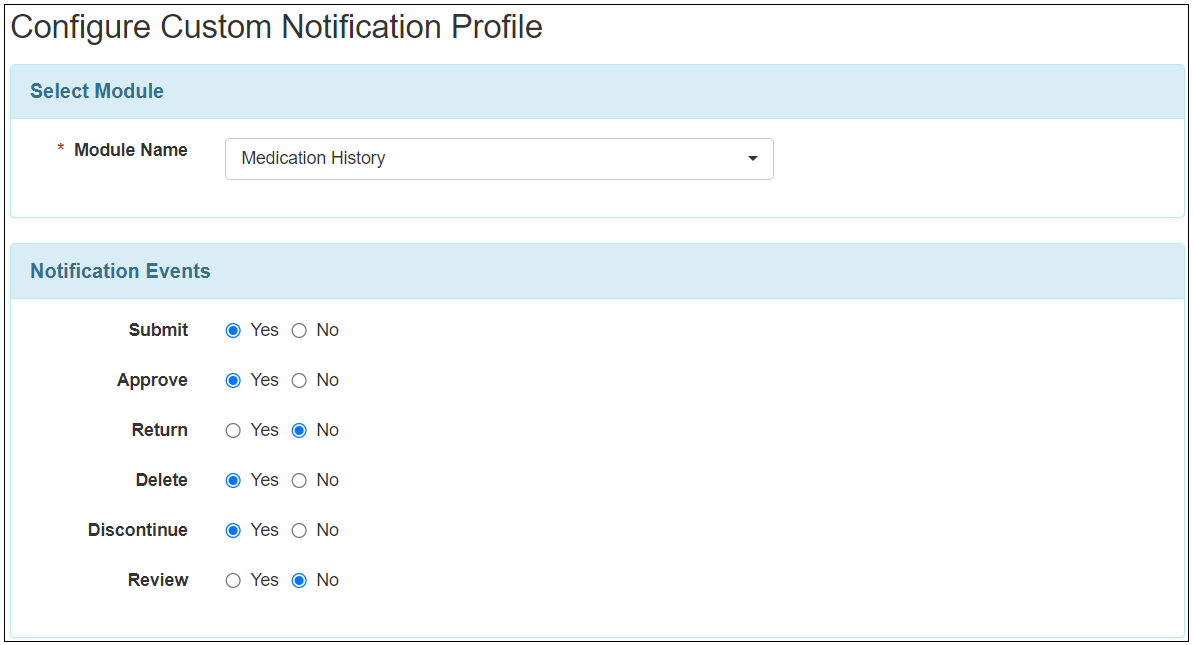
- Users will now require the Medication History caseload-based roles to access the notifications for the Medication History module. Users with only Health Tracking (HT) roles will no longer have access to Medication History module notifications.
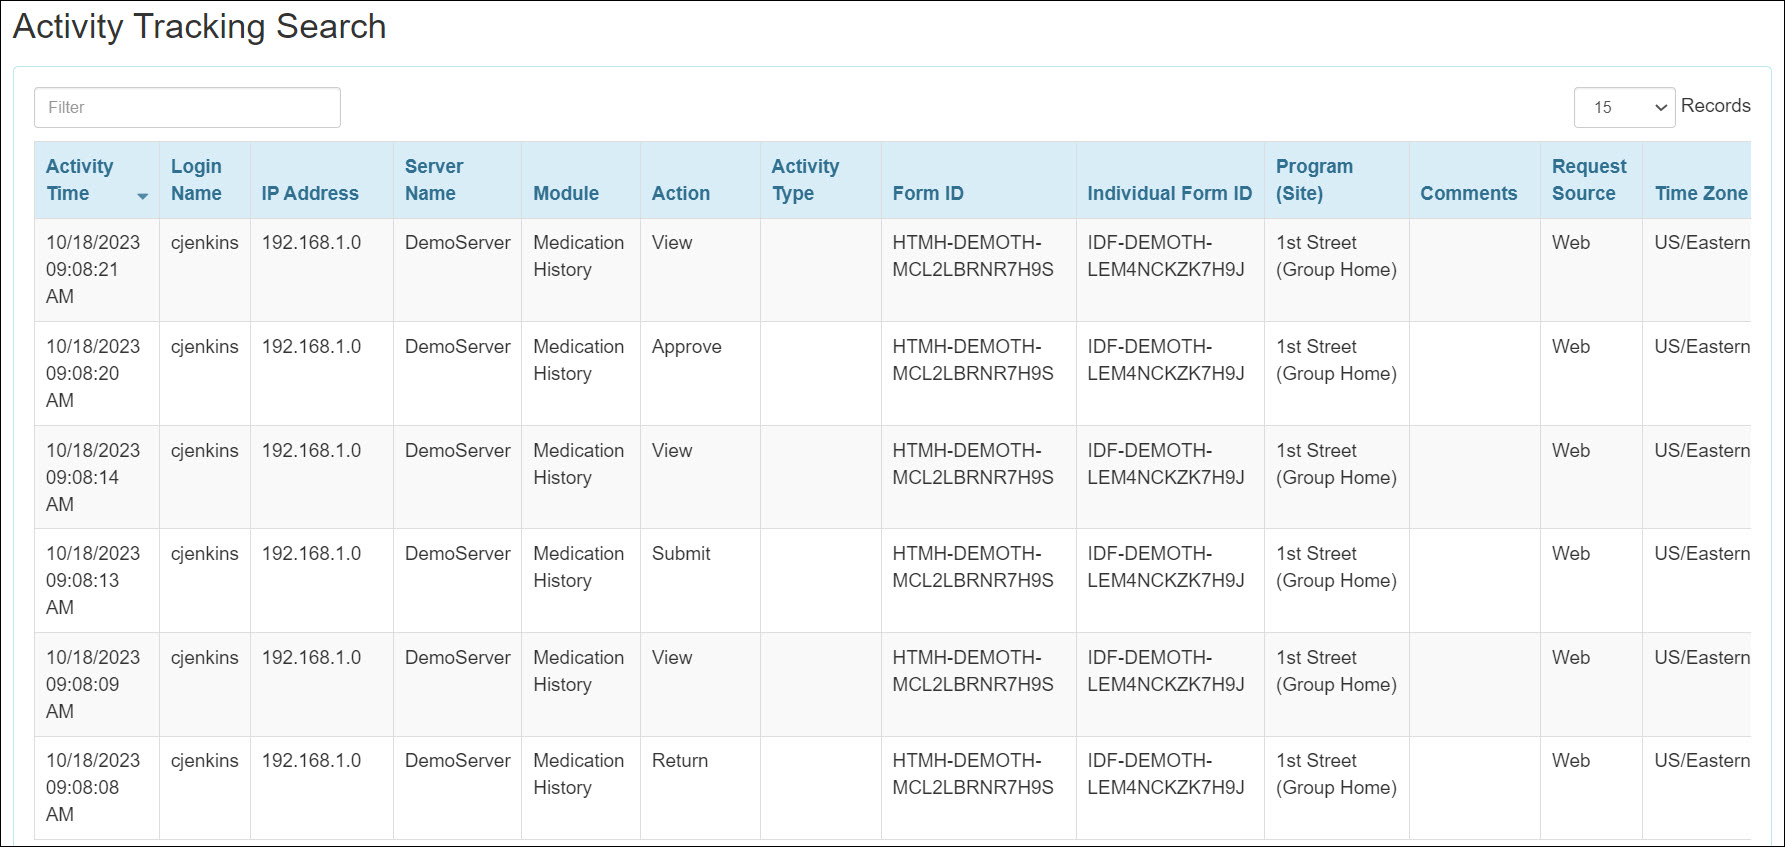
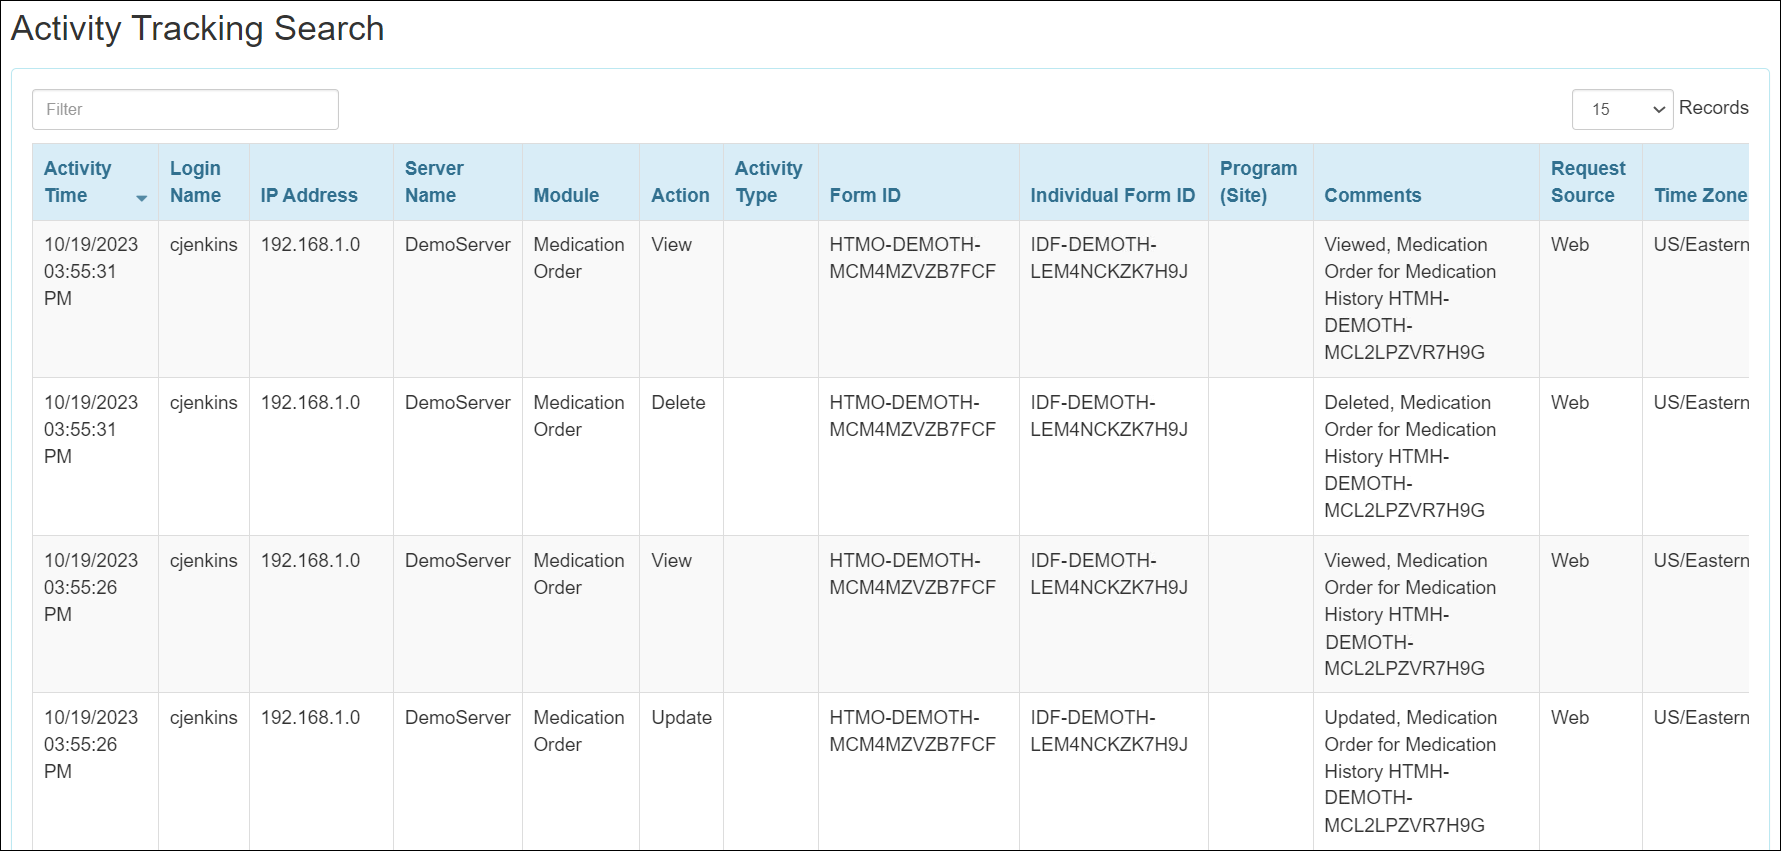
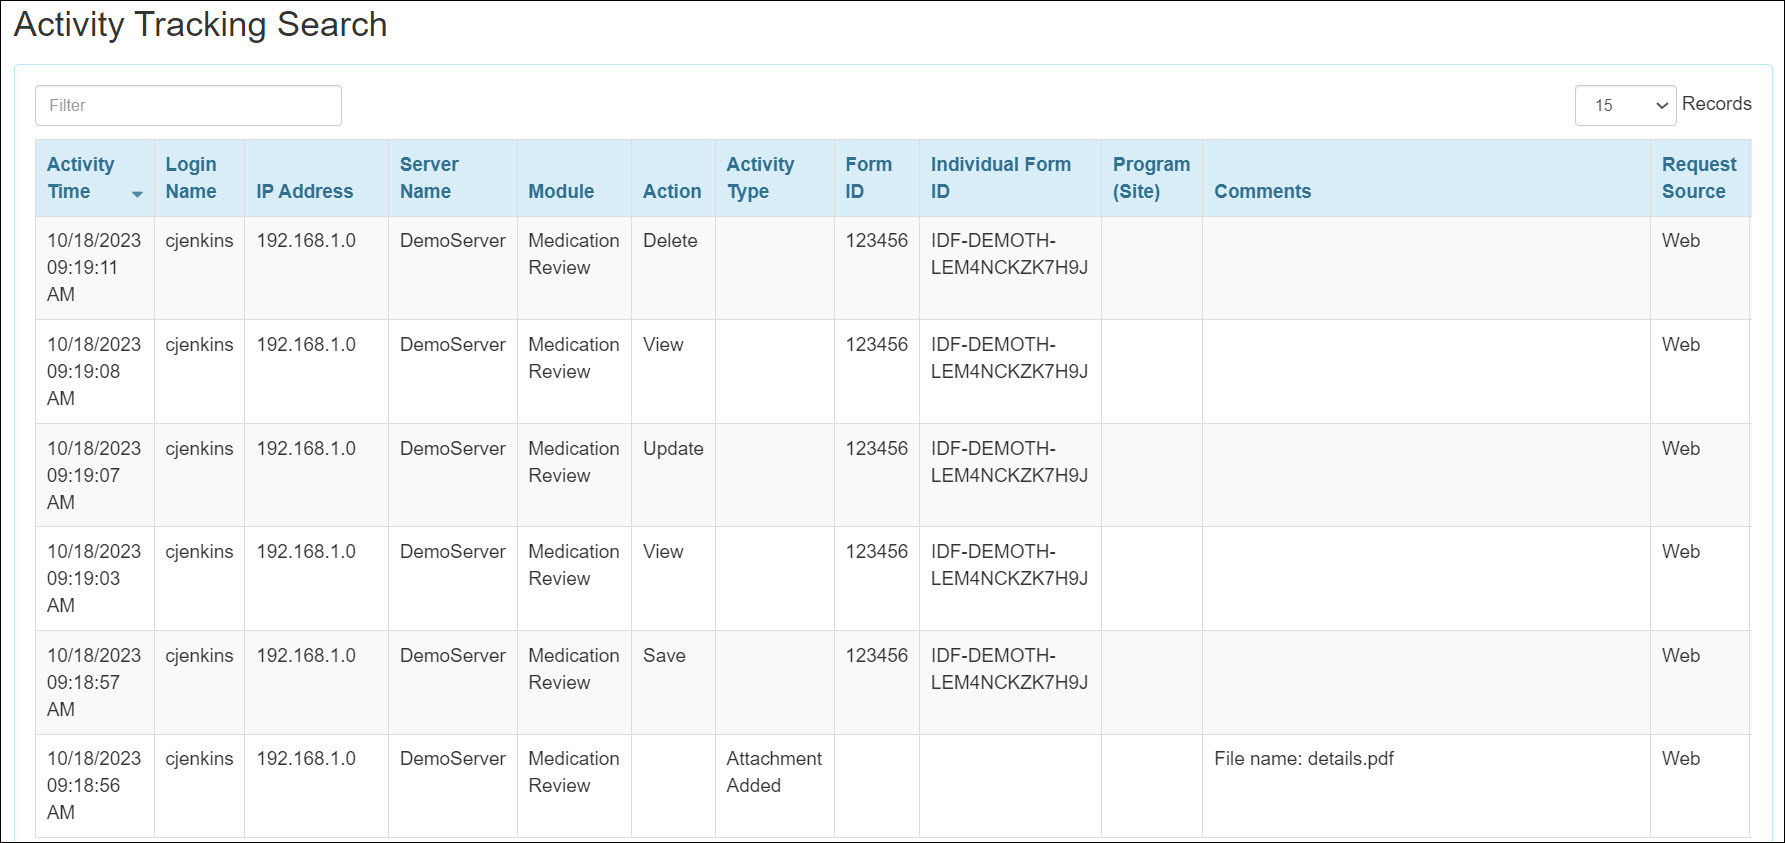
- Users will now be able to view the Medication History activities by performing the Activity Tracking Search for the Medication History module. Reviewing Medication History forms using the Health Tracking Review option, the Module name will be published as ‘Medication History’.
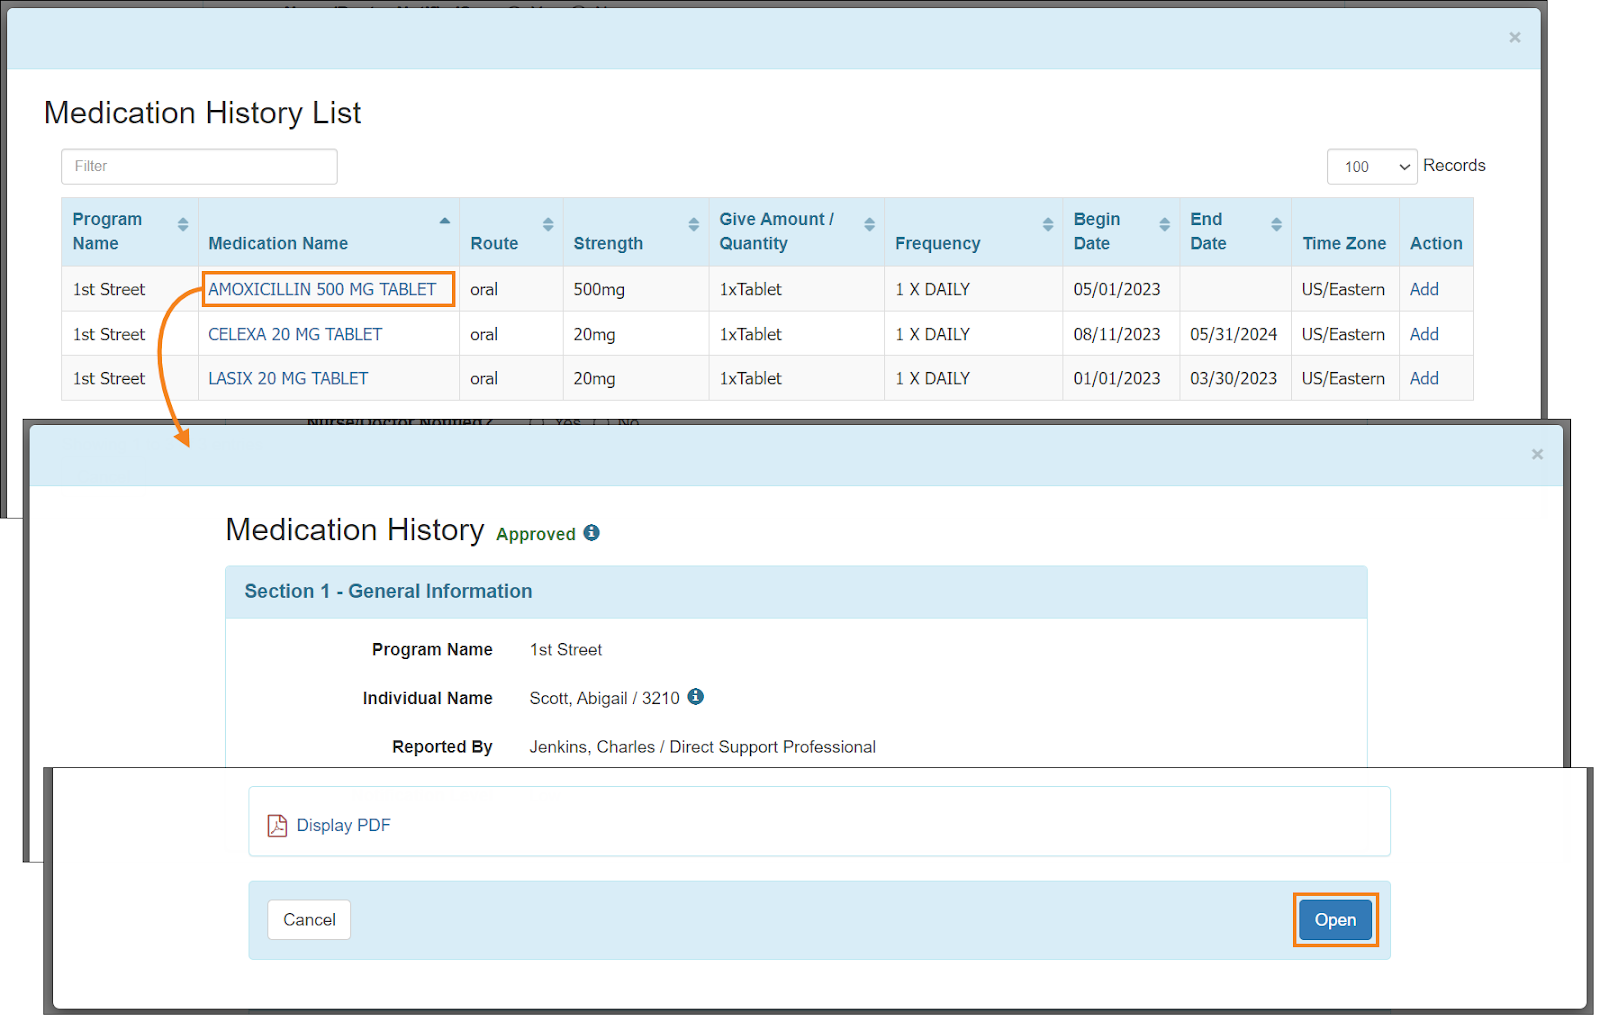
- The Edit button at the bottom of Medication History popup forms accessed from the 'Medication History List' window in GER, Blood Glucose, Infection Tracking, and SComm modules has been renamed to Open.
- Users will need the appropriate Medication History roles assigned to be able to access the Medication History forms in Health Tracking Detailed and Monthly Reports. In the Health Tracking Monthly Report for Medication History, the Entered By column has been renamed to Created By.
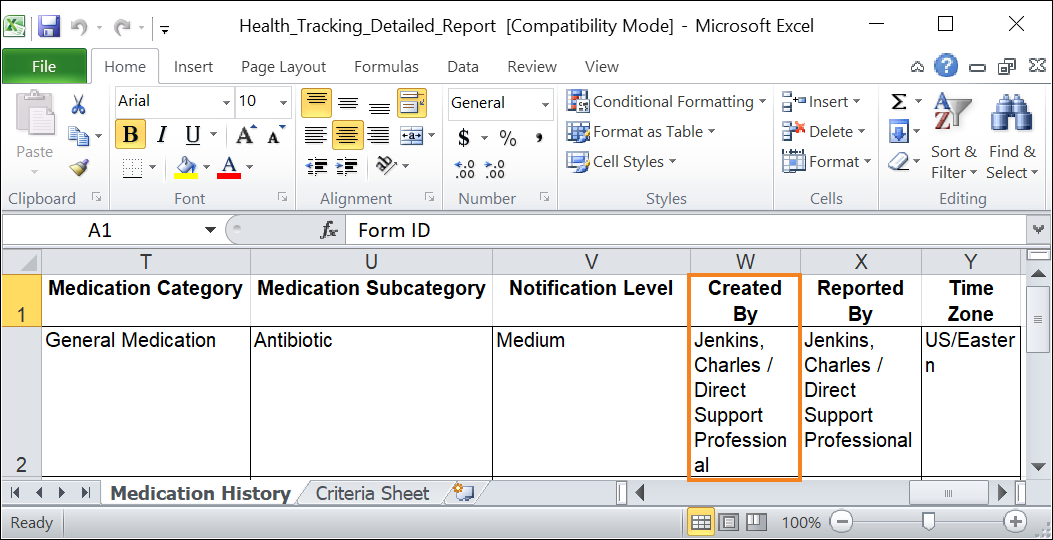
- In the Medication History Detailed Report excel, the following changes have been made:
- Entered By has been renamed to Created By.
- The column titled Report Date has been removed.
- Users assigned with both Medication History Submit and Medication History Approve caseload-based roles will now be able to directly Approve New, Draft, and Returned Medication History forms.
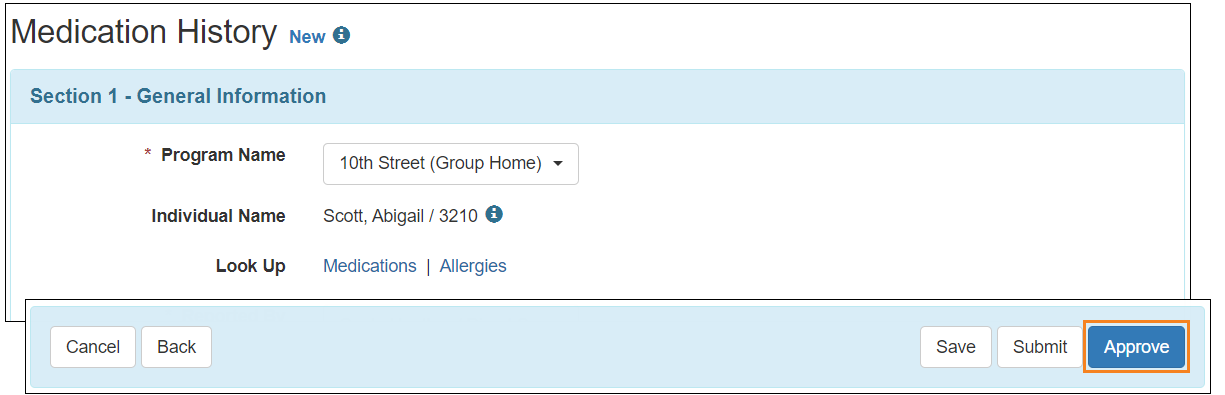
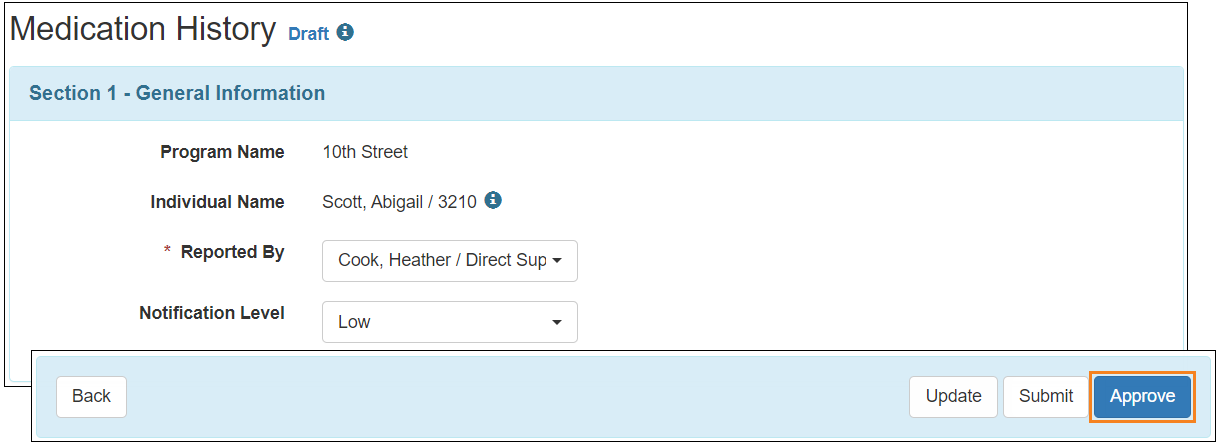
- After switching to the editable mode of Draft, Returned, and Pending Approval Medication History forms, users can now directly Approve Medication History forms if they have the appropriate roles assigned.
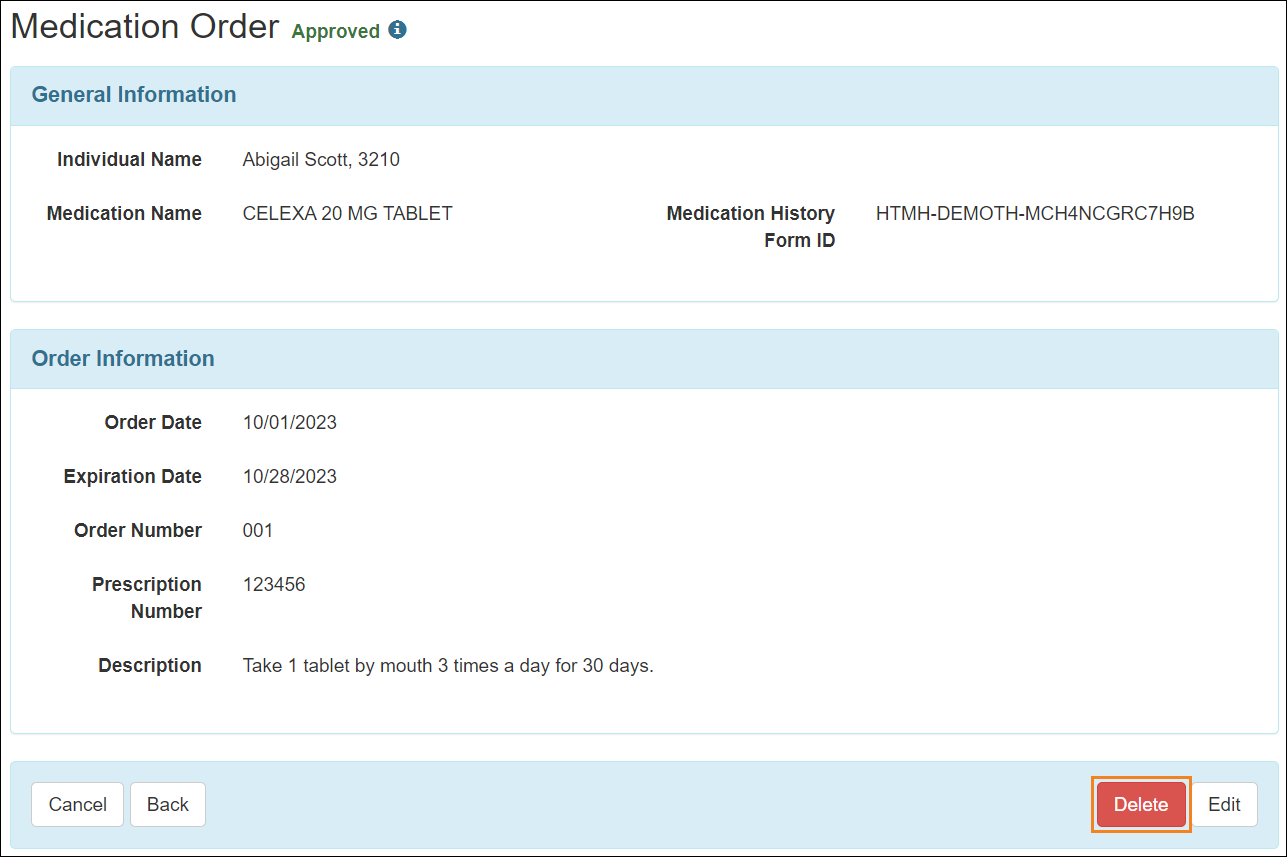
Medication Order
[Back to Top]- Users will now require appropriate Medication History caseload-based roles to access the Medication Order module. Users with only the Health Tracking (HT) roles will no longer have access to Medication Order.
- Medication Orders can be created only from the Medication History form’s read-only mode of the Medication History form.
- The Delete button has been shifted to the left of the Edit button on the Medication Order form and will now appear in red color.
- On the ‘Activity Tracking Search’ page, Medication Order has been added to the Module dropdown field and the following options have been added to the Action dropdown field for it:
- View
- Save
- Update
- Delete
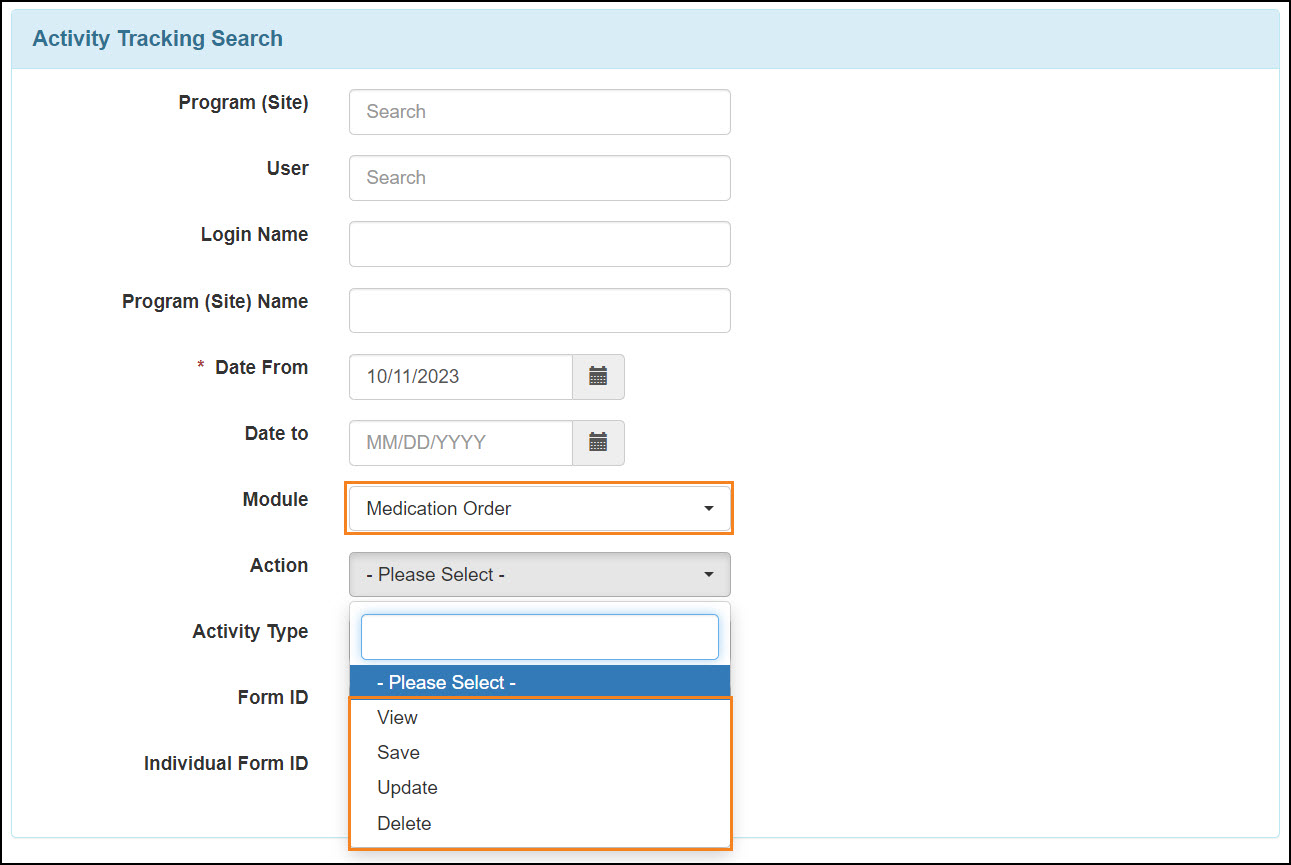
On the ‘Activity Tracking Search’ results page, users will be able to view the activities performed for a Medication Order form.
Medication Review
[Back to Top]- Users will now require appropriate Medication History caseload-based roles to access the Medication Review module. Users with only the Health Tracking (HT) roles will no longer have access to Medication Review.
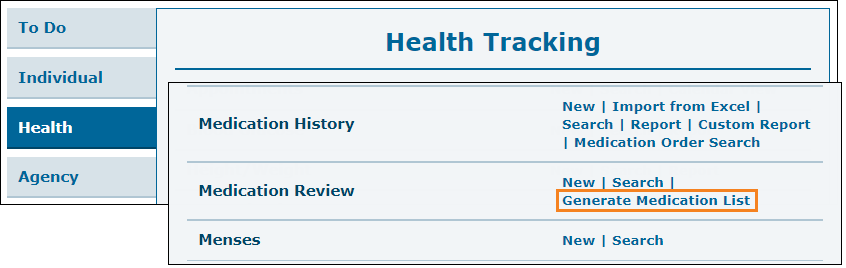
- The Create Review List link beside the Medication Review option on the Health tab has been renamed to Generate Medication List.
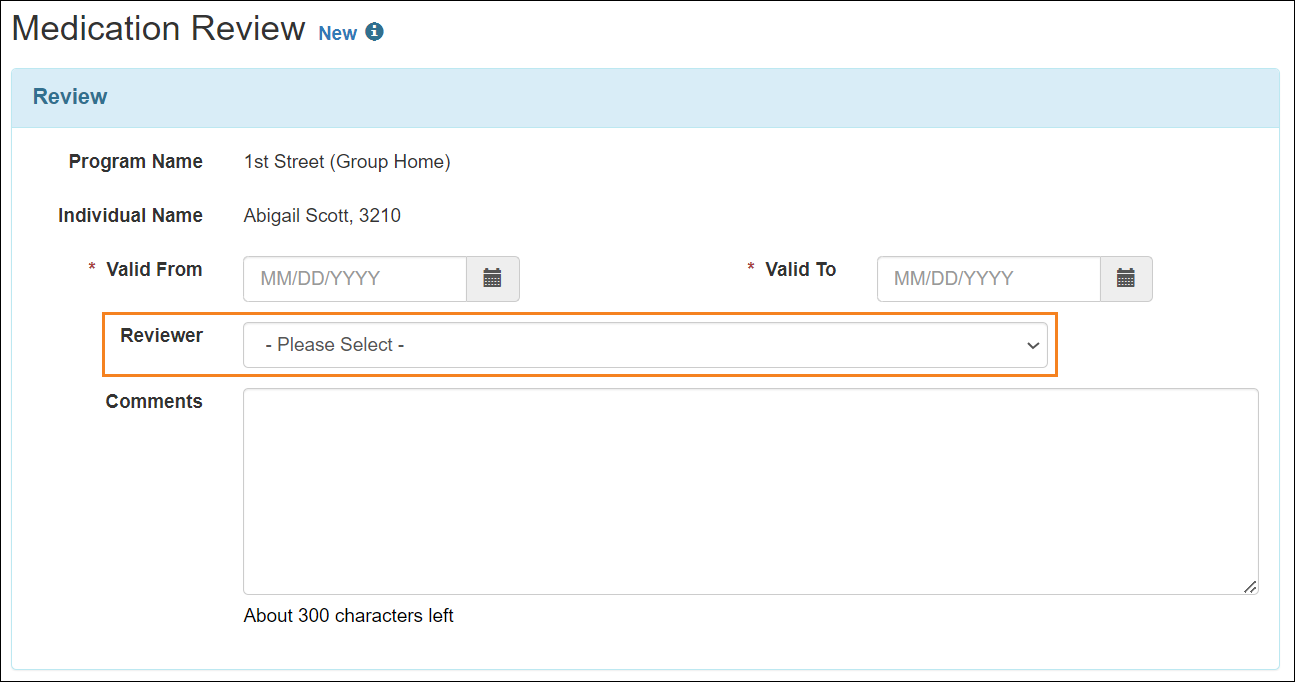
- The Reviewer (Physician) field of the ‘Medication Review’ form has been renamed to Reviewer. The following type of Shared Contacts will now also show in this dropdown field:
- Nurse Practitioner
- Pharmacist
- Physician's Assistant
- The Delete button has been shifted beside the Edit button on the Medication Review form and will now appear in red color. The Delete button will no longer be displayed in the editable mode of the Medication Review form.
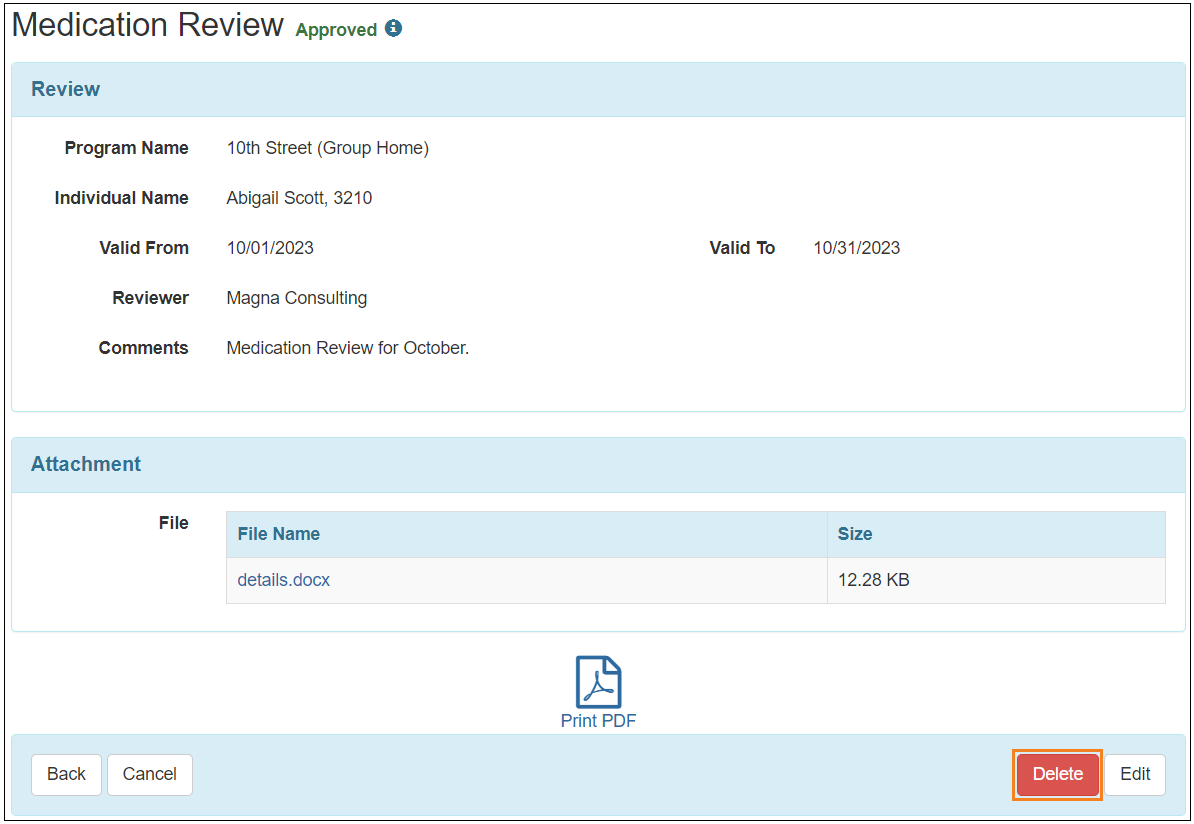
A confirmation message will appear upon clicking on the Delete button stating:
‘Are you sure you want to delete this form?’

- In the ‘Activity Tracking Search’ results page, the View action for viewing the Medication Review module will now be displayed in the Action column.
Notification
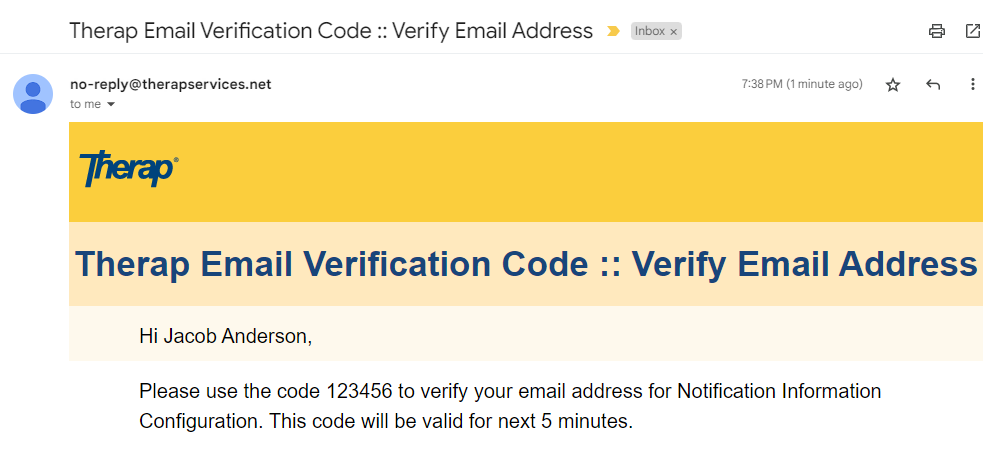
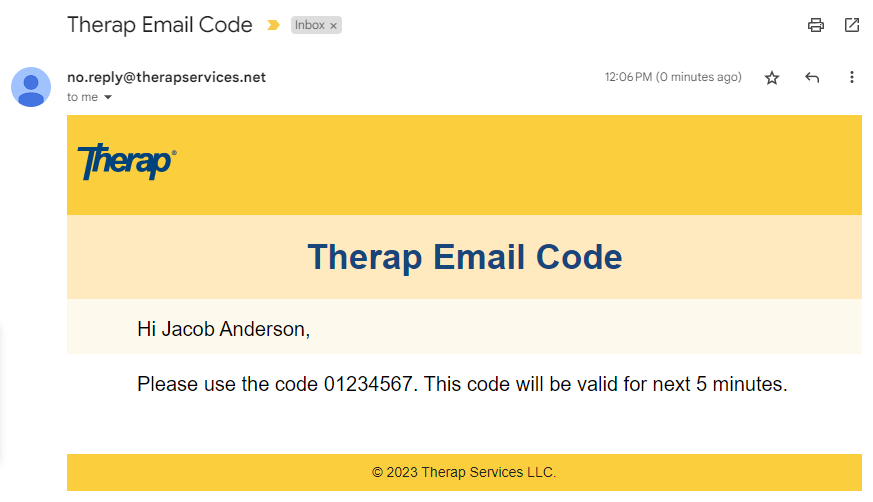
[Back to Top]- The user interface of the Therap Email Verification Code emails containing the OTP for the verification of the Notification Information Email and Phone/Text Message Emai have been updated.
Password Policy
[Back to Top]- After saving Password Policy, administrators will now see a success message with a Go to Dashboard link.

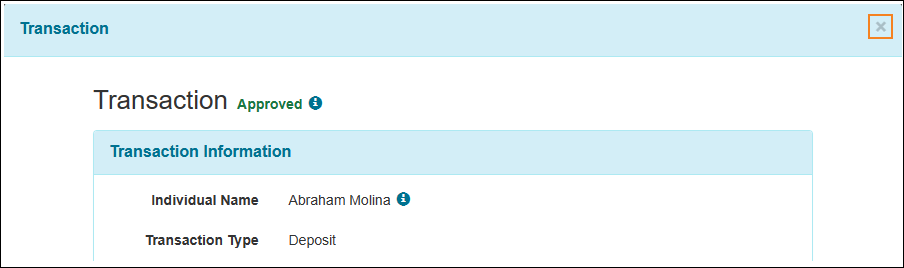
Personal Finance
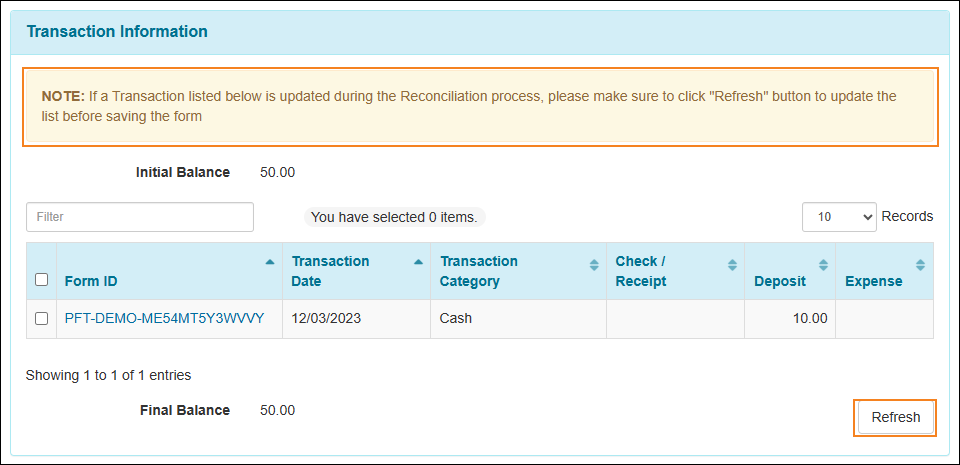
[Back to Top]- Edits made to the transactions during the reconciliation process will now reflect in the ‘Transaction Information’ section of the Personal Finance Reconciliation form.
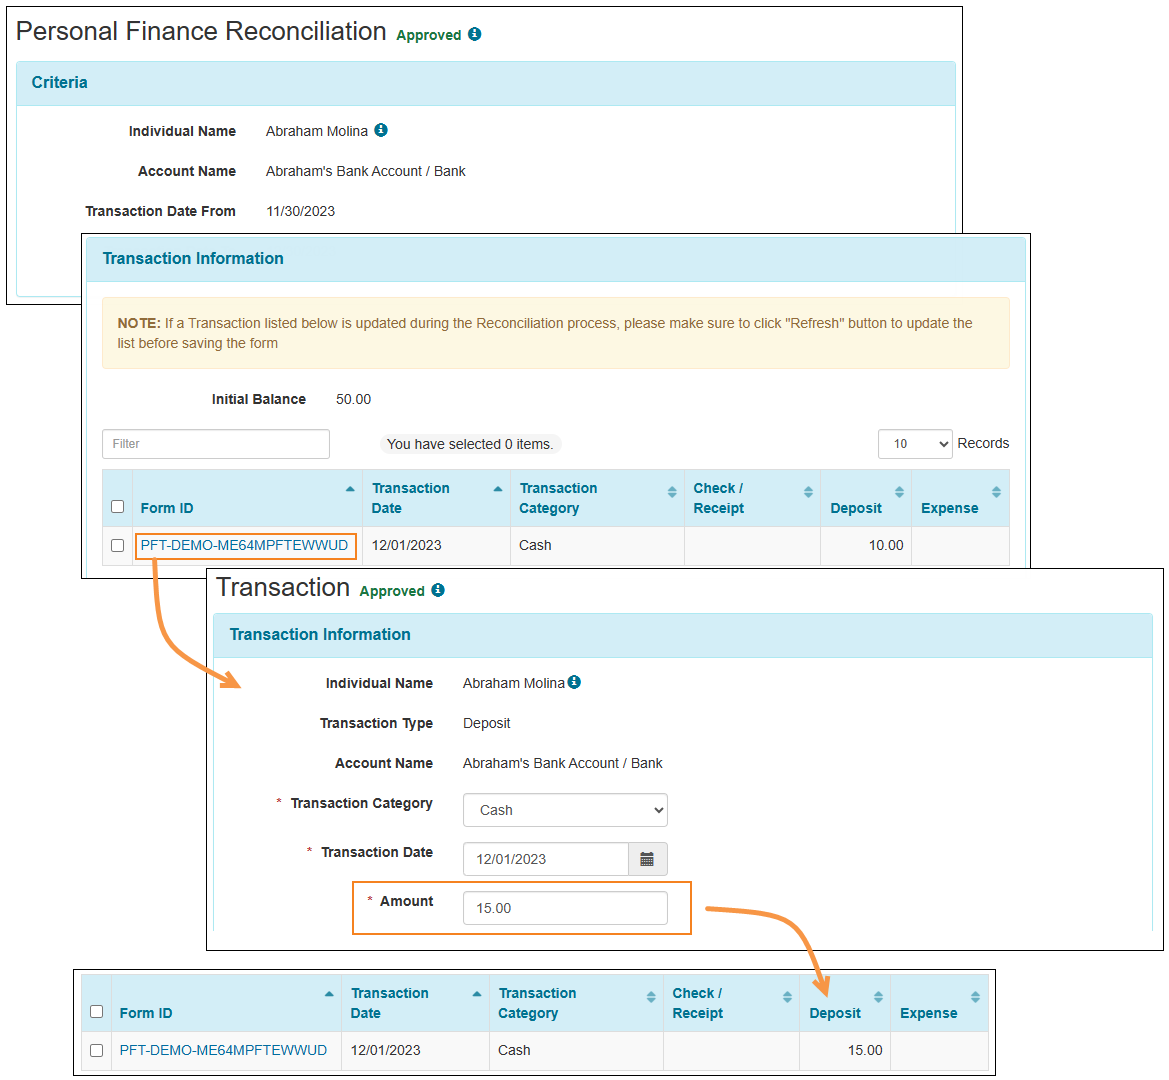
The changes will automatically appear in the Personal Finance Reconciliation form when users close the Transaction pop-up after making changes.
- A new Refresh button has been added to the ‘Transaction Information’ section of the Personal Finance Reconciliation form. Users can now see the updated information on the ‘Transaction Information’ section for the changes made in the Transaction form, by clicking the Refresh button.
Also, the following message will now be displayed above the list of Transactions:
‘NOTE: If a Transaction listed below is updated during the Reconciliation process, please make sure to click the Refresh button to update the list before saving the form.’
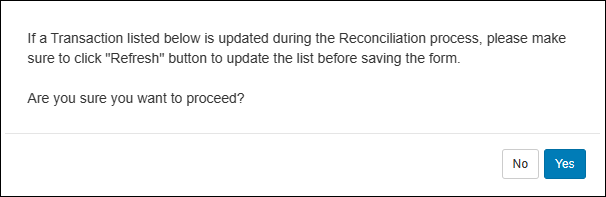
- The system will now show a message requesting the users to refresh the list of Transactions before saving the Personal Finance Reconciliation form.
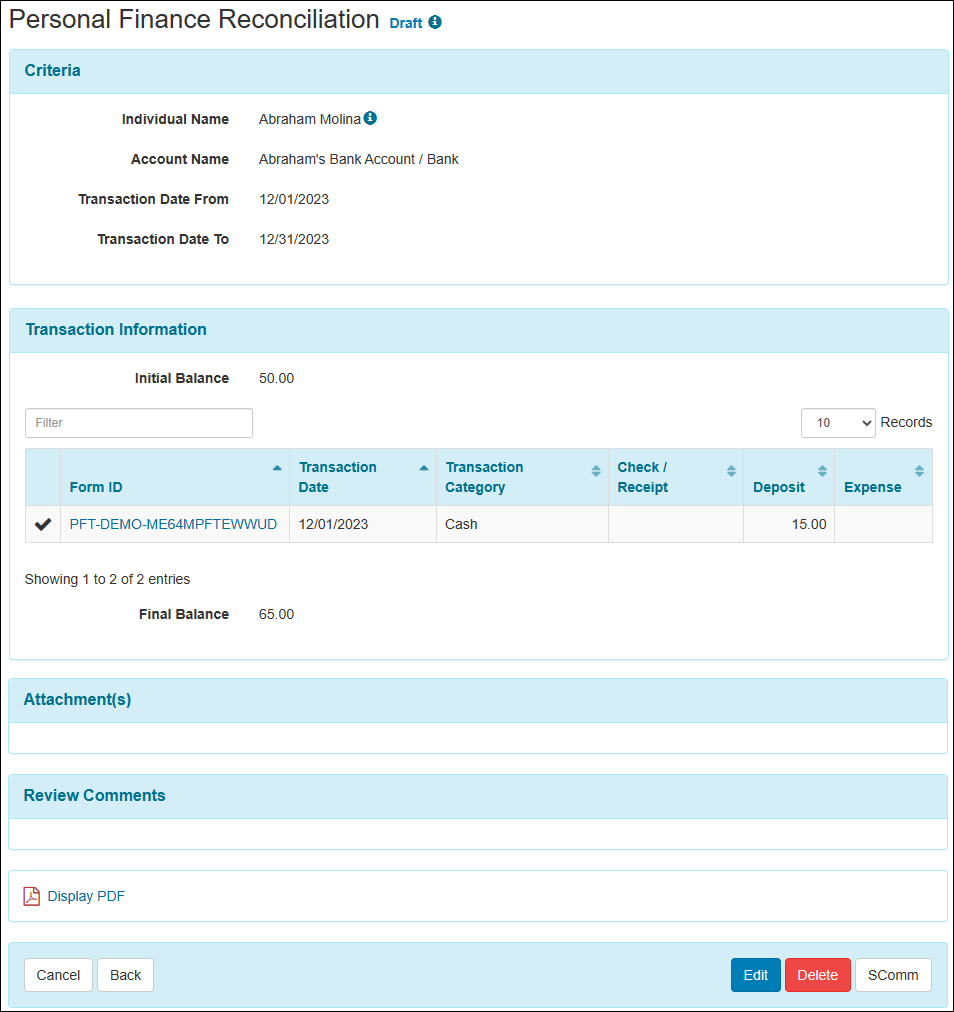
Once the form is saved, the draft Personal Finance Reconciliation form will appear in a 'Read-Only' mode. Further changes can be made to the form by clicking on the Edit button.
- Multiple users cannot edit the Personal Reconciliation form simultaneously. If one user is currently editing the Reconciliation form, and another user attempts to make changes, the latter user will encounter an error message.

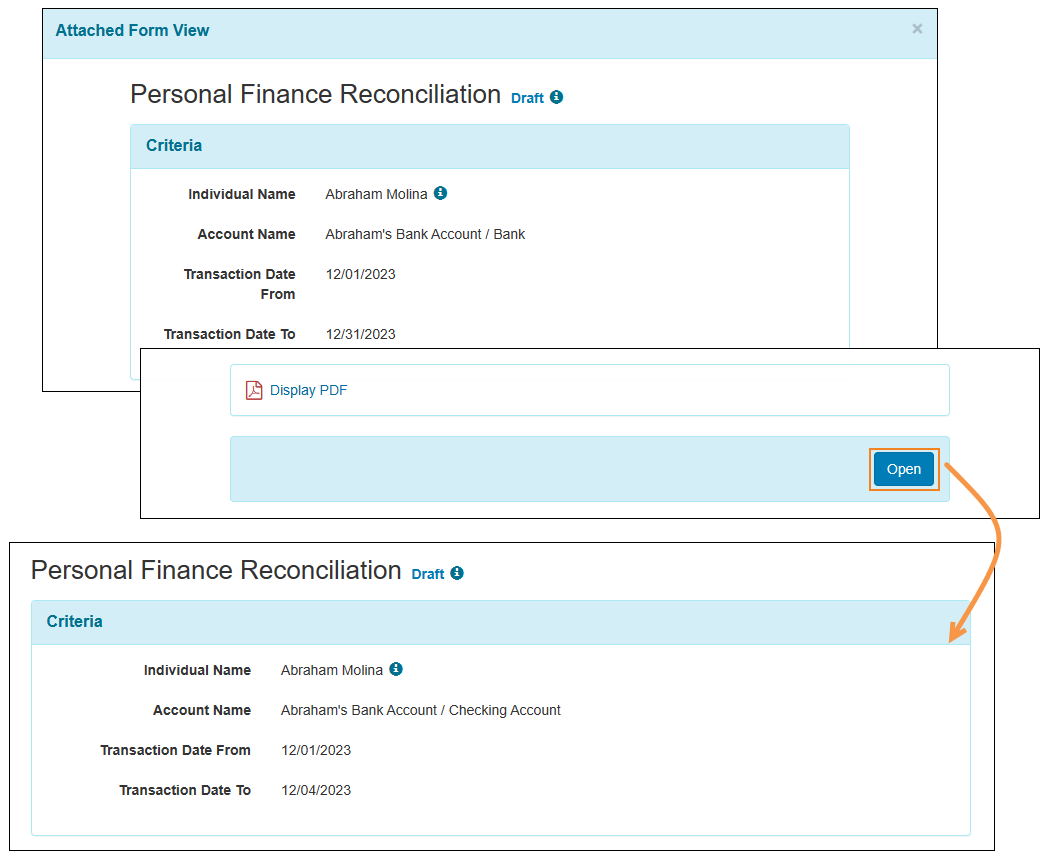
- The Edit button has been removed from the Personal Finance Reconciliation form attachment that appeared previously when users accessed the form through SComm. An Open button has now been added to the ‘Attached Form View’ page. Clicking on the button will redirect the users to the corresponding Personal Finance Reconciliation form.
Priority List
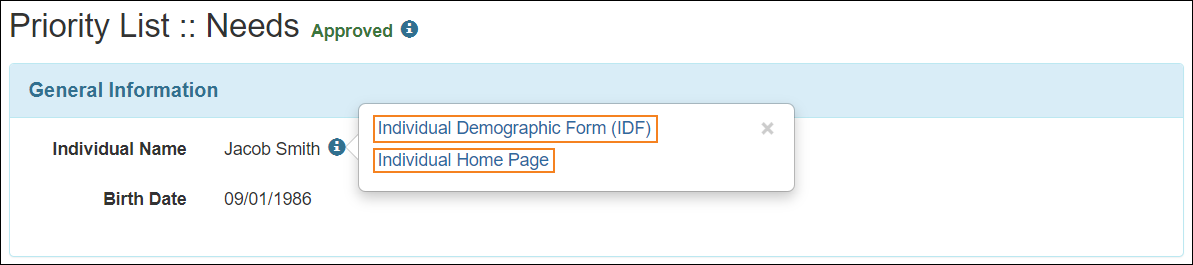
[Back to Top]- An ‘i’ icon has been added next to the Individual Name field on the Priority List form of all statuses containing the Individual Demographic Form (IDF) and the Individual Home Page links, which will be available to the users with the appropriate roles.
- A new table view with a Filter field has been added to the table in the ‘Select a Priority List’ section of the ‘Priority List for (Individual’s name)’ page.

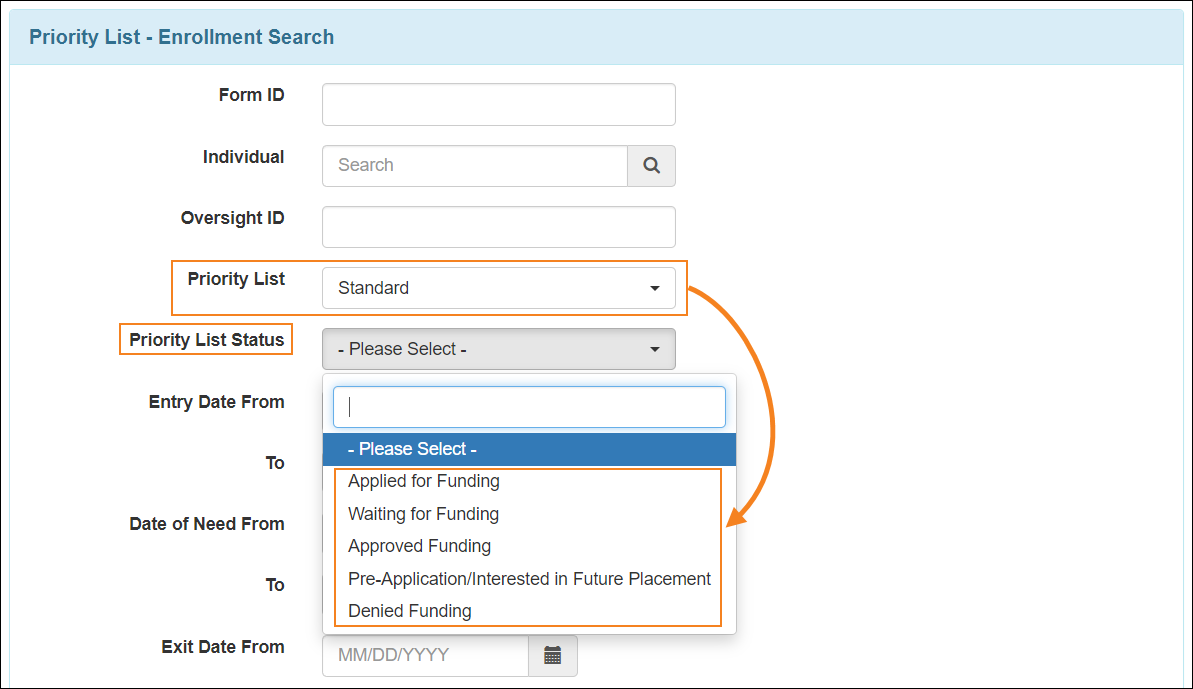
- The options for the dropdown list of the Priority List Status field will depend on the selected option for the Priority List field in the ‘Priority List - Enrollment Search’ page.
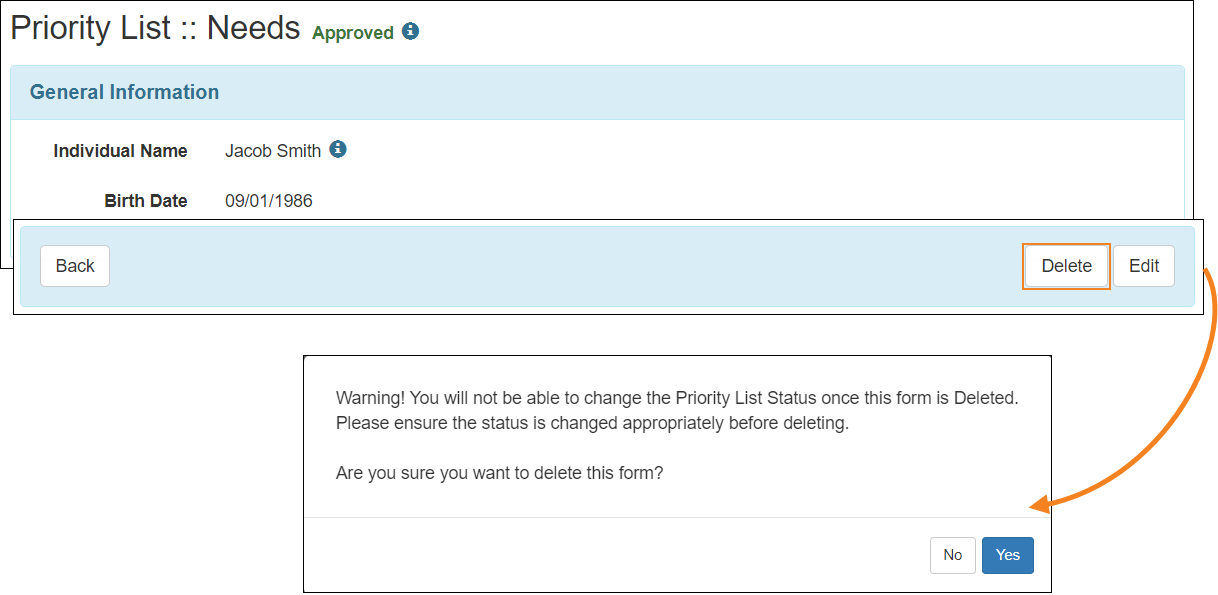
- The warning message displayed while attempting to delete a Priority List form has been updated to the following:
‘Warning! You will not be able to change the Priority List Status once this form is Deleted. Please ensure the status is changed appropriately before deleting.
Are you sure you want to delete this form?’
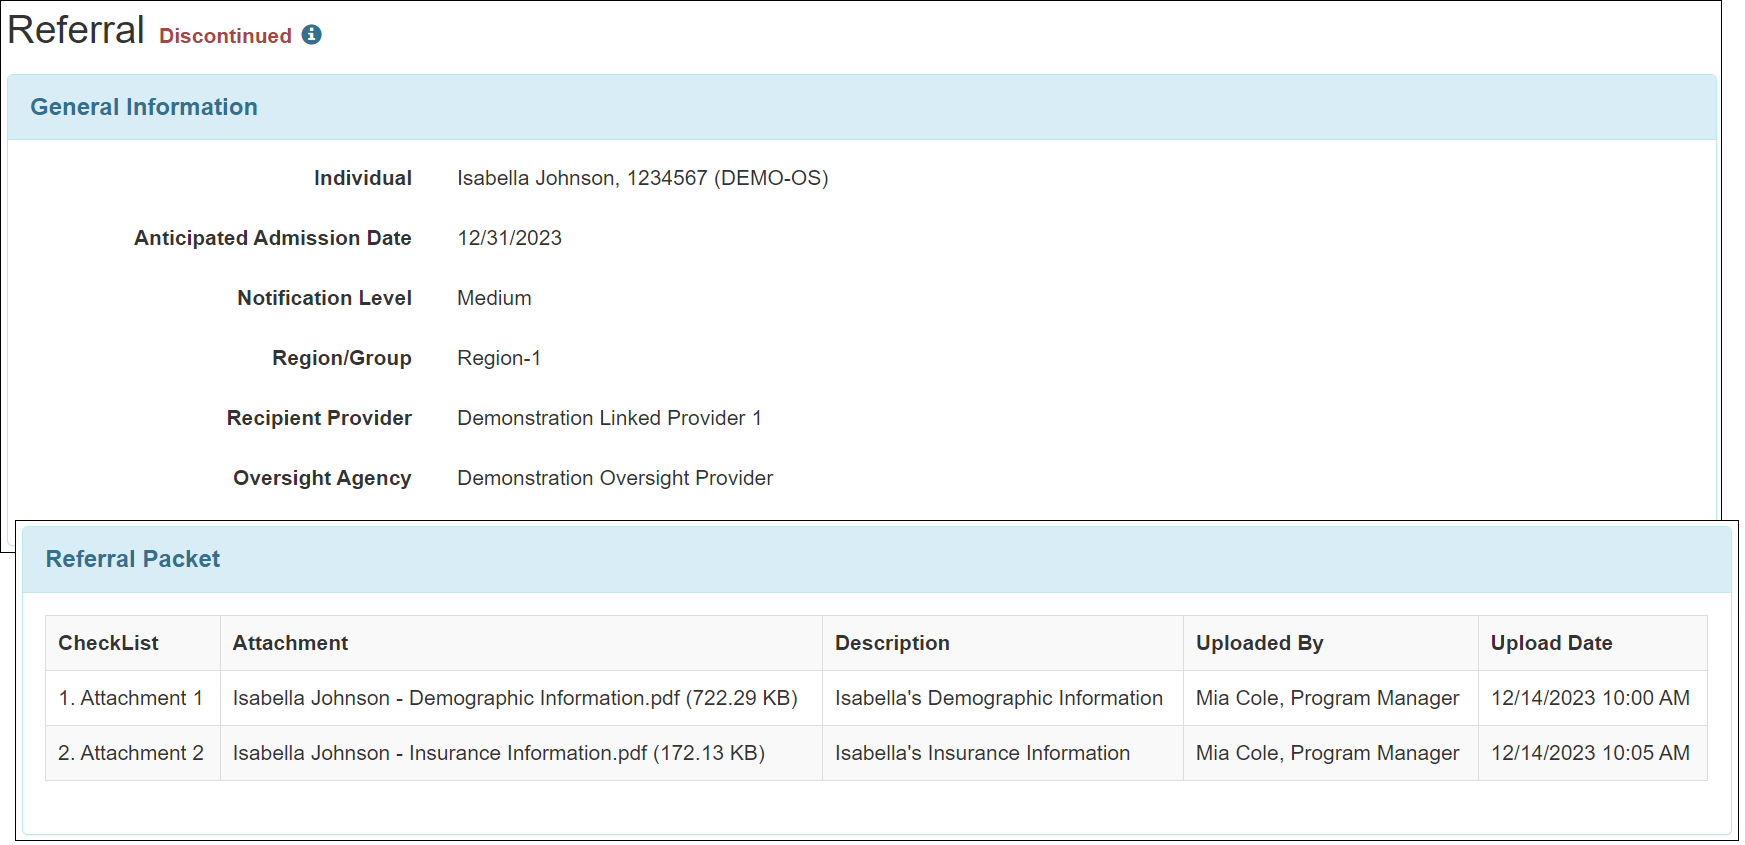
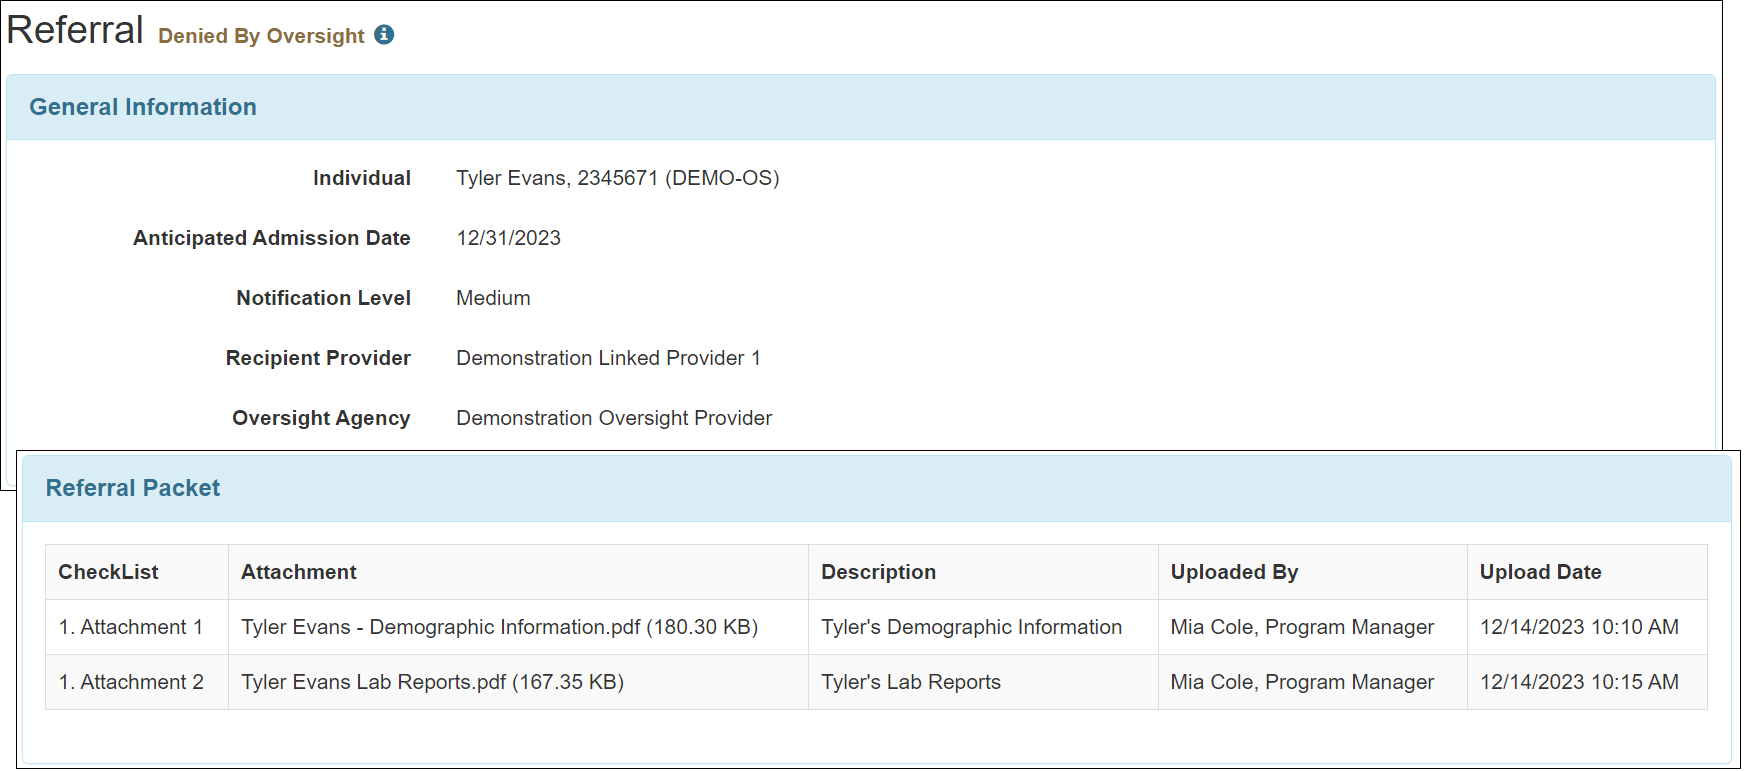
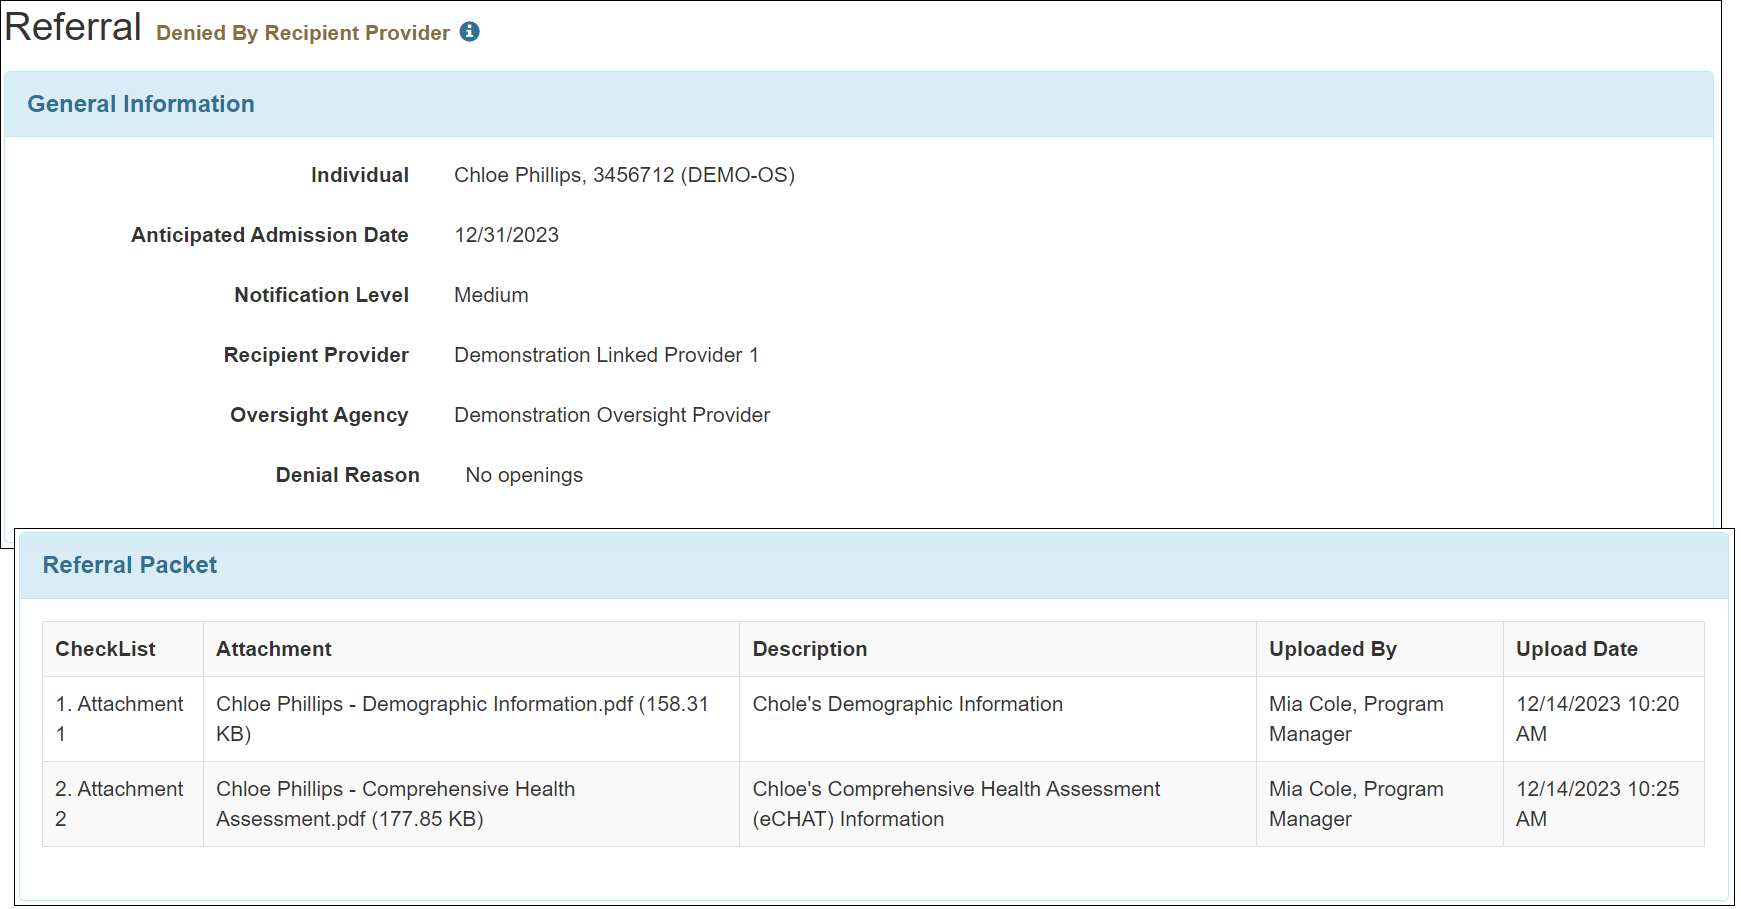
Referral
[Back to Top]- If a Referral gets discontinued by the Oversight agency, or gets denied either by the Oversight or by the Linked Provider, then users at the Linked Provider agency will no longer be able to avail the Action column in the 'Referral Packet' section of the Referral form. Consequently, users at the Linked Provider agencies will no longer be able to download or view any attched files from the Referrals in 'Discontinued', 'Denied By Oversight', and 'Denied By Recipient Provider' statuses.
Additionally, the 'i' icon will no longer appear beside the Individual field on the Referrals in these three statuses, and therefore users at the Linked Provider agencies will not be able to open the individual's Individual Demographic Form (IDF) from the Referral form.
Scanner Interface
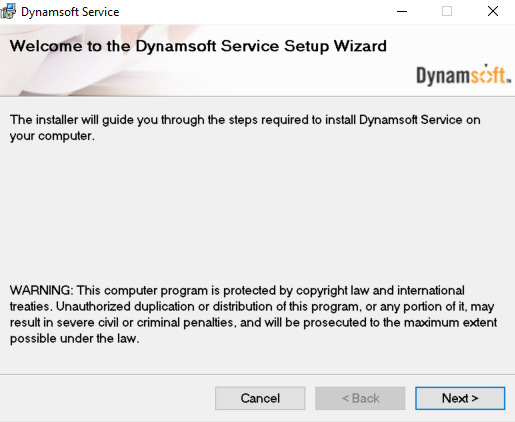
[Back to Top]- When attempting to use the Scanner Interface for the first time after this release, users will be asked to complete a one-time setup by clicking on a Download button.
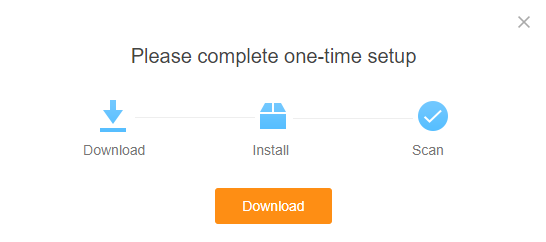
- This will allow the user to download an installer for the Dynamsoft Service application. After installing the application and refreshing the browser, users will have access to an updated Scanner Interface.
Scheduling
[Back to Top]- The following new criteria sections have been added to the ‘Schedule/EVV Dashboard’:
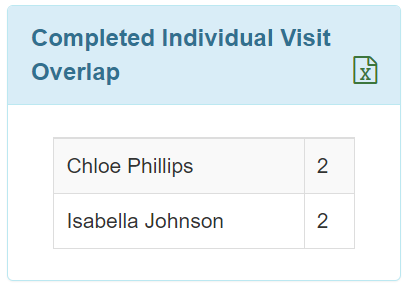
- Completed Individual Visit Overlap: This section will list the individuals who have completed schedules with start and end dates within the selected date range for which the Check-In/Out times overlap, and the number of schedules for each individual where there are overlaps in the Check-In/Check-Out times will be shown as the count. For example, if an individual has 4 schedules with the Check-In and Check-Out times 8am-11am, 8am-9am, 10am-11am, and 10am-12pm respectively, then all 4 schedules are considered as overlapping and will show up in the list. However, schedules with a start and end date outside the selected date range will not be considered even if their Check-In/Out times overlap with other schedules that are within the selected date range.
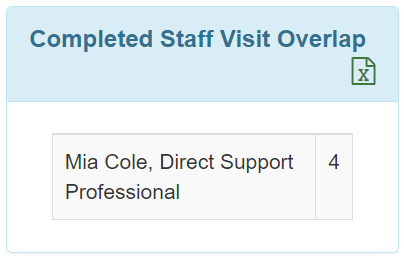
- Completed Staff Visit Overlap: This section will list the staff members who are assigned to multiple completed schedules with start and end dates within the selected date range for which the Check-In/Out times overlap, and the number of schedules for each staff member where there are overlaps in the Check-In/Check-Out times will be shown as the count. For example, if a staff member has been assigned to 4 schedules with the Check-In and Check-Out times 8am-11am, 8am-9am, 10am-11am, and 10am-12pm respectively, then all 4 schedules are considered as overlapping and will show up in the list. However, schedules with a start and end date outside the selected date range will not be considered even if their Check-In/Out times overlap with other schedules that are within the selected date range.
- Completed Individual Visit Overlap: This section will list the individuals who have completed schedules with start and end dates within the selected date range for which the Check-In/Out times overlap, and the number of schedules for each individual where there are overlaps in the Check-In/Check-Out times will be shown as the count. For example, if an individual has 4 schedules with the Check-In and Check-Out times 8am-11am, 8am-9am, 10am-11am, and 10am-12pm respectively, then all 4 schedules are considered as overlapping and will show up in the list. However, schedules with a start and end date outside the selected date range will not be considered even if their Check-In/Out times overlap with other schedules that are within the selected date range.
Self Password Reset
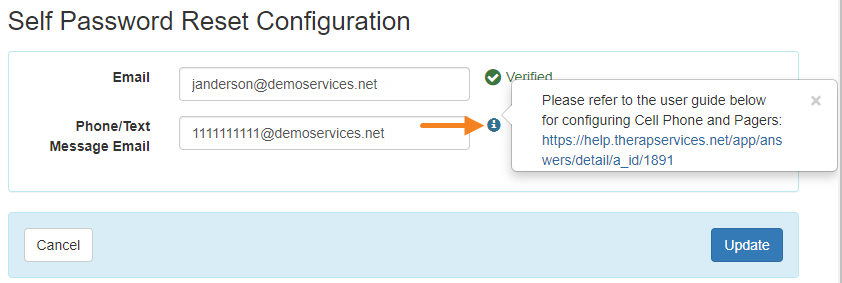
[Back to Top]- On the Self Password Reset Configuration page, the 'Help' (?) icon has been replaced with an ‘Information’ (i) icon.
- If Self Password Reset is enabled for a user and they complete their configuration when prompted to after login, they will now be shown a success message once their configuration has been completed successfully.

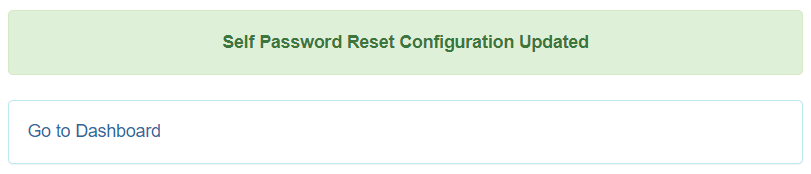
- Once a user successfully completes or updates their Self Password Reset configuration from the Settings tab, they will now be shown a success message with a Go to Dashboard option.
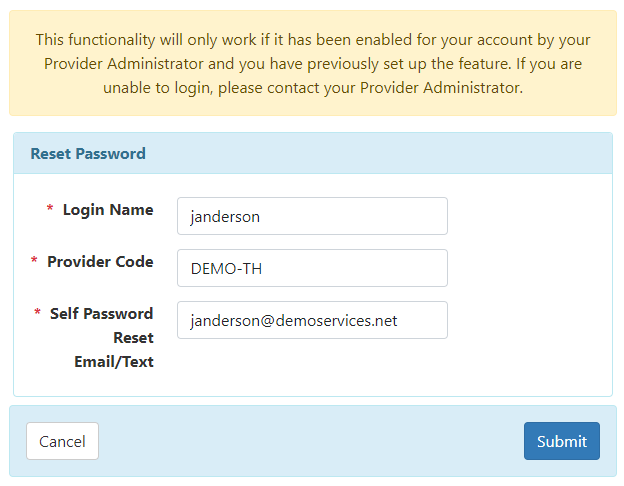
- On the user information form displayed after clicking on the Forgot Password? link on the login page, the Email/Text field has been renamed to Self Password Reset Email/Text.
- The user interface of the Therap Password Reset Token email where the One Time Passcode (OTP) is sent has been updated.

Service Directory
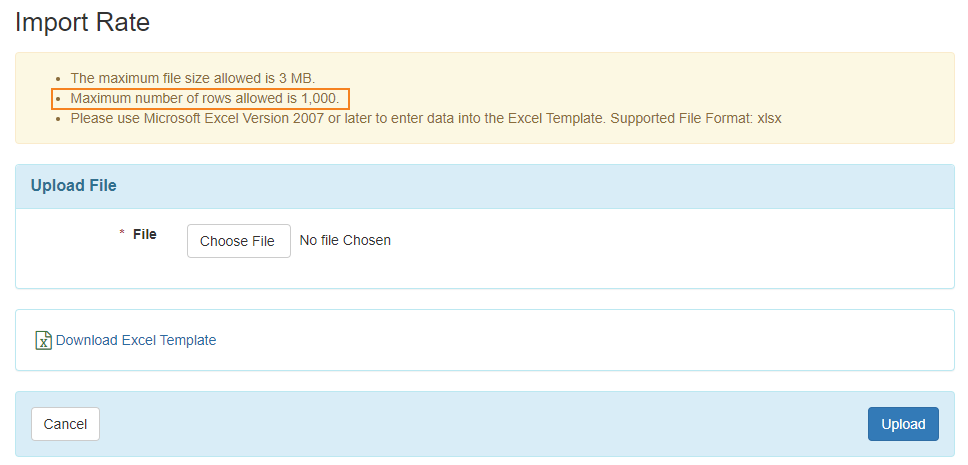
[Back to Top]- While importing rates into the Service Directory by uploading Excel files, users will now be able to have up to 1,000 rows per Excel file instead of 200 rows.
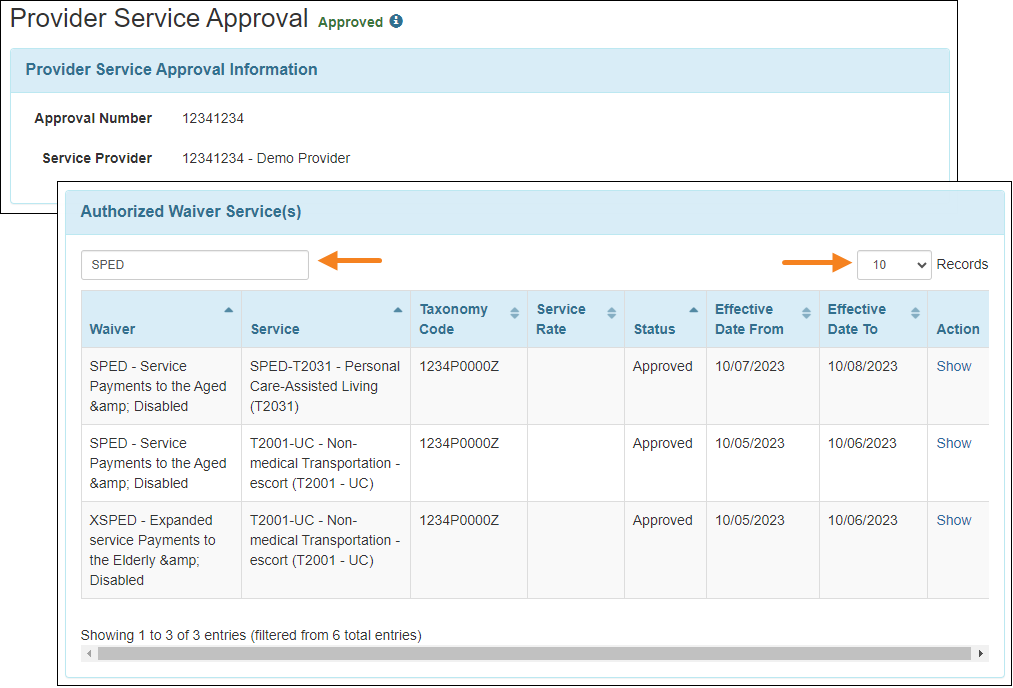
- The authorized waiver services can now be filtered using the new Filter textbox in the 'Authorized Waiver Service(s)' section on the 'Provider Service Approval' form. Pagination has also been added to this section so that the waiver services for the selected number of records in the Records dropdown field will be shown on each page.
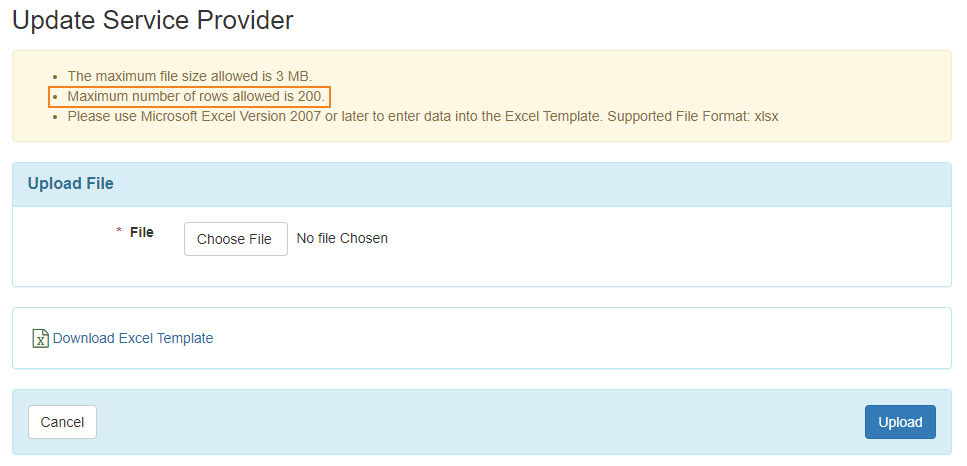
- Users will now be able to upload a maximum of 200 rows per Excel file when updating the Service Provider information of the Service Directory via Excel upload.
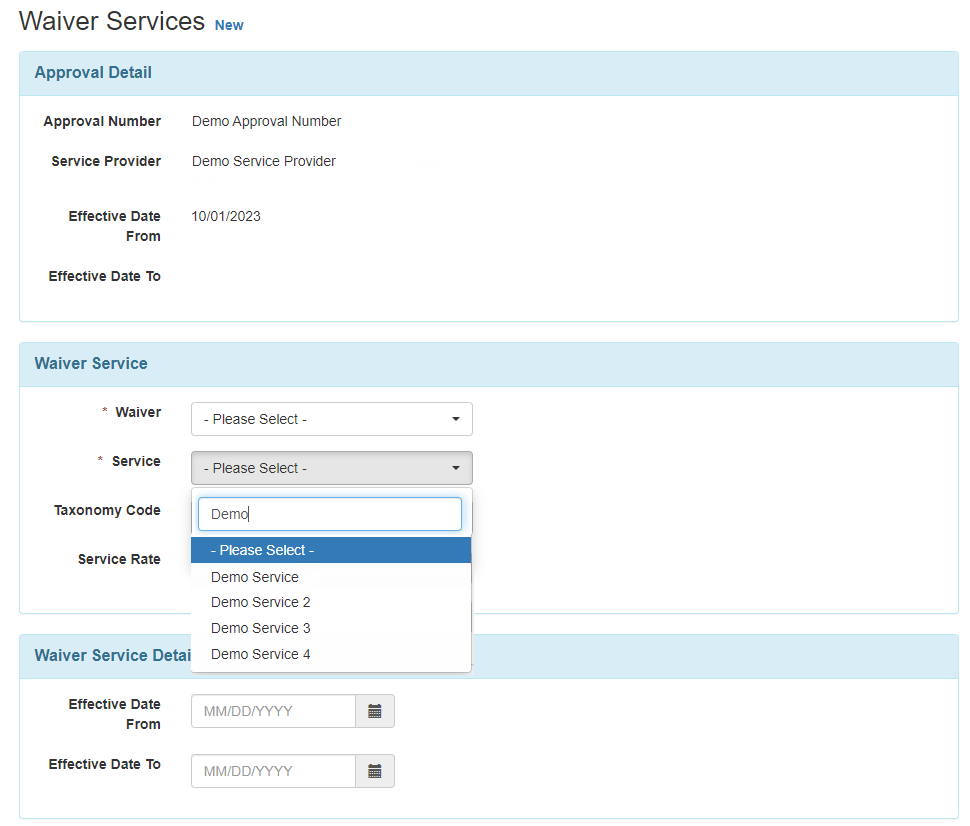
- The Service dropdown field in the ‘Waiver Service’ section of the ‘Waiver Services’ form is now searchable. While adding a new Service to the ‘Provider Service Approval’, users will now be able to search for the entries located within the dropdown field.
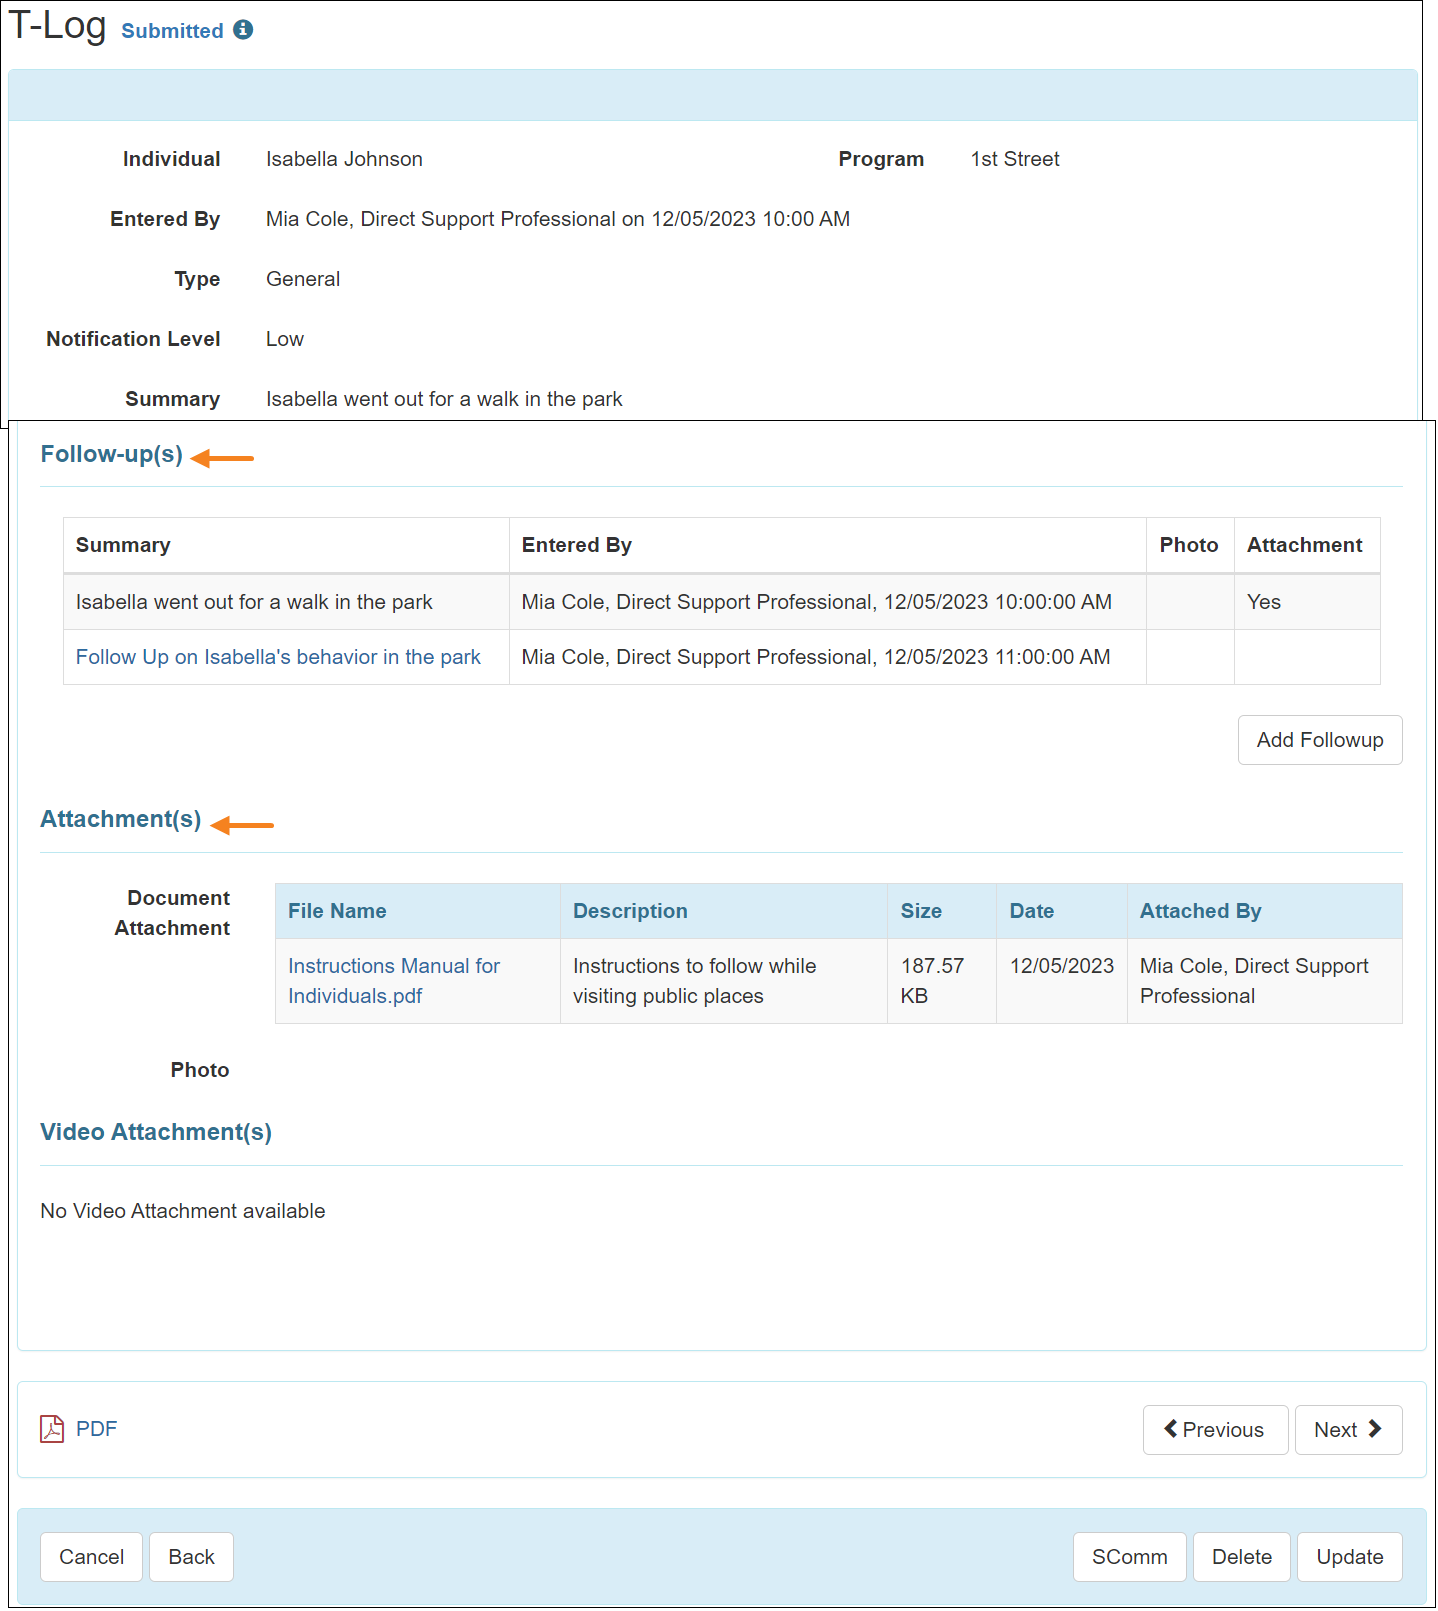
T-Log
[Back to Top]- The following sections of the T-Log forms have been renamed:
- The section titled ‘Follow-up’ has been renamed to ‘Follow-up(s)’.
- The section titled Attachments has been renamed to ‘Attachment(s)’.
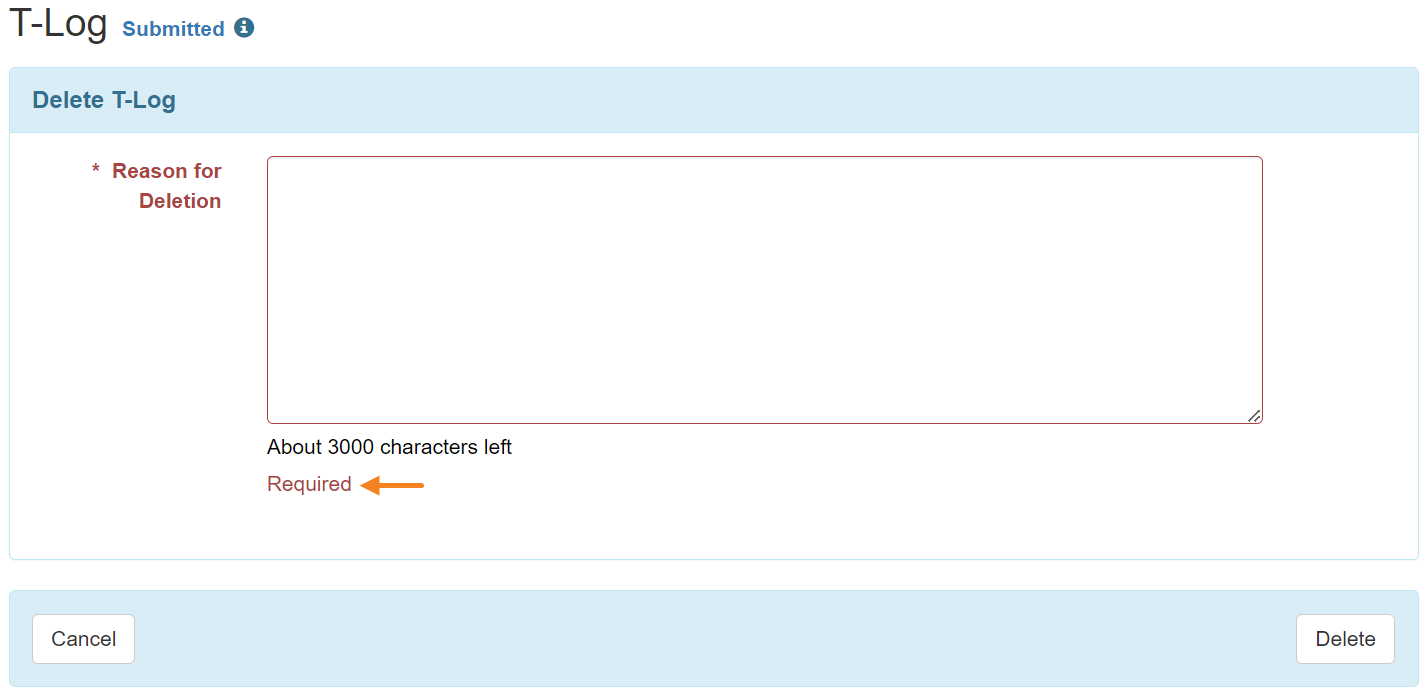
- The error message that appears on the ‘Delete T-Log’ page if users attempt to delete a T-Log without entering any reason in the Reason for Deletion text field, has been reworded from Delete Comment is required to Required.
Training Management System (TMS)
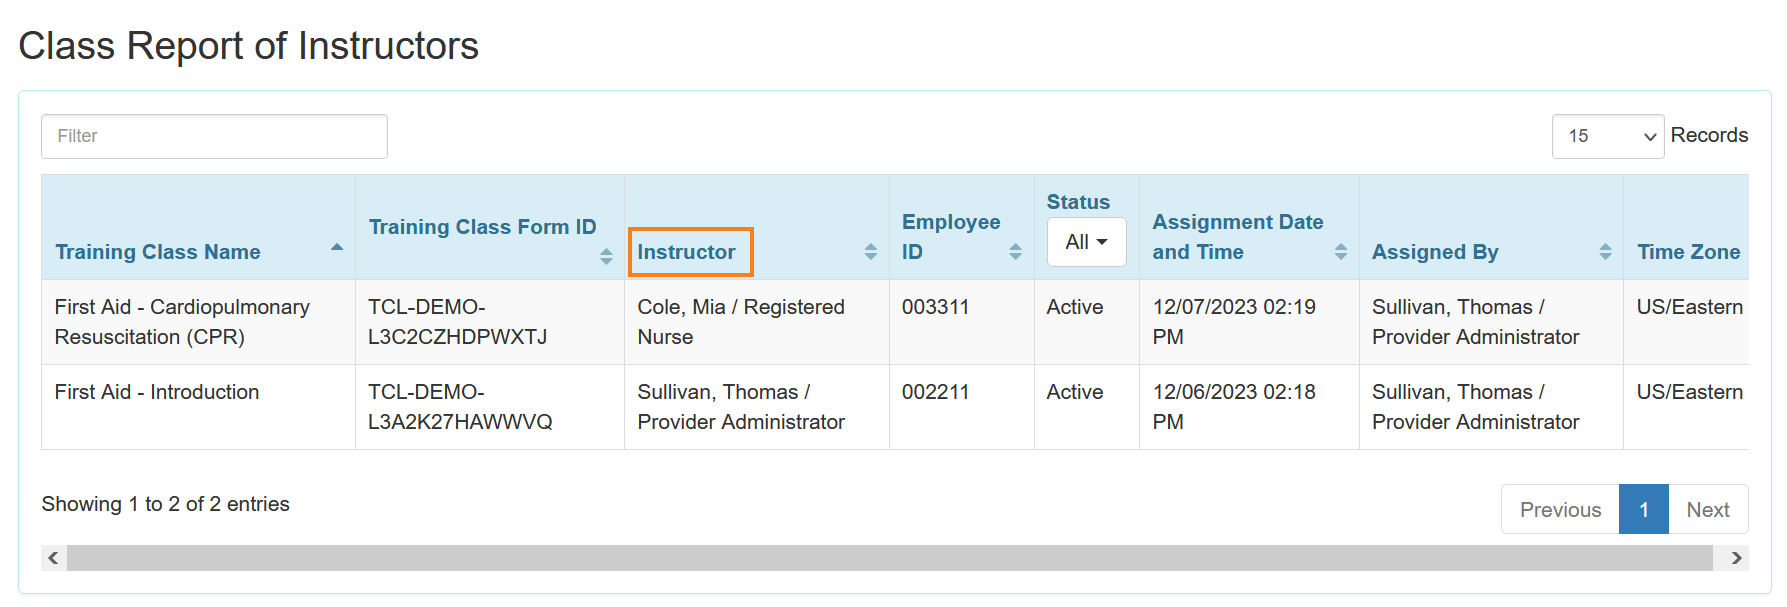
[Back to Top]- The Instructor Name field and column have been renamed to Instructor in the following forms:
- Training Instructor

- Session Report of Instructors
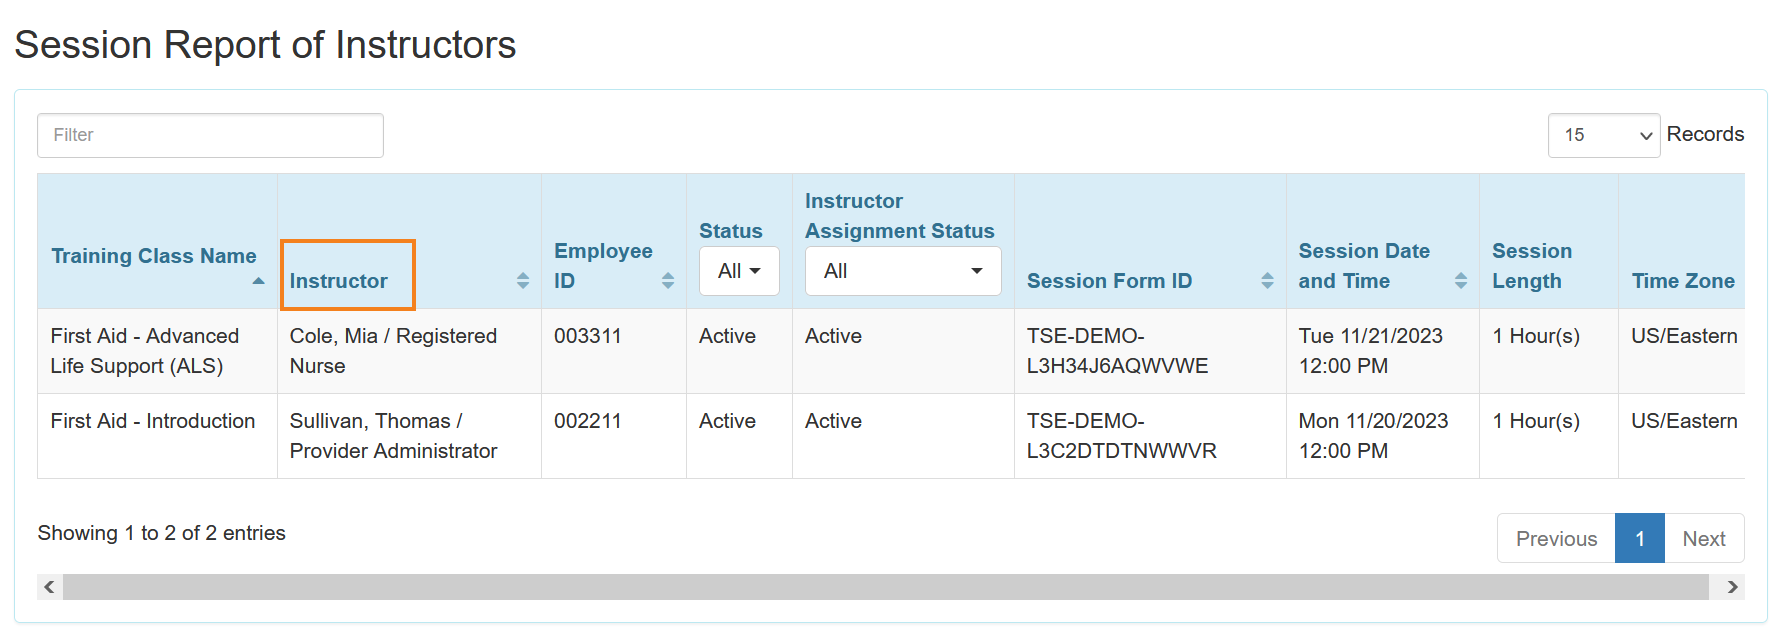
- Class Report of Instructors
- Training Instructor
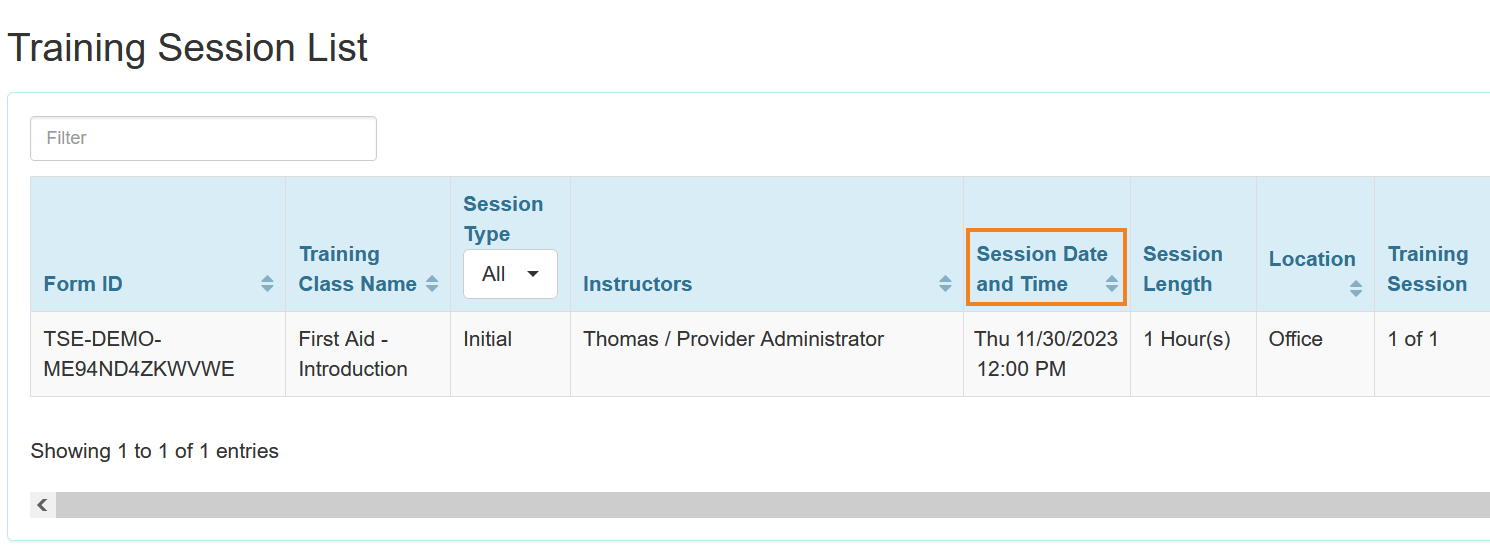
- The Date and Time column has been renamed to Session Date and Time in the following pages:
- ‘Training Session Search’ result page accessed from the following options:
- Search link beside the Session option.
- Publish Result link beside the Conduct Session(s) option.
- View Result link beside the Conduct Session(s) option.
- Signup to Session link beside the Supervise Trainee(s) option.
- Cancel Signup link beside the Supervise Trainee(s) option.
- Training Session(s) link beside the History option.
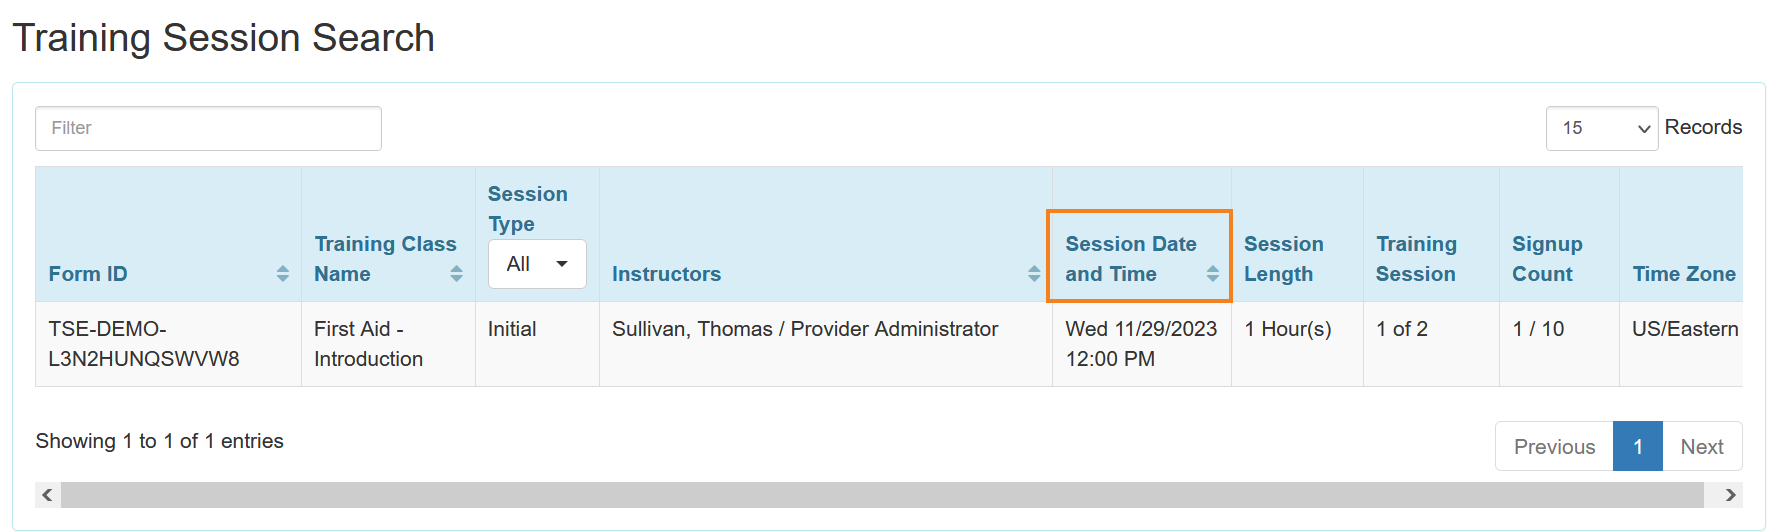
- Session Signup Report

- ‘Training Session List’ accessed from following links in the ‘Classes’ section:
- Signup
- View Signup(s)
- View Results/Notes
- ‘Training Session Search’ result page accessed from the following options:
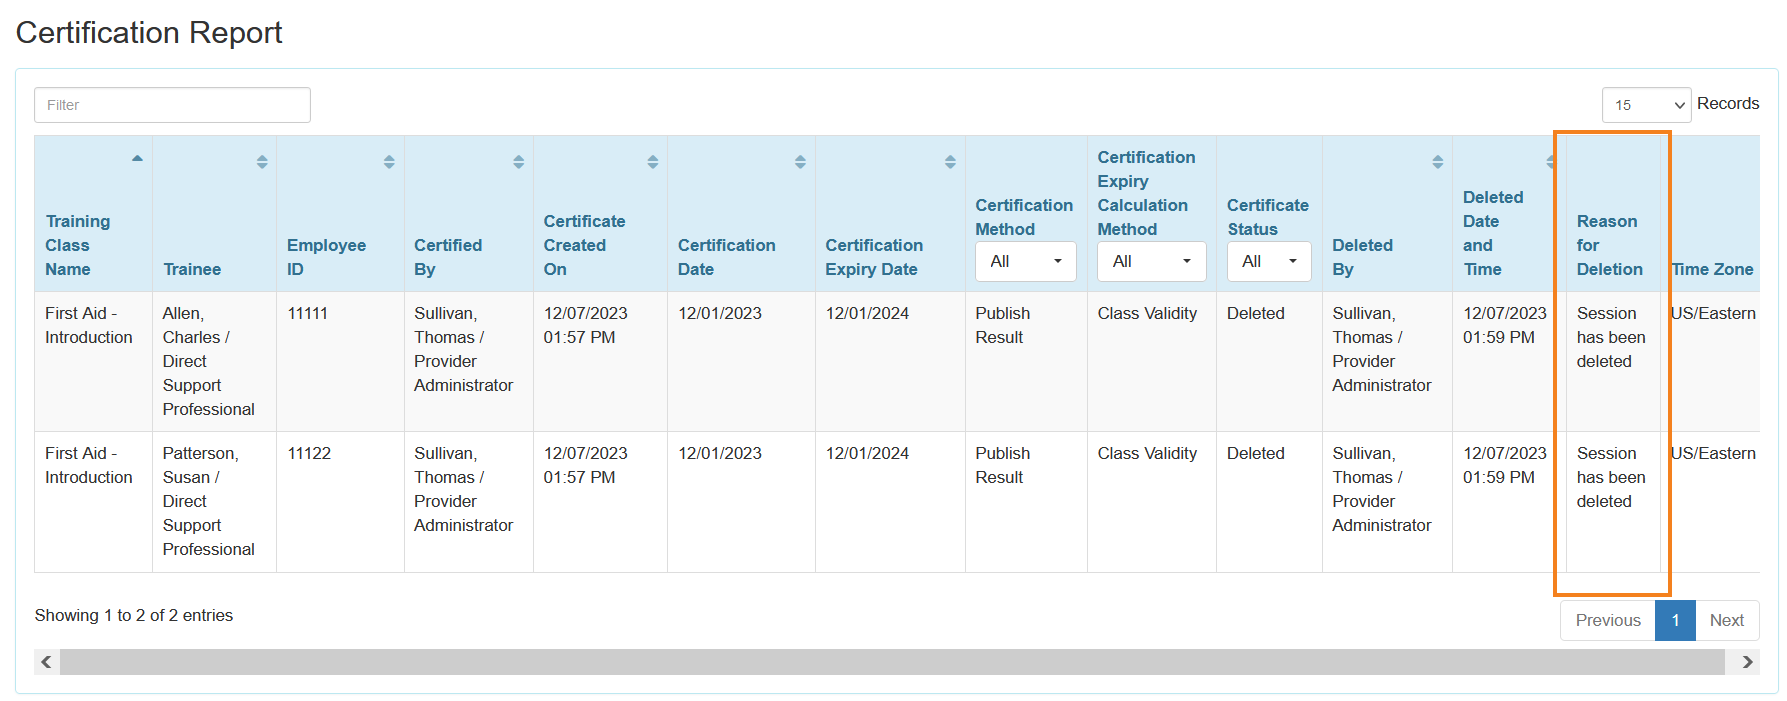
- The comment of Reason for Deletion of Training Certificates due to deleted Training Session has been updated in the ‘Certification Report’.
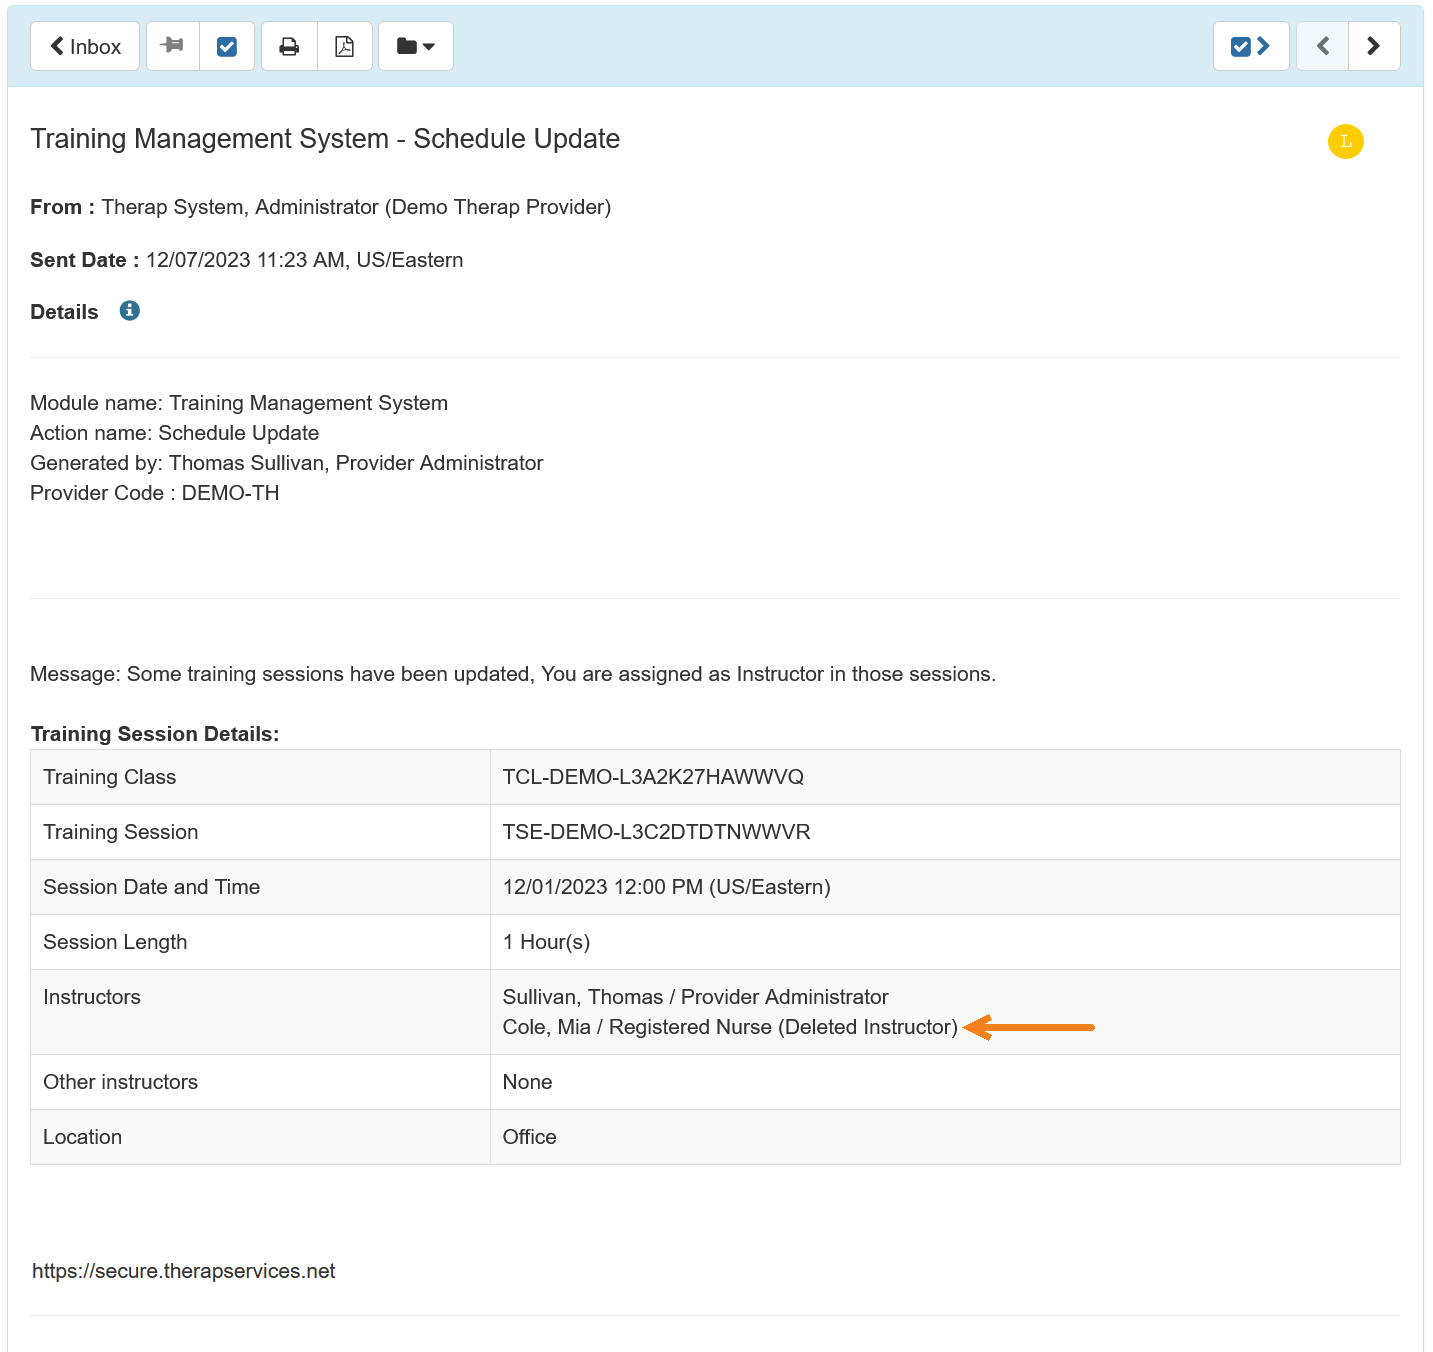
- In SComm and Email notification messages for the ‘Schedule Update’ Notification Event, deleted Instructors will now have a ‘(Deleted Instructor)’ label added after their names.
Two Factor Authentication (2FA)
[Back to Top]- If Two Factor Authentication (2FA) is Force Activated for a user and they complete their configuration when prompted to after login, they will now be shown a success message once the configuration has been completed successfully.

- Once a user successfully completes or updates their 2FA configuration from the Settings tab, they will now be shown a success message with a Go to Dashboard option.

- The user interface for entering the 2FA OTP during login has been updated.
- Authenticator App

- Hardware Token
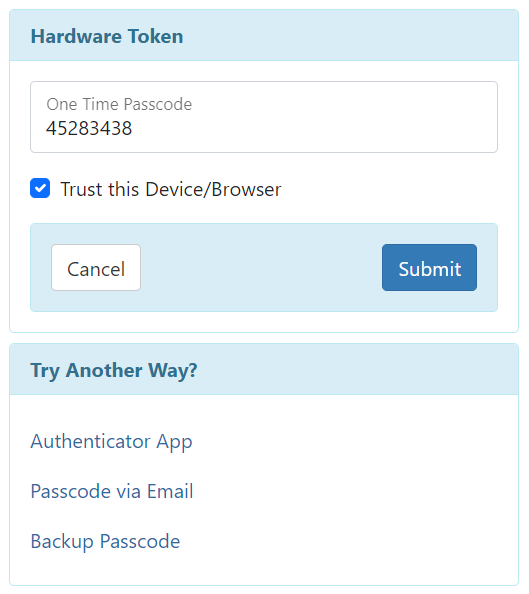
- Passcode via Email
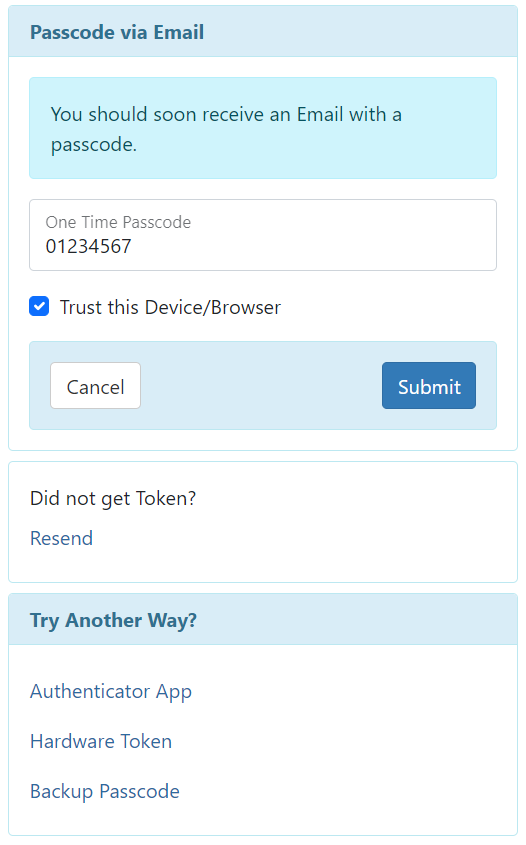
- Backup Passcode
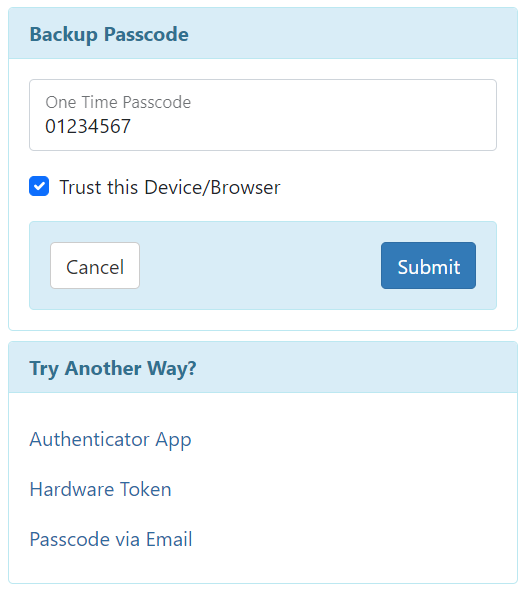
- Authenticator App
- The user interface for the 2FA emails sent from Therap have been updated.
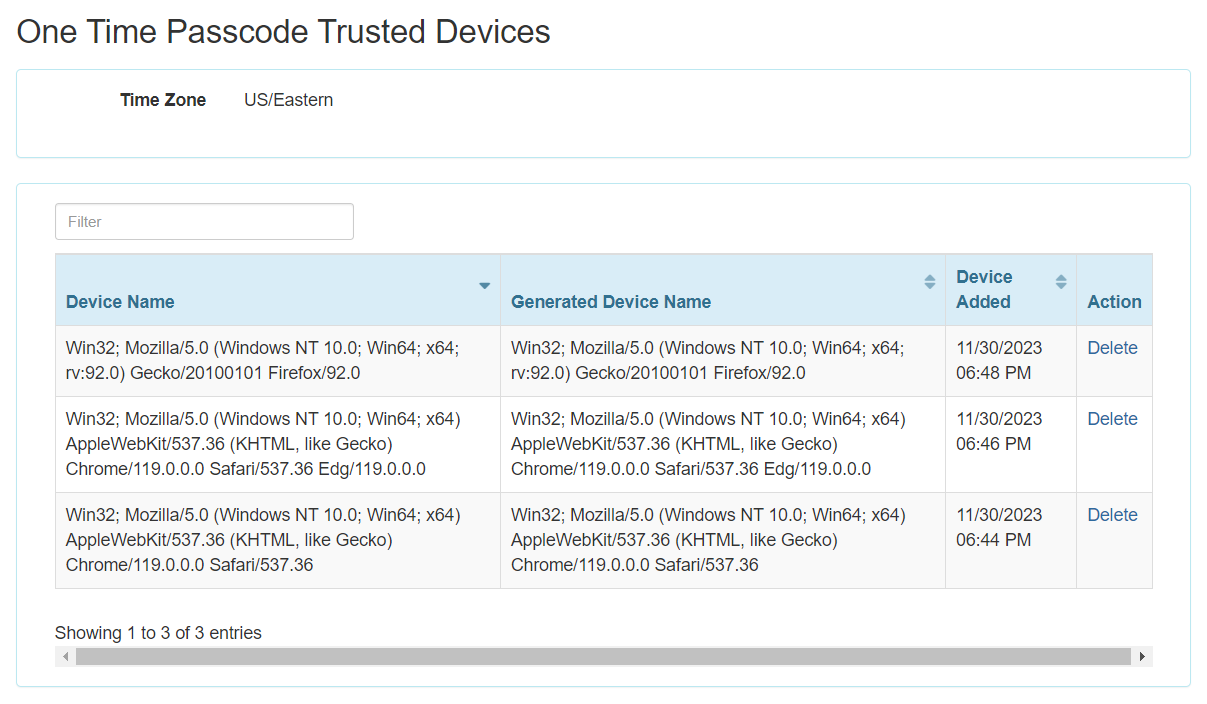
- The following updates have been made on the ‘One Time Passcode Trusted Devices’ page:
- The Time Zone column has been removed. The user’s Time Zone information will now instead be shown at the top of the page.
- The Records dropdown and the page number count at the bottom right have been removed.
- The Export to Excel link has been removed.
User
[Back to Top]- The following updates have been made to the User form:
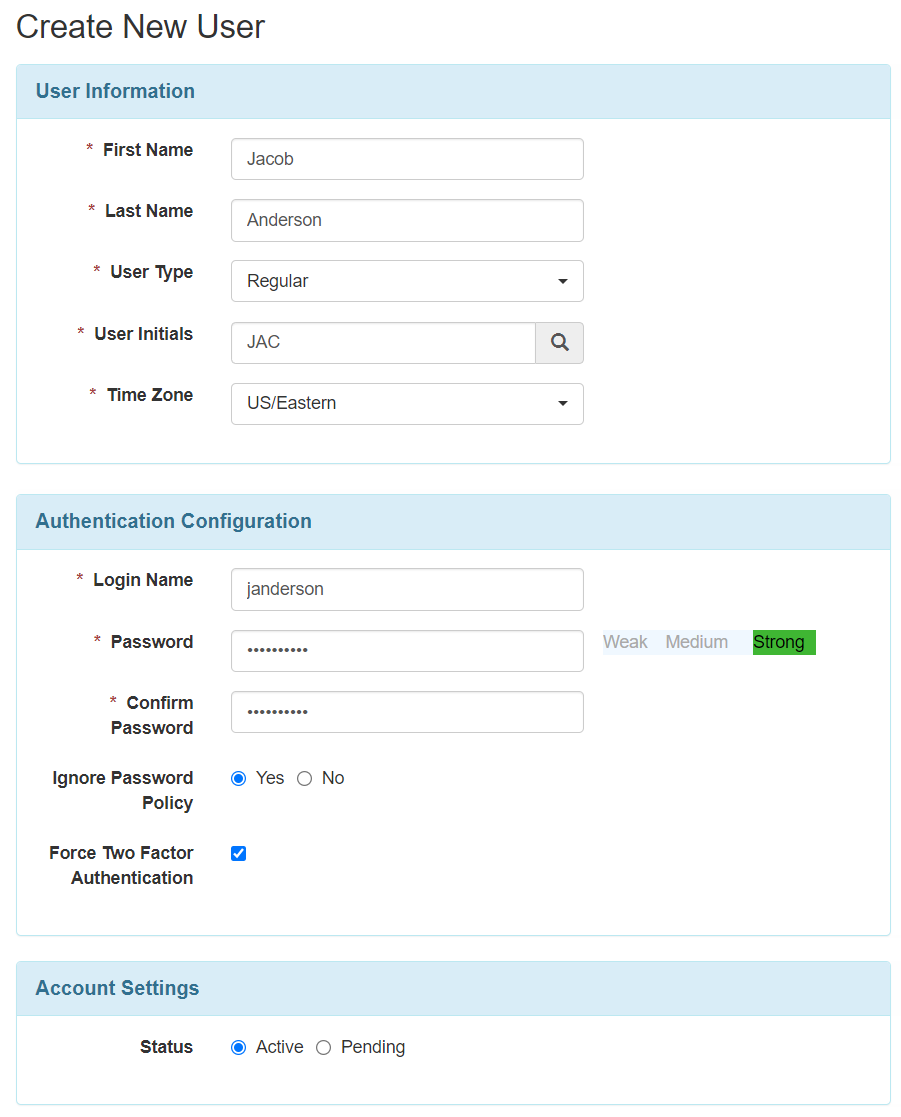
- A new ‘Authentication Configuration’ section has been added.
- The Login Name, Password, Confirm Password, and Ignore Password Policy fields have been moved from the ‘User Information’ section to the ‘Authentication Configuration’ section.
- The Force Two Factor Authentication checkbox has been moved from the ‘Account Settings’ section to the ‘Authentication Configuration’ section.
- The maximum length for the Expected Value of the Login Name field has been updated from 104 to 90 in the Import User from Excel template file.
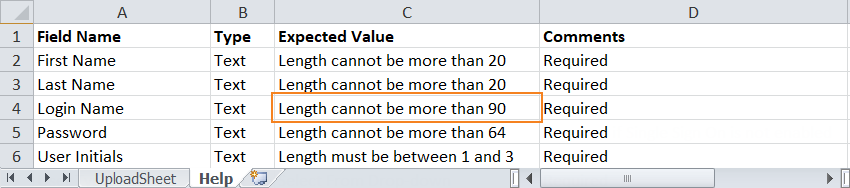
Exceeding the character limit will display the following validation message in the Detailed Report of the import file: Login Name: Length cannot be more than 90.

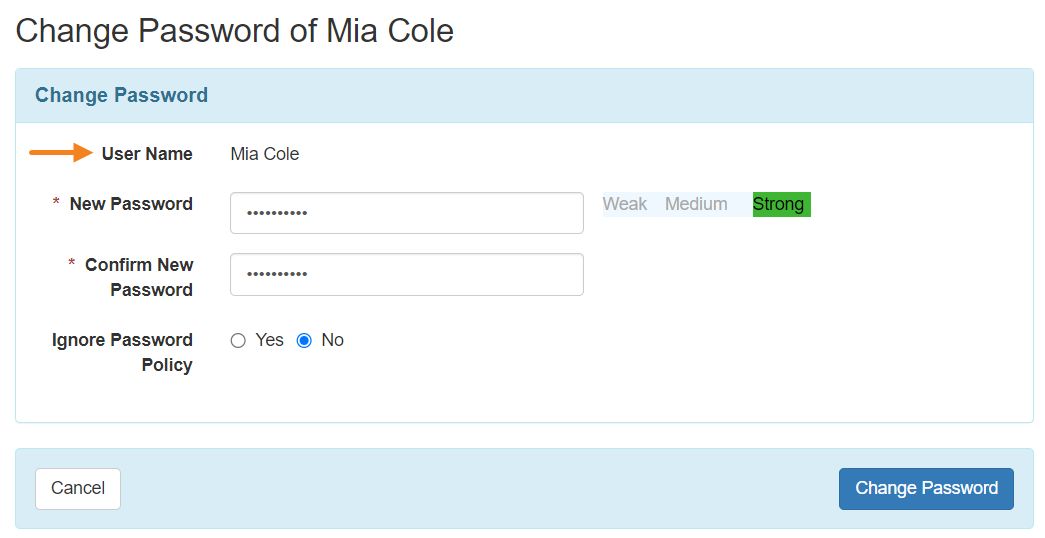
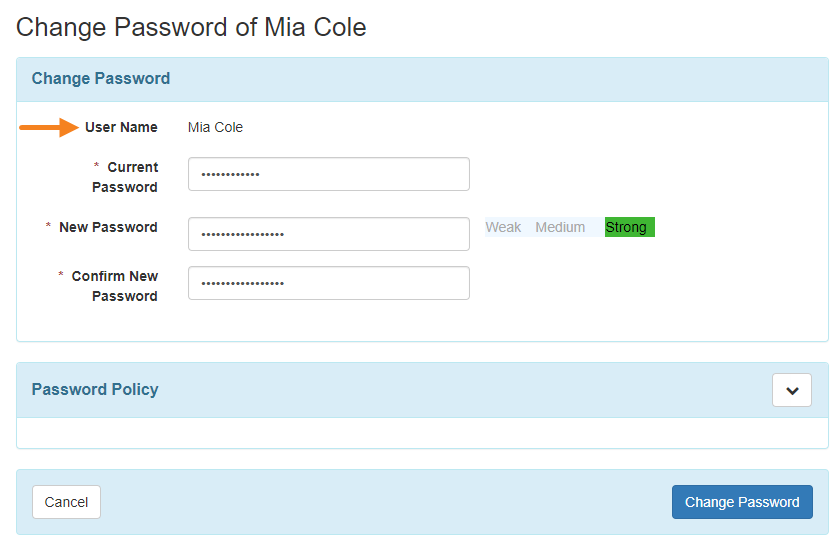
- When a user resets another user’s password or updates their own password, the ‘Change Password’ page will now display the User Name of the user whose password is being updated instead of their Login Name.
- If a user’s password is reset by an administrator and they enter their new password when prompted to after login, they will now be shown a success message once their password update has been successfully completed.

- Once a user successfully updates their own password from the Settings tab, they will now be shown a success message with a Go to Dashboard option. After a user resets another user’s password, they will be taken to a success message with a Go to Dashboard option instead of a ‘Back to List’ option.
