Therap for Canada 2024.9.0 Released!
Release Date: 12/2/2024 To learn more about the new features and enhancements included in this release, please view Release User Guides for Canada 2024.9.0
- Attendance
- Calendar
- Default Enrollment Program New!
- Document Storage
- Event Summaries
- General Events Report (GER)
- GER Resolution
- Individual History
- Individual Home Page
- ISP Data
- Medication History
Attendance
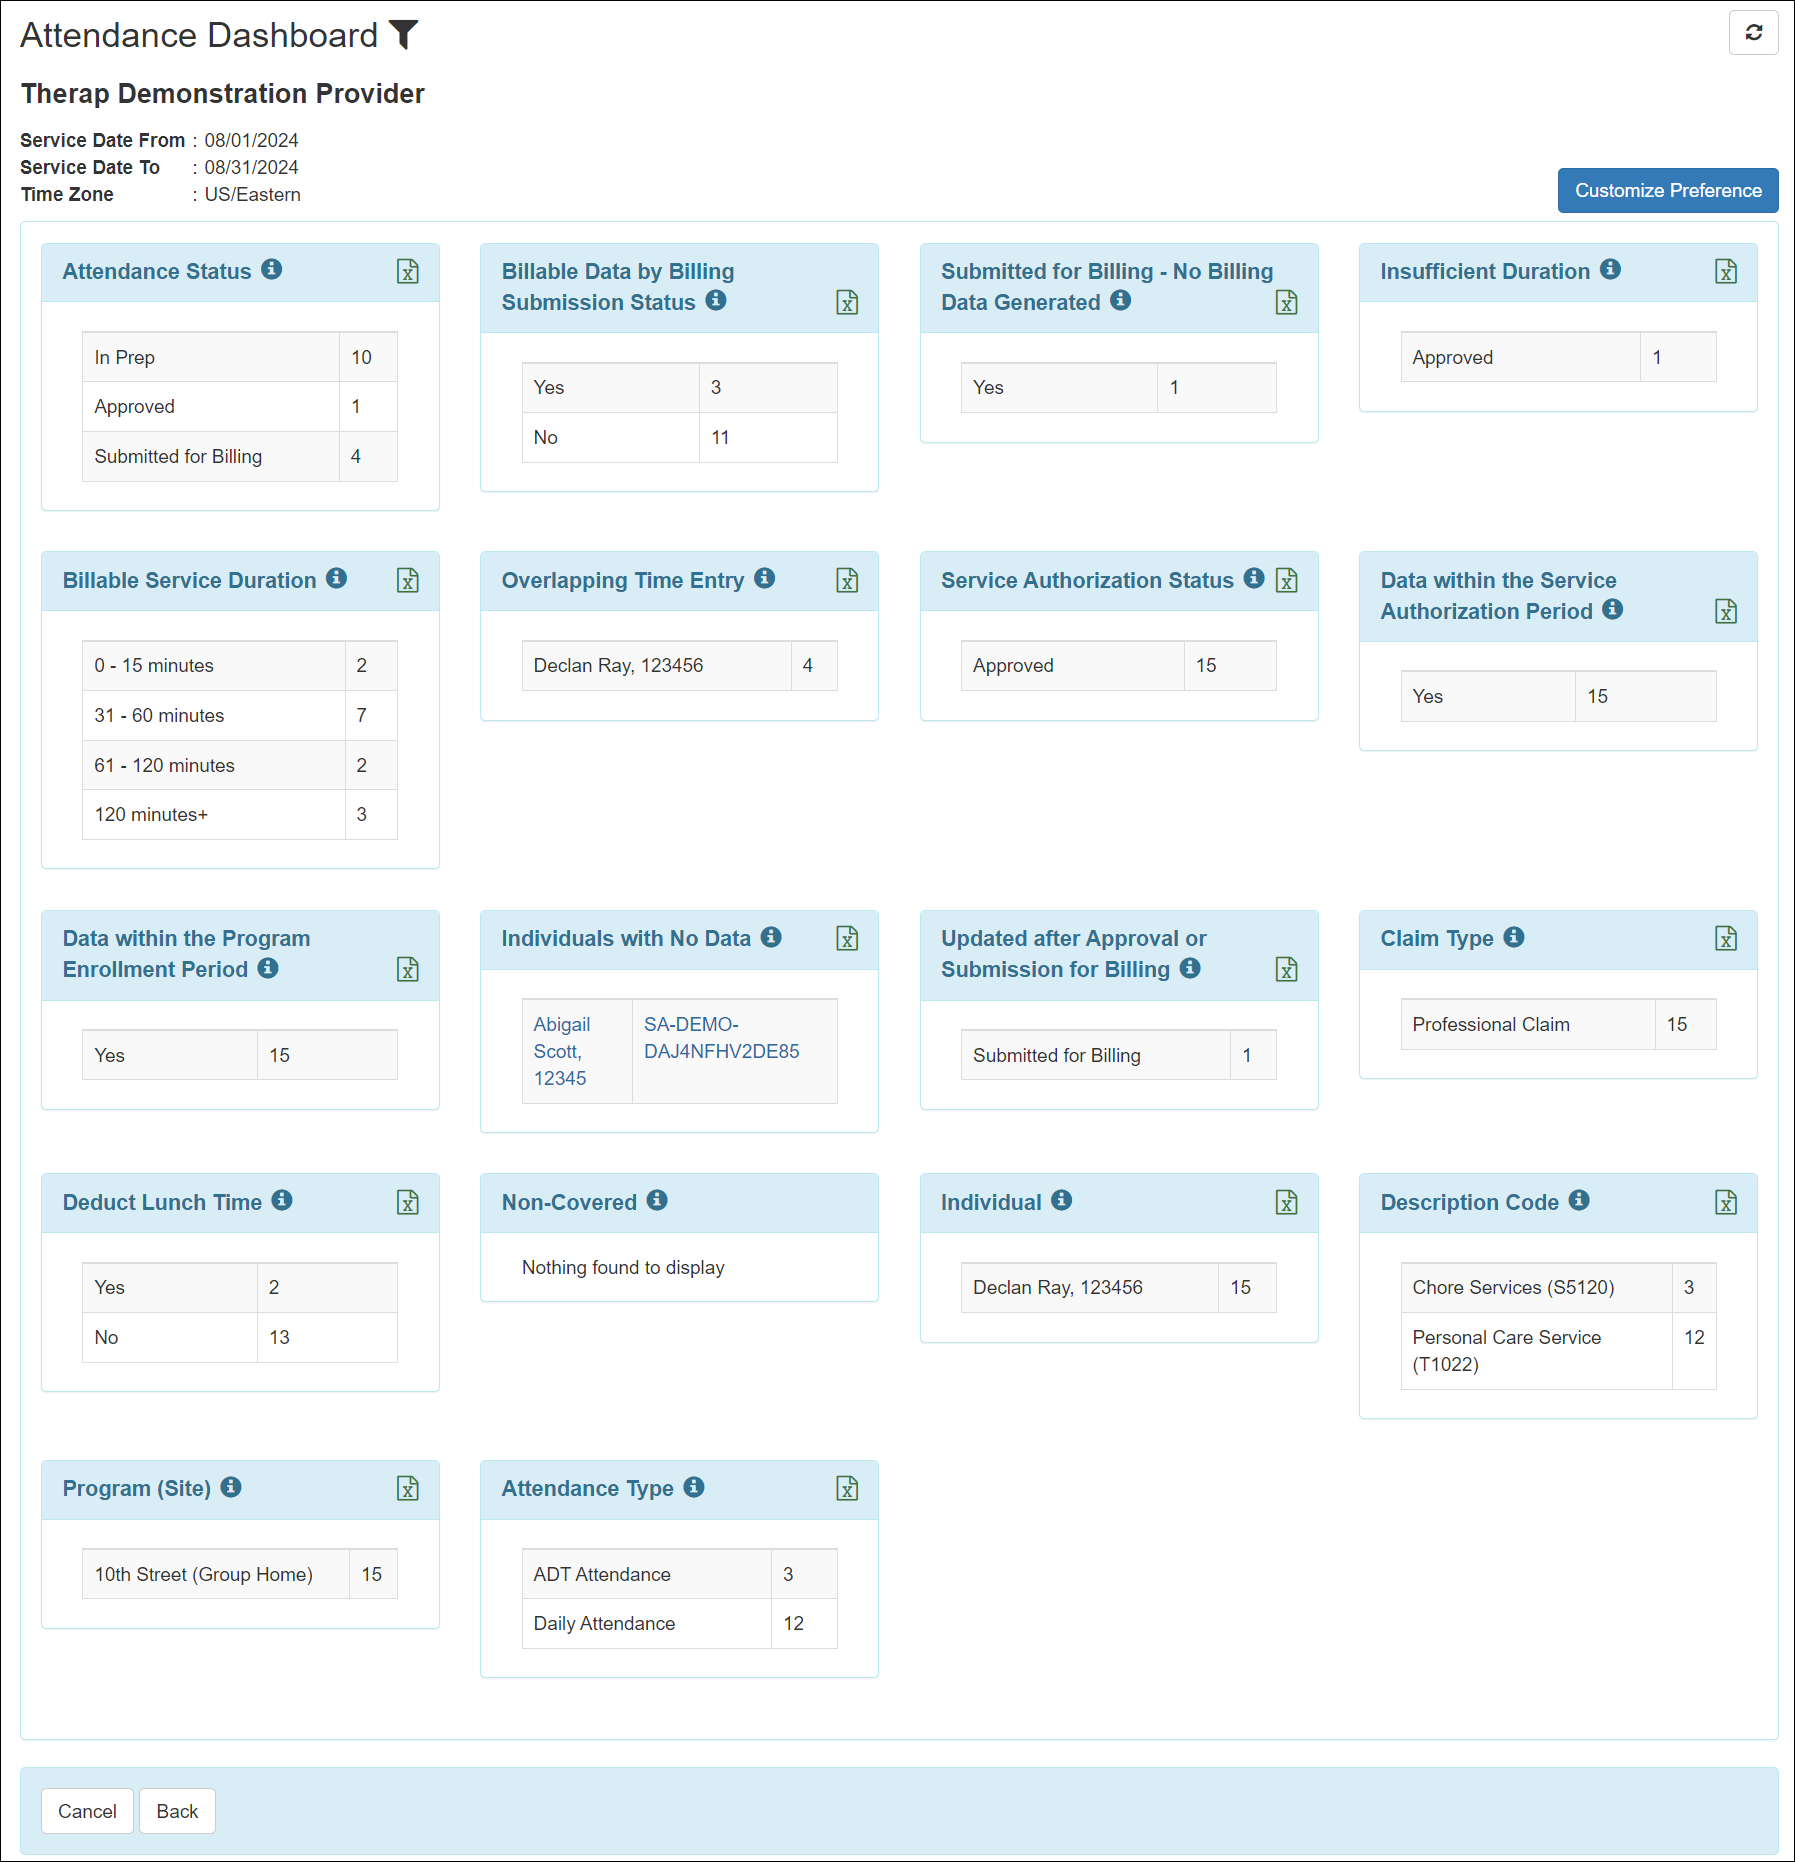
[Back to Top]- A new 'Attendance Dashboard' has been introduced. Users assigned with the Attendance Data View caseload-based role will see a new Dashboard link next to the Attendance option in the ‘Attendance’ section of the Billing tab.

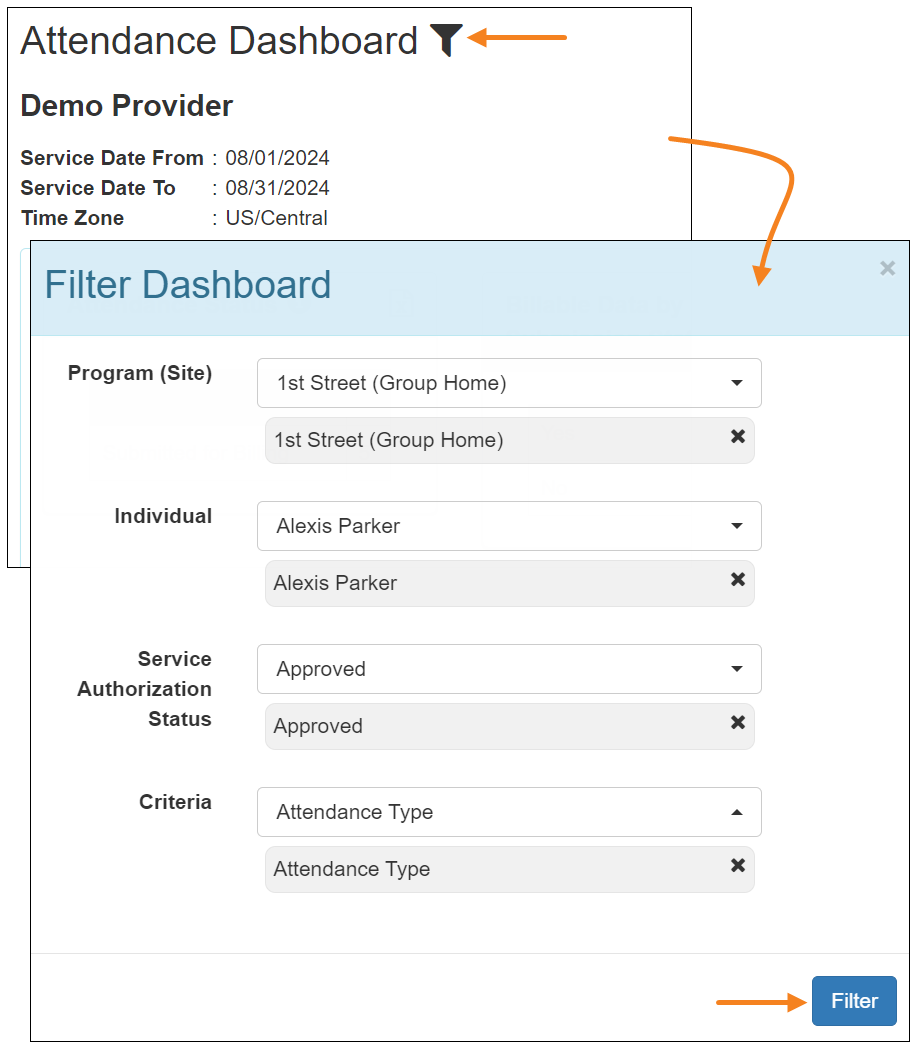
- Clicking on the Dashboard link will open the 'Attendance Dashboard' search page where users can enter a date range to generate the report. A maximum date range of one month can be selected to generate the Dashboard.

- Based on the date range entered, the Attendance Dashboard will display data counts for the following criteria:
- Attendance Status
- Billable Data by Billing Submission Status
- Submitted for Billing - No Billing Data Generated
- Insufficient Duration
- Billable Service Duration
- Overlapping Time Entry
- Service Authorization Status
- Data within the Service Authorization Period
- Data within the Program Enrollment Period
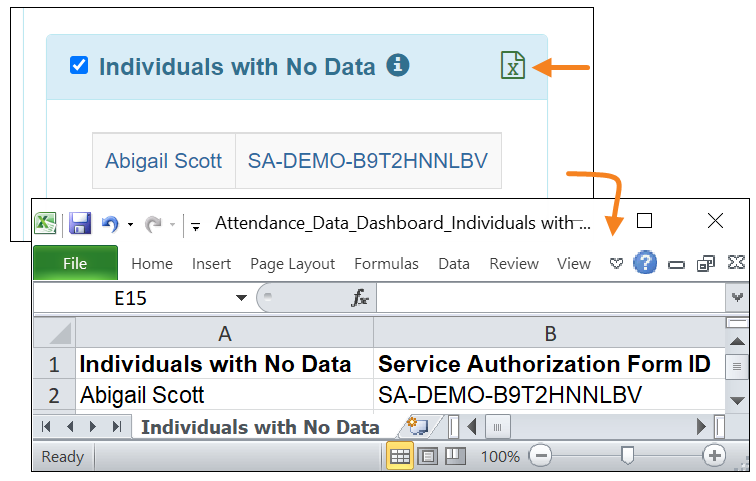
- Individuals with No Data
- Updated after Approval or Submission for Billing
- Claim Type
- Telehealth
- Deduct Lunch Time
- Non-Covered
- Individual
- Description Code
- Program (Site)
- Attendance Type
- Users may click on the Customize Preference button and uncheck the sections that they do not want to be displayed on the Attendance Dashboard. Re-checking the sections will bring back the sections. Clicking on the Save Preference button will apply the changes to the Dashboard.
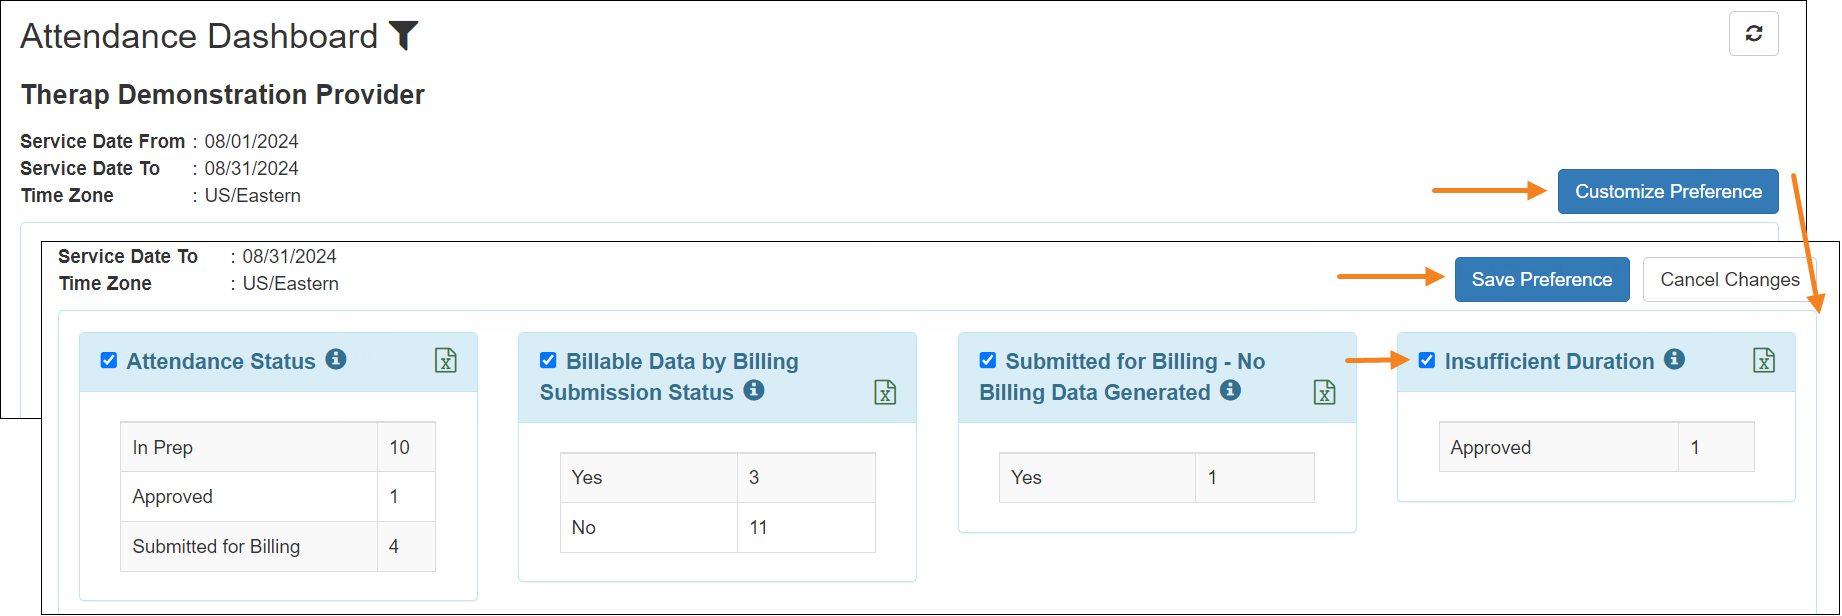
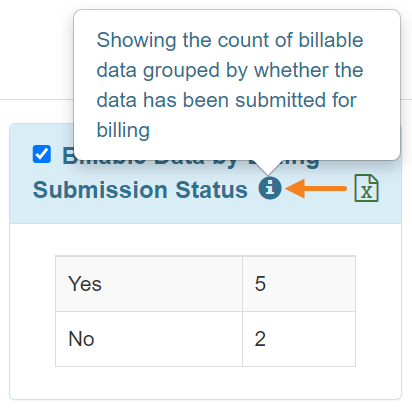
- Clicking on the 'i' icon will show the detailed description of that section.
- Clicking on the Excel file icon will download an Excel file displaying the information of that section.
- Clicking on a row in a section will allow users to view the Attendance details.

- The filter icon at the top of the Attendance Dashboard can be used to apply a filter to the Dashboard.
Calendar
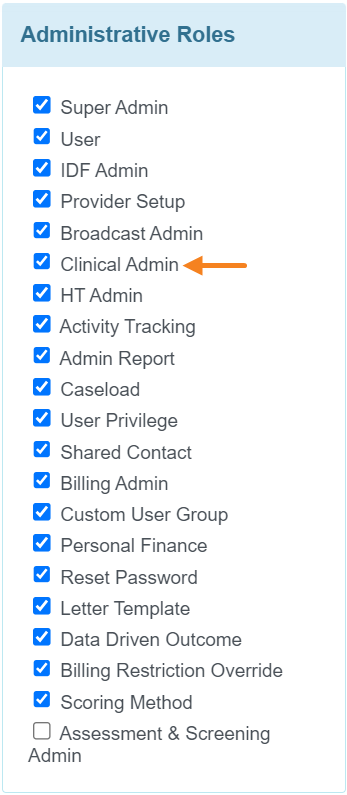
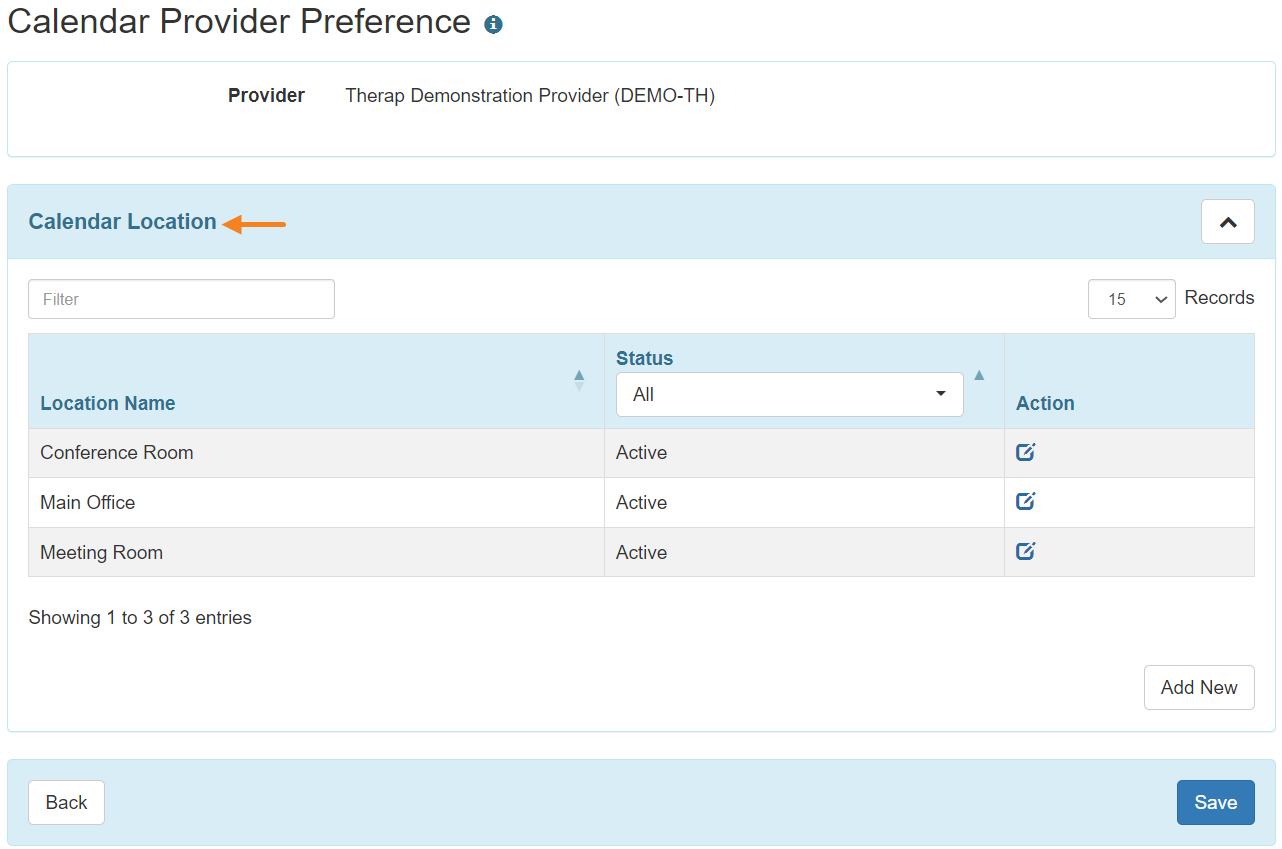
[Back to Top]- Users will now require the Clinical Admin administrative role, instead of the Provider Setup administrative role, to be able to configure Calendar Locations (add new locations, rename and deactivate locations, and reactivate inactive locations) for their agency on the agency’s ‘Calendar Provider Preference’ page.
Default Enrollment Program New!
[Back to Top]- A new ‘Default Enrollment Program’ feature has been introduced. An agency Super Admin will have to send a request to Therap to enable this feature.
- After the ‘Default Enrollment Program’ feature is enabled, a new Default Enrollment Program checkbox will appear on the ‘Create New Program' and 'Update/Delete Program' forms. Enabling this checkbox will set the program as a Default Enrollment Program.
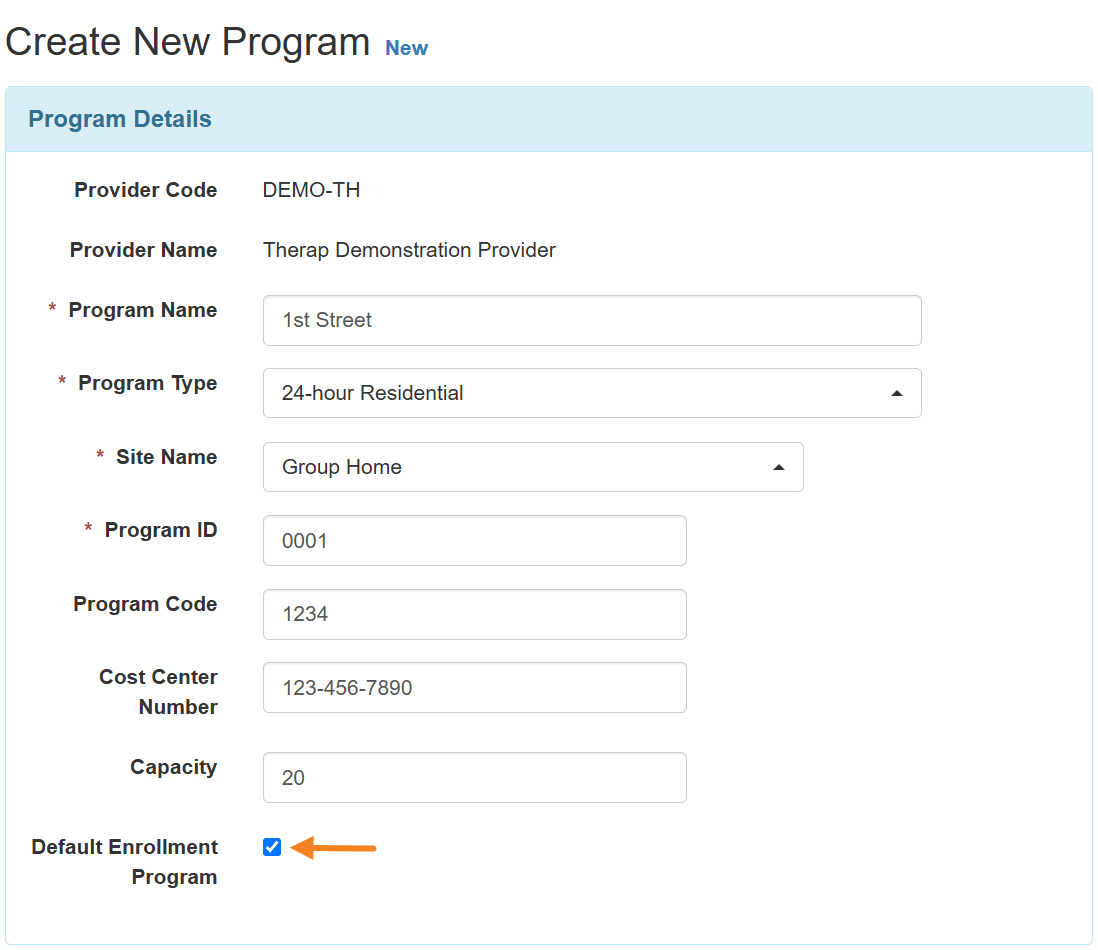
- After a program is set as a Default Enrollment Program, new individuals entered into the system will be automatically enrolled into the program during Individual Intake. A banner will appear on the individual’s Individual Demographic Form (IDF) notifying that the individual will be automatically enrolled into the program during the intake process.

- The Enrollment Date for the Default Enrollment Program will be their Individual Intake date. If the Individual Intake is performed via IDF Excel Import, the date entered in the Program Enrollment Date column will be ignored for Default Enrollment Programs. Instead, the date of the Excel import will be entered into the Enrollment Date field for Default Enrollment Programs.
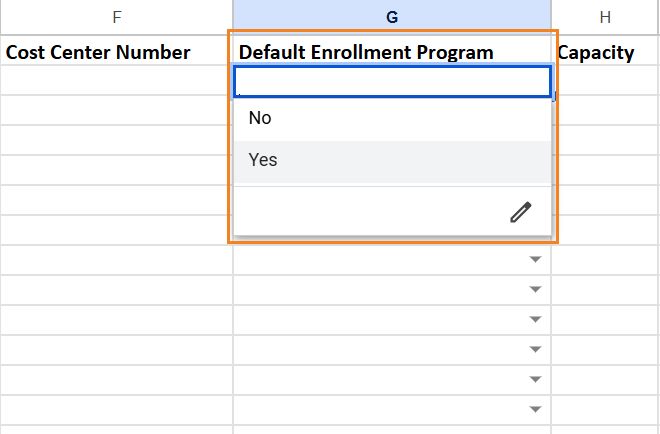
- A new column titled Default Enrollment Program has been added to the ‘Import Program from Excel’ file, with the options Yes and No to choose whether the program will be a Default Enrollment Program.
Document Storage
[Back to Top]- Form IDs have been added to the Individual Document Type and Agency Document Type. Users will be able to view the Form ID from the ‘Individual Document Type’ and ‘Agency Document Type’ pop up window when creating and updating a document type.
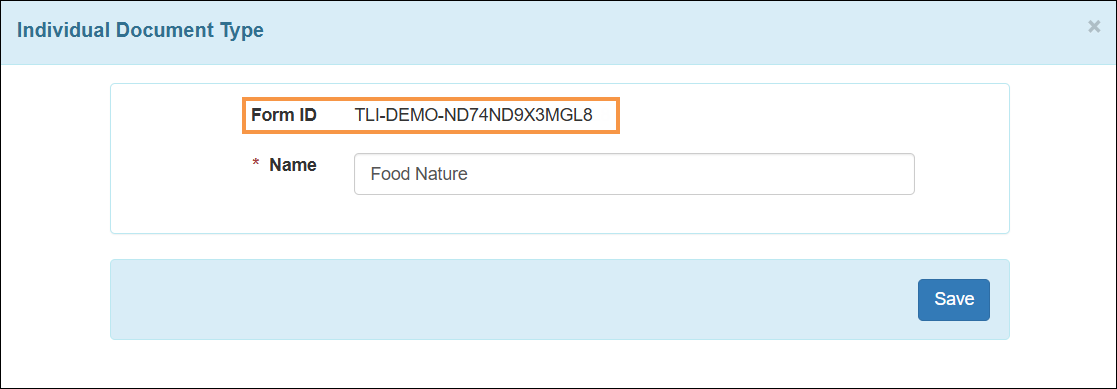
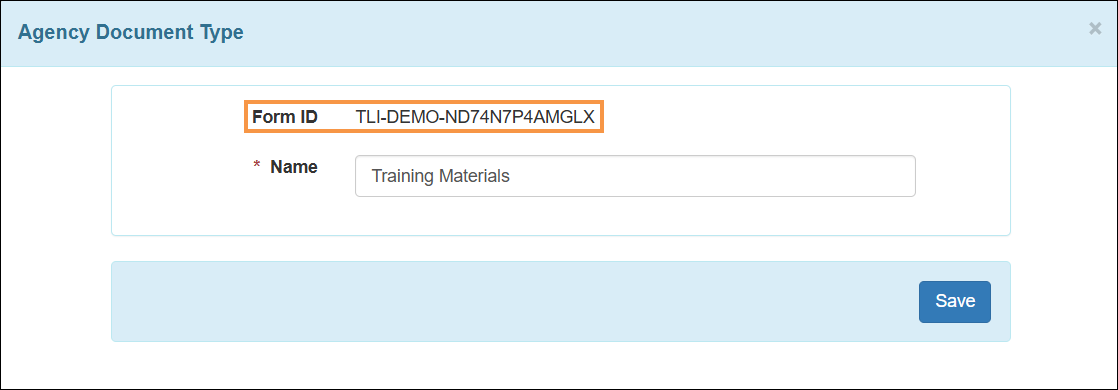
- A new Form ID column has been added to the ‘Individual Document Type List’ and ‘Agency Document Type List’ pages.
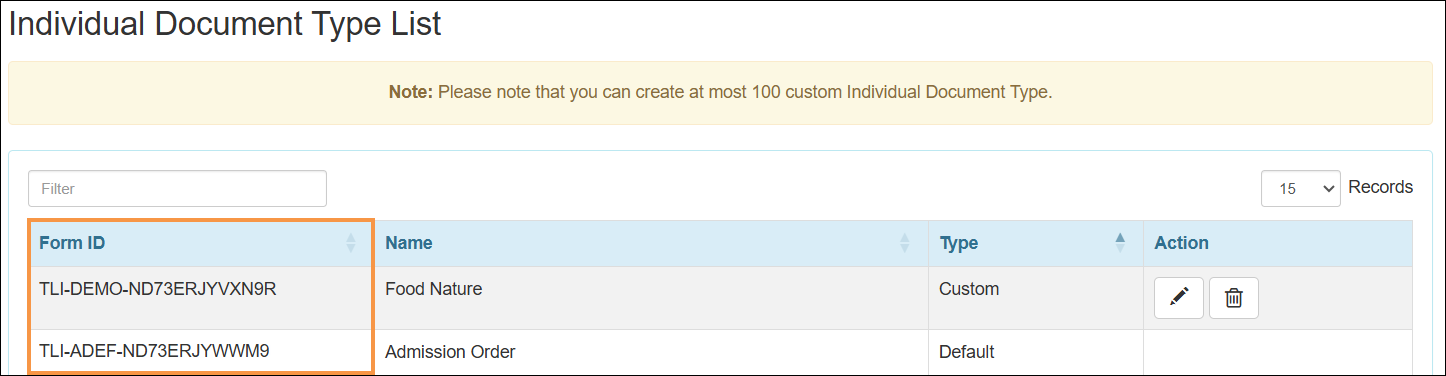
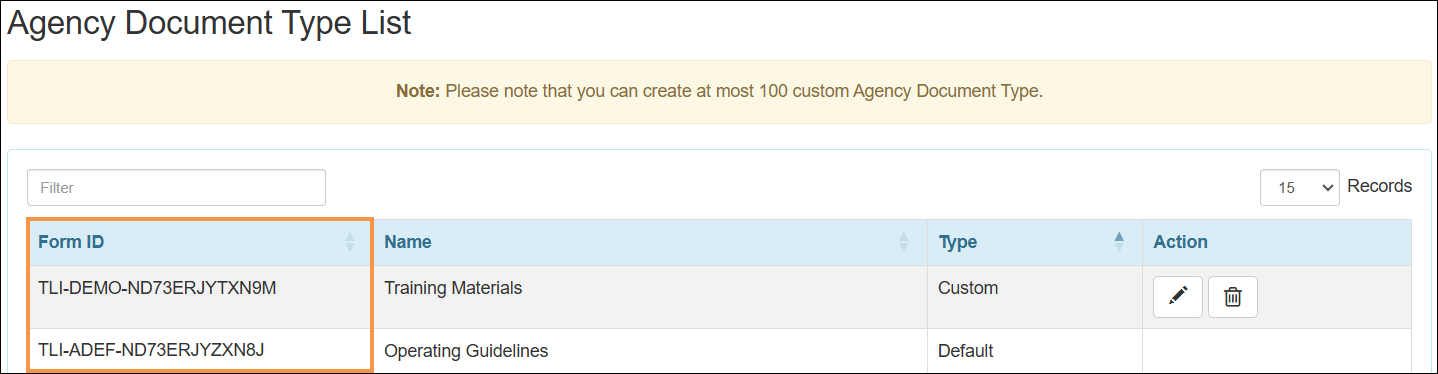
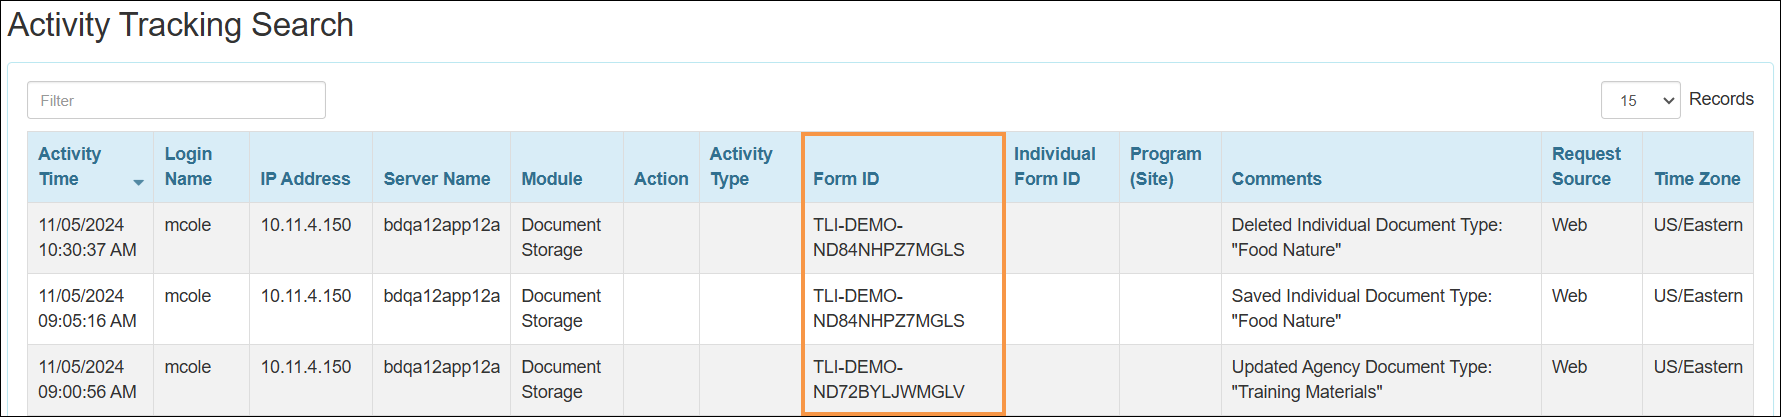
- Form IDs for Individual Document Type and Agency Document Type will show in the Form ID column of the ‘Activity Tracking Search’ result page when users save, update, and delete an Individual Document Type and Agency Document Type.
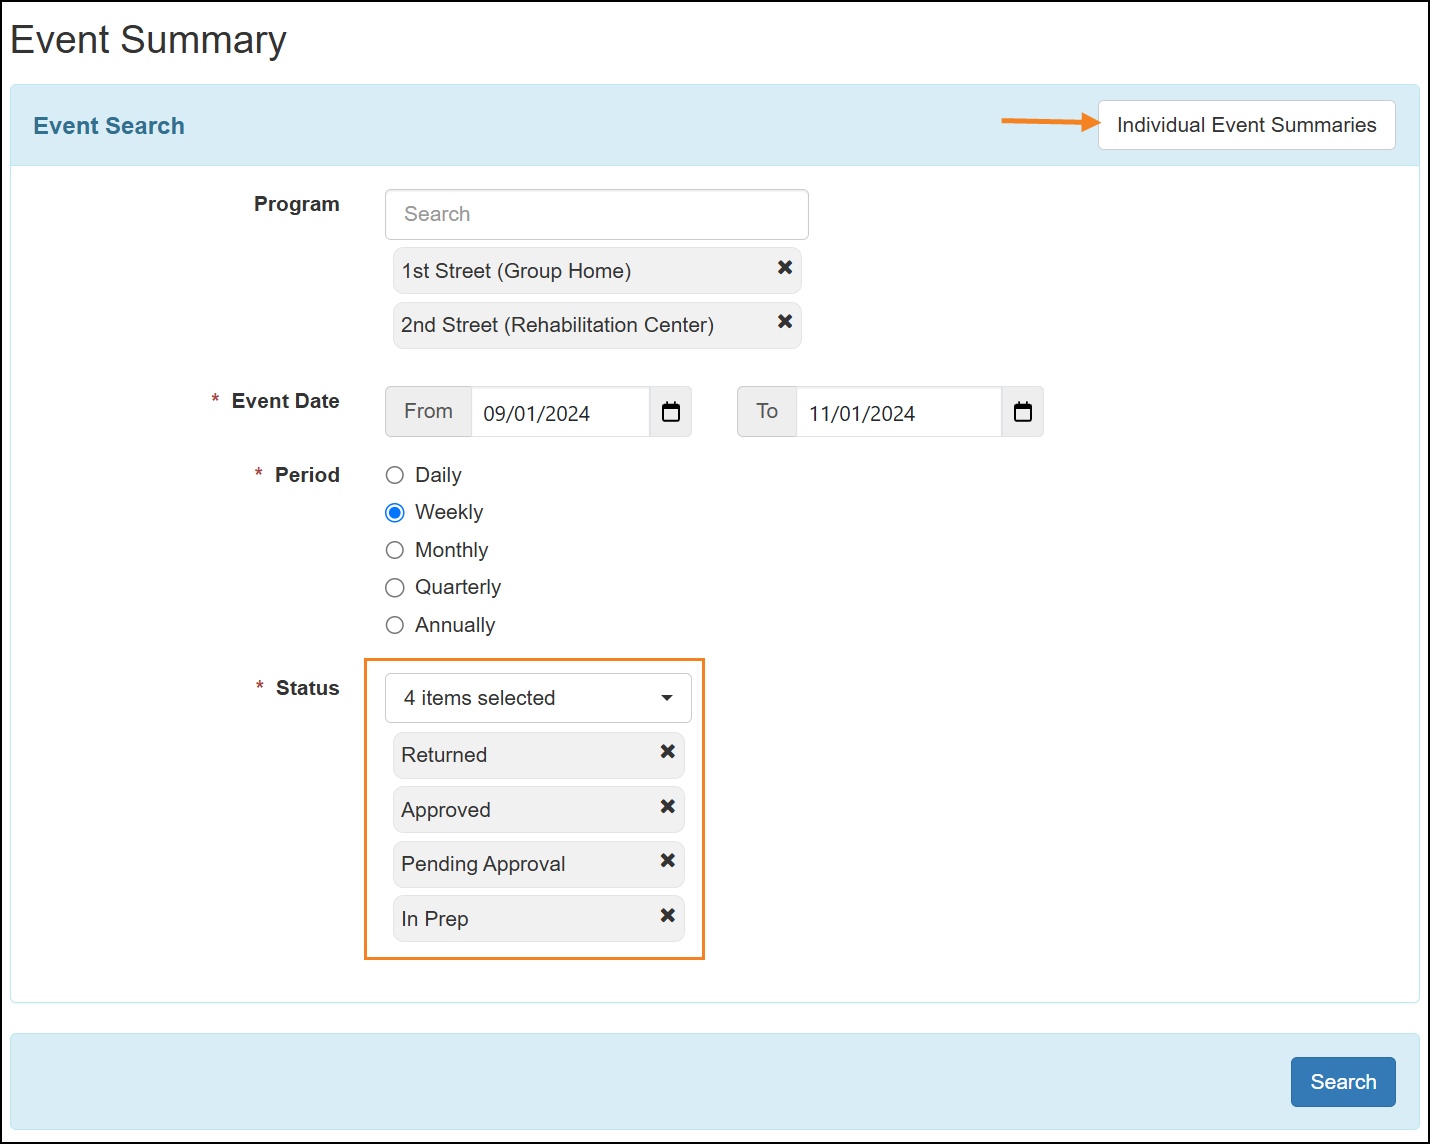
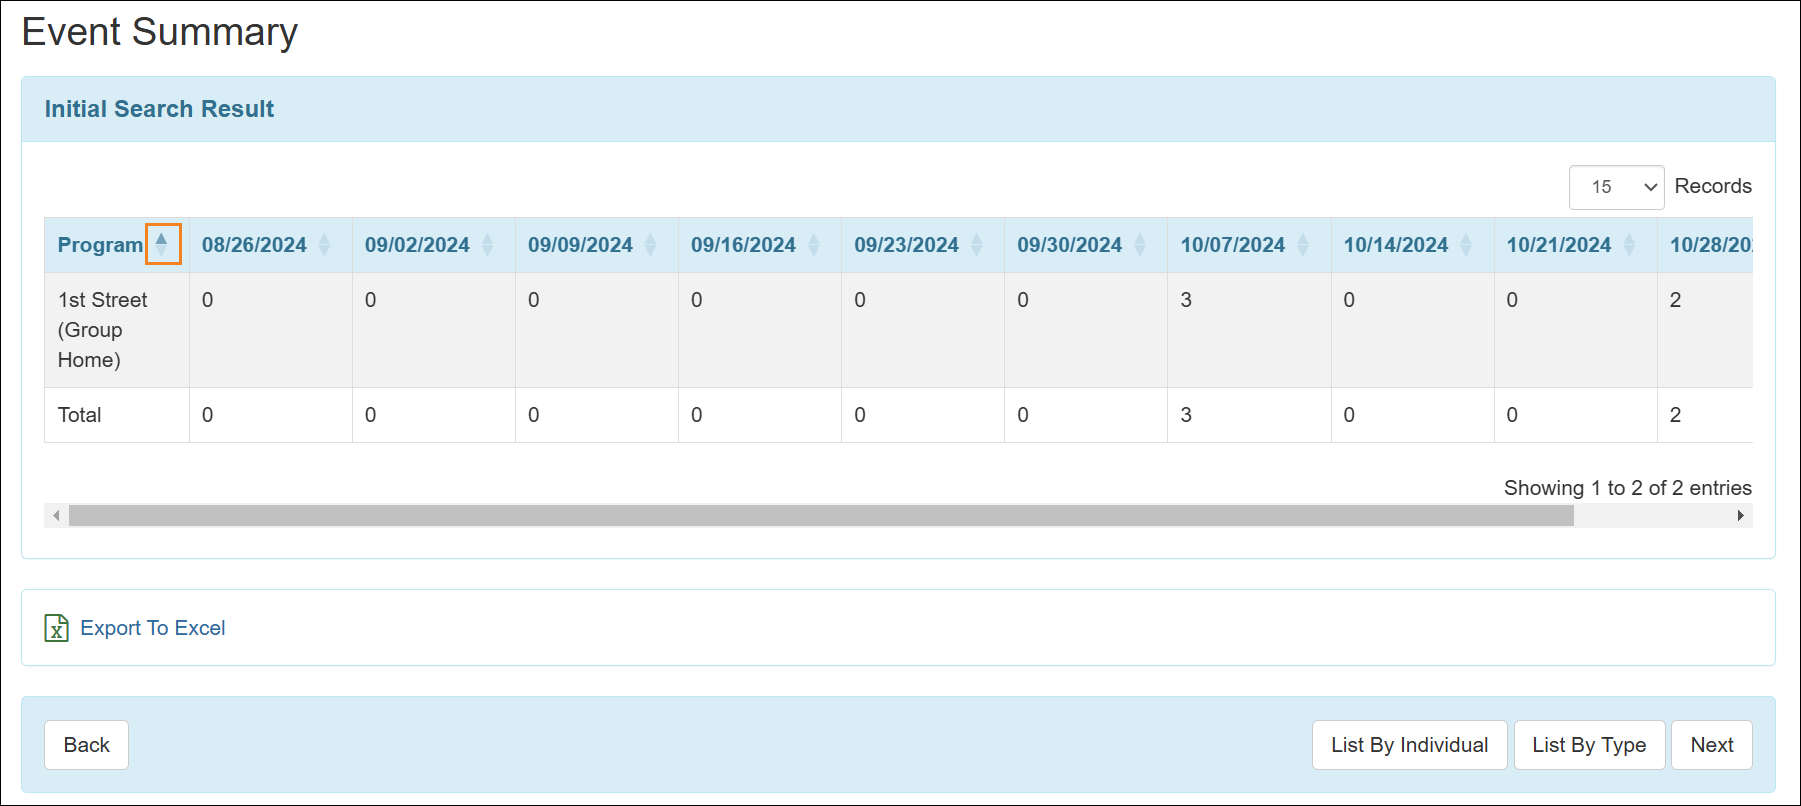
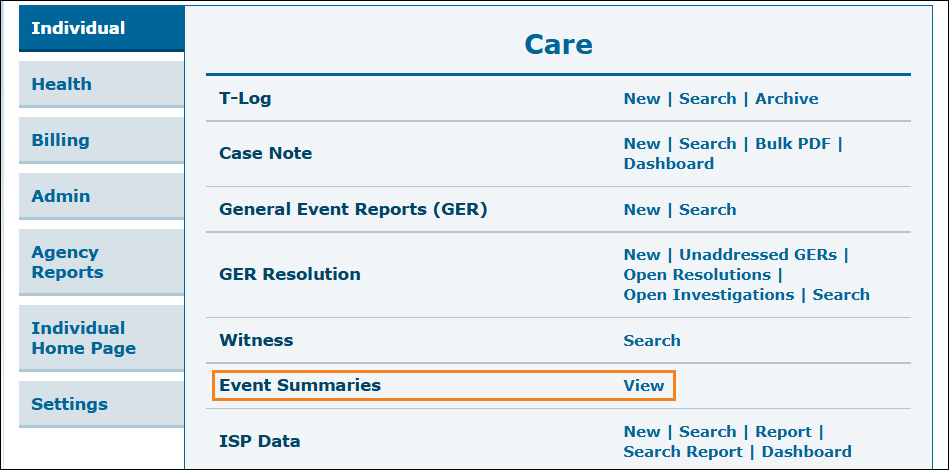
Event Summaries
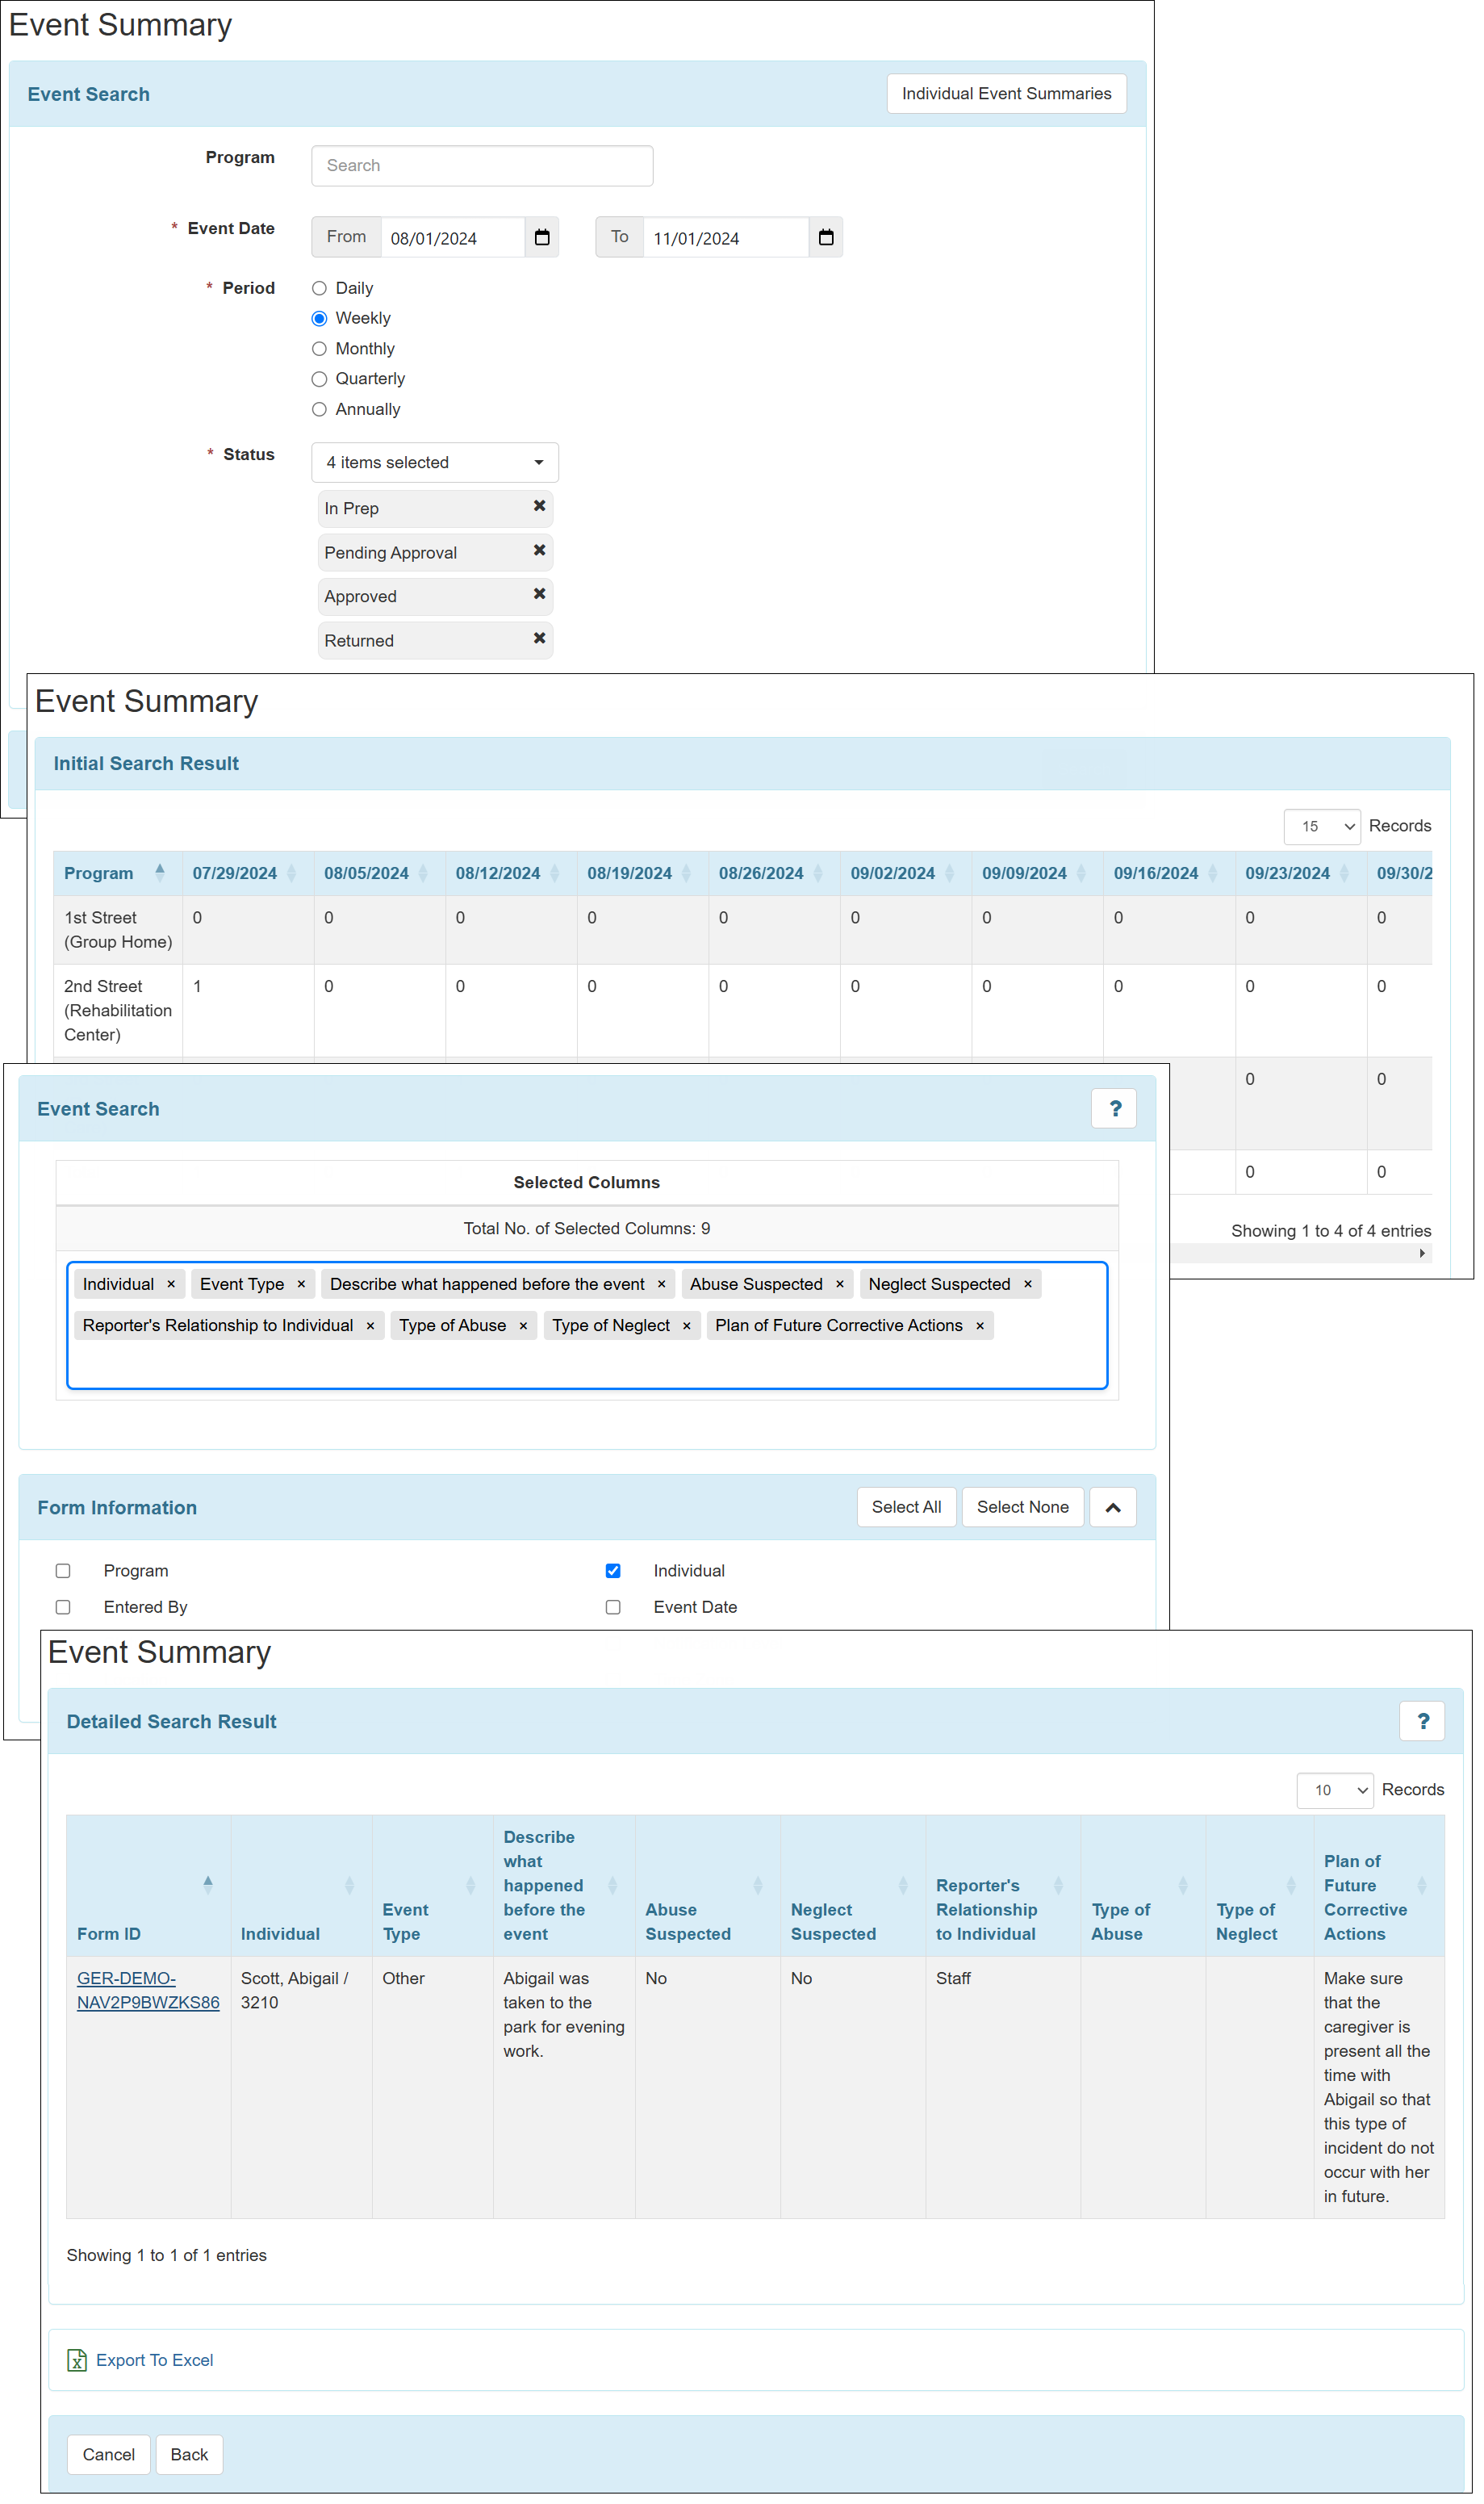
[Back to Top]- A new user interface for the Event Summaries module has been introduced.
- The following changes have been made to the 'Event Summary' page:
- The Go to Individual Event Summaries and Go to Agency-wide Event Summaries toggle links at the top of the ‘Event Search’ page will now appear as Individual Event Summaries and Agency-wide Event Summaries toggle buttons respectively on the top right corner of the 'Event Search' section.
- The Status field on the ‘Event Search’ page has been changed from checkboxes to a dropdown menu.
- A new sorting filter has been added to each column in the ‘Initial Search Result’ section of the Event Summary 'Initial Search Result' page.
- The following changes have been made to the 'Event Summary' output column selection page:
- Section labels within the 'Event Search' column selection page have been renamed to keep consistent with the GER form.
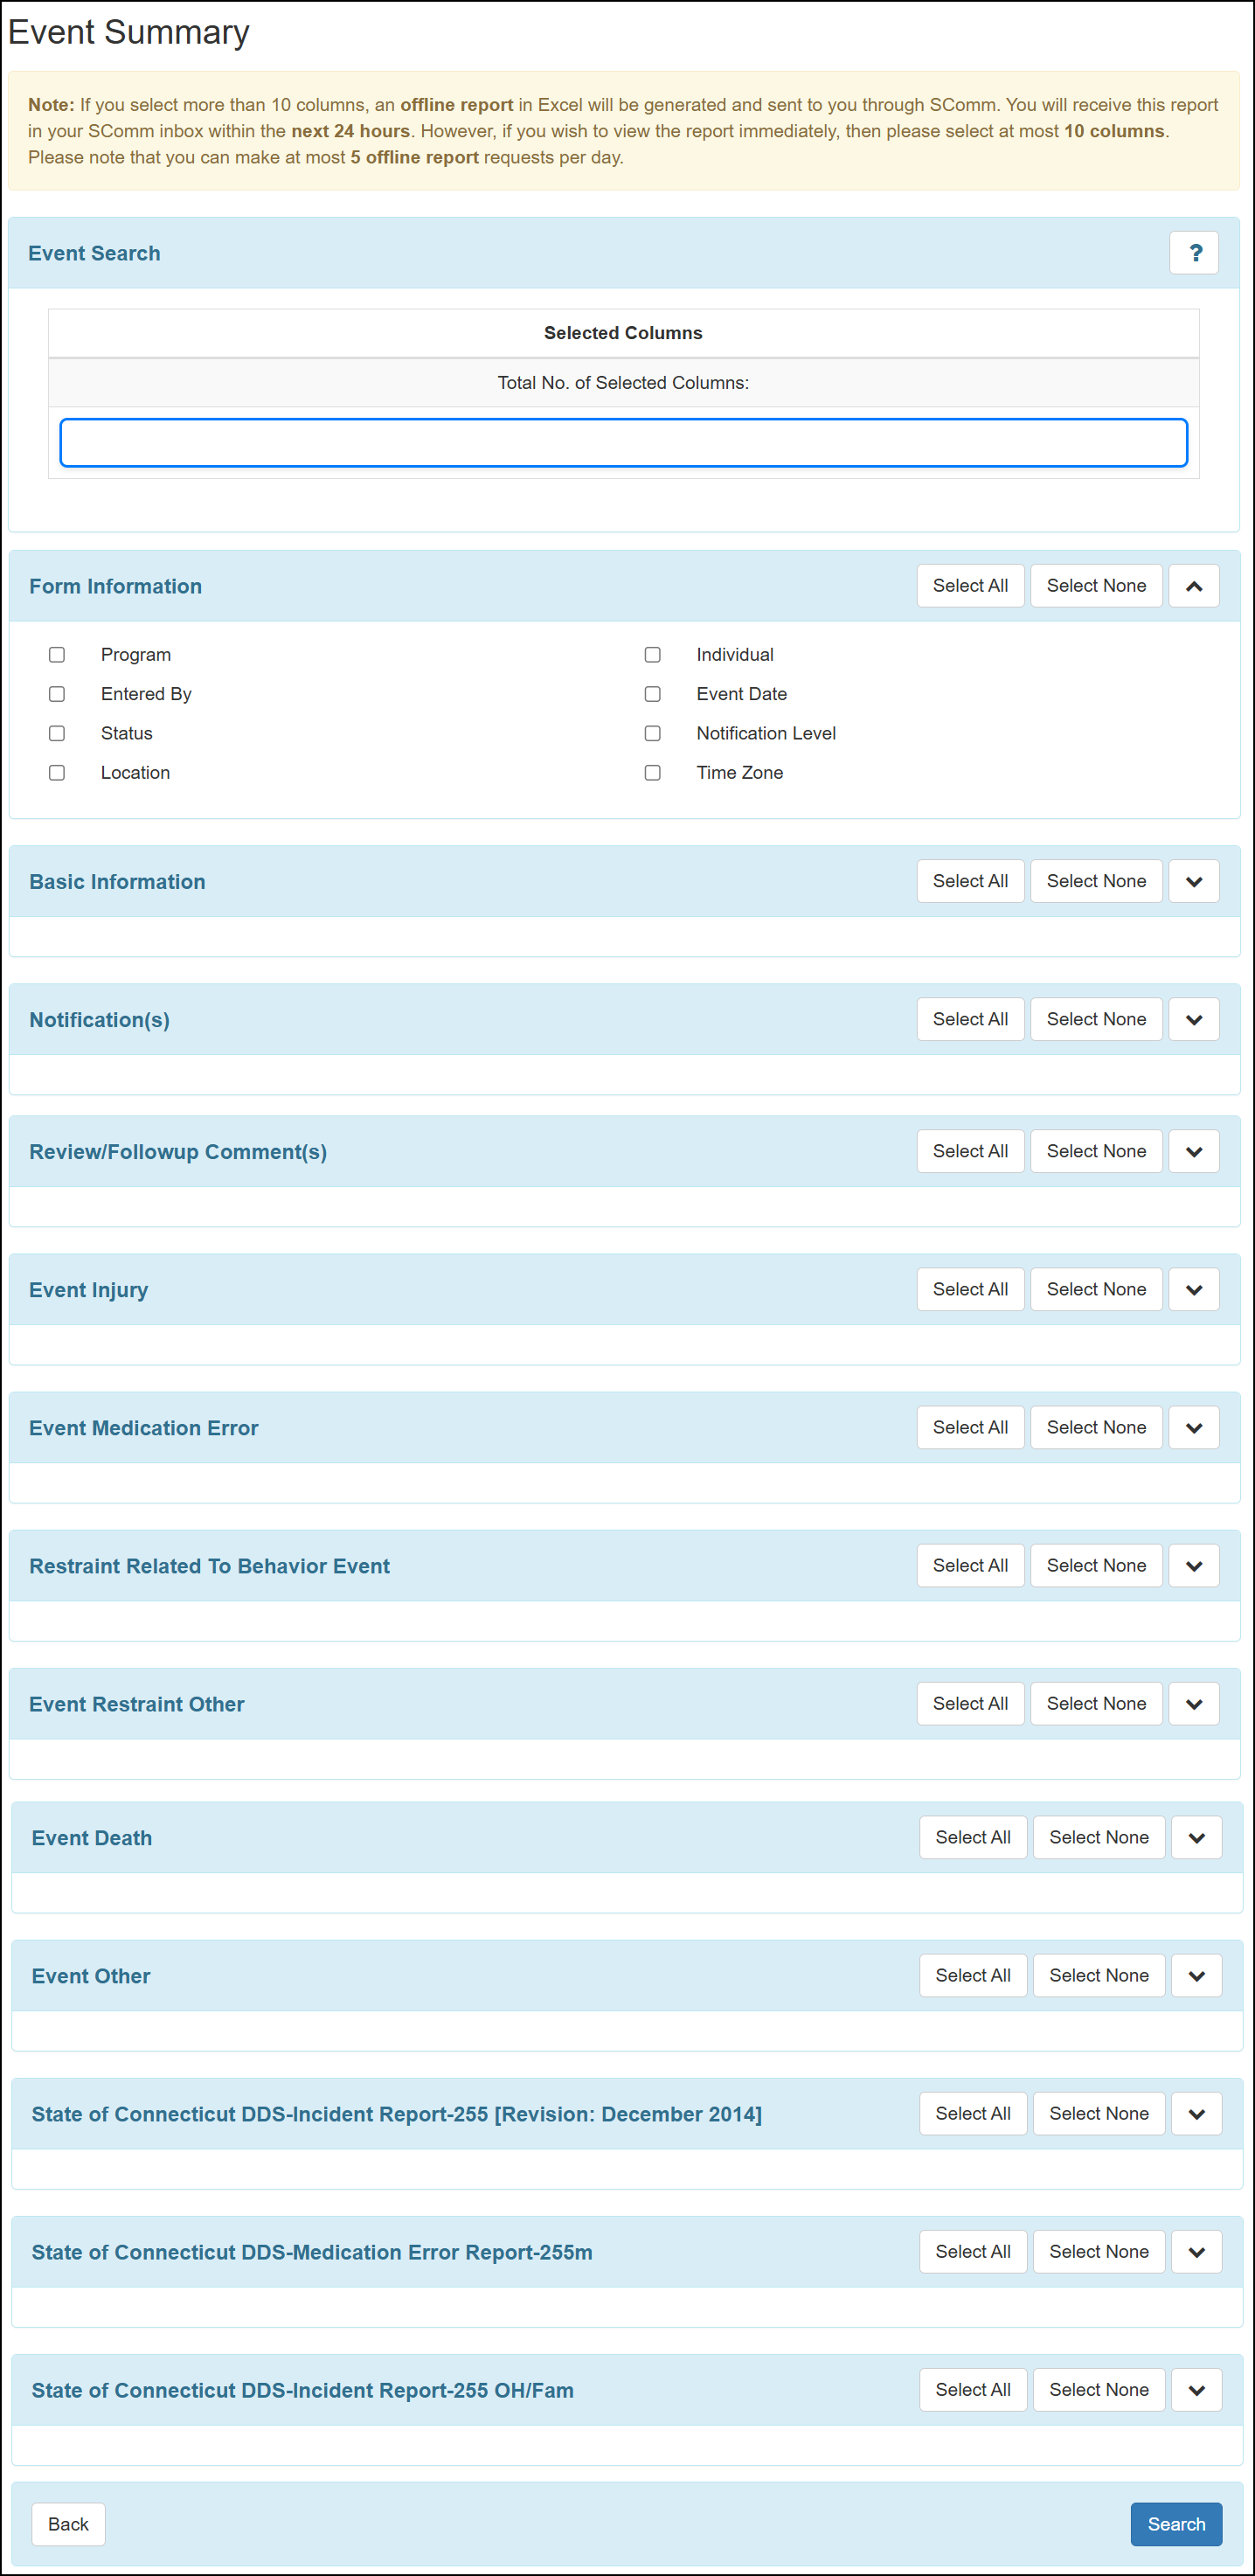
- A new auto-complete search field has been added to the new ‘Event Search’ section. Users can type in the output columns names to add them as ‘Selected Columns’. If an output column is selected using this field, it will automatically be checked off in the respective section.
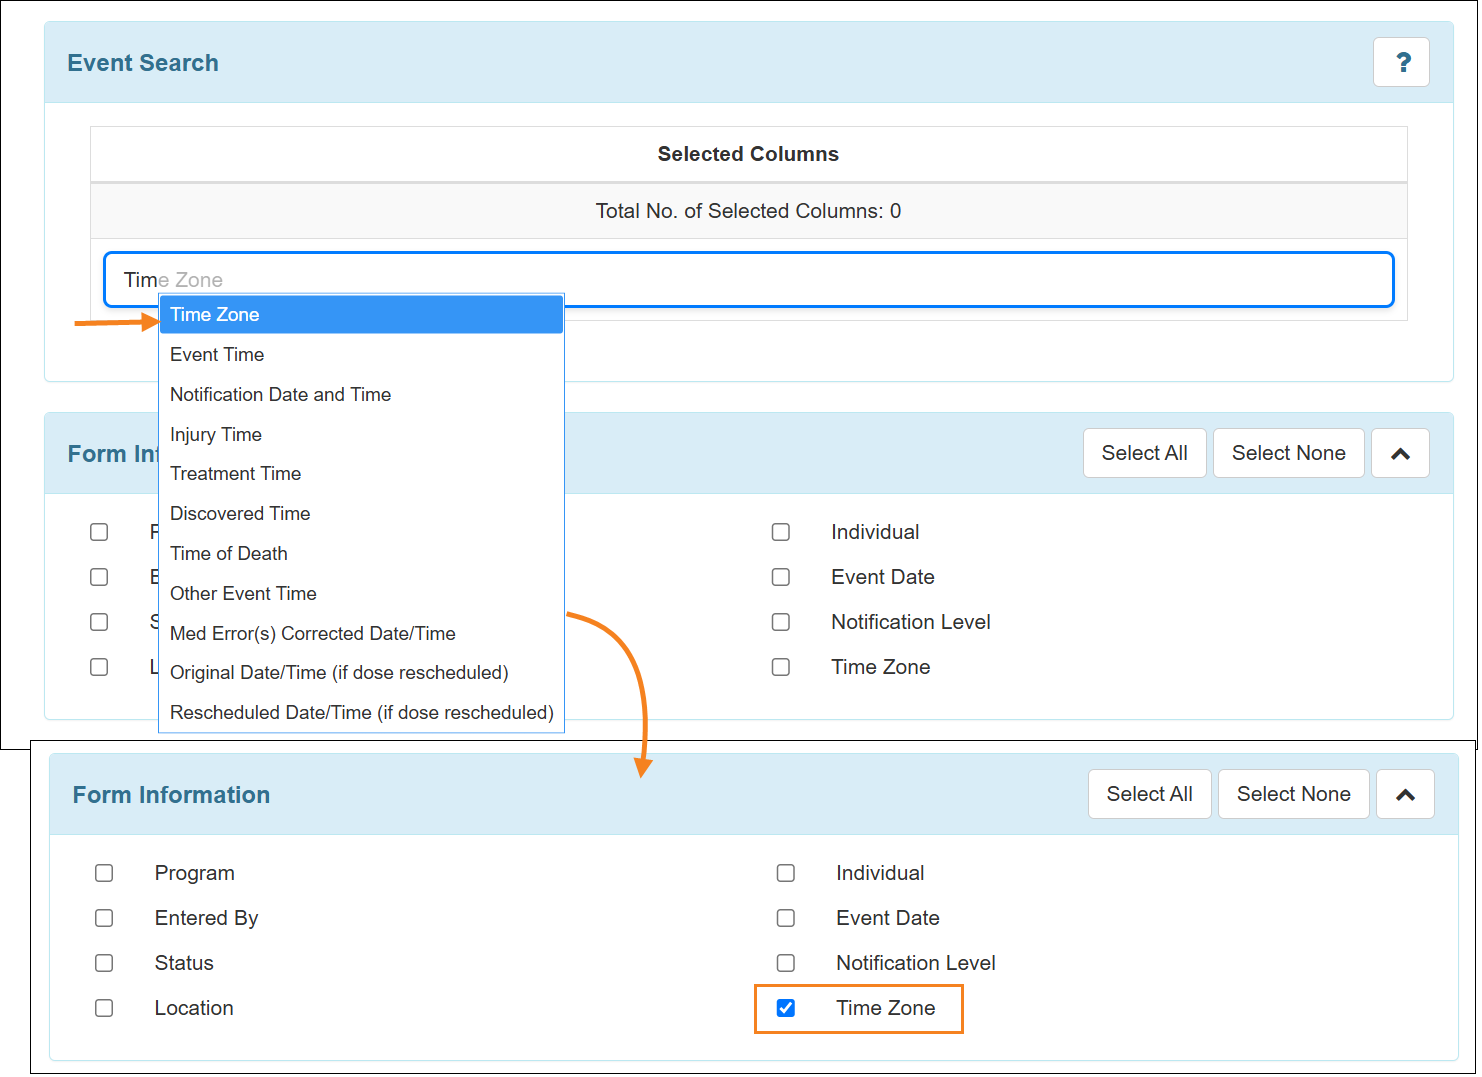
- Clicking on the Expand toggle button beside each section will expand the section and display all the options in that section. Clicking on the same toggle button again will collapse the section.
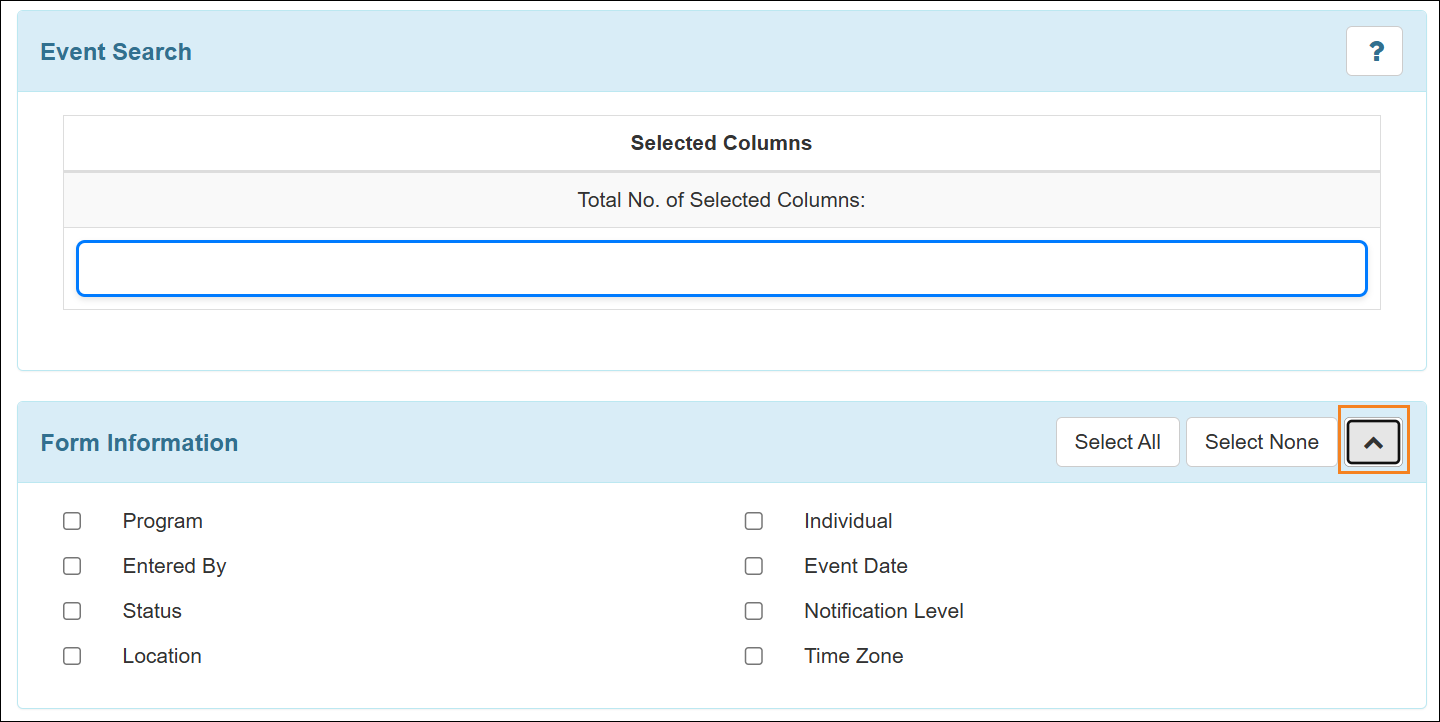
- Clicking on the Select All toggle button beside each section will select all the options and clicking on the Select None toggle button will deselect all the options.
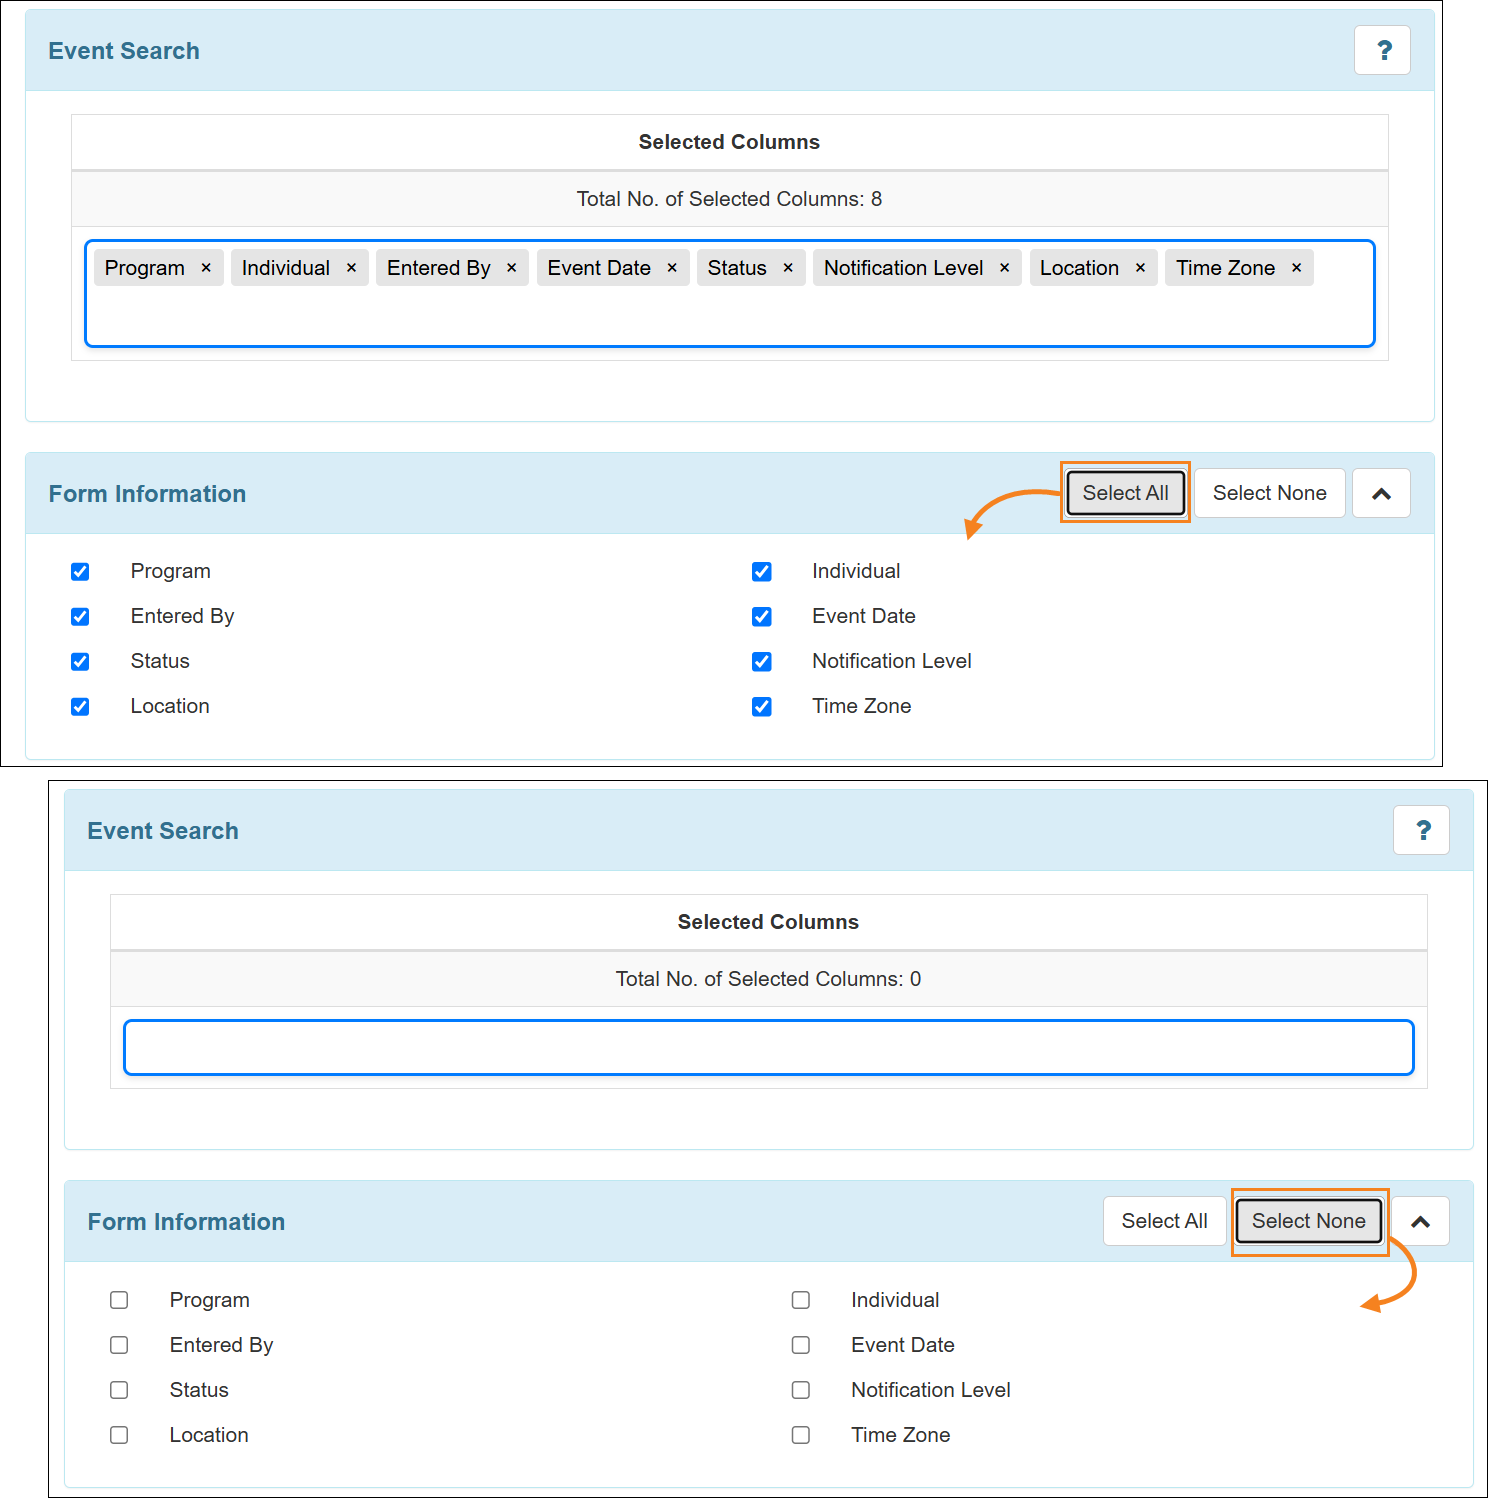
- In the Event Medication Error section, the following output columns have been renamed:
- From ‘Cause Of Error’ to ‘Medication Error Cause’.
- From ‘Error Discovered Time’ to ‘Discovered Time’.
- Section labels within the 'Event Search' column selection page have been renamed to keep consistent with the GER form.
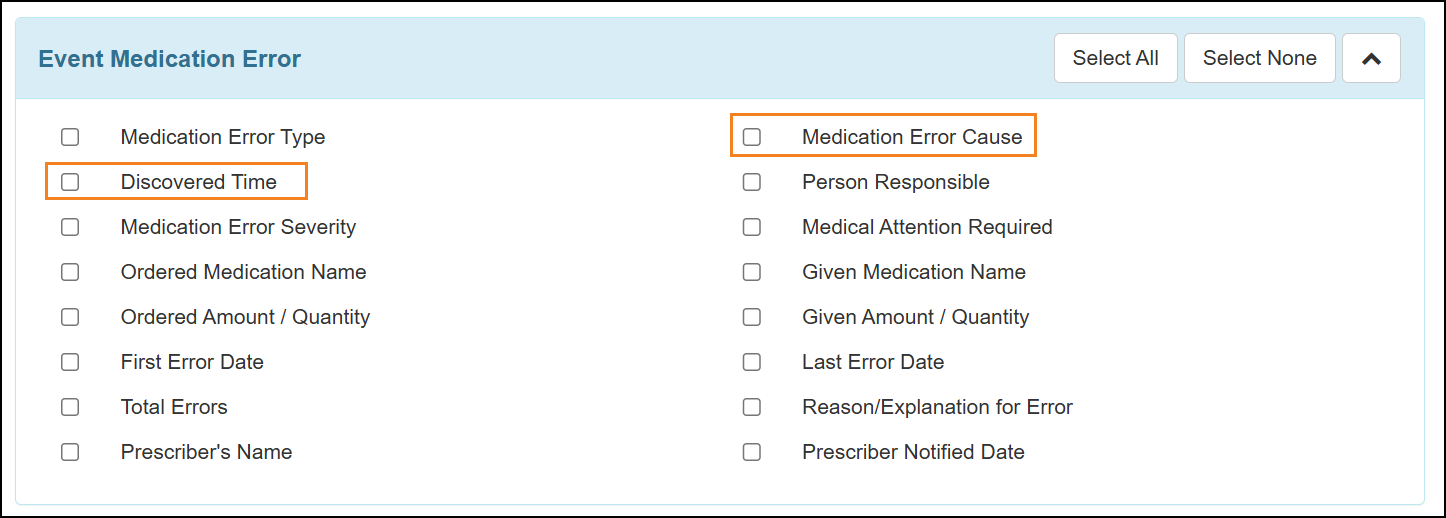
- The following change has been made to the Event Summary 'Detailed Search Result' page:
- On the ‘Detailed Search Result’ page, clicking on a Form ID hyperlink in the Form ID column will display the form in the ‘GER’ popup window. Users can scroll down to the bottom of the page and click on the Edit button to access the form.
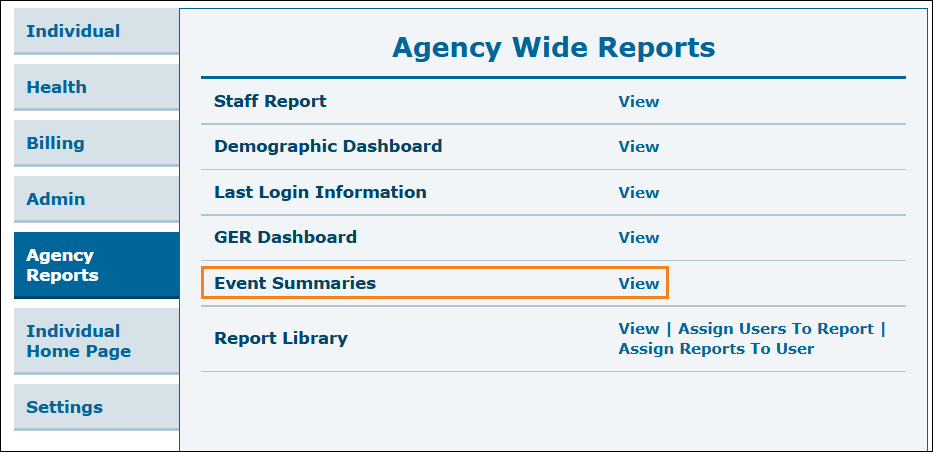
- After switching to the linked providers, Oversight users will now be able to access the View link beside the Event Summaries option from the Agency Reports tab and Individual tab.
- On the ‘Detailed Search Result’ page, clicking on a Form ID hyperlink in the Form ID column will display the form in the ‘GER’ popup window. Users can scroll down to the bottom of the page and click on the Edit button to access the form.
General Events Report (GER)
[Back to Top]- The following changes have been made to the GER Dashboard:
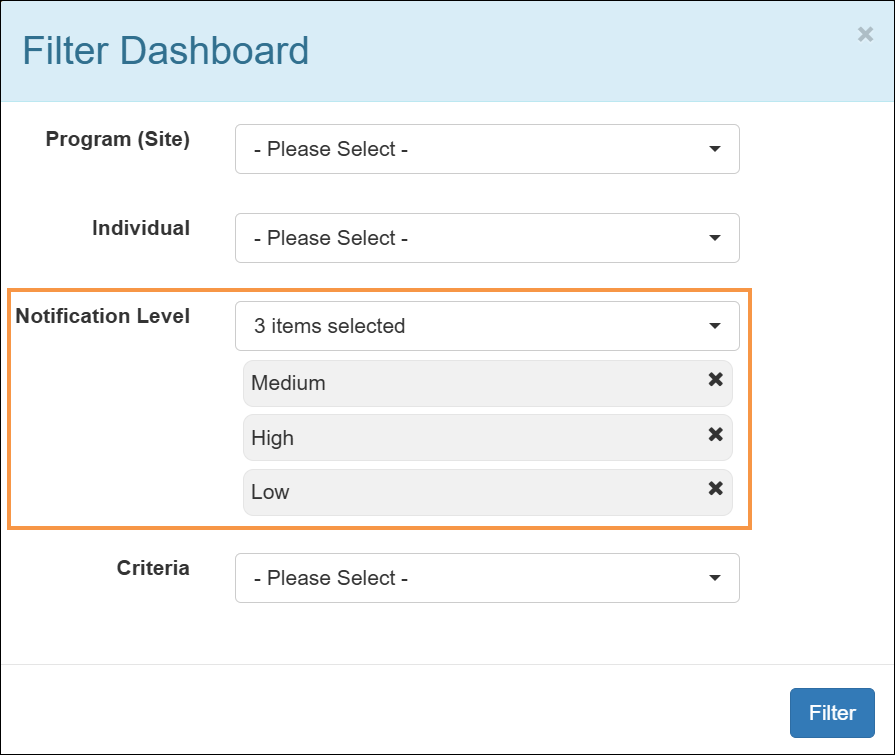
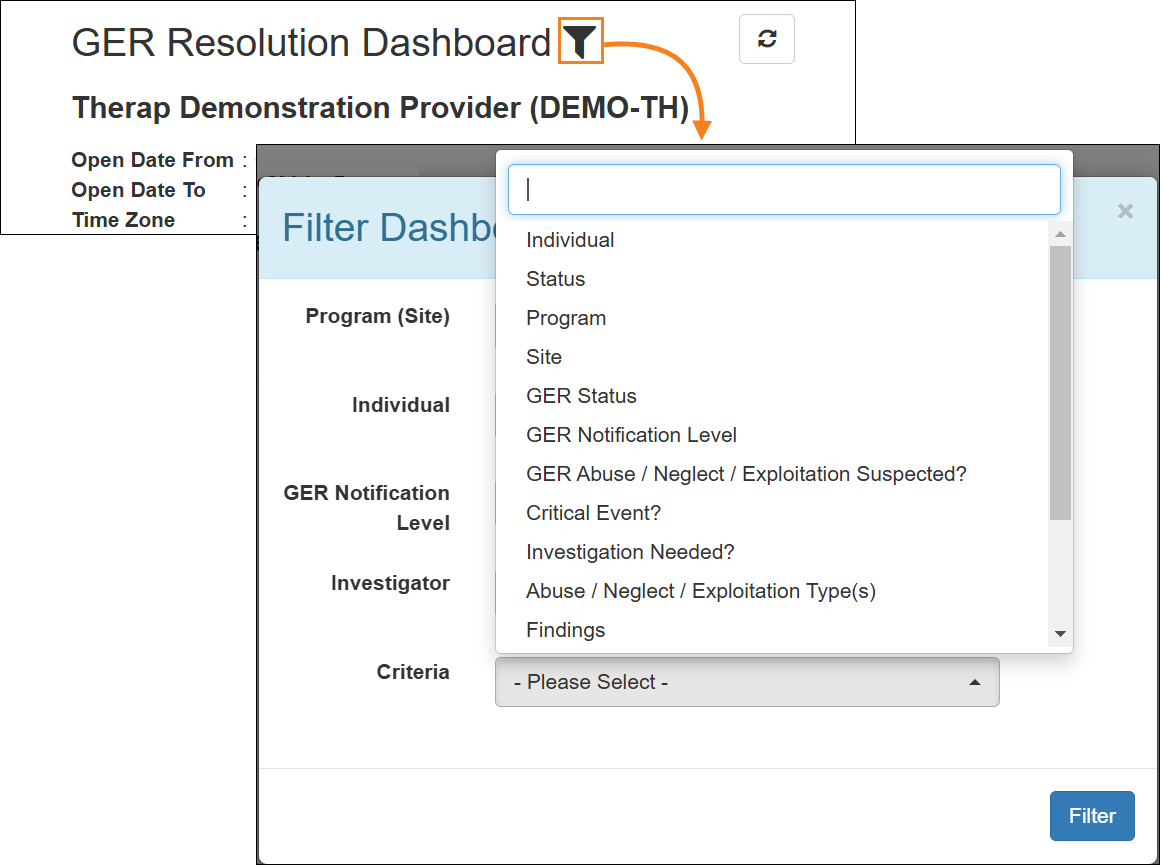
- Notification Level as a new criterion has been added to the ‘Filter Dashboard’ popup window. This will allow users to filter the GER Dashboard for their selected notification level(s).
- On the GER Dashboard generated for the ‘General Information’ Component, the following changes have been made:
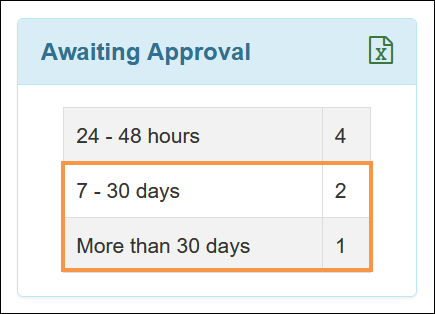
- For the ‘Awaiting Approval' criterion section, the More than 7 days option has been split into the new 7 - 30 days and More than 30 days options.
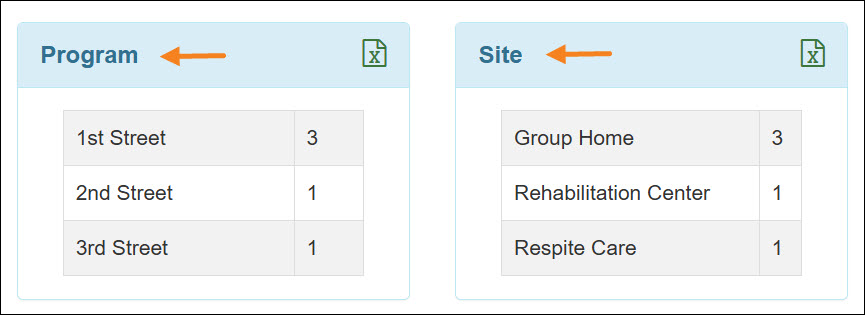
- The ‘Program (Site)’ criterion section has been split into the new ‘Program’ and ‘Site’ criteria sections.
- For the ‘Awaiting Approval' criterion section, the More than 7 days option has been split into the new 7 - 30 days and More than 30 days options.
- Notification Level as a new criterion has been added to the ‘Filter Dashboard’ popup window. This will allow users to filter the GER Dashboard for their selected notification level(s).
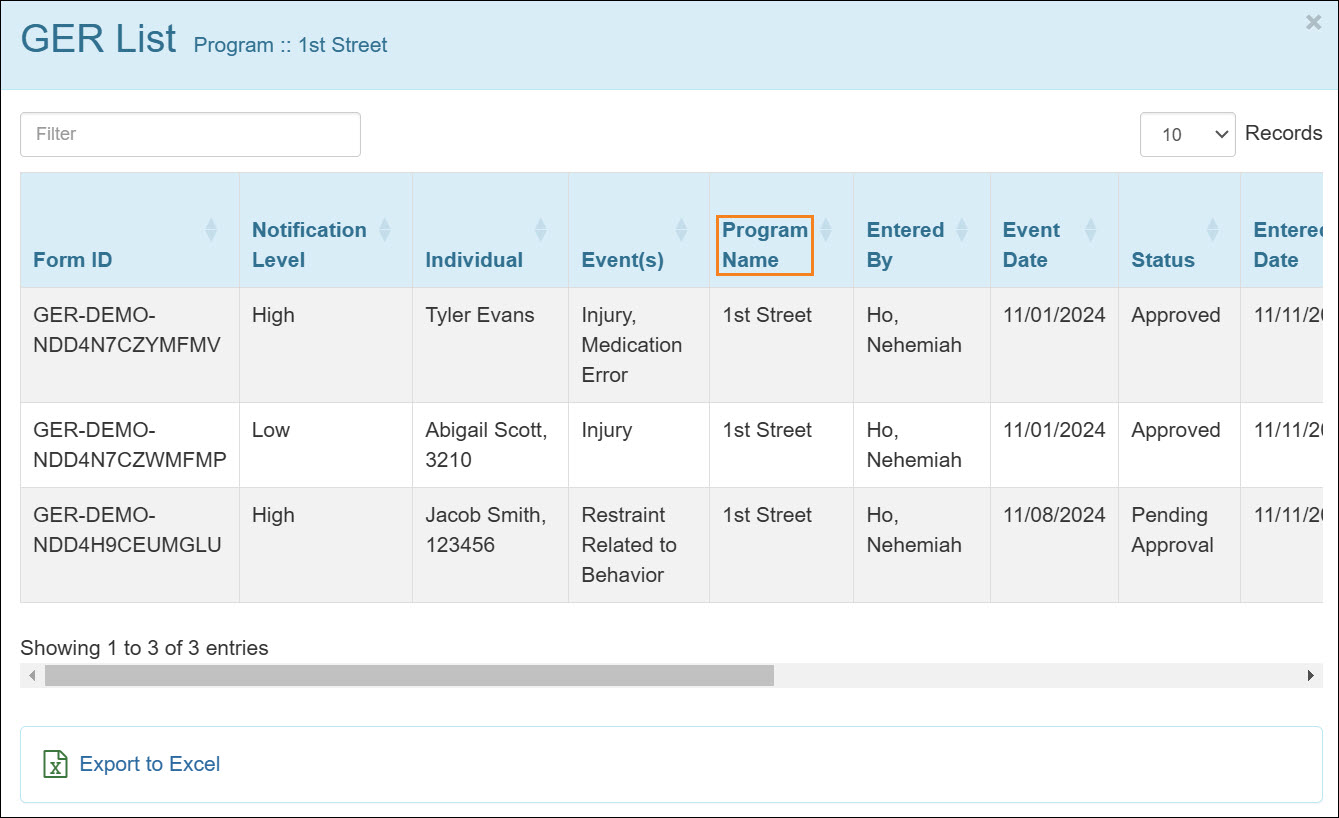
- On the 'GER List' page that appears after clicking on each row of the criteria sections, the Program (Site) column has been renamed to Program Name, and will now display only the program information.
GER Resolution
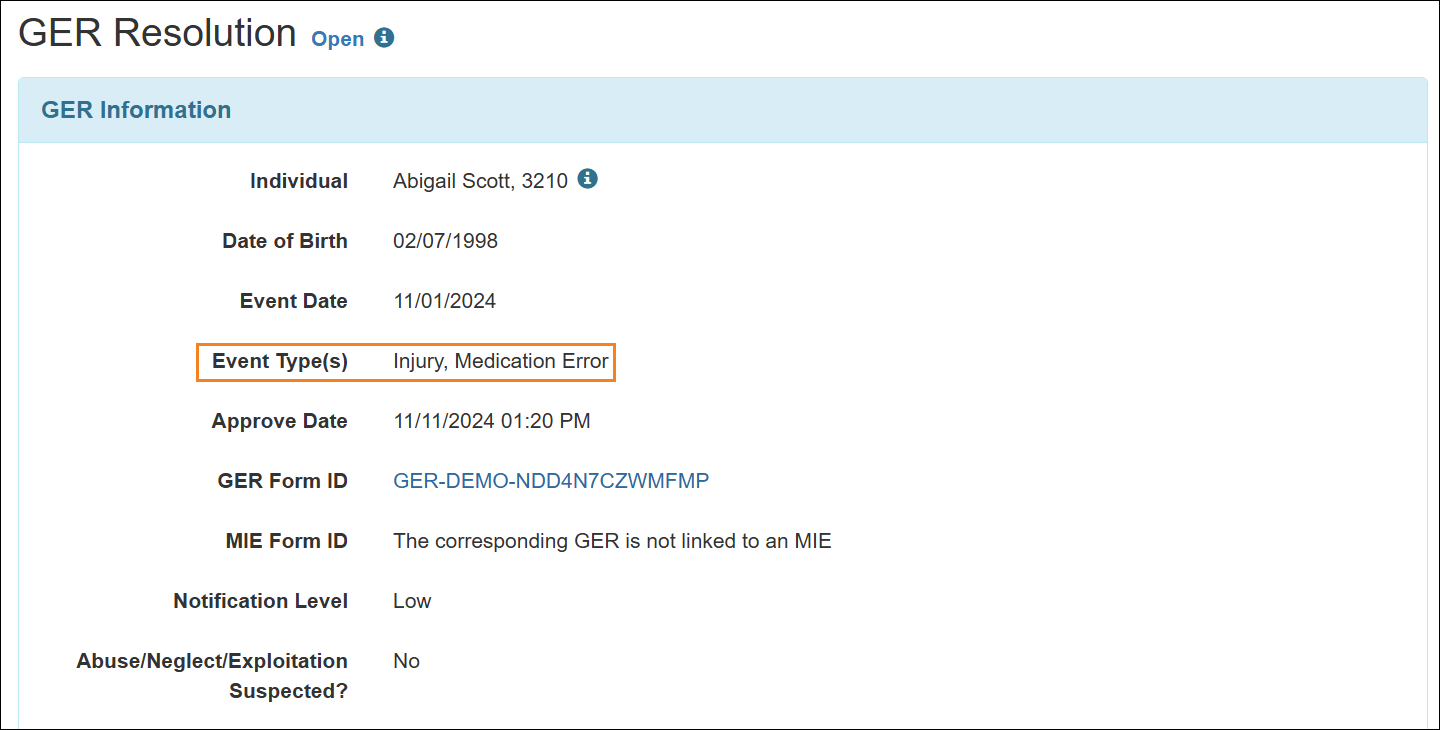
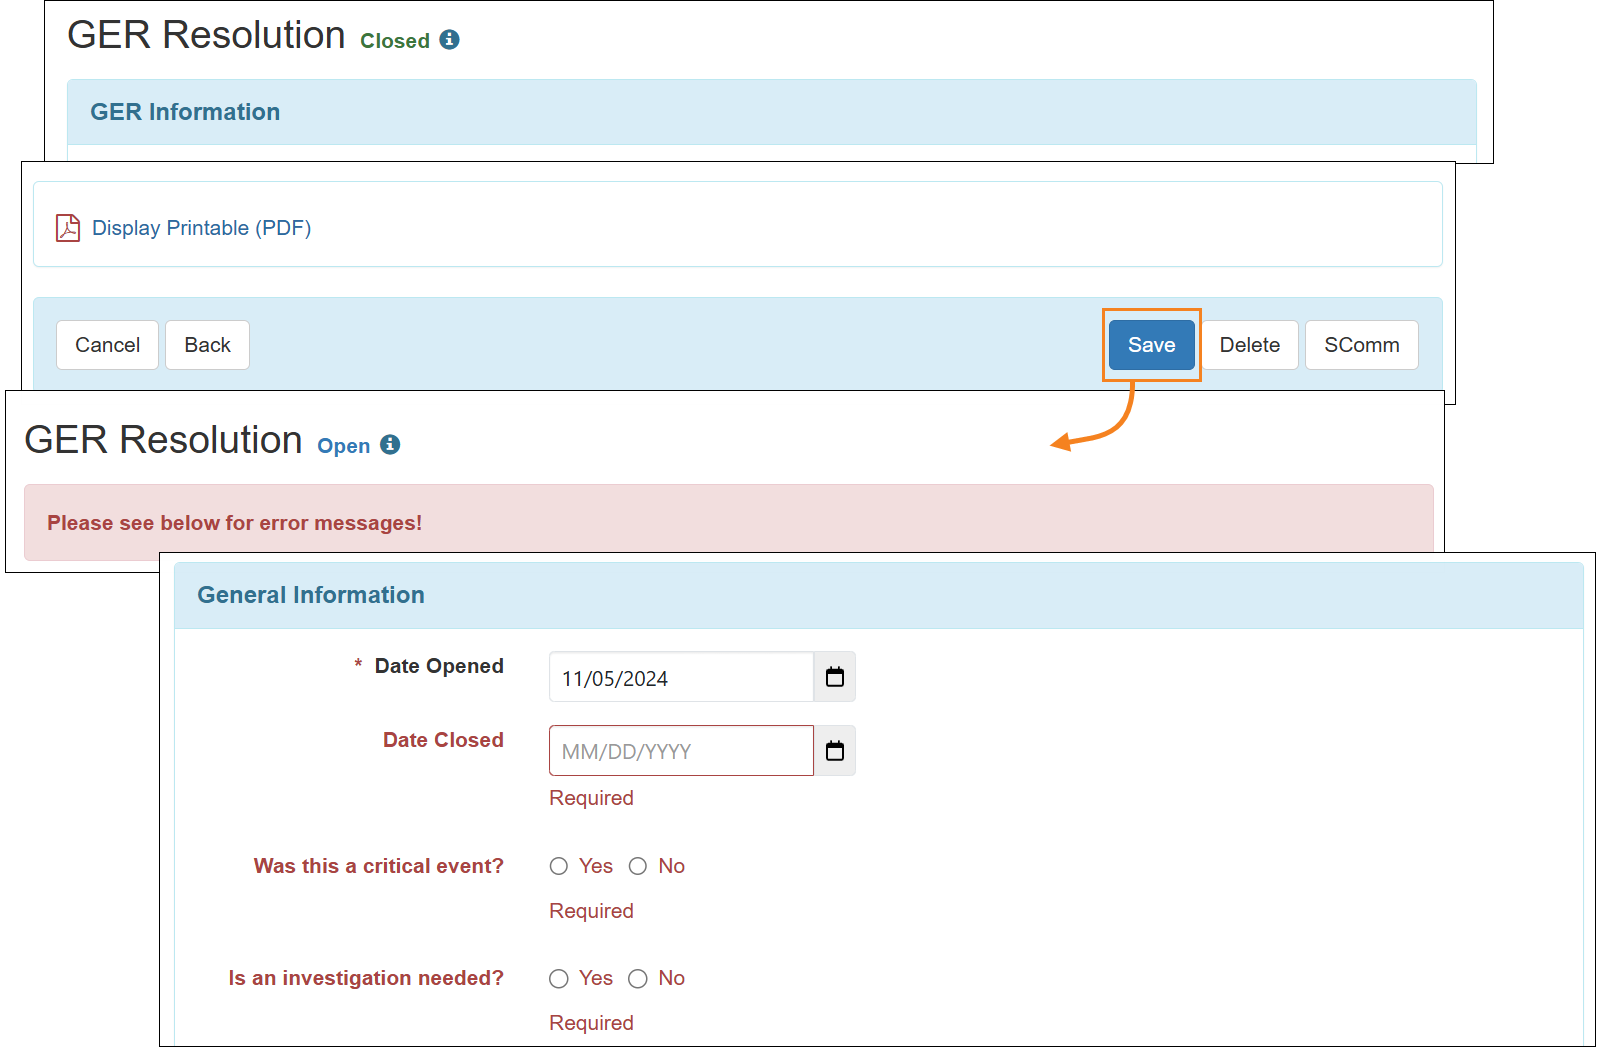
[Back to Top]- A new field titled Event Type(s) has been added in the ‘GER Information’ section of the GER Resolution form. This field will display the event types that have been added to the respective GER form.
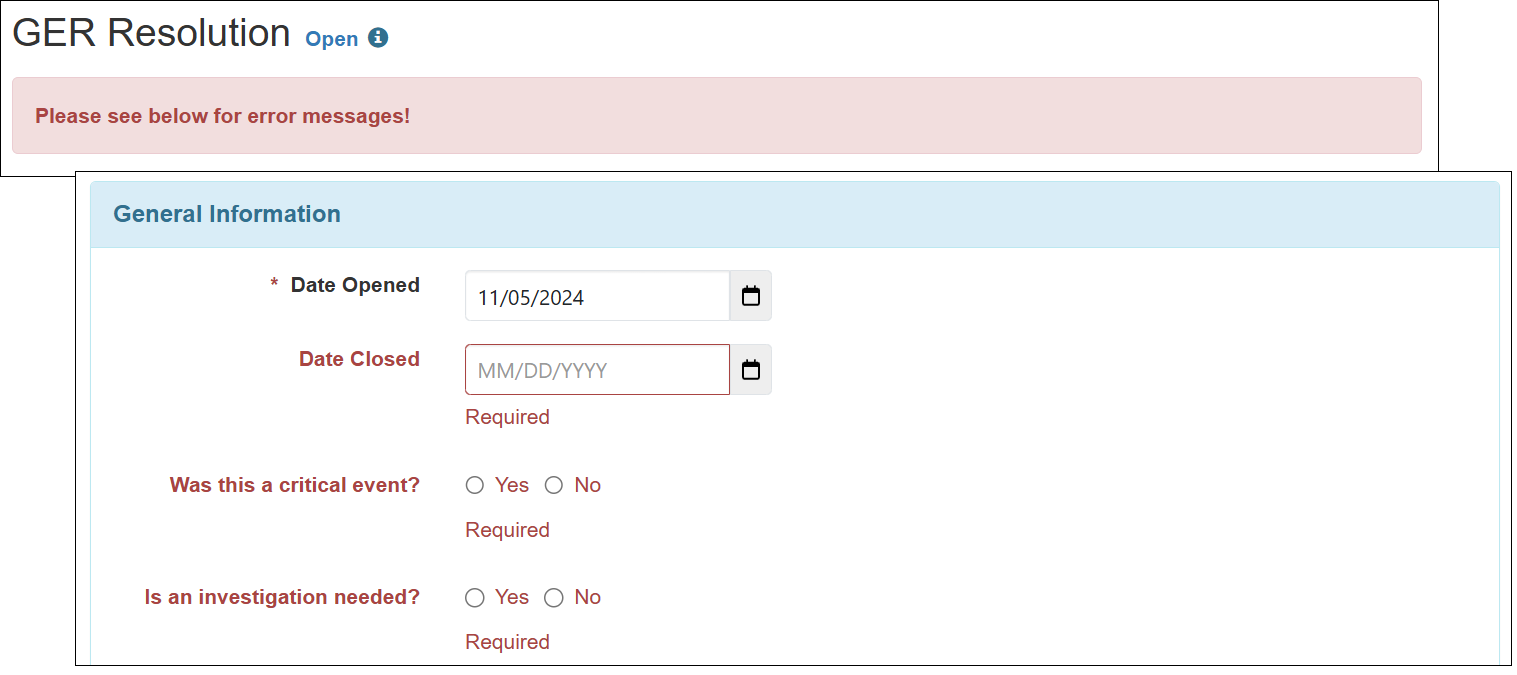
- While attempting to close a GER resolution, users must now enter information in the following fields:
- Was this a critical event?
- Is an investigation needed?
If users attempt to close a GER Resolution without entering information in these two fields then they will receive an error message.
- For the GER Resolutions closed prior to this release, if the Was this a critical event? and Is an investigation needed? fields remain blank, then users will receive an error message while attempting to update the GER Resolutions.
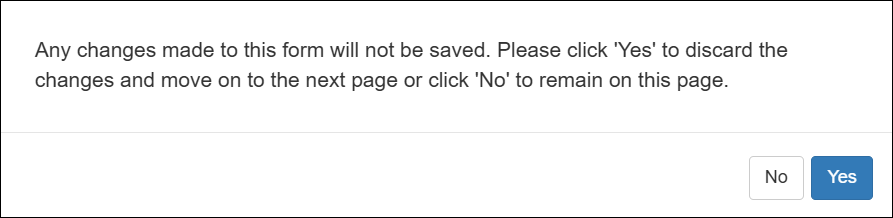
- If users enter information in a GER Resolution form but attempts to navigate away from the form without saving, closing, or deleting it, they will receive a warning message stating:
'Any changes made to this form will not be saved. Please click ‘Yes’ to discard the changes and move on to the next page or click ‘No’ to remain on this page.'
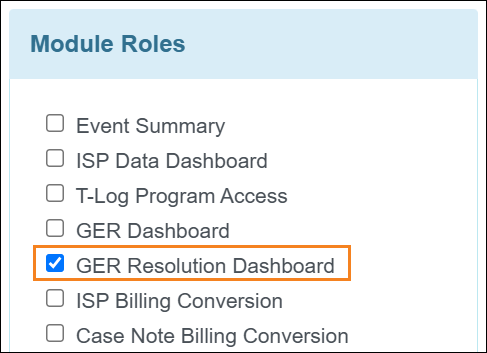
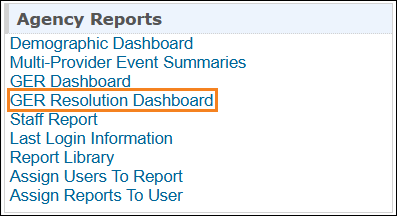
- A new agency wide and administrative role titled GER Resolution Dashboard has been added in the 'Module Roles' section of the 'User Privilege' page. Users assigned with this role will be able to access the new GER Resolution Dashboard for all individuals in the agency by clicking on the View link next to the new GER Resolution Dashboard option on the Agency Reports tab.
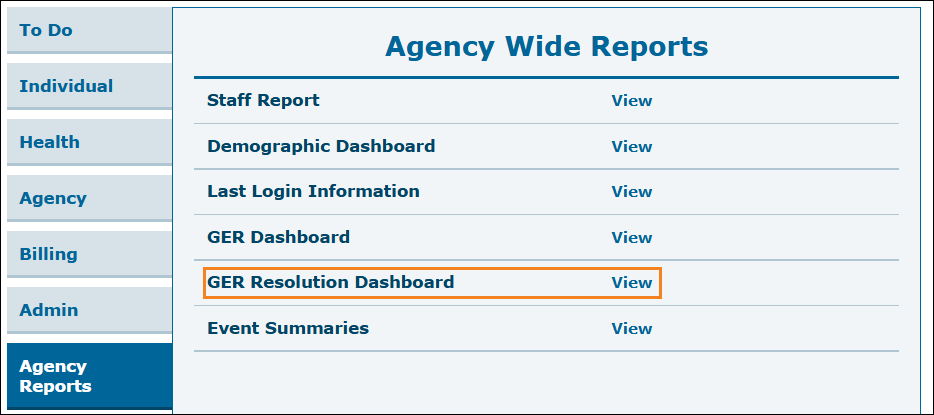
Oversight users will find the GER Resolution Dashboard link in the ‘Agency Reports’ section on their Oversight Dashboard. Using this link, Oversight users will also be able to generate Dashboard for GER Resolutions created from the linked providers.
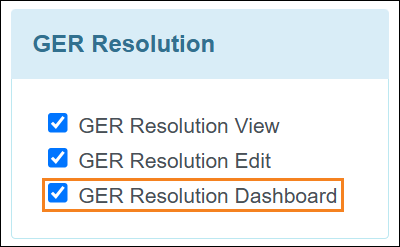
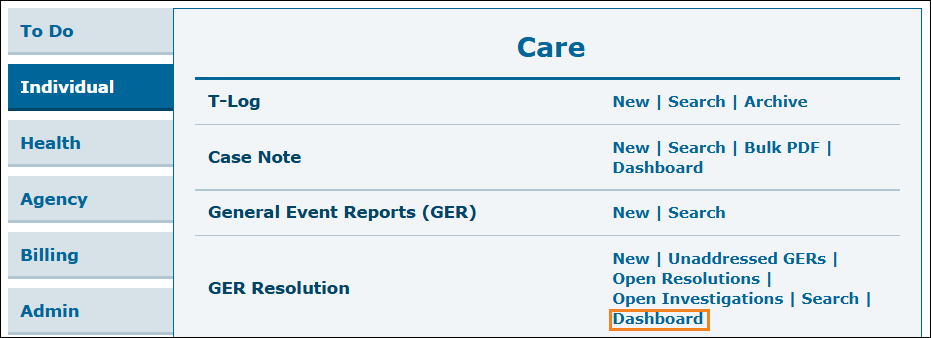
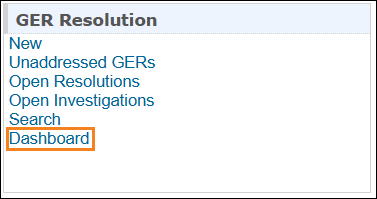
- A new caseload-based role titled GER Resolution Dashboard has been added in the ‘GER Resolution’ section of the 'Super Role' page. Users assigned with this role will be able to access the GER Resolution Dashboard for the individuals in their caseloads by clicking on the new Dashboard link next to the GER Resolution option on the Individual tab.
Oversight users will find the Dashboard link in the ‘GER Resolution’ section on their Oversight Dashboard to view the GER Resolutions created by the respective Oversight provider.
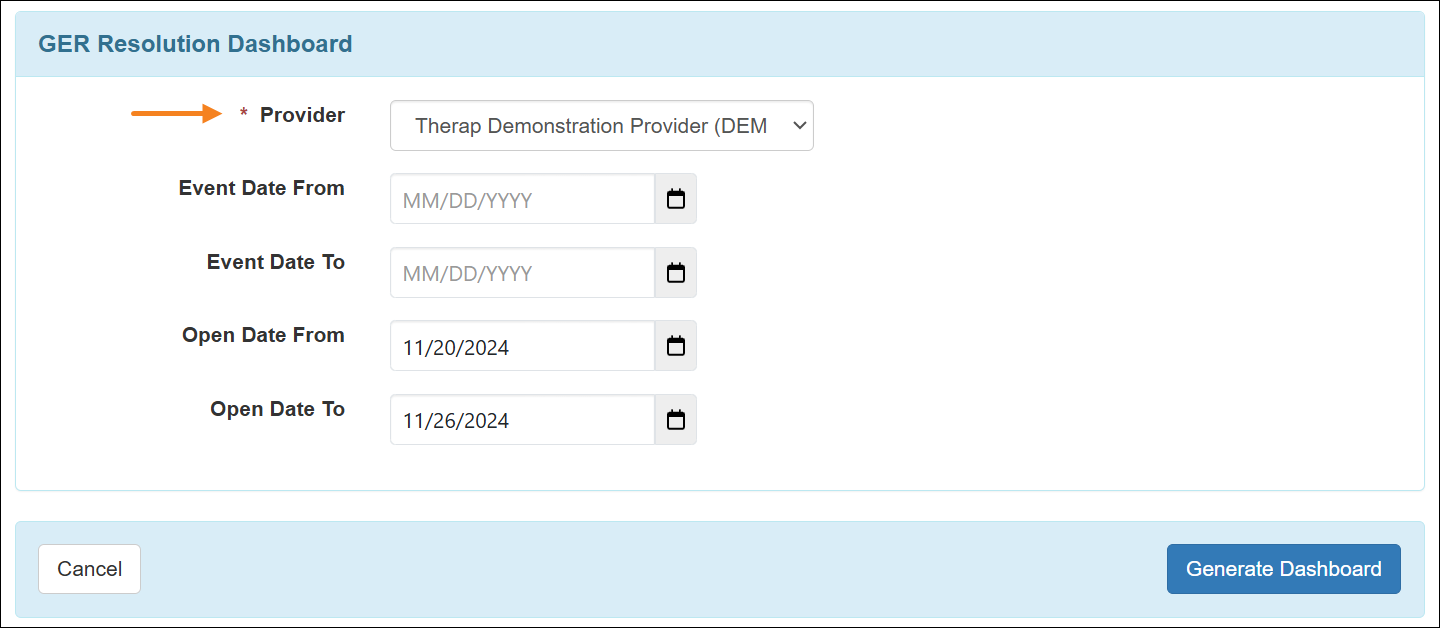
- Accessing the GER Resolution Dashboard will open up the ‘GER Resolution Dashboard’ search criteria page. Users will need to enter an appropriate Event Date From to Event Date To, or Open Date From to Open Date To date range for up to 6 months to be able to generate the GER Resolution Dashboard.
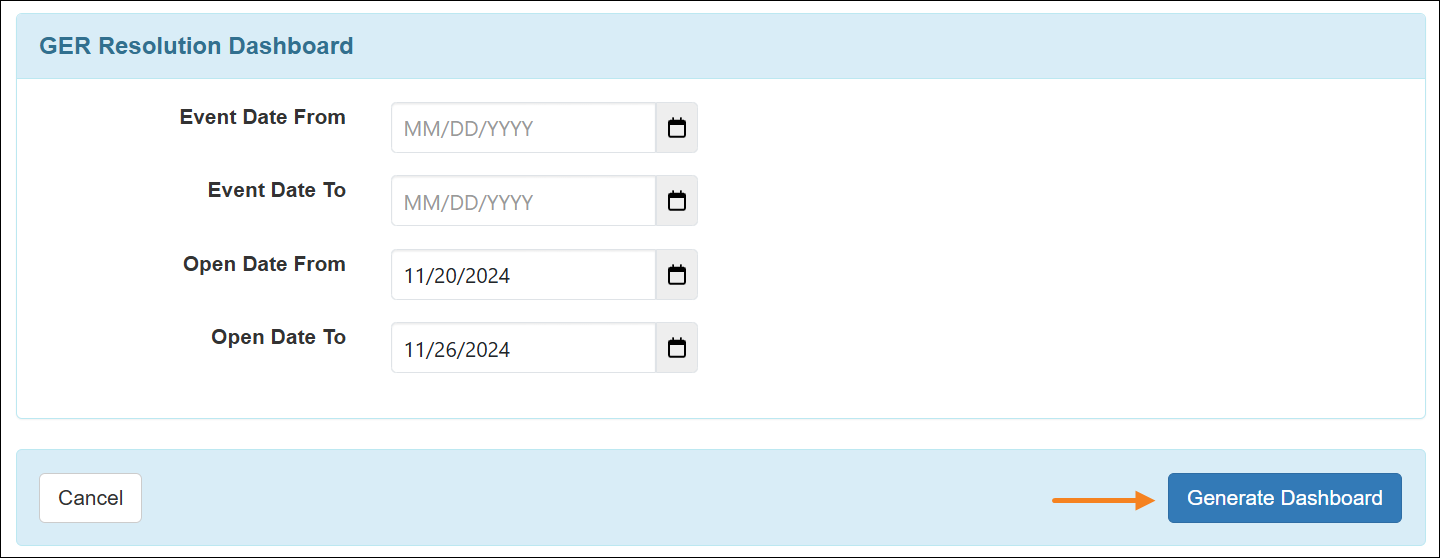
For the Oversight users, the ‘GER Resolution Dashboard’ search criteria page will have an additional Provider dropdown field. Users can select linked providers or the respective Oversight Provider from this dropdown field.
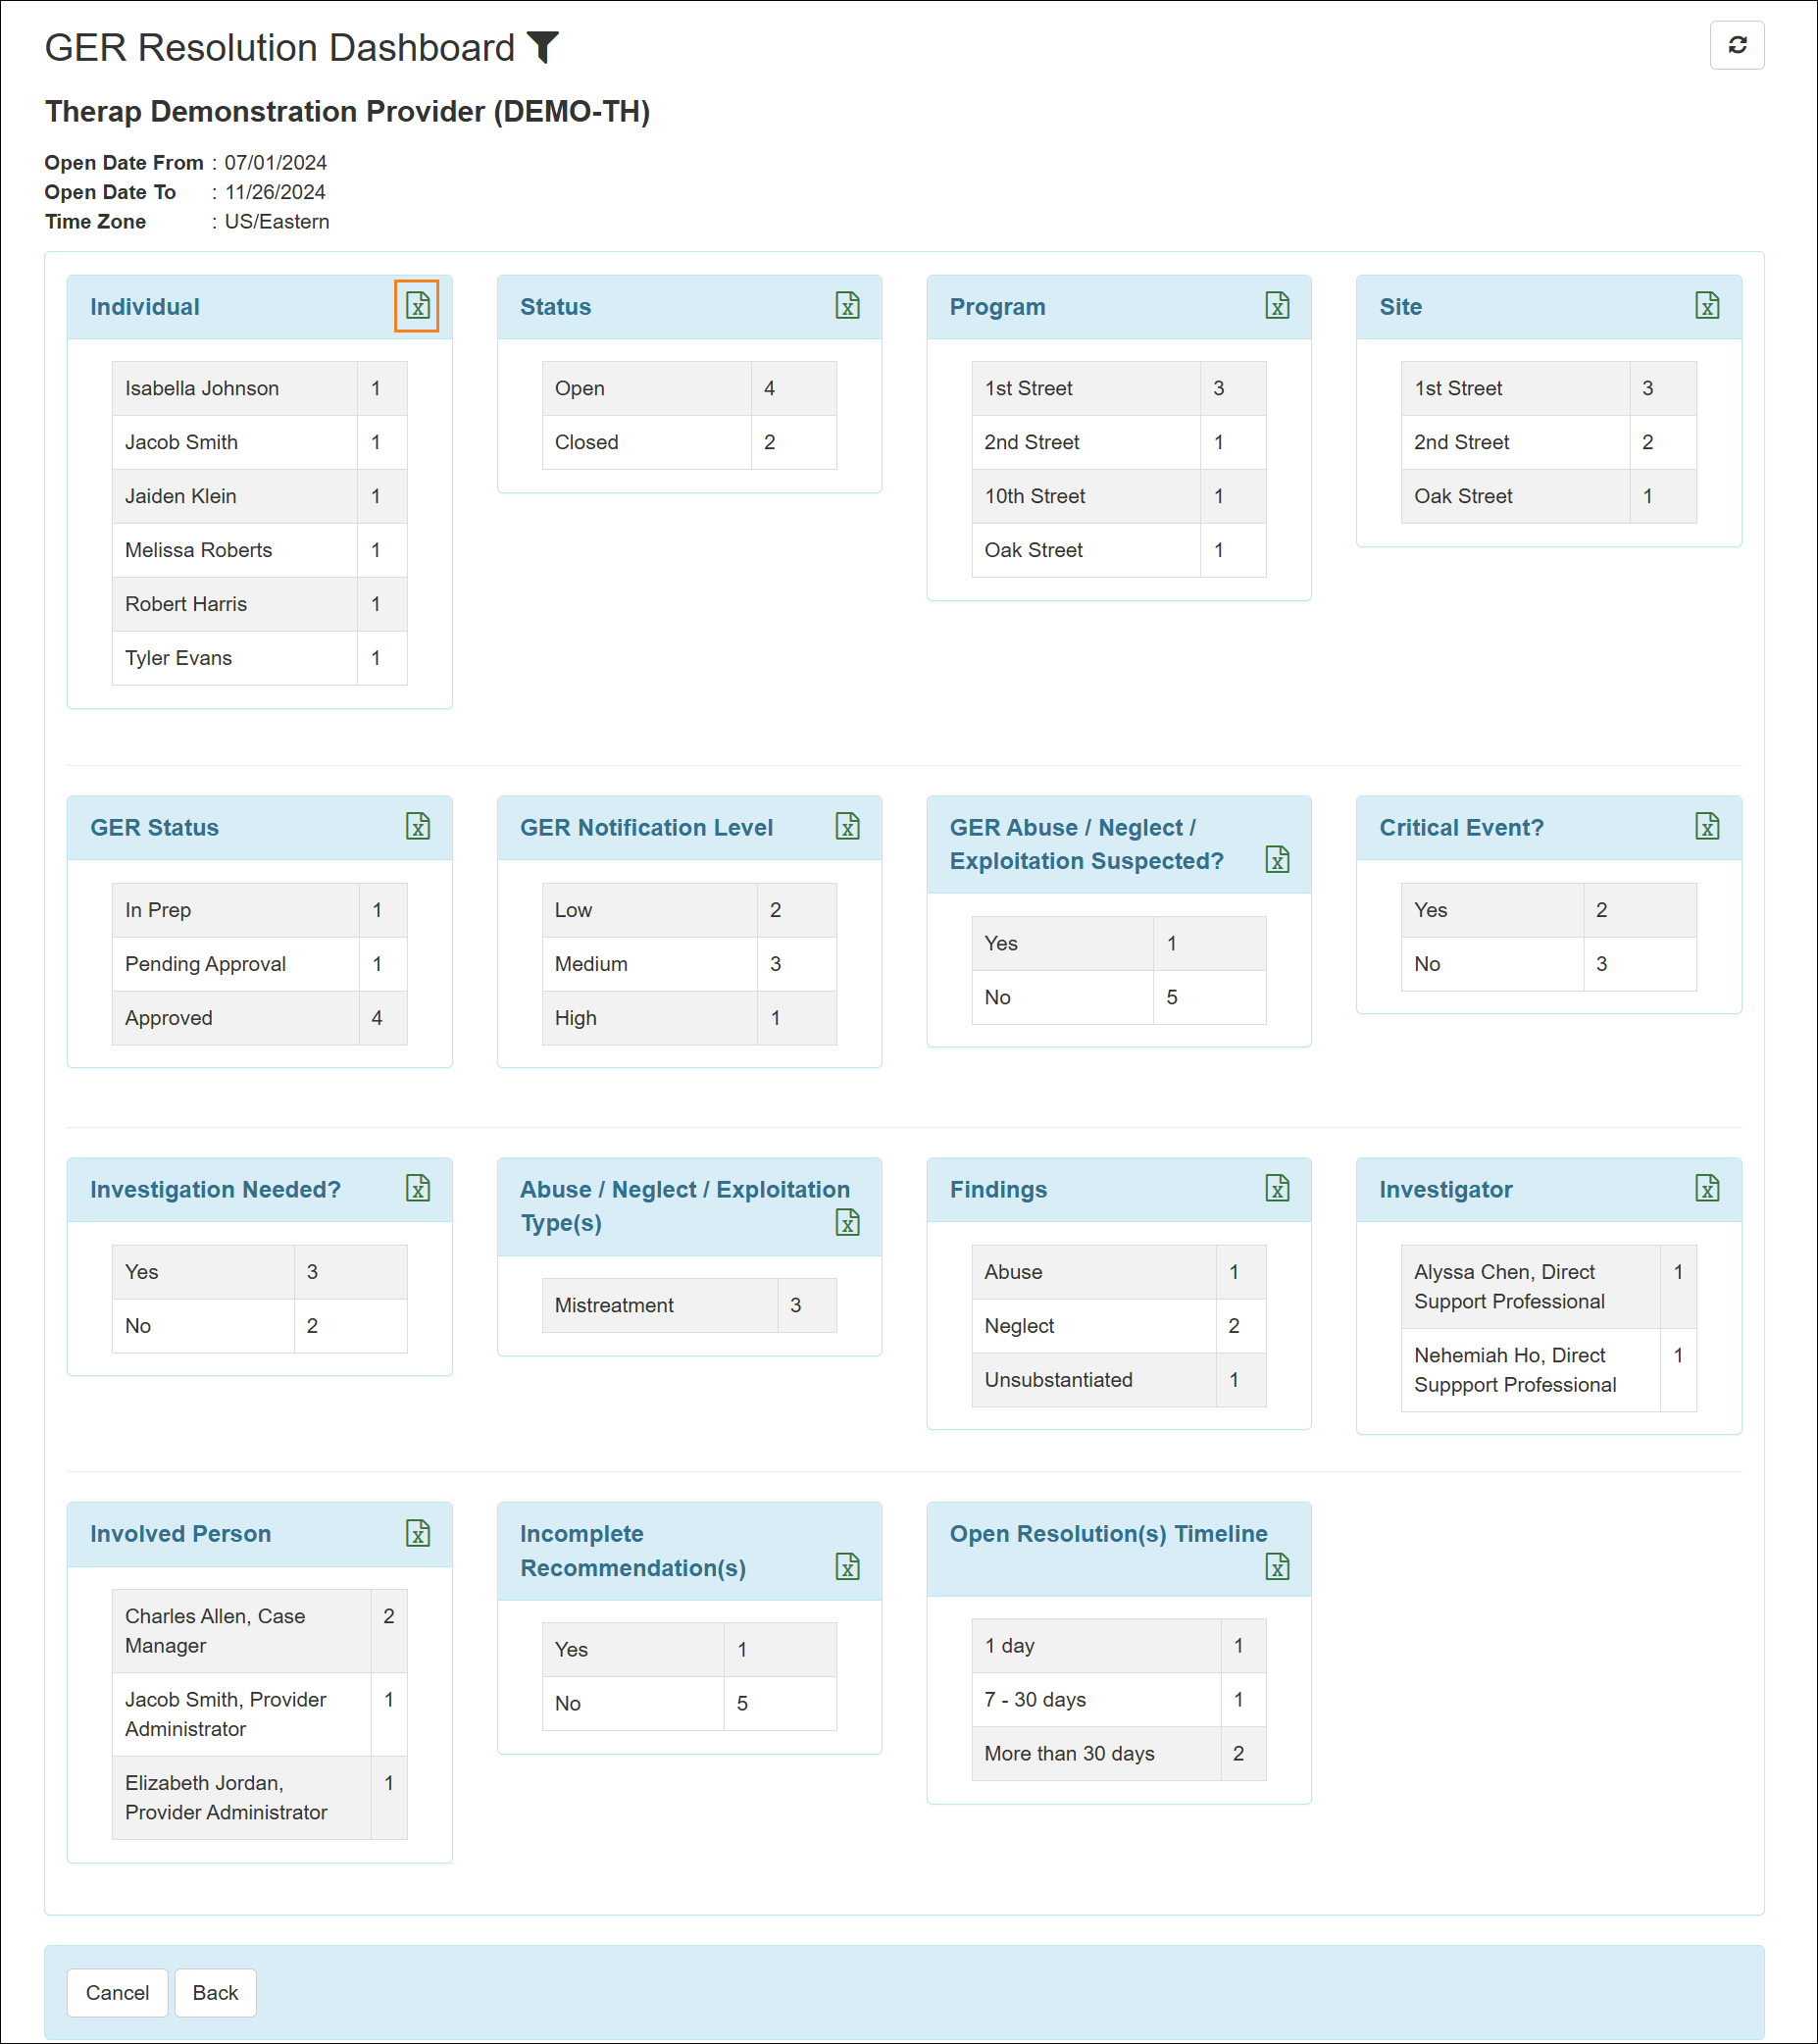
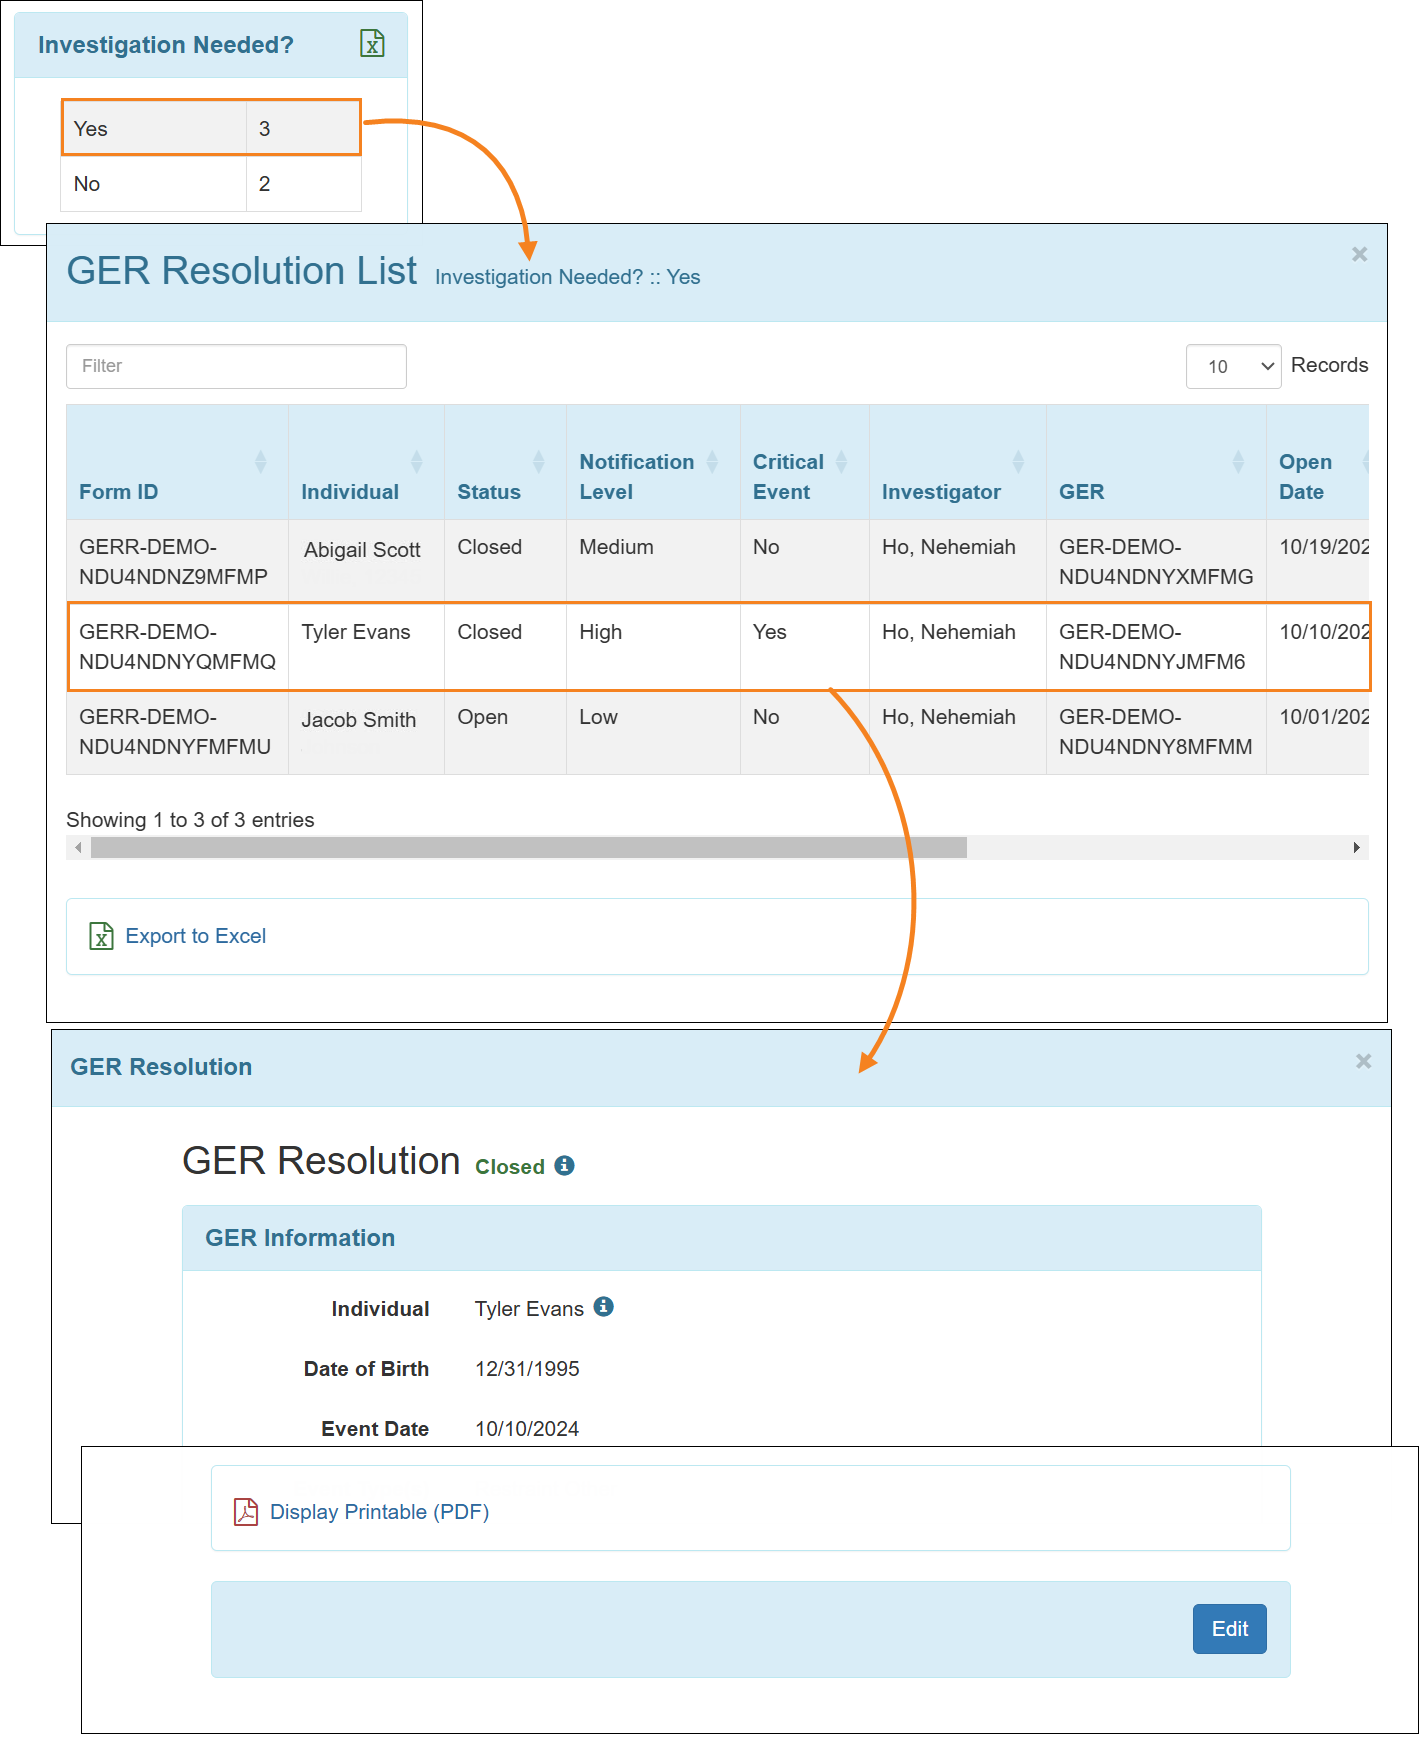
- The generated GER Resolution Dashboard will display the search parameters and the user’s Time Zone on top of the page. The sections available on the GER Resolution Dashboard will display data for all statuses of GER Resolutions except for the Deleted, and users will be able to export the specific list and Excel report by clicking on the Excel icon in the top right corner of each section.
For the Oversight users, there will be an additional ‘GER Provider' criterion section available on the GER Resolution Dashboard.
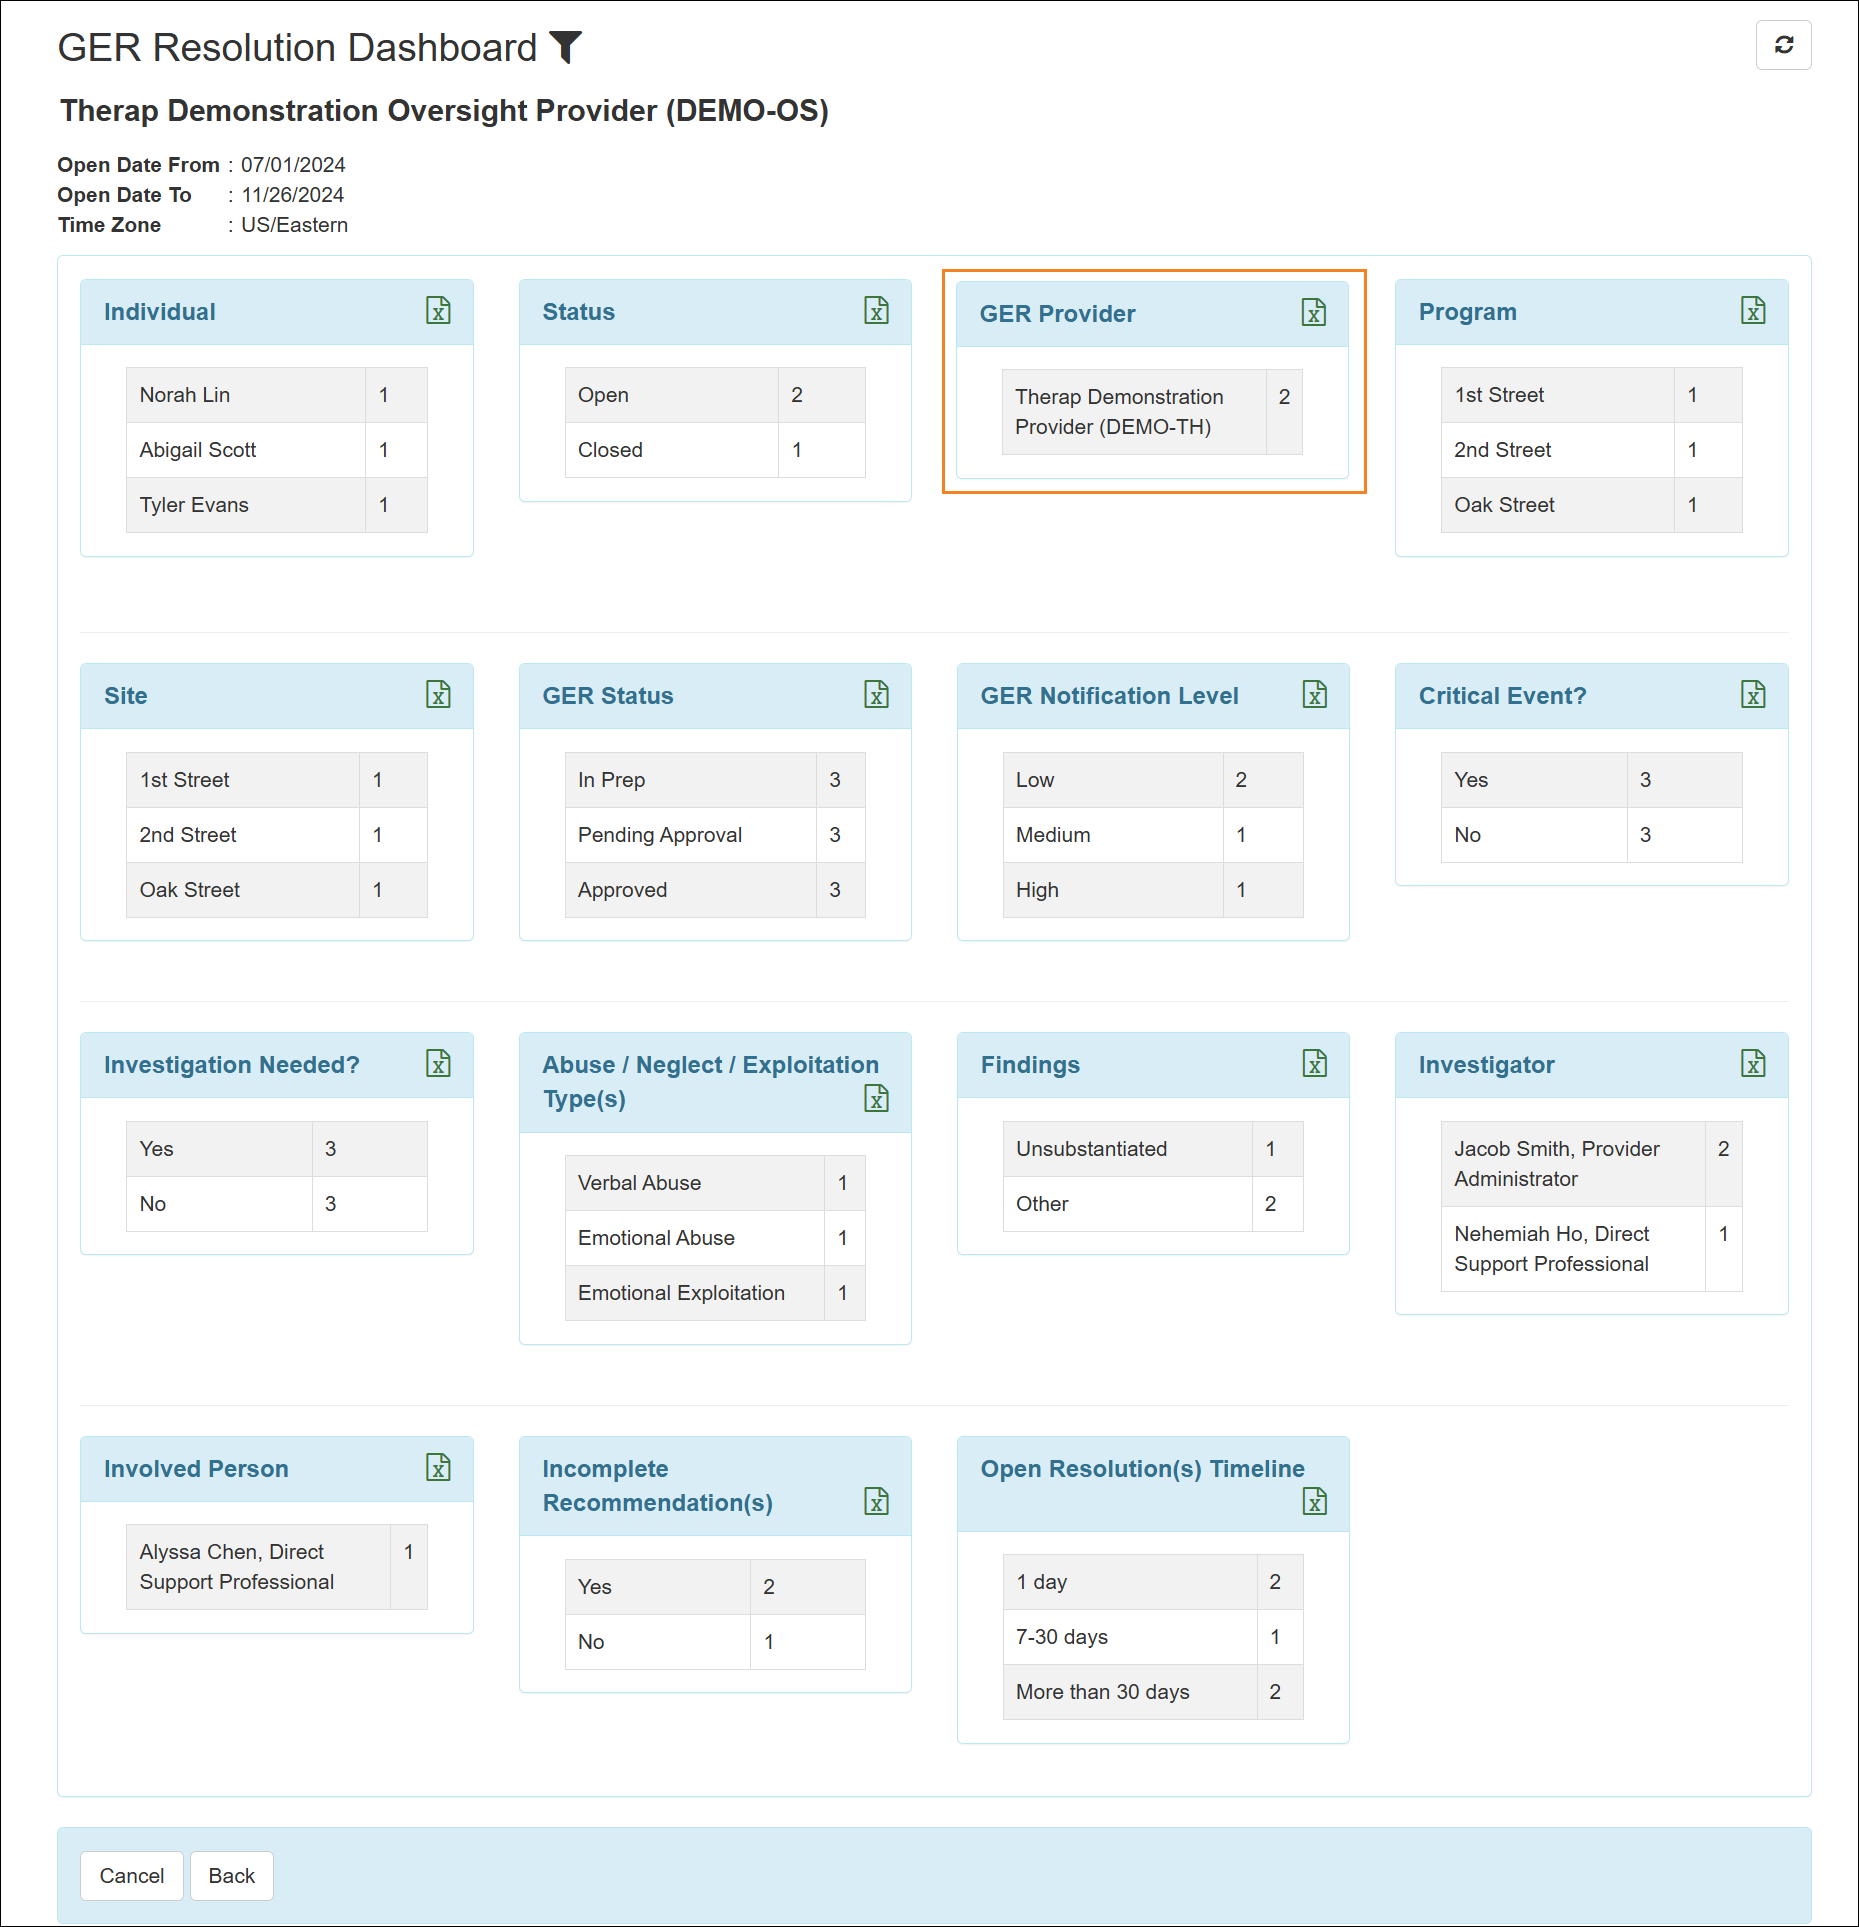
- If users want to narrow down the displaying GER Resolution Dashboard, then they can click on the filter icon on top of the page, select appropriate information on the ‘Filter Dashboard’ popup window, and filter the GER Resolution Dashboard. For the Oversight users, there will be an additional ‘GER Provider' criterion option available. Users can also use the Refresh button on the top right corner of the Dashboard to reset the searched data.
- Clicking on the rows of a section will display the list of GER Resolutions that make up the count for that row. Clicking on any row of the 'GER Resolution List' page will open the corresponding GER Resolution form in a 'GER Resolution' popup window. Users can also export ‘GER Resolution List’ into excel using the Export to Excel link at the bottom of the popup window.
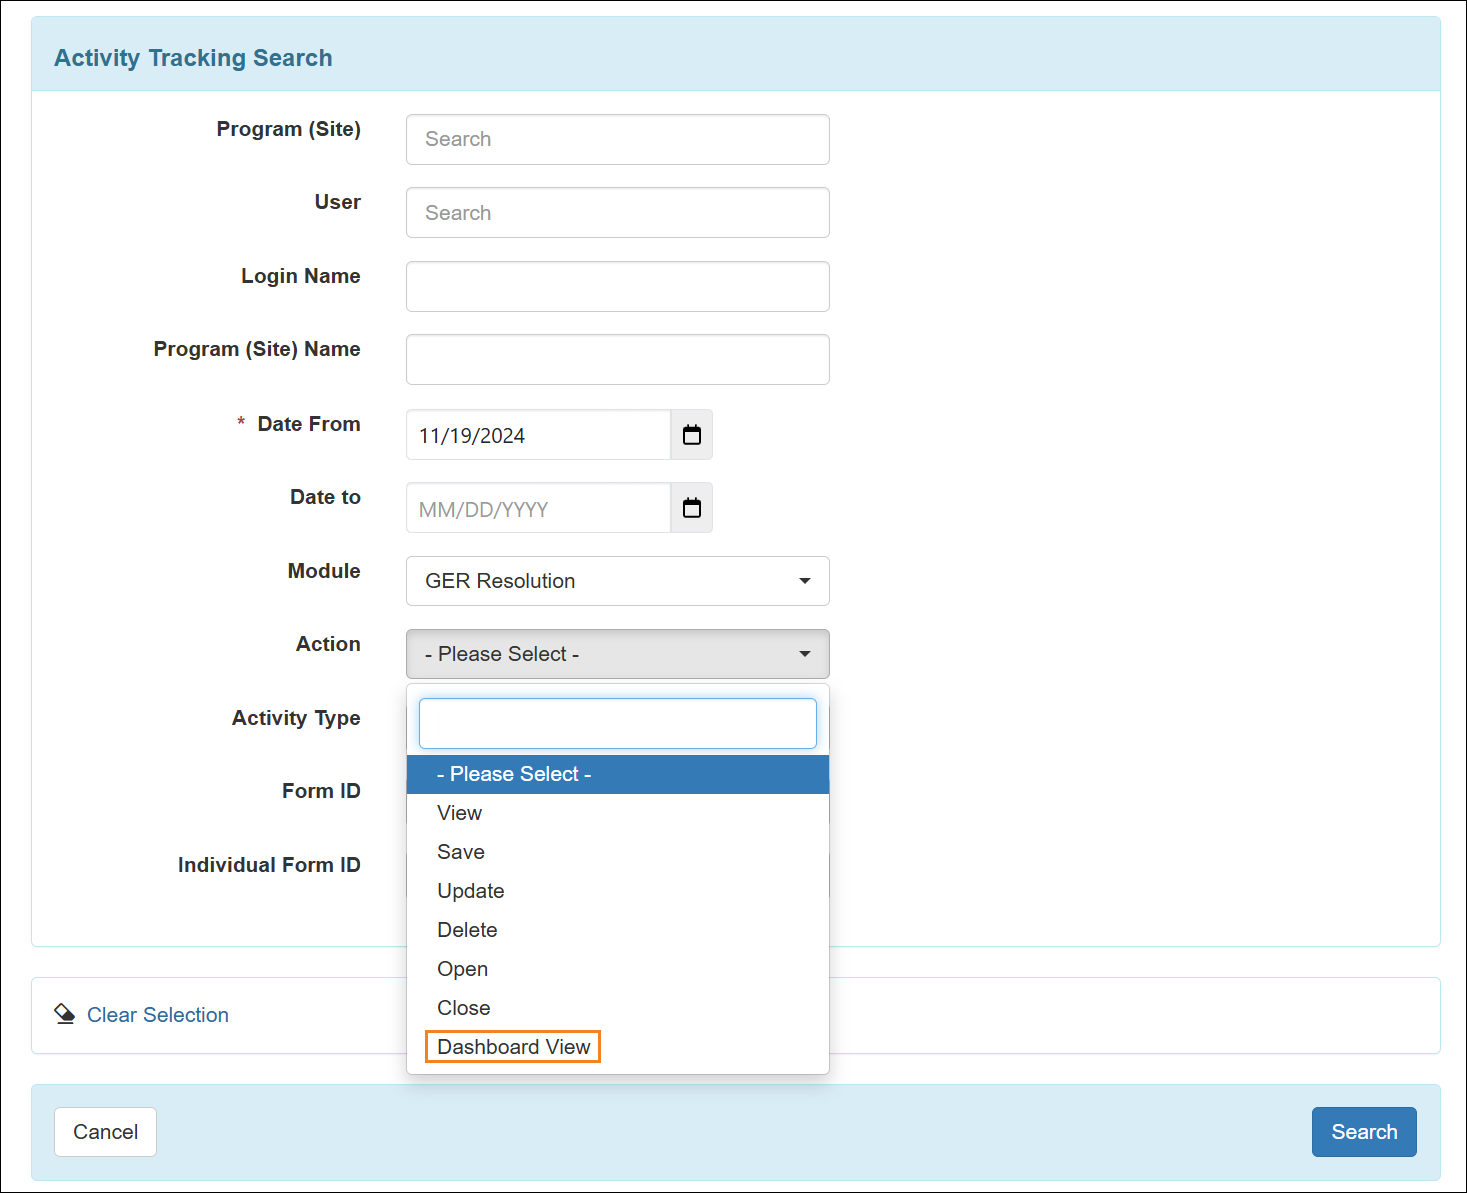
- On the ‘Activity Tracking Search’ page, a new Action titled Dashboard View has been added for the GER Resolution module.
Individual History
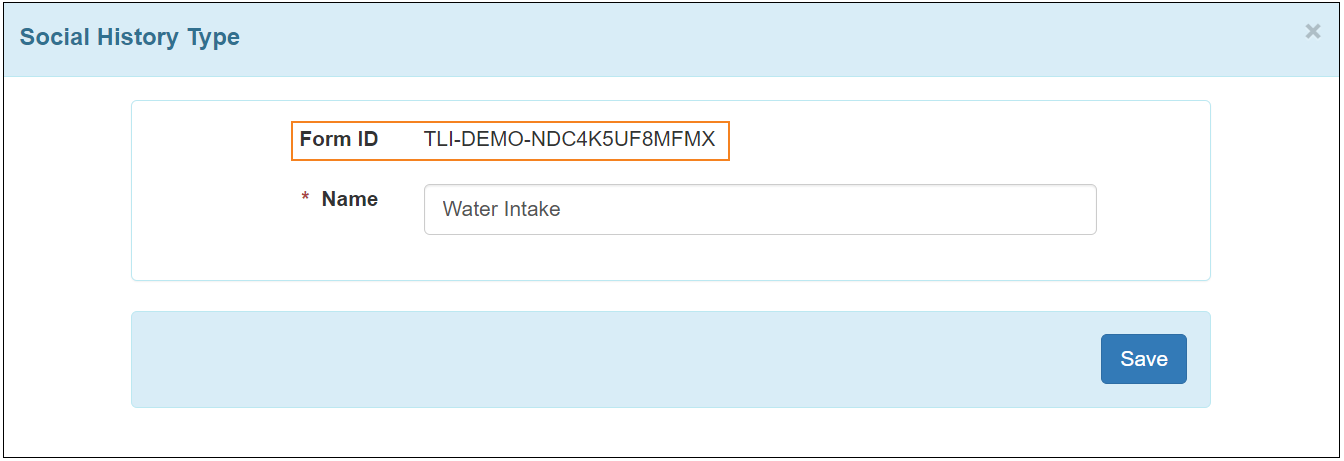
[Back to Top]- Form ID for Social History Types has been introduced in this release. A new Form ID field will now be displayed when users attempt to add or update a Custom Social History Type.
- A new Form ID column has been added to the ‘Social History Type List’ page to display the Form IDs of the Default and Custom Social History Types that are available for the provider.
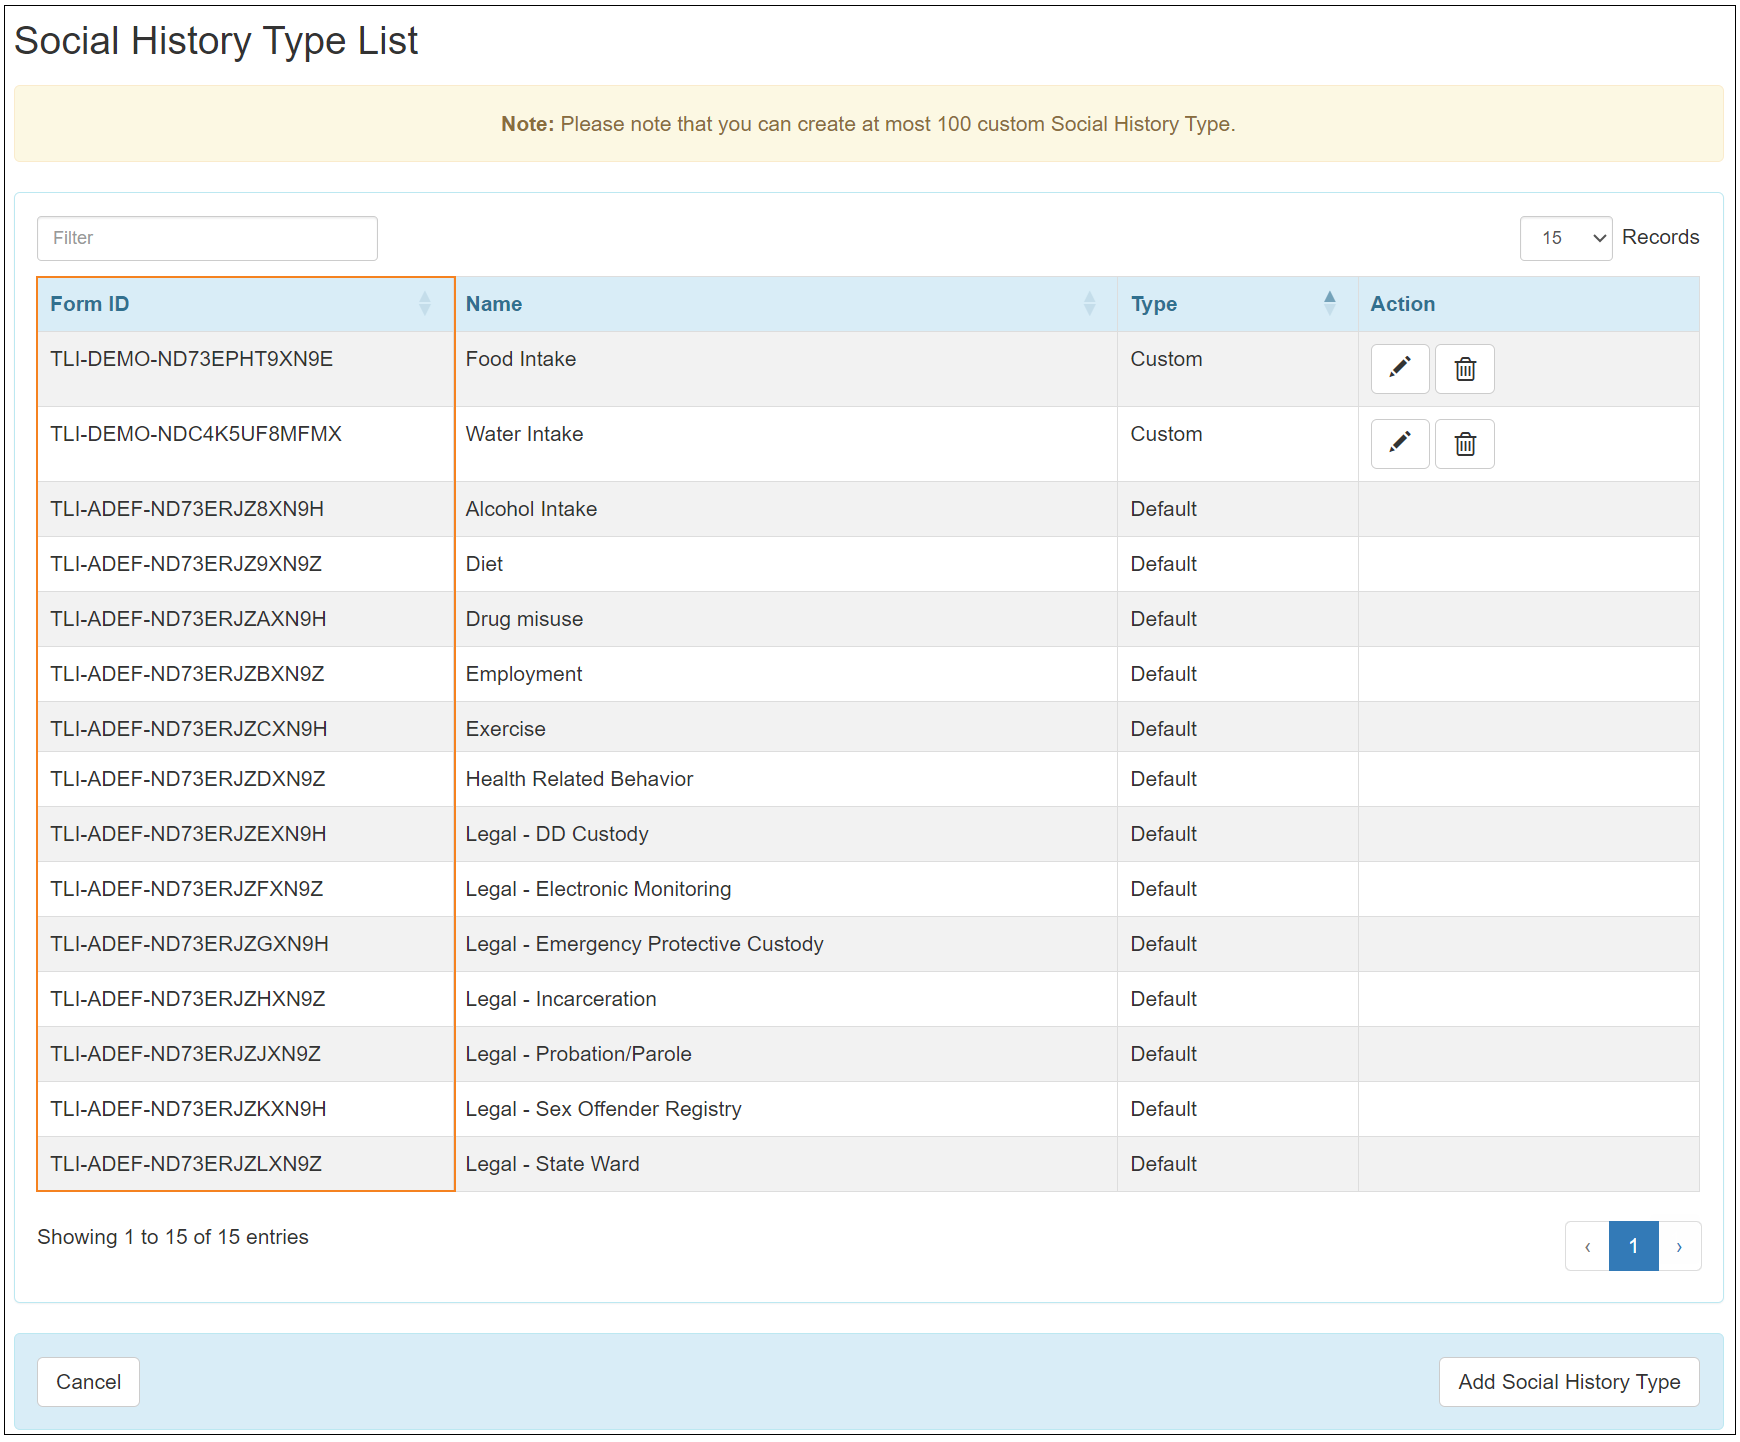
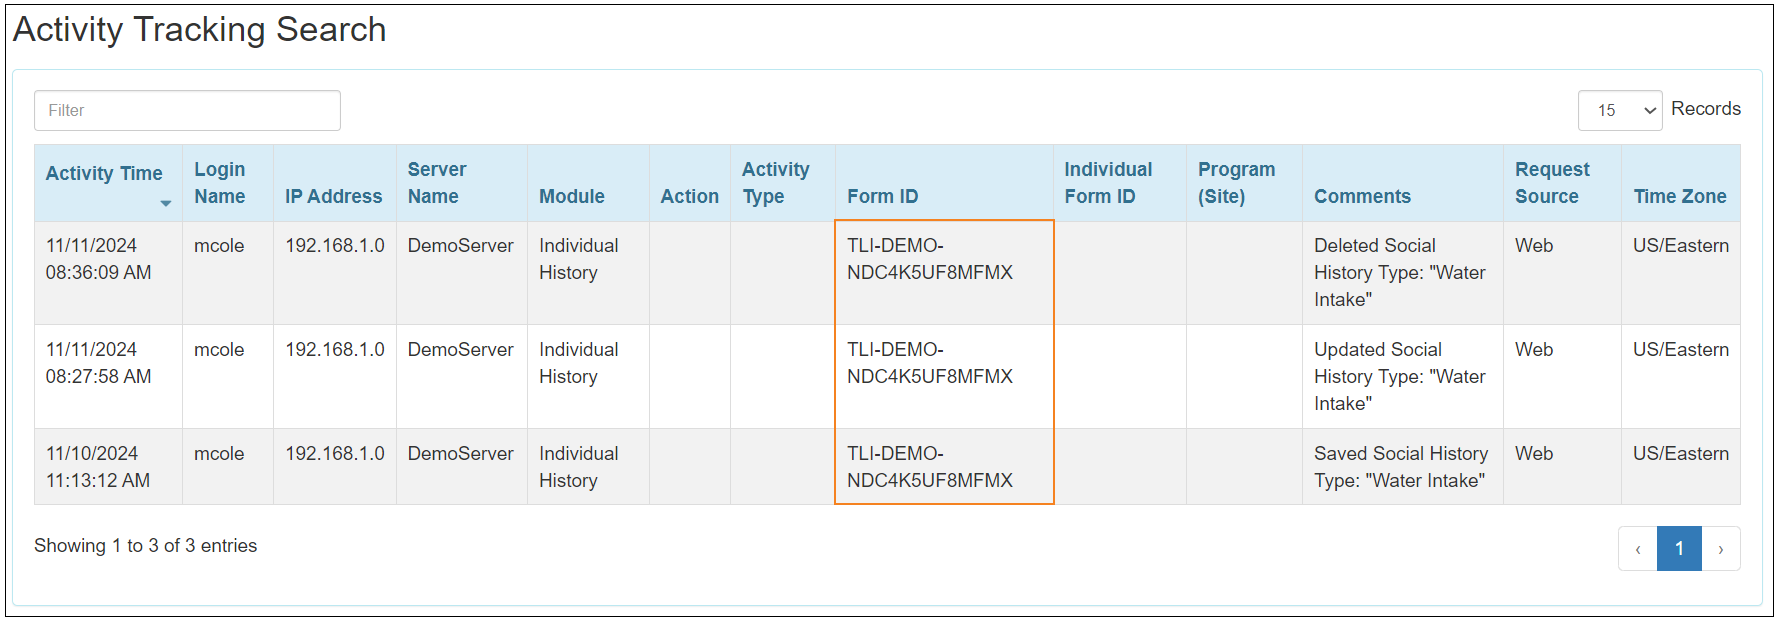
- Saving, updating, or deleting a Social History Type will now display the respective Form ID in the Form ID column of the ‘Activity Tracking Search’ results page.
Individual Home Page
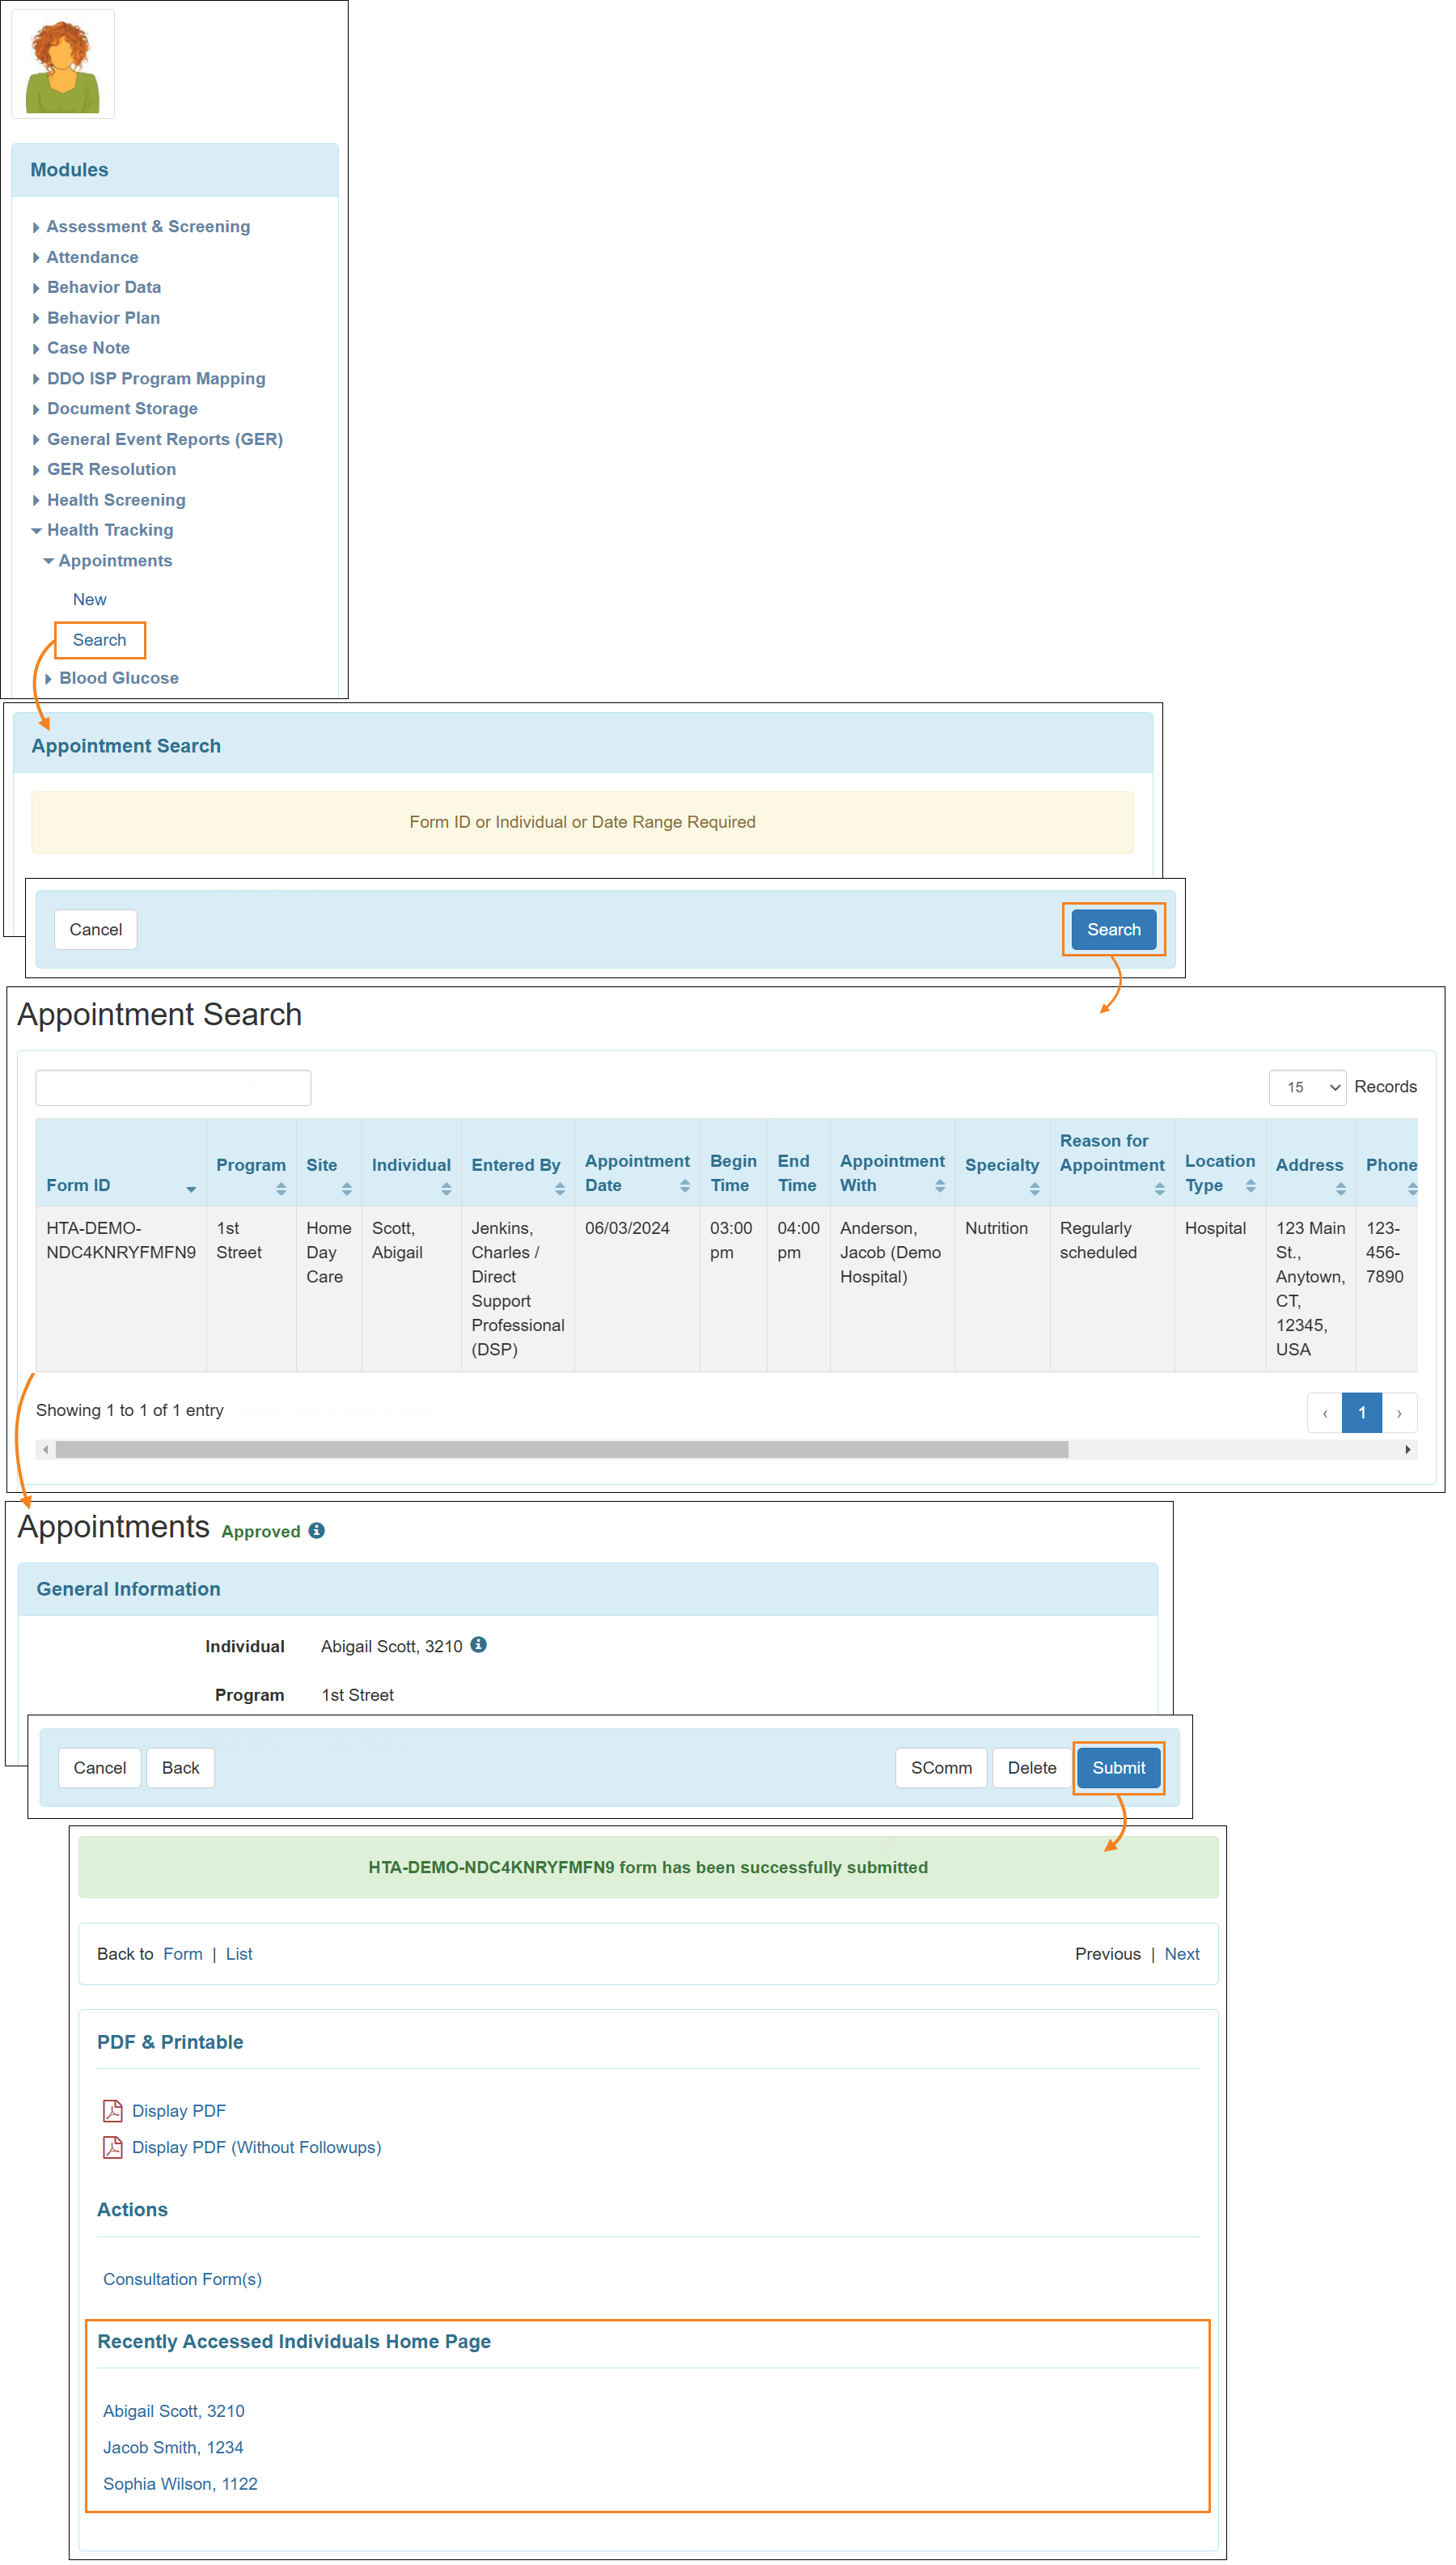
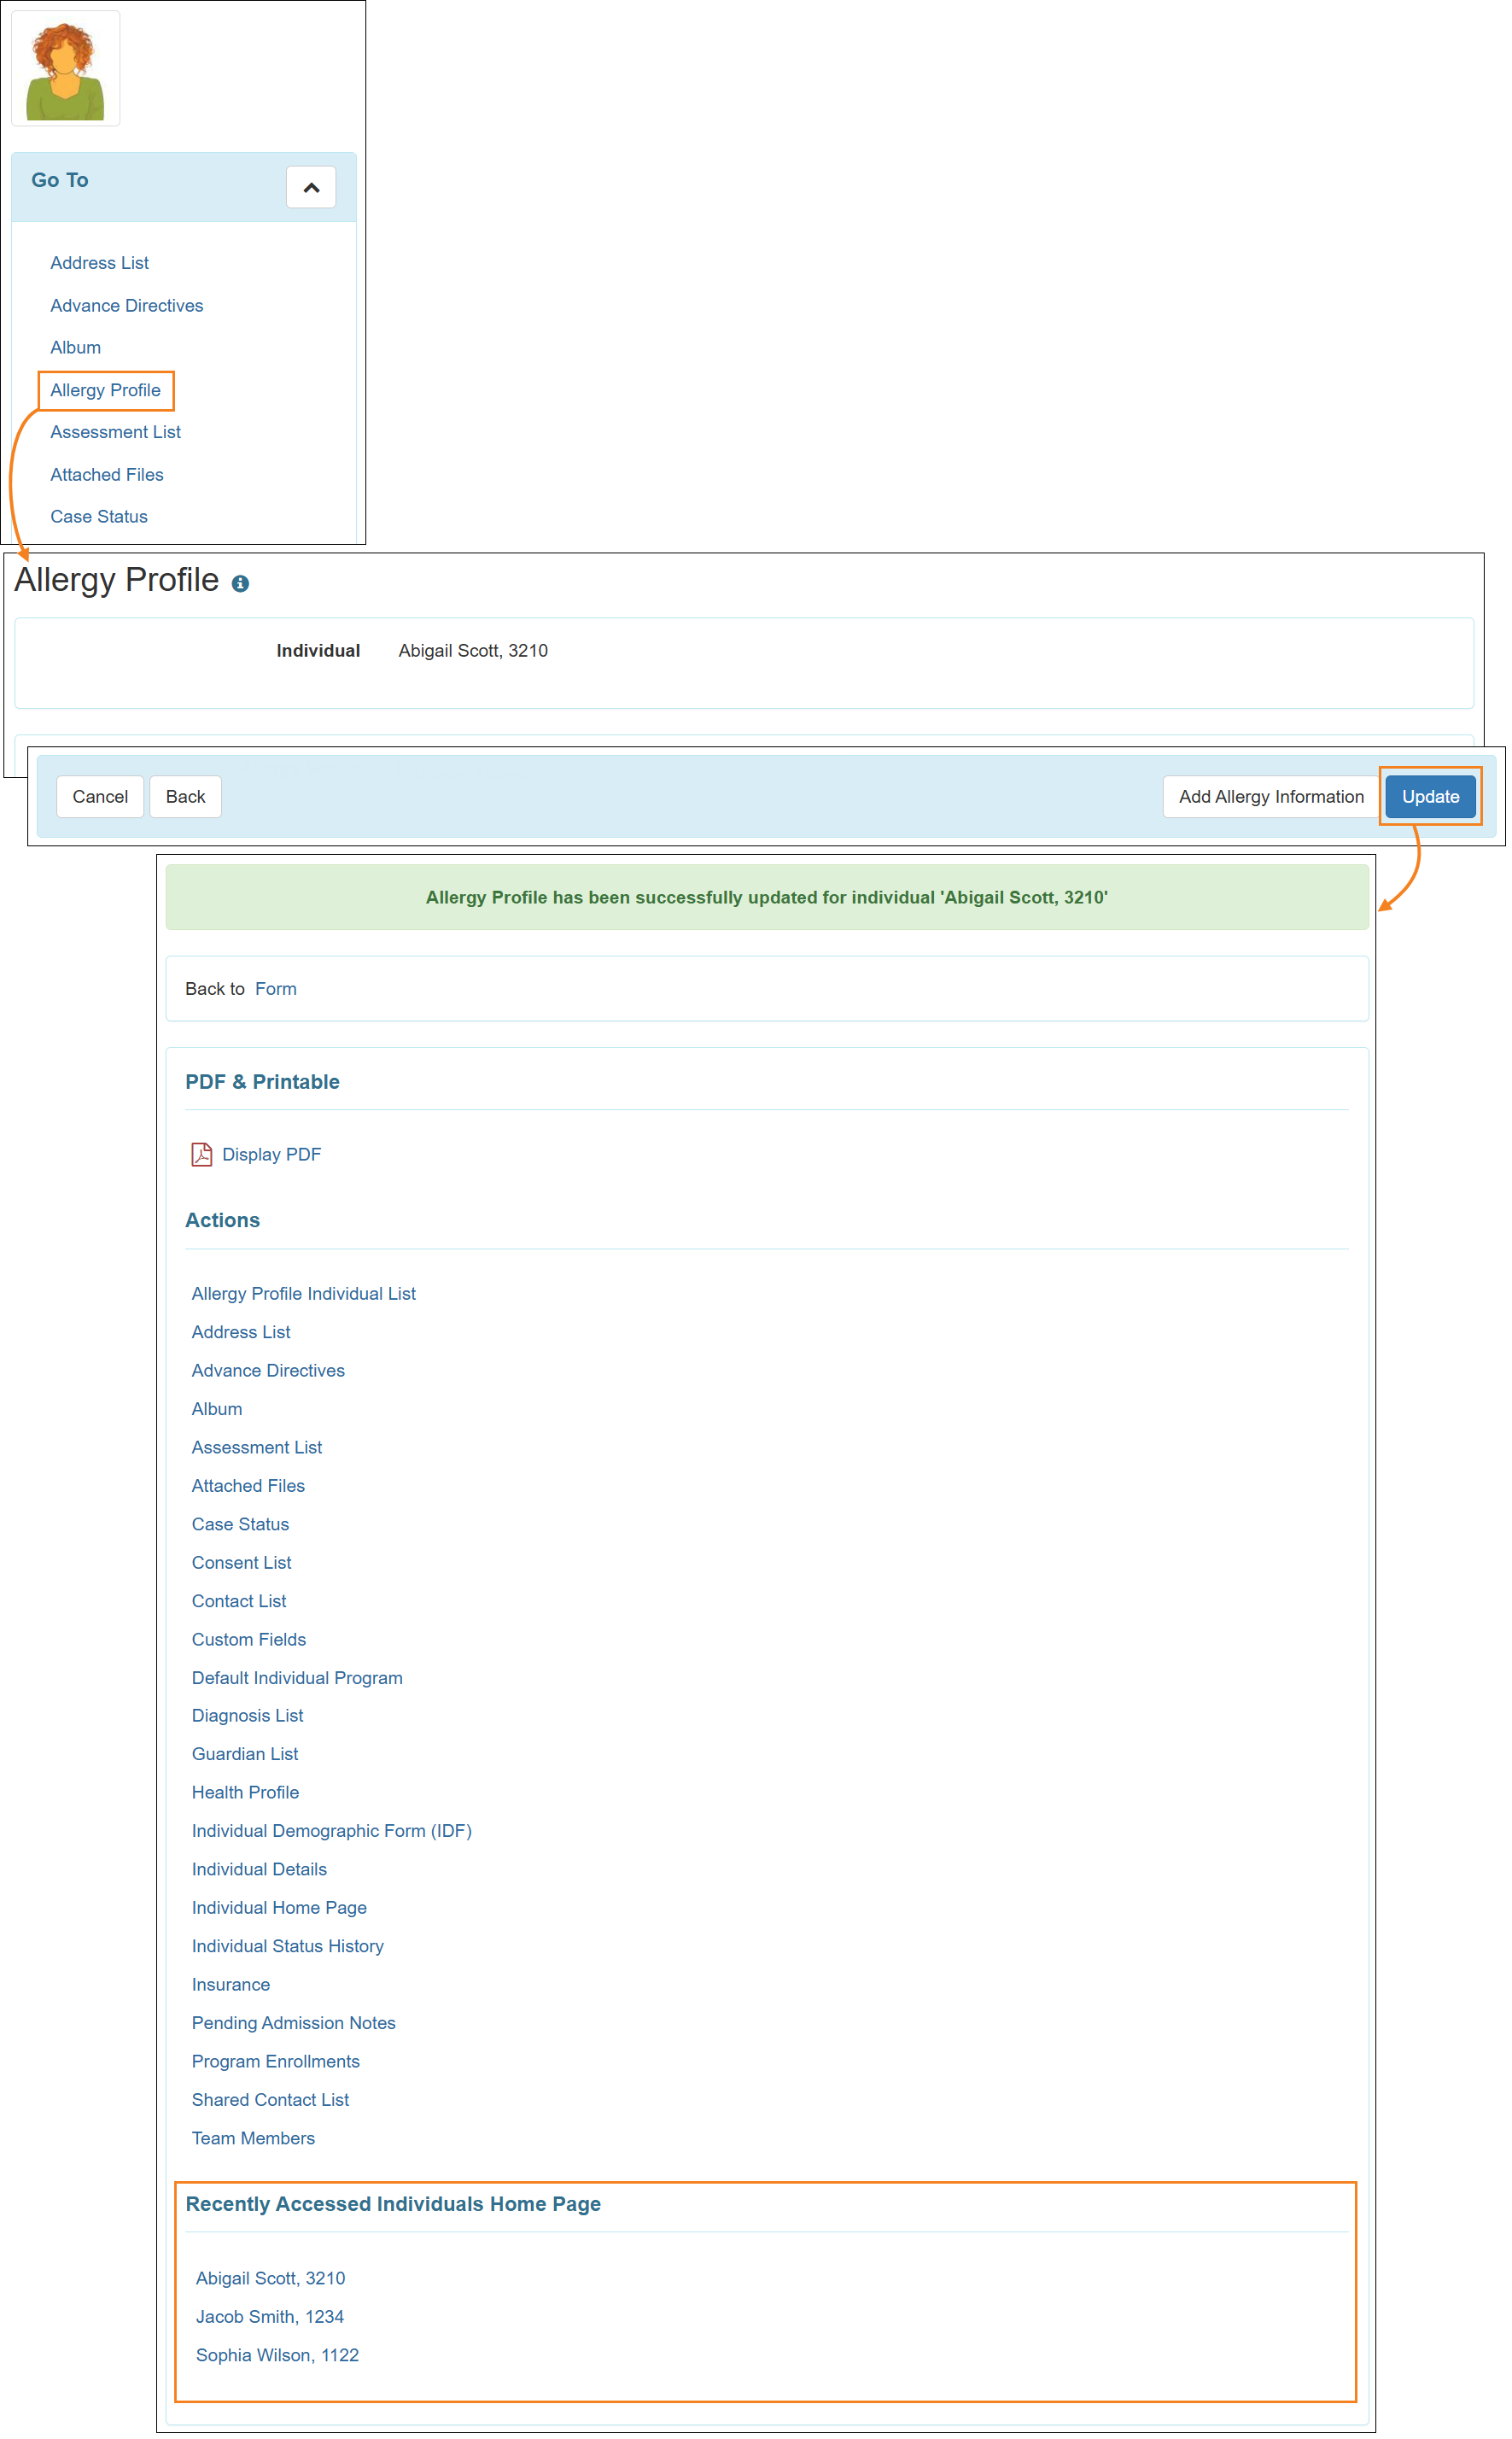
[Back to Top]- If users have 'Recently Accessed' selected for the Individual Home Shows option, then opening a form from the ‘Modules’ or 'Go To' sections of the Individual Home Page and performing an action on the form will now display a new ‘Recently Accessed Individuals Home Page’ section in the success message page of the respective form. This section will display up to three individuals whose Individual Home Pages were recently accessed. Clicking on an individual name will take users to the respective individual’s Individual Home Page.
ISP Data
[Back to Top]- The option to generate agency-wide ISP Data Dashboard for all individuals of the agency has been moved from the Admin tab to the Agency Reports tab. The option has been renamed from ISP Data to ISP Data Dashboard and the link has been renamed from Dashboard to View.
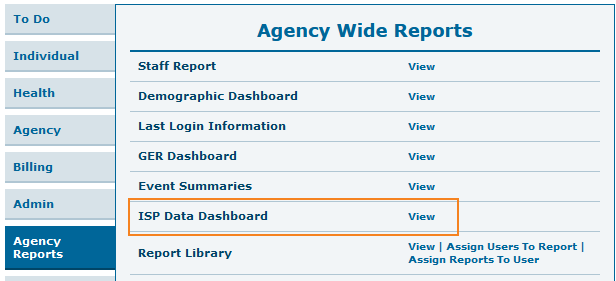
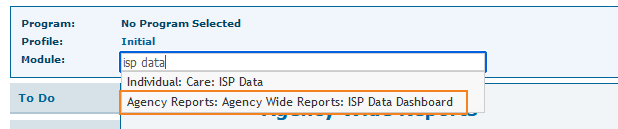
The option for agency-wide ISP Data Dashboard in the Module dropdown list at the top of the dashboard has been renamed from ‘Admin: Care: ISP Data’ to ‘Agency Reports: Agency Wide Reports: ISP Data Dashboard’.
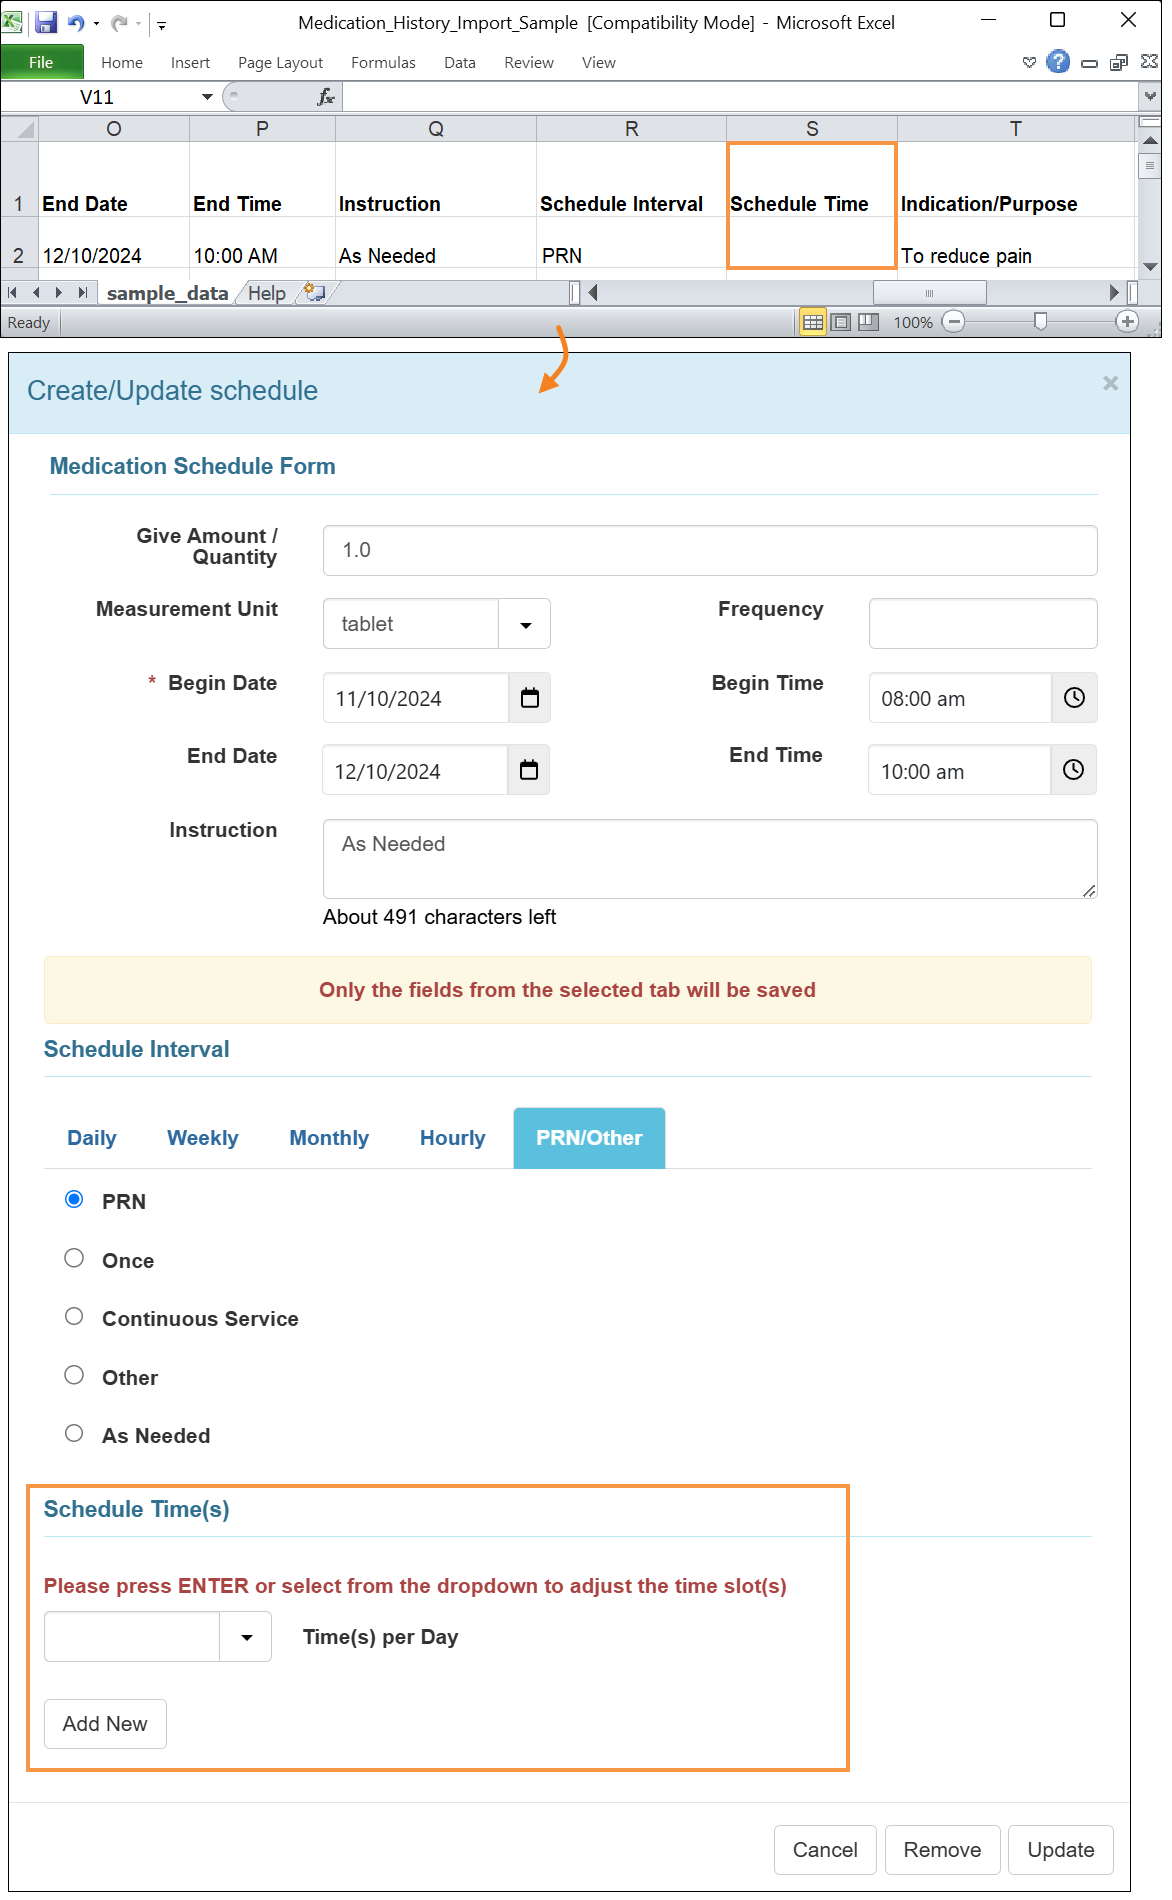
Medication History
[Back to Top]- The following changes have been made in the ‘Schedule Time(s)’ section of the Medication History ‘Create/Update schedule’ pop-up:
- The default Schedule Time slot that appears in the Time(s) per Day field has been removed.
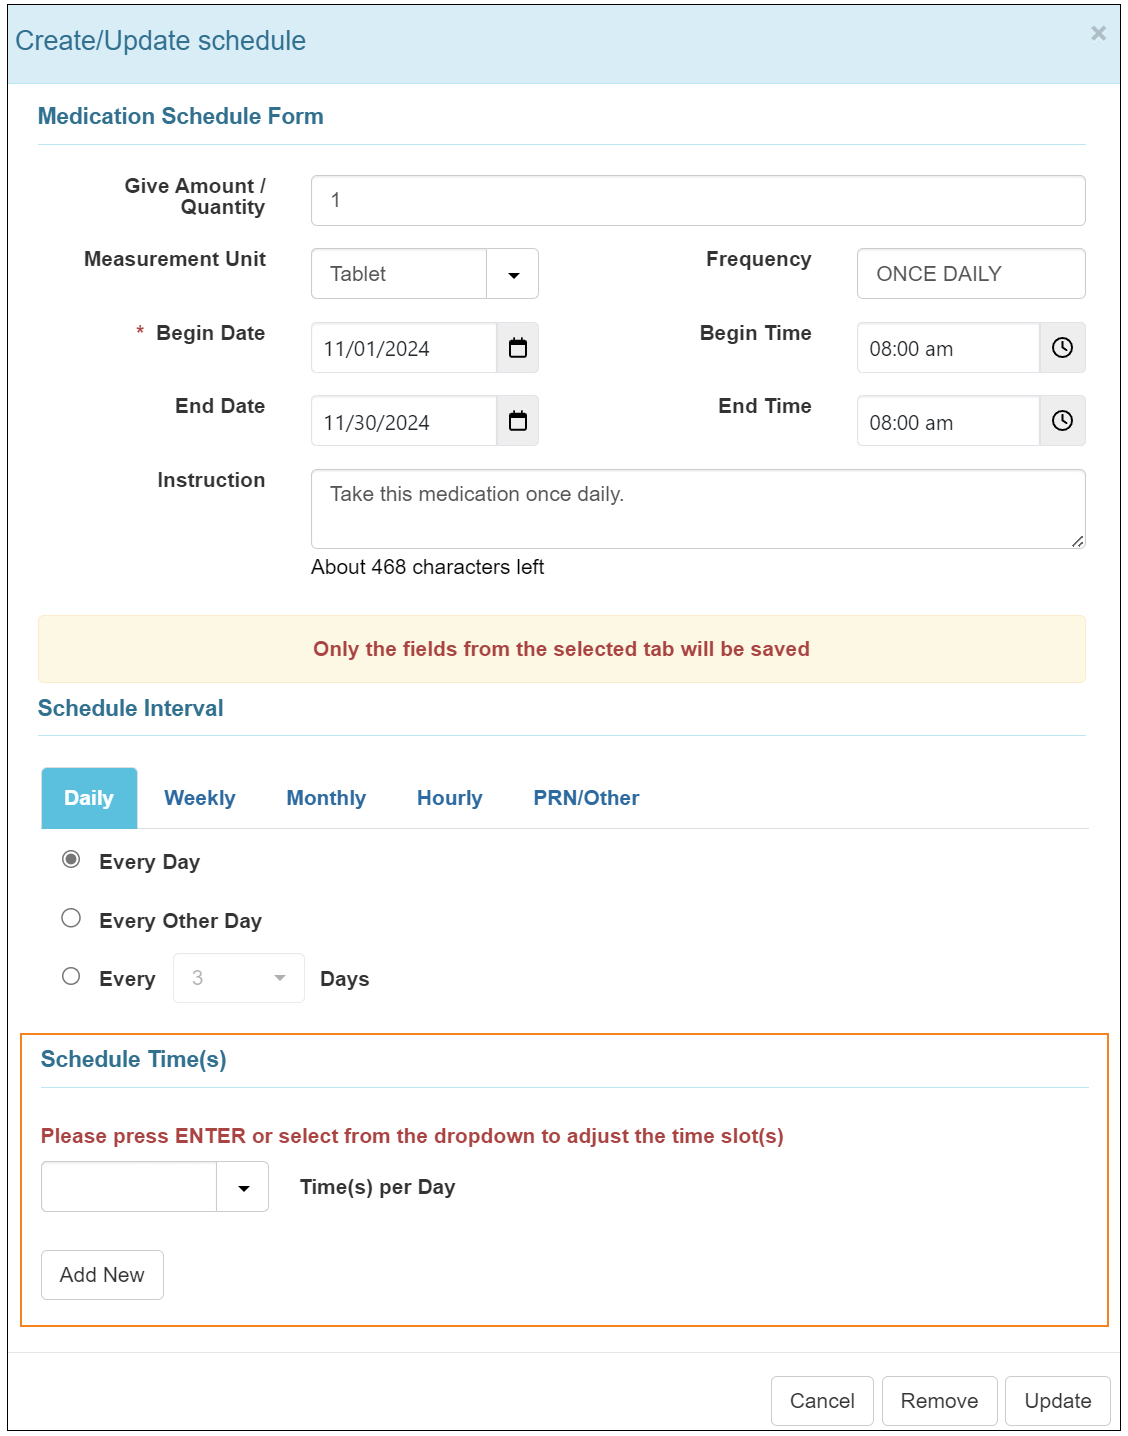
- If Scheduled (Medication) or Scheduled (Treatment) is selected in the Medication Type dropdown field, then users must select at least one Schedule Time slot. Otherwise, a validation message will appear stating: Time(s) per Day must be greater than 0 for Scheduled (Medication) or Scheduled (Treatment).

- The default Schedule Time slot that appears in the Time(s) per Day field has been removed.
- When importing Medication History Excel files of PRN Type Medications and Treatments, and Other Type Medications, if users leave the Schedule Time column blank in the Excel, the Time(s) per Day field will remain empty in the Medication History form, and no Schedule Time slot will appear.